SUBARU OUTBACK 2022 Getting Started Guide
OUTBACK 2022
SUBARU
SUBARU
https://www.carmanualsonline.info/img/17/40401/w960_40401-0.png
SUBARU OUTBACK 2022 Getting Started Guide
Trending: dashboard warning lights, horn, CD changer, lumbar support, carplay, gas type, odometer
Page 131 of 172
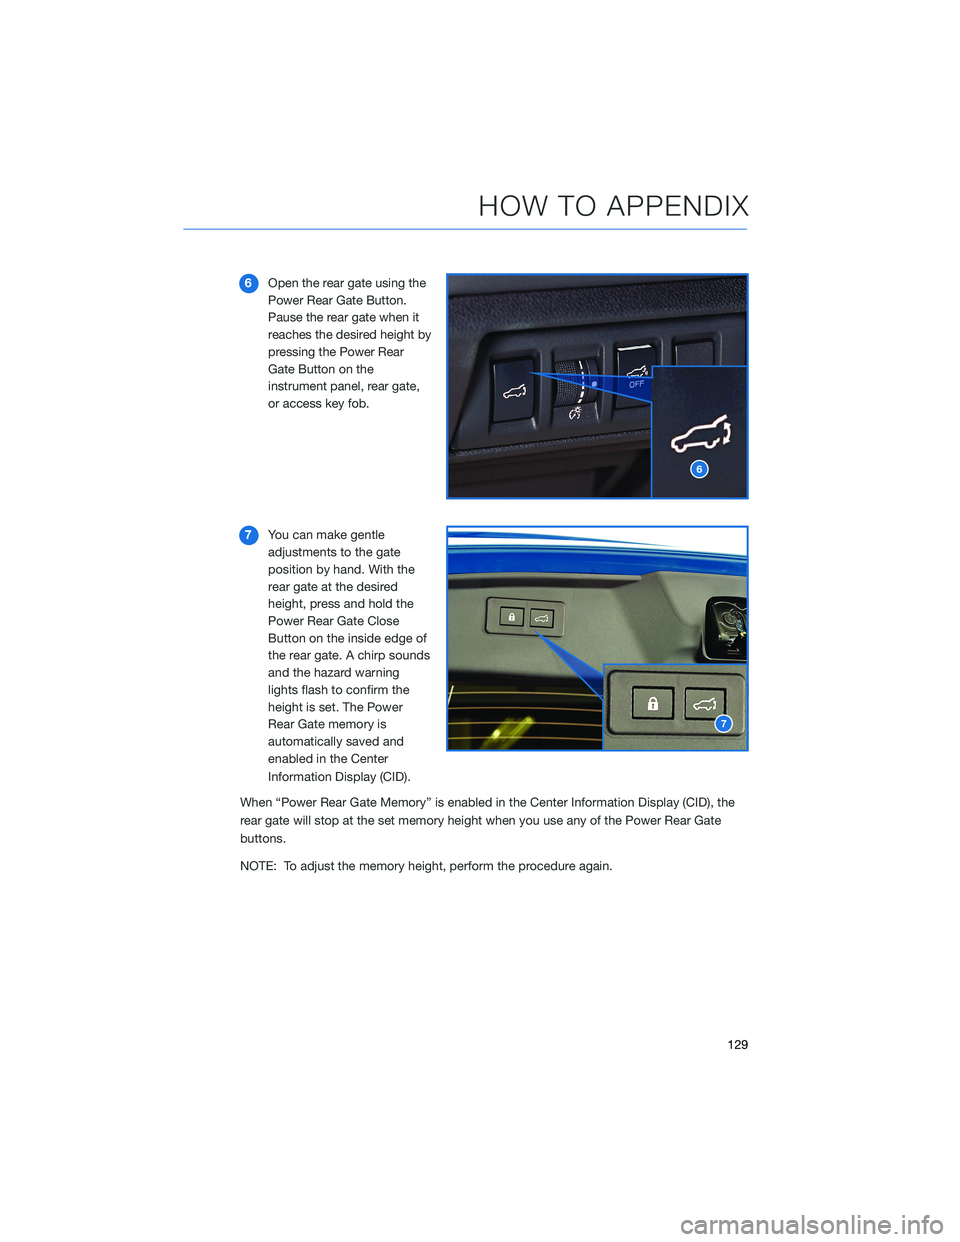
6Open the rear gate using the
Power Rear Gate Button.
Pause the rear gate when it
reaches the desired height by
pressing the Power Rear
Gate Button on the
instrument panel, rear gate,
or access key fob.
7You can make gentle
adjustments to the gate
position by hand. With the
rear gate at the desired
height, press and hold the
Power Rear Gate Close
Button on the inside edge of
the rear gate. A chirp sounds
and the hazard warning
lights flash to confirm the
height is set. The Power
Rear Gate memory is
automatically saved and
enabled in the Center
Information Display (CID).
When “Power Rear Gate Memory” is enabled in the Center Information Display (CID), the
rear gate will stop at the set memory height when you use any of the Power Rear Gate
buttons.
NOTE: To adjust the memory height, perform the procedure again.
6
7
HOW TO APPENDIX
129
Page 132 of 172
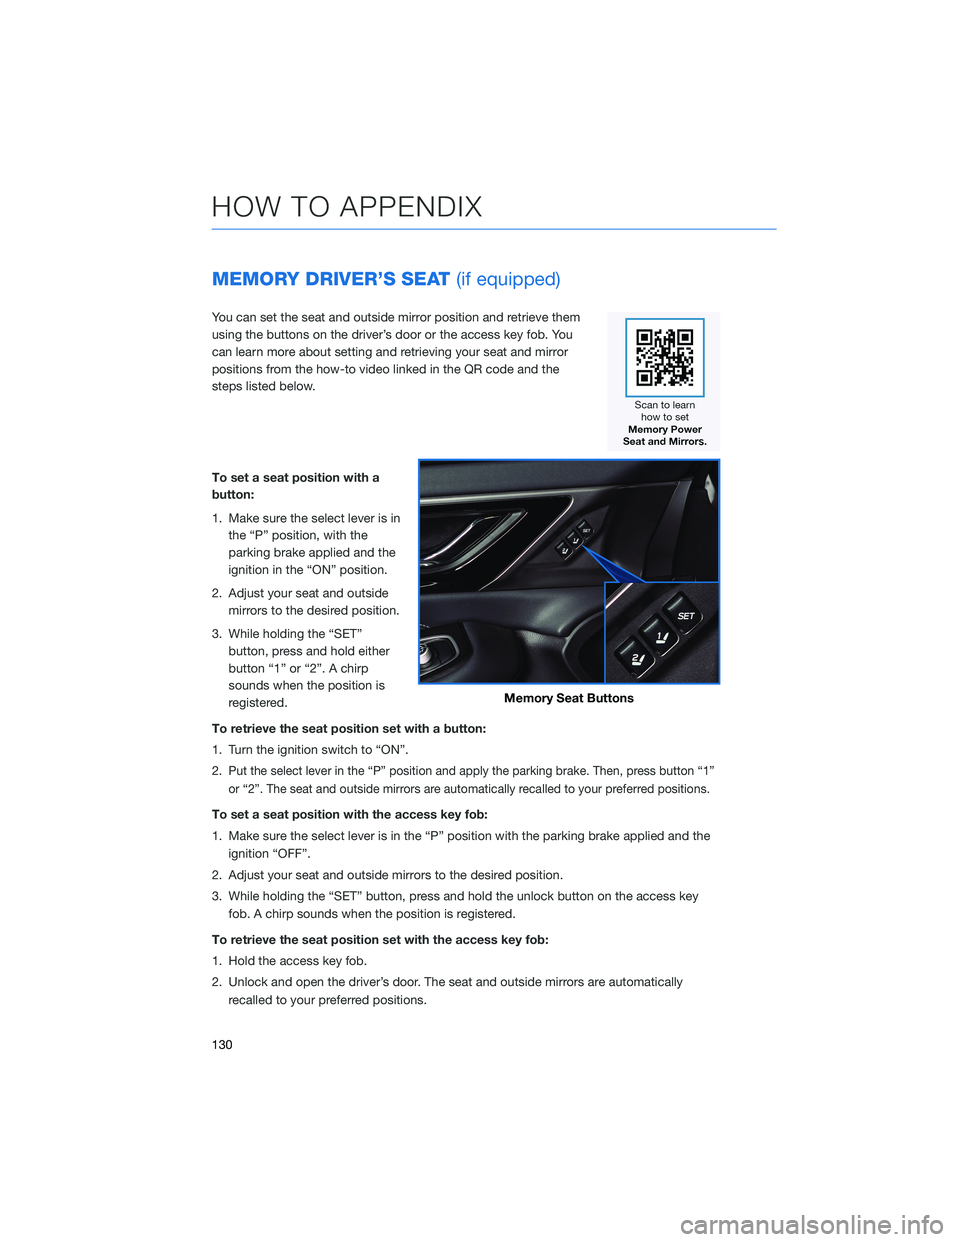
MEMORY DRIVER’S SEAT(if equipped)
You can set the seat and outside mirror position and retrieve them
using the buttons on the driver’s door or the access key fob. You
can learn more about setting and retrieving your seat and mirror
positions from the how-to video linked in the QR code and the
steps listed below.
To set a seat position with a
button:
1. Make sure the select lever is in
the “P” position, with the
parking brake applied and the
ignition in the “ON” position.
2. Adjust your seat and outside
mirrors to the desired position.
3. While holding the “SET”
button, press and hold either
button “1” or “2”. A chirp
sounds when the position is
registered.
To retrieve the seat position set with a button:
1. Turn the ignition switch to “ON”.
2.
Put the select lever in the “P” position and apply the parking brake. Then, press button “1”
or “2”. The seat and outside mirrors are automatically recalled to your preferred positions.
To set a seat position with the access key fob:
1. Make sure the select lever is in the “P” position with the parking brake applied and the
ignition “OFF”.
2. Adjust your seat and outside mirrors to the desired position.
3. While holding the “SET” button, press and hold the unlock button on the access key
fob. A chirp sounds when the position is registered.
To retrieve the seat position set with the access key fob:
1. Hold the access key fob.
2. Unlock and open the driver’s door. The seat and outside mirrors are automatically
recalled to your preferred positions.
Memory Seat Buttons
HOW TO APPENDIX
130
Page 133 of 172
BLUETOOTH®PAIRING
Pairing an Android Device
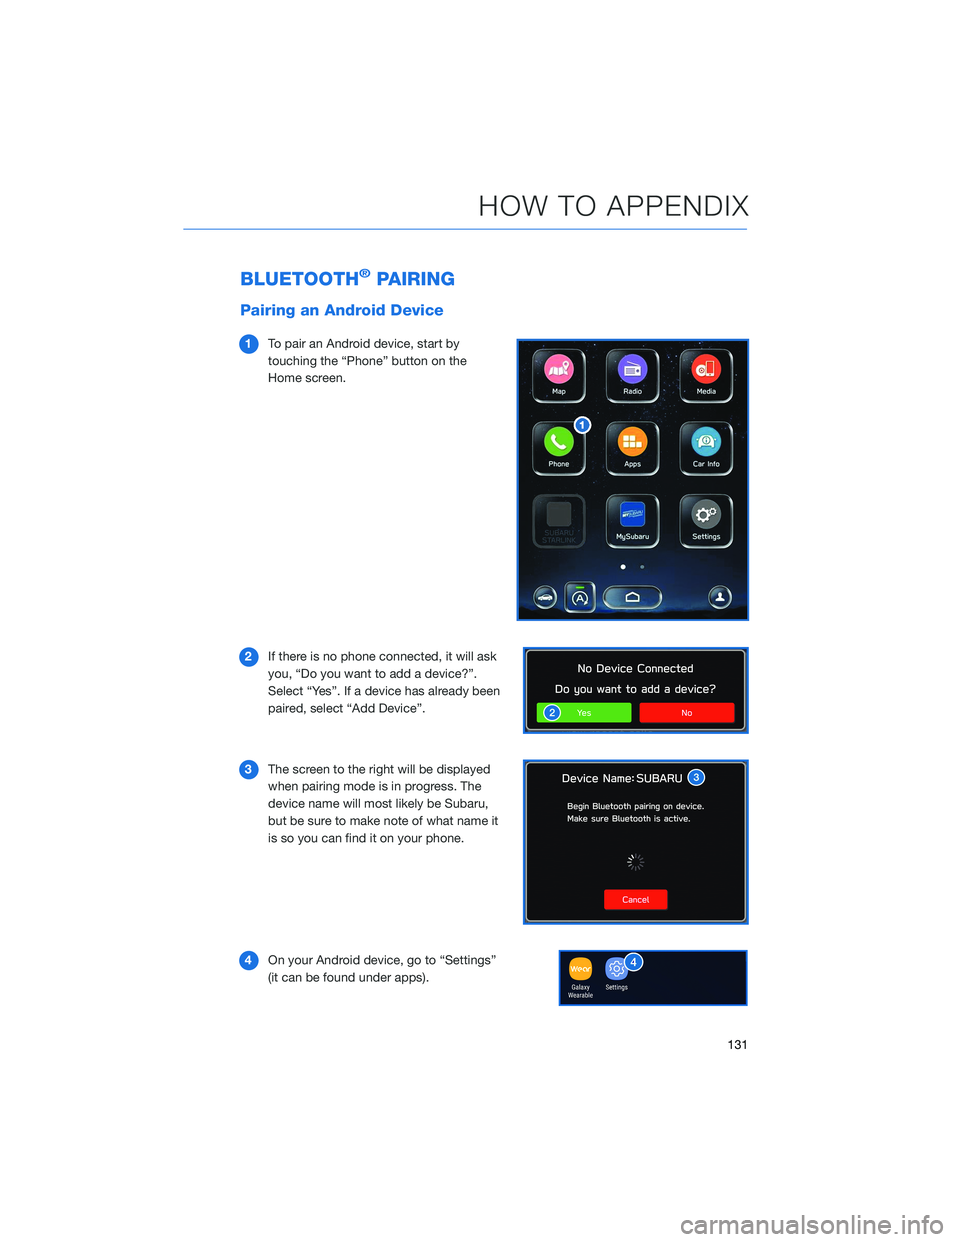
1To pair an Android device, start by
touching the “Phone” button on the
Home screen.
2If there is no phone connected, it will ask
you, “Do you want to add a device?”.
Select “Yes”. If a device has already been
paired, select “Add Device”.
3The screen to the right will be displayed
when pairing mode is in progress. The
device name will most likely be Subaru,
but be sure to make note of what name it
is so you can find it on your phone.
4On your Android device, go to “Settings”
(it can be found under apps).
HOW TO APPENDIX
131
Page 134 of 172
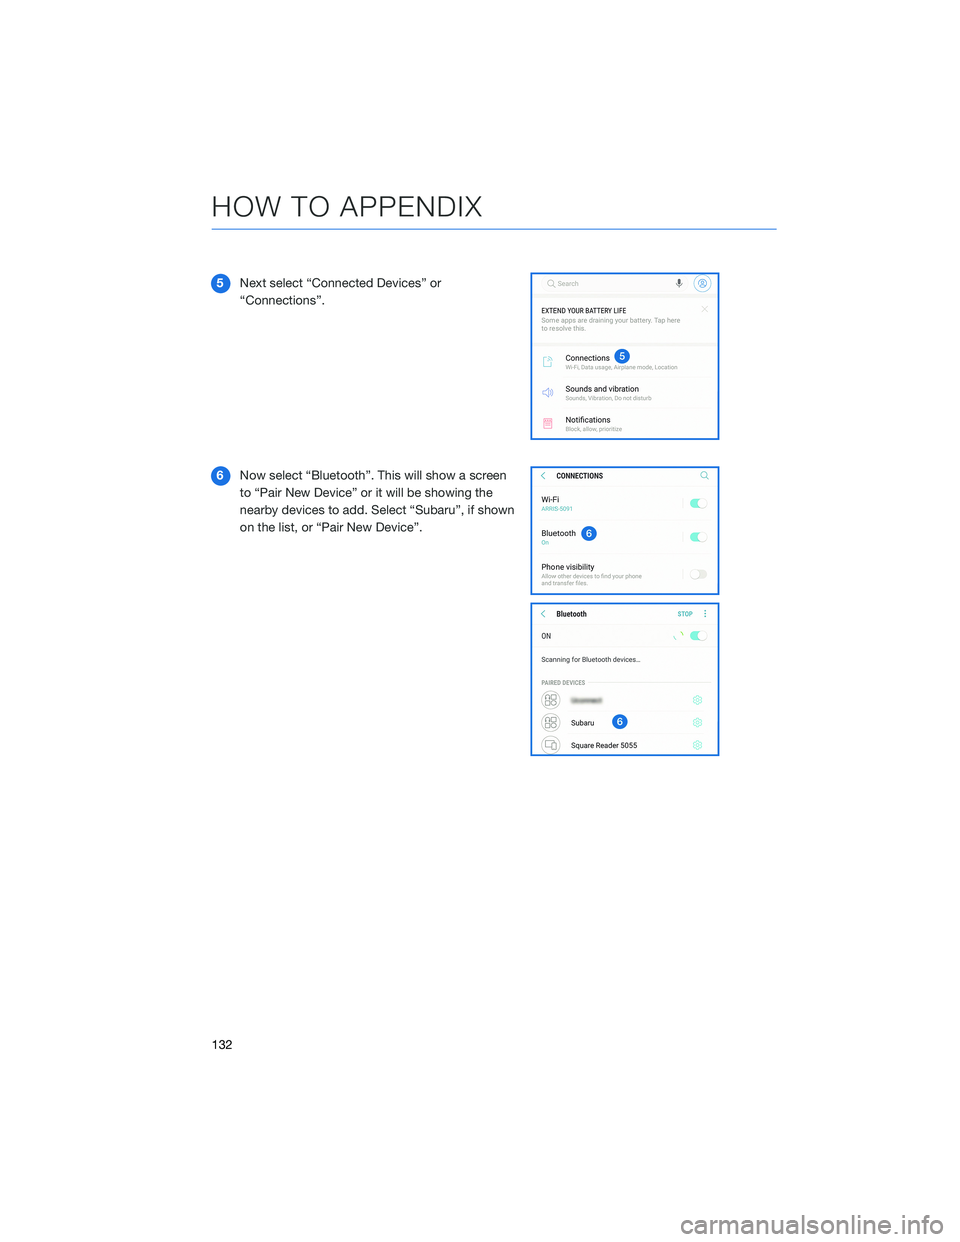
5Next select “Connected Devices” or
“Connections”.
6Now select “Bluetooth”. This will show a screen
to “Pair New Device” or it will be showing the
nearby devices to add. Select “Subaru”, if shown
on the list, or “Pair New Device”.
HOW TO APPENDIX
132
Page 135 of 172
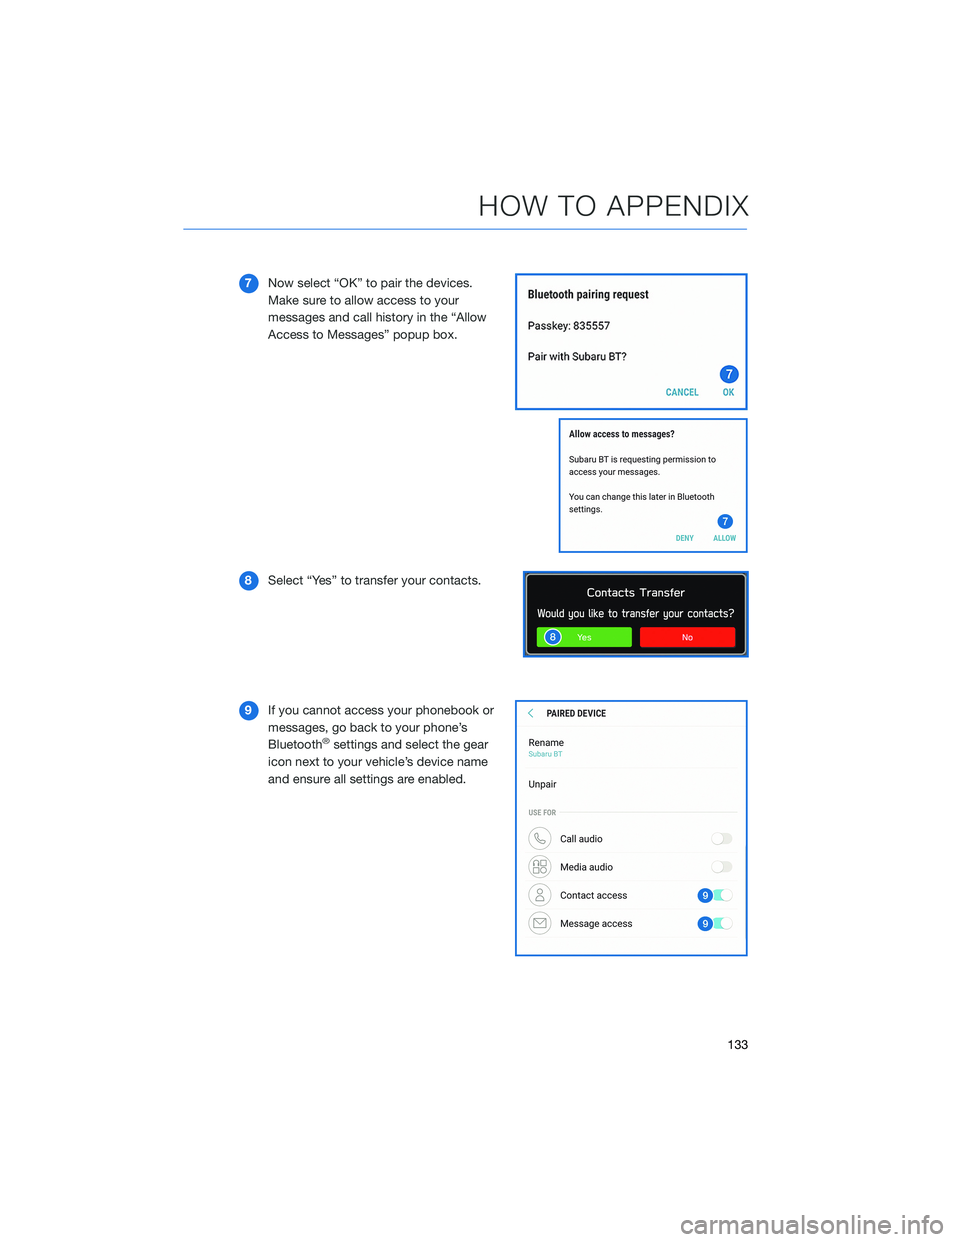
7Now select “OK” to pair the devices.
Make sure to allow access to your
messages and call history in the “Allow
Access to Messages” popup box.
8Select “Yes” to transfer your contacts.
9If you cannot access your phonebook or
messages, go back to your phone’s
Bluetooth
®settings and select the gear
icon next to your vehicle’s device name
and ensure all settings are enabled.
HOW TO APPENDIX
133
Page 136 of 172
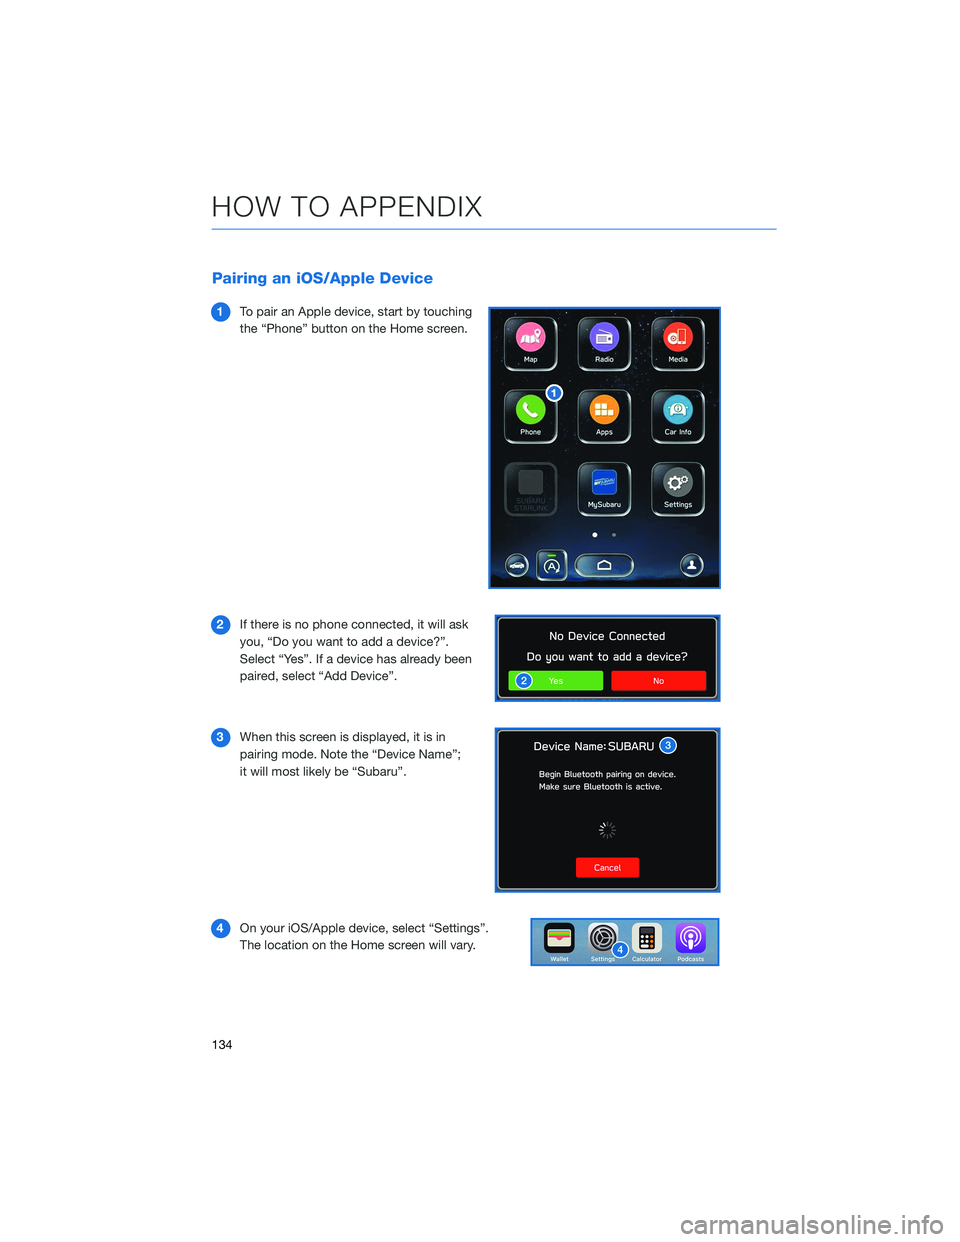
Pairing an iOS/Apple Device
1To pair an Apple device, start by touching
the “Phone” button on the Home screen.
2If there is no phone connected, it will ask
you, “Do you want to add a device?”.
Select “Yes”. If a device has already been
paired, select “Add Device”.
3When this screen is displayed, it is in
pairing mode. Note the “Device Name”;
it will most likely be “Subaru”.
4On your iOS/Apple device, select “Settings”.
The location on the Home screen will vary.
HOW TO APPENDIX
134
Page 137 of 172
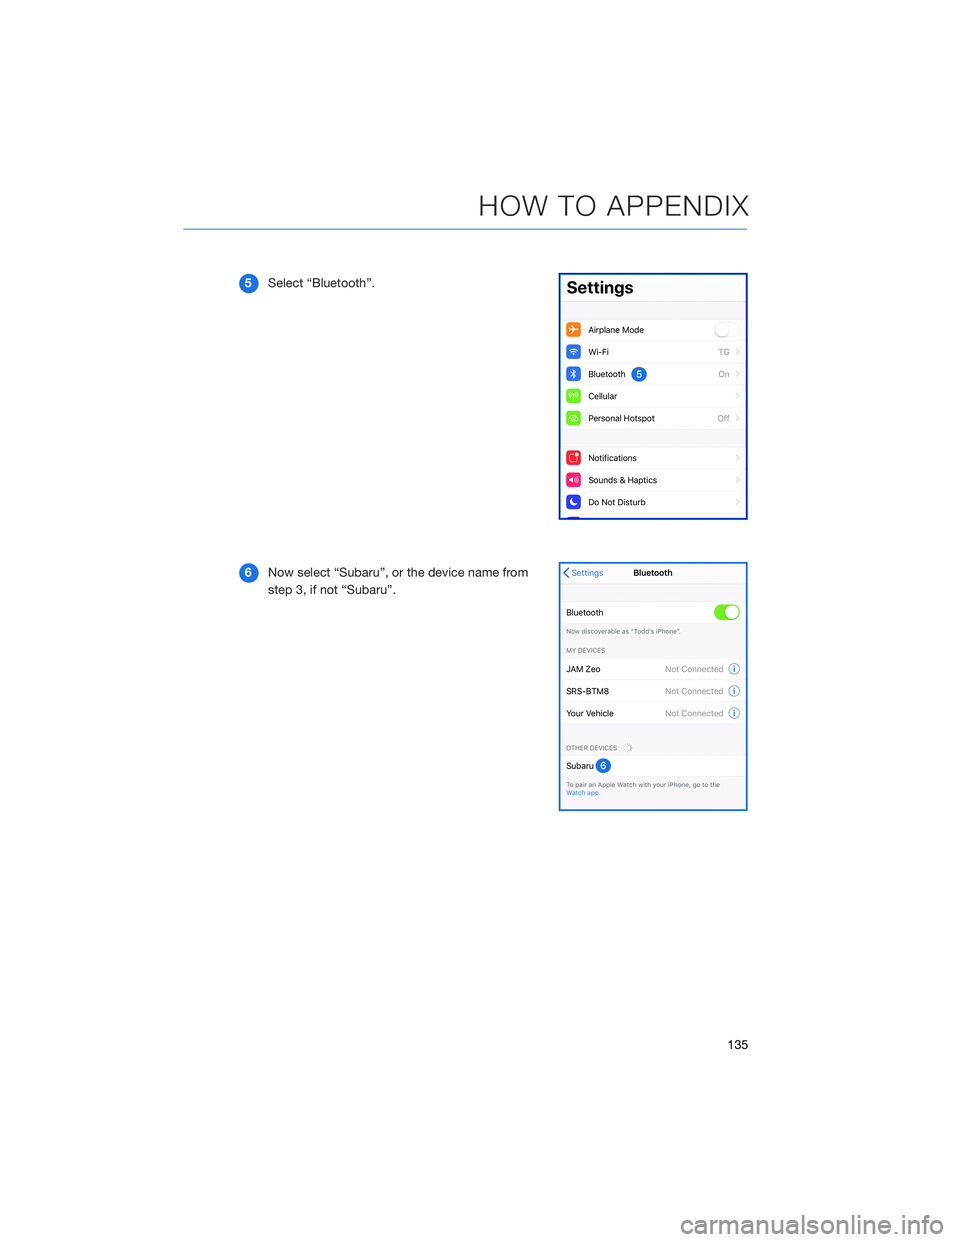
5Select “Bluetooth”.
6Now select “Subaru”, or the device name from
step 3, if not “Subaru”.
HOW TO APPENDIX
135
Page 138 of 172
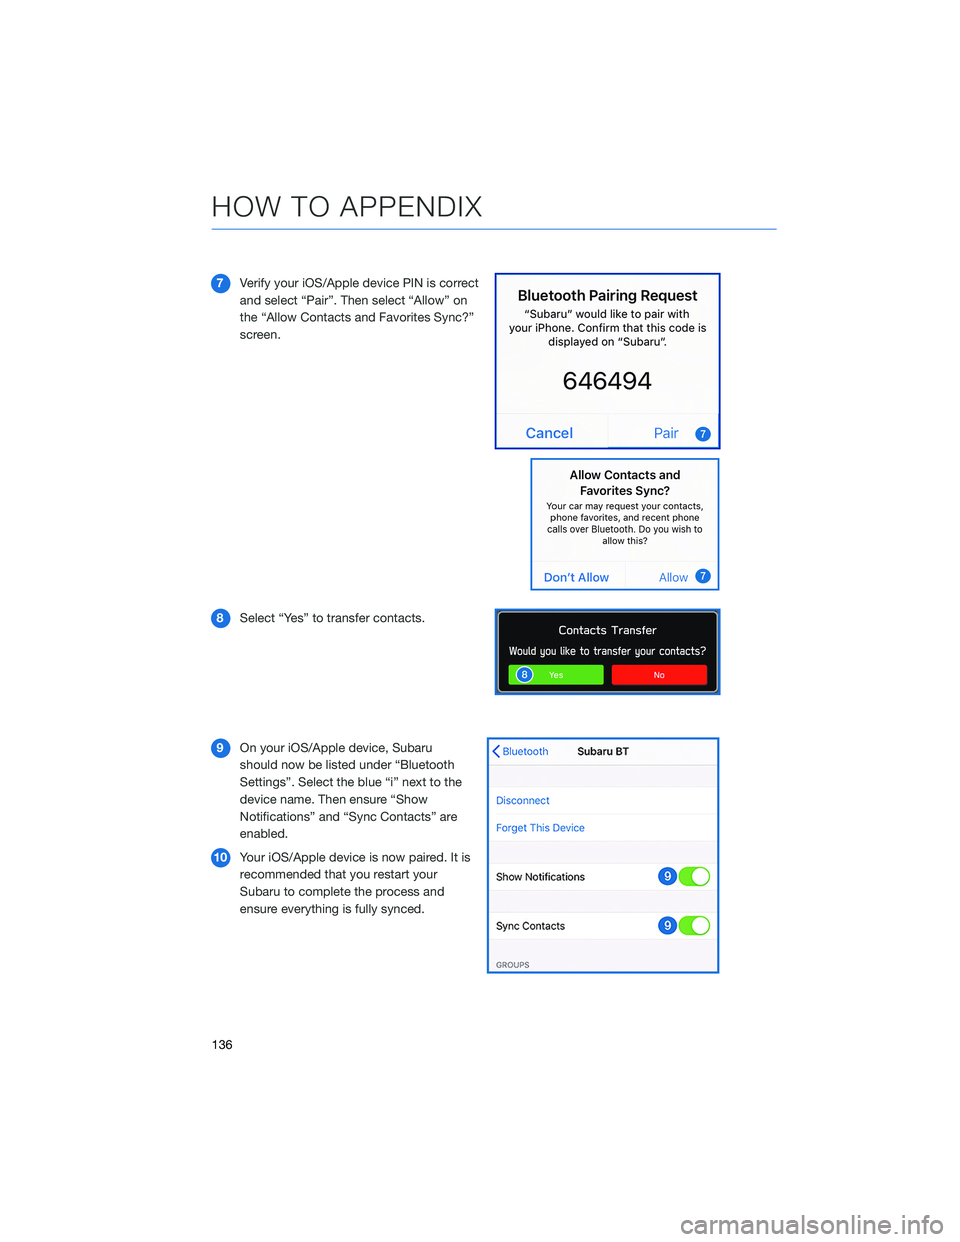
7Verify your iOS/Apple device PIN is correct
and select “Pair”. Then select “Allow” on
the “Allow Contacts and Favorites Sync?”
screen.
8Select “Yes” to transfer contacts.
9On your iOS/Apple device, Subaru
should now be listed under “Bluetooth
Settings”. Select the blue “i” next to the
device name. Then ensure “Show
Notifications” and “Sync Contacts” are
enabled.
10Your iOS/Apple device is now paired. It is
recommended that you restart your
Subaru to complete the process and
ensure everything is fully synced.
HOW TO APPENDIX
136
Page 139 of 172
ANDROID AUTO™
Cables
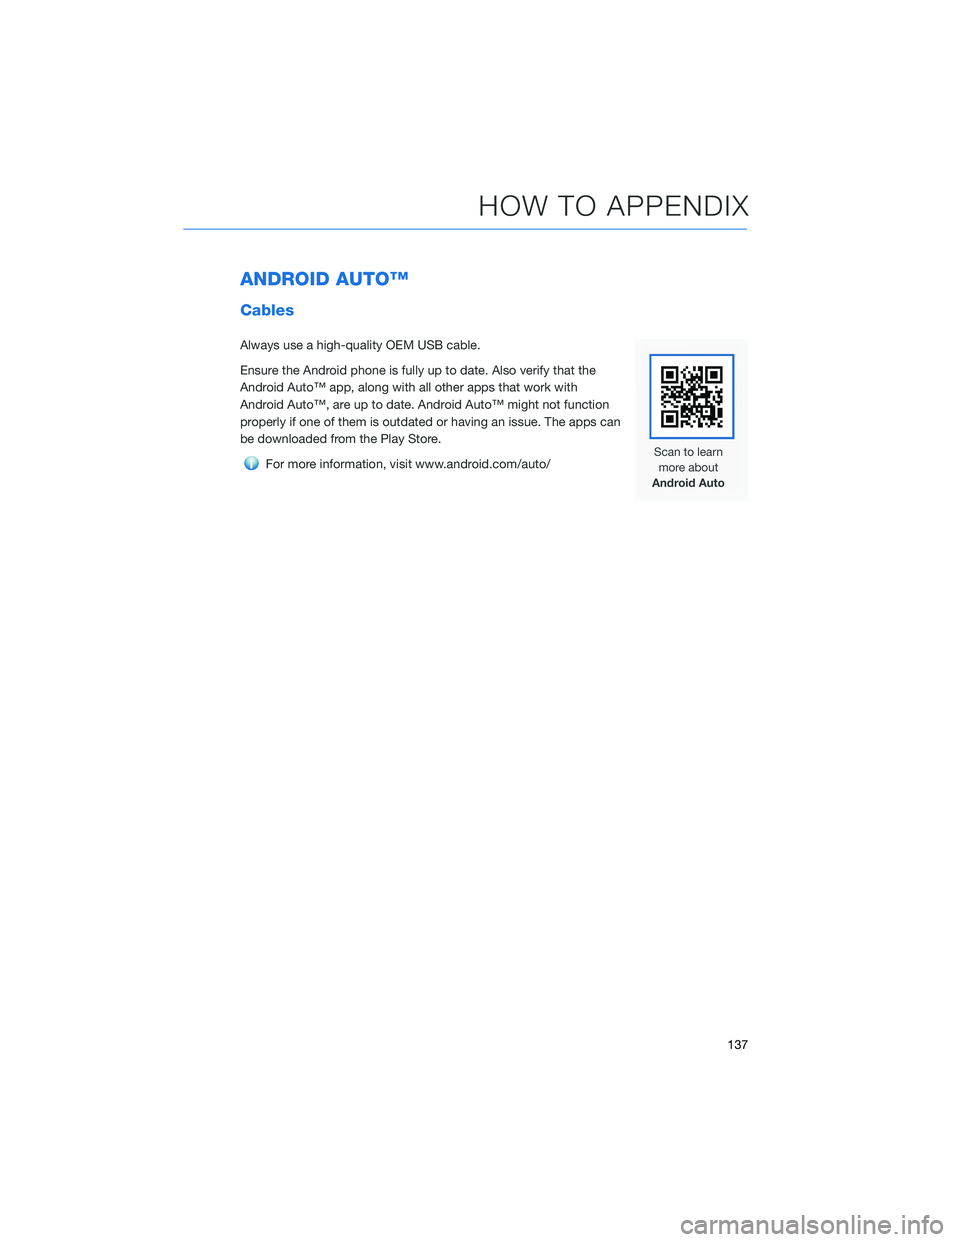
Always use a high-quality OEM USB cable.
Ensure the Android phone is fully up to date. Also verify that the
Android Auto™ app, along with all other apps that work with
Android Auto™, are up to date. Android Auto™ might not function
properly if one of them is outdated or having an issue. The apps can
be downloaded from the Play Store.
For more information, visit www.android.com/auto/
HOW TO APPENDIX
137
Page 140 of 172
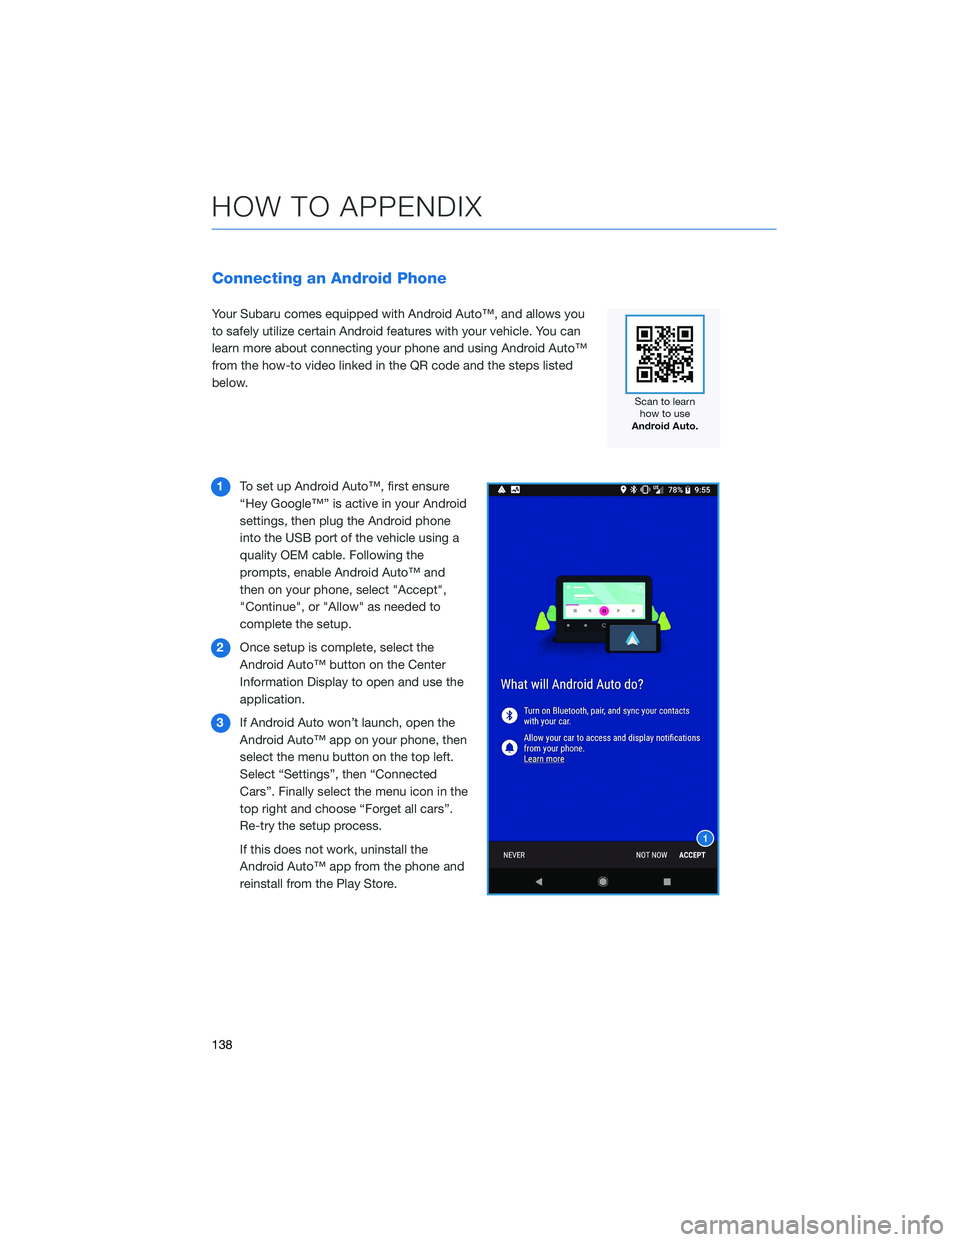
Connecting an Android Phone
Your Subaru comes equipped with Android Auto™, and allows you
to safely utilize certain Android features with your vehicle. You can
learn more about connecting your phone and using Android Auto™
from the how-to video linked in the QR code and the steps listed
below.
1To set up Android Auto™, first ensure
“Hey Google™” is active in your Android
settings, then plug the Android phone
into the USB port of the vehicle using a
quality OEM cable. Following the
prompts, enable Android Auto™ and
then on your phone, select "Accept",
"Continue", or "Allow" as needed to
complete the setup.
2Once setup is complete, select the
Android Auto™ button on the Center
Information Display to open and use the
application.
3If Android Auto won’t launch, open the
Android Auto™ app on your phone, then
select the menu button on the top left.
Select “Settings”, then “Connected
Cars”. Finally select the menu icon in the
top right and choose “Forget all cars”.
Re-try the setup process.
If this does not work, uninstall the
Android Auto™ app from the phone and
reinstall from the Play Store.
HOW TO APPENDIX
138
Trending: check engine, air condition, engine, navigation update, dead battery, fuel pressure, ad blue
