buttons SUBARU OUTBACK 2022 Getting Started Guide
[x] Cancel search | Manufacturer: SUBARU, Model Year: 2022, Model line: OUTBACK, Model: SUBARU OUTBACK 2022Pages: 172, PDF Size: 58.6 MB
Page 84 of 172
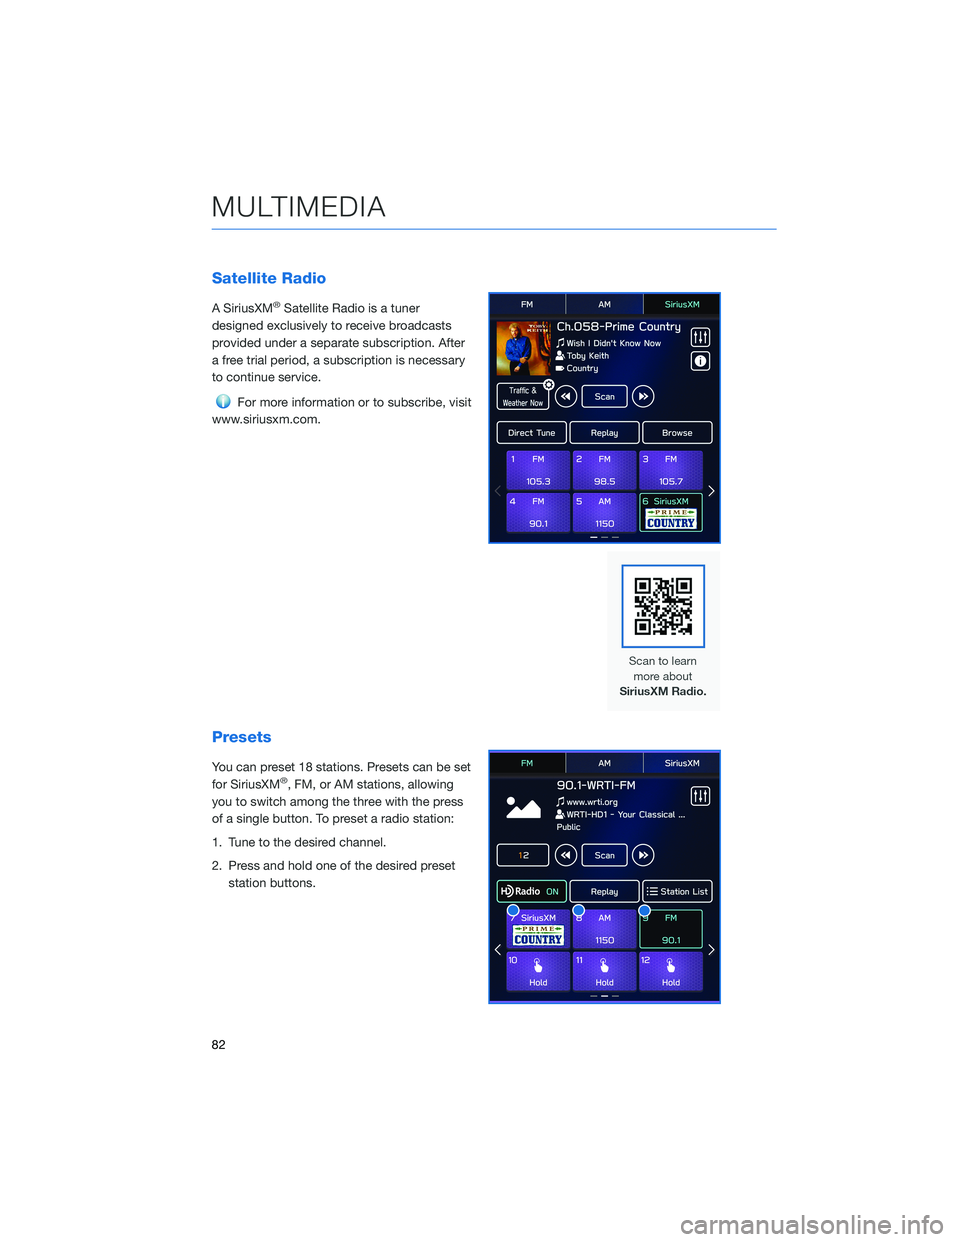
Satellite Radio
A SiriusXM®Satellite Radio is a tuner
designed exclusively to receive broadcasts
provided under a separate subscription. After
a free trial period, a subscription is necessary
to continue service.
For more information or to subscribe, visit
www.siriusxm.com.
Presets
You can preset 18 stations. Presets can be set
for SiriusXM®, FM, or AM stations, allowing
you to switch among the three with the press
of a single button. To preset a radio station:
1. Tune to the desired channel.
2. Press and hold one of the desired preset
station buttons.
MULTIMEDIA
82
Page 94 of 172
SAFETY AND SECURITY OVERVIEW
STARLINK®Safety and Security services* are designed to help in your time of need. These
include Advanced Automatic Collision Notification, SOS Emergency Assistance, Enhanced
Roadside Assistance, Stolen Vehicle Recovery, the added convenience of Remote Engine
Start with Climate Control, and so much more.
With the SUBARU STARLINK
®system integrated into your vehicle, advanced safety and
security technology is just a button press away. The SUBARU STARLINK®experience
includes in-vehicle call center support, maintenance and diagnostic alerts as well as
remote services that keep you connected to your Subaru vehicle.
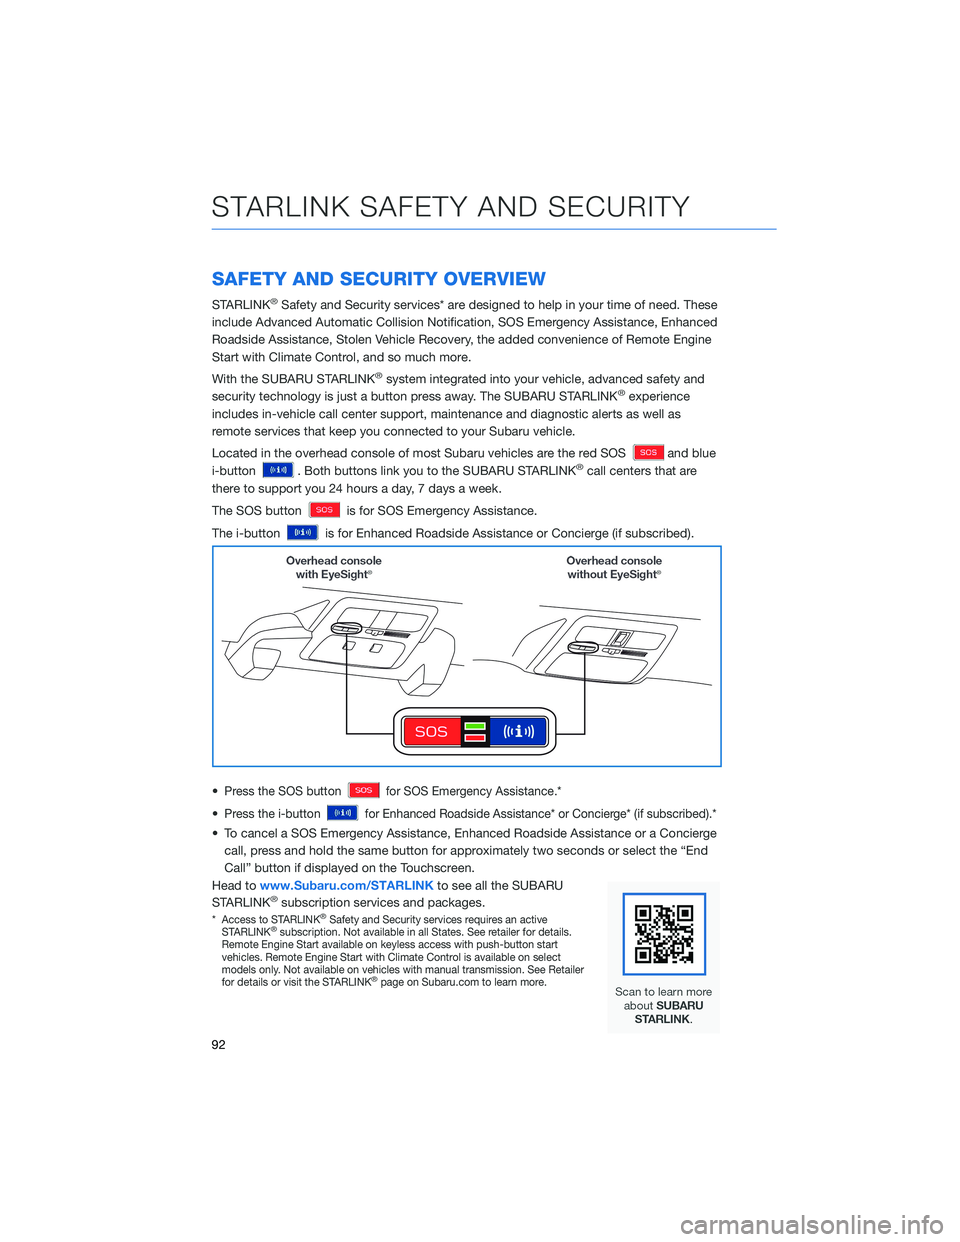
Located in the overhead console of most Subaru vehicles are the red SOS
and blue
i-button
. Both buttons link you to the SUBARU STARLINK®call centers that are
there to support you 24 hours a day, 7 days a week.
The SOS button
is for SOS Emergency Assistance.
The i-button
is for Enhanced Roadside Assistance or Concierge (if subscribed).
•
Press the SOS buttonfor SOS Emergency Assistance.*
•Press the i-buttonfor Enhanced Roadside Assistance* or Concierge* (if subscribed).*
• To cancel a SOS Emergency Assistance, Enhanced Roadside Assistance or a Concierge
call, press and hold the same button for approximately two seconds or select the “End
Call” button if displayed on the Touchscreen.
Head towww.Subaru.com/STARLINKto see all the SUBARU
STARLINK
®subscription services and packages.
*Access to STARLINK®Safety and Security services requires an active
STARLINK®subscription. Not available in all States. See retailer for details.
Remote Engine Start available on keyless access with push-button start
vehicles. Remote Engine Start with Climate Control is available on select
models only. Not available on vehicles with manual transmission. See Retailer
for details or visit the STARLINK
®page on Subaru.com to learn more.
STARLINK SAFETY AND SECURITY
92
Page 107 of 172
Advanced Adaptive Cruise Control with Lane Centering
Advanced Adaptive Cruise Control is a driving support system intended to reduce the
burden on you when driving on an expressway (including during congestion and when
driving at high speed). Advanced Adaptive Cruise Control and Lane Centering work
together to assist you by automatically controlling the accelerator, brake, and steering.
Advanced Adaptive Cruise Control
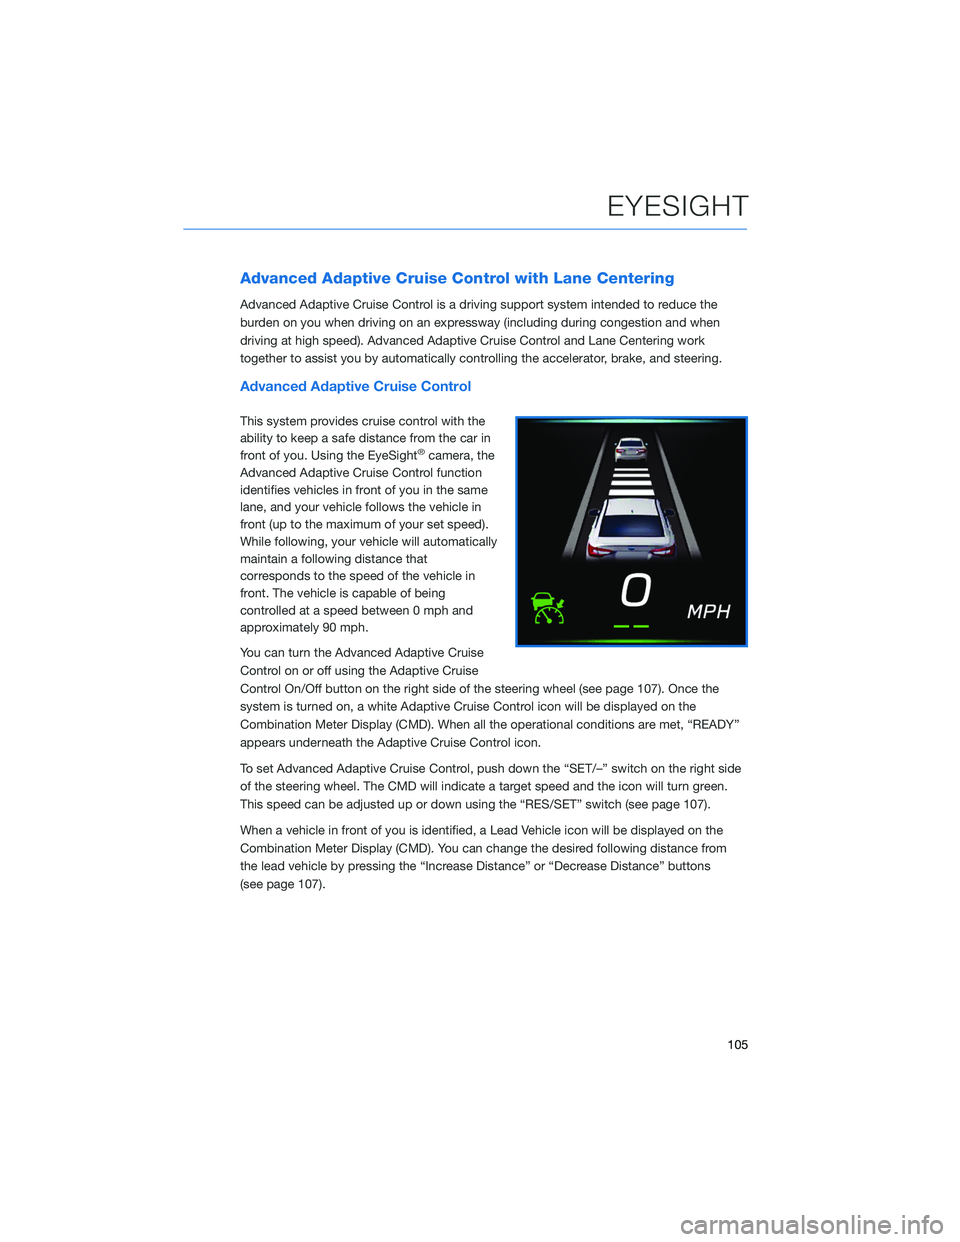
This system provides cruise control with the
ability to keep a safe distance from the car in
front of you. Using the EyeSight
®camera, the
Advanced Adaptive Cruise Control function
identifies vehicles in front of you in the same
lane, and your vehicle follows the vehicle in
front (up to the maximum of your set speed).
While following, your vehicle will automatically
maintain a following distance that
corresponds to the speed of the vehicle in
front. The vehicle is capable of being
controlled at a speed between 0 mph and
approximately 90 mph.
You can turn the Advanced Adaptive Cruise
Control on or off using the Adaptive Cruise
Control On/Off button on the right side of the steering wheel (see page 107). Once the
system is turned on, a white Adaptive Cruise Control icon will be displayed on the
Combination Meter Display (CMD). When all the operational conditions are met, “READY”
appears underneath the Adaptive Cruise Control icon.
To set Advanced Adaptive Cruise Control, push down the “SET/–” switch on the right side
of the steering wheel. The CMD will indicate a target speed and the icon will turn green.
This speed can be adjusted up or down using the “RES/SET” switch (see page 107).
When a vehicle in front of you is identified, a Lead Vehicle icon will be displayed on the
Combination Meter Display (CMD). You can change the desired following distance from
the lead vehicle by pressing the “Increase Distance” or “Decrease Distance” buttons
(see page 107).
EYESIGHT
105
Page 117 of 172
STEERING RESPONSIVE HEADLIGHTS (SRH)
The Steering Responsive Headlights (SRH) system aims the headlight beams in the
direction you are steering, improving visibility at corners and intersections when driving at
night. You can turn the SRH system on or off in the Center Information Display through the
“Car Settings” icon.
REVERSE AUTOMATIC BRAKING (RAB)(if equipped)
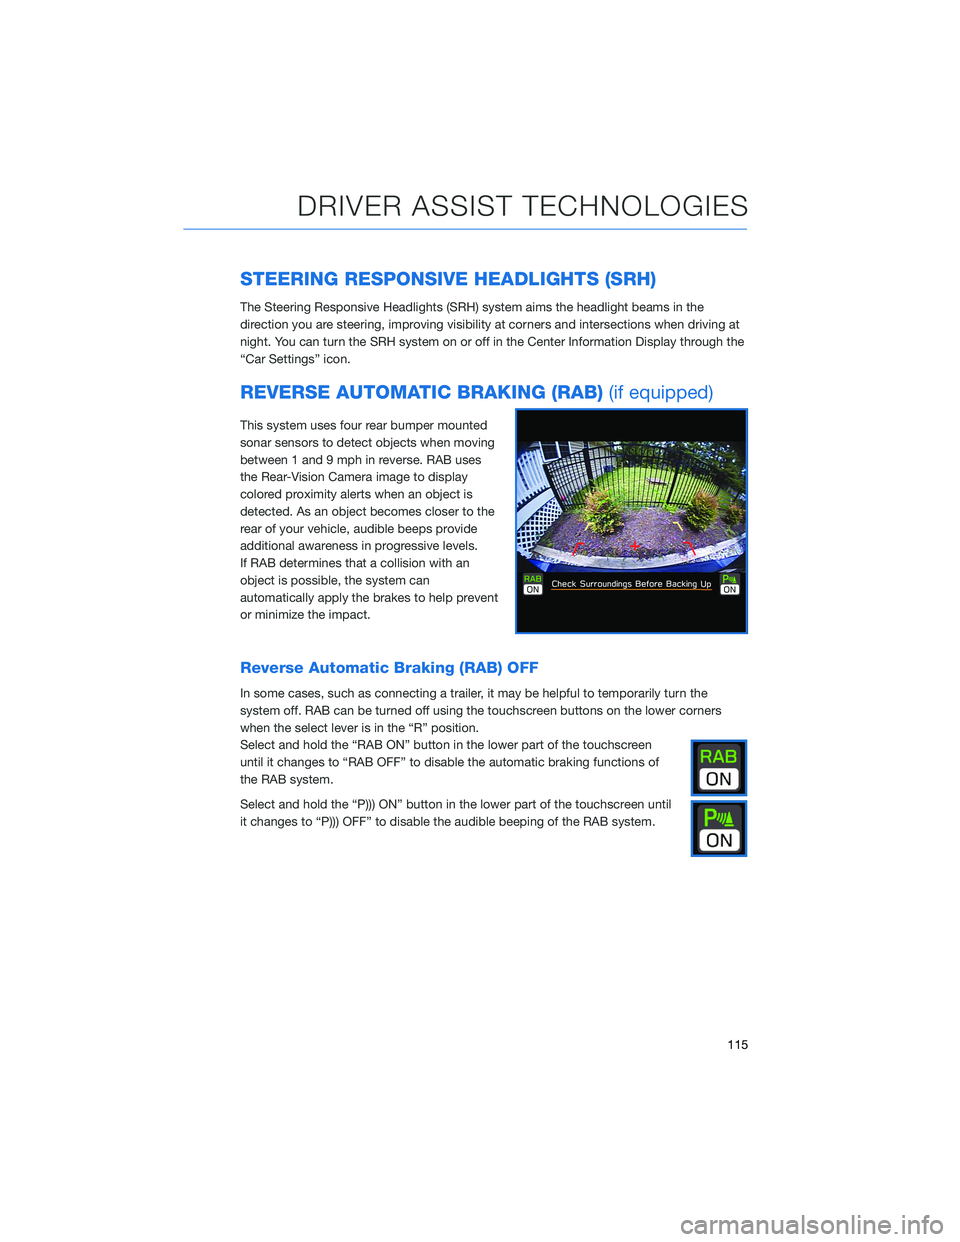
This system uses four rear bumper mounted
sonar sensors to detect objects when moving
between 1 and 9 mph in reverse. RAB uses
the Rear-Vision Camera image to display
colored proximity alerts when an object is
detected. As an object becomes closer to the
rear of your vehicle, audible beeps provide
additional awareness in progressive levels.
If RAB determines that a collision with an
object is possible, the system can
automatically apply the brakes to help prevent
or minimize the impact.
Reverse Automatic Braking (RAB) OFF
In some cases, such as connecting a trailer, it may be helpful to temporarily turn the
system off. RAB can be turned off using the touchscreen buttons on the lower corners
when the select lever is in the “R” position.
Select and hold the “RAB ON” button in the lower part of the touchscreen
until it changes to “RAB OFF” to disable the automatic braking functions of
the RAB system.
Select and hold the “P))) ON” button in the lower part of the touchscreen until
it changes to “P))) OFF” to disable the audible beeping of the RAB system.
DRIVER ASSIST TECHNOLOGIES
115
Page 128 of 172
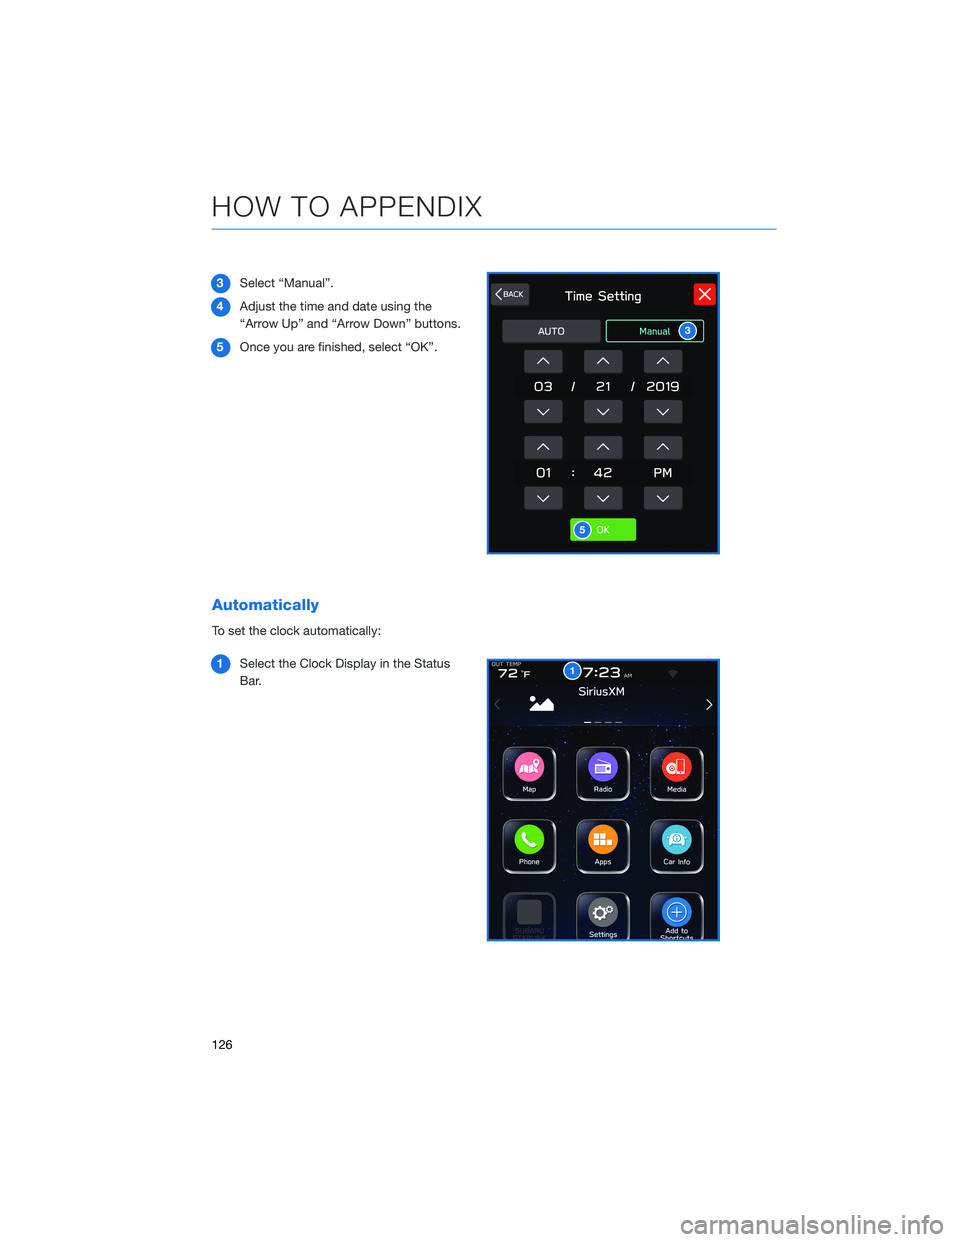
3Select “Manual”.
4Adjust the time and date using the
“Arrow Up” and “Arrow Down” buttons.
5Once you are finished, select “OK”.
Automatically
To set the clock automatically:
1Select the Clock Display in the Status
Bar.
3
5
1
HOW TO APPENDIX
126
Page 131 of 172
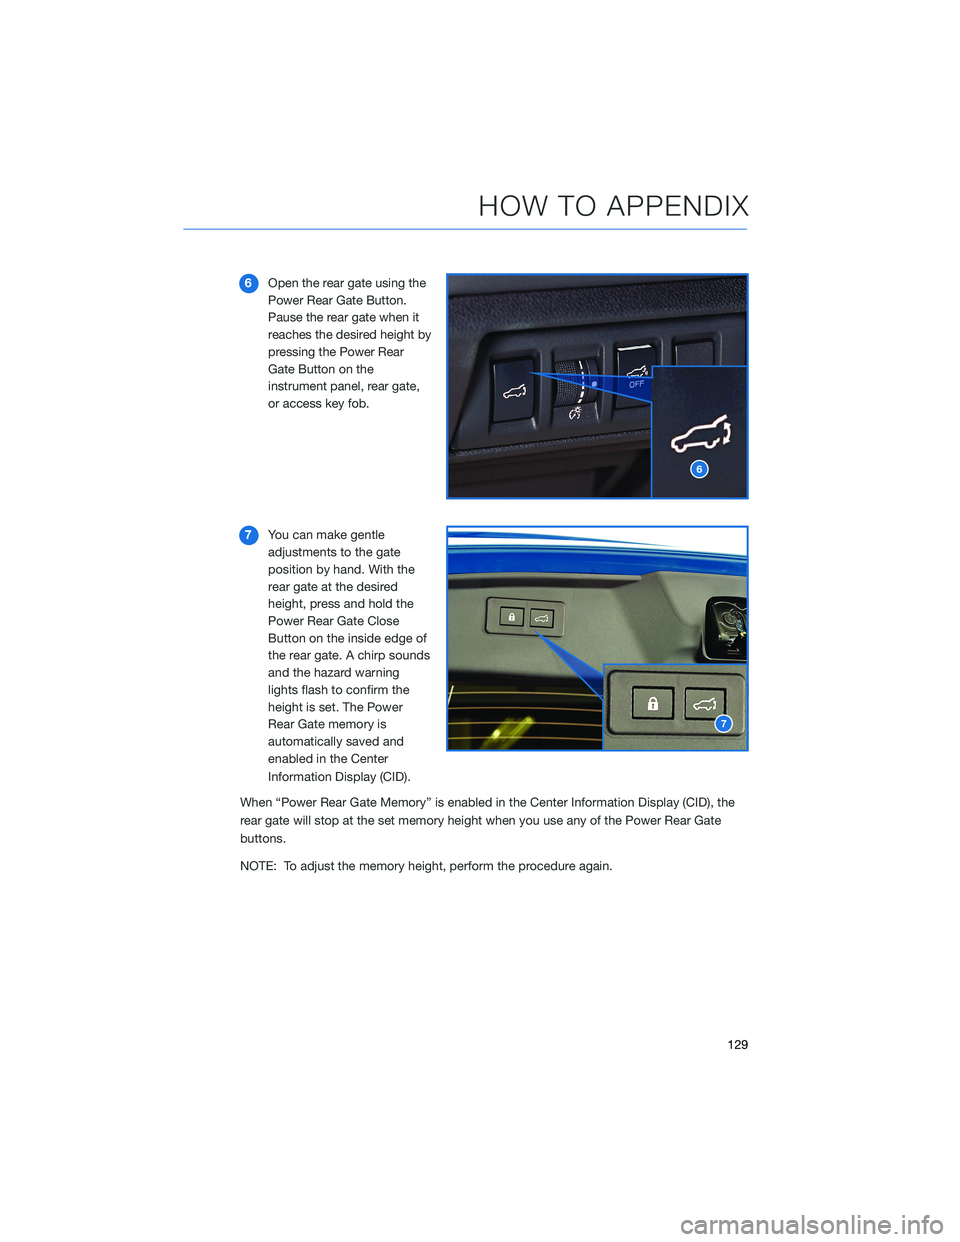
6Open the rear gate using the
Power Rear Gate Button.
Pause the rear gate when it
reaches the desired height by
pressing the Power Rear
Gate Button on the
instrument panel, rear gate,
or access key fob.
7You can make gentle
adjustments to the gate
position by hand. With the
rear gate at the desired
height, press and hold the
Power Rear Gate Close
Button on the inside edge of
the rear gate. A chirp sounds
and the hazard warning
lights flash to confirm the
height is set. The Power
Rear Gate memory is
automatically saved and
enabled in the Center
Information Display (CID).
When “Power Rear Gate Memory” is enabled in the Center Information Display (CID), the
rear gate will stop at the set memory height when you use any of the Power Rear Gate
buttons.
NOTE: To adjust the memory height, perform the procedure again.
6
7
HOW TO APPENDIX
129
Page 132 of 172
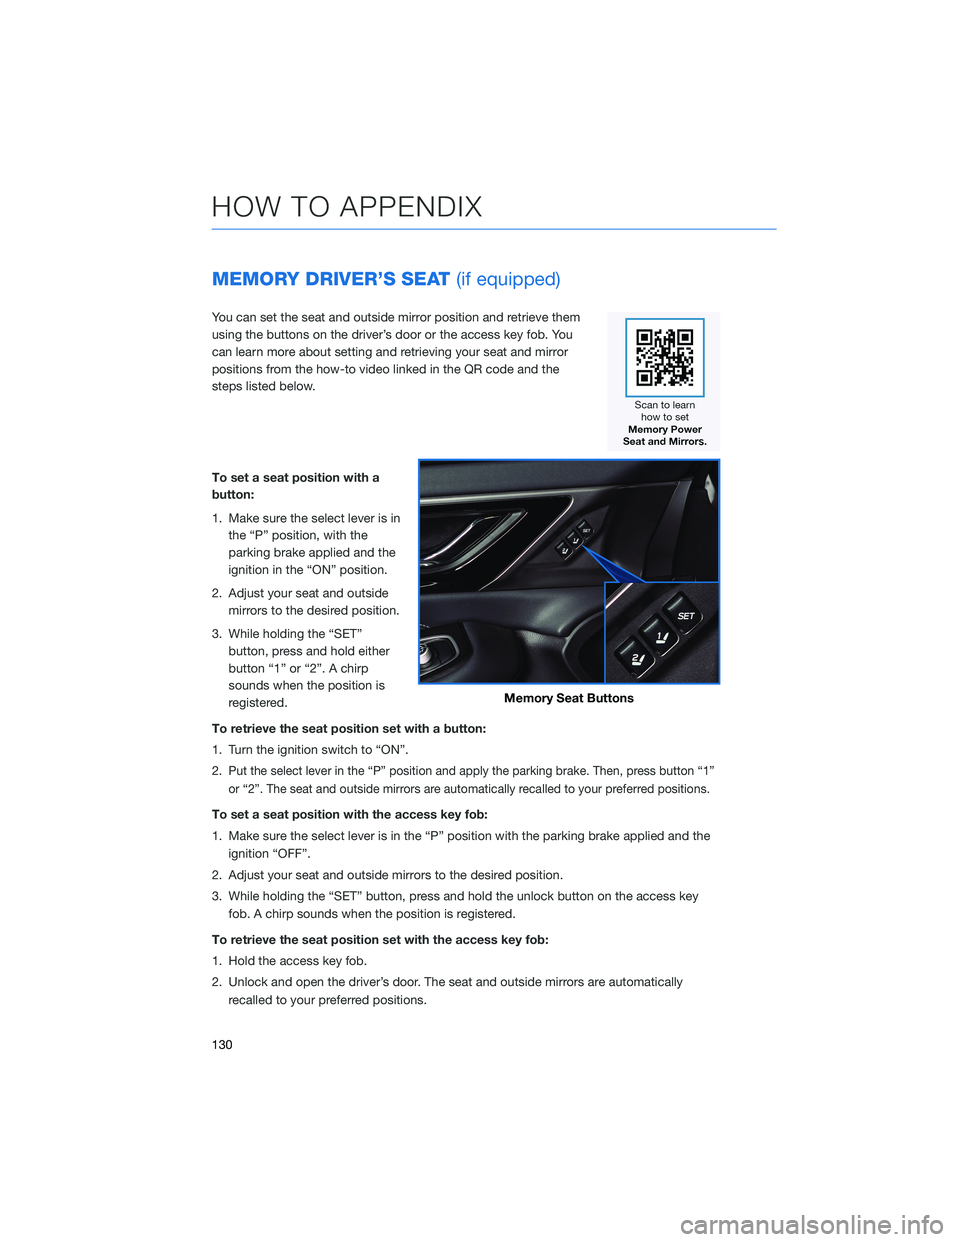
MEMORY DRIVER’S SEAT(if equipped)
You can set the seat and outside mirror position and retrieve them
using the buttons on the driver’s door or the access key fob. You
can learn more about setting and retrieving your seat and mirror
positions from the how-to video linked in the QR code and the
steps listed below.
To set a seat position with a
button:
1. Make sure the select lever is in
the “P” position, with the
parking brake applied and the
ignition in the “ON” position.
2. Adjust your seat and outside
mirrors to the desired position.
3. While holding the “SET”
button, press and hold either
button “1” or “2”. A chirp
sounds when the position is
registered.
To retrieve the seat position set with a button:
1. Turn the ignition switch to “ON”.
2.
Put the select lever in the “P” position and apply the parking brake. Then, press button “1”
or “2”. The seat and outside mirrors are automatically recalled to your preferred positions.
To set a seat position with the access key fob:
1. Make sure the select lever is in the “P” position with the parking brake applied and the
ignition “OFF”.
2. Adjust your seat and outside mirrors to the desired position.
3. While holding the “SET” button, press and hold the unlock button on the access key
fob. A chirp sounds when the position is registered.
To retrieve the seat position set with the access key fob:
1. Hold the access key fob.
2. Unlock and open the driver’s door. The seat and outside mirrors are automatically
recalled to your preferred positions.
Memory Seat Buttons
HOW TO APPENDIX
130
Page 162 of 172
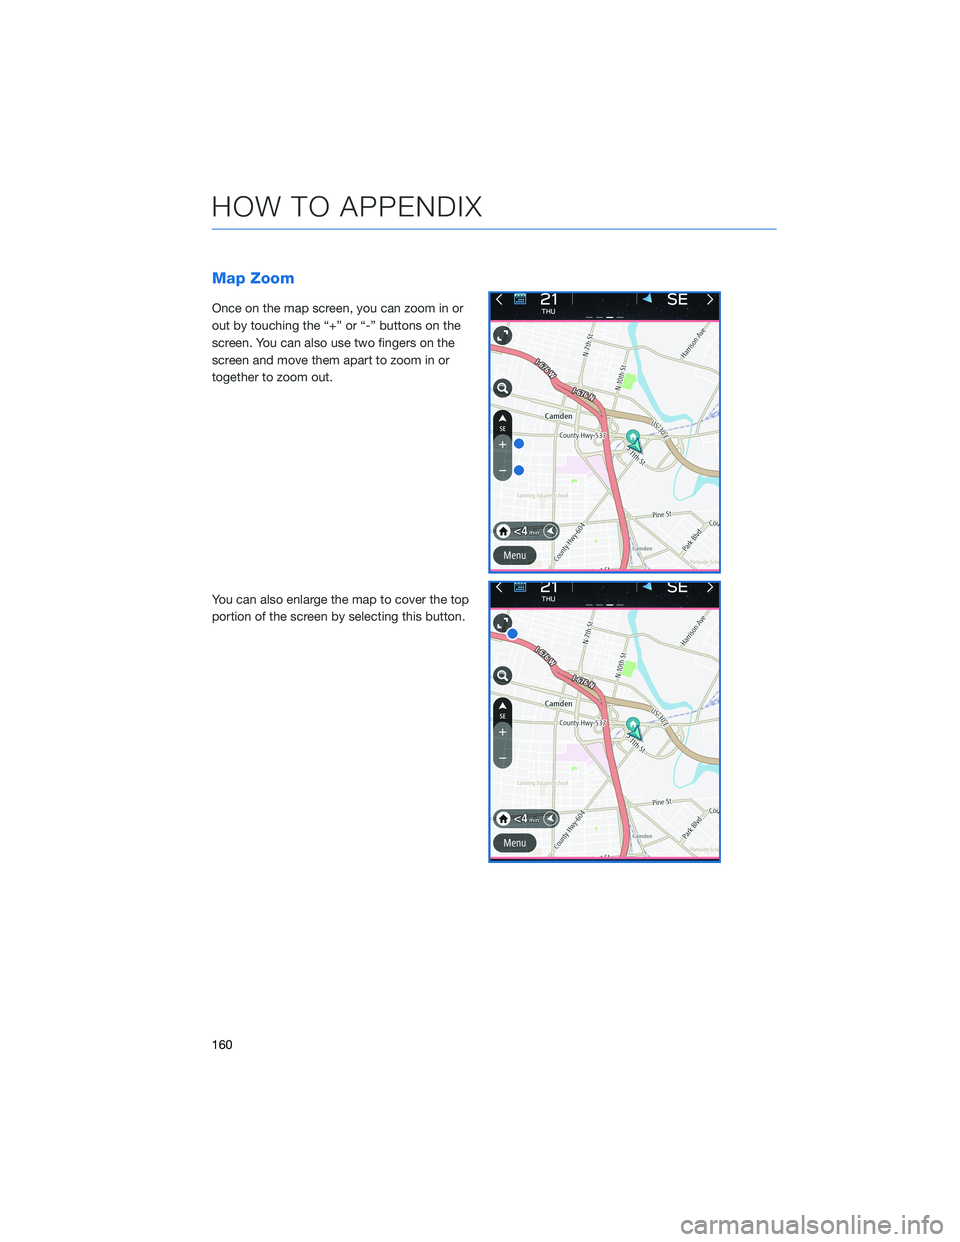
Map Zoom
Once on the map screen, you can zoom in or
out by touching the “+” or “-” buttons on the
screen. You can also use two fingers on the
screen and move them apart to zoom in or
together to zoom out.
You can also enlarge the map to cover the top
portion of the screen by selecting this button.
HOW TO APPENDIX
160
Page 163 of 172
Map View/Perspectives
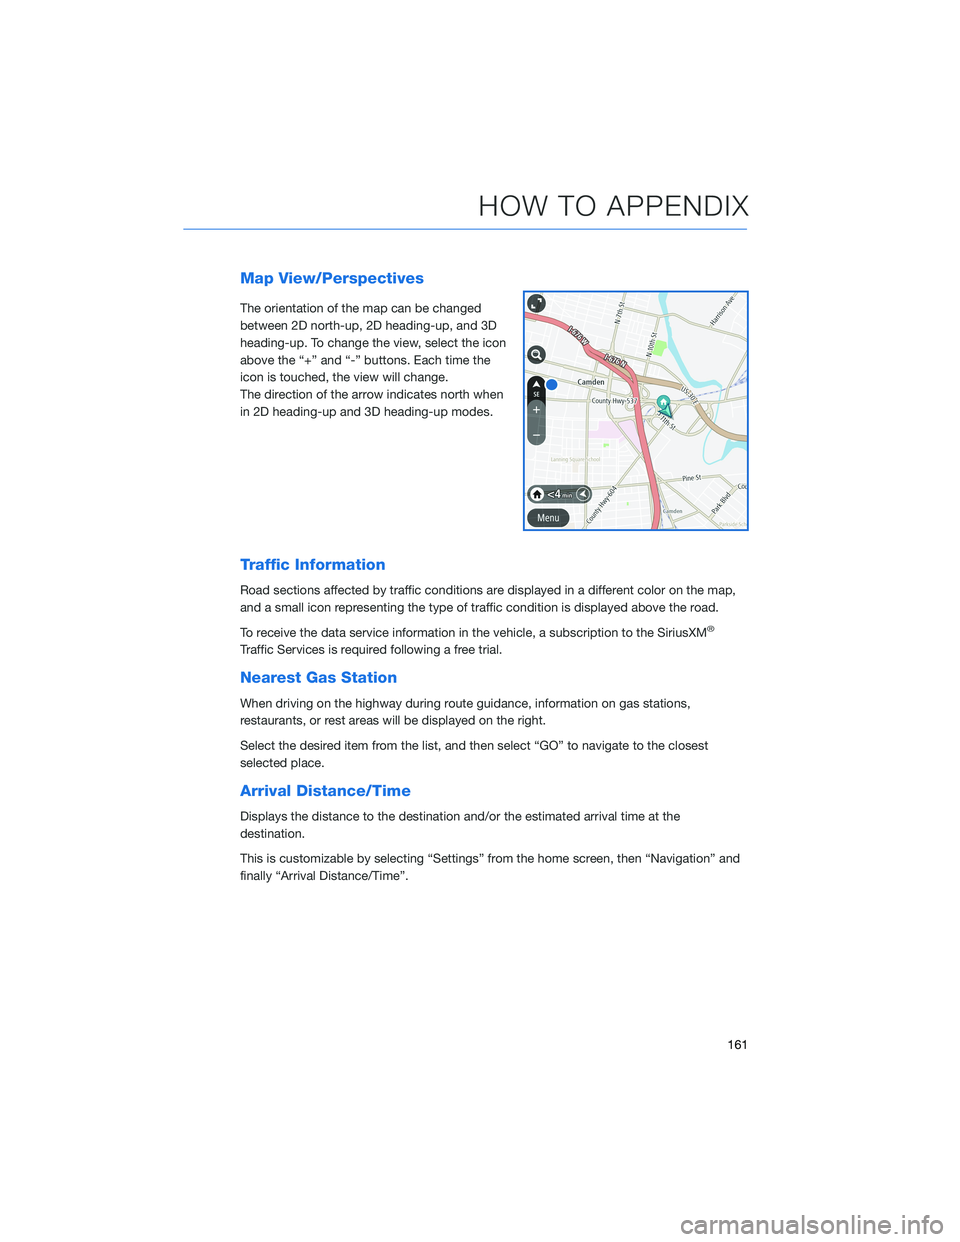
The orientation of the map can be changed
between 2D north-up, 2D heading-up, and 3D
heading-up. To change the view, select the icon
above the “+” and “-” buttons. Each time the
icon is touched, the view will change.
The direction of the arrow indicates north when
in 2D heading-up and 3D heading-up modes.
Traffic Information
Road sections affected by traffic conditions are displayed in a different color on the map,
and a small icon representing the type of traffic condition is displayed above the road.
To receive the data service information in the vehicle, a subscription to the SiriusXM
®
Traffic Services is required following a free trial.
Nearest Gas Station
When driving on the highway during route guidance, information on gas stations,
restaurants, or rest areas will be displayed on the right.
Select the desired item from the list, and then select “GO” to navigate to the closest
selected place.
Arrival Distance/Time
Displays the distance to the destination and/or the estimated arrival time at the
destination.
This is customizable by selecting “Settings” from the home screen, then “Navigation” and
finally “Arrival Distance/Time”.
HOW TO APPENDIX
161
Page 167 of 172
2.4L TURBO ENGINE ........... 60
2.5L ENGINE . . . . . . .......... 59
A
ACCESSORY CONNECTIONS . . . . . . 33
ADDING SHORTCUTS . . . . ...... 75
ADVANCED ADAPTIVE CRUISE
CONTROL . . . . . ........... 35
ANDROID AUTO™ . . . . . ....... 137
Cables . . . . . . . ..........137
Compatible Models ..........139
Connecting an Android Phone....138
APPLE CARPLAY
®............ 139
Cables . . . . . . . ..........139
Compatible Models ..........141
Connecting an iPhone . . . .....140
AUDIO CONTROLS ............ 34
AUTO START–STOP . . . . . . . . . . . 44
B
BLIND SPOT DETECTION (BSD) / REAR
CROSS TRAFFIC ALERT (RCTA) . . 113
Blind Spot Detection (BSD) . . . . . 113
Blind Spot Detection / Rear Cross
Traffic Alert OFF . . . . ........114
Lane Change Assist (LCA)......113
Rear Cross-Traffic Alert (RCTA) . . . 113
BLUETOOTH
®PAIRING . . ....... 131
Pairing an Android Device . . . . . . 131
Pairing an iOS/Apple Device . . . . . 134
BUTTONS . . . . ............. 68
Controlling the Volume . . . . . . . . . 68
C
CARGO COVER . . . . . . . . ...... 56
CENTER CONSOLE STORAGE ..... 23
CHILD SAFETY LOCKS.......... 53
CLIMATE CONTROL........... 25
11.6–Inch Automatic Climate
Control . . . . . . . . . . . . . . . . . . 26Dual 7–Inch Automatic Climate
Control . . . . . . . . . . . . . . . . . . 25
Heated Seats . .............31
Heated Steering Wheel . .......32
Rear Heated Seats...........32
Remote Engine Start with Climate
Control . . . . . . . . . . . . . . . . . . 31
Ventilated Seats . . . . . . . . . . . . 32
CLOCK . . ................. 99
COMBINATION METER .......... 40
CREATING A DRIVER PROFILE ..... 77
Retrieving a Driver Profile.......80
D
DRIVERFOCUS
®COMPONENTS . . . 116
Camera . ................116
Center Information Display (CID) . . 117
Combination Meter Display (CMD). . 117
DRIVERFOCUS®OVERVIEW..... 116
DRIVER MONITORING SYSTEM OFF . . 120
DRIVER PROFILE/CONVENIENCE
SETTINGS ............... 118
Deleting a Driver . . ..........119
Recognizing a Driver.........119
Registering a Driver . . . . . . . . . . 118
DRIVING THE VEHICLE . . . ....... 43
Automatic Transmission Shift Mode..43
Paddle Shift Control Switches.....43
DROWSY/INATTENTIVE WARNINGS . . 118
E
ELECTRONIC PARKING BRAKE (EPB) . . 46
Auto Vehicle Hold (AVH) . . ......47
ENGINE OIL . . .............. 61
ENGINE OIL CAPACITY......... 61
ENROLLMENT . . . . . . ......... 93
EYESIGHT
®DISCLAIMER . . ..... 123
EYESIGHT®OVERVIEW . . . . . . . . . 100
EYESIGHT®ASSIST MONITOR
(EAM) . . . . . . . ........... 109
INDEX
165