high SUBARU OUTBACK 2022 Getting Started Guide
[x] Cancel search | Manufacturer: SUBARU, Model Year: 2022, Model line: OUTBACK, Model: SUBARU OUTBACK 2022Pages: 172, PDF Size: 58.6 MB
Page 53 of 172
FUEL FILLER LID
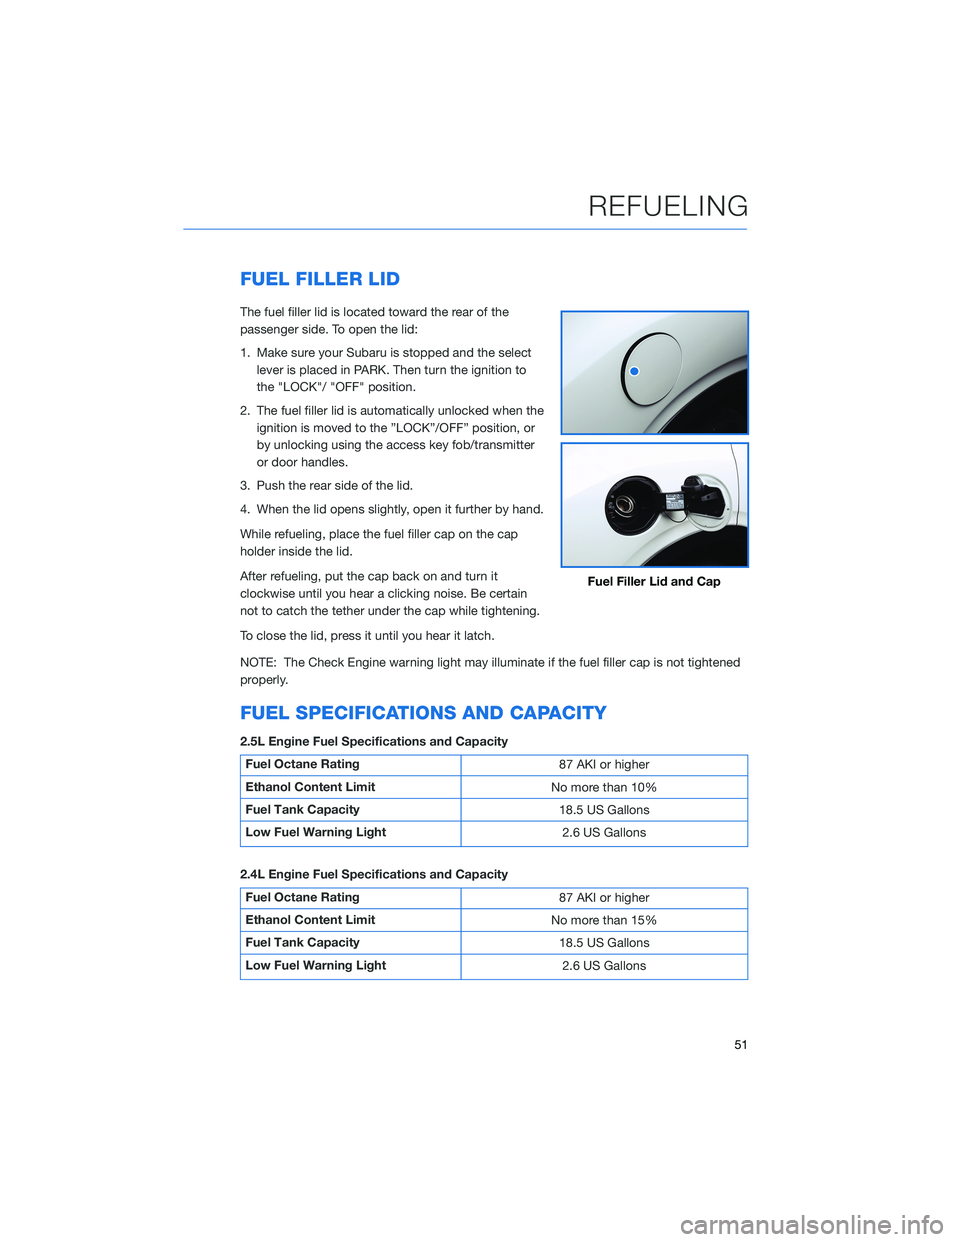
The fuel filler lid is located toward the rear of the
passenger side. To open the lid:
1. Make sure your Subaru is stopped and the select
lever is placed in PARK. Then turn the ignition to
the "LOCK"/ "OFF" position.
2. The fuel filler lid is automatically unlocked when the
ignition is moved to the ”LOCK”/OFF” position, or
by unlocking using the access key fob/transmitter
or door handles.
3. Push the rear side of the lid.
4. When the lid opens slightly, open it further by hand.
While refueling, place the fuel filler cap on the cap
holder inside the lid.
After refueling, put the cap back on and turn it
clockwise until you hear a clicking noise. Be certain
not to catch the tether under the cap while tightening.
To close the lid, press it until you hear it latch.
NOTE: The Check Engine warning light may illuminate if the fuel filler cap is not tightened
properly.
FUEL SPECIFICATIONS AND CAPACITY
2.5L Engine Fuel Specifications and Capacity
Fuel Octane Rating
87 AKI or higher
Ethanol Content Limit
No more than 10%
Fuel Tank Capacity
18.5 US Gallons
Low Fuel Warning Light
2.6 US Gallons
2.4L Engine Fuel Specifications and Capacity
Fuel Octane Rating
87 AKI or higher
Ethanol Content Limit
No more than 15%
Fuel Tank Capacity
18.5 US Gallons
Low Fuel Warning Light
2.6 US Gallons
Fuel Filler Lid and Cap
REFUELING
51
Page 73 of 172
VOICE RECOGNITION
With SUBARU STARLINK®, simple voice commands can control
features like navigation, entertainment, phone calls, and, on select
models, climate control. A microphone is located in the overhead
console. You do not need to speak directly into it.
Visit www.subaru.com/owners/starlink/multimedia.html for
more information.
Press the voice recognition switch to start the voice recognition
system. Press and hold the switch to cancel it.
For help with what you can say with voice recognition, press the “Help” button on the
screen or press the voice recognition button and say “Help”.
Tips
The system may not recognize the voice command due to various types of interference.
Some causes for voice command interference are:
• The command is spoken too quickly or at a low or high volume.
• The command is incorrect or unclear.
• The window is open, the climate control system is set on high, or the ventilation is
directed toward the microphone.
• Passengers are talking while the command is spoken.
NOTE: The system is designed to recognize a variety of commands, but certain words,
accents or speech patterns may be difficult for the system to recognize.
STARLINK OVERVIEW
71
Page 98 of 172
SOUND
To change the sound settings, press the “Home” button and select “Settings”, then
“Sound”. Choose the setting you want to change.
SETTING FUNCTION
Audio
In the audio settings, you may have the following setting capabilities:•Sound Customization— This function allows you to set the
Equalizer, Balance/Fader and Vocal Image Control.
•Equalizer—
How good an audio program sounds is
largely determined by the mix of the treble, mid and bass
levels. In fact, different kinds of music and vocal programs
usually sound better with different mixes of treble, mid and
bass.
•Balance/Fader— A good balance of the left and right
stereo channels and of the front and rear sound levels is
also important.
Keep in mind that when listening to a stereo recording or
broadcast, changing the right/left balance will increase the
volume of 1 group of sounds while decreasing the volume
of another.
•Vocal Image Control— Extracts only vocal sound from
whole sound and adjusts volume balance off vocals only.
•Sound Restorer— This function plays compressed audio
with quality near original sound by adding the complement
signal of high tone.
•Virtual Bass— This function corrects the bass sound by
adding harmonic sound.
•Dynamic Beat Enhancer— This function expands the
dynamic range lost in data compression and creates a sharp
beat sound.
•
Speed Volume Control— The system adjusts to the optimum
volume and tone quality according to vehicle speed to
compensate for increased vehicle noise.
•AUX Volume Gain— Sets the AUX volume gain.
Navigation Guidance
VolumeSets the navigation prompt volume.
Notification Volume Sets the interrupt guidance volume.
Beep Sound SettingTurns the tone sound on or off.
Beep Sound VolumeSets the tone sound volume.
Phone Ringtone VolumeSets the ringtone volume.
Incoming Call VolumeSets the volume of the received call.
Call Volume Sets the call volume.
SMS/MMS Ringtone
VolumeSets the SMS/MMS ringtone volume.
SMS/MMS Read Out
VolumeSets the SMS/MMS read out volume.
Voice Volume Sets the voice recognition prompts volume.
SETTINGS AND UPDATES
96
Page 102 of 172
EYESIGHT®OVERVIEW
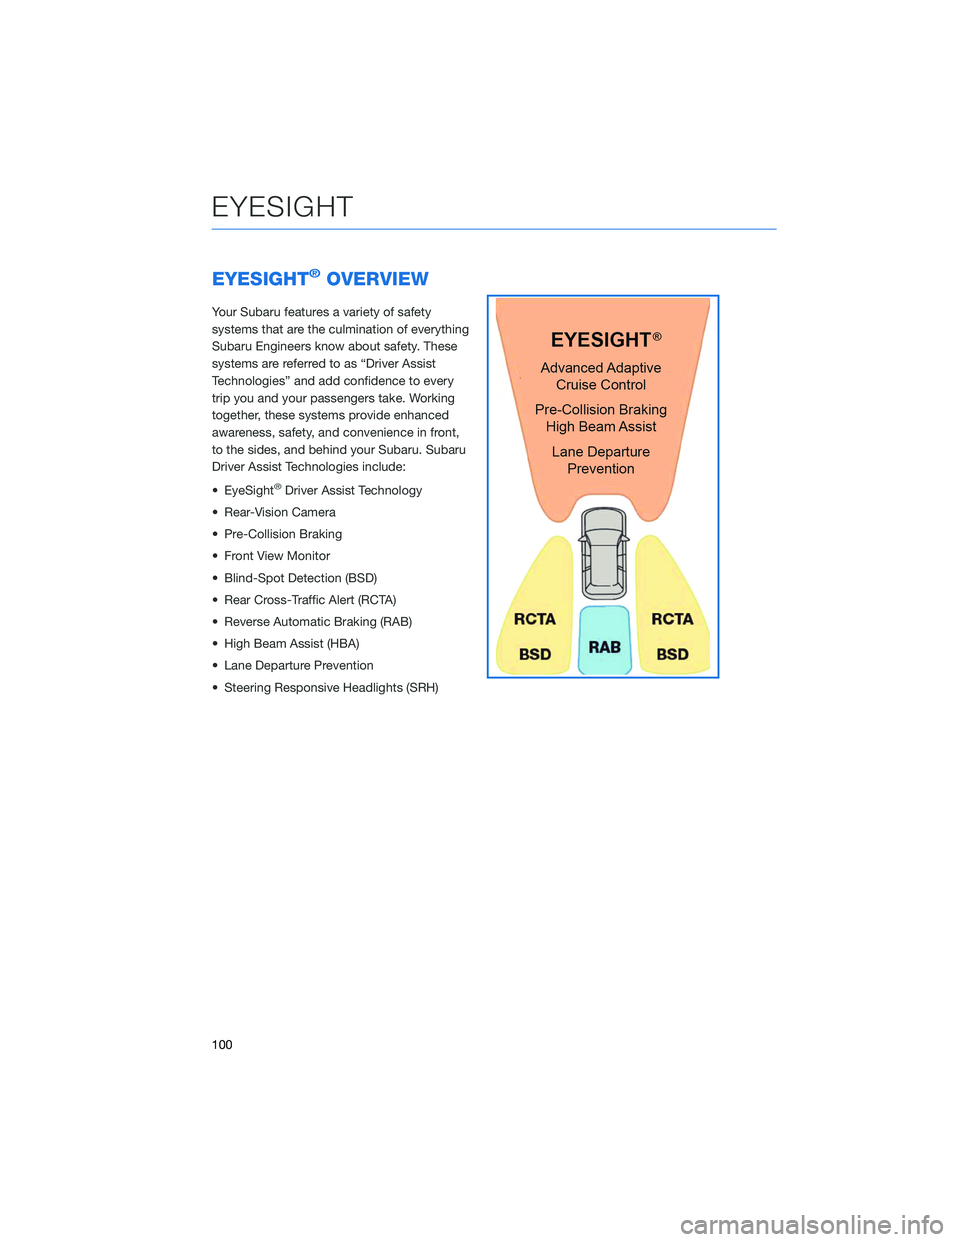
Your Subaru features a variety of safety
systems that are the culmination of everything
Subaru Engineers know about safety. These
systems are referred to as “Driver Assist
Technologies” and add confidence to every
trip you and your passengers take. Working
together, these systems provide enhanced
awareness, safety, and convenience in front,
to the sides, and behind your Subaru. Subaru
Driver Assist Technologies include:
• EyeSight
®Driver Assist Technology
• Rear-Vision Camera
• Pre-Collision Braking
• Front View Monitor
• Blind-Spot Detection (BSD)
• Rear Cross-Traffic Alert (RCTA)
• Reverse Automatic Braking (RAB)
• High Beam Assist (HBA)
• Lane Departure Prevention
• Steering Responsive Headlights (SRH)
EYESIGHT
100
Page 104 of 172
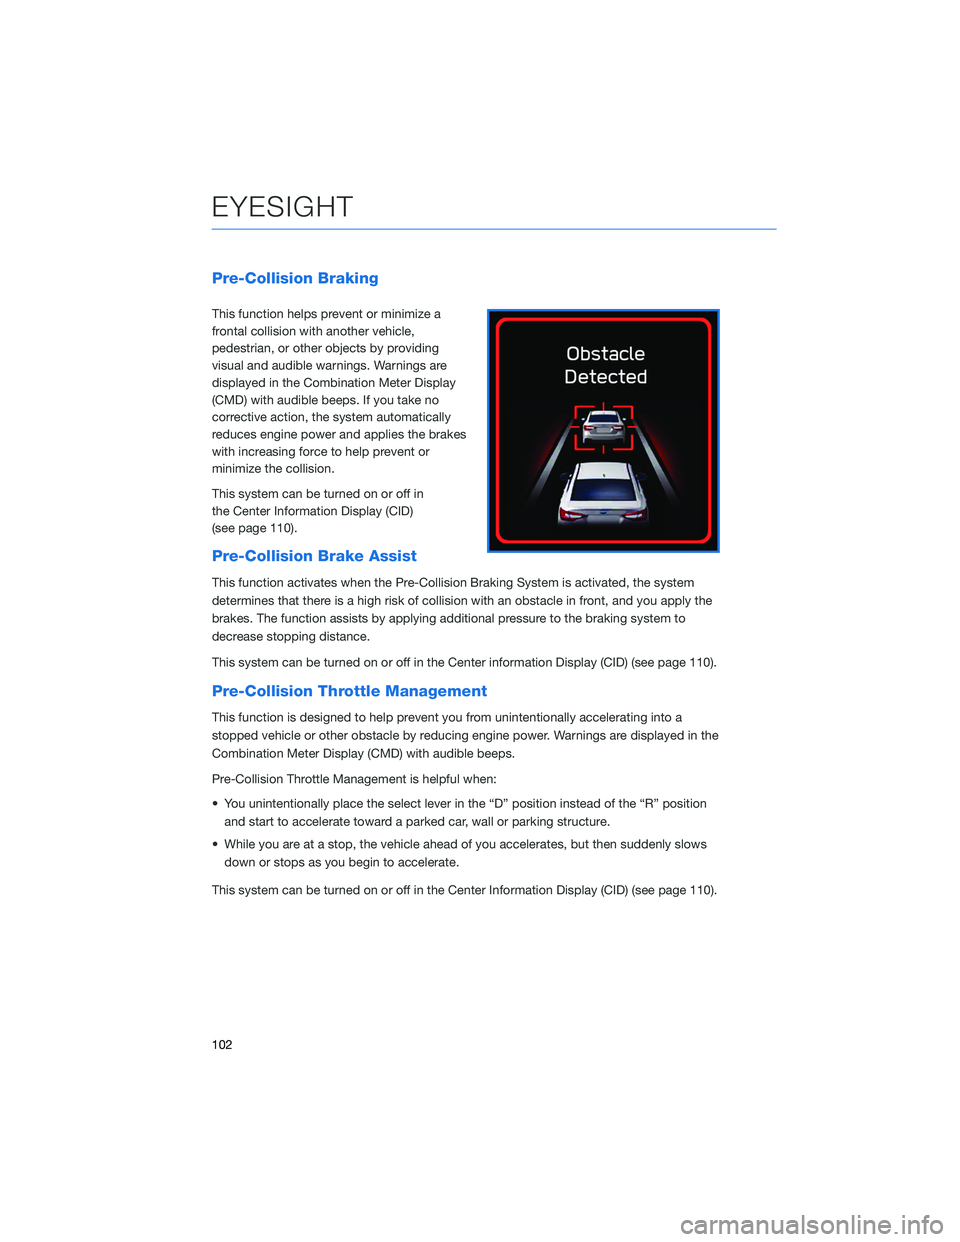
Pre-Collision Braking
This function helps prevent or minimize a
frontal collision with another vehicle,
pedestrian, or other objects by providing
visual and audible warnings. Warnings are
displayed in the Combination Meter Display
(CMD) with audible beeps. If you take no
corrective action, the system automatically
reduces engine power and applies the brakes
with increasing force to help prevent or
minimize the collision.
This system can be turned on or off in
the Center Information Display (CID)
(see page 110).
Pre-Collision Brake Assist
This function activates when the Pre-Collision Braking System is activated, the system
determines that there is a high risk of collision with an obstacle in front, and you apply the
brakes. The function assists by applying additional pressure to the braking system to
decrease stopping distance.
This system can be turned on or off in the Center information Display (CID) (see page 110).
Pre-Collision Throttle Management
This function is designed to help prevent you from unintentionally accelerating into a
stopped vehicle or other obstacle by reducing engine power. Warnings are displayed in the
Combination Meter Display (CMD) with audible beeps.
Pre-Collision Throttle Management is helpful when:
• You unintentionally place the select lever in the “D” position instead of the “R” position
and start to accelerate toward a parked car, wall or parking structure.
• While you are at a stop, the vehicle ahead of you accelerates, but then suddenly slows
down or stops as you begin to accelerate.
This system can be turned on or off in the Center Information Display (CID) (see page 110).
EYESIGHT
102
Page 106 of 172
Lane Departure Prevention
This function provides steering assistance to
keep your Subaru in its lane of travel when
cruising on expressways, freeways, and
interstate highways. Using the EyeSight
®
camera, the Lane Departure Prevention
Function identifies lane markings when
traveling at speeds of approximately 37 mph
or greater.
Operate the Center Information Display (CID)
to turn on the Lane Departure Prevention
Function by selecting “All Functions” or “Lane
Departure Prevention Function Only” on the
“Lane Departure Prevention Function” screen
of the EyeSight
®settings.
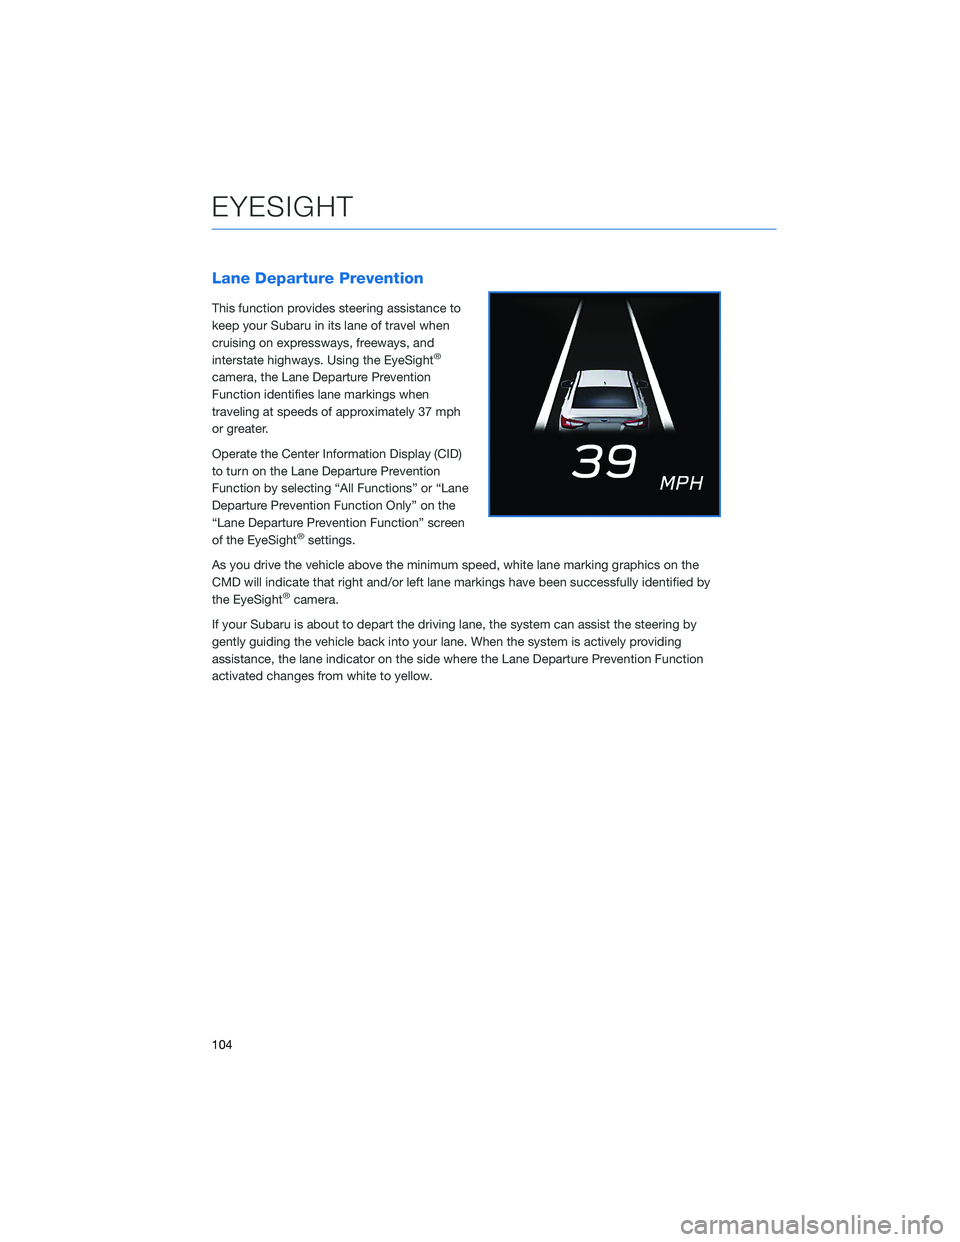
As you drive the vehicle above the minimum speed, white lane marking graphics on the
CMD will indicate that right and/or left lane markings have been successfully identified by
the EyeSight
®camera.
If your Subaru is about to depart the driving lane, the system can assist the steering by
gently guiding the vehicle back into your lane. When the system is actively providing
assistance, the lane indicator on the side where the Lane Departure Prevention Function
activated changes from white to yellow.
EYESIGHT
104
Page 107 of 172
Advanced Adaptive Cruise Control with Lane Centering
Advanced Adaptive Cruise Control is a driving support system intended to reduce the
burden on you when driving on an expressway (including during congestion and when
driving at high speed). Advanced Adaptive Cruise Control and Lane Centering work
together to assist you by automatically controlling the accelerator, brake, and steering.
Advanced Adaptive Cruise Control
This system provides cruise control with the
ability to keep a safe distance from the car in
front of you. Using the EyeSight
®camera, the
Advanced Adaptive Cruise Control function
identifies vehicles in front of you in the same
lane, and your vehicle follows the vehicle in
front (up to the maximum of your set speed).
While following, your vehicle will automatically
maintain a following distance that
corresponds to the speed of the vehicle in
front. The vehicle is capable of being
controlled at a speed between 0 mph and
approximately 90 mph.
You can turn the Advanced Adaptive Cruise
Control on or off using the Adaptive Cruise
Control On/Off button on the right side of the steering wheel (see page 107). Once the
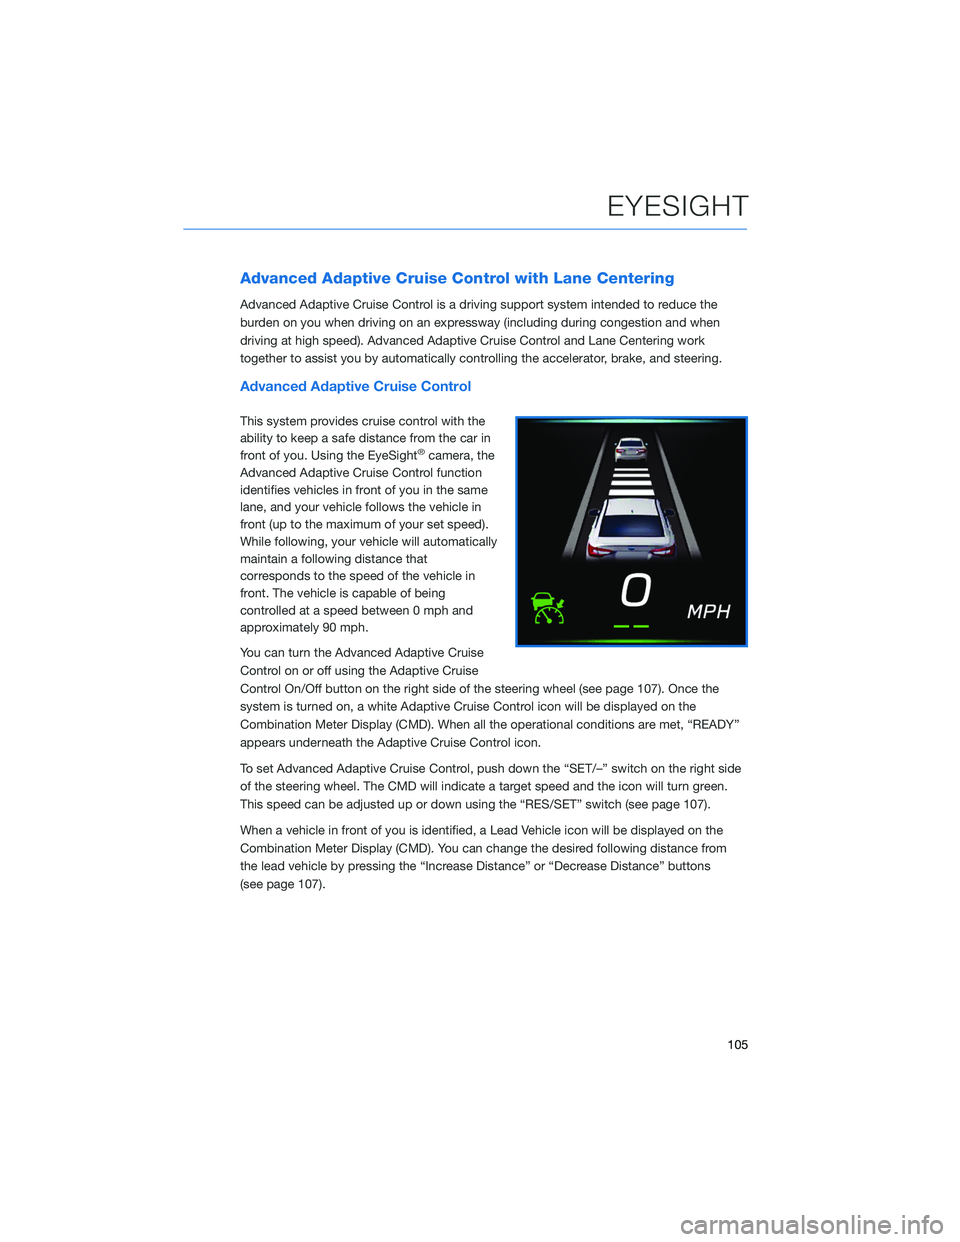
system is turned on, a white Adaptive Cruise Control icon will be displayed on the
Combination Meter Display (CMD). When all the operational conditions are met, “READY”
appears underneath the Adaptive Cruise Control icon.
To set Advanced Adaptive Cruise Control, push down the “SET/–” switch on the right side
of the steering wheel. The CMD will indicate a target speed and the icon will turn green.
This speed can be adjusted up or down using the “RES/SET” switch (see page 107).
When a vehicle in front of you is identified, a Lead Vehicle icon will be displayed on the
Combination Meter Display (CMD). You can change the desired following distance from
the lead vehicle by pressing the “Increase Distance” or “Decrease Distance” buttons
(see page 107).
EYESIGHT
105
Page 108 of 172
Lane Centering
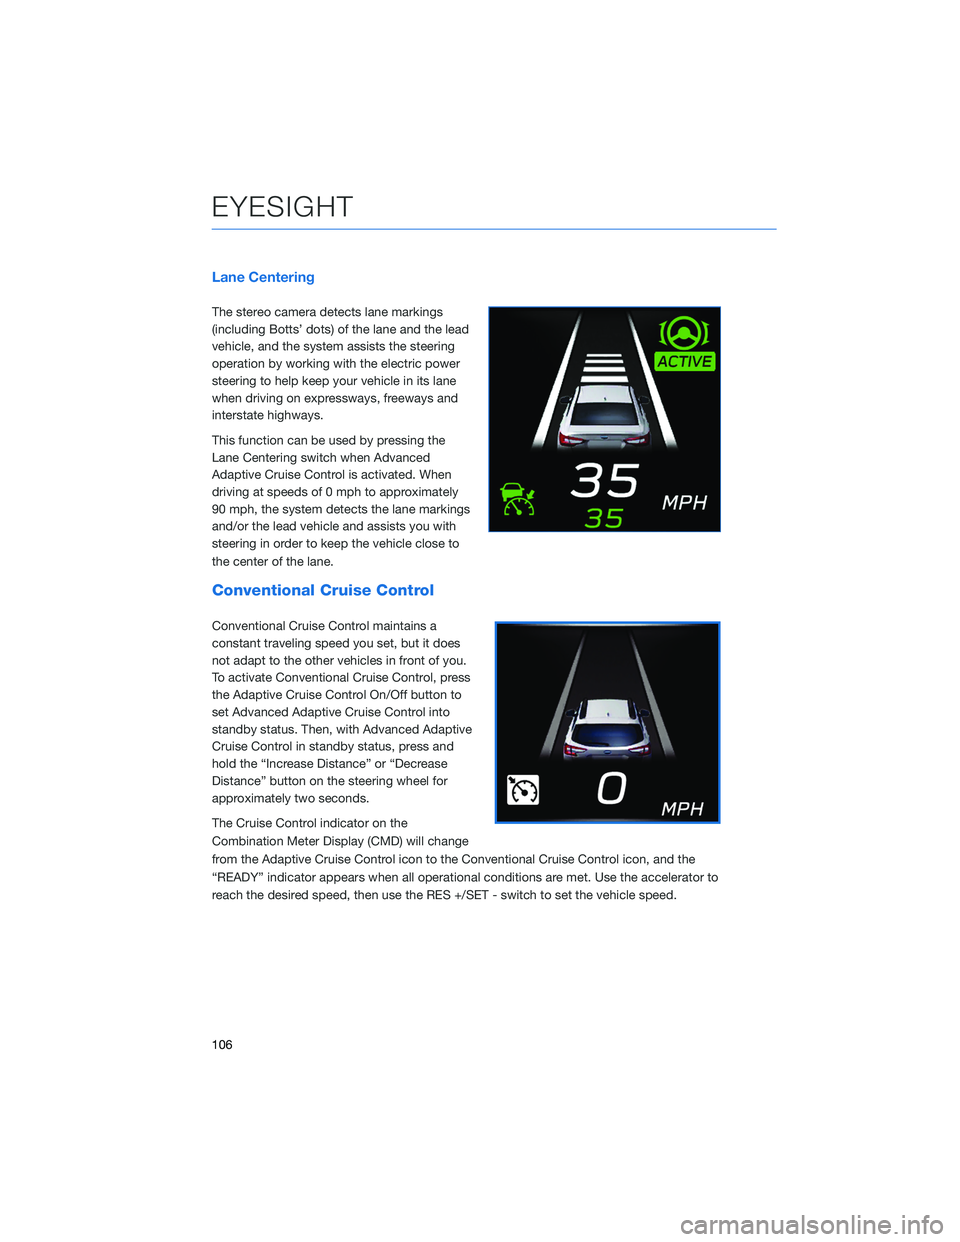
The stereo camera detects lane markings
(including Botts’ dots) of the lane and the lead
vehicle, and the system assists the steering
operation by working with the electric power
steering to help keep your vehicle in its lane
when driving on expressways, freeways and
interstate highways.
This function can be used by pressing the
Lane Centering switch when Advanced
Adaptive Cruise Control is activated. When
driving at speeds of 0 mph to approximately
90 mph, the system detects the lane markings
and/or the lead vehicle and assists you with
steering in order to keep the vehicle close to
the center of the lane.
Conventional Cruise Control
Conventional Cruise Control maintains a
constant traveling speed you set, but it does
not adapt to the other vehicles in front of you.
To activate Conventional Cruise Control, press
the Adaptive Cruise Control On/Off button to
set Advanced Adaptive Cruise Control into
standby status. Then, with Advanced Adaptive
Cruise Control in standby status, press and
hold the “Increase Distance” or “Decrease
Distance” button on the steering wheel for
approximately two seconds.
The Cruise Control indicator on the
Combination Meter Display (CMD) will change
from the Adaptive Cruise Control icon to the Conventional Cruise Control icon, and the
“READY” indicator appears when all operational conditions are met. Use the accelerator to
reach the desired speed, then use the RES +/SET - switch to set the vehicle speed.
EYESIGHT
106
Page 115 of 172
BLIND SPOT DETECTION (BSD) / REAR CROSS
TRAFFIC ALERT (RCTA)(if equipped)
This system uses radar sensors mounted behind the rear bumper on the left and right
sides that warn you if another vehicle is sensed in your blind spots. These functions
provide additional awareness when changing lanes or driving in reverse.
Blind Spot Detection (BSD)
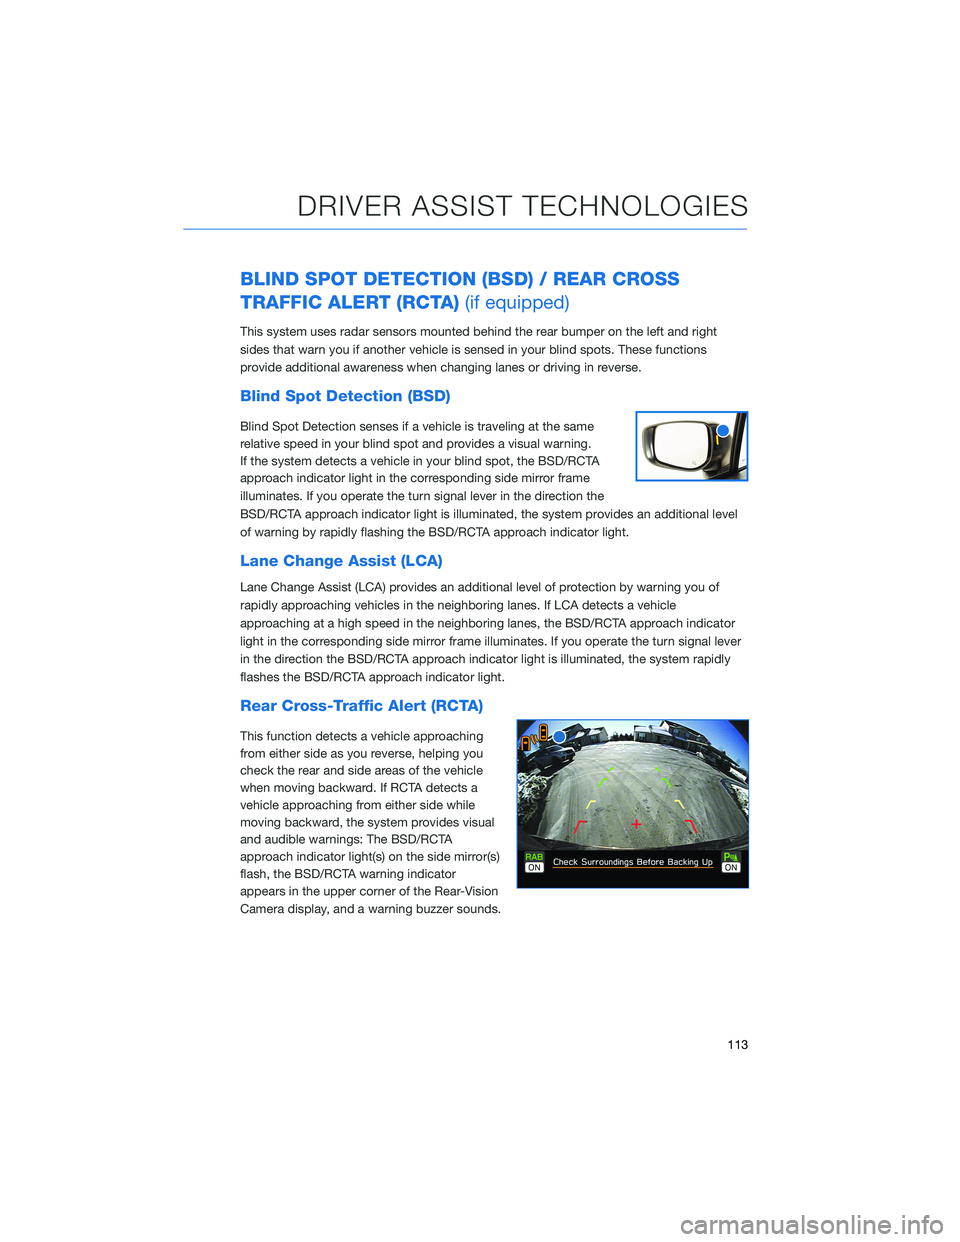
Blind Spot Detection senses if a vehicle is traveling at the same
relative speed in your blind spot and provides a visual warning.
If the system detects a vehicle in your blind spot, the BSD/RCTA
approach indicator light in the corresponding side mirror frame
illuminates. If you operate the turn signal lever in the direction the
BSD/RCTA approach indicator light is illuminated, the system provides an additional level
of warning by rapidly flashing the BSD/RCTA approach indicator light.
Lane Change Assist (LCA)
Lane Change Assist (LCA) provides an additional level of protection by warning you of
rapidly approaching vehicles in the neighboring lanes. If LCA detects a vehicle
approaching at a high speed in the neighboring lanes, the BSD/RCTA approach indicator
light in the corresponding side mirror frame illuminates. If you operate the turn signal lever
in the direction the BSD/RCTA approach indicator light is illuminated, the system rapidly
flashes the BSD/RCTA approach indicator light.
Rear Cross-Traffic Alert (RCTA)
This function detects a vehicle approaching
from either side as you reverse, helping you
check the rear and side areas of the vehicle
when moving backward. If RCTA detects a
vehicle approaching from either side while
moving backward, the system provides visual
and audible warnings: The BSD/RCTA
approach indicator light(s) on the side mirror(s)
flash, the BSD/RCTA warning indicator
appears in the upper corner of the Rear-Vision
Camera display, and a warning buzzer sounds.
DRIVER ASSIST TECHNOLOGIES
113
Page 116 of 172
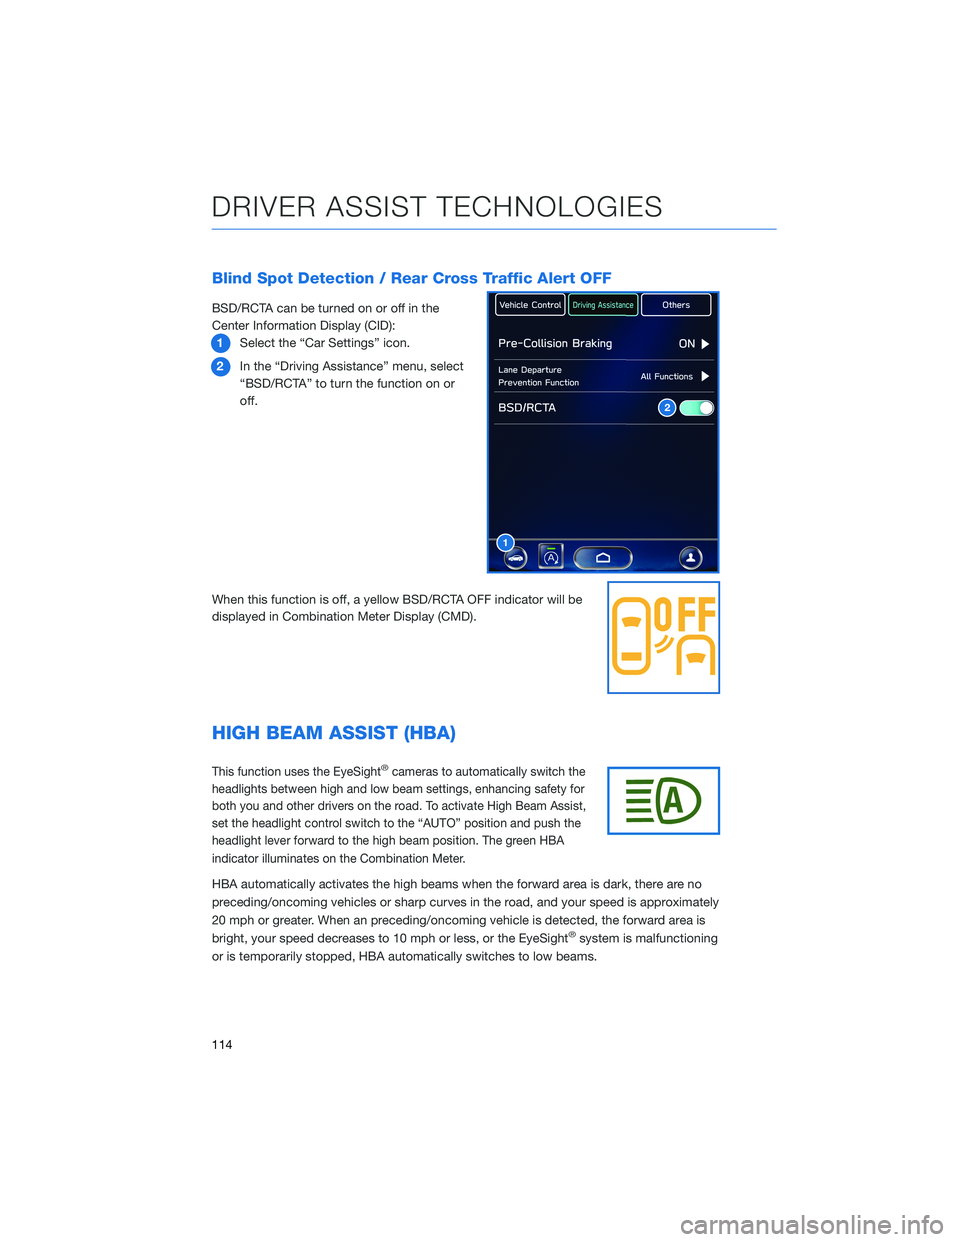
Blind Spot Detection / Rear Cross Traffic Alert OFF
BSD/RCTA can be turned on or off in the
Center Information Display (CID):
1Select the “Car Settings” icon.
2In the “Driving Assistance” menu, select
“BSD/RCTA” to turn the function on or
off.
When this function is off, a yellow BSD/RCTA OFF indicator will be
displayed in Combination Meter Display (CMD).
HIGH BEAM ASSIST (HBA)
This function uses the EyeSight®cameras to automatically switch the
headlights between high and low beam settings, enhancing safety for
both you and other drivers on the road. To activate High Beam Assist,
set the headlight control switch to the “AUTO” position and push the
headlight lever forward to the high beam position. The green HBA
indicator illuminates on the Combination Meter.
HBA automatically activates the high beams when the forward area is dark, there are no
preceding/oncoming vehicles or sharp curves in the road, and your speed is approximately
20 mph or greater. When an preceding/oncoming vehicle is detected, the forward area is
bright, your speed decreases to 10 mph or less, or the EyeSight
®system is malfunctioning
or is temporarily stopped, HBA automatically switches to low beams.
1
2
DRIVER ASSIST TECHNOLOGIES
114