phone SUBARU OUTBACK 2022 Getting Started Guide
[x] Cancel search | Manufacturer: SUBARU, Model Year: 2022, Model line: OUTBACK, Model: SUBARU OUTBACK 2022Pages: 172, PDF Size: 58.6 MB
Page 98 of 172
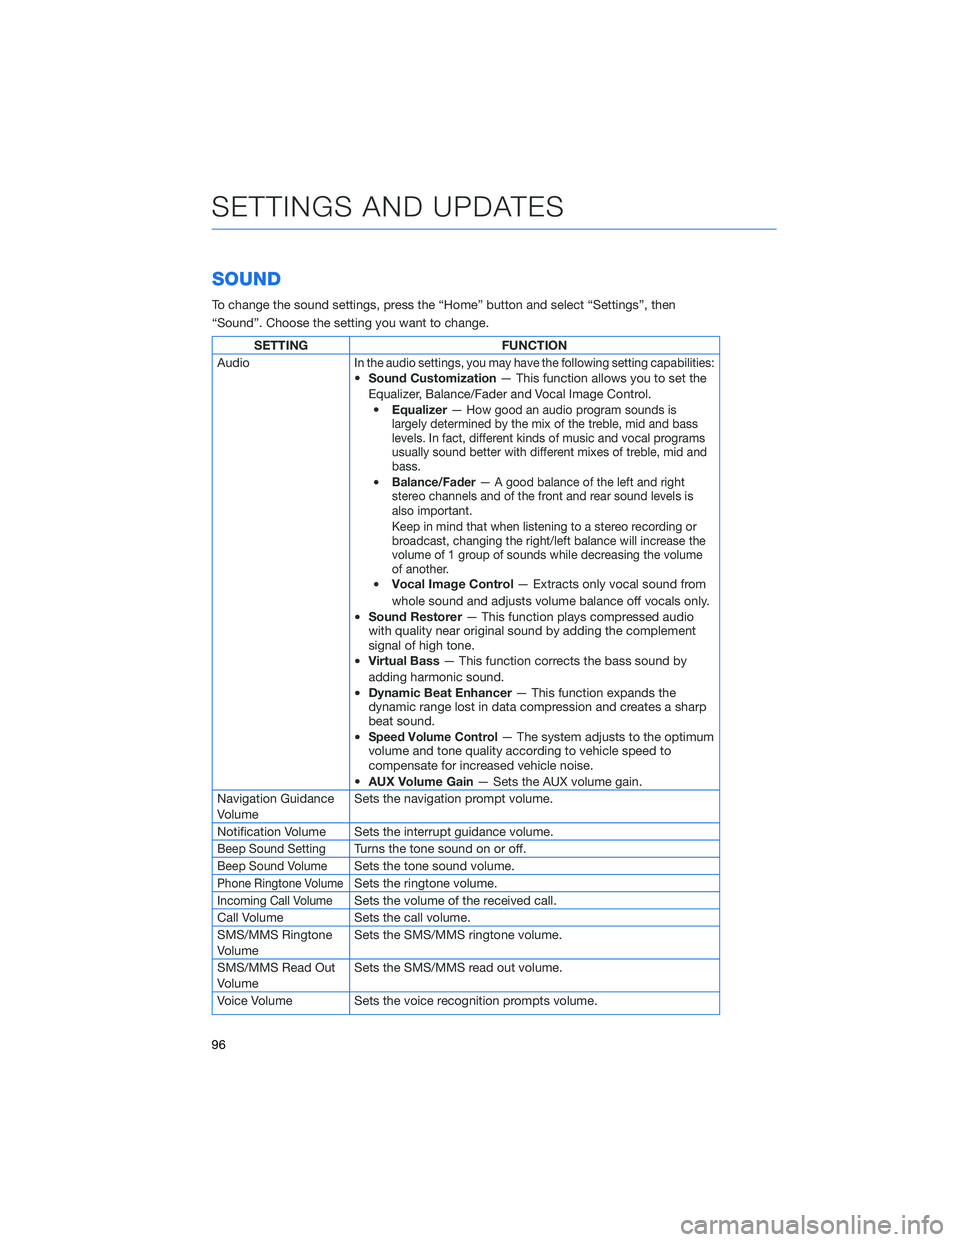
SOUND
To change the sound settings, press the “Home” button and select “Settings”, then
“Sound”. Choose the setting you want to change.
SETTING FUNCTION
Audio
In the audio settings, you may have the following setting capabilities:•Sound Customization— This function allows you to set the
Equalizer, Balance/Fader and Vocal Image Control.
•Equalizer—
How good an audio program sounds is
largely determined by the mix of the treble, mid and bass
levels. In fact, different kinds of music and vocal programs
usually sound better with different mixes of treble, mid and
bass.
•Balance/Fader— A good balance of the left and right
stereo channels and of the front and rear sound levels is
also important.
Keep in mind that when listening to a stereo recording or
broadcast, changing the right/left balance will increase the
volume of 1 group of sounds while decreasing the volume
of another.
•Vocal Image Control— Extracts only vocal sound from
whole sound and adjusts volume balance off vocals only.
•Sound Restorer— This function plays compressed audio
with quality near original sound by adding the complement
signal of high tone.
•Virtual Bass— This function corrects the bass sound by
adding harmonic sound.
•Dynamic Beat Enhancer— This function expands the
dynamic range lost in data compression and creates a sharp
beat sound.
•
Speed Volume Control— The system adjusts to the optimum
volume and tone quality according to vehicle speed to
compensate for increased vehicle noise.
•AUX Volume Gain— Sets the AUX volume gain.
Navigation Guidance
VolumeSets the navigation prompt volume.
Notification Volume Sets the interrupt guidance volume.
Beep Sound SettingTurns the tone sound on or off.
Beep Sound VolumeSets the tone sound volume.
Phone Ringtone VolumeSets the ringtone volume.
Incoming Call VolumeSets the volume of the received call.
Call Volume Sets the call volume.
SMS/MMS Ringtone
VolumeSets the SMS/MMS ringtone volume.
SMS/MMS Read Out
VolumeSets the SMS/MMS read out volume.
Voice Volume Sets the voice recognition prompts volume.
SETTINGS AND UPDATES
96
Page 99 of 172
PHONE
This system supports Bluetooth®, a wireless data system, allowing you to make and
receive calls without taking your hands off the steering wheel.
In the settings menu, you will be able to manage devices, adjust phone book and message
settings, and adjust other phone/Bluetooth
®settings.
To access the phone settings screen, press the “Home” button, select “Settings”, then
select the “Phone” menu.
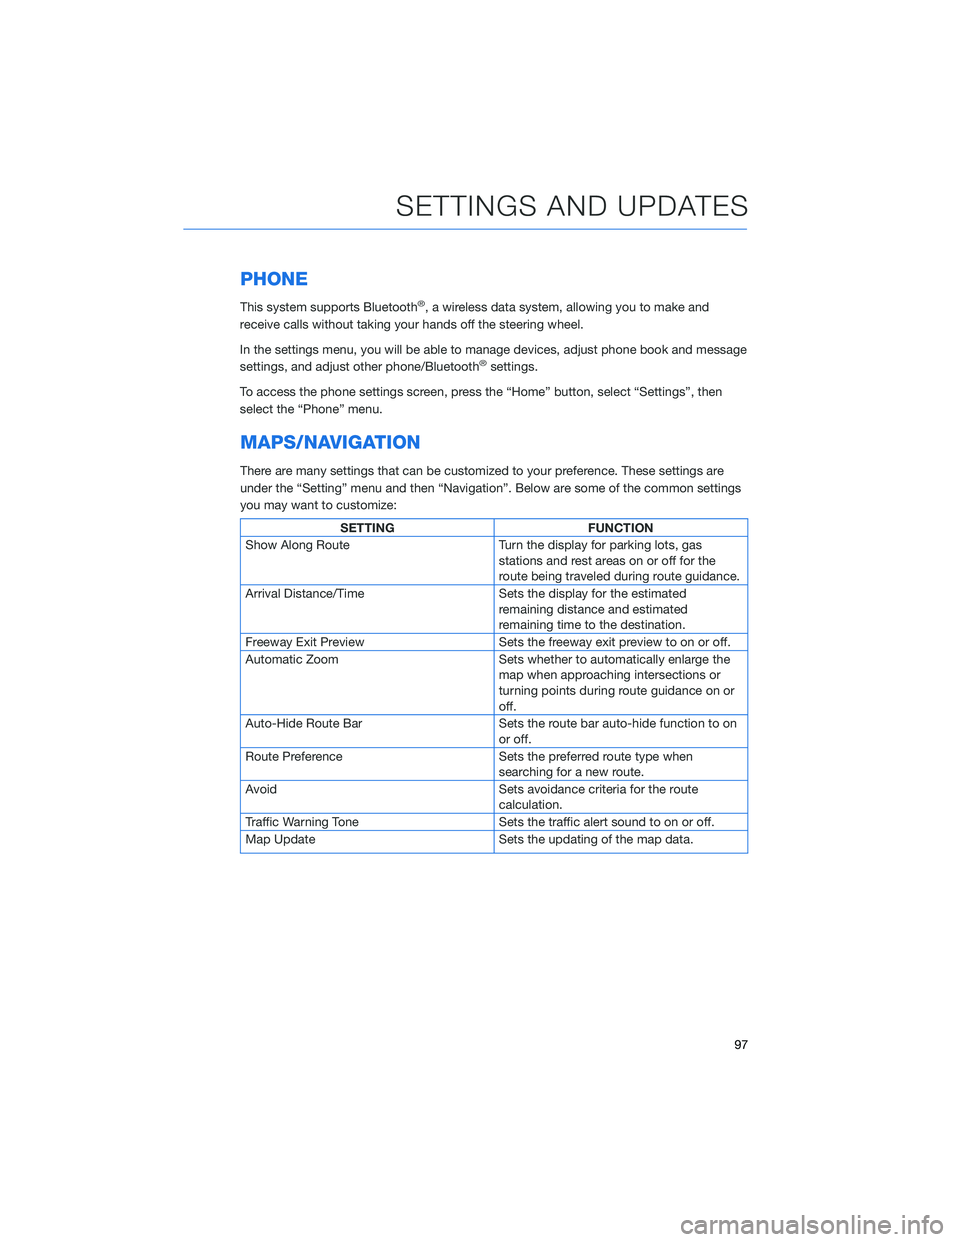
MAPS/NAVIGATION
There are many settings that can be customized to your preference. These settings are
under the “Setting” menu and then “Navigation”. Below are some of the common settings
you may want to customize:
SETTING FUNCTION
Show Along Route Turn the display for parking lots, gas
stations and rest areas on or off for the
route being traveled during route guidance.
Arrival Distance/Time Sets the display for the estimated
remaining distance and estimated
remaining time to the destination.
Freeway Exit Preview Sets the freeway exit preview to on or off.
Automatic Zoom Sets whether to automatically enlarge the
map when approaching intersections or
turning points during route guidance on or
off.
Auto-Hide Route Bar Sets the route bar auto-hide function to on
or off.
Route Preference Sets the preferred route type when
searching for a new route.
Avoid Sets avoidance criteria for the route
calculation.
Traffic Warning Tone Sets the traffic alert sound to on or off.
Map Update Sets the updating of the map data.
SETTINGS AND UPDATES
97
Page 129 of 172
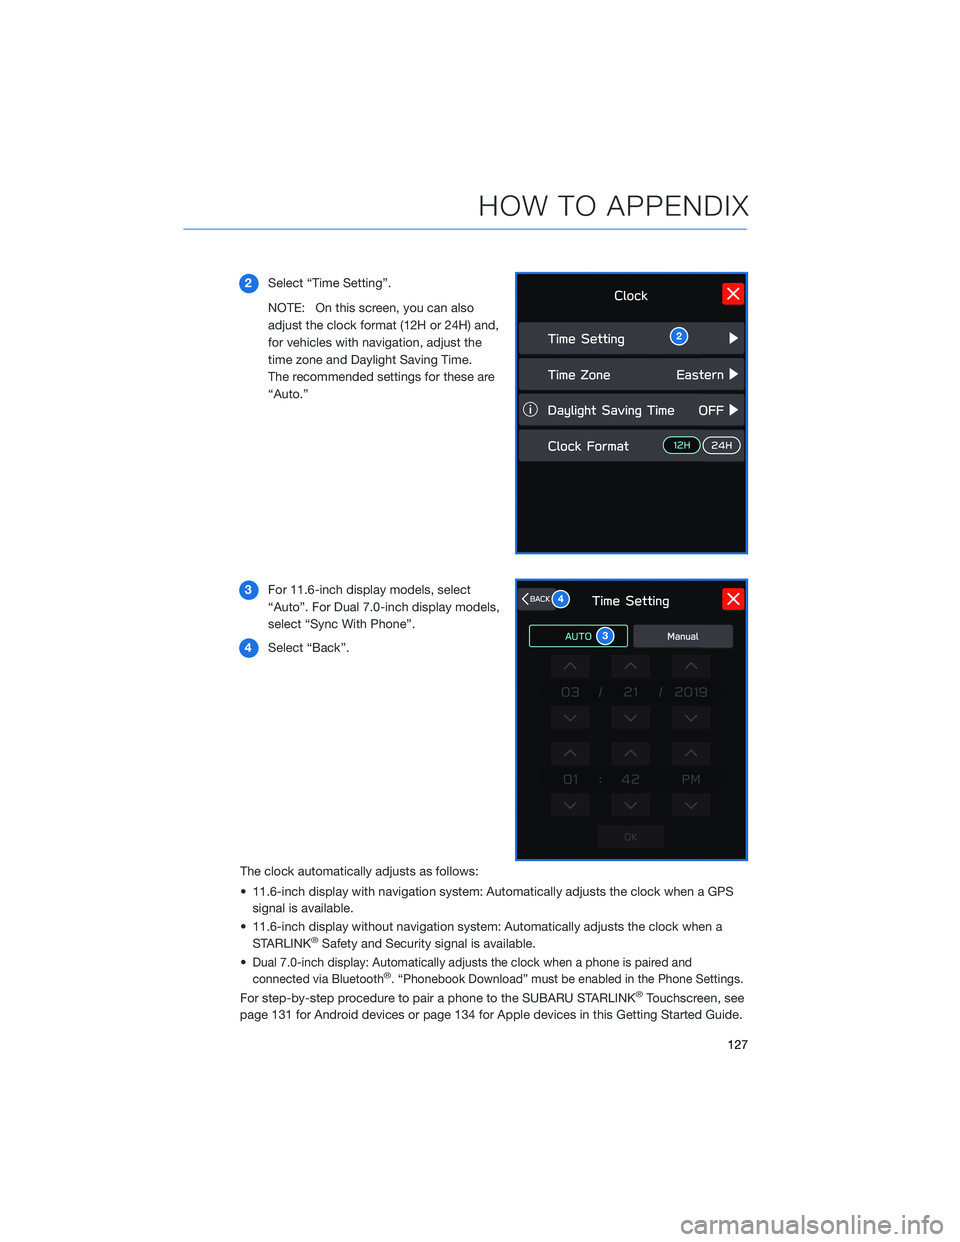
2Select “Time Setting”.
NOTE: On this screen, you can also
adjust the clock format (12H or 24H) and,
for vehicles with navigation, adjust the
time zone and Daylight Saving Time.
The recommended settings for these are
“Auto.”
3For 11.6-inch display models, select
“Auto”. For Dual 7.0-inch display models,
select “Sync With Phone”.
4Select “Back”.
The clock automatically adjusts as follows:
• 11.6-inch display with navigation system: Automatically adjusts the clock when a GPS
signal is available.
• 11.6-inch display without navigation system: Automatically adjusts the clock when a
STARLINK
®Safety and Security signal is available.
•
Dual 7.0-inch display: Automatically adjusts the clock when a phone is paired and
connected via Bluetooth®. “Phonebook Download” must be enabled in the Phone Settings.
For step-by-step procedure to pair a phone to the SUBARU STARLINK®Touchscreen, see
page 131 for Android devices or page 134 for Apple devices in this Getting Started Guide.
2
3
4
HOW TO APPENDIX
127
Page 133 of 172
BLUETOOTH®PAIRING
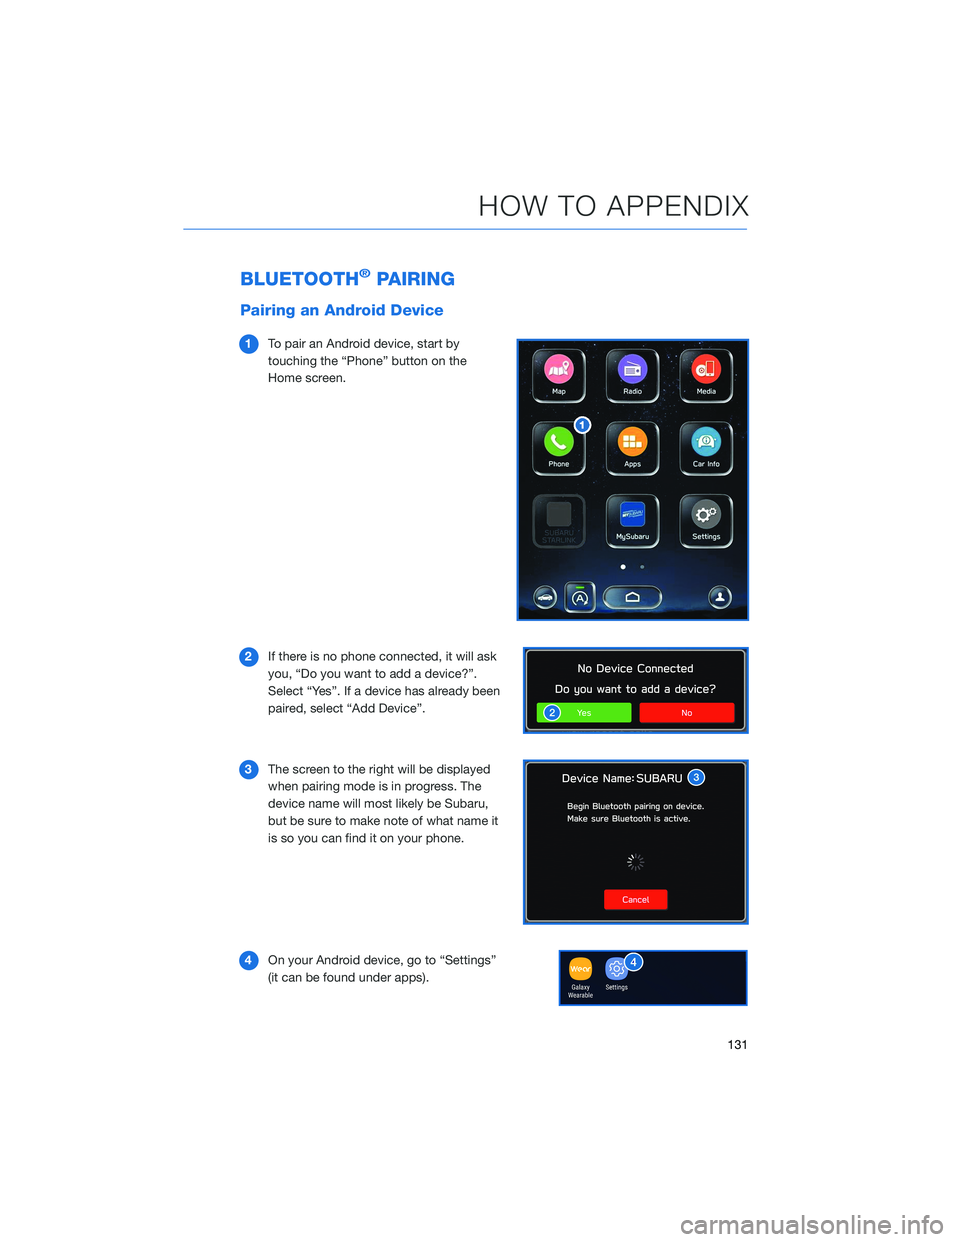
Pairing an Android Device
1To pair an Android device, start by
touching the “Phone” button on the
Home screen.
2If there is no phone connected, it will ask
you, “Do you want to add a device?”.
Select “Yes”. If a device has already been
paired, select “Add Device”.
3The screen to the right will be displayed
when pairing mode is in progress. The
device name will most likely be Subaru,
but be sure to make note of what name it
is so you can find it on your phone.
4On your Android device, go to “Settings”
(it can be found under apps).
HOW TO APPENDIX
131
Page 135 of 172
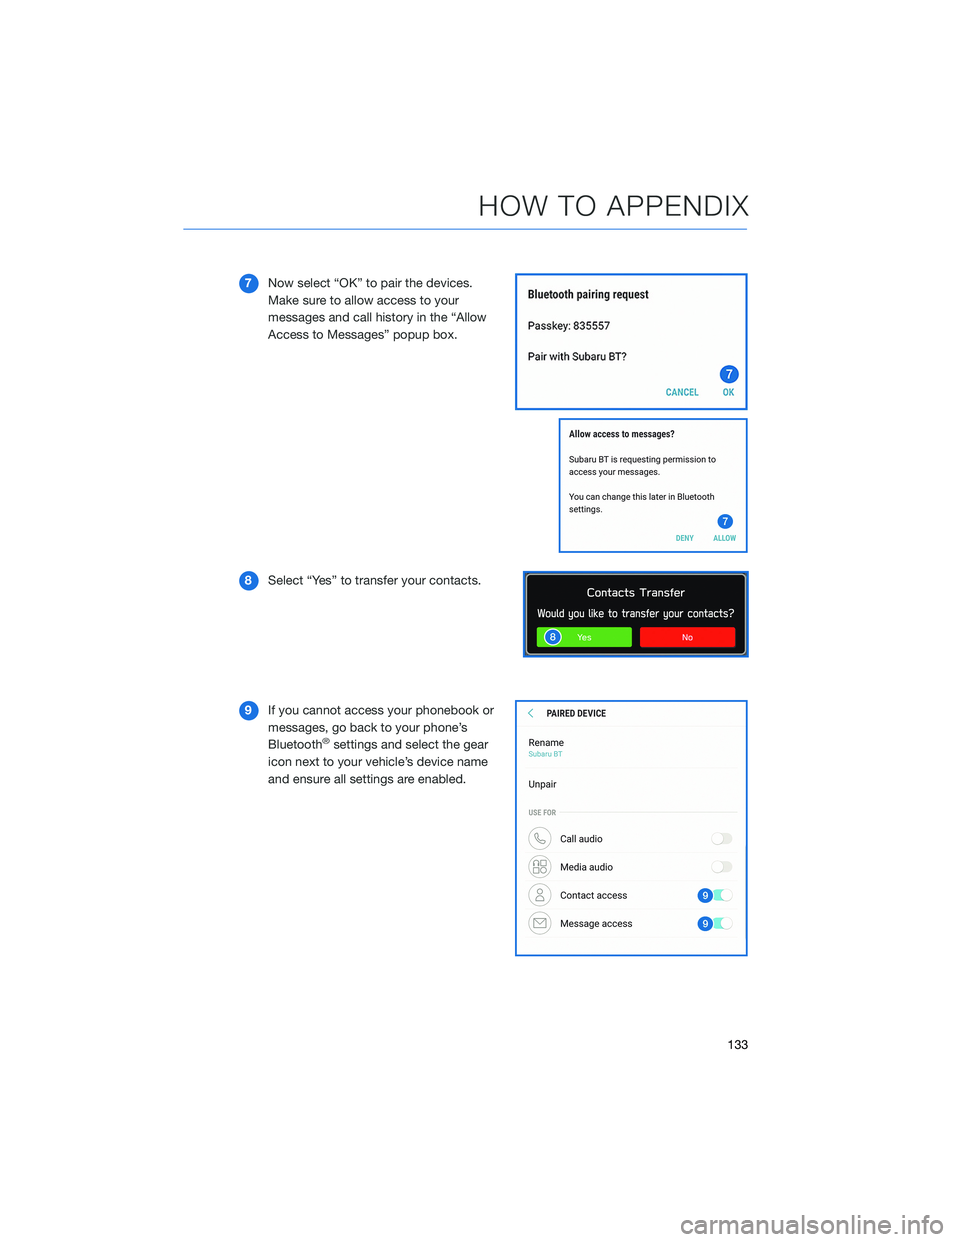
7Now select “OK” to pair the devices.
Make sure to allow access to your
messages and call history in the “Allow
Access to Messages” popup box.
8Select “Yes” to transfer your contacts.
9If you cannot access your phonebook or
messages, go back to your phone’s
Bluetooth
®settings and select the gear
icon next to your vehicle’s device name
and ensure all settings are enabled.
HOW TO APPENDIX
133
Page 136 of 172
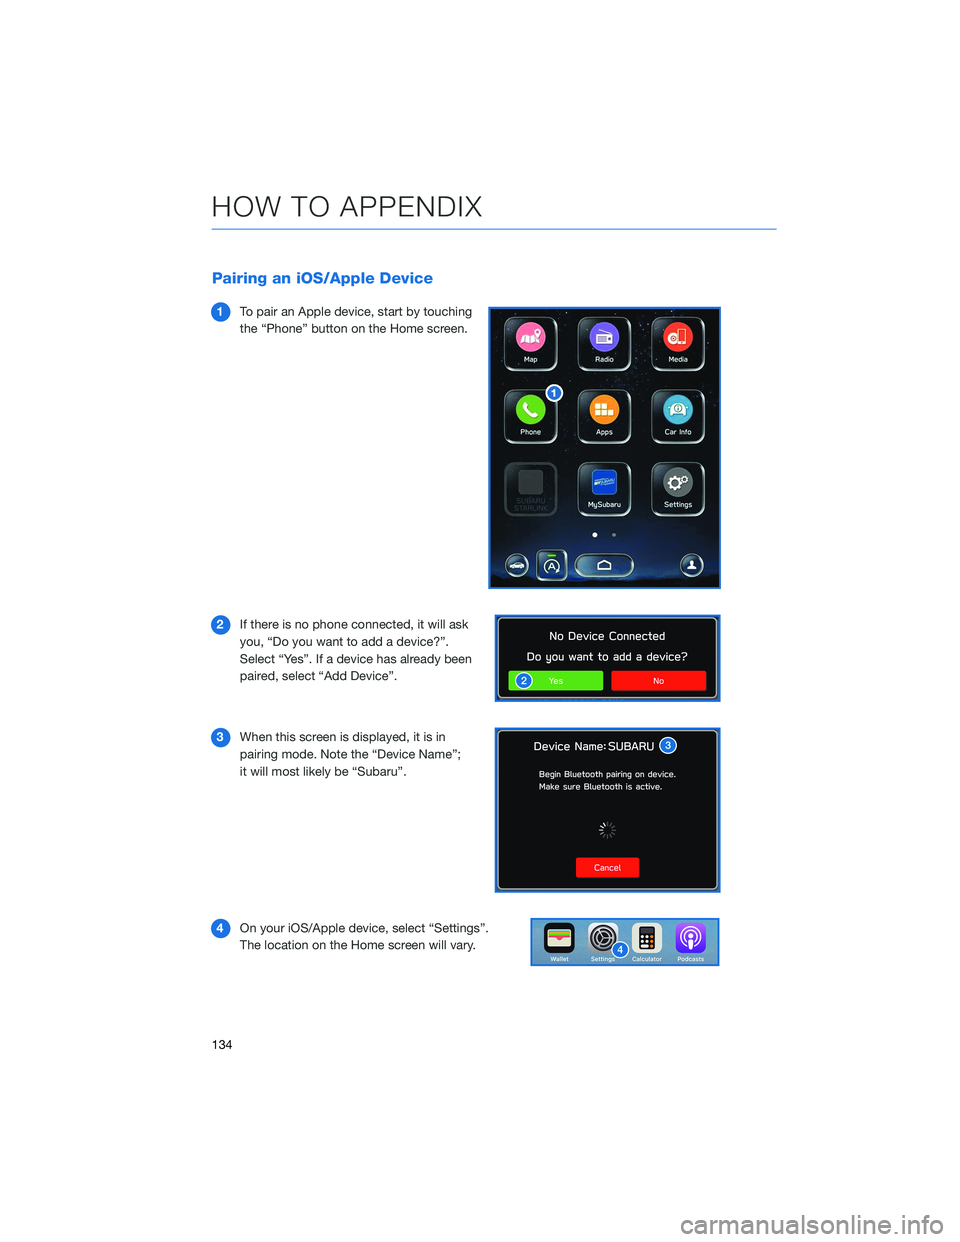
Pairing an iOS/Apple Device
1To pair an Apple device, start by touching
the “Phone” button on the Home screen.
2If there is no phone connected, it will ask
you, “Do you want to add a device?”.
Select “Yes”. If a device has already been
paired, select “Add Device”.
3When this screen is displayed, it is in
pairing mode. Note the “Device Name”;
it will most likely be “Subaru”.
4On your iOS/Apple device, select “Settings”.
The location on the Home screen will vary.
HOW TO APPENDIX
134
Page 139 of 172
ANDROID AUTO™
Cables
Always use a high-quality OEM USB cable.
Ensure the Android phone is fully up to date. Also verify that the
Android Auto™ app, along with all other apps that work with
Android Auto™, are up to date. Android Auto™ might not function
properly if one of them is outdated or having an issue. The apps can
be downloaded from the Play Store.
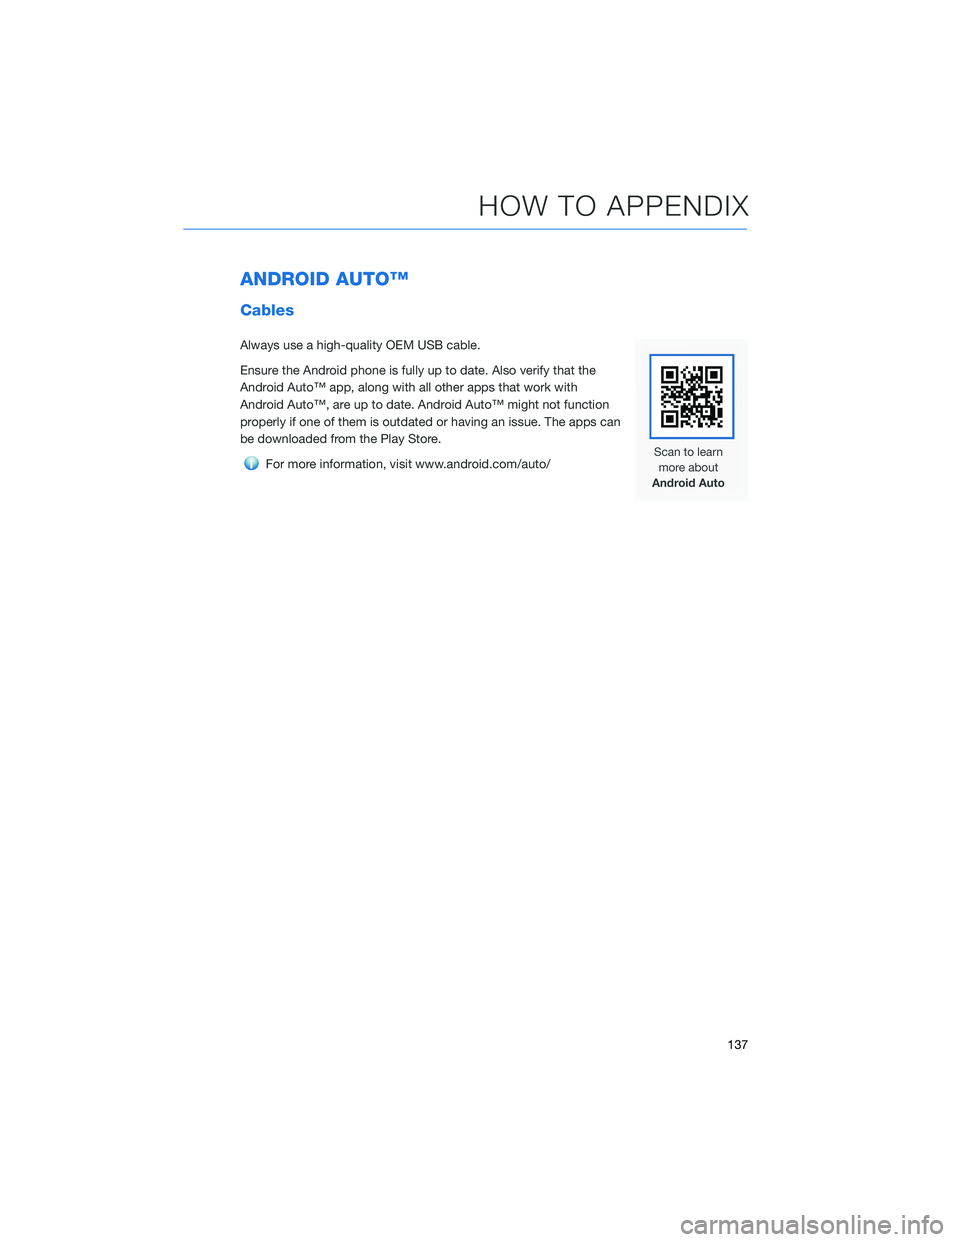
For more information, visit www.android.com/auto/
HOW TO APPENDIX
137
Page 140 of 172
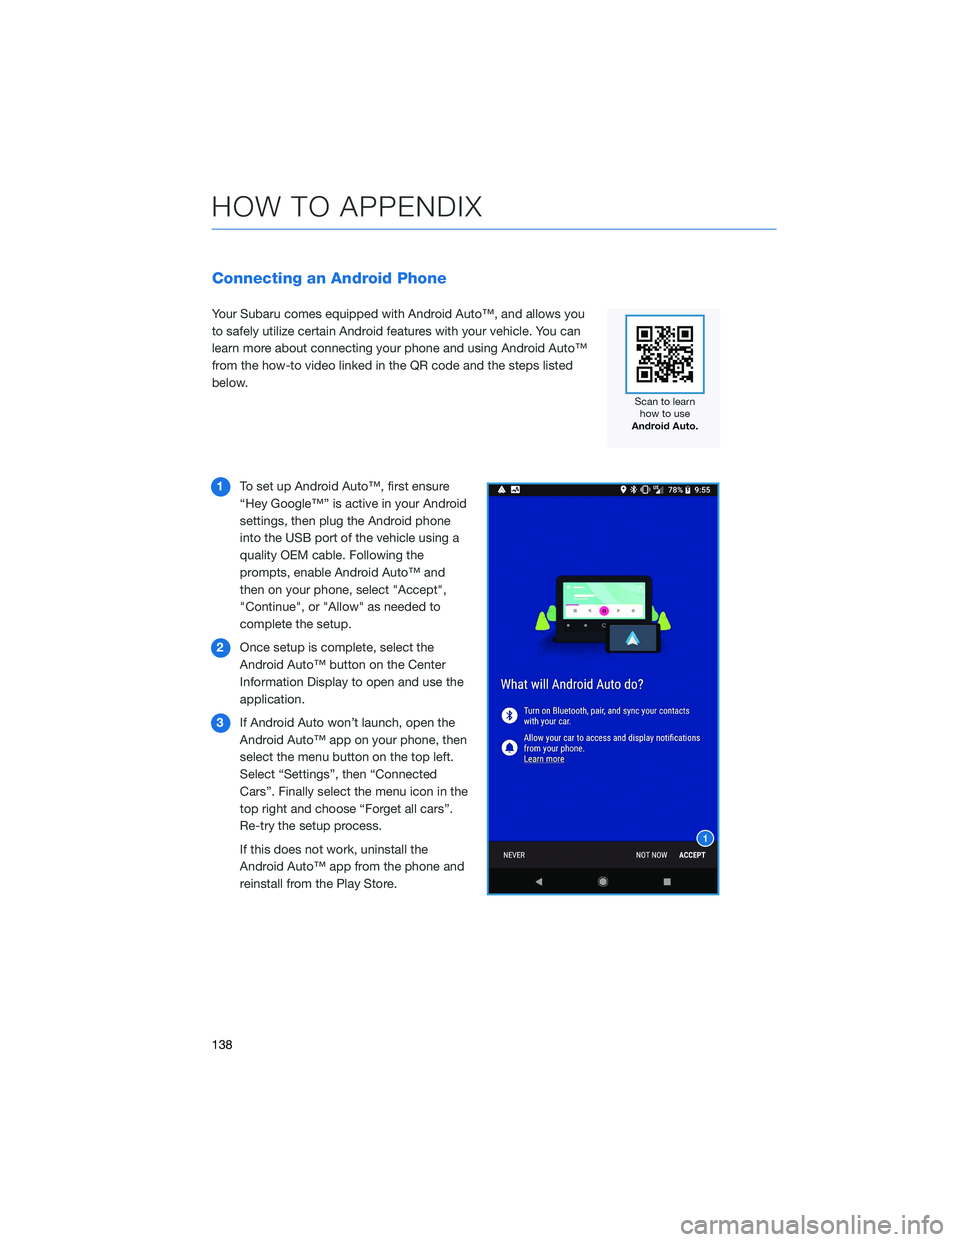
Connecting an Android Phone
Your Subaru comes equipped with Android Auto™, and allows you
to safely utilize certain Android features with your vehicle. You can
learn more about connecting your phone and using Android Auto™
from the how-to video linked in the QR code and the steps listed
below.
1To set up Android Auto™, first ensure
“Hey Google™” is active in your Android
settings, then plug the Android phone
into the USB port of the vehicle using a
quality OEM cable. Following the
prompts, enable Android Auto™ and
then on your phone, select "Accept",
"Continue", or "Allow" as needed to
complete the setup.
2Once setup is complete, select the
Android Auto™ button on the Center
Information Display to open and use the
application.
3If Android Auto won’t launch, open the
Android Auto™ app on your phone, then
select the menu button on the top left.
Select “Settings”, then “Connected
Cars”. Finally select the menu icon in the
top right and choose “Forget all cars”.
Re-try the setup process.
If this does not work, uninstall the
Android Auto™ app from the phone and
reinstall from the Play Store.
HOW TO APPENDIX
138
Page 141 of 172
Compatible Models
Android Auto™ is available on Android phones. To see if your phone
is compatible, please refer to the Android Auto™ website:
https://www.android.com/phones/
APPLE CARPLAY®
Cables
Apple CarPlay®requires compatible iPhones to be connected via
your Subaru’s USB port. Cables must be an 8-Pin Lightning MFi
Certified cable (made for iPod/iPhone). Look for the “Works with
Apple CarPlay
®” or “Made for iPod, iPhone, iPad” icons when
selecting a cable.
For more information, visit: www.apple.com/ios/carplay/
HOW TO APPENDIX
139
Page 142 of 172
Connecting an iPhone
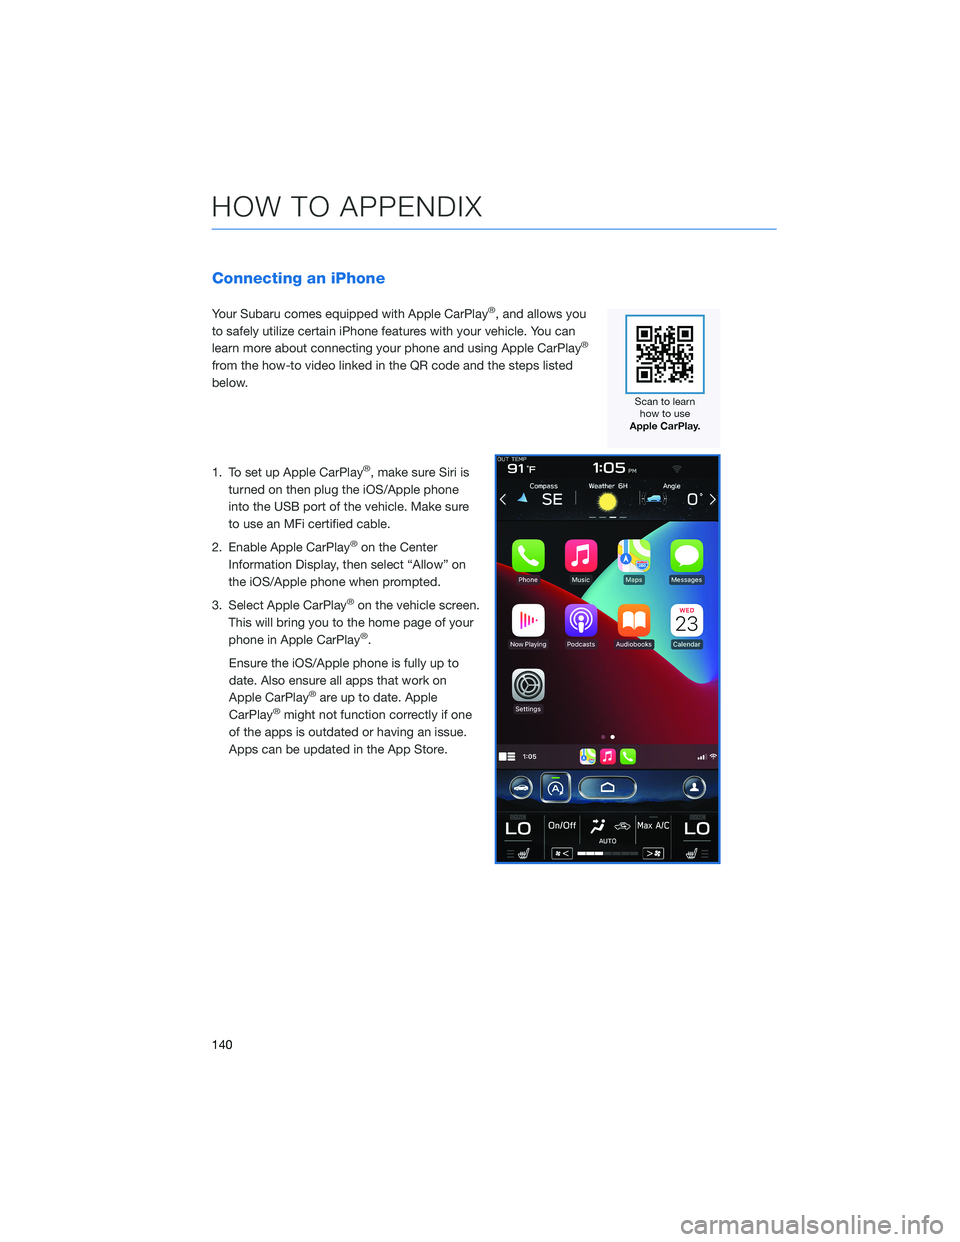
Your Subaru comes equipped with Apple CarPlay®, and allows you
to safely utilize certain iPhone features with your vehicle. You can
learn more about connecting your phone and using Apple CarPlay
®
from the how-to video linked in the QR code and the steps listed
below.
1. To set up Apple CarPlay
®, make sure Siri is
turned on then plug the iOS/Apple phone
into the USB port of the vehicle. Make sure
to use an MFi certified cable.
2. Enable Apple CarPlay
®on the Center
Information Display, then select “Allow” on
the iOS/Apple phone when prompted.
3. Select Apple CarPlay
®on the vehicle screen.
This will bring you to the home page of your
phone in Apple CarPlay
®.
Ensure the iOS/Apple phone is fully up to
date. Also ensure all apps that work on
Apple CarPlay
®are up to date. Apple
CarPlay®might not function correctly if one
of the apps is outdated or having an issue.
Apps can be updated in the App Store.
HOW TO APPENDIX
140