parking brake SUBARU SOLTERRA 2023 Owner's Manual
[x] Cancel search | Manufacturer: SUBARU, Model Year: 2023, Model line: SOLTERRA, Model: SUBARU SOLTERRA 2023Pages: 628, PDF Size: 11.91 MB
Page 237 of 628
2375-2. Driving procedures
Owners Manual_USA_M42C01_en
5
Driving
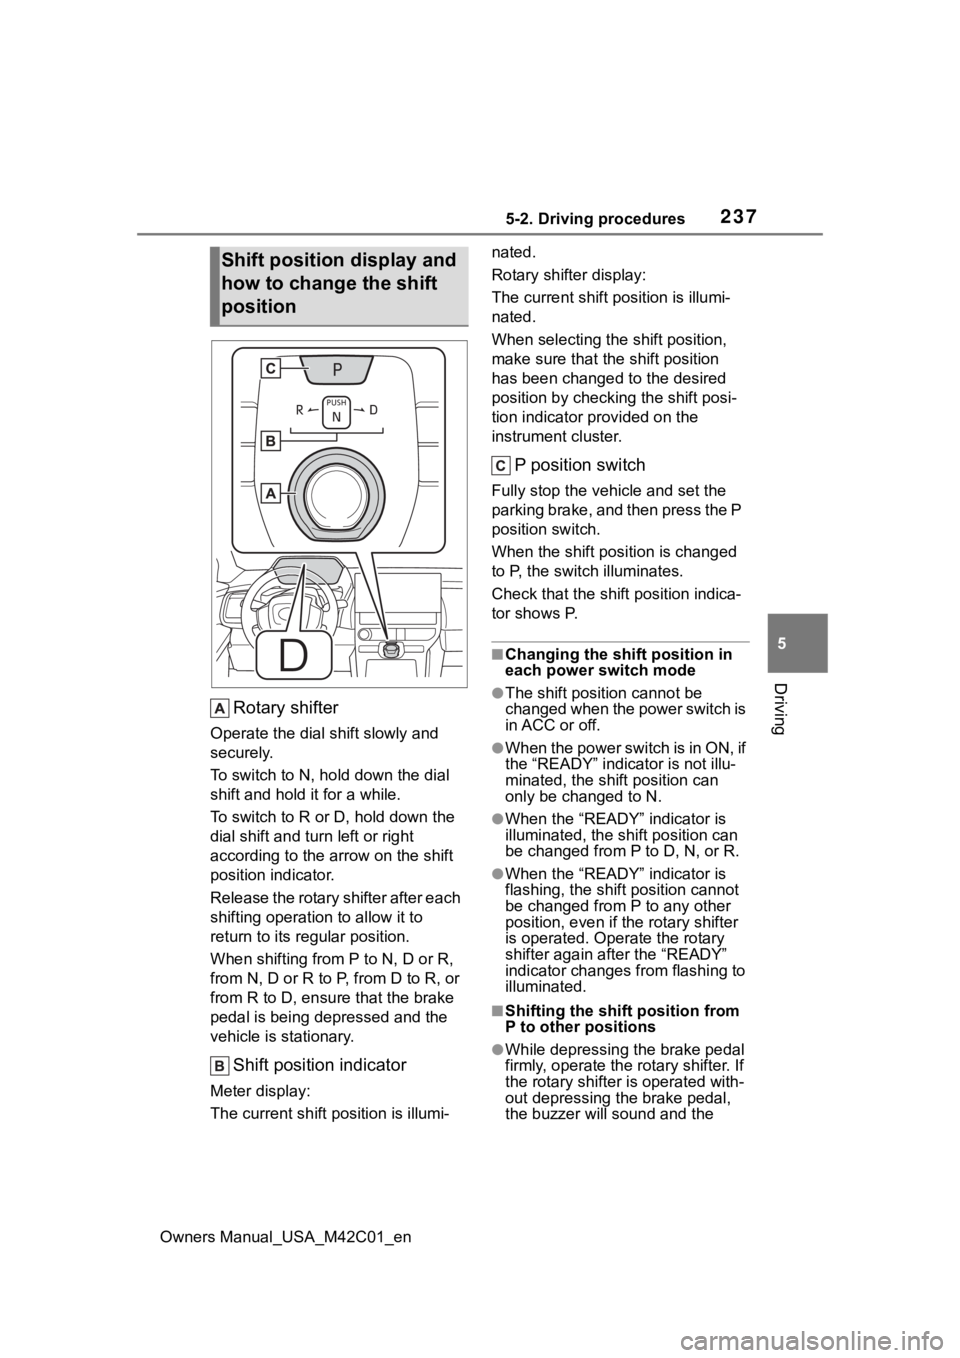
Rotary shifter
Operate the dial shift slowly and
securely.
To switch to N, hol d down the dial
shift and hold it for a while.
To switch to R or D, hold down the
dial shift and turn left or right
according to the arrow on the shift
position indicator.
Release the rotary shifter after each
shifting operation to allow it to
return to its regular position.
When shifting from P to N, D or R,
from N, D or R to P, from D to R, or
from R to D, ensure that the brake
pedal is being depressed and the
vehicle is stationary.
Shift position indicator
Meter display:
The current shift position is illumi- nated.
Rotary shifter display:
The current shift p
osition is illumi-
nated.
When selecting the shift position,
make sure that the shift position
has been changed to the desired
position by checking the shift posi-
tion indicator provided on the
instrument cluster.
P position switch
Fully stop the vehicle and set the
parking brake, and then press the P
position switch.
When the shift position is changed
to P, the switch illuminates.
Check that the shif t position indica-
tor shows P.
■Changing the shift position in
each power switch mode
●The shift position cannot be
changed when the power switch is
in ACC or off.
●When the power switch is in ON, if
the “READY” indica tor is not illu-
minated, the shift position can
only be changed to N.
●When the “READY” indicator is
illuminated, the shift position can
be changed from P to D, N, or R.
●When the “READY” indicator is
flashing, the shift position cannot
be changed from P to any other
position, even if the rotary shifter
is operated. Ope rate the rotary
shifter again after the “READY”
indicator changes from flashing to
illuminated.
■Shifting the shift position from
P to other positions
●While depressing the brake pedal
firmly, operate the rotary shifter. If
the rotary shifter is operated with-
out depressing the brake pedal,
the buzzer will sound and the
Shift position display and
how to change the shift
position
Page 243 of 628
2435-2. Driving procedures
Owners Manual_USA_M42C01_en
5
Driving
■Using the manual mode
The parking brake can be set
and released manually.
and a message is shown on the
multi-information display.
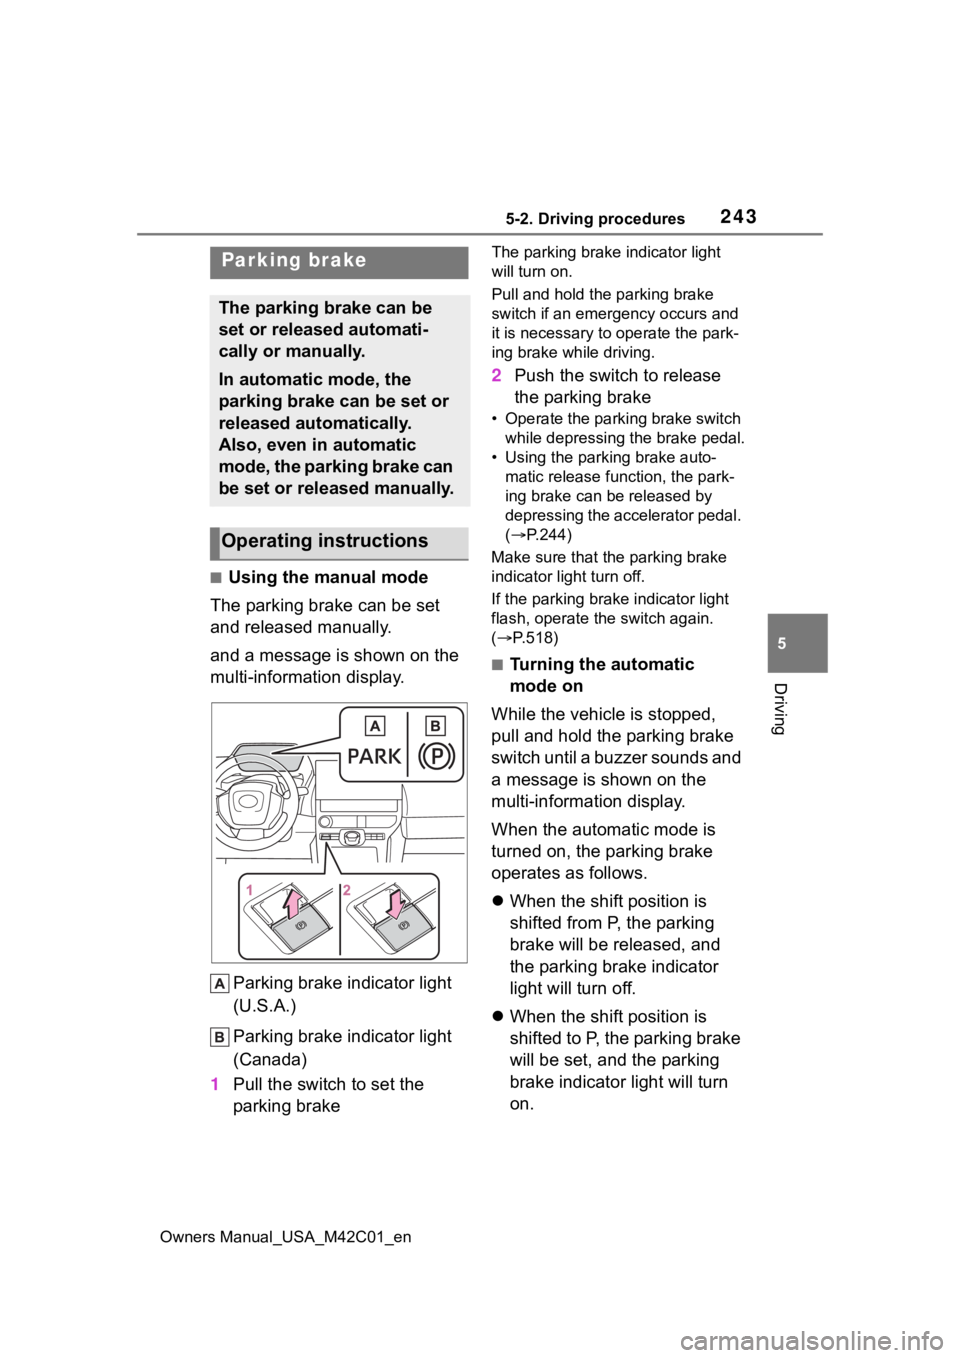
Parking brake indicator light
(U.S.A.)
Parking brake indicator light
(Canada)
1 Pull the switch to set the
parking brake
The parking brake indicator light
will turn on.
Pull and hold the parking brake
switch if an emergency occurs and
it is necessary to operate the park-
ing brake while driving.
2 Push the switch to release
the parking brake
• Operate the parking brake switch
while depressing the brake pedal.
• Using the parking brake auto- matic release function, the park-
ing brake can be released by
depressing the accelerator pedal.
( P.244)
Make sure that the parking brake
indicator light turn off.
If the parking brak e indicator light
flash, operate t he switch again.
( P.518)
■Turning the automatic
mode on
While the vehicle is stopped,
pull and hold the parking brake
switch until a buzzer sounds and
a message is shown on the
multi-information display.
When the automatic mode is
turned on, the parking brake
operates as follows.
When the shift position is
shifted from P, the parking
brake will be released, and
the parking brake indicator
light will turn off.
When the shift position is
shifted to P, the parking brake
will be set, and the parking
brake indicator light will turn
on.
Parking brake
The parking brake can be
set or released automati-
cally or manually.
In automatic mode, the
parking brake can be set or
released automatically.
Also, even in automatic
mode, the parking brake can
be set or released manually.
Operating instructions
Page 244 of 628
2445-2. Driving procedures
Owners Manual_USA_M42C01_en
Operate the shift position with
the vehicle stopped and the
brake pedal depressed.
The auto function may not operate
if the shift position is moved
extremely quickly. In this situation,
apply the parking brake manually.
( P.243)
■Turning the automatic
mode off
While the vehicle is stopped and
depressing the brake pedal,
press and hold the parking
brake switch until a buzzer
sounds and message is shown
on the multi-information display.
■Parking brake operation
●When the power s witch is not in
ON, the parking brake cannot be
released using the parking brake
switch.
●When the power s witch is not in
ON, automatic mode (automatic
brake setting and releasing) is not
available.
■Parking brake automatic
release function
When all of the follo wing conditions
are met in manual mode, the park-
ing brake can be released by
depressing the accelerator pedal.
●The driver’s door is closed
●The driver is wearing the seat belt
●The shift position is in a forward
driving position or reverse driving
position
●The malfunction in dicator lamp or
brake system warning light is not
illuminated.
When depressing the accelerator
pedal, depress it slowly.
If the parking brake is not released when the accelerator pedal is
depressed, release the parking
brake manually.
■Parking brake automatic lock
function
The parking brak e will be set auto-
matically under the following condi-
tions:
●The brake pedal is not depressed
●The driver’s door is open
●The driver’s seat belt is not fas-
tened
●The shift position is in a position
other than P or N
(The shift position is in P during
advanced park operation.)(If
equipped)
●The malfunction in dicator lamp or
brake system warning light are not
illuminated.
■If “Parking Brake Temporarily
Unavailable” is displayed on
the multi-info rmation display
If the parking brake is operated
repeatedly over a short period of
time, the system may restrict opera-
tion to prevent ove rheating. If this
happens, refrain from operating the
parking brake. Normal operation will
return after about 1 minute.
■If “Parking Brake Unavailable”
is displayed on the multi-infor-
mation display
Operate the parking brake switch. If
the message does not disappear
after operating the switch several
times, the system may be malfunc-
tioning. Have the vehicle inspected
by your Toyota dealer.
■Parking brake operation sound
When the parking brake operates, a
motor sound (whirr ing sound) may
be heard.
This does not indicate a malfunc-
tion.
■Parking brake indicator light
●Depending on the power switch
Page 245 of 628
2455-2. Driving procedures
Owners Manual_USA_M42C01_en
5
Driving
mode, the parking brake indicator
light will turn on and stay on as
described below:
ON: Comes on until the parking
brake is released.
Not in ON: Stays on for approxi-
mately 15 seconds.
●When the power switch is turned
off with the parking brake set, the
parking brake indicator light will
stay on for about 15 seconds.
This does not indicate a malfunc-
tion.
■When the parking brake switch
malfunctions
Automatic mode (automatic brake
setting and releas ing) will be turned
on automatically.
■Parking the vehicle
P. 2 4 3
■Parking brake engaged warning
buzzer
A buzzer will sound if the vehicle is
driven with the parking brake
engaged. “Parking Brake ON” is dis-
played on the multi-information dis-
play. (with the vehicle reached a
speed of 3 mph [5 km/h])
■If the brake system warning
light comes on
P. 5 1 3
■Usage in winter time
P. 3 9 4
WARNING
■When parking the vehicle
Do not leave a child in the vehicle
alone. The parking brake may be
released unintentionally and there
is the danger of the vehicle mov-
ing that may lead to an accident
resulting in death or serious injury.
■Parking brake switch
Do not set any objects near the
parking brake switch.
Objects may inte rfere with the
switch and may lead the parking
brake to unexpectedly operate.
■Parking brake automatic lock
function
Never use the automatic parking
brake engagement function in
place of normal parking brake
operation. This function is
designed to reduce the risk of a
collision due to the driver forget-
ting to engage the parking brake.
Over-reliance on this function to
park the vehicle safely may lead
to an accident resulting in death
or serious injury. ( P.219)
NOTICE
■When parking the vehicle
Before you leave the vehicle, shift
the shift position to P, set the park-
ing brake and make sure that the
vehicle does not move.
■When the system malfunc-
tions
Stop the vehicle in a safe place
and check the warning messages.
■When the vehicle 12-volt bat-
tery is discharged
The parking brake system cannot
be activated. ( P.541)
■When the parking brake can-
not be released due to a mal-
function
Driving the vehicle with the park-
ing brake set will lead to brake
components overheating, which
may affect braking performance
and increase brake wear.
Have the vehicle inspected by
your Toyota dealer immediately if
this occurs.
Page 246 of 628
2465-2. Driving procedures
Owners Manual_USA_M42C01_en
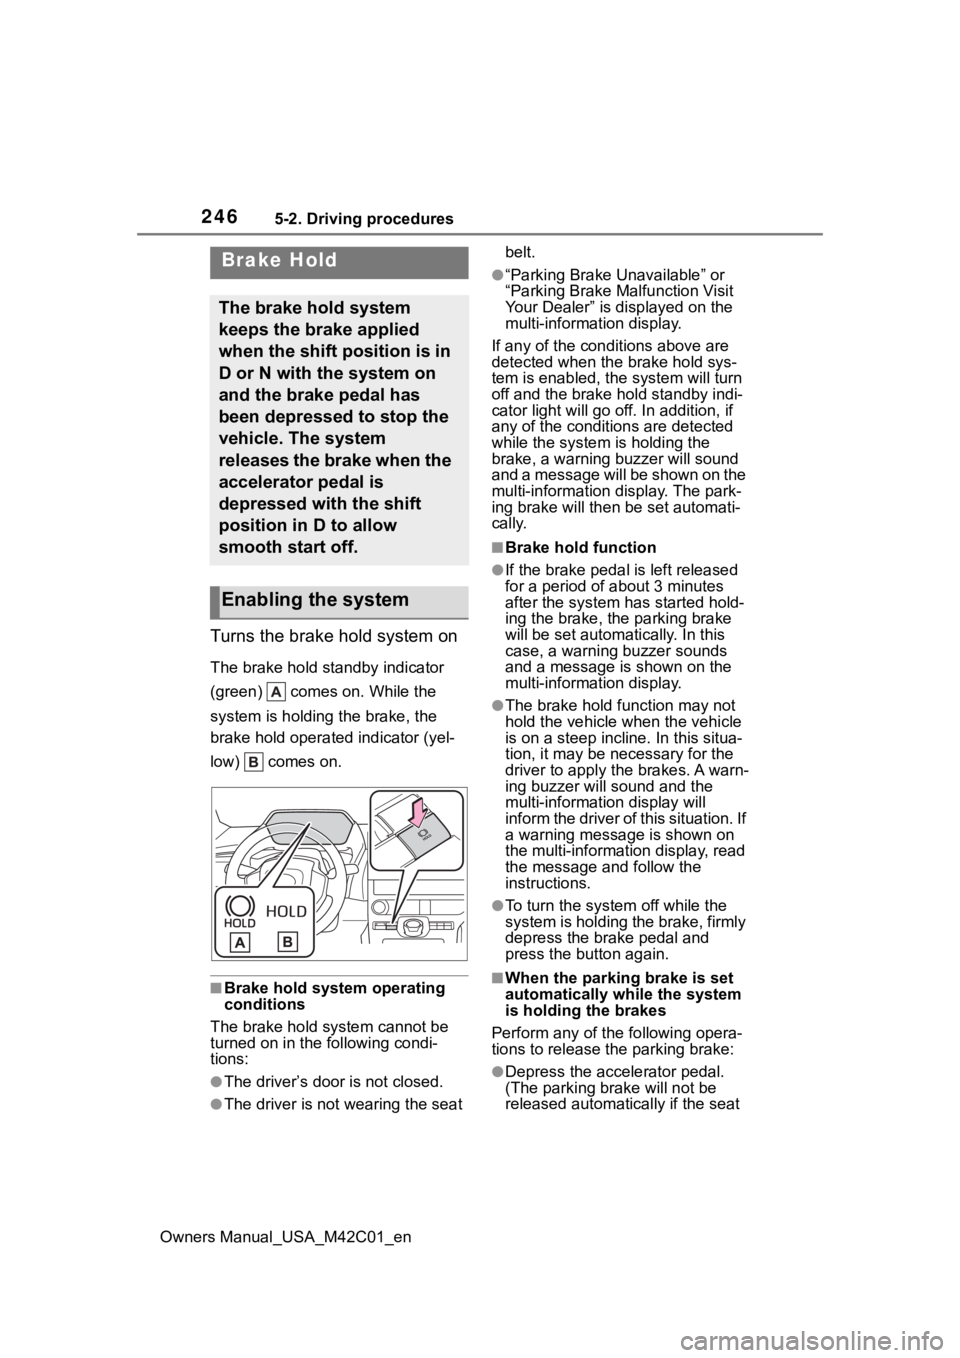
Turns the brake hold system on
The brake hold standby indicator
(green) comes on. While the
system is holding the brake, the
brake hold operated indicator (yel-
low) comes on.
■Brake hold system operating
conditions
The brake hold system cannot be
turned on in the following condi-
tions:
●The driver’s doo r is not closed.
●The driver is not wearing the seat belt.
●“Parking Brake Unavailable” or
“Parking Brake Malfunction Visit
Your Dealer” is displayed on the
multi-information display.
If any of the cond itions above are
detected when the brake hold sys-
tem is enabled, the system will turn
off and the brake hold standby indi-
cator light will go off. In addition, if
any of the conditions are detected
while the system is holding the
brake, a warning buzzer will sound
and a message will be shown on the
multi-information display. The park-
ing brake will then be set automati-
cally.
■Brake hold function
●If the brake pedal is left released
for a period of about 3 minutes
after the system has started hold-
ing the brake, the parking brake
will be set automatically. In this
case, a warning buzzer sounds
and a message is shown on the
multi-information display.
●The brake hold function may not
hold the vehicle when the vehicle
is on a steep incline. In this situa-
tion, it may be ne cessary for the
driver to apply the brakes. A warn-
ing buzzer will sound and the
multi-information display will
inform the driver of this situation. If
a warning message is shown on
the multi-information display, read
the message and follow the
instructions.
●To turn the system off while the
system is holding the brake, firmly
depress the brake pedal and
press the button again.
■When the parking brake is set
automatically while the system
is holding the brakes
Perform any of the following opera-
tions to release the parking brake:
●Depress the accelerator pedal.
(The parking brake will not be
released automatically if the seat
Brake Hold
The brake hold system
keeps the brake applied
when the shift position is in
D or N with the system on
and the brake pedal has
been depressed to stop the
vehicle. The system
releases the brake when the
accelerator pedal is
depressed with the shift
position in D to allow
smooth start off.
Enabling the system
Page 247 of 628
2475-2. Driving procedures
Owners Manual_USA_M42C01_en
5
Driving
belt is not fastened.)
●Operate the parking brake switch
with the brake pedal depressed.
Make sure that the parking brake
indicator light goes off. ( P.243)
■When an inspection at your
Toyota dealer is necessary
When the brake hold standby indi-
cator (green) does not illuminate
even when the brake hold switch is
pressed with the brake hold system
operating conditions met, the sys-
tem may be malfunctioning. Have
the vehicle inspected at your Toyota
dealer.
■If “Brake Hold Malfunction
Press Brake to Deactivate Visit
Your Dealer” or “Brake Hold
Malfunction Visit Your Dealer”
is displayed on the multi-infor-
mation display
The system may be malfunctioning.
Have the vehicle inspected by your
Toyota dealer.
■Warning messages and buzzers
Warning messages and buzzers are
used to indicate a system malfunc-
tion or to inform the driver of the
need for caution. If a warning mes-
sage is shown on the multi-informa-
tion display, read the message and
follow the instructions.
■If the brake hold operated indi-
cator flashes
P. 5 1 9
WARNING
■When the vehicle is on a
steep incline
When using the brake hold sys-
tem on a steep incline, exercise
caution. The brake hold function
may not hold the vehicle in such a
situation.
■When stopped on a slippery
road
The system cannot stop the vehi-
cle when the gripping ability of the
tires has been exceeded. Do not
use the system w hen stopped on
a slippery road.
NOTICE
■When parking the vehicle
The brake hold system is not
designed for use when parking
the vehicle for a long period of
time. Turning the power switch off
while the system is holding the
brake may release the brake,
which would cause the vehicle to
move. When operating the power
switch, depress the brake pedal,
shift the shift position to P and set
the parking brake.
Page 248 of 628
2485-3. Operating the lights and wipers
Owners Manual_USA_M42C01_en
5-3.Operating the lights and wipers
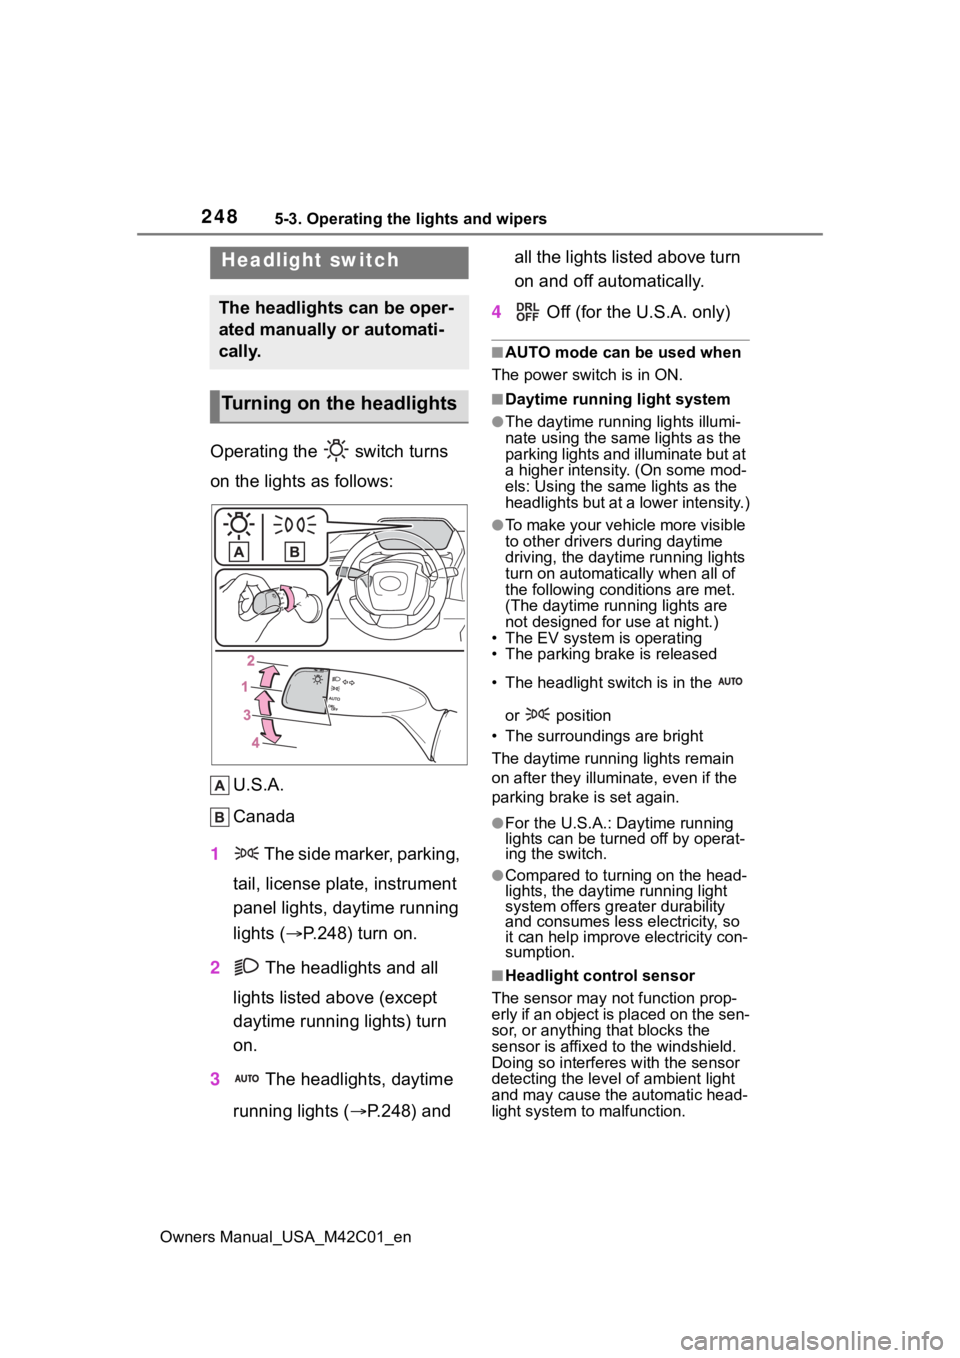
Operating the switch turns
on the lights as follows:U.S.A.
Canada
1 The side marker, parking,
tail, license plate, instrument
panel lights, daytime running
lights ( P.248) turn on.
2 The headlights and all
lights listed above (except
daytime running lights) turn
on.
3 The headlights, daytime
running lights ( P.248) and all the lights listed above turn
on and off automatically.
4 Off (for the U.S.A. only)
■AUTO mode can be used when
The power switch is in ON.
■Daytime running light system
●The daytime runn ing lights illumi-
nate using the same lights as the
parking lights and illuminate but at
a higher intensity. (On some mod-
els: Using the same lights as the
headlights but at a lower intensity.)
●To make your vehicle more visible
to other drivers during daytime
driving, the daytime running lights
turn on automatically when all of
the following conditions are met.
(The daytime running lights are
not designed for use at night.)
• The EV system is operating
• The parking brake is released
• The headlight switch is in the
or position
• The surroundings are bright
The daytime running lights remain
on after they illumi nate, even if the
parking brake is set again.
●For the U.S.A.: Daytime running
lights can be turned off by operat-
ing the switch.
●Compared to turning on the head-
lights, the daytime running light
system offers greater durability
and consumes less electricity, so
it can help improve electricity con-
sumption.
■Headlight control sensor
The sensor may not function prop-
erly if an object is placed on the sen-
sor, or anything that blocks the
sensor is affixed to the windshield.
Doing so interferes with the sensor
detecting the level of ambient light
and may cause t he automatic head-
light system to malfunction.
Headlight switch
The headlights can be oper-
ated manually or automati-
cally.
Turning on the headlights
Page 264 of 628
2645-4. Using the driving support systems
Owners Manual_USA_M42C01_en
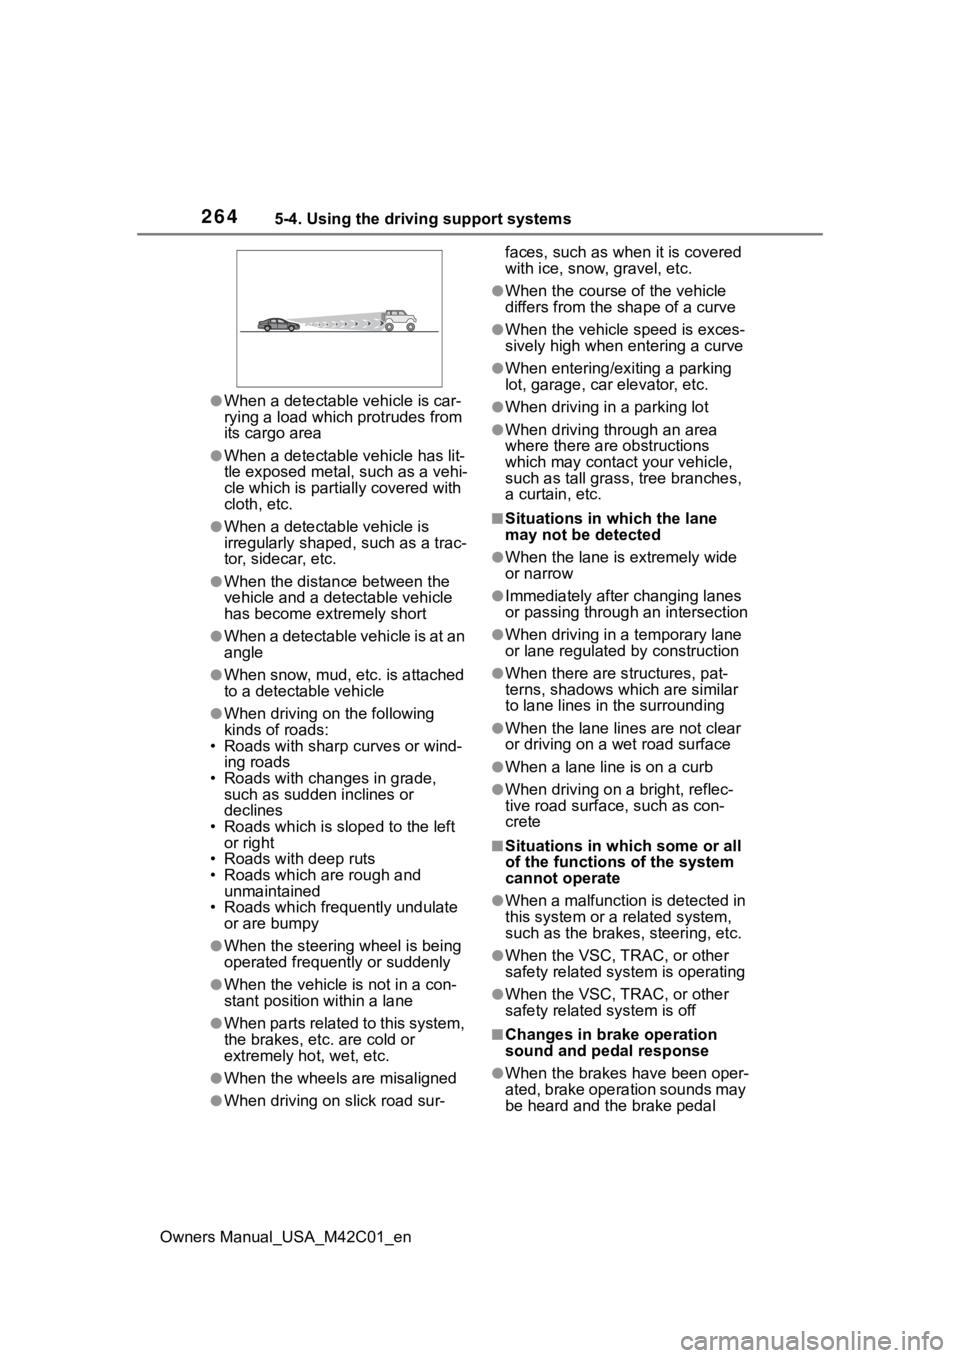
●When a detectable vehicle is car-
rying a load which protrudes from
its cargo area
●When a detectable vehicle has lit-
tle exposed metal, such as a vehi-
cle which is parti ally covered with
cloth, etc.
●When a detectabl e vehicle is
irregularly shaped , such as a trac-
tor, sidecar, etc.
●When the distance between the
vehicle and a detectable vehicle
has become extremely short
●When a detectable vehicle is at an
angle
●When snow, mud, etc. is attached
to a detectable vehicle
●When driving on the following
kinds of roads:
• Roads with sharp curves or wind- ing roads
• Roads with chang es in grade,
such as sudden inclines or
declines
• Roads which is slo ped to the left
or right
• Roads with deep ruts
• Roads which are rough and
unmaintained
• Roads which frequently undulate
or are bumpy
●When the steering wheel is being
operated frequently or suddenly
●When the vehicle is not in a con-
stant position within a lane
●When parts related to this system,
the brakes, etc. are cold or
extremely hot, wet, etc.
●When the wheels are misaligned
●When driving on slick road sur- faces, such as when it is covered
with ice, snow, gravel, etc.
●When the course of the vehicle
differs from the
shape of a curve
●When the vehicle speed is exces-
sively high when entering a curve
●When entering/exiting a parking
lot, garage, car elevator, etc.
●When driving in a parking lot
●When driving through an area
where there are obstructions
which may contact your vehicle,
such as tall grass , tree branches,
a curtain, etc.
■Situations in which the lane
may not be detected
●When the lane is extremely wide
or narrow
●Immediately after changing lanes
or passing through an intersection
●When driving in a temporary lane
or lane regulated by construction
●When there are s tructures, pat-
terns, shadows which are similar
to lane lines in the surrounding
●When the lane lines are not clear
or driving on a wet road surface
●When a lane line is on a curb
●When driving on a bright, reflec-
tive road surface, such as con-
crete
■Situations in which some or all
of the functions of the system
cannot operate
●When a malfunction is detected in
this system or a related system,
such as the brakes, steering, etc.
●When the VSC, TRAC, or other
safety related system is operating
●When the VSC, TRAC, or other
safety related system is off
■Changes in brake operation
sound and pedal response
●When the brakes have been oper-
ated, brake operation sounds may
be heard and the brake pedal
Page 293 of 628
2935-4. Using the driving support systems
Owners Manual_USA_M42C01_en
5
Driving
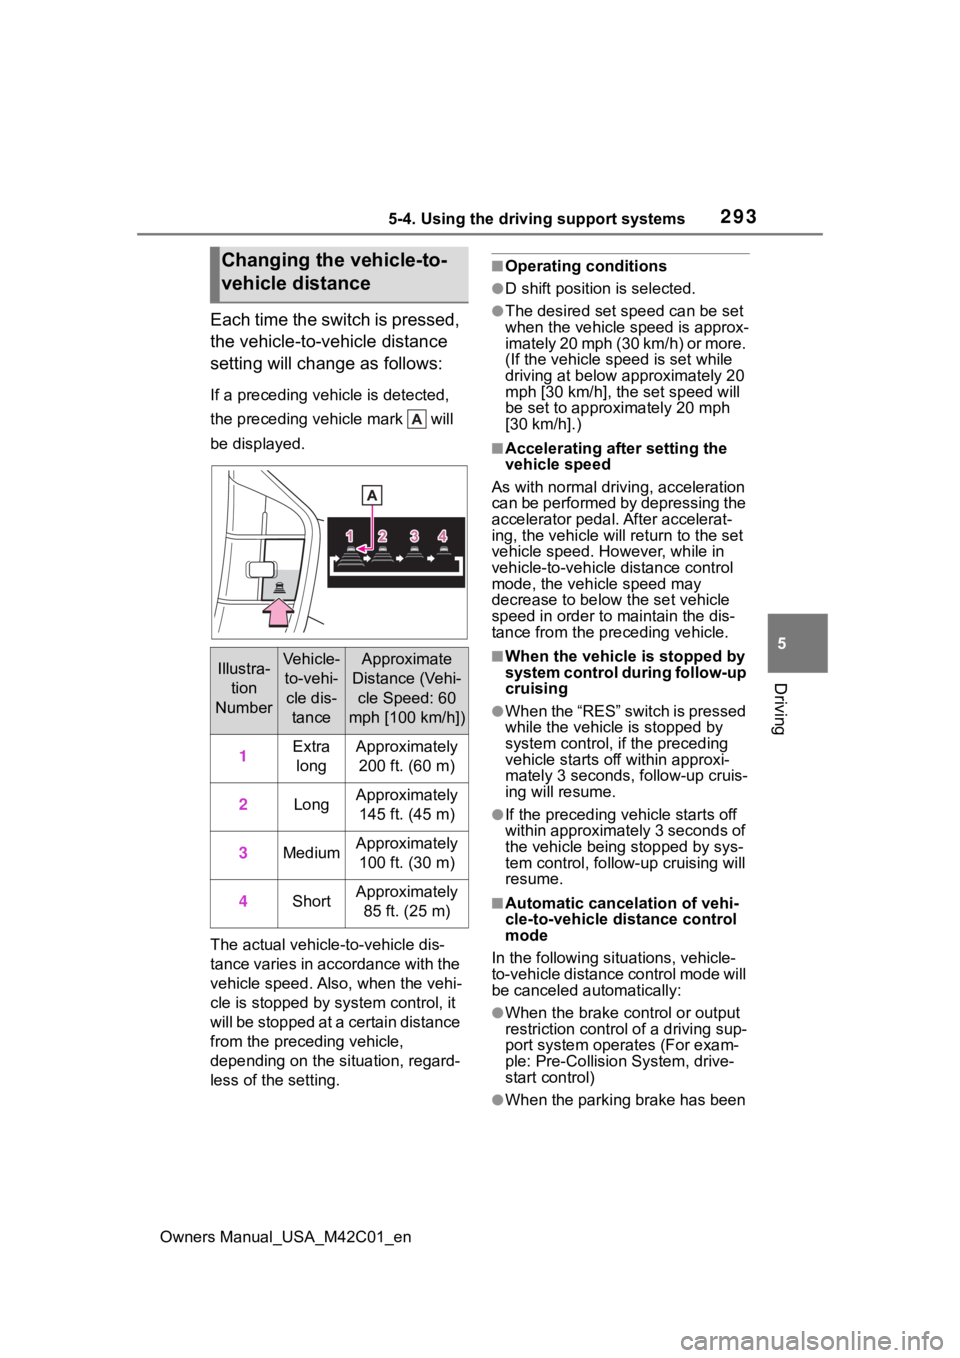
Each time the switch is pressed,
the vehicle-to-vehicle distance
setting will change as follows:
If a preceding vehicle is detected,
the preceding vehicle mark will
be displayed.
The actual vehicle-to-vehicle dis-
tance varies in accordance with the
vehicle speed. Also, when the vehi-
cle is stopped by system control, it
will be stopped at a certain distance
from the preceding vehicle,
depending on the situation, regard-
less of the setting.
■Operating conditions
●D shift position is selected.
●The desired set speed can be set
when the vehicle speed is approx-
imately 20 mph (30 km/h) or more.
(If the vehicle speed is set while
driving at below approximately 20
mph [30 km/h], th e set speed will
be set to approxi mately 20 mph
[30 km/h].)
■Accelerating after setting the
vehicle speed
As with normal driving, acceleration
can be performed by depressing the
accelerator pedal. After accelerat-
ing, the vehicle will return to the set
vehicle speed. However, while in
vehicle-to-vehicle distance control
mode, the vehicle speed may
decrease to below the set vehicle
speed in order to maintain the dis-
tance from the preceding vehicle.
■When the vehicle is stopped by
system control during follow-up
cruising
●When the “RES” switch is pressed
while the vehicle is stopped by
system control, if the preceding
vehicle starts off within approxi-
mately 3 seconds, follow-up cruis-
ing will resume.
●If the preceding vehicle starts off
within approximately 3 seconds of
the vehicle being stopped by sys-
tem control, follo w-up cruising will
resume.
■Automatic cancelation of vehi-
cle-to-vehicle d istance control
mode
In the following situ ations, vehicle-
to-vehicle distance control mode will
be canceled automatically:
●When the brake control or output
restriction control of a driving sup-
port system oper ates (For exam-
ple: Pre-Collision System, drive-
start control)
●When the parking brake has been
Changing the vehicle-to-
vehicle distance
Illustra-
tion
NumberVehicle- to-vehi-
cle dis- tanceApproximate
Distance (Vehi-
cle Speed: 60
mph [100 km/h])
1Extra longApproximately 200 ft. (60 m)
2LongApproximately 145 ft. (45 m)
3MediumApproximately 100 ft. (30 m)
4ShortApproximately 85 ft. (25 m)
Page 294 of 628
2945-4. Using the driving support systems
Owners Manual_USA_M42C01_enoperated
●When the vehicle is stopped by
system control on a steep incline
●When any of the following are
detected while the vehicle is
stopped by system control:
• The driver’s seat belt is unfas-
tened
• The driver’s door is opened
• Approximately 3 minutes have elapsed since the vehicle was
stopped
The parking brake may be actived
automatically.
The shift position may automatically
change to P. ( P.238)
●Situations in whic h some or all of
the functions of the system cannot
operate: P. 2 6 4
■Dynamic radar cruise control
system warning messages and
buzzers
For safe use: P.259
■Preceding vehicles that the sen-
sor may not detect correctly
In the following situations, depend-
ing on the conditions, if the system
cannot provide sufficient decelera-
tion or accelerati on is necessary,
operate the brake pedal or accelera-
tor pedal.
As the sensor may not be able to
correctly detect these types of vehi-
cles, the approach warning
( P.294) may not operate.
●When a vehicle cuts in front of
your vehicle or changes lanes
away from your vehicle extremely
slowly or quickly
●When changing lanes
●When a preceding vehicle is driv-
ing at a low speed
●When a vehicle i s stopped in the
same lane as the vehicle
●When a motorcycle is traveling in
the same lane as the vehicle
■Conditions under which the
system may not operate cor-
rectly
In the following situations, operate
the brake pedal (or accelerator
pedal, depending on the situation)
as necessary.
As the sensor may not be able to
correctly detect a vehicle, the sys-
tem may not operate properly.
●When a preceding vehicle brakes
suddenly
●When changing lanes at low
speeds, such as in a traffic jam
In situations where the vehicle
approaches a preceding vehicle
and the system cannot provide
sufficient deceleration, such as
if a vehicle cuts in front of the
vehicle, a warning display will
flash and a buzzer will sound to
alert the driver. Depress the
brake pedal to ensure appropri-
ate vehicle-to-vehicle distance.
■Warnings may not occur
when
In the following situations, the
warning may not operate even
though the vehicle-to-vehicle
distance is short.
When the preceding vehicle is
traveling at the same speed
or faster than your vehicle
When the preceding vehicle is
traveling at an extremely low
speed
Immediately after the vehicle
speed has been set
Approach warning