brakes SUBARU TRIBECA 2010 1.G User Guide
[x] Cancel search | Manufacturer: SUBARU, Model Year: 2010, Model line: TRIBECA, Model: SUBARU TRIBECA 2010 1.GPages: 422, PDF Size: 12.87 MB
Page 295 of 422
8-18Driving tips
Trailer hitch (if equipped)
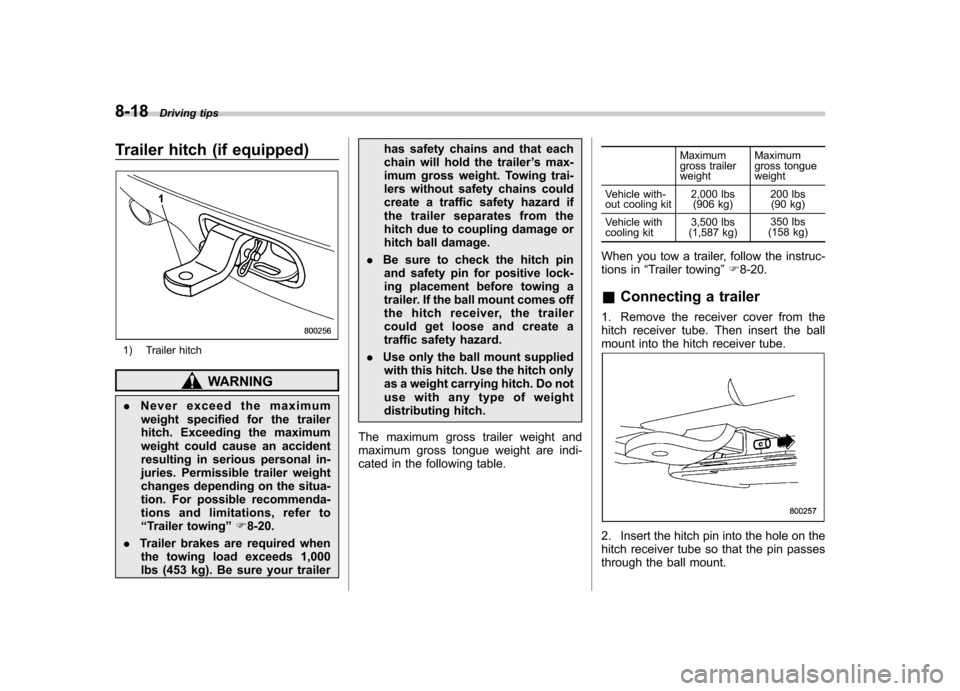
1) Trailer hitch
WARNING
. Never exceed the maximum
weight specified for the trailer
hitch. Exceeding the maximum
weight could cause an accident
resulting in serious personal in-
juries. Permissible trailer weight
changes depending on the situa-
tion. For possible recommenda-
tions and limitations, refer to“ Trailer towing ”F 8-20.
. Trailer brakes are required when
the towing load exceeds 1,000
lbs (453 kg). Be sure your trailer has safety chains and that each
chain will hold the trailer
’s max-
imum gross weight. Towing trai-
lers without safety chains could
create a traffic safety hazard if
the trailer separates from the
hitch due to coupling damage or
hitch ball damage.
. Be sure to check the hitch pin
and safety pin for positive lock-
ing placement before towing a
trailer. If the ball mount comes off
the hitch receiver, the trailer
could get loose and create a
traffic safety hazard.
. Use only the ball mount supplied
with this hitch. Use the hitch only
as a weight carrying hitch. Do not
use with any type of weight
distributing hitch.
The maximum gross trailer weight and
maximum gross tongue weight are indi-
cated in the following table. Maximum
gross trailer weight
Maximum
gross tongue weight
Vehicle with-
out cooling kit 2,000 lbs
(906 kg) 200 lbs
(90 kg)
Vehicle with
cooling kit 3,500 lbs
(1,587 kg) 350 lbs
(158 kg)
When you tow a trailer, follow the instruc-
tions in “Trailer towing ”F 8-20.
& Connecting a trailer
1. Remove the receiver cover from the
hitch receiver tube. Then insert the ball
mount into the hitch receiver tube.
2. Insert the hitch pin into the hole on the
hitch receiver tube so that the pin passes
through the ball mount.
Page 297 of 422
8-20Driving tips
watercraft. &When you do not tow a trailer
. Remove the ball mount from the hitch
receiver tube and insert the receiver cover
onto the hitch receiver tube. . Place the dust cap over the four-pin
connector of the hitch wire harness to
protect against possible damage. . Occasionally lubricate terminals of the
four-pin connector using the terminal grease. Trailer towing
Your vehicle is designed and intended to
be used primarily as a passenger-carrying
vehicle. Towing a trailer puts additional
loads on your vehicle
’s engine, drivetrain,
brakes, tires and suspension and has an
adverse effect on fuel economy.
If you do decide to tow a trailer, your safety
and satisfaction depend upon proper use
of correct equipment and cautious opera-
tion of your vehicle. Seek the advice of
your SUBARU dealer to assist you in
purchasing a hitch and other necessary
towing equipment appropriate for your
vehicle. In addition, be sure to follow the
instructions on correct installation and use
provided by the trailer and other towing
equipment manufacturers.
SUBARU assumes no responsibility for
injuries or vehicle damage that result from
trailer towing equipment, or from any
errors or omissions in the instructions
accompanying such equipment or for your
failure to follow the proper instructions.
& Warranties and maintenance
SUBARU warranties do not apply to
vehicle damage or malfunction caused
by trailer towing. If you use your vehicle to
tow a trailer, more frequent maintenance
will be required due to the additional load. (Refer to
“Maintenance schedule under
severe driving conditions ”in the “Warranty
and Maintenance Booklet ”.)
Under no circumstances should a trailer
be towed with a new vehicle or a vehicle
with any new powertrain component (en-
gine, transmission, differential, wheel
bearings, etc.) for the first 1,000 miles
(1,600 km) of driving.
& Maximum load limits
WARNING
Never exceed the maximum load
limits explained in the following.
Exceeding the maximum load limits
could cause personal injury and/or
vehicle damage.
CAUTION
. Adequate size trailer brakes are
required when the trailer and its
cargo exceed 1,000 lbs (453 kg)
total weight.
. Before towing a trailer, check the
trailer total weight, GVW, GAWs
and tongue load. Make sure the
load and its distribution in your
vehicle and trailer are accepta-
Page 298 of 422

ble.
! Total trailer weight
Total trailer weight
The total trailer weight (trailer weight plus
its cargo load) must never exceed the
maximum weight shown in the followingtable. Vehicle without cooling kit
Conditions Maximum total trailer weight
When towing a trailer without brakes. 1,000 lbs (453 kg)
When towing a trailer with brakes. 2,000 lbs (906 kg)
When towing a trailer on a long uphill grade
continuously for over 5 miles (8 km) with an
outside temperature of 104 8F (40 8C) or above. 1,000 lbs (453 kg)
Vehicle with cooling kit Conditions Maximum total trailer weight
When towing a trailer without brakes. 1,000 lbs (453 kg)
When towing a trailer with brakes. 3,500 lbs (1,587 kg)
When towing a trailer on a long uphill grade
continuously for over 5 miles (8 km) with an
outside temperature of 104 8F (40 8C) or above. 1,750 lbs (794 kg)Driving tips
8-21
– CONTINUED –
Page 301 of 422
8-24Driving tips
of your vehicle to install a commer-
cial trailer hitch. If you do, danger-
ous exhaust gas, water or mud may
enter the passenger compartment
through the drilled hole. Exhaust
gas contains carbon monoxide, a
colorless and odorless gas which is
dangerous, or even lethal, if inhaled.
Also, drilling the frame or under-
body of your vehicle could cause
deterioration of strength of your
vehicle and cause corrosion around
the drilled hole.
CAUTION
. Do not modify the vehicle ex-
haust system, brake system, or
other systems when installing a
hitch or other trailer towingequipment.
. Do not use axle-mounted hitches
as they can cause damage to the
axle housing, wheel bearings,
wheels or tires.
Choose a proper hitch for your vehicle and
trailer.
The use of a genuine SUBARU trailer
hitch is recommended. A genuine
SUBARU hitch is available from your SUBARU dealer.
If use of a non-genuine hitch is unavoid-
able, be sure the hitch is suited to your
vehicle and trailer. Consult with a profes-
sional hitch supplier to assist you in
choosing an appropriate hitch for your
vehicle. Be sure to follow all of the hitchmanufacturer
’s instructions for installation
and use.
Never use a hitch that mounts only to the
rear bumper. The bumper is not designed
to handle that type of load.
For all types of hitches, regularly check
that the hitch mounting bolts and nuts aretight. & Connecting a trailer
! Trailer brakes
WARNING
. Adequate size trailer brakes are
required when the trailer and its
cargo exceed 1,000 lbs (453 kg)
total weight.
. Do not directly connect your
trailer ’s hydraulic brake system
to the hydraulic brake system in
your vehicle. Direct connection
would cause the vehicle ’s brake
performance to deteriorate and could lead to an accident.
If your trailer ’s total weight (trailer weight
plus its cargo weight) exceeds 1,000 lbs
(453 kg), the trailer is required to be
equipped with its own brake system.
Electric brakes or surge brakes are
recommended, and must be installed
properly. Check that your trailer ’s brakes
conform with Federal, state/province and/
or other applicable regulations. YourSUBARU ’s brake system is not designed
to be tapped into the trailer ’s hydraulic
brake system. Please ask your SUBARU
dealer and professional trailer supplier for
more information about the trailer ’s brake
system. ! Trailer safety chainsWARNING
Always use safety chains between
your vehicle and the trailer. Towing
trailer without safety chains could
create a traffic safety hazard if the
trailer separates from the hitch due
to coupling damage or hitch balldamage.
In case the trailer hitch connector or hitch
ball should break or become discon-
nected, the trailer could get loose and
Page 304 of 422

.Backing up with a trailer is difficult and
takes practice. When backing up with a
trailer, never accelerate or steer rapidly.
When turning back, grip the bottom of the
steering wheel with one hand and turn it to
the left for a left turn, and turn it to the right
for a right turn. . If the ABS warning light illuminates
while the vehicle is in motion, stop towing
the trailer and have repairs performed
immediately by the nearest SUBARU
dealer. ! Driving on grades
. Before going down a steep hill, slow
down and shift into lower gear (if neces-
sary, use 1st gear) in order to utilize the
engine braking effect and prevent over-
heating of your vehicle ’s brakes. Do not
make sudden downshifts. . When driving uphill in hot weather, the
air conditioner may turn off automatically
to protect the engine from overheating. . When driving uphill in hot weather, pay
attention to the water temperature gauge
pointer and AT OIL TEMP warning light
because the engine and transmission are
relatively prone to overheating under
these conditions. If the water temperature
gauge pointer approaches the OVER-
HEAT zone or the AT OIL TEMP warning
light illuminates, immediately turn off the air conditioner and stop the vehicle in the
nearest safe location. For further instruc-
tions and additional information, refer to
the following sections.
–“If you park your vehicle in an
emergency ”F 9-2
–“ Engine overheating ”F 9-14
–“ Temperature gauge ”F 3-9
–“ AT OIL TEMP warning light ”F 3-13
NOTE
The temperature of engine coolant is
less likely to rise to the OVERHEAT
zone in the “D ” position than in the
manual mode position. . Avoid using the accelerator pedal to
stay stationary on an uphill slope instead
of using the parking brake or foot brake.
That may cause the transmission fluid tooverheat. ! Parking on a grade
Always block the wheels under both
vehicle and trailer when parking. Apply
the parking brake firmly. You should not
park on a hill or slope. But if parking on a
hill or slope cannot be avoided, you
should take the following steps.
1. Apply the brakes and hold the pedal down.
2. Have someone place wheel blocks
under both the vehicle and trailer wheels. 3. When the wheel blocks are in place,
release the regular brakes slowly until the
blocks absorb the load.
4. Apply the regular brakes and then
apply the parking brake; slowly release
the regular brakes.
5. Shift into
“P ”and shut off the engine. Driving tips
8-27
Page 327 of 422

10-2Appearance care
Exterior care &Washing
CAUTION
. When washing the vehicle, the
brakes may get wet. As a result,
the brake stopping distance will
be longer. To dry the brakes,
drive the vehicle at a safe speed
while lightly pressing the brake
pedal to heat up the brakes.
. Do not wash the engine compart-
ment and areas adjacent to it. If
water enters the engine air in-
take, electrical parts or the power
steering fluid reservoir, it will
cause engine trouble or a mal-
function of the power steering. .
Since your vehicle is equipped
with a rear wiper, automatic car-
wash brushes could become
tangled around it, damaging the
wiper arm and other compo-
nents. Ask the automatic car-
wash operator not to let the
brushes touch the wiper arm or
to fix the wiper arm on the rear
window glass with adhesive tape
before operating the machine.
NOTE
When having your vehicle washed in
an automatic car wash, make sure
beforehand that the car wash is of
suitable type.
The best way to preserve your vehicle ’s
beauty is frequent washing. Wash the
vehicle at least once a month to avoid
contamination by road grime.
Wash dirt off with a wet sponge and plenty
of lukewarm or cold water. Do not wash
the vehicle with hot water and in directsunlight.
Salt, chemicals, insects, tar, soot, tree
sap, and bird droppings should be washed
off by using a light detergent, as required.
If you use a light detergent, make certain
that it is a neutral detergent. Do not use strong soap or chemical detergents. All
cleaning agents should be promptly
flushed from the surface and not allowed
to dry there. Rinse the vehicle thoroughly
with plenty of lukewarm water. Wipe the
remaining water off with a chamois or softcloth. !
Washing the underbody
Chemicals, salts and gravel used for
deicing road surfaces are extremely cor-
rosive, accelerating the corrosion of un-
derbody components, such as the exhaust
system, fuel and brake lines, brake
cables, floor pan and fenders, and sus-pension.
Thoroughly flush the underbody and in-
side of the fenders with lukewarm or cold
water at frequent intervals to reduce the
harmful effects of such agents.
Mud and sand adhering to the underbody
components may accelerate their corro-sion.
After driving off-road or muddy or sandy
roads, wash the mud and sand off the
underbody.
Carefully flush the suspension and axle
parts, as they are particularly prone to
mud and sand buildup. Do not use a
sharp-edged tool to remove caked mud.
Page 398 of 422

&Glossary of tire terminology
. Accessory weight
The combined weight (in excess of
those standard items which may be
replaced) of automatic transmis-
sion, power steering, power brakes,
power windows, power seats, radio,
and heater, to the extent that these
items are available as factory-in-
stalled equipment (whether in-
stalled or not). . Bead
The part of the tire that is made of
steel wires, wrapped or reinforced
by ply cords and that is shaped to fit
the rim. . Bead separation
A breakdown of the bond between
components in the bead. . Bias ply tire
A pneumatic tire in which the ply
cords that extend to the beads are
laid at alternate angles substantially
less than 90 degrees to the center-
line of the tread. . Carcass
The tire structure, except tread and sidewall rubber which, when in-
flated, bears the load.
. Chunking
The breaking away of pieces of the
tread or sidewall.. Cold tire pressure
The pressure in a tire that has been
driven less than 1 mile or has been
standing for three hours or more.. Cord
The strands forming the plies in the tire. . Cord separation
The parting of cords from adjacent
rubber compounds.. Cracking
Any parting within the tread, side-
wall, or inner liner of the tire
extending to cord material. . Curb weight
The weight of a motor vehicle with
standard equipment including the
maximum capacity of fuel, oil and
coolant, and if so equipped, air
conditioning and additional weight
optional engine. .
Extra load tire
A tire designed to operate at higher
loads and higher inflation pressure
than the corresponding standardtire. . Groove
The space between two adjacent
tread ribs.. Innerliner
The layer(s) forming the inside sur-
face of a tubeless tire that contains
the inflating medium within the tire. . Innerliner separation
The parting of the innerliner from
cord material in the carcass.. Intended outboard sidewall
(1) The sidewall that contains a
whitewall, bears white lettering
or bears manufacturer, brand,
and/or model name molding that
is higher or deeper than the
same molding on the other side-
wall of the tire, or (2) The outward facing sidewall
of an asymmetrical tire that has
a particular side that must al-
ways face outward when mount-
Consumer information and Reporting safety defects
13-7
– CONTINUED –
Page 400 of 422

sory weight, including heavy duty
brakes, ride levelers, roof rack,
heavy duty battery, and special trim. .Radial ply tire
A pneumatic tire in which the ply
cords that extend to the beads are
laid at substantially 90 degrees to
the centerline of the tread. . Recommended inflation pres-
sure
The cold inflation pressure recom-
mended by a vehicle manufacturer. . Reinforced tire
A tire designed to operate at higher
loads and at higher inflation pres-
sures than the corresponding stan-
dard tire. . Rim
A metal support for a tire or a tire
and tube assembly upon which the
tire beads are seated. . Rim diameter
Nominal diameter of the bead seat. . Rim size designation
Rim diameter and width. .
Rim type designation
The industry of manufacturer ’s des-
ignation for a rim by style or code. . Rim width
Nominal distance between rim flanges. . Section width
The linear distance between the
exteriors of the sidewalls of an
inflated tire, excluding elevations
due to labeling, decoration, or
protective bands. . Sidewall
That portion of a tire between the
tread and bead.. Sidewall separation
The parting of the rubber com-
pound from the cord material in
the sidewall.. Test rim
The rim on which a tire is fitted for
testing, and it may be any rim listed
as appropriate for use with that tire.. Tread
That portion of a tire that comes
into contact with the road. .
Tread rib
A tread section running circumfer-
entially around a tire. . Tread separation
Pulling away of the tread from the
tire carcass. . Treadwear indicators (TWI)
The projections within the principal
grooves designed to give a visual
indication of the degrees of wear of
the tread. . Vehicle capacity weight
The rated cargo and luggage load
plus 150 lbs (68 kg) times thevehicle ’s designated seating capa-
city. . Vehicle maximum load on the
tire
Load on an individual tire that is
determined by distributing to each
axle its share of the maximum
loaded vehicle weight and dividing
by 2. . Vehicle normal load on the tire
Load on an individual tire that is
determined by distributing to each
axle its share of the curb weight,
Consumer information and Reporting safety defects
13-9
– CONTINUED –
Page 406 of 422

injury. .Vehicle stability will deteriorate.
. Heavy and/or high-mounted
loads could increase the risk of
rollover.. Stopping distance will increase.
. Brakes could overheat and fail.
. Suspension, bearings, axles and
other parts of the body could break
or experience accelerated wear
that will shorten vehicle life. . Tires could fail.
. Tread separation could occur.
. Tire could separate from its rim.
& Steps for Determining Cor-
rect Load Limit
1. Locate the statement “The com-
bined weight of occupants and
cargo should never exceed XXXpounds ”on your vehicle ’s placard.
2. Determine the combined weight
of the driver and passengers that
will be riding in your vehicle. 3. Subtract the combined weight of
the driver and passengers from
XXX kilograms or XXX pounds. 4.
The resulting figure equals the
available amount of cargo and
luggage load capacity. For exam-
ple, if the “XXX ”amount equals
1,400 lbs (635 kg) and there will be
five- 150 lbs (68 kg) passengers in
your vehicle, the amount of avail-
able cargo and luggage load capa-
city is 650 lbs. (1,400 750 (5 6
150) = 650 lbs).
5. Determine the combined weight
of luggage and cargo being loaded
on the vehicle. That weight may not
safely exceed the available cargo
and luggage load capacity calcu-
lated in Step 4. 6. If your vehicle will be towing a
trailer, load from your trailer will be
transferred to your vehicle. Consult
this manual to determine how this
reduces the available cargo and
luggage load capacity of your ve- hicle. Uniform tire quality grading
standards
This information indicates the rela-
tive performance of passenger car
tires in the area of treadwear,
traction, and temperature resis-
tance. This is to aid the consumer
in making an informed choice in the
purchase of tires.
Quality grades can be found where
applicable on the tire sidewall be-
tween tread shoulder and maxi-
mum section width. For example:
Treadwear 200 Traction AA Tem-
perature A
The quality grades apply to new
pneumatic tires for use on passen-
ger cars. However, they do not
apply to deep tread, winter type
snow tires, space-saver or tempor-
ary use spare tires, tires with
nominal rim diameters of 12 inches
or less, or to some limited produc-
tion tires.
All passenger car tires must con-
Consumer information and Reporting safety defects
13-15
– CONTINUED –