manual transmission SUBARU TRIBECA 2010 1.G Owners Manual
[x] Cancel search | Manufacturer: SUBARU, Model Year: 2010, Model line: TRIBECA, Model: SUBARU TRIBECA 2010 1.GPages: 422, PDF Size: 12.87 MB
Page 244 of 422
Fuel...................................................................... 7-2
Fuel requirements ............................................... 7-2
Fuel filler lid and cap ........................................... 7-3
State emission testing (U.S. only) ...................... 7-5
Preparing to drive ............................................... 7-7
Starting the engine .............................................. 7-7
Stopping the engine ............................................ 7-8
Remote engine start system (dealer option) ..... 7-8
Starting your vehicle ........................................... 7-9
Remote start safety features ................................ 7-9
Entering the vehicle while it is running via remote start .................................................................. 7-9
Entering the vehicle following remote engine start shutdown .......................................................... 7-9
Pre-heating or pre-cooling the interior of the vehicle ............................................................. 7-10
Service mode ..................................................... 7-10
Remote engine start transmitter programming and programmable feature option ..................... 7-10
System maintenance .......................................... 7-11
Automatic transmission ..................................... 7-12
Select lever ........................................................ 7-13
Shift lock function .............................................. 7-14
Selection of manual mode .................................. 7-16
Driving tips ........................................................ 7-17
SPORT mode ..................................................... 7-18 Power steering
................................................... 7-18
Braking ............................................................... 7-19
Braking tips ....................................................... 7-19
Brake system .................................................... 7-19
Disc brake pad wear warning indicators ............. 7-20
ABS (Anti-lock Brake System) .......................... 7-20
ABS system self-check ...................................... 7-21
ABS warning light .............................................. 7-21
Electronic Brake Force Distribution (EBD) system ............................................................. 7-22
Steps to take if EBD system malfunctions ..... ..... 7-22
Vehicle Dynamics Control system .................... 7-23
Vehicle Dynamics Control system monitor..... ..... 7-25
Traction Control system OFF switch ................... 7-27
Tire pressure monitoring system (TPMS) ........ 7-28
Parking your vehicle ......................................... 7-29
Parking brake .................................................... 7-29
Parking tips ....................................................... 7-30
Cruise control .................................................... 7-30
To set cruise control .......................................... 7-31
To temporarily cancel the cruise control ............. 7-31
To turn off the cruise control .............................. 7-32
To change the cruising speed .. .......................... 7-32
Cruise control indicator light .............................. 7-33
Cruise control set indicator light ........................ 7-33
Starting and operating
7
Page 255 of 422
7-12Starting and operating
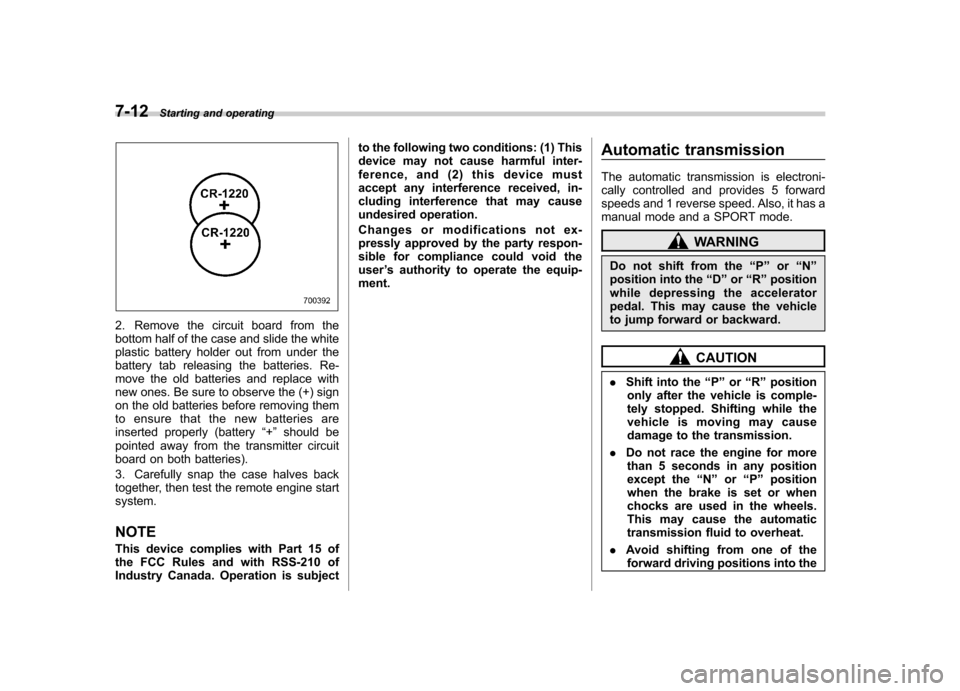
2. Remove the circuit board from the
bottom half of the case and slide the white
plastic battery holder out from under the
battery tab releasing the batteries. Re-
move the old batteries and replace with
new ones. Be sure to observe the (+) sign
on the old batteries before removing them
to ensure that the new batteries are
inserted properly (battery “+ ” should be
pointed away from the transmitter circuit
board on both batteries).
3. Carefully snap the case halves back
together, then test the remote engine startsystem.
NOTE
This device complies with Part 15 of
the FCC Rules and with RSS-210 of
Industry Canada. Operation is subject to the following two conditions: (1) This
device may not cause harmful inter-
ference, and (2) this device must
accept any interference received, in-
cluding interference that may cause
undesired operation.
Changes or modifications not ex-
pressly approved by the party respon-
sible for compliance could void theuser
’s authority to operate the equip-
ment. Automatic transmission
The automatic transmission is electroni-
cally controlled and provides 5 forward
speeds and 1 reverse speed. Also, it has a
manual mode and a SPORT mode.
WARNING
Do not shift from the “P ” or “N ”
position into the “D ” or “R ” position
while depressing the accelerator
pedal. This may cause the vehicle
to jump forward or backward.
CAUTION
. Shift into the “P ” or “R ” position
only after the vehicle is comple-
tely stopped. Shifting while the
vehicle is moving may cause
damage to the transmission.
. Do not race the engine for more
than 5 seconds in any position
except the “N ” or “P ” position
when the brake is set or when
chocks are used in the wheels.
This may cause the automatic
transmission fluid to overheat.
. Avoid shifting from one of the
forward driving positions into the
Page 256 of 422
“R ” position or vice versa until
the vehicle has completely
stopped. Such shifting may
cause damage to the transmis-sion.
. When parking the vehicle, first
securely apply the parking brake
and then place the select lever inthe “P ” position. Avoid parking
for a long time with the select
lever in any other position as
doing so could result in a dead
battery.
NOTE . When the engine coolant tempera-
ture is still low, the automatic transmis-
sion will upshift to higher engine
speeds than when the coolant tempera-
ture is sufficiently high in order to
shorten the warm-up time and improve
driveability. The gearshift timing will
automatically shift to the normal timing
after the engine has warmed up.. Immediately after ATF (automatic
transmission fluid) is replaced, you
may feel that the automatic transmis-
sion operation is somewhat unusual.
This results from invalidation of data
which the on-board computer has
collected and stored in memory to allow the transmission to shift at the
most appropriate times for the current
condition of your vehicle. Optimized
shifting will be restored as the vehicle
continues to be driven for a while.
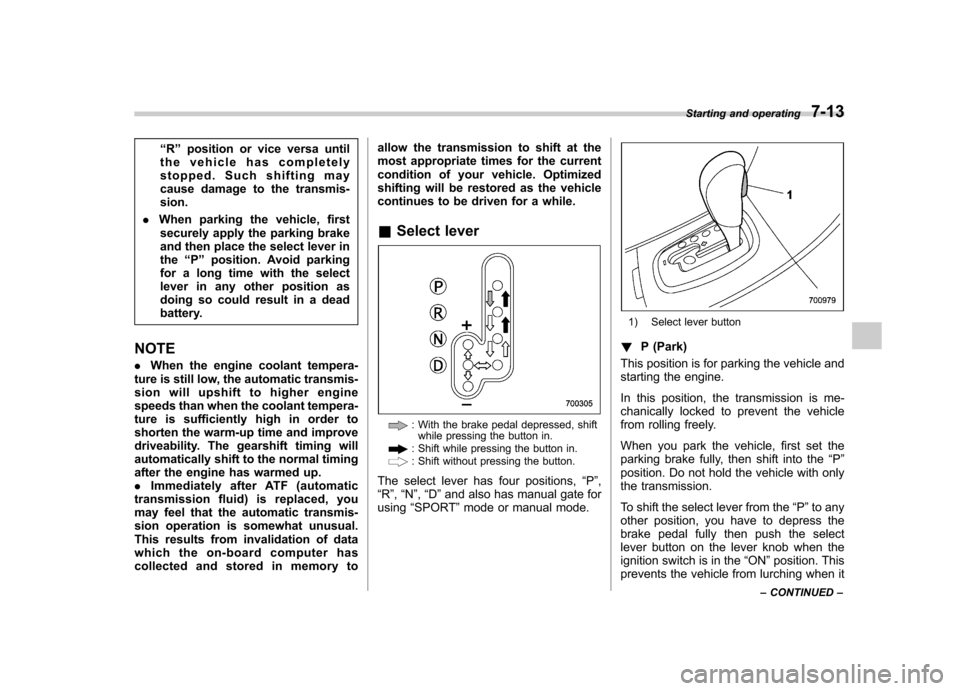
& Select lever
: With the brake pedal depressed, shift
while pressing the button in.
: Shift while pressing the button in.: Shift without pressing the button.
The select lever has four positions, “P ”,
“ R ”, “N ”, “D ”and also has manual gate for
using “SPORT ”mode or manual mode.
1) Select lever button
! P (Park)
This position is for parking the vehicle and
starting the engine.
In this position, the transmission is me-
chanically locked to prevent the vehicle
from rolling freely.
When you park the vehicle, first set the
parking brake fully, then shift into the “P ”
position. Do not hold the vehicle with only
the transmission.
To shift the select lever from the “P ”to any
other position, you have to depress the
brake pedal fully then push the select
lever button on the lever knob when the
ignition switch is in the “ON ”position. This
prevents the vehicle from lurching when it Starting and operating
7-13
– CONTINUED –
Page 257 of 422
7-14Starting and operating
is started.
If the select lever does not move from the “P ” position with the brake pedal de-
pressed, the select lever button pushed
in, and the ignition switch in the ON
position, refer to “Shift lock function ”F 7-
14. ! R (Reverse)
This position is for backing the vehicle.
To shift from the “N ” to “R ”position, stop
the vehicle completely then move the
lever to the “R ” position while pushing
the select lever button. ! N (Neutral)
This position is for restarting a stalled engine.
In this position the wheels and transmis-
sion are not locked. In this position, the
transmission is neutral; the vehicle will roll
freely, even on the slightest incline unless
the parking brake or foot brake is applied.
Avoid coasting with the transmission neutral.
During coasting, there is no engine brak-
ing effect.
NOTE
When the ignition switch has been
turned to the “LOCK ”position, move-
ment of the select lever from the “N ” position to the
“R ” position is possible
for a limited time period by depressing
the brake pedal and then becomes
impossible. If the select lever becomes
impossible to be moved after a limited
time period, turn the ignition switch tothe “ON ”position. You will then be able
to move the select lever to the “P ”
position.
WARNING
Do not drive the vehicle with the
select lever in the “N ” (Neutral)
position. Engine braking has no
effect in this condition and the risk
of an accident is consequently in-creased.
! D (Drive)
This position is for normal driving.
The transmission automatically shifts into
a suitable gear from 1st to 5th according to
the vehicle speed and the acceleration
you require.
When more acceleration is required in this
position, depress the accelerator pedal
fully to the floor and hold that position. The
transmission will automatically downshift
to 4th, 3rd, 2nd or 1st gear. When you
release the pedal, the transmission will return to the original gear position.
To use the SPORT mode, move the lever
from this position into the manual gate.
To use the manual mode, move the lever
from this position into the manual gate
then move it toward the
“+ ” and “� ” ends.
! While climbing a grade
When driving up a hill, undesired upshift to
4th or 5th gear is prevented from taking
place when the accelerator is released.
This minimizes the chance of subsequent
downshifting to a lower gear when accel-
erating again. This prevents repeated
upshifting and downshifting resulting in a
smoother operation of the vehicle.
NOTE
The transmission may downshift to 2nd
or 1st gear, depending on the way the
accelerator pedal is depressed to ac-
celerate the vehicle again. & Shift lock function
The shift lock function helps prevent the
improper operation of the select lever. . The select lever cannot be operated
unless the ignition switch is turned to the “ ON ”position and the brake pedal is
depressed. . The select lever cannot be moved from
Page 260 of 422

Gearshifts can be performed using the
select lever.
Shift to the next-higher gear by briefly
pushing the select lever toward the“+ ”
end of the manual gate.
Shift to the next-lower gear by briefly
pulling the select lever toward the “� ”
end of the manual gate. NOTE
Please read the following points care-
fully and bear them in mind when using
the manual mode. . When the temperature of the engine
oil is higher than normal, warning
beeps are emitted and the shift position
indicator shows “� ”. If these warnings
are issued, deselect the manual mode
to protect the engine from damage. .
The transmission does not automa-
tically shift up in the manual mode.
Perform gearshifts in accordance with
road conditions so that the tachometer
needle does not enter the red zone. If
the engine speed reaches a predeter-
mined level, a fuel-cut function will
operate. Shift up if this happens. Also,
the transmission may automatically
shift up to protect the engine.. If you attempt to shift down when
the engine speed is too high, i.e., when
a downshift would push the tachometer
needle beyond the red zone, beeps will
be emitted to warn you that the down-
shift is not possible. . If you attempt to shift up when the
vehicle speed is too low, the transmis-
sion will not respond.. You can perform a skip-shift (for
example, from 4th to 2nd) by operating
the select lever twice in rapid succes-sion.. The transmission automatically se-
lects 1st gear when the vehicle stopsmoving.. If the temperature of the automatic
transmission fluid becomes too high,the “AT OIL TEMP ”warning light will
illuminate and upshifts to 5th gear will
not be possible. Immediately stop the
vehicle in a safe place and let the
engine idle until the warning light turns off.
& Driving tips
. On a road surface where there is a risk
of wheelspin (for example, a snow- or
gravel-covered road), you can pull away
from a standstill safely and easily by first
selecting the 2nd gear of the manualmode. . Always apply the foot or parking brake
when the vehicle is stopped in the “D ”or
“ R ”position.
. Always set the parking brake when
parking your vehicle. Do not hold the
vehicle with only the transmission. . Do not keep the vehicle in a stationary
position on an uphill grade by using the “ D ”position. Use the brake instead.
. The engine may, on rare occasions,
knock when the vehicle rapidly acceler-
ates or rapidly pulls away from a standstill.
This phenomenon does not indicate aproblem. . A slight reduction in output torque may
occur before the engine warms up. Starting and operating
7-17
– CONTINUED –
Page 261 of 422
7-18Starting and operating
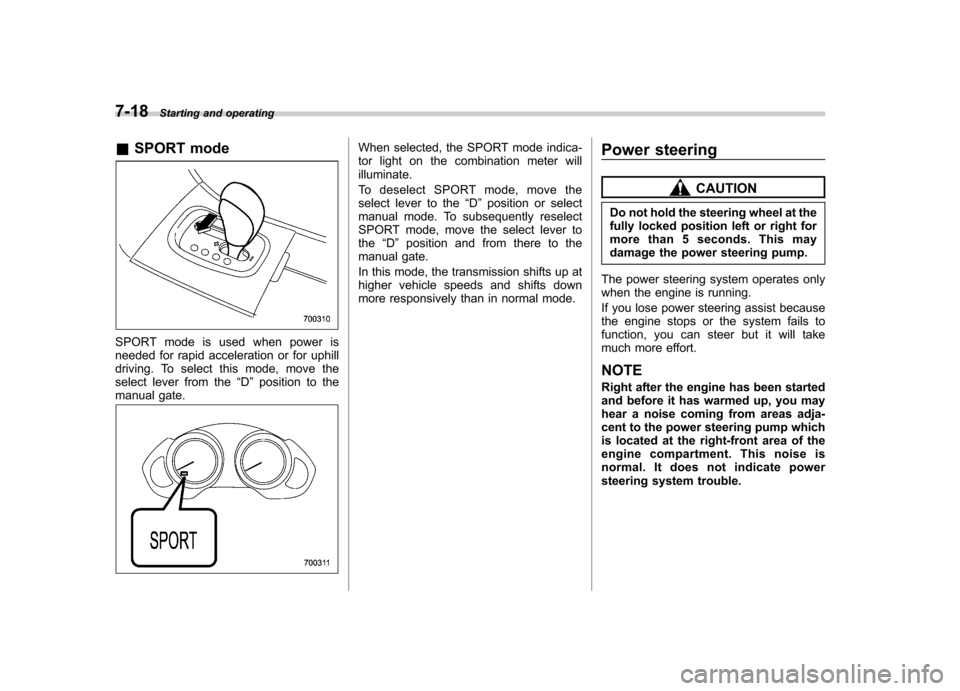
&SPORT mode
SPORT mode is used when power is
needed for rapid acceleration or for uphill
driving. To select this mode, move the
select lever from the “D ” position to the
manual gate.
When selected, the SPORT mode indica-
tor light on the combination meter willilluminate.
To deselect SPORT mode, move the
select lever to the “D ” position or select
manual mode. To subsequently reselect
SPORT mode, move the select lever tothe “D ” position and from there to the
manual gate.
In this mode, the transmission shifts up at
higher vehicle speeds and shifts down
more responsively than in normal mode. Power steering
CAUTION
Do not hold the steering wheel at the
fully locked position left or right for
more than 5 seconds. This may
damage the power steering pump.
The power steering system operates only
when the engine is running.
If you lose power steering assist because
the engine stops or the system fails to
function, you can steer but it will take
much more effort. NOTE
Right after the engine has been started
and before it has warmed up, you may
hear a noise coming from areas adja-
cent to the power steering pump which
is located at the right-front area of the
engine compartment. This noise is
normal. It does not indicate power
steering system trouble.
Page 284 of 422

underbody. Clear off any such matter from
the underbody. If the vehicle is used with
these materials trapped or adhering to the
underbody, a mechanical breakdown or
fire could occur. .Secure all cargo carried inside the
vehicle and make certain that it is not
piled higher than the seatbacks. During
sudden stops or jolts, unsecured cargo
could be thrown around in the vehicle and
cause injury. Do not pile heavy loads on
the roof. Those loads raise the vehicle ’s
center of gravity and make it more prone
to tip over. . If you must rock the vehicle to free it
from sand or mud, depress the accelerator
pedal slightly and move the select lever
back and forth between “D ” and “R ”
repeatedly. Do not race the engine. For
the best possible traction, avoid spinning
the wheels when trying to free the vehicle. . When the road surface is extremely
slippery, you can obtain better traction by
starting the vehicle with the transmission
in 2nd than 1st. . Never equip your vehicle with tires
larger than those specified in this manual.. Wash the vehicle ’s underbody after off-
road driving. Suspension components are
particularly prone to dirt buildup, so they
need to be washed thoroughly. . Frequent driving of an AWD model under hard-driving conditions such as
rough roads or off roads will necessitate
more frequent replacement of engine oil,
brake fluid and transmission oil than that
specified in the maintenance schedule
described in the
“Warranty and Mainte-
nance Booklet ”.
Remember that damage done to your
SUBARU while operating it off-road and
not using common sense precautions
such as those listed above is not eligible
for warranty coverage. Winter driving
&
Operation during cold weather
Carry some emergency equipment, such
as a window scraper, a bag of sand,
flares, a small shovel and jumper cables.
Check the battery and cables. Cold
temperatures reduce battery capacity.
The battery must be in good condition to
provide enough power for cold winterstarts.
Use an engine oil of proper grade and
viscosity for cold weather. Heavy summer
oil will cause harder starting.
Keep the door locks from freezing by
squirting them with deicer or glycerin. Driving tips
8-7
– CONTINUED –
Page 288 of 422
Recommended winter (snow) tire sizeP255/55R18 stud less
& Tire chains
CAUTION
Tire chains cannot be used on your
vehicle because of the lack of
clearance between the tires and
vehicle body.
& Rocking the vehicle
If you must rock the vehicle to free it from
snow, sand, or mud, depress the accel-
erator pedal slightly and move the select
lever back and forth between “D ”and “R ”
repeatedly. Do not race the engine. For
the best possible traction, avoid spinning
the wheels when trying to free the vehicle.
When the road surface is extremely
slippery, you can obtain better traction by
starting the vehicle with the transmission
in 2nd than 1st.
For information about holding the trans-
mission in the 2nd position, refer to“ Selection of manual mode ”F 7-16 and
“ Driving tips ”F 7-17. Loading your vehicle
WARNING
Never allow passengers to ride on a
folded rear seatback or in the cargo
area. Doing so may result in serious
injury.
WARNING
. Never stack luggage or other
cargo higher than the top of the
seatback because it could tumble
forward and injure passengers in
the event of a sudden stop or
accident. Keep luggage or cargo
low, as close to the floor as possible.
. When you carry something inside
the vehicle, secure it whenever
you can to prevent it from being
thrown around inside the vehicle
during sudden stops, sharp turns
or in an accident.
. Do not pile heavy loads on the
roof. These loads raise the vehi-cle ’s center of gravity and make it
more prone to tip over.
. Secure lengthy items properly to
prevent them from shooting for-
ward and causing serious injury
during a sudden stop.
. Never exceed the maximum load
limit. If you do, some parts on
your vehicle can break, or it can
change the way your vehicle
handles. This could result in loss
of control and cause personal
injury. Also, overloading can
shorten the life of your vehicle.
. Do not place anything on the
extended luggage cover. Such
items could tumble forward in
the event of a sudden stop or a
collision. This could cause ser-
ious injury. Driving tips
8-11
– CONTINUED –
Page 304 of 422

.Backing up with a trailer is difficult and
takes practice. When backing up with a
trailer, never accelerate or steer rapidly.
When turning back, grip the bottom of the
steering wheel with one hand and turn it to
the left for a left turn, and turn it to the right
for a right turn. . If the ABS warning light illuminates
while the vehicle is in motion, stop towing
the trailer and have repairs performed
immediately by the nearest SUBARU
dealer. ! Driving on grades
. Before going down a steep hill, slow
down and shift into lower gear (if neces-
sary, use 1st gear) in order to utilize the
engine braking effect and prevent over-
heating of your vehicle ’s brakes. Do not
make sudden downshifts. . When driving uphill in hot weather, the
air conditioner may turn off automatically
to protect the engine from overheating. . When driving uphill in hot weather, pay
attention to the water temperature gauge
pointer and AT OIL TEMP warning light
because the engine and transmission are
relatively prone to overheating under
these conditions. If the water temperature
gauge pointer approaches the OVER-
HEAT zone or the AT OIL TEMP warning
light illuminates, immediately turn off the air conditioner and stop the vehicle in the
nearest safe location. For further instruc-
tions and additional information, refer to
the following sections.
–“If you park your vehicle in an
emergency ”F 9-2
–“ Engine overheating ”F 9-14
–“ Temperature gauge ”F 3-9
–“ AT OIL TEMP warning light ”F 3-13
NOTE
The temperature of engine coolant is
less likely to rise to the OVERHEAT
zone in the “D ” position than in the
manual mode position. . Avoid using the accelerator pedal to
stay stationary on an uphill slope instead
of using the parking brake or foot brake.
That may cause the transmission fluid tooverheat. ! Parking on a grade
Always block the wheels under both
vehicle and trailer when parking. Apply
the parking brake firmly. You should not
park on a hill or slope. But if parking on a
hill or slope cannot be avoided, you
should take the following steps.
1. Apply the brakes and hold the pedal down.
2. Have someone place wheel blocks
under both the vehicle and trailer wheels. 3. When the wheel blocks are in place,
release the regular brakes slowly until the
blocks absorb the load.
4. Apply the regular brakes and then
apply the parking brake; slowly release
the regular brakes.
5. Shift into
“P ”and shut off the engine. Driving tips
8-27
Page 411 of 422

14-2Index
A
ABS (Anti-lock Brake System) ..................................... 7-20
Warning light ................................................. 3-15, 7-21
Accessories ....................................................... 5-2, 11-40
Accessory power outlet ............................................... 6-10
Active head restraint ..................................................... 1-6
Air cleaner element ................................................... 11-14
Air conditioner Automatic climate control system ............................... 4-5
Air filtration system ..................................................... 4-11
Airflow ........................................................................ 4-2
Airflow mode selection .................................................. 4-3
Airflow selection
Automatic climate control system ............................... 4-8
Alarm system ............................................................ 2-16
All-Wheel Drive warning light ....................................... 3-18
Aluminum wheel ....................................................... 11-30
Cleaning ............................................................... 10-3
Antenna system ........................................................... 5-2
Anti-lock Brake System (ABS) ..................................... 7-20
Arming the system ..................................................... 2-17
Armrest ..................................................................... 1-13
AT OIL TEMP warning light ......................................... 3-13
Audio Antenna system ....................................................... 5-2
Auxiliary input jack ................................................. 5-28
Control button ........................................................ 5-26
Set......................................................................... 5-3
Auto-dimming mirror/compass .............................. 3-38, 3-41
Automatic climate control system ................................... 4-5 Automatic transmission
............................................... 7-12
Capacities ............................................................. 12-3
Fluid ................................................................... 11-16
MANUAL mode ...................................................... 7-16
Oil temperature warning light (AT OIL TEMP) ............. 3-13
Select lever ........................................................... 7-13
Shift lock function ................................................... 7-14
Shift lock release .................................................... 7-14
SPORT mode ........................................................ 7-18
Automatic/Emergency Locking Retractor (A/ELR) ........... 1-18
BBattery .................................................................... 11-37
Drainage prevention function ..................................... 2-6
Jump starting ......................................................... 9-12
Replacement (remote keyless entry system) .............. 2-11
Booster seat .............................................................. 1-37
Bottle holder ............................................................... 6-9
Brake Assist .................................................................... 7-19
Booster ....................................................... 7-19, 11-21
Fluid ................................................................... 11-20
Pad and lining ...................................................... 11-23
Parking ....................................................... 7-29, 11-23
Pedal .................................................................. 11-22
System .................................................................. 7-19
Brake pedal Free play ............................................................. 11-22
Reserve distance .................................................. 11-22
Brake system ............................................................. 7-19
Warning light .......................................................... 3-16