window SUBARU TRIBECA 2010 1.G Owners Manual
[x] Cancel search | Manufacturer: SUBARU, Model Year: 2010, Model line: TRIBECA, Model: SUBARU TRIBECA 2010 1.GPages: 422, PDF Size: 12.87 MB
Page 4 of 422

Warranties &Warranties for U.S.A.
All SUBARU vehicles distributed by
Subaru of America, Inc. and sold at retail
by an authorized SUBARU dealer in the
United States come with the followingwarranties. . SUBARU Limited Warranty
. Emission Control Systems Warranty
. Emissions Performance Warranty
All warranty information, including details
of coverage and exclusions, is in the“ Warranty and Maintenance Booklet ”.
Please read these warranties carefully.
& Warranties for Canada
All SUBARU vehicles distributed by
Subaru Canada, Inc. and sold at retail by
an authorized SUBARU dealer in Canada
come with the following warranties. . SUBARU Limited Warranty
. Anti-Corrosion Warranty
. Emission Control Warranty
All warranty information, including details
of coverage and exclusions, is in the“ Warranty and Service Booklet ”. Please
read these warranties carefully.CAUTION
. If your vehicle is equipped with a
navigation system and/or Rear
Seat Entertainment System, the
displays contain mercury. There-
fore, the displays of the naviga-
tion system and/or Rear Seat
Entertainment System must be
removed before vehicle disposal.
Once the displays have been
removed, please reuse, recycle
or dispose of them as hazardouswaste.
. If your vehicle is equipped with
High Intensity Discharge (HID)
headlights, the HID headlights
contain mercury. Therefore, it is
necessary to remove HID head-
lights before vehicle disposal.
Once removed, please reuse, re-
cycle or dispose of the HID head-
lights as hazardous waste. How to use this Owner
’s
Manual & Using your Owner ’s Manual
Before you operate your vehicle, carefully
read this manual. To protect yourself and
extend the service life of your vehicle,
follow the instructions in this manual.
Failure to observe these instructions may
result in serious injury and damage to yourvehicle.
This manual is composed of fourteen
chapters. Each chapter begins with a brief
table of contents, so you can usually tell at
a glance if that chapter contains the
information you want.
Chapter 1: Seat, seatbelt and SRS airbags
This chapter informs you how to use the
seat and seatbelt and contains precau-
tions for the SRS airbags.
Chapter 2: Keys and doors
This chapter informs you how to operate
the keys, locks and windows.
Chapter 3: Instruments and controls
This chapter informs you about the opera-
tion of instrument panel indicators and
how to use the instruments and otherswitches. 1
– CONTINUED –
Page 6 of 422
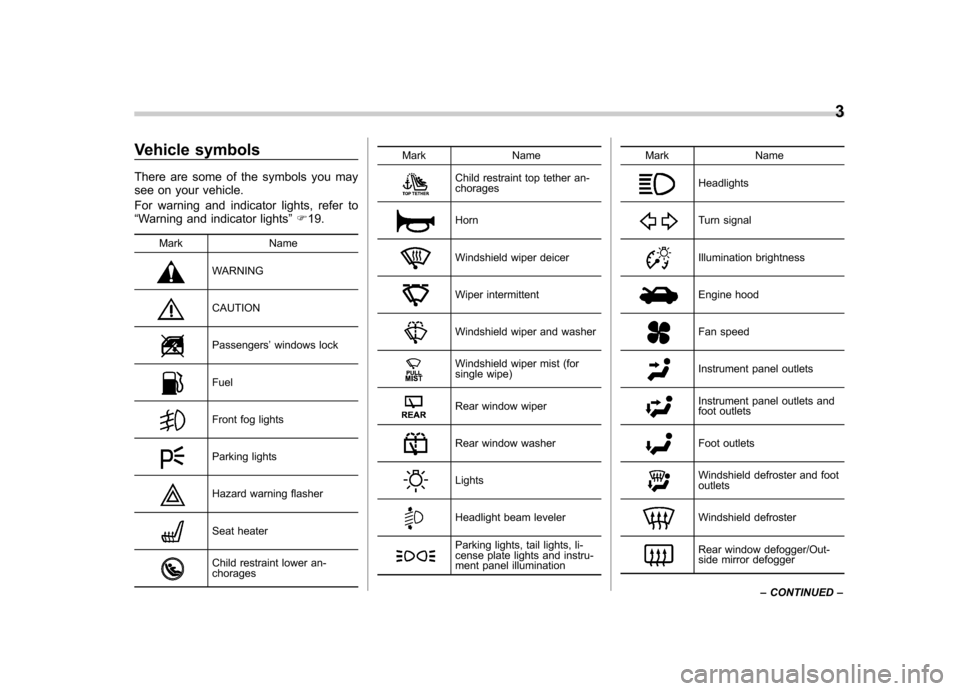
Vehicle symbols
There are some of the symbols you may
see on your vehicle.
For warning and indicator lights, refer to “Warning and indicator lights ”F 19.
Mark Name
WARNING
CAUTION
Passengers ’windows lock
Fuel
Front fog lights
Parking lights
Hazard warning flasher
Seat heater
Child restraint lower an- chorages Mark Name
Child restraint top tether an- chorages
Horn
Windshield wiper deicer
Wiper intermittent
Windshield wiper and washer
Windshield wiper mist (for
single wipe)
Rear window wiper
Rear window washer
Lights
Headlight beam leveler
Parking lights, tail lights, li-
cense plate lights and instru-
ment panel illumination
Mark Name
Headlights
Turn signal
Illumination brightness
Engine hood
Fan speed
Instrument panel outlets
Instrument panel outlets and
foot outlets
Foot outlets
Windshield defroster and foot outlets
Windshield defroster
Rear window defogger/Out-
side mirror defogger3
– CONTINUED –
Page 8 of 422
&Child safety
WARNING
. Never hold a child on your lap or
in your arms while the vehicle is
moving. The passenger cannot
protect the child from injury in a
collision, because the child will
be caught between the passen-
ger and objects inside the vehi-cle.
. While riding in the vehicle, in-
fants and small children should
always be placed in one of the
rear seating positions recom-
mended in this Owner ’s Manual
in an infant or child restraint
system which is appropriate for
the child ’s age, height and
weight. If a child is too big for a
child restraint system, the child
should sit in a REAR seat and be
restrained using the seatbelts.
According to accident statistics,
children are safer when properly
restrained in the rear seating
positions than in the front seat-
ing positions. Never allow a child
to stand up or kneel on the seat.
. Put children aged 12 and under in
a REAR seat properly restrained at all times in a child restraint
device or in a seatbelt. The SRS
airbag deploys with considerable
speed and force and can injure or
even kill children, especially if
they are 12 years of age and
under and are not restrained or
improperly restrained. Because
children are lighter and weaker
than adults, their risk of being
injured from deployment is great-
er.
. NEVER INSTALL A REARWARD
FACING CHILD SAFETY SEAT IN
THE FRONT SEAT. DOING SO
RISKS SERIOUS INJURY OR
DEATH TO THE CHILD BY PLA-
CING THE CHILD ’S HEAD TOO
CLOSE TO THE SRS AIRBAG.
. Always use the child safety locks
whenever a child rides in the
rear. Serious injury could result
if a child accidentally opened the
door and fell out. Refer to “Child
safety locks ”F 2-21.
. Always lock the passenger ’s win-
dows using the lock switch when
children are riding in the vehicle.
Failure to follow this procedure
could result in injury to a child
operating the power window. Re-
fer to “Power windows ”F 2-21. .
Never leave unattended children
in the vehicle. They could acci-
dentally injure themselves or
others through inadvertent op-
eration of the vehicle. Also, on
hot or sunny days, temperature
in a closed vehicle could quickly
become high enough to cause
severe or possibly fatal injuries
to them.
For instructions and precautions, carefully
read the following sections. . For the seatbelt system, refer to “Seat-
belts ”F 1-16.
. For the child restraint system, refer to
“ Child restraint systems ”F 1-31.
. For the SRS airbag system, refer to
“ *SRS airbag (Supplemental Restraint
System airbag) ”F 1-45.
& Engine exhaust gas (carbon monoxide)
WARNING
. Never inhale engine exhaust gas.
Engine exhaust gas contains
carbon monoxide, a colorless
and odorless gas which is dan-
gerous, or even lethal, if inhaled.
. Always properly maintain the en- 5
– CONTINUED –
Page 9 of 422
6
gine exhaust system to prevent
engine exhaust gas from enter-
ing the vehicle.
. Never run the engine in a closed
space, such as a garage, except
for the brief time needed to drive
the vehicle in or out of it.
. Avoid remaining in a parked
vehicle for a lengthy time while
the engine is running. If that is
unavoidable, then use the venti-
lation fan to force fresh air into
the vehicle.
. Always keep the front ventilator
inlet grille free from snow, leaves
or other obstructions to ensure
that the ventilation system al-
ways works properly.
. If at any time you suspect that
exhaust fumes are entering the
vehicle, have the problem
checked and corrected as soon
as possible. If you must drive
under these conditions, drive
only with all windows fully open.
. Keep the rear gate closed while
driving to prevent exhaust gas
from entering the vehicle. &
Drinking and driving
WARNING
Drinking and then driving is very
dangerous. Alcohol in the blood-
stream delays your reaction and
impairs your perception, judgment
and attentiveness. If you drive after
drinking - even if you drink just a
little - it will increase the risk of
being involved in a serious or fatal
accident, injuring or killing yourself,
your passengers and others. In
addition, if you are injured in the
accident, alcohol may increase the
severity of that injury.
Please don ’t drink and drive.
Drunken driving is one of the most
frequent causes of accidents. Since alco-
hol affects all people differently, you may
have consumed too much alcohol to drive
safely even if the level of alcohol in your
blood is below the legal limit. The safest
thing you can do is never drink and drive.
However if you have no choice but to
drive, stop drinking and sober up comple-
tely before getting behind the wheel. &
Drugs and drivingWARNING
There are some drugs (over the
counter and prescription) that can
delay your reaction time and impair
your perception, judgment and at-
tentiveness. If you drive after taking
them, it may increase your, yourpassengers ’and other persons ’risk
of being involved in a serious or
fatal accident.
If you are taking any drugs, check with
your doctor or pharmacist or read the
literature that accompanies the medication
to determine if the drug you are taking can
impair your driving ability. Do not drive
after taking any medications that can
make you drowsy or otherwise affect your
ability to safely operate a motor vehicle. If
you have a medical condition that requires
you to take drugs, please consult with
your doctor.
Never drive if you are under the influence
of any illicit mind-altering drugs. For your
own health and well-being, we urge you
not to take illegal drugs in the first place
and to seek treatment if you are addicted
to those drugs.
Page 14 of 422

1) Rear gate (page 2-24)
2) Rear wiper switch (page 3-35)
3) Rear window defogger button(page 3-37)
4) Fuel filler lid and cap (page 7-3)
5) Child safety locks (page 2-21)
6) Tie-down hooks (page 9-15)
7) Bulb replacement (page 11-40)
8) Towing hook (page 9-14) 11
– CONTINUED –
Page 18 of 422

&Instrument panel1) Door locks (page 2-5)
2) Illumination brightness control
(page 3-28)
3) Remote control mirror switch (page 3-42)
Power folding mirror switch (if equipped)
(page 3-43)
4) Windshield wiper deicer (page 3-36)
5) Traction Control system OFF switch (page 7-27)
6) Headlight beam leveler (if equipped) (page 3-29)
7) Light control switch (page 3-26)
8) Combination meter (page 3-5)
9) Wiper control lever (page 3-33)
10) Cruise control (page 7-30)
11) Horn (page 3-44)
12) SRS airbag (page 1-45)
13) Tilt steering (page 3-44)
14) Hood lock release knob (page 11-4)
15) Fuse box (page 11-38)
16) Power windows (page 2-21) 15
– CONTINUED –
Page 19 of 422
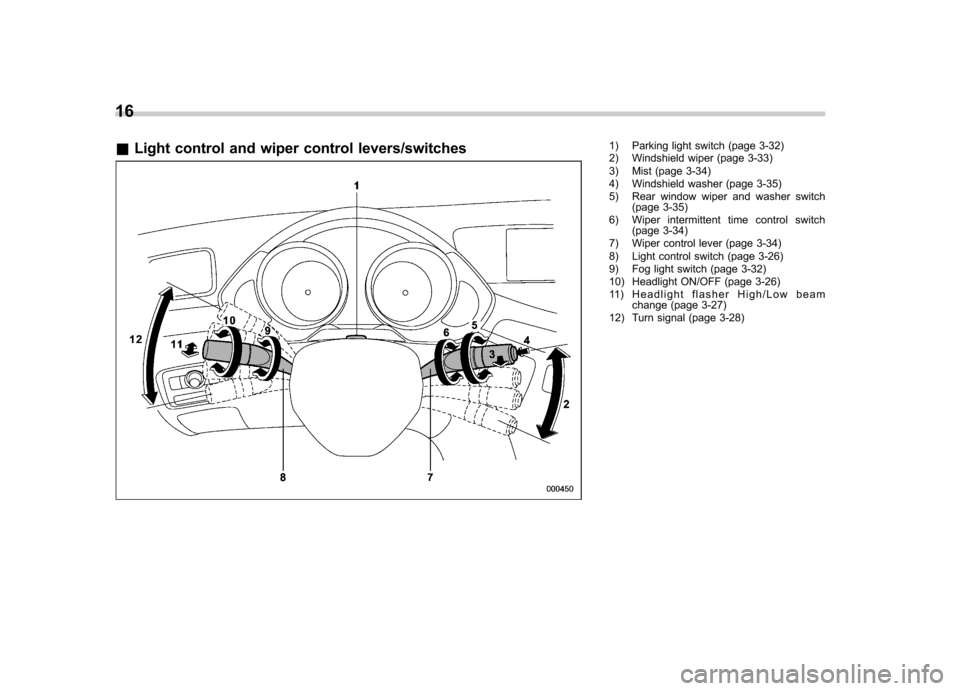
16 &Light control and wiper control levers/switches
1) Parking light switch (page 3-32)
2) Windshield wiper (page 3-33)
3) Mist (page 3-34)
4) Windshield washer (page 3-35)
5) Rear window wiper and washer switch
(page 3-35)
6) Wiper intermittent time control switch (page 3-34)
7) Wiper control lever (page 3-34)
8) Light control switch (page 3-26)
9) Fog light switch (page 3-32)
10) Headlight ON/OFF (page 3-26)
11) Headlight flasher High/Low beam change (page 3-27)
12) Turn signal (page 3-28)
Page 25 of 422

22
Function settings
A SUBARU dealer can change the settings of the functions shown in the following table to meet your personal requirements. Contact
the nearest SUBARU dealer for details. If your vehicle is equipped with the genuine SUBARU navigation system, the settings for some
of these functions can be changed using the navigation monitor. For details, please refer to the Owner’s Manual supplement for the
navigation system.
Item Function Possible settings Default setting Page
Alarm system Alarm system Operation/Non-operation Operation 2-16
Monitoring start delay time (after closure of doors) 0 second/30 seconds 30 seconds 2-17
Impact sensor operation (only models with shock
sensors (dealer option)) Operation/Non-operation Non-operation 2-20
Passive arming Operation/Non-operation Non-operation 2-19
Dome light/map lights illumination ON/OFF OFF 2-16
Remote keyless entry sys- tem Hazard warning flasher Operation/Non-operation Operation 2-8
Audible signal
Operation/Non-operation Operation 2-11
Key lock-in prevention Key lock-in prevention Operation/Non-operation Operation 2-7
Remote engine start system
(dealer option) Horn chirp confirmation ON/OFF ON 7-10
Rear window defogger Rear window defogger Operation for 15 minutes/ Continuous operationOperation for 15 minutes 3-37
Windshield wiper deicer Windshield wiper deicer Operation for 15 minutes/ Continuous operationOperation for 15 minutes 3-36
Map lights/Dome light Operation of map lights/dome light OFF delay timer OFF/Short/Normal/Long Normal 6-2/6-3
Map lights Illumination in conjunction with a door open Operation/Non-operation Operation (Illumination - ON)6-3
Battery drainage prevention function Battery drainage prevention function Operation/Non-operation Operation 2-6
Page 38 of 422
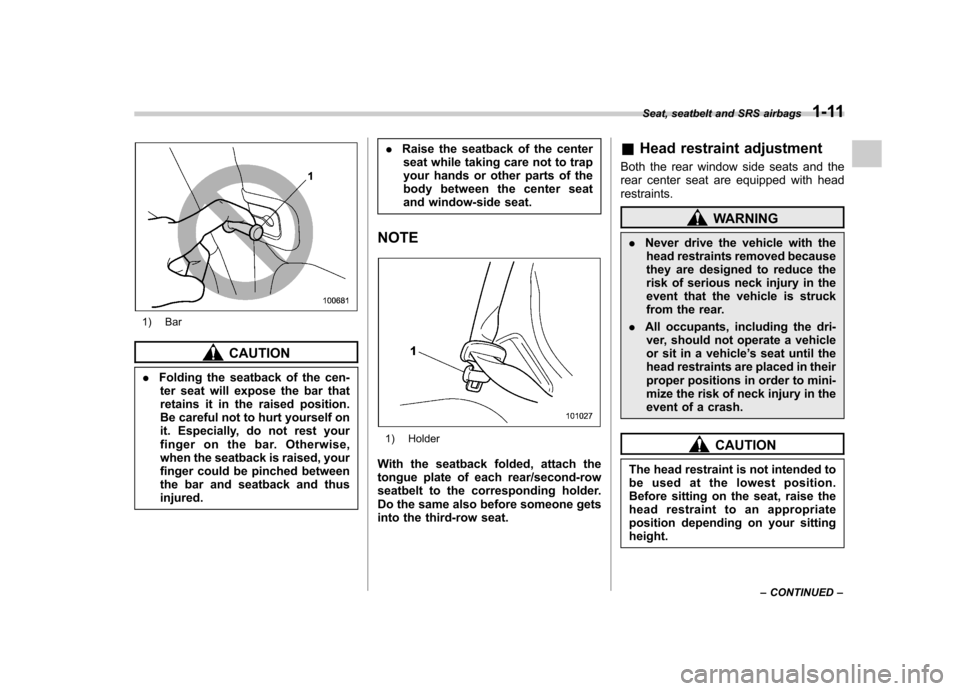
1) Bar
CAUTION
. Folding the seatback of the cen-
ter seat will expose the bar that
retains it in the raised position.
Be careful not to hurt yourself on
it. Especially, do not rest your
finger on the bar. Otherwise,
when the seatback is raised, your
finger could be pinched between
the bar and seatback and thusinjured. .
Raise the seatback of the center
seat while taking care not to trap
your hands or other parts of the
body between the center seat
and window-side seat.
NOTE
1) Holder
With the seatback folded, attach the
tongue plate of each rear/second-row
seatbelt to the corresponding holder.
Do the same also before someone gets
into the third-row seat. &
Head restraint adjustment
Both the rear window side seats and the
rear center seat are equipped with headrestraints.
WARNING
. Never drive the vehicle with the
head restraints removed because
they are designed to reduce the
risk of serious neck injury in the
event that the vehicle is struck
from the rear.
. All occupants, including the dri-
ver, should not operate a vehicle
or sit in a vehicle ’s seat until the
head restraints are placed in their
proper positions in order to mini-
mize the risk of neck injury in the
event of a crash.
CAUTION
The head restraint is not intended to
be used at the lowest position.
Before sitting on the seat, raise the
head restraint to an appropriate
position depending on your sittingheight. Seat, seatbelt and SRS airbags
1-11
– CONTINUED –
Page 39 of 422
1-12Seat, seatbelt and SRS airbags
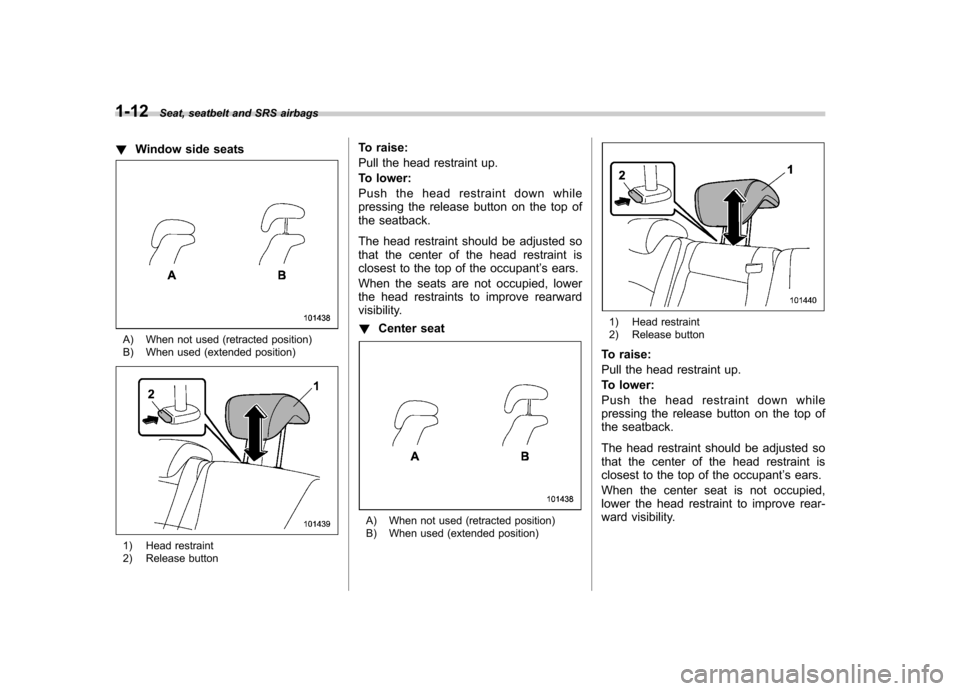
! Window side seats
A) When not used (retracted position)
B) When used (extended position)
1) Head restraint
2) Release button To raise:
Pull the head restraint up.
To lower:
Push the head restraint down while
pressing the release button on the top of
the seatback.
The head restraint should be adjusted so
that the center of the head restraint is
closest to the top of the occupant
’s ears.
When the seats are not occupied, lower
the head restraints to improve rearward
visibility. ! Center seat
A) When not used (retracted position)
B) When used (extended position)
1) Head restraint
2) Release button
To raise:
Pull the head restraint up.
To lower:
Push the head restraint down while
pressing the release button on the top of
the seatback.
The head restraint should be adjusted so
that the center of the head restraint is
closest to the top of the occupant ’s ears.
When the center seat is not occupied,
lower the head restraint to improve rear-
ward visibility.