Multi-function display SUBARU WRX 2018 Owners Manual
[x] Cancel search | Manufacturer: SUBARU, Model Year: 2018, Model line: WRX, Model: SUBARU WRX 2018Pages: 578, PDF Size: 33.21 MB
Page 23 of 578
(22,1)
北米Model "A1700BE-B" EDITED: 2017/ 10/ 11
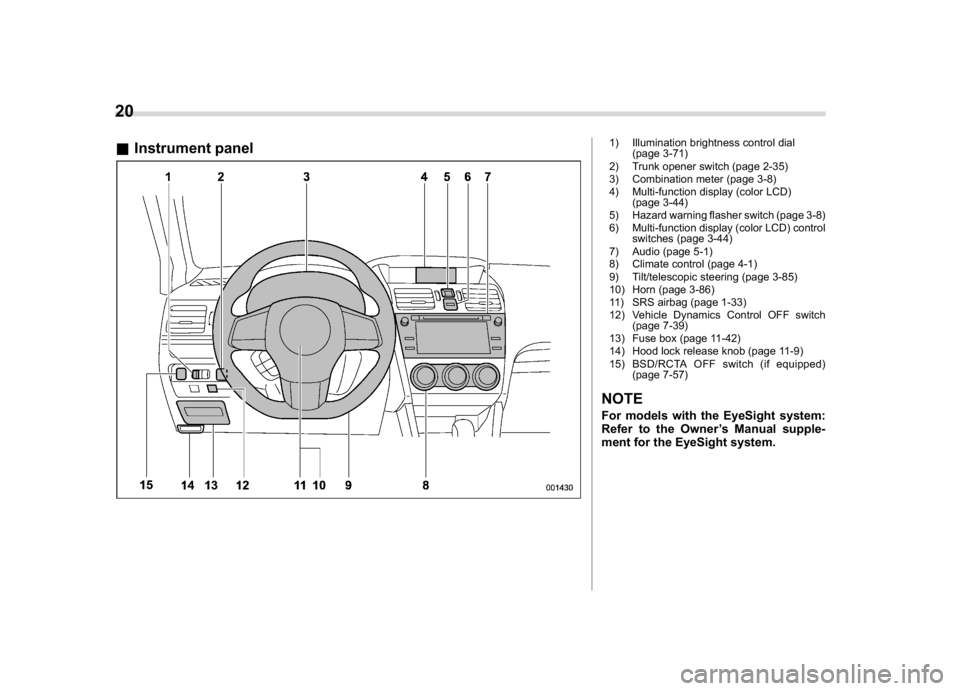
&Instrument panel
1) Illumination brightness control dial
(page 3-71)
2) Trunk opener switch (page 2-35)
3) Combination meter (page 3-8)
4) Multi-function display (color LCD)
(page 3-44)
5) Hazard warning flasher switch (page 3-8)
6) Multi-function display (color LCD) control
switches (page 3-44)
7) Audio (page 5-1)
8) Climate control (page 4-1)
9) Tilt/telescopic steering (page 3-85)
10) Horn (page 3-86)
11) SRS airbag (page 1-33)
12) Vehicle Dynamics Control OFF switch
(page 7-39)
13) Fuse box (page 11-42)
14) Hood lock release knob (page 11-9)
15) BSD/RCTA OFF switch (if equipped)
(page 7-57)NOTEFor models with the EyeSight system:
Refer to the Owner’s Manual supple-
ment for the EyeSight system.
20
Page 30 of 578

(29,1)
北米Model "A1700BE-B" EDITED: 2017/ 10/ 11
Function settingsA SUBARU dealer can change the settings of the functions shown in the following table to meet your personal requirements. Contact
your nearest SUBARU dealer for details. In addition, you can change the settings for some of these functions using the multi-function
display (color LCD). For more information, refer to“Multi-function display (color LCD)”F3-44.Item Function Possible settings Default setting Page
Alarm system Alarm system Operation/Non-operation Operation 2-24
Monitoring start delay time (after closure of doors) 0 seconds/30 seconds 30 seconds 2-25
Impact sensor operation (only models with shock
sensors (dealer option))Operation/Non-operation Non-operation 2-30
Passive arming (models without“keyless access
with push-button start system”)Operation/Non-operation Non-operation 2-29
Dome light and map lights (models with moonroof)
illuminationON/OFF OFF 2-24
Keyless access (if equipped) Hazard warning flasher Operation/Non-operation Operation 2-11
Audible signal Operation/Non-operation Operation 2-14
Audible signal volume Level 1 - 7 Level 5 2-14
Door unlock selection function (driver’s door
unlock)Driver’s door only/All
doorsDriver’s door
only2-12
Remote keyless entry system Hazard warning flasher Operation/Non-operation Operation 2-18
Audible signal Operation/Non-operation Operation 2-20
Audible signal volume Level 1 - 7 Level 5 2-20
Remote trunk open function Activation of trunk opening by remote transmitter/
access key fobOperation/Non-operation Operation 2-20
Key lock-in prevention Key lock-in prevention Operation/Non-operation Operation 2-7
Defogger and deicer system for
models with the automatic climate
control systemRear window defogger, outside mirror defogger
and windshield wiper deicerOperation for 15 minutes/
Continuous operationOperation for
15 minutes3-84
–CONTINUED–
27
0
Page 109 of 578
(112,1)
北米Model "A1700BE-B" EDITED: 2017/ 10/ 11
doors.
!Door unlock selection function
You can unlock only the door(s) that has/
have been selected.
You can change the setting as follows.
.Operate the multi-function display (col-
or LCD). For details, refer to“Keyless
Access setting”F3-62
.Have the setting changed by a
SUBARU dealer.&Unlock using PIN Code Ac-
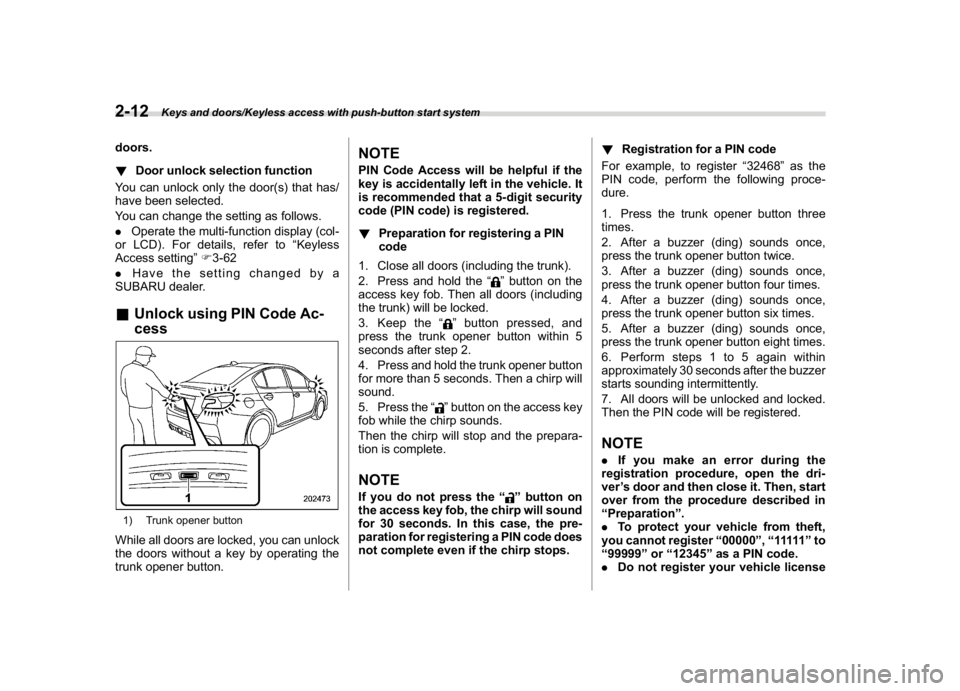
cess1) Trunk opener buttonWhile all doors are locked, you can unlock
the doors without a key by operating the
trunk opener button.
NOTEPIN Code Access will be helpful if the
key is accidentally left in the vehicle. It
is recommended that a 5-digit security
code (PIN code) is registered.
!Preparation for registering a PIN
code
1. Close all doors (including the trunk).
2. Press and hold the“
”button on the
access key fob. Then all doors (including
the trunk) will be locked.
3. Keep the“
”button pressed, and
press the trunk opener button within 5
seconds after step 2.
4. Press and hold the trunk opener button
for more than 5 seconds. Then a chirp will
sound.
5. Press the“”button on the access key
fob while the chirp sounds.
Then the chirp will stop and the prepara-
tion is complete.
NOTEIf you do not press the“
”button on
the access key fob, the chirp will sound
for 30 seconds. In this case, the pre-
paration for registering a PIN code does
not complete even if the chirp stops.!Registration for a PIN code
For example, to register“32468”as the
PIN code, perform the following proce-
dure.
1. Press the trunk opener button three
times.
2. After a buzzer (ding) sounds once,
press the trunk opener button twice.
3. After a buzzer (ding) sounds once,
press the trunk opener button four times.
4. After a buzzer (ding) sounds once,
press the trunk opener button six times.
5. After a buzzer (ding) sounds once,
press the trunk opener button eight times.
6. Perform steps 1 to 5 again within
approximately 30 seconds after the buzzer
starts sounding intermittently.
7. All doors will be unlocked and locked.
Then the PIN code will be registered.
NOTE.Ifyoumakeanerrorduringthe
registration procedure, open the dri-
ver’s door and then close it. Then, start
over from the procedure described in
“Preparation”.
.To protect your vehicle from theft,
you cannot register“00000”,“11111”to
“99999”or“12345”as a PIN code.
.Do not register your vehicle license
Keys and doors/Keyless access with push-button start system
2-12
Page 115 of 578
(118,1)
北米Model "A1700BE-B" EDITED: 2017/ 10/ 11
ignore the sensor operation.
.When performing the locking proce-
dure too quickly, doors may not be locked.
After the locking procedures, it is recom-
mended to pull the REAR door handles to
confirm that the doors have been locked.
.It is possible to lock the doors even
when one of the doors is open. After
performing the locking procedure, close
the opened door to lock it.
.Within 3 seconds after locking the
doors by touching the door lock sensor, it
is not possible to unlock doors by gripping
the door handle.
.When locking, be sure to carry the
access key fob to prevent locking the
access key fob in the vehicle.
.The settings of the hazard warning
flasher operation and the volume of the
audible signal can be changed by your
SUBARU dealer. Contact your SUBARU
dealer for details. You can also change the
setting of the hazard warning flasher
operation by operating the multi-function
display (color LCD). For details, refer to
“Hazard warning flasher setting”F3-61.
Remote keyless entry system
CAUTION
.Do not expose the remote trans-
mitter to severe shocks, such as
those experienced as a result of
dropping or throwing.
.Do not take the remote transmit-
ter apart except when replacing
the battery.
.Do not get the remote transmitter
wet. If it gets wet, wipe it dry with
a cloth immediately.
.When you carry the remote trans-
mitter on an airplane, do not
press the button of the remote
transmitter while in the airplane.
When any button of the remote
transmitter is pressed, radio
waves are sent and may affect
the operation of the airplane.
When you carry the remote trans-
mitter in a bag on an airplane,
take measures to prevent the
buttons of the remote transmitter
from being pressed.
For models with“keyless access with
push-button start system”, the access
key fob is used as the transmitter for theremote keyless entry system. For models
without“keyless access with push-button
start system”, the transmitter for the
remote keyless entry system is located
inside the key head.
The remote keyless entry system has the
following functions.
.Locking and unlocking the doors with-
out a key
.Opening the trunk without a key
.Sounding a panic alarm
.Arming and disarming the alarm sys-
tem. For detailed information, refer to
“Alarm system”F2-24.
The operable distance of the remote key-
less entry system is approximately 30 feet
(10 meters). However, this distance will
vary depending on environmental condi-
tions. The system’s operable distance will
be shorter in areas near a facility or
electronic equipment emitting strong radio
waves such as a power plant, broadcast
station, TV tower, or remote controller of
home electronic appliances.
NOTE.For models with“keyless access
with push-button start system”,the
remote keyless entry system will not
be activated when the push-button
ignition switch is in any position other
Keys and doors/Remote keyless entry system
2-18
Page 116 of 578
(119,1)
北米Model "A1700BE-B" EDITED: 2017/ 10/ 11
than the“OFF”position.
.For models without“keyless access
with push-button start system”,the
remote keyless entry system will not
be activated when the key is inserted in
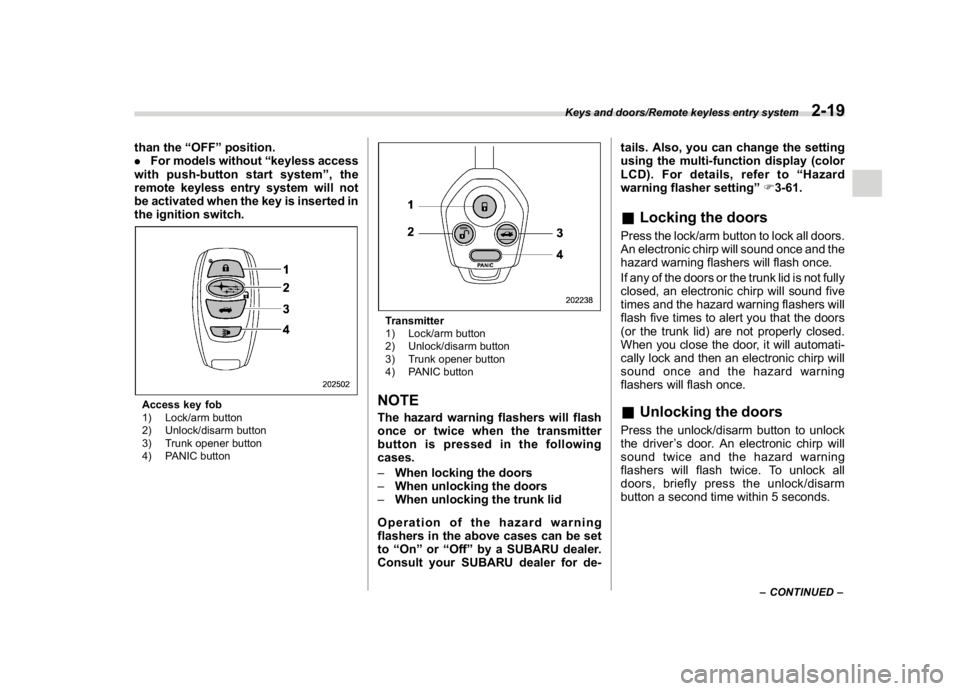
the ignition switch.Access key fob
1) Lock/arm button
2) Unlock/disarm button
3) Trunk opener button
4) PANIC button
Transmitter
1) Lock/arm button
2) Unlock/disarm button
3) Trunk opener button
4) PANIC buttonNOTEThe hazard warning flashers will flash
once or twice when the transmitter
button is pressed in the following
cases.
–When locking the doors
–When unlocking the doors
–When unlocking the trunk lid
Operation of the hazard warning
flashers in the above cases can be set
to“On”or“Off”by a SUBARU dealer.
Consult your SUBARU dealer for de-tails. Also, you can change the setting
using the multi-function display (color
LCD).Fordetails,referto“Hazard
warning flasher setting”F3-61.
&Locking the doorsPress the lock/arm button to lock all doors.
An electronic chirp will sound once and the
hazard warning flashers will flash once.
If any of the doors or the trunk lid is not fully
closed, an electronic chirp will sound five
times and the hazard warning flashers will
flash five times to alert you that the doors
(or the trunk lid) are not properly closed.
When you close the door, it will automati-
cally lock and then an electronic chirp will
sound once and the hazard warning
flashers will flash once.&Unlocking the doorsPress the unlock/disarm button to unlock
the driver’s door. An electronic chirp will
sound twice and the hazard warning
flashers will flash twice. To unlock all
doors, briefly press the unlock/disarm
button a second time within 5 seconds.
–CONTINUED–
Keys and doors/Remote keyless entry system
2-19
2
Page 139 of 578
(144,1)
北米Model "A1700BE-B" EDITED: 2017/ 10/ 11
High Beam Assist indicator light (green)
(if equipped).......................................................3-35
High Beam Assist warning indicator (yellow)
(if equipped).......................................................3-35
Cruise control indicator........................................3-35
Cruise control set indicator...................................3-35
Automatic headlight beam leveler warning light
(models with LED headlights)..............................3-35
Front fog light indicator light (if equipped) ............3-35
Headlight indicator light........................................3-35
Driver’s control center differential auto indicator
(STI)...................................................................3-36
Driver’s control center differential indicator and
warning (STI)......................................................3-36
REV indicator light (STI)........................................3-37
Steering Responsive Headlight warning indicator/
Steering Responsive Headlight OFF indicator
(if equipped).......................................................3-37
BSD/RCTA warning indicator (if equipped).............3-37
BSD/RCTA OFF indicator (if equipped)..................3-37
RAB warning indicator (if equipped)......................3-37
RAB OFF indicator light (if equipped)....................3-37
Combination meter display (colorLCD).............3-38
Basic operation.....................................................3-39
Welcome screen (opening animation) and
Good-bye screen (ending animation)...................3-39
Warning screen.....................................................3-39
Basic screens.......................................................3-40
Warning indication................................................3-41
Menu screens.......................................................3-41
Multi-function display (colorLCD)......................3-44
Welcome screen...................................................3-45
Self-check screen.................................................3-45
Interruption screen...............................................3-46
Basic operation....................................................3-46
Basic screens.......................................................3-47
Setting screen......................................................3-52
How to get the source code using the open
source...............................................................3-63
Light control switch.............................................3-63
Headlights............................................................3-64
High/low beam change (dimmer) ...........................3-65
Headlight flasher..................................................3-68
Daytime running light system...............................3-69
Steering Responsive Headlight (SRH)
(if equipped).......................................................3-69
To turn on/off the SRH..........................................3-69
Turn signallever...................................................3-70
One-touch lane changer........................................3-70
Illumination brightness control...........................3-71
Automatic dimming function.................................3-71
Auto dimmer cancel function................................3-71
Headlight beam leveler (ifequipped)..................3-71
Automatic headlight beam leveler
(models with LED headlights)............................3-71
Fog light switch (ifequipped)..............................3-72
Wiper and washer.................................................3-72
Windshield wiper and washer switches.................3-74
Instruments and controls
Page 181 of 578
(186,1)
北米Model "A1700BE-B" EDITED: 2017/ 10/ 11
!Sonar Audible Alarm
The Reverse Automatic Braking system is
equipped with a function that emits a
warning sound when the system operates.
The function can be activated or deacti-
vated. Select“On”to set the warning
sound to active. Select“Off”to set the
warning sound to inactive.
!Default Settings
Select“Ye s”to use the menu screen to
restore customized settings to the factory
default settings. Select“No”to return to the
previous screen without restoring to the
factory default settings.
Multi-function display (color
LCD)
WARNING
Always pay adequate attention to
safe driving when operating the
multi-function display while the ve-
hicle is in motion. When operation of
the multi-function display is disturb-
ing your awareness and ability to
concentrate on driving, stop the
vehicle in a safe place before per-
forming operations on the screen.
Also, do not concentrate on the
display while driving. Doing so may
cause you to look away from the
road and could result in an accident.
The multi-function display has the follow-
ing functions.
Description Page
Displays useful messages,
such as warning information,
etc.3-46
Displays basic screens (e.g.
fuel consumption screen, etc.)3-47
Sets and adjusts maintenance
notification3-59
Registers driving history 3-60
Sets and customizes car op-
eration3-61
Reverse Automatic Braking
system (if equipped)7-66
Also, use the multi-function display to set
and initialize the multi-function display
itself.NOTE.Illustrations show the display for
U.S.-spec. models as an example. For
models other than U.S.-spec. models,
elements in the illustrations (such as
the display indication and measure-
ment unit) may be different than the
ones for U.S.-spec. models.
.When the vehicle is in motion,
certain functions and selections may
not be available.
.The images shown in this Owner’s
Manual are sample images. The actual
images may vary depending on the
Instruments and controls/Multi-function display (color LCD)
3-44
Page 182 of 578
(187,1)
北米Model "A1700BE-B" EDITED: 2017/ 10/ 11
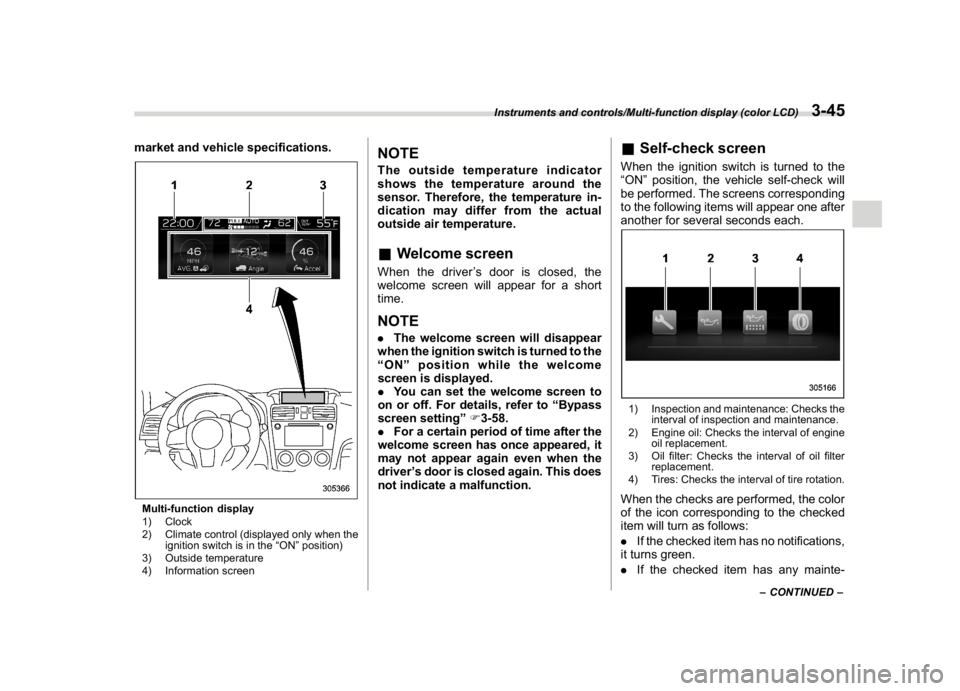
market and vehicle specifications.Multi-function display
1) Clock
2) Climate control (displayed only when the
ignition switch is in the“ON”position)
3) Outside temperature
4) Information screen
NOTEThe outside temperature indicator
shows the temperature around the
sensor. Therefore, the temperature in-
dication may differ from the actual
outside air temperature.&Welcome screenWhen the driver’s door is closed, the
welcome screen will appear for a short
time.NOTE.The welcome screen will disappear
when the ignition switch is turned to the
“ON”position while the welcome
screen is displayed.
.You can set the welcome screen to
on or off. For details, refer to“Bypass
screen setting”F3-58.
.For a certain period of time after the
welcome screen has once appeared, it
may not appear again even when the
driver’s door is closed again. This does
not indicate a malfunction.
&Self-check screenWhen the ignition switch is turned to the
“ON”position, the vehicle self-check will
be performed. The screens corresponding
to the following items will appear one after
another for several seconds each.1) Inspection and maintenance: Checks the
interval of inspection and maintenance.
2) Engine oil: Checks the interval of engine
oil replacement.
3) Oil filter: Checks the interval of oil filter
replacement.
4) Tires: Checks the interval of tire rotation.When the checks are performed, the color
of the icon corresponding to the checked
item will turn as follows:
.If the checked item has no notifications,
it turns green.
.If the checked item has any mainte-
–CONTINUED–
Instruments and controls/Multi-function display (color LCD)
3-45
3
Page 183 of 578
(188,1)
北米Model "A1700BE-B" EDITED: 2017/ 10/ 11
nance notifications, it turns yellow.
If there is a notification, the message will
be displayed. Take the appropriate actions
based on the message indicated.NOTE.You can set the self-check screen to
on or off. The default setting is off. For
details, refer to“On/Off setting”F3-59.
.After performing the maintenance,
change the setting of the correspond-
ing maintenance item. For details, refer
to“Maintenance settings”F3-59.
.The maintenance notification screen
will be displayed under either of the
following conditions.
–The period of time remaining until
the registered notification date is 15
days or less.
–The total driving distance remain-
ing until the registered notification
distance is approximately 311 miles
(500 km) or less.
.The maintenance notification screen
will be displayed until either of the
following conditions is satisfied.
–The period of time passed after
the registered notification date is 15
days or more.
–The total distance driven after the
registered notification distance is
approximately 311 miles (500 km) ormore.
&Interruption screenUseful messages, such as reminder in-
formation, vehicle information, warning
information, etc. may interrupt the current
screen and appear on the display accom-
panied by a beep. Take proper action
according to the message.The warning screen will return to the
original screen after a few seconds.
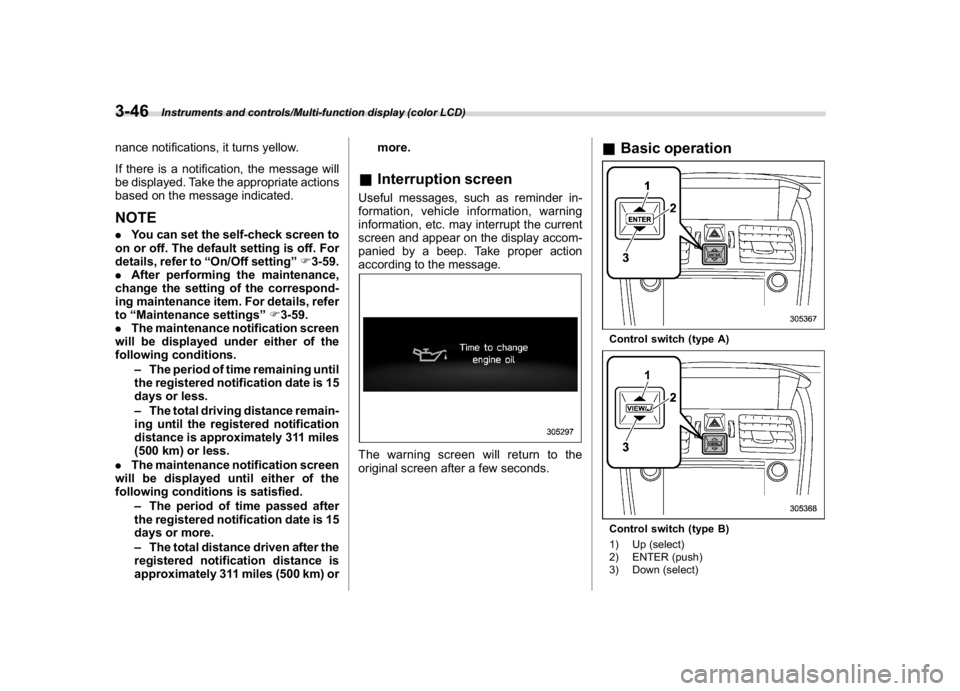
&Basic operationControl switch (type A)Control switch (type B)
1) Up (select)
2) ENTER (push)
3) Down (select)
Instruments and controls/Multi-function display (color LCD)
3-46
Page 184 of 578
(189,1)
北米Model "A1700BE-B" EDITED: 2017/ 10/ 11
By operating“
”or“
”of the control
switch, the screens and selection items
can be switched. When the ENTER button
is pushed, the item can be selected and
set.
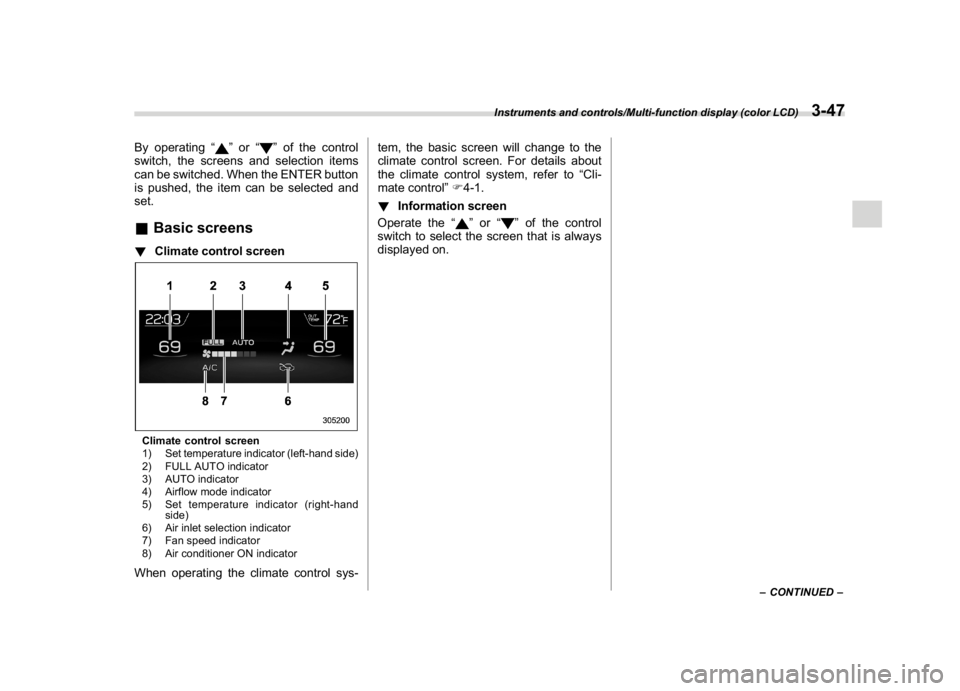
&Basic screens!Climate control screenClimate control screen
1) Set temperature indicator (left-hand side)
2) FULL AUTO indicator
3) AUTO indicator
4) Airflow mode indicator
5) Set temperature indicator (right-hand
side)
6) Air inlet selection indicator
7) Fan speed indicator
8) Air conditioner ON indicatorWhen operating the climate control sys-tem, the basic screen will change to the
climate control screen. For details about
the climate control system, refer to“Cli-
mate control”F4-1.
!Information screen
Operate the“
”or“
”of the control
switch to select the screen that is always
displayed on.
–CONTINUED–
Instruments and controls/Multi-function display (color LCD)
3-47
3