engine SUBARU WRX 2020 Quick Guide
[x] Cancel search | Manufacturer: SUBARU, Model Year: 2020, Model line: WRX, Model: SUBARU WRX 2020Pages: 44, PDF Size: 15.19 MB
Page 3 of 44
2PURPOSE OF THIS GUIDE
4ENTRY AND EXIT
6INSTRUMENT PANEL
8GETTING COMFORTABLE
17CONTROLS
22GAUGES AND WARNING LIGHTS
23OPERATING THE VEHICLE
30REFUELING
32PASSENGER/CARGO AREAS
35ENGINE COMPARTMENT
37ADDITIONAL SPECIFICATIONS
38INDEX
TABLE OF CONTENTS
Page 21 of 44
4High Beams:Push the lever forward to change from low beam to high beam. Pull the
lever back to center to return to low beam. If equipped, this also activates the High
Beam Assist (HBA) system.
5Fog Lights:If equipped, rotate the dial to turn on the fog lights.
Illumination Brightness
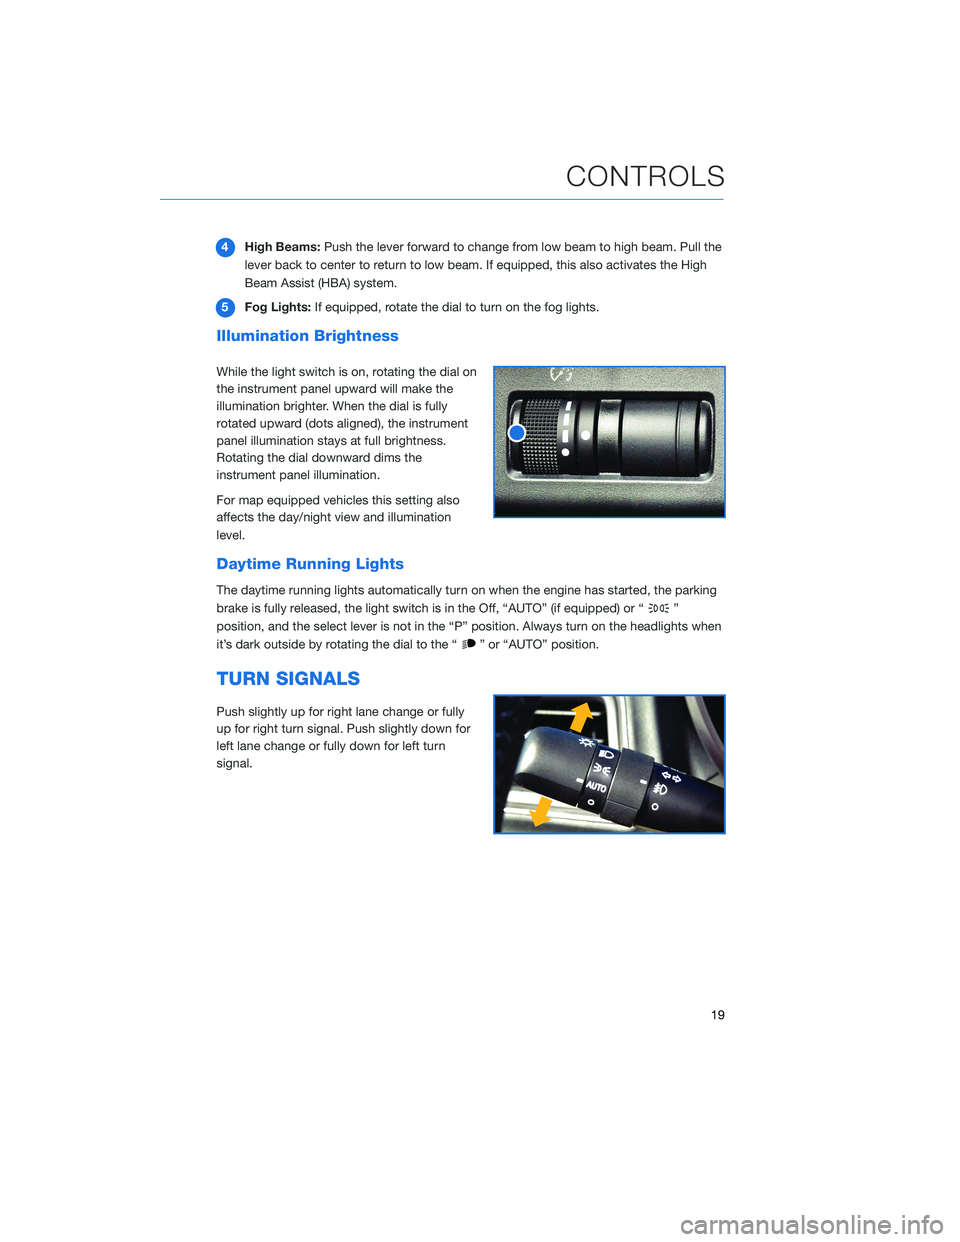
While the light switch is on, rotating the dial on
the instrument panel upward will make the
illumination brighter. When the dial is fully
rotated upward (dots aligned), the instrument
panel illumination stays at full brightness.
Rotating the dial downward dims the
instrument panel illumination.
For map equipped vehicles this setting also
affects the day/night view and illumination
level.
Daytime Running Lights
The daytime running lights automatically turn on when the engine has started, the parking
brake is fully released, the light switch is in the Off, “AUTO” (if equipped) or “
”
position, and the select lever is not in the “P” position. Always turn on the headlights when
it’s dark outside by rotating the dial to the “
” or “AUTO” position.
TURN SIGNALS
Push slightly up for right lane change or fully
up for right turn signal. Push slightly down for
left lane change or fully down for left turn
signal.
CONTROLS
19
Page 24 of 44
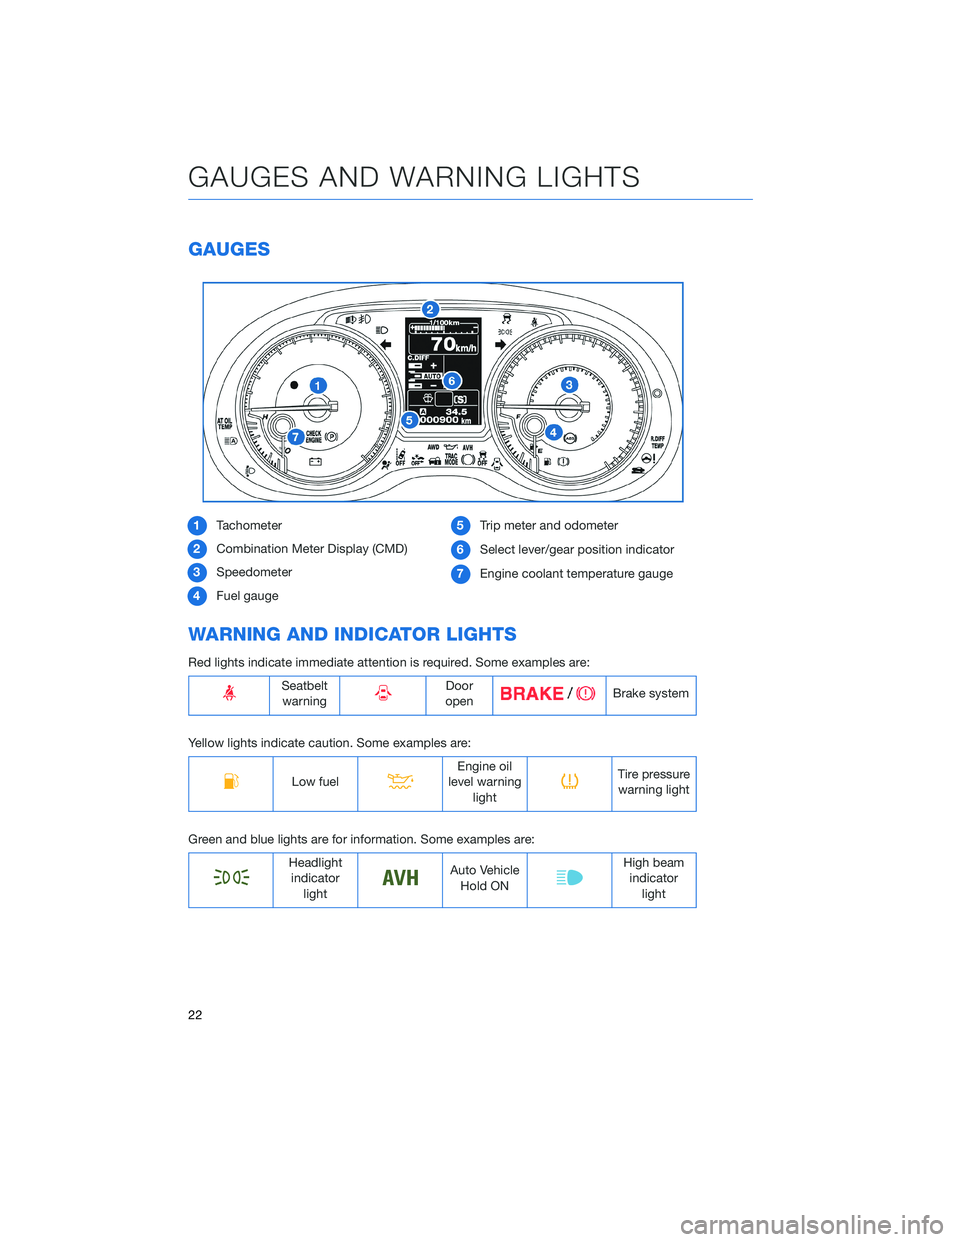
GAUGES
1Tachometer
2Combination Meter Display (CMD)
3Speedometer
4Fuel gauge5Trip meter and odometer
6Select lever/gear position indicator
7Engine coolant temperature gauge
WARNING AND INDICATOR LIGHTS
Red lights indicate immediate attention is required. Some examples are:
Seatbelt
warningDoor
openBrake system
Yellow lights indicate caution. Some examples are:
Low fuelEngine oil
level warning
lightTire pressure
warning light
Green and blue lights are for information. Some examples are:
Headlight
indicator
lightAuto Vehicle
Hold ONHigh beam
indicator
light
GAUGES AND WARNING LIGHTS
22
Page 25 of 44
IGNITION SWITCH
The ignition switch has four positions:
LOCK:You can only insert or remove the key in this position.
ACC (Accessory):Provides power to the radio and accessory power outlets.
ON:All electric systems are available. The key returns to this position after starting the
engine.
START:Turn the key to this position to start the engine.
PUSH-BUTTON IGNITION SWITCH(IF EQUIPPED)
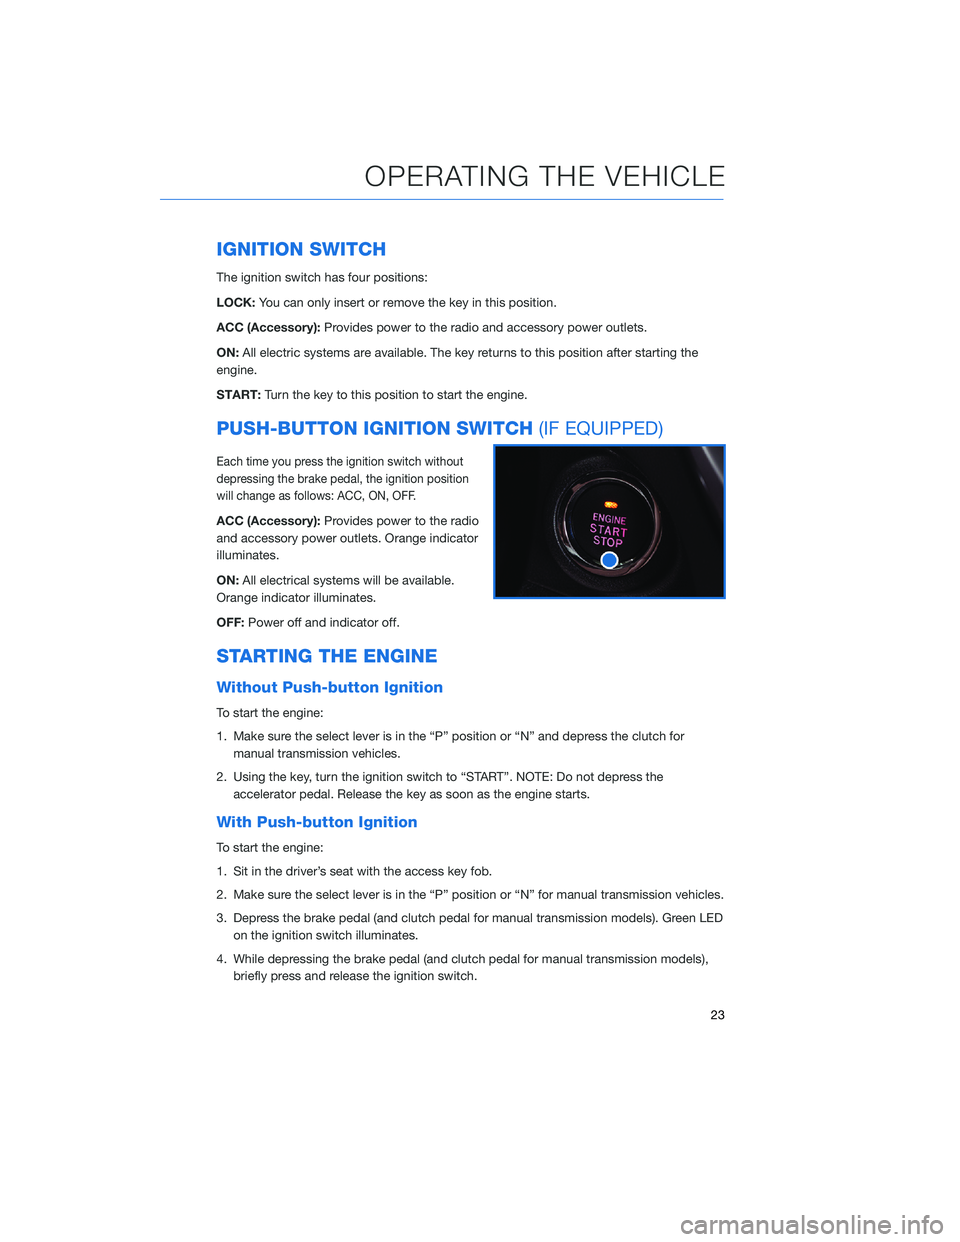
Each time you press the ignition switch without
depressing the brake pedal, the ignition position
will change as follows: ACC, ON, OFF.
ACC (Accessory):Provides power to the radio
and accessory power outlets. Orange indicator
illuminates.
ON:All electrical systems will be available.
Orange indicator illuminates.
OFF:Power off and indicator off.
STARTING THE ENGINE
Without Push-button Ignition
To start the engine:
1. Make sure the select lever is in the “P” position or “N” and depress the clutch for
manual transmission vehicles.
2. Using the key, turn the ignition switch to “START”. NOTE: Do not depress the
accelerator pedal. Release the key as soon as the engine starts.
With Push-button Ignition
To start the engine:
1. Sit in the driver’s seat with the access key fob.
2. Make sure the select lever is in the “P” position or “N” for manual transmission vehicles.
3. Depress the brake pedal (and clutch pedal for manual transmission models). Green LED
on the ignition switch illuminates.
4. While depressing the brake pedal (and clutch pedal for manual transmission models),
briefly press and release the ignition switch.
OPERATING THE VEHICLE
23
Page 26 of 44
DRIVING THE VEHICLE
6-Speed Manual Transmission
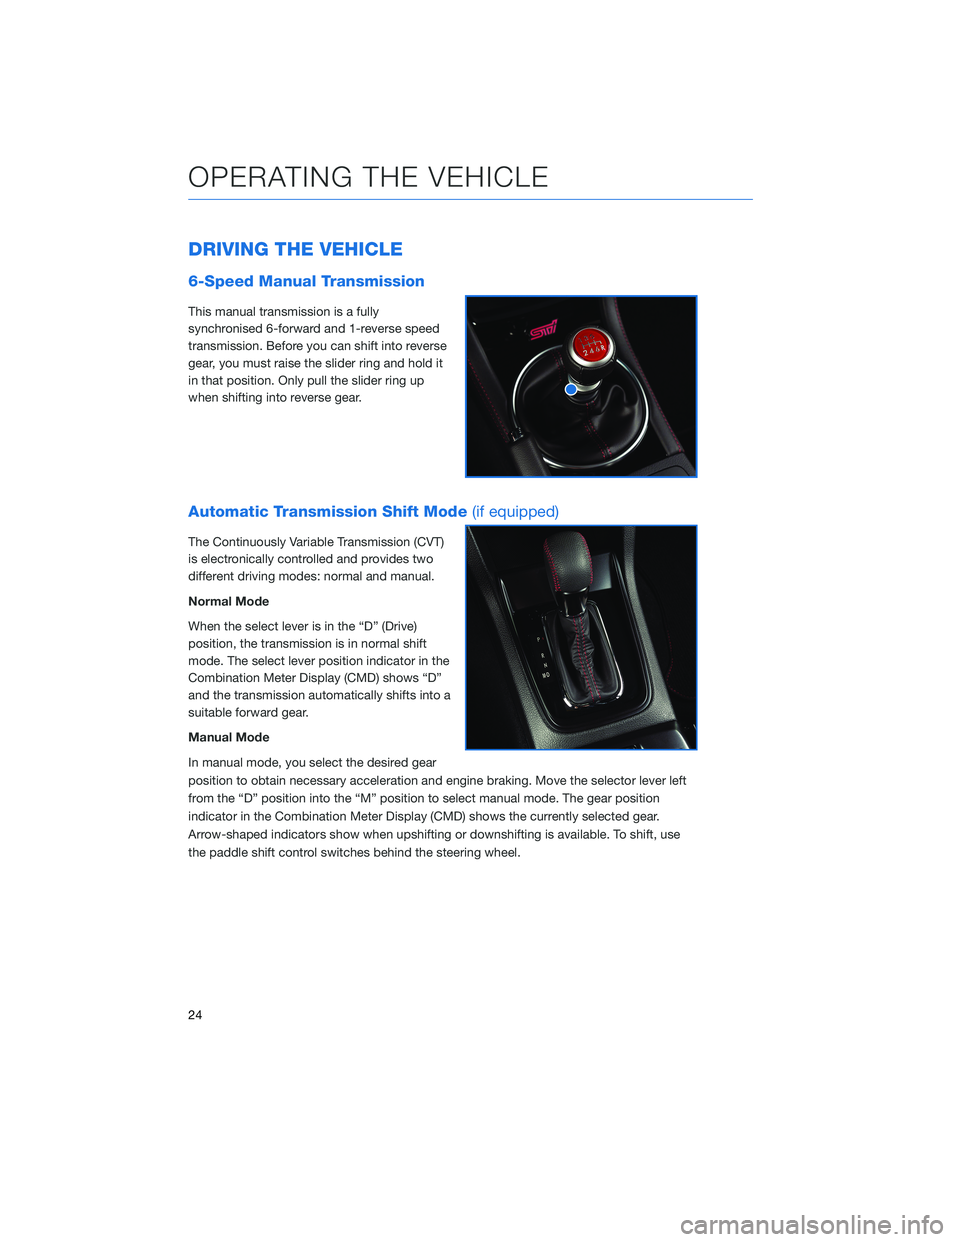
This manual transmission is a fully
synchronised 6-forward and 1-reverse speed
transmission. Before you can shift into reverse
gear, you must raise the slider ring and hold it
in that position. Only pull the slider ring up
when shifting into reverse gear.
Automatic Transmission Shift Mode(if equipped)
The Continuously Variable Transmission (CVT)
is electronically controlled and provides two
different driving modes: normal and manual.
Normal Mode
When the select lever is in the “D” (Drive)
position, the transmission is in normal shift
mode. The select lever position indicator in the
Combination Meter Display (CMD) shows “D”
and the transmission automatically shifts into a
suitable forward gear.
Manual Mode
In manual mode, you select the desired gear
position to obtain necessary acceleration and engine braking. Move the selector lever left
from the “D” position into the “M” position to select manual mode. The gear position
indicator in the Combination Meter Display (CMD) shows the currently selected gear.
Arrow-shaped indicators show when upshifting or downshifting is available. To shift, use
the paddle shift control switches behind the steering wheel.
OPERATING THE VEHICLE
24
Page 27 of 44
Paddle Shift Control Switches (if equipped)
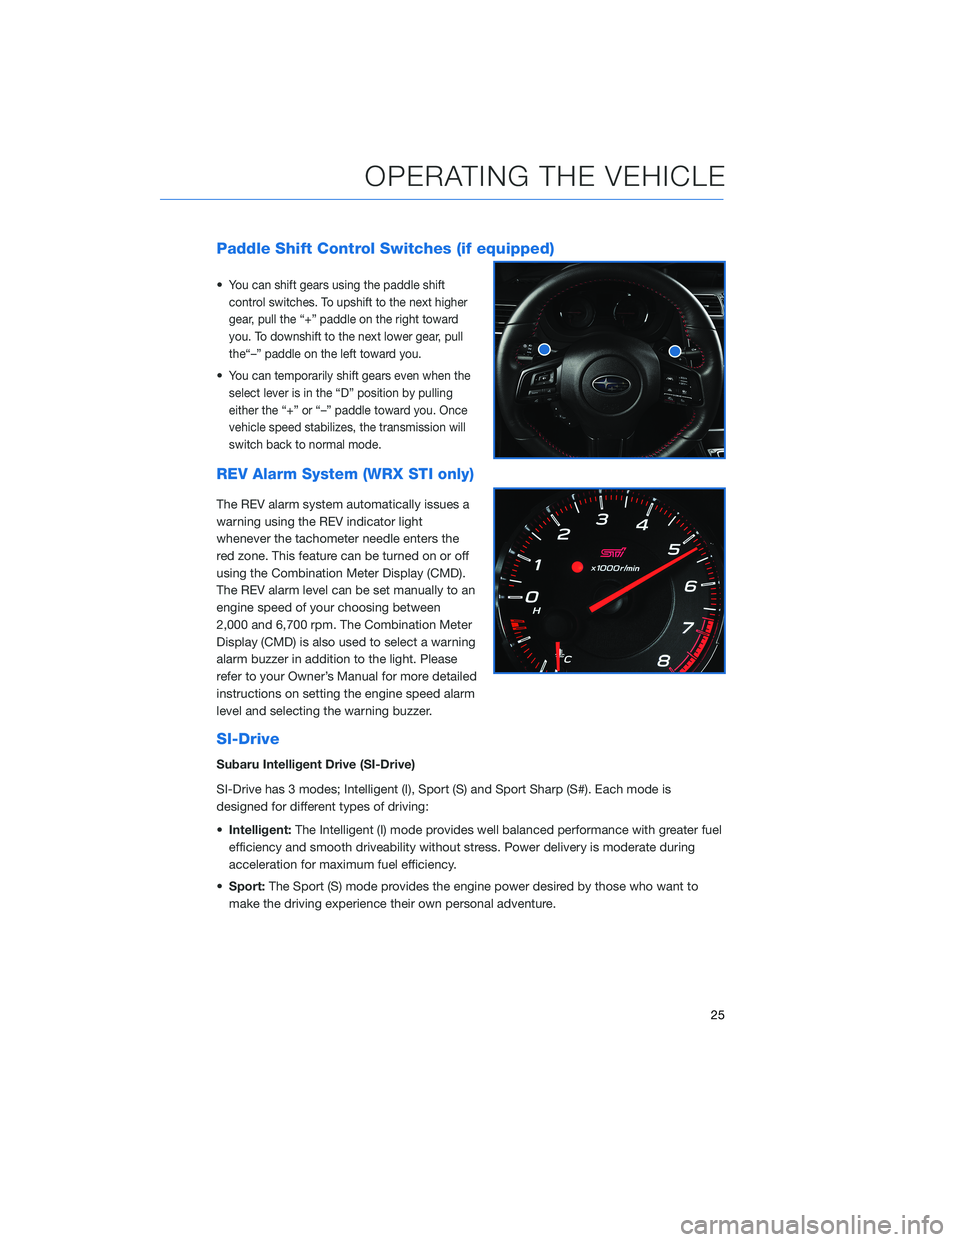
•You can shift gears using the paddle shift
control switches. To upshift to the next higher
gear, pull the “+” paddle on the right toward
you. To downshift to the next lower gear, pull
the“–” paddle on the left toward you.
•You can temporarily shift gears even when the
select lever is in the “D” position by pulling
either the “+” or “–” paddle toward you. Once
vehicle speed stabilizes, the transmission will
switch back to normal mode.
REV Alarm System (WRX STI only)
The REV alarm system automatically issues a
warning using the REV indicator light
whenever the tachometer needle enters the
red zone. This feature can be turned on or off
using the Combination Meter Display (CMD).
The REV alarm level can be set manually to an
engine speed of your choosing between
2,000 and 6,700 rpm. The Combination Meter
Display (CMD) is also used to select a warning
alarm buzzer in addition to the light. Please
refer to your Owner’s Manual for more detailed
instructions on setting the engine speed alarm
level and selecting the warning buzzer.
SI-Drive
Subaru Intelligent Drive (SI-Drive)
SI-Drive has 3 modes; Intelligent (I), Sport (S) and Sport Sharp (S#). Each mode is
designed for different types of driving:
•Intelligent:The Intelligent (I) mode provides well balanced performance with greater fuel
efficiency and smooth driveability without stress. Power delivery is moderate during
acceleration for maximum fuel efficiency.
•Sport:The Sport (S) mode provides the engine power desired by those who want to
make the driving experience their own personal adventure.
OPERATING THE VEHICLE
25
Page 28 of 44
•Sport Sharp:For sports-minded drivers, the Sport Sharp (S#) mode offers an
exhilarating level of engine performance and control. The throttle becomes more
responsive regardless of the engine speed. Delivering maximum driving enjoyment, this
mode is ideal for driving on twisting roads and for merging or overtaking other vehicles
on the freeway with confidence.
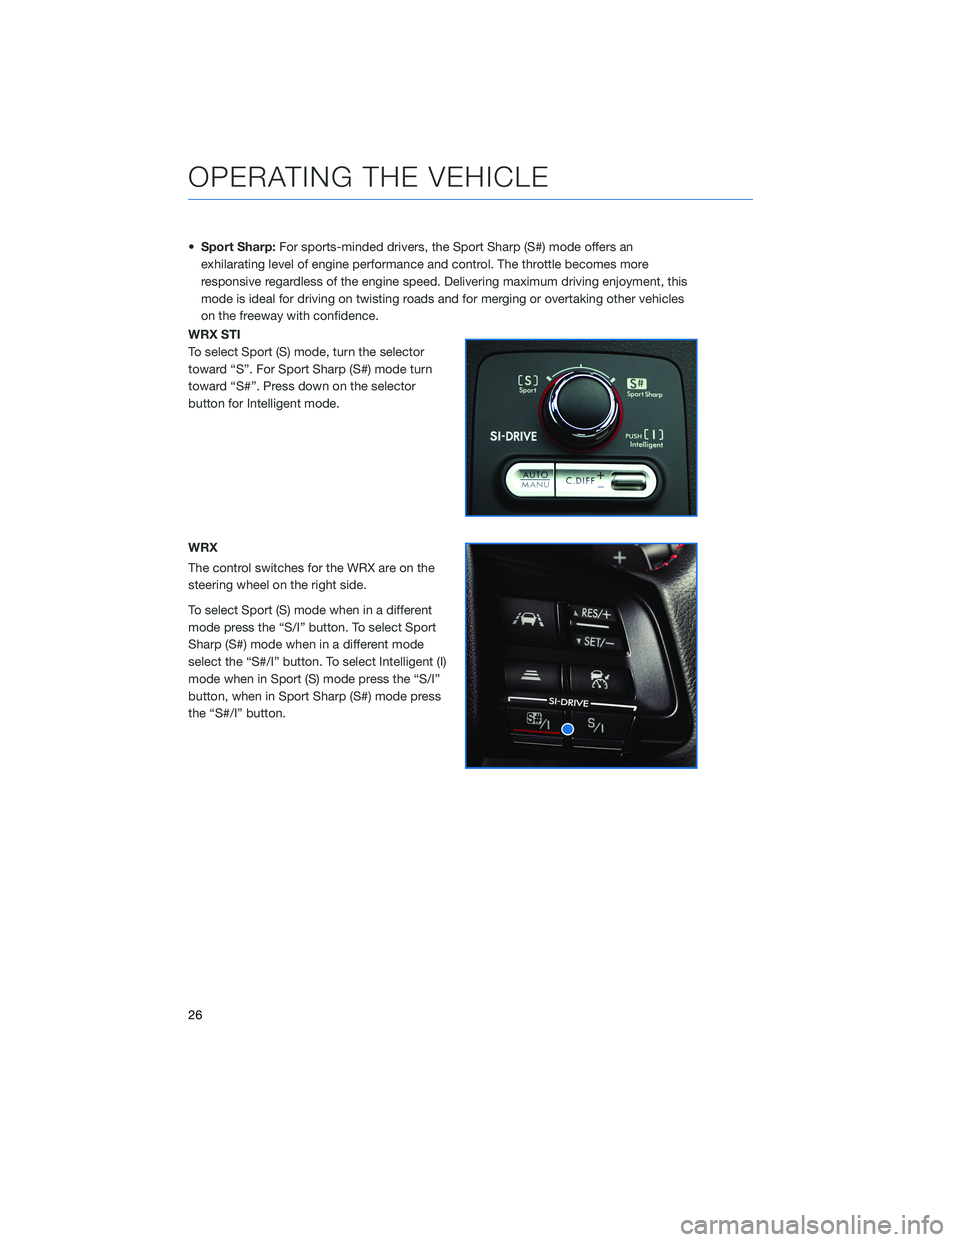
WRX STI
To select Sport (S) mode, turn the selector
toward “S”. For Sport Sharp (S#) mode turn
toward “S#”. Press down on the selector
button for Intelligent mode.
WRX
The control switches for the WRX are on the
steering wheel on the right side.
To select Sport (S) mode when in a different
mode press the “S/I” button. To select Sport
Sharp (S#) mode when in a different mode
select the “S#/I” button. To select Intelligent (I)
mode when in Sport (S) mode press the “S/I”
button, when in Sport Sharp (S#) mode press
the “S#/I” button.
OPERATING THE VEHICLE
26
Page 31 of 44
TURNING OFF THE VEHICLE
Without Push-button Ignition
To stop the engine:
1. Stop your Subaru completely.
2. Move the select lever to the “P” position.
3. Turn the ignition switch to “OFF”.
NOTE: The windows will remain active for about 45 seconds and the SUBARU
STARLINK™ Multimedia system will remain on for about three minutes or until a door is
opened, whichever occurs first.
With Push-button Ignition Switch(if equipped)
To stop the engine:
1. Stop the vehicle completely.
2. Move the select lever to the “P” position or set the parking brake for manual
transmission models.
3. Press the ignition switch.
NOTE: The windows will remain active for about 45 seconds and the SUBARU
STARLINK™ Multimedia system will remain on for about three minutes or until a door is
opened, whichever occurs first.
OPERATING THE VEHICLE
29
Page 32 of 44
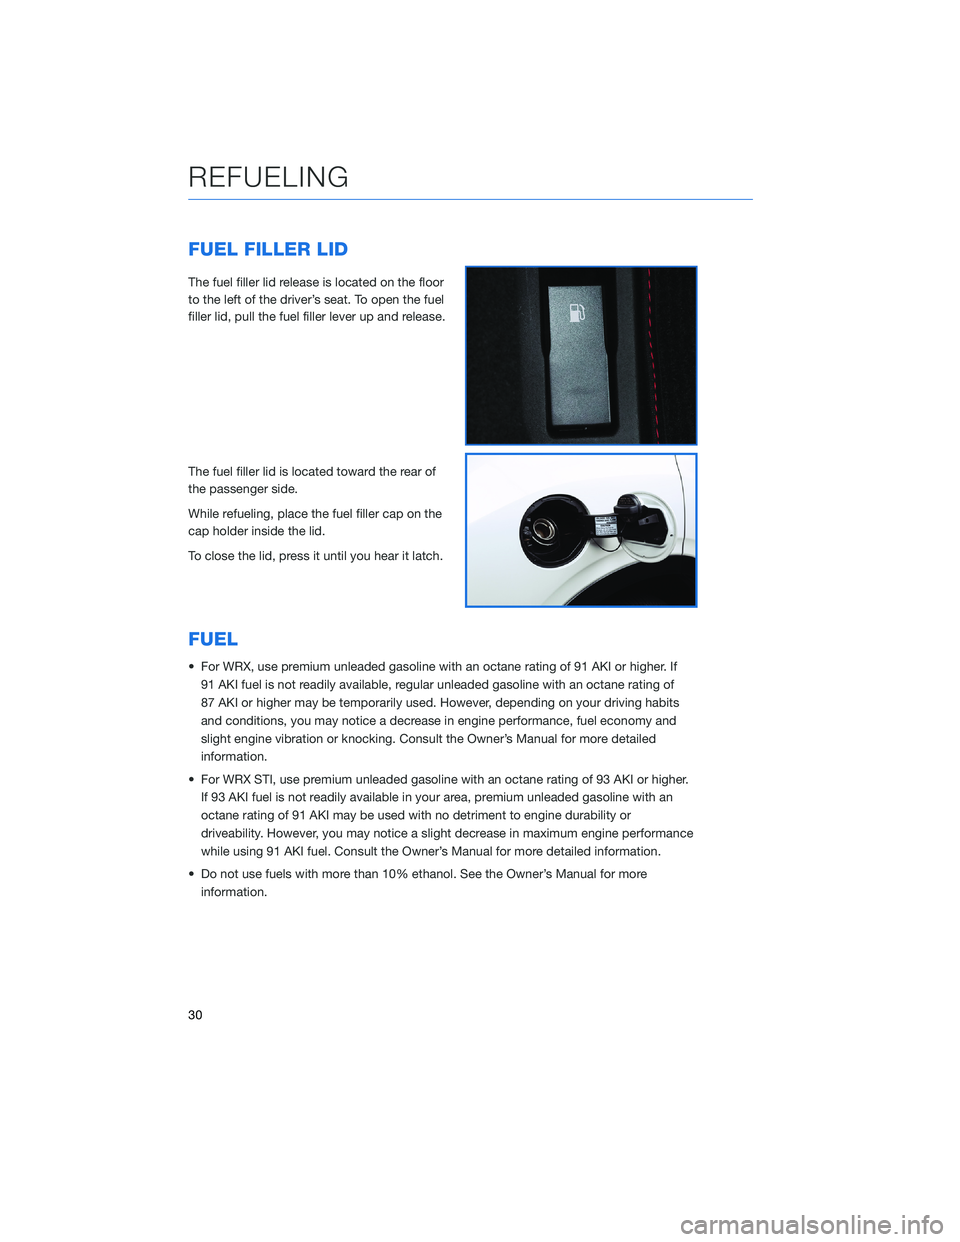
FUEL FILLER LID
The fuel filler lid release is located on the floor
to the left of the driver’s seat. To open the fuel
filler lid, pull the fuel filler lever up and release.
The fuel filler lid is located toward the rear of
the passenger side.
While refueling, place the fuel filler cap on the
cap holder inside the lid.
To close the lid, press it until you hear it latch.
FUEL
• For WRX, use premium unleaded gasoline with an octane rating of 91 AKI or higher. If
91 AKI fuel is not readily available, regular unleaded gasoline with an octane rating of
87 AKI or higher may be temporarily used. However, depending on your driving habits
and conditions, you may notice a decrease in engine performance, fuel economy and
slight engine vibration or knocking. Consult the Owner’s Manual for more detailed
information.
• For WRX STI, use premium unleaded gasoline with an octane rating of 93 AKI or higher.
If 93 AKI fuel is not readily available in your area, premium unleaded gasoline with an
octane rating of 91 AKI may be used with no detriment to engine durability or
driveability. However, you may notice a slight decrease in maximum engine performance
while using 91 AKI fuel. Consult the Owner’s Manual for more detailed information.
• Do not use fuels with more than 10% ethanol. See the Owner’s Manual for more
information.
REFUELING
30
Page 37 of 44
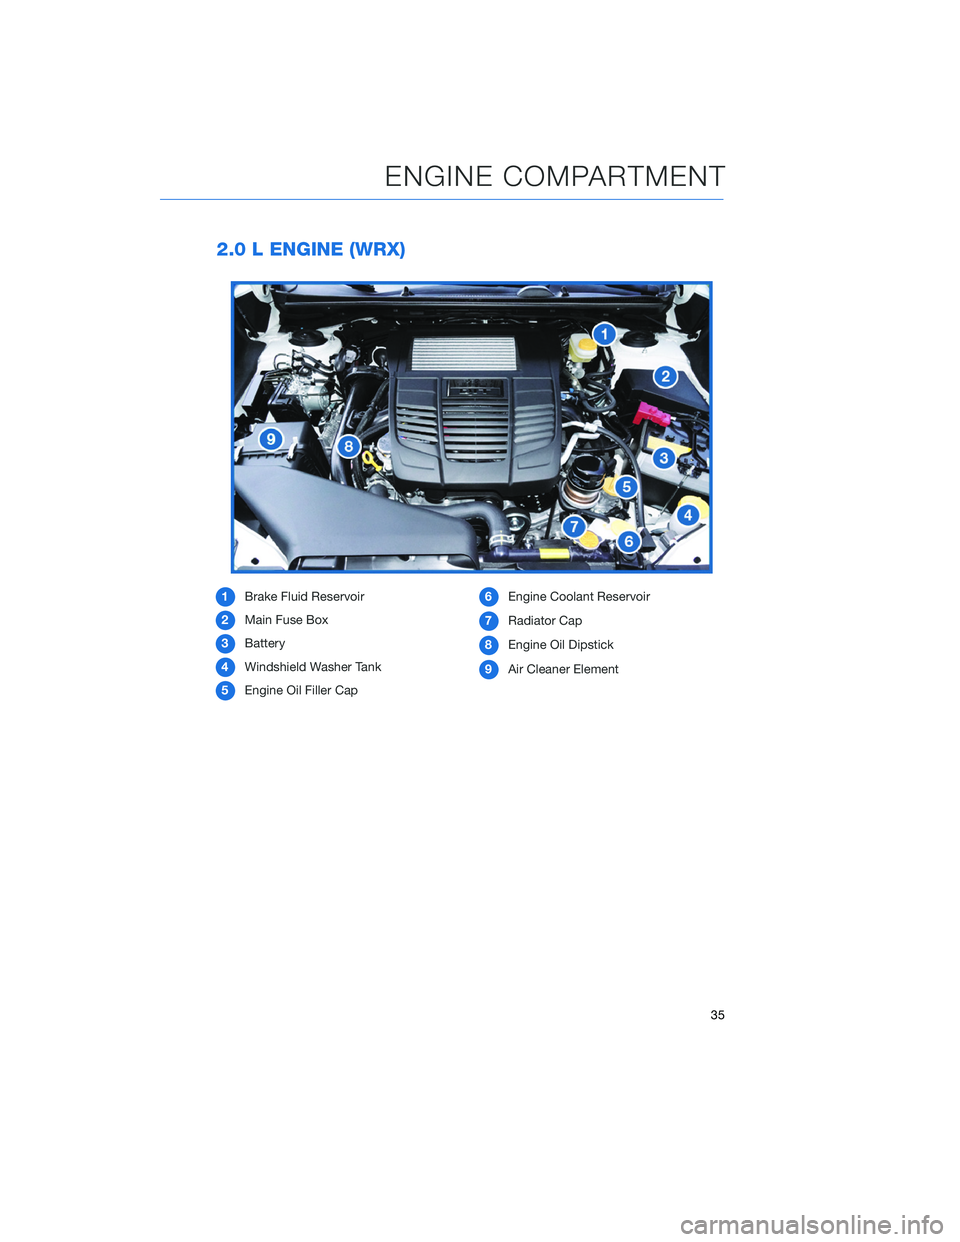
2.0 L ENGINE (WRX)
1Brake Fluid Reservoir
2Main Fuse Box
3Battery
4Windshield Washer Tank
5Engine Oil Filler Cap6Engine Coolant Reservoir
7Radiator Cap
8Engine Oil Dipstick
9Air Cleaner Element
ENGINE COMPARTMENT
35