buttons SUZUKI AERIO 2007 1.G Owners Manual
[x] Cancel search | Manufacturer: SUZUKI, Model Year: 2007, Model line: AERIO, Model: SUZUKI AERIO 2007 1.GPages: 232, PDF Size: 3.34 MB
Page 96 of 232
Downloaded from www.Manualslib.com manuals search engine 4-31 INSTRUMENT PANEL
54G27-03E
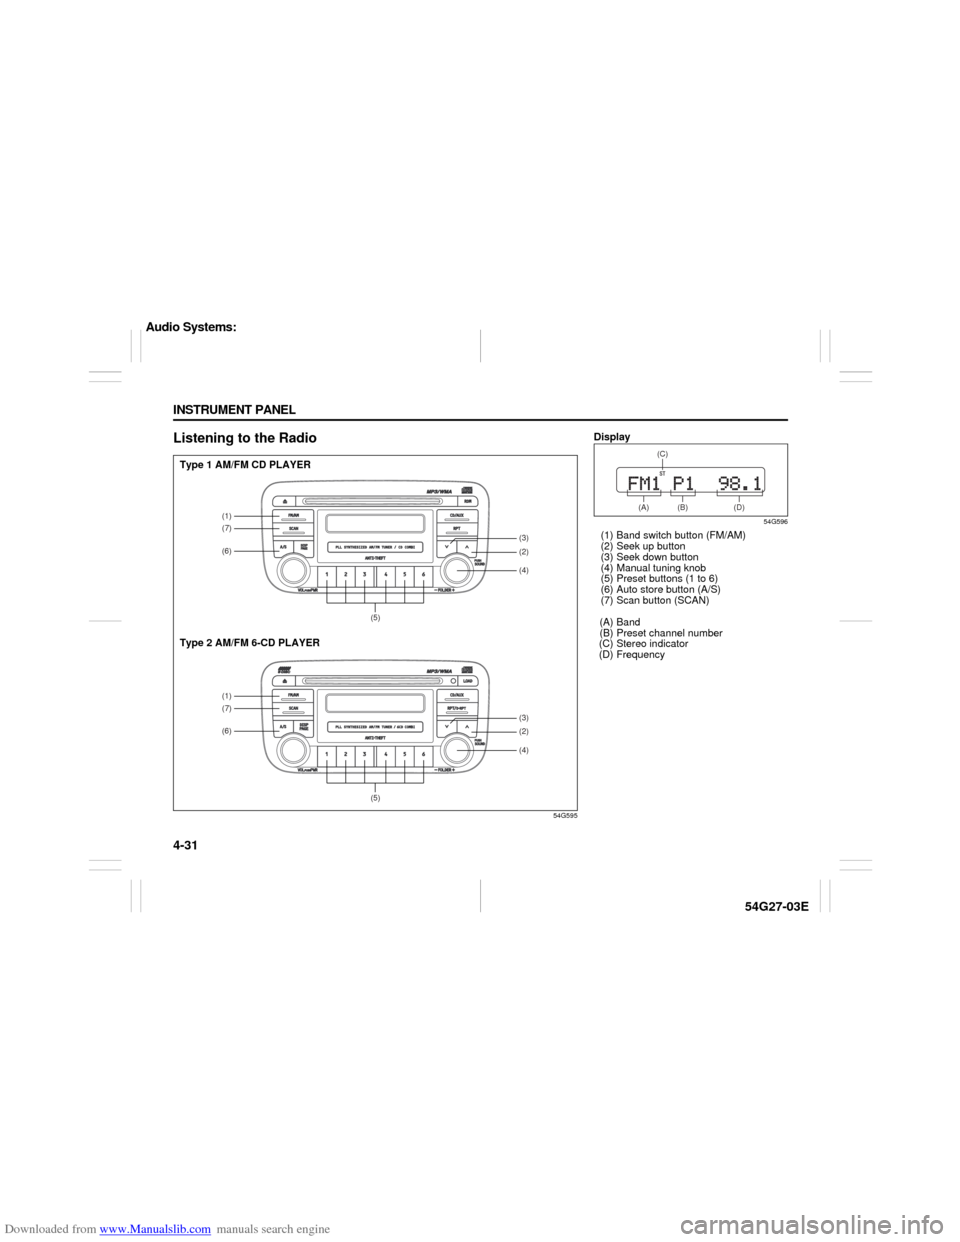
Listening to the Radio
54G595
(1)(7)(6)
(5)(1)(7)(6)
(5)
(4)(2)(3)(4)(2)(3)
Type 1 AM/FM CD PLAYER
Type 2 AM/FM 6-CD PLAYER
Display
54G596
(1) Band switch button (FM/AM)
(2) Seek up button
(3) Seek down button
(4) Manual tuning knob
(5) Preset buttons (1 to 6)
(6) Auto store button (A/S)
(7) Scan button (SCAN)
(A) Band
(B) Preset channel number
(C) Stereo indicator
(D) Frequency
(A) (B) (D)(C)
Audio Systems:
Page 97 of 232
Downloaded from www.Manualslib.com manuals search engine 4-32 INSTRUMENT PANEL
54G27-03E
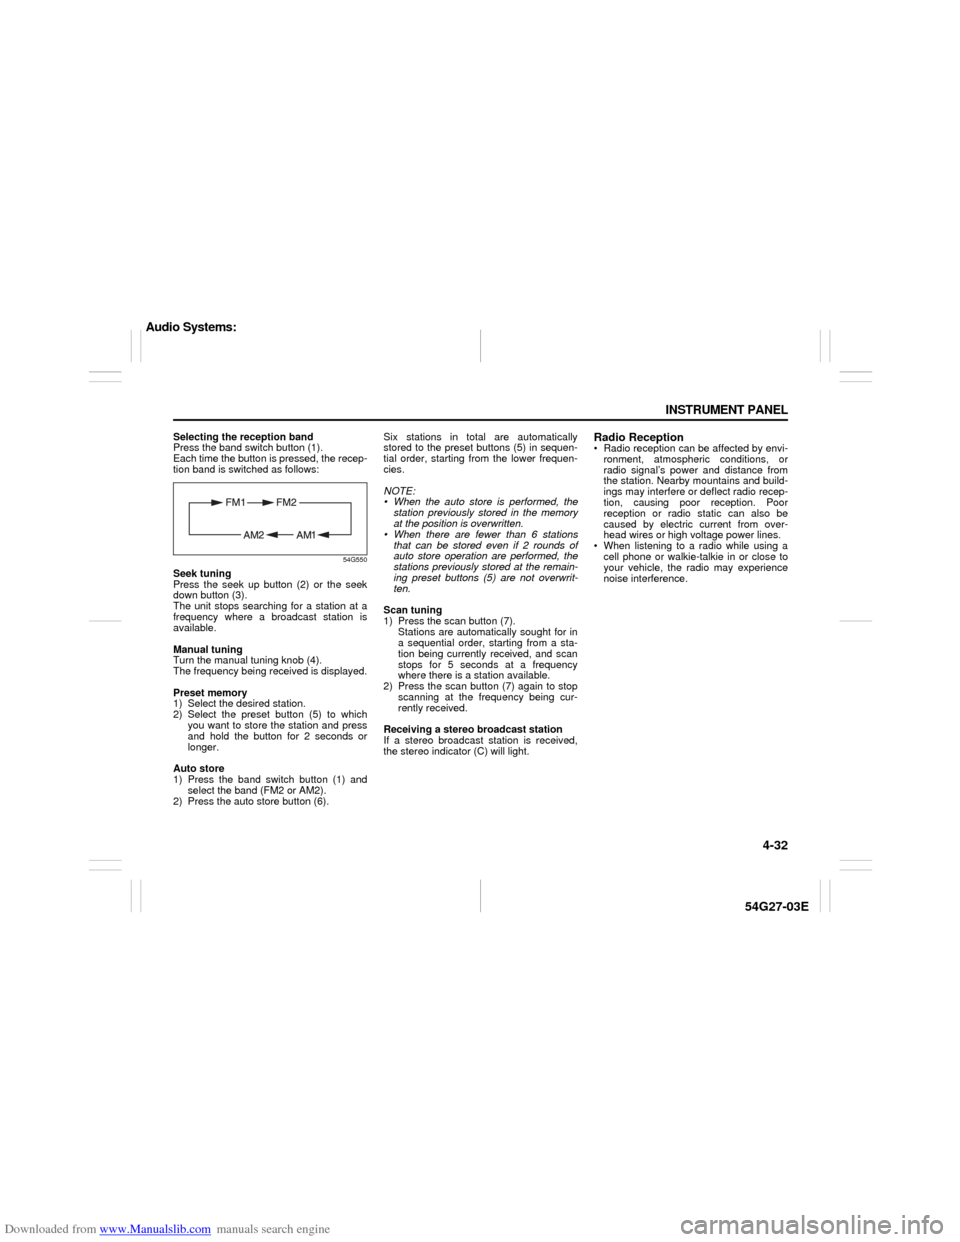
Selecting the reception band
Press the band switch button (1).
Each time the button is pressed, the recep-
tion band is switched as follows:
54G550
Seek tuning
Press the seek up button (2) or the seek
down button (3).
The unit stops searching for a station at a
frequency where a broadcast station is
available.
Manual tuning
Turn the manual tuning knob (4).
The frequency being received is displayed.
Preset memory
1) Select the desired station.
2) Select the preset button (5) to which
you want to store the station and press
and hold the button for 2 seconds or
longer.
Auto store
1) Press the band switch button (1) and
select the band (FM2 or AM2).
2) Press the auto store button (6).Six stations in total are automatically
stored to the preset buttons (5) in sequen-
tial order, starting from the lower frequen-
cies.
NOTE:
When the auto store is performed, the
station previously stored in the memory
at the position is overwritten.
When there are fewer than 6 stations
that can be stored even if 2 rounds of
auto store operation are performed, the
stations previously stored at the remain-
ing preset buttons (5) are not overwrit-
ten.
Scan tuning
1) Press the scan button (7).
Stations are automatically sought for in
a sequential order, starting from a sta-
tion being currently received, and scan
stops for 5 seconds at a frequency
where there is a station available.
2) Press the scan button (7) again to stop
scanning at the frequency being cur-
rently received.
Receiving a stereo broadcast station
If a stereo broadcast station is received,
the stereo indicator (C) will light.
Radio Reception Radio reception can be affected by envi-
ronment, atmospheric conditions, or
radio signal’s power and distance from
the station. Nearby mountains and build-
ings may interfere or deflect radio recep-
tion, causing poor reception. Poor
reception or radio static can also be
caused by electric current from over-
head wires or high voltage power lines.
When listening to a radio while using a
cell phone or walkie-talkie in or close to
your vehicle, the radio may experience
noise interference.
Audio Systems:
Page 104 of 232
Downloaded from www.Manualslib.com manuals search engine 4-39 INSTRUMENT PANEL
54G27-03E
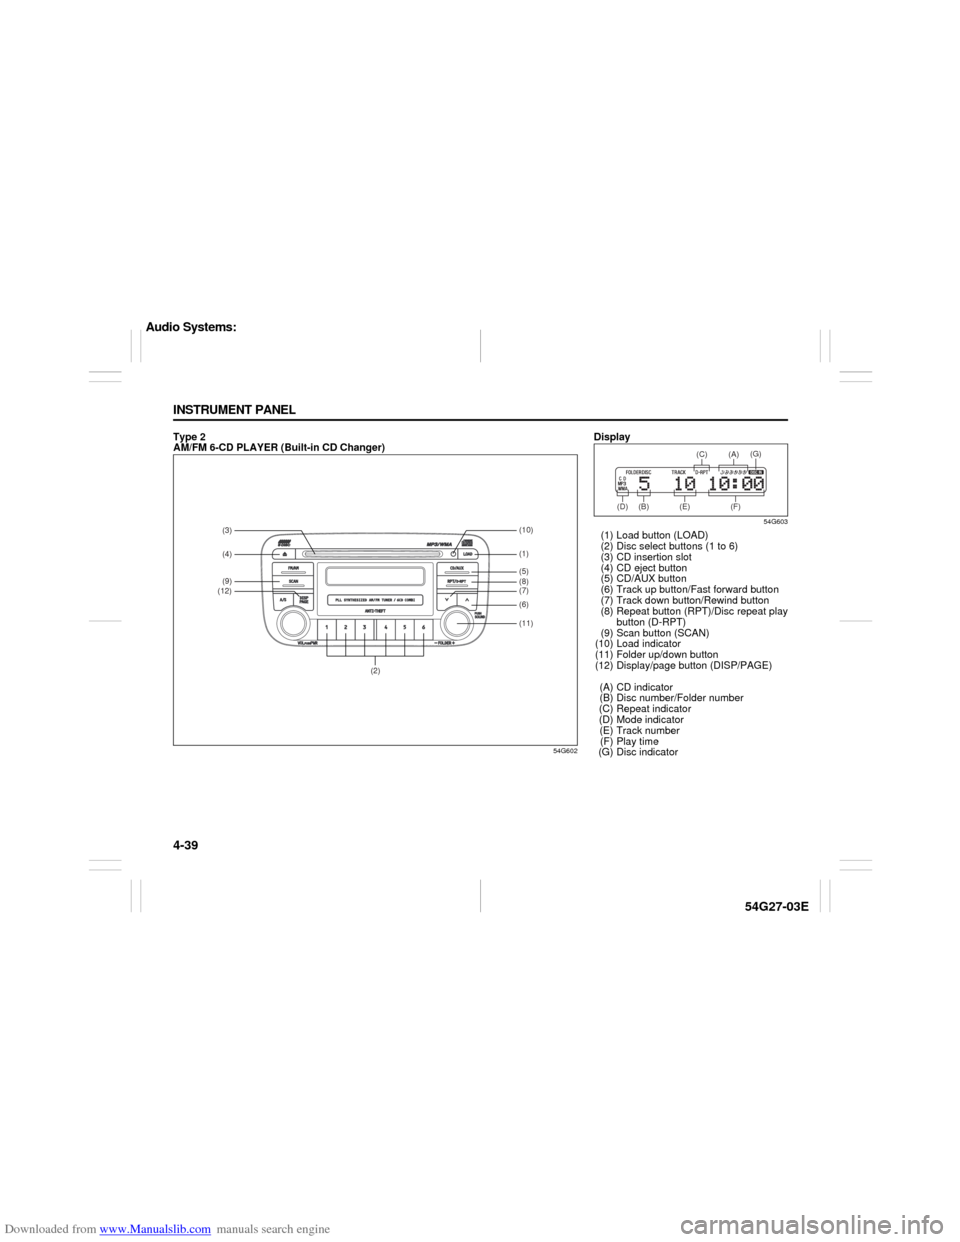
Type 2
AM/FM 6-CD PLAYER (Built-in CD Changer)
54G602
(2)
(3)(4)(9)(12)
(11) (8)(6)(7) (5)(1)(10)
Display
54G603
(1) Load button (LOAD)
(2) Disc select buttons (1 to 6)
(3) CD insertion slot
(4) CD eject button
(5) CD/AUX button
(6) Track up button/Fast forward button
(7) Track down button/Rewind button
(8) Repeat button (RPT)/Disc repeat play
button (D-RPT)
(9) Scan button (SCAN)
(10) Load indicator
(11) Folder up/down button
(12) Display/page button (DISP/PAGE)
(A) CD indicator
(B) Disc number/Folder number
(C) Repeat indicator
(D) Mode indicator
(E) Track number
(F) Play time
(G) Disc indicator
(B) (D) (E) (F)(C) (A)
(G)
Audio Systems:
Page 105 of 232

Downloaded from www.Manualslib.com manuals search engine 4-40 INSTRUMENT PANEL
54G27-03E
NOTE:
About Single CDs (8 cm CDs)
Since the unit is not compatible with a
single CD, do not load it into the unit.
Keep in mind the fact that a single CD
cannot be played even using a single
CD adaptor for the unit.
When a single CD is loaded into the unit
accidentally, it will be ejected immedi-
ately. Please be sure to remove it.
If you forcefully try to push it into the unit
without removing it, the CD cannot be
ejected. This will damage the mecha-
nism. Please never do this.
Loading one CD
1) Press the load button (1), then press
one of the disc select buttons (2) that
corresponds to the slot into which you
want to load a CD.
The load indicator (10) will light up.
2) Load the CD into the CD insertion slot
(3). When the CD is loaded, play starts.
The disk number in the CD indicator (A)
will light.Loading multiple CDs
1) Press the load button (1) for 2 seconds
or longer. The unit will beep and the
load indicator (10) will light up.
2) Load a CD into the CD insertion slot
(3).
3) The next disc number will blink in the
display. Load the next CD.
4) After loading the required number of
CD’s, press any disc select button (2) to
select the desired CD to listen to. If no
select button is pressed, play will start
from the last loaded CD.
Only the numbers in the CD indicator (A)
that correspond to the loaded slots will
light.Ejecting one CD
1) Select the CD you want to remove with
the disc select buttons (2).
2) Press the CD eject button (4).
If you leave the ejected CD without
removing it, it will be drawn into the unit
automatically after about 15 seconds.
(Auto reload function)
The back up eject mechanism:
This function allows you to eject the CD
loaded in the unit with the unit turned off
only by pressing the CD eject button (4).
Ejecting all the CDs
Press the CD eject button (4) for 2 sec-
onds or longer. The unit will beep and the
load indicator (10) will light up. All the CDs
will be ejected from the unit in a sequential
manner.
Please prepare a location where
removed CDs can be stored.
If you leave the ejected CD without
removing it, it will be drawn into the unit
automatically after about 15 seconds.
(Auto reload function)
CAUTION
You can load a CD only while the load
indicator (10) lights up for about 15
seconds. During that period, the
shutter located in the depth of the CD
insertion slot (3) is opened. After 15
seconds time has elapsed, the load
indicator (10) turns off and the shut-
ter closes, making it impossible to
load a CD. If you try to load the CD
with the shutter closed, the CD may
damage the shutter. Never do this.
CAUTION
If you forcefully try to push an ejected
CD inside the unit before auto reload-
ing, the disc surface might be
scratched.
Audio Systems:
Page 106 of 232

Downloaded from www.Manualslib.com manuals search engine 4-41 INSTRUMENT PANEL
54G27-03E
The back up eject mechanism:
This function allows you to eject the CD
loaded in the unit with the unit turned off
only by pressing the CD eject button (4).
Listening to a CD
1) When a CD is inserted, it is automati-
cally played back.
When a CD is already inside the unit,
press the CD button (5) to play back the
CD. When a CD is inside the unit, the
CD indicator (A) is lit on the display
unit.
2) If you want to play another CD, select it
with the disc select buttons (2).
Play starts from the point on the disc
that the unit played last (Last position
memory).
When a disc included CD-DA and MP3/
WMA files is loaded and played back,
pressing and holding the CD/AUX button
(5) for 2 seconds changes the file type
between CD-DA and MP3/WMA. If a file
type is not selected, CD-DA files are
played back first. After all CD-DA files are
played back, MP3/WMA files are automati-
cally played back.Selecting a track
Press the track up button (6) to listen to
the next track.
Press the track down button (7) twice to
listen to the previous track.
When the track down button (7) is
pressed once, the track being currently
played will return to the beginning.
Fast forwarding/Rewinding a track
Press the fast forward button (6) to
advance a track rapidly.
Press the rewind button (7) to rewind a
track.
Selecting a folder (while an MP3/WMA
file is played back)
Turning button (11) clockwise advances
to the next folder.
Turning button (11) counterclockwise
returns to the previous folder.
Repeat play
Press the repeat button (8).
The repeat indicator “RPT” (C) lights and a
track being currently played is played
repeatedly.
Press the repeat button (8) again to cancel
repeat play.
Disc repeat play (while a CD-DA file is
played back)
Press the disc repeat play button (8) for 2
seconds or longer.
The repeat indicator “D-RPT” (C) lights.When all the tracks on a disc being cur-
rently played finish playing, the beginning
of the disc is returned and play starts.
To cancel disc repeat play, press the disc
repeat play button (8) again.
Repeat play in the current folder (while
an MP3/WMA file is played back)
Press and hold the repeat button (8) for 2
seconds.
The repeat indicator “D-RPT” (C) lights,
and tracks in the current folder are played
back repeatedly.
Press the repeat button (8) again to cancel
repeat play in the current folder.
CAUTION
If you try to push an ejected CD
inside the unit forcibly before auto
reloading, the disc surface might be
scratched.
Audio Systems:
Page 109 of 232
Downloaded from www.Manualslib.com manuals search engine 4-44 INSTRUMENT PANEL
54G27-03E
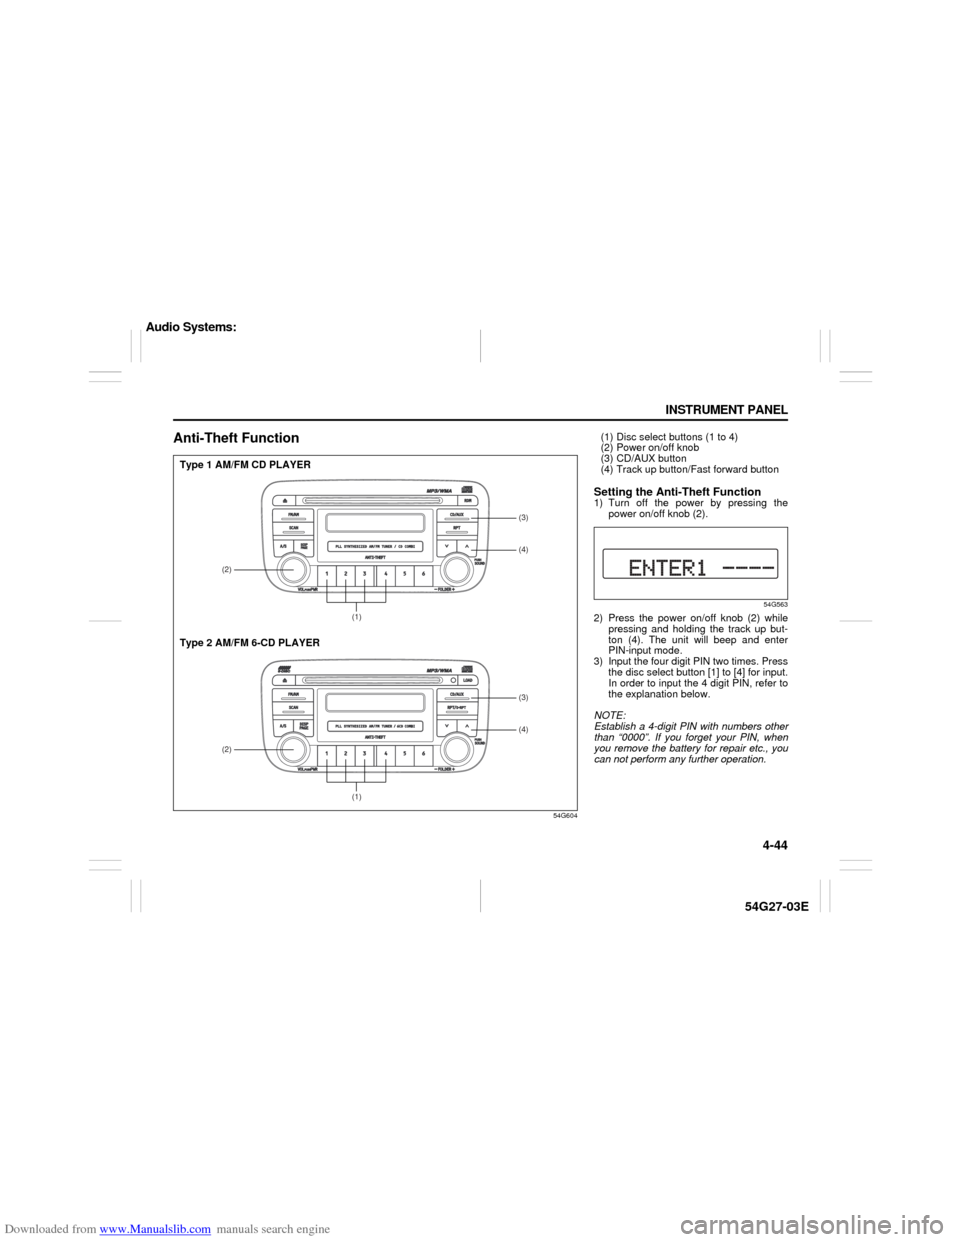
Anti-Theft Function
54G604
(2)
(1)(4) (3)(2)
(1)(4) (3)
Type 1 AM/FM CD PLAYER
Type 2 AM/FM 6-CD PLAYER
(1) Disc select buttons (1 to 4)
(2) Power on/off knob
(3) CD/AUX button
(4) Track up button/Fast forward buttonSetting the Anti-Theft Function1) Turn off the power by pressing the
power on/off knob (2).
54G563
2) Press the power on/off knob (2) while
pressing and holding the track up but-
ton (4). The unit will beep and enter
PIN-input mode.
3) Input the four digit PIN two times. Press
the disc select button [1] to [4] for input.
In order to input the 4 digit PIN, refer to
the explanation below.
NOTE:
Establish a 4-digit PIN with numbers other
than “0000”. If you forget your PIN, when
you remove the battery for repair etc., you
can not perform any further operation.
Audio Systems:
Page 110 of 232
![SUZUKI AERIO 2007 1.G Owners Manual Downloaded from www.Manualslib.com manuals search engine 4-45 INSTRUMENT PANEL
54G27-03E
How to input the code number
(for example “0364”)
54G564
1. Press the disc select button [1] once.
The numb SUZUKI AERIO 2007 1.G Owners Manual Downloaded from www.Manualslib.com manuals search engine 4-45 INSTRUMENT PANEL
54G27-03E
How to input the code number
(for example “0364”)
54G564
1. Press the disc select button [1] once.
The numb](/img/20/7570/w960_7570-109.png)
Downloaded from www.Manualslib.com manuals search engine 4-45 INSTRUMENT PANEL
54G27-03E
How to input the code number
(for example “0364”)
54G564
1. Press the disc select button [1] once.
The number “0” is displayed.
Every time this button is pressed, the
displayed number changes over in
the order “0” to “9”.
54G565
2. Press the disc select button [2] four
times. The number “3” is displayed.
54G566
3. Manipulate the disc select buttons
[3] and [4] in the same way as
above, and input “0364”.
54G567
4. Press the CD button (3).
Pressing the CD button (3) will
cause the unit to beep and enter PIN
confirmation mode. Re-input the PIN
to confirm it, and press the CD but-
ton (3). If the number entered the
second time is different from the first
number, the unit will beep and go
back to first input mode.
NOTE:
Write down your PIN for the future use.
Cancel Your Established PIN
SettingThis operation is to be done when you
want to cancel the anti-theft code or
change your code number.
1) Turn off the power by pressing the
power on/off knob (2).
54G568
2) Press the power on/off knob (2) while
pressing and holding the track up but-
ton (4).
3) Input your PIN and press the CD button
(3).
Input a four-digit PIN using the disc
select buttons [1] through [4]. If the PIN
matches, the unit will emit a short beep
and the PIN will be erased. The unit will
return to normal operation.
If the PIN does not match, the unit will
emit a long beep and return to normal
position. In this case, the PIN will not be
erased.
To change your PIN, first erase your
current PIN, then set the new one.
Audio Systems:
Page 111 of 232
Downloaded from www.Manualslib.com manuals search engine 4-46 INSTRUMENT PANEL
54G27-03E
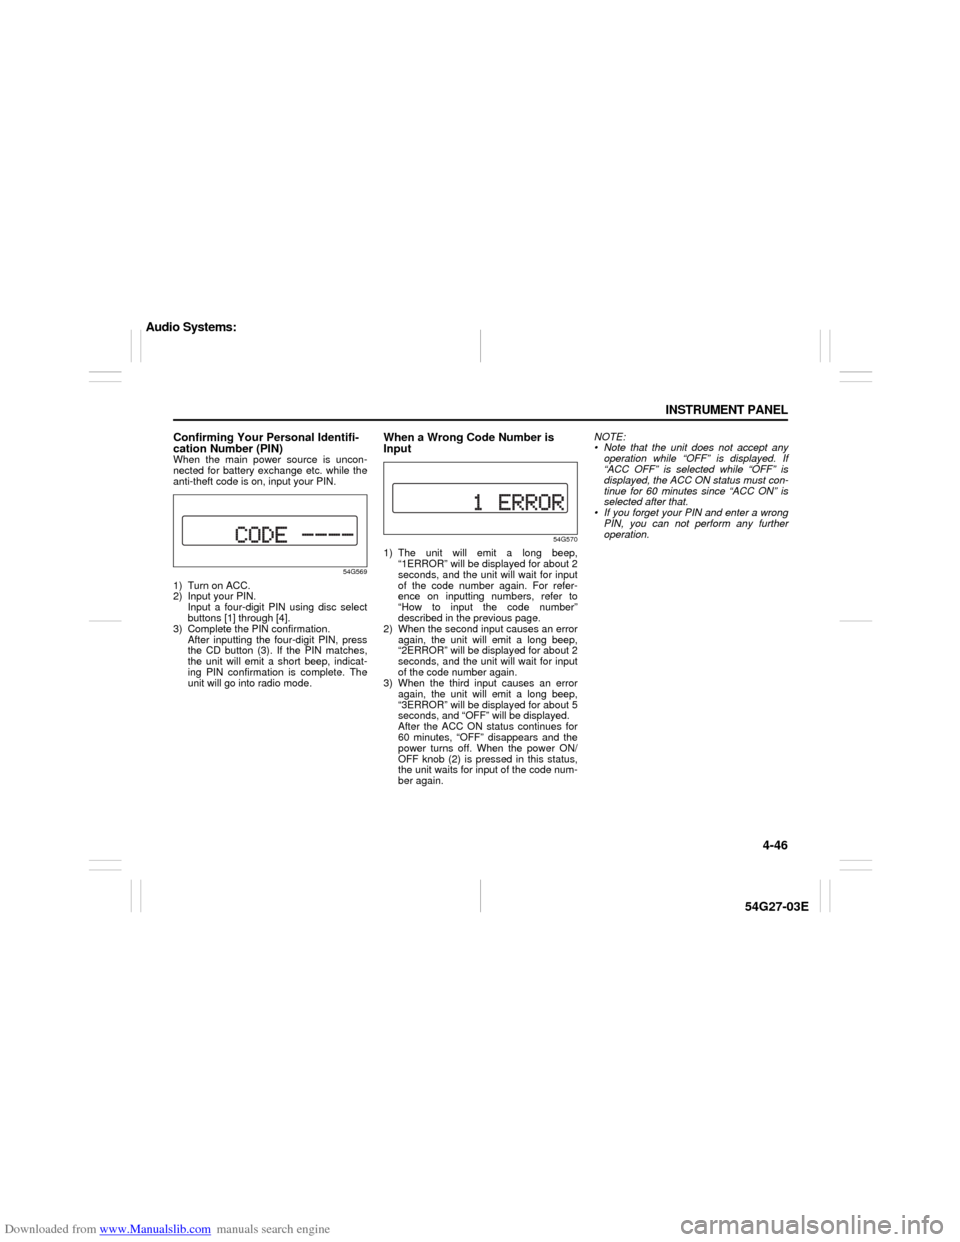
Confirming Your Personal Identifi-
cation Number (PIN)When the main power source is uncon-
nected for battery exchange etc. while the
anti-theft code is on, input your PIN.
54G569
1) Turn on ACC.
2) Input your PIN.
Input a four-digit PIN using disc select
buttons [1] through [4].
3) Complete the PIN confirmation.
After inputting the four-digit PIN, press
the CD button (3). If the PIN matches,
the unit will emit a short beep, indicat-
ing PIN confirmation is complete. The
unit will go into radio mode.
When a Wrong Code Number is
Input
54G570
1) The unit will emit a long beep,
“1ERROR” will be displayed for about 2
seconds, and the unit will wait for input
of the code number again. For refer-
ence on inputting numbers, refer to
“How to input the code number”
described in the previous page.
2) When the second input causes an error
again, the unit will emit a long beep,
“2ERROR” will be displayed for about 2
seconds, and the unit will wait for input
of the code number again.
3) When the third input causes an error
again, the unit will emit a long beep,
“3ERROR” will be displayed for about 5
seconds, and “OFF” will be displayed.
After the ACC ON status continues for
60 minutes, “OFF” disappears and the
power turns off. When the power ON/
OFF knob (2) is pressed in this status,
the unit waits for input of the code num-
ber again.NOTE:
Note that the unit does not accept any
operation while “OFF” is displayed. If
“ACC OFF” is selected while “OFF” is
displayed, the ACC ON status must con-
tinue for 60 minutes since “ACC ON” is
selected after that.
If you forget your PIN and enter a wrong
PIN, you can not perform any further
operation.
Audio Systems: