rear SUZUKI ALTO 2015 Owner's Manual
[x] Cancel search | Manufacturer: SUZUKI, Model Year: 2015, Model line: ALTO, Model: SUZUKI ALTO 2015Pages: 139, PDF Size: 2.22 MB
Page 91 of 139
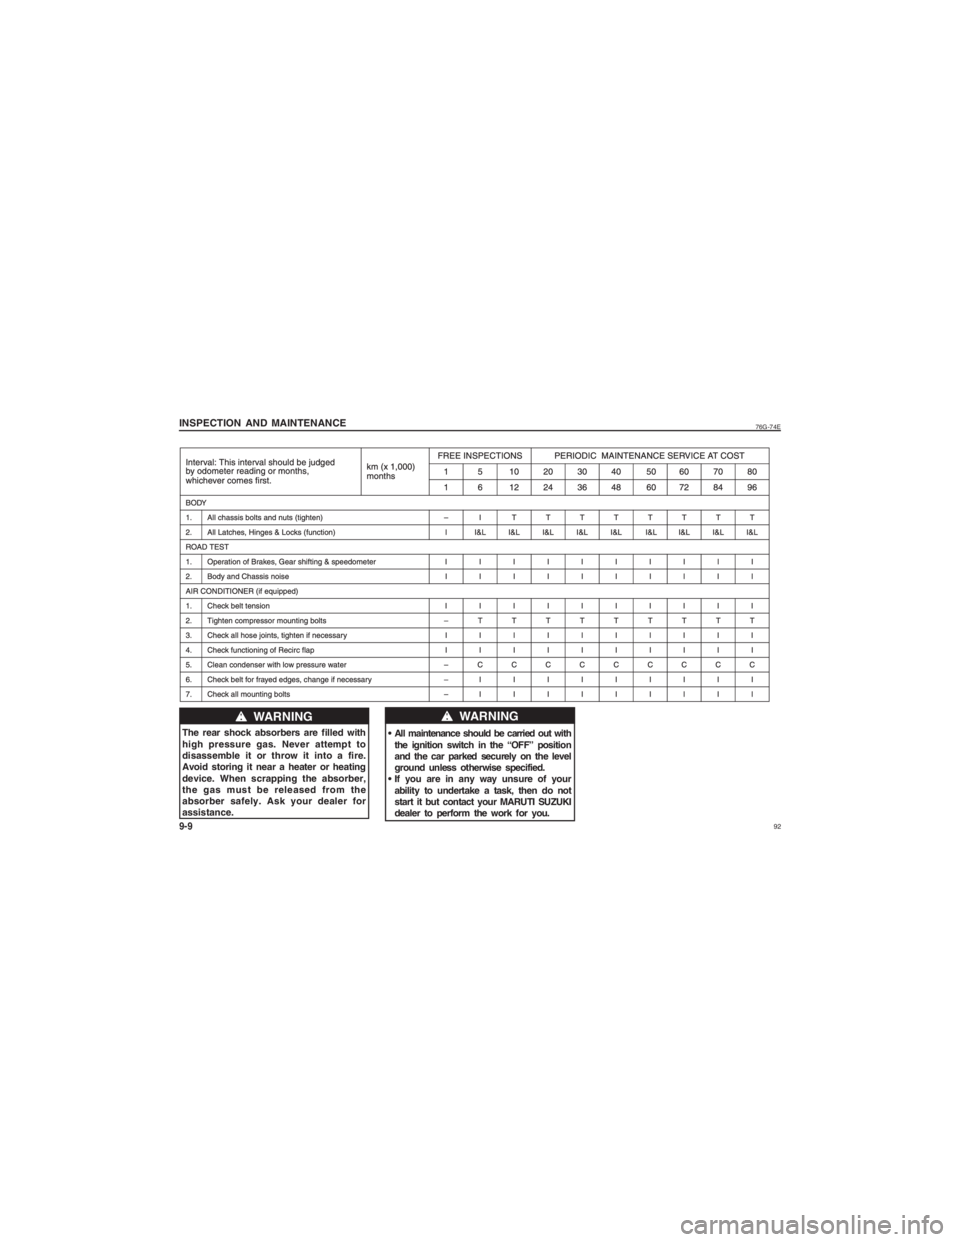
92
76G-74E
ww ww
w WARNING
The rear shock absorbers are filled with
high pressure gas. Never attempt to
disassemble it or throw it into a fire.
Avoid storing it near a heater or heating
device. When scrapping the absorber,
the gas must be released from the
absorber safely. Ask your dealer for
assistance. All maintenance should be carried out with
the ignition switch in the “OFF” position
and the car parked securely on the level
ground unless otherwise specified.
If you are in any way unsure of your
ability to undertake a task, then do not
start it but contact your MARUTI SUZUKI
dealer to perform the work for you.
ww ww
w WARNING
INSPECTION AND MAINTENANCE9-9
Page 105 of 139
106
76G-74E
INSPECTION AND MAINTENANCE9-23NOTE:When measuring the distance between the
brake pedal and floor wall, be sure not toinclude any floor covering other thansilencer mat in the measurement.If you experience any of the following
problems with your vehicle’s brake
system, have the vehicle inspected
immediately by your MARUTI SUZUKI
dealer.
Poor braking performance
Uneven braking (Brakes not working uniformly on all wheels.)
Excessive pedal travel
Brake dragging
Excessive noise
Pedal pulsation (Pedal pulsates
when depressed.)
ww ww
w WARNING
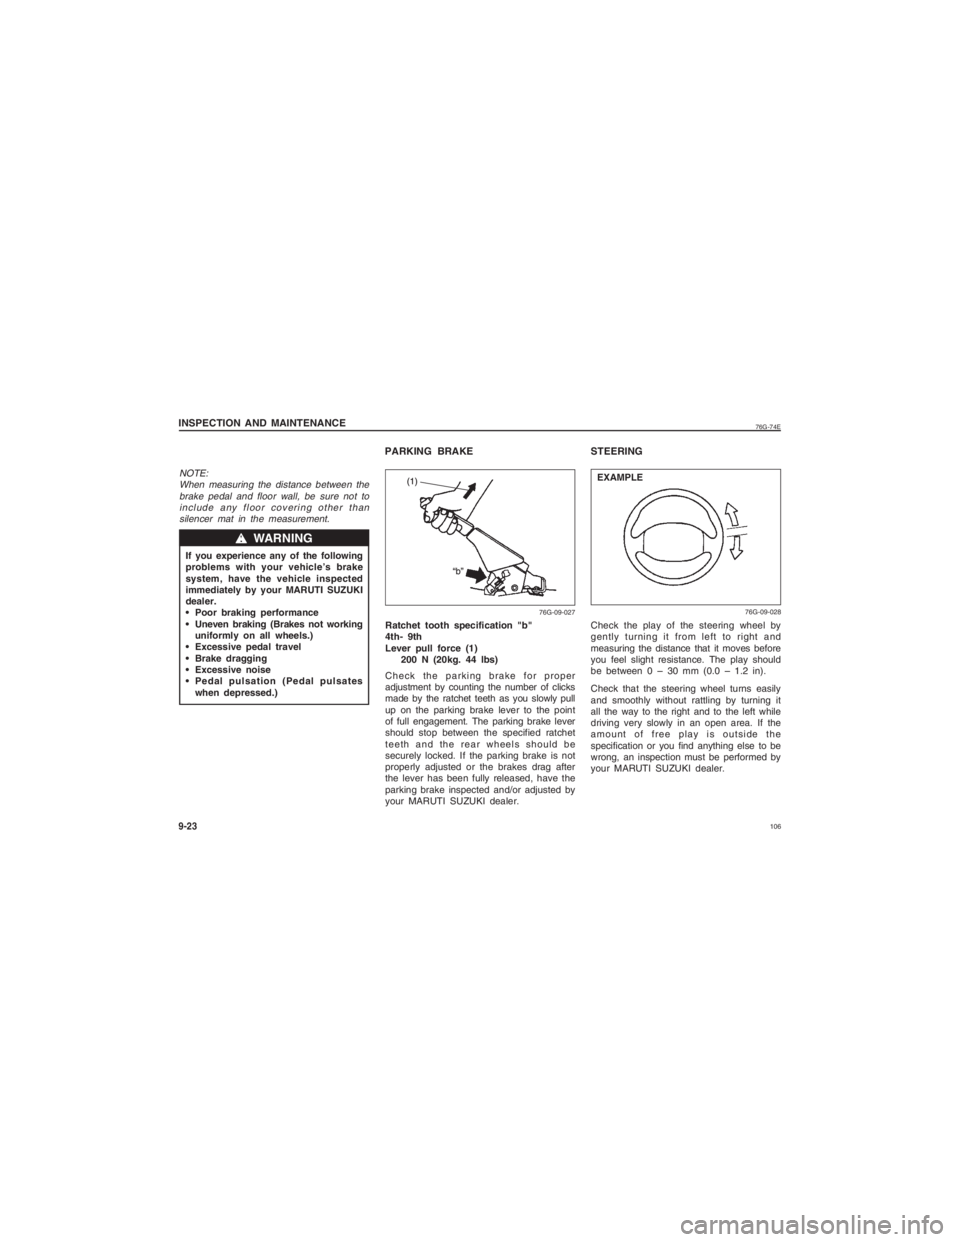
Ratchet tooth specification "b"
4th- 9th
Lever pull force (1)
200 N (20kg. 44 lbs)
Check the parking brake for proper
adjustment by counting the number of clicks
made by the ratchet teeth as you slowly pull
up on the parking brake lever to the point
of full engagement. The parking brake lever
should stop between the specified ratchet
teeth and the rear wheels should be
securely locked. If the parking brake is not
properly adjusted or the brakes drag after
the lever has been fully released, have the
parking brake inspected and/or adjusted by
your MARUTI SUZUKI dealer.
76G-09-027
STEERINGCheck the play of the steering wheel by
gently turning it from left to right and
measuring the distance that it moves before
you feel slight resistance. The play should
be between 0 – 30 mm (0.0 – 1.2 in).
Check that the steering wheel turns easily
and smoothly without rattling by turning it
all the way to the right and to the left while
driving very slowly in an open area. If the
amount of free play is outside the
specification or you find anything else to be
wrong, an inspection must be performed by
your MARUTI SUZUKI dealer.
76G-09-028
EXAMPLE
PARKING BRAKE
Page 106 of 139
10776G-74E
9-24
INSPECTION AND MAINTENANCE
CLUTCH PEDAL
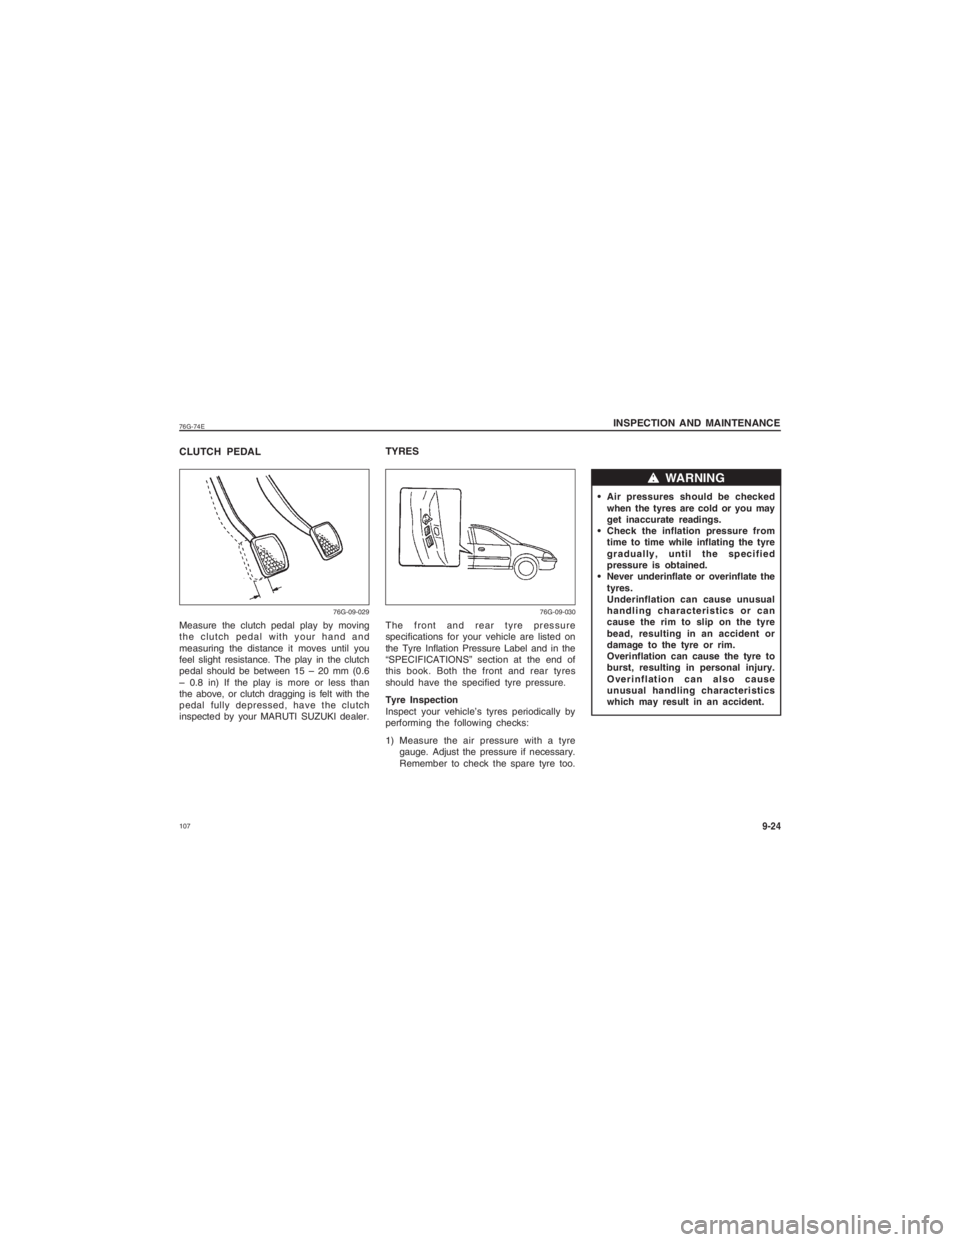
Measure the clutch pedal play by moving
the clutch pedal with your hand and
measuring the distance it moves until you
feel slight resistance. The play in the clutch
pedal should be between 15 – 20 mm (0.6
– 0.8 in) If the play is more or less than
the above, or clutch dragging is felt with the
pedal fully depressed, have the clutch
inspected by your MARUTI SUZUKI dealer.
76G-09-029
TYRESThe front and rear tyre pressure
specifications for your vehicle are listed on
the Tyre Inflation Pressure Label and in the
“SPECIFICATIONS” section at the end of
this book. Both the front and rear tyres
should have the specified tyre pressure.
Tyre Inspection
Inspect your vehicle’s tyres periodically by
performing the following checks:
1) Measure the air pressure with a tyre gauge. Adjust the pressure if necessary.
Remember to check the spare tyre too.
76G-09-030
Air pressures should be checkedwhen the tyres are cold or you may
get inaccurate readings.
Check the inflation pressure from time to time while inflating the tyre
gradually, until the specified
pressure is obtained.
Never underinflate or overinflate the tyres.
Underinflation can cause unusual
handling characteristics or can
cause the rim to slip on the tyre
bead, resulting in an accident or
damage to the tyre or rim.
Overinflation can cause the tyre to
burst, resulting in personal injury.
Overinflation can also cause
unusual handling characteristics
which may result in an accident.
ww ww
w WARNING
Page 108 of 139
10976G-74E
INSPECTION AND MAINTENANCE
9-26
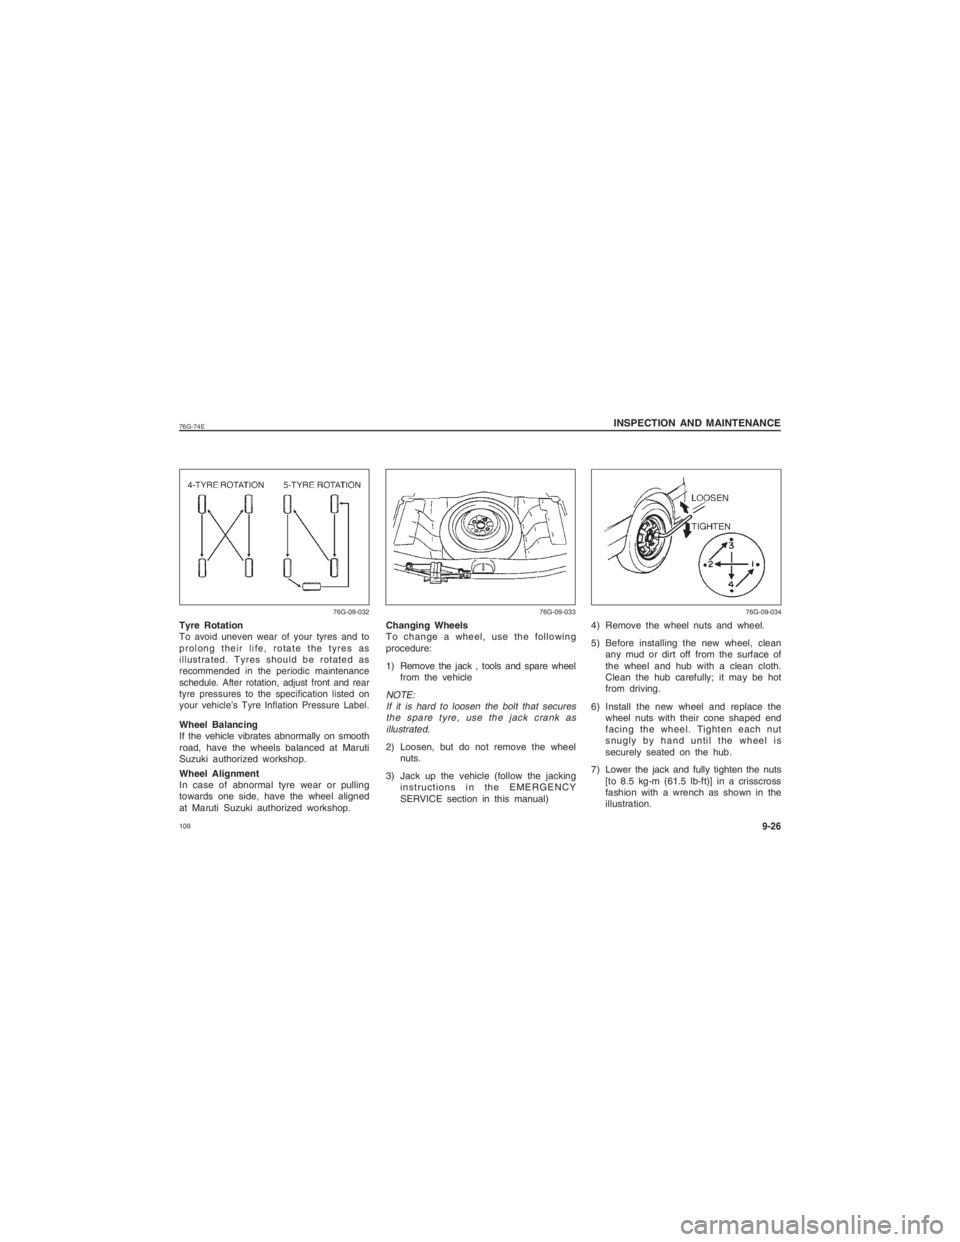
Tyre RotationTo avoid uneven wear of your tyres and to
prolong their life, rotate the tyres as
illustrated. Tyres should be rotated as
recommended in the periodic maintenance
schedule. After rotation, adjust front and rear
tyre pressures to the specification listed on
your vehicle’s Tyre Inflation Pressure Label.Wheel Balancing
If the vehicle vibrates abnormally on smooth
road, have the wheels balanced at Maruti
Suzuki authorized workshop.
Wheel Alignment
In case of abnormal tyre wear or pulling
towards one side, have the wheel aligned
at Maruti Suzuki authorized workshop.
76G-09-032
Changing Wheels
To change a wheel, use the following
procedure:
1) Remove the jack , tools and spare wheelfrom the vehicleNOTE:If it is hard to loosen the bolt that securesthe spare tyre, use the jack crank as
illustrated.2) Loosen, but do not remove the wheel nuts.
3) Jack up the vehicle (follow the jacking instructions in the EMERGENCY
SERVICE section in this manual)
76G-09-033
4) Remove the wheel nuts and wheel.
5) Before installing the new wheel, cleanany mud or dirt off from the surface of
the wheel and hub with a clean cloth.
Clean the hub carefully; it may be hot
from driving.
6) Install the new wheel and replace the wheel nuts with their cone shaped end
facing the wheel. Tighten each nut
snugly by hand until the wheel is
securely seated on the hub.
7) Lower the jack and fully tighten the nuts [to 8.5 kg-m (61.5 lb-ft)] in a crisscross
fashion with a wrench as shown in the
illustration.
76G-09-034
Page 112 of 139
11376G-74E
INSPECTION AND MAINTENANCE
9-30
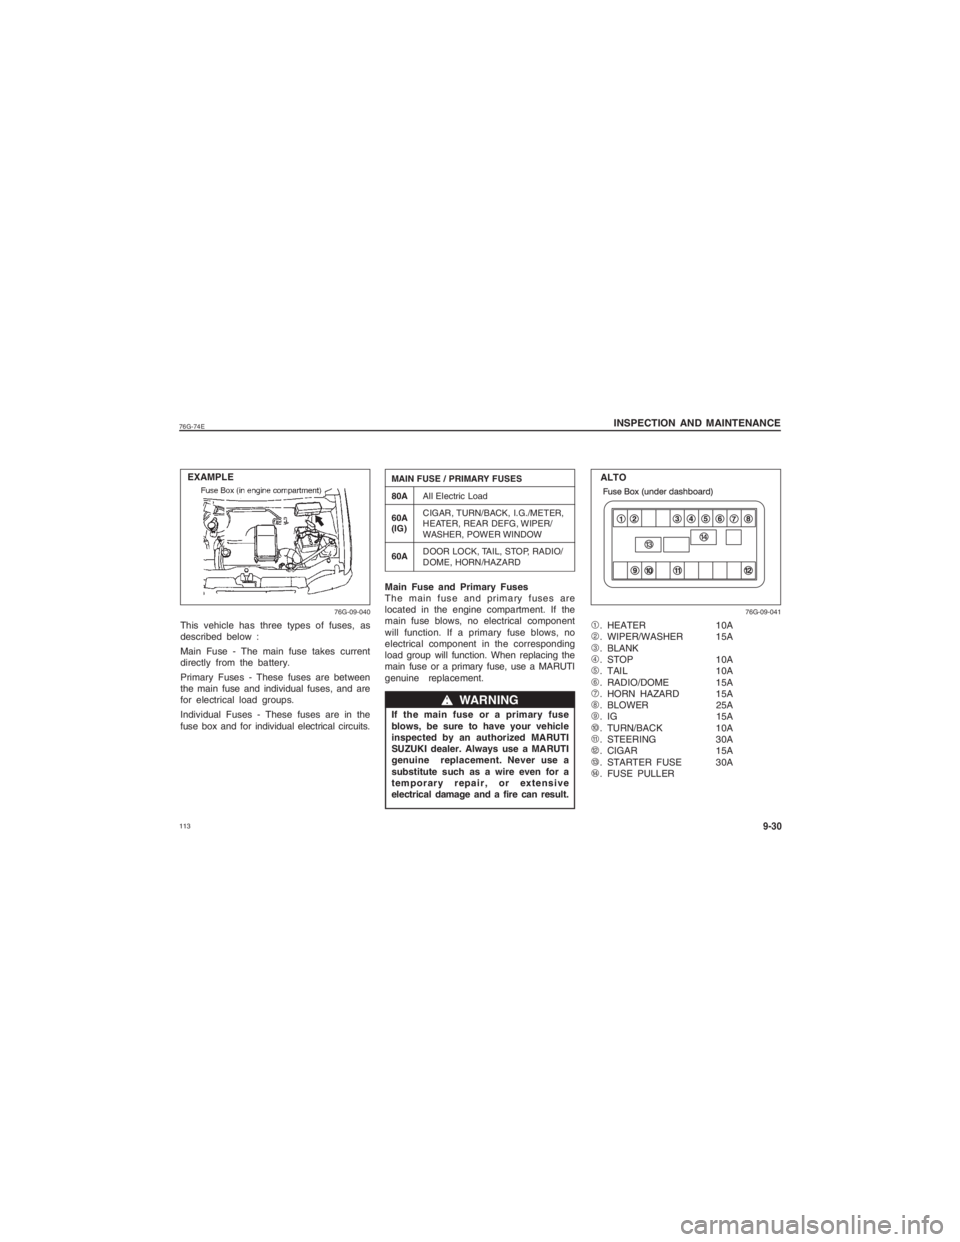
This vehicle has three types of fuses, as
described below :
Main Fuse - The main fuse takes current
directly from the battery.
Primary Fuses - These fuses are between
the main fuse and individual fuses, and are
for electrical load groups.
Individual Fuses - These fuses are in the
fuse box and for individual electrical circuits.
76G-09-040
EXAMPLE1. HEATER 10A
2 . WIPER/WASHER 15A
3 . BLANK
4 . STOP 10A
5 . TAIL 10A
6 . RADIO/DOME 15A
7 . HORN HAZARD 15A
8 . BLOWER 25A
9 . IG 15A
0 . TURN/BACK 10A
c . STEERING 30A
d . CIGAR 15A
e . STARTER FUSE 30A
f . FUSE PULLER
Main Fuse and Primary Fuses
The main fuse and primary fuses are
located in the engine compartment. If the
main fuse blows, no electrical component
will function. If a primary fuse blows, no
electrical component in the corresponding
load group will function. When replacing the
main fuse or a primary fuse, use a MARUTI
genuine replacement.
If the main fuse or a primary fuse
blows, be sure to have your vehicle
inspected by an authorized MARUTI
SUZUKI dealer. Always use a MARUTI
genuine replacement. Never use a
substitute such as a wire even for a
temporary repair, or extensive
electrical damage and a fire can result.
ww ww
w WARNING
MAIN FUSE / PRIMARY FUSES
80A All Electric Load
60A CIGAR, TURN/BACK, I.G./METER,
(IG) HEATER, REAR DEFG, WIPER/
WASHER, POWER WINDOW
60A DOOR LOCK, TAIL, STOP, RADIO/
DOME, HORN/HAZARD
76G-09-041
ALTO
Page 115 of 139
116
76G-74E
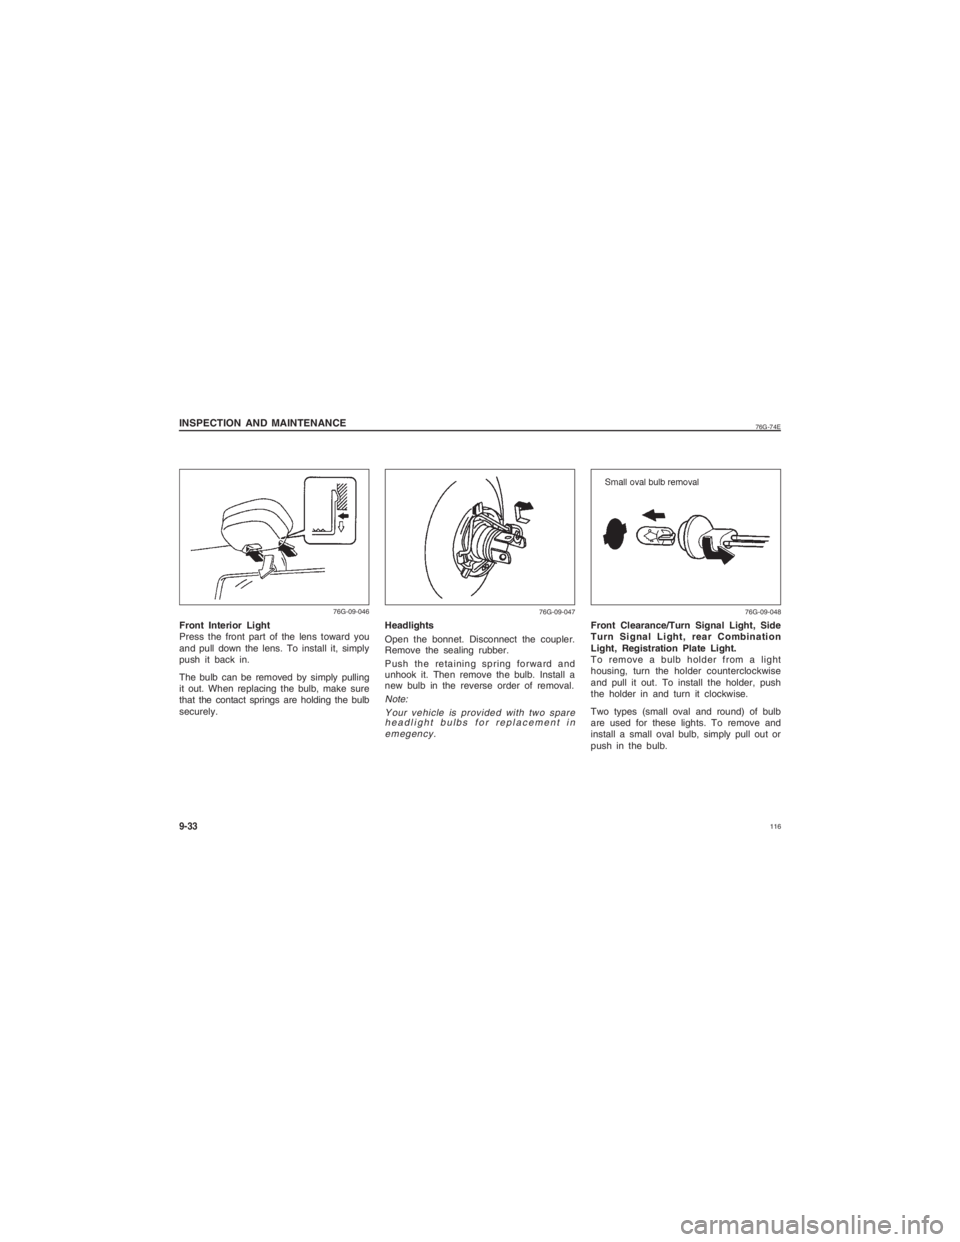
INSPECTION AND MAINTENANCE9-33Front Interior Light
Press the front part of the lens toward you
and pull down the lens. To install it, simply
push it back in.
The bulb can be removed by simply pulling
it out. When replacing the bulb, make sure
that the contact springs are holding the bulb
securely.
76G-09-046
Front Clearance/Turn Signal Light, Side
Turn Signal Light, rear Combination
Light, Registration Plate Light.
To remove a bulb holder from a light
housing, turn the holder counterclockwise
and pull it out. To install the holder, push
the holder in and turn it clockwise.
Two types (small oval and round) of bulb
are used for these lights. To remove and
install a small oval bulb, simply pull out or
push in the bulb.
76G-09-048
Headlights
Open the bonnet. Disconnect the coupler.
Remove the sealing rubber.
Push the retaining spring forward and
unhook it. Then remove the bulb. Install a
new bulb in the reverse order of removal.Note:Your vehicle is provided with two spareheadlight bulbs for replacement in
emegency.
76G-09-047
Page 117 of 139
118
76G-74E
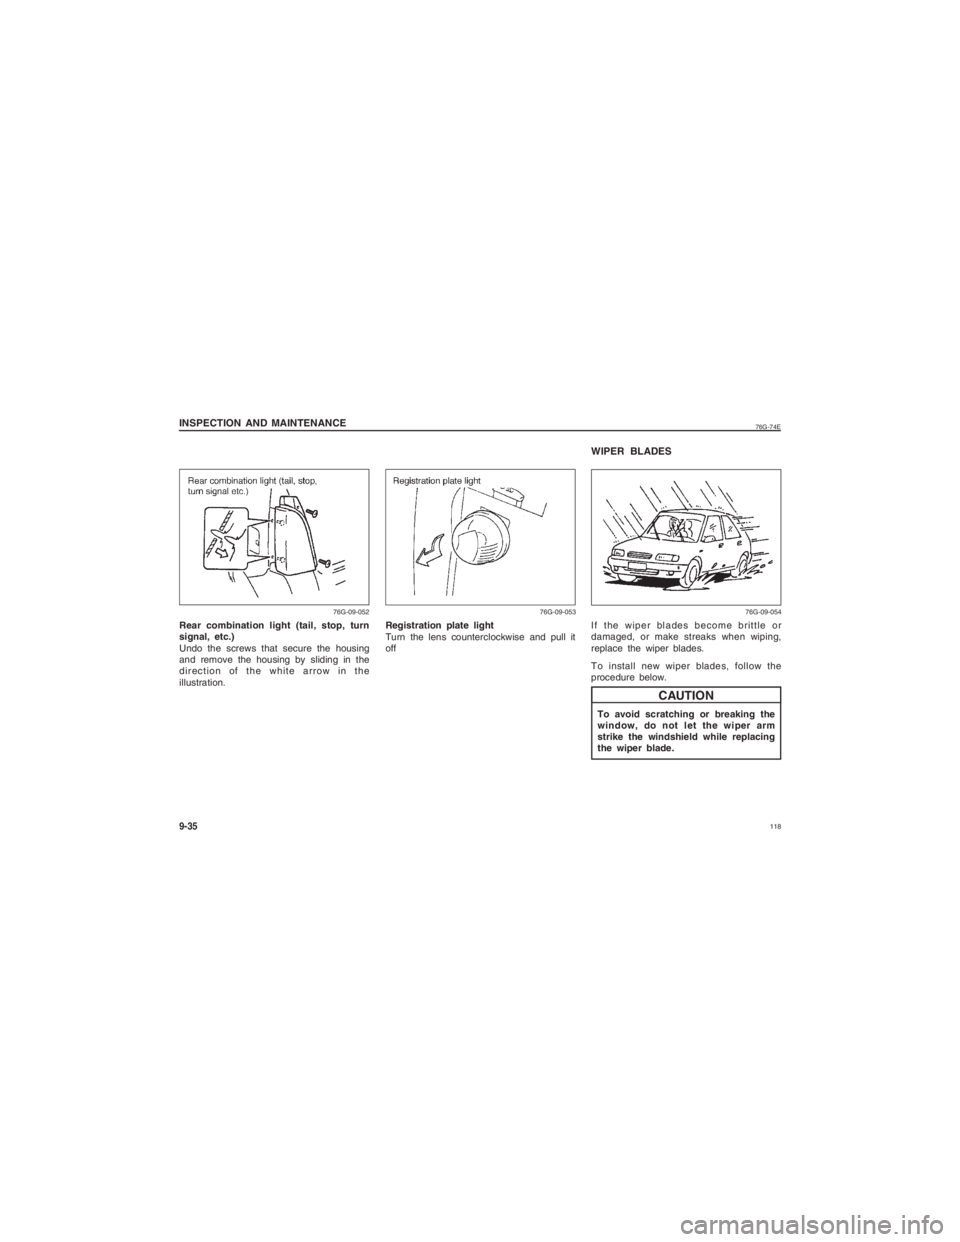
INSPECTION AND MAINTENANCE9-35Rear combination light (tail, stop, turn
signal, etc.)
Undo the screws that secure the housing
and remove the housing by sliding in the
direction of the white arrow in the
illustration.
76G-09-052
WIPER BLADESIf the wiper blades become brittle or
damaged, or make streaks when wiping,
replace the wiper blades.
To install new wiper blades, follow the
procedure below.To avoid scratching or breaking the
window, do not let the wiper arm
strike the windshield while replacing
the wiper blade.
CAUTION
76G-09-054
Registration plate light
Turn the lens counterclockwise and pull it
off
76G-09-053
Page 121 of 139
122
76G-74E
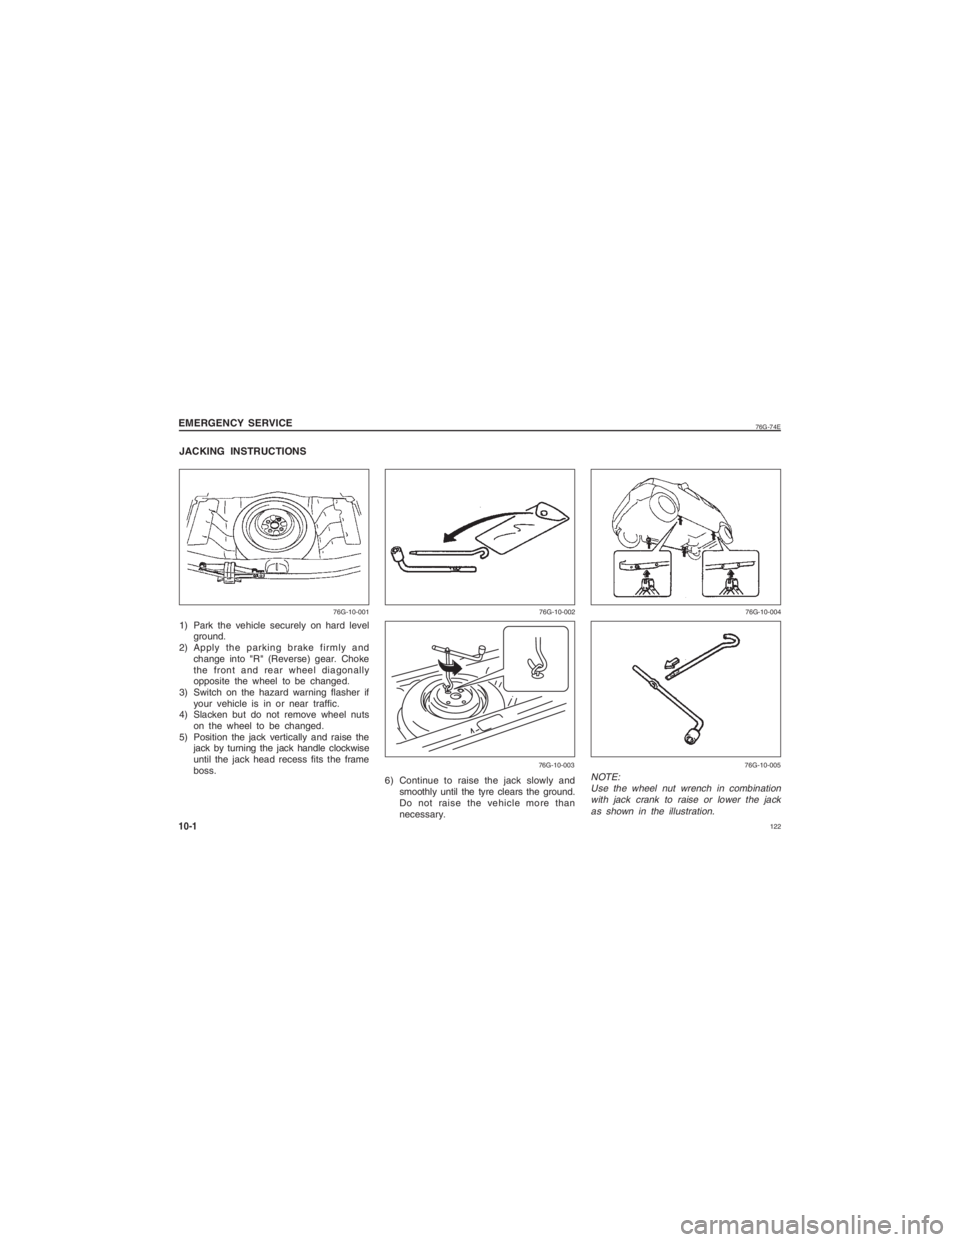
JACKING INSTRUCTIONS1) Park the vehicle securely on hard levelground.
2) Apply the parking brake firmly and
change into "R" (Reverse) gear. Choke
the front and rear wheel diagonally
opposite the wheel to be changed.
3) Switch on the hazard warning flasher if your vehicle is in or near traffic.
4) Slacken but do not remove wheel nuts
on the wheel to be changed.
5) Position the jack vertically and raise the jack by turning the jack handle clockwise
until the jack head recess fits the frame
boss.EMERGENCY SERVICE10-1
NOTE:
Use the wheel nut wrench in combinationwith jack crank to raise or lower the jack
as shown in the illustration.
76G-10-001 76G-10-002 76G-10-004
76G-10-003 76G-10-005
6) Continue to raise the jack slowly and
smoothly until the tyre clears the ground.
Do not raise the vehicle more than
necessary.
Page 124 of 139
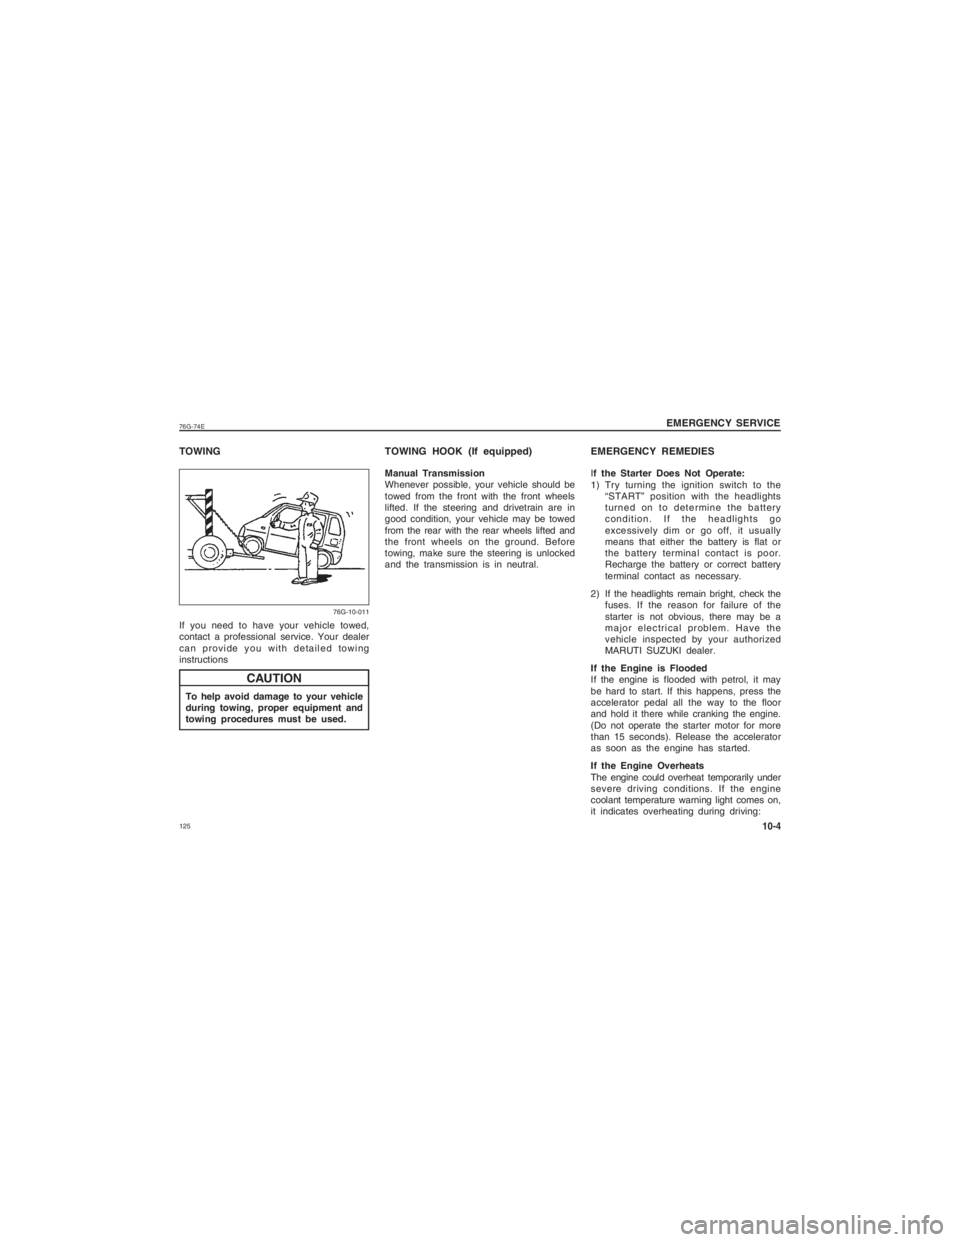
12576G-74ETOWINGIf you need to have your vehicle towed,
contact a professional service. Your dealer
can provide you with detailed towing
instructionsTo help avoid damage to your vehicle
during towing, proper equipment and
towing procedures must be used.
EMERGENCY REMEDIES EMERGENCY SERVICE
10-4
CAUTION
Manual Transmission
Whenever possible, your vehicle should be
towed from the front with the front wheels
lifted. If the steering and drivetrain are in
good condition, your vehicle may be towed
from the rear with the rear wheels lifted and
the front wheels on the ground. Before
towing, make sure the steering is unlocked
and the transmission is in neutral. I
f the Starter Does Not Operate:
1) Try turning the ignition switch to the
“START” position with the headlights
turned on to determine the battery
condition. If the headlights go
excessively dim or go off, it usually
means that either the battery is flat or
the battery terminal contact is poor.
Recharge the battery or correct battery
terminal contact as necessary.
2) If the headlights remain bright, check the fuses. If the reason for failure of the
starter is not obvious, there may be a
major electrical problem. Have the
vehicle inspected by your authorized
MARUTI SUZUKI dealer.
If the Engine is Flooded
If the engine is flooded with petrol, it may
be hard to start. If this happens, press the
accelerator pedal all the way to the floor
and hold it there while cranking the engine.
(Do not operate the starter motor for more
than 15 seconds). Release the accelerator
as soon as the engine has started.
If the Engine Overheats
The engine could overheat temporarily under
severe driving conditions. If the engine
coolant temperature warning light comes on,
it indicates overheating during driving:TOWING HOOK (If equipped)
76G-10-011
Page 134 of 139

13576G-74E
SPECIFICATIONS
13
SPECIFICATIONSNOTE:Specifications are subject to change without notice.
ITEM: DIMENSIONS UNIT:mm
ALTO (STD / Lx / Lxi) ALTO K10 (Lxi / Vxi)
Overall length 34953620
Overall width 14751495/1475 (without side moulding)
Overall height 14601460
Wheelbase 23602360
Tread front 1295 1295
rear 1290 1290
Ground clearance 160160
ITEM: MASS (WEIGHT) UNIT:Kg
ALTO (STD / Lx / Lxi) ALTO K10 (Lxi / Vxi)
Kerb mass (weight) 690-705750-765
Gross vehicle mass (weight) rating 11401185
Seating Capacity 5 persons5 persons
ITEM: ENGINE ALTO (STD / Lx / Lxi)ALTO K10 (Lxi / Vxi)
Type F8DK10B
Number of cylinders 33
Bore 68.573
Stroke 72.079.5
Piston displacement 796 cc998 cc
Compression ratio 9.2 ± 0.2 : 110.0 ± 0.4 : 1
13-1