rear brake SUZUKI ALTO 2015 Owners Manual
[x] Cancel search | Manufacturer: SUZUKI, Model Year: 2015, Model line: ALTO, Model: SUZUKI ALTO 2015Pages: 139, PDF Size: 2.22 MB
Page 56 of 139

5776G-74E
OTHER CONTROLS AND EQUIPMENT
6
OTHER CONTROLS AND EQUIPMENT
Parking Brake Lever
........................................................................\
.................. 6-1
Pedals ........................................................................\
........................................... 6-2
Gear Lever ........................................................................\
................................... 6-3
Fuel Filler Cap ........................................................................\
............................ 6-3
Folding Rear Seats ........................................................................\
.................... 6-5
Sun Visor ........................................................................\
..................................... 6-5
Interior Light Switch........................................................................\
.................. 6-6
Assist Grips ........................................................................\
................................ 6-6
Bonnet ........................................................................\
........................................... 6-6
Frame Hooks (if equipped) ........................................................................\
...... 6-7
Cup Holder (if equipped) ........................................................................\
......... 6-8
Tyre Changing Tools ........................................................................\
................. 6-8
High Mount Stop Lamp ........................................................................\
............ 6-9
Page 57 of 139

58
76G-74E
PARKING BRAKE LEVER
Never drive your vehicle with theparking brake on: rear brake
effectiveness can be reduced from
over heating, brake life may be
shortened, or permanent brake
damage may result.
If the parking brake does not hold the vehicle securely or does not
fully release, have your vehicle
inspected immediately by an
authorized MARUTI SUZUKI dealer.
Always apply the parking brake fully
before leaving your vehicle or it may
move, causing injury or damage.
When parking, make sure the gear
shift lever for manual transmission is
left in first gear or reverse. Remember,
even though the transmission is in
gear, you must always apply the
parking brake fully.
The parking brake lever is located between
the seats. To apply the parking brake, hold
the brake pedal down and pull the parking
brake lever all the way up.
To release the parking brake, hold the brake
pedal down, pull up slightly on the parking
brake lever, push the button on the end of
the lever with your thumb, and lower the
lever to its original position.
ww ww
w WARNING
6-1
ww
ww
w WARNING
OTHER CONTROLS AND EQUIPMENT
76G-06-001
76G-06-002
Page 58 of 139
5976G-74EPEDALS
6-2
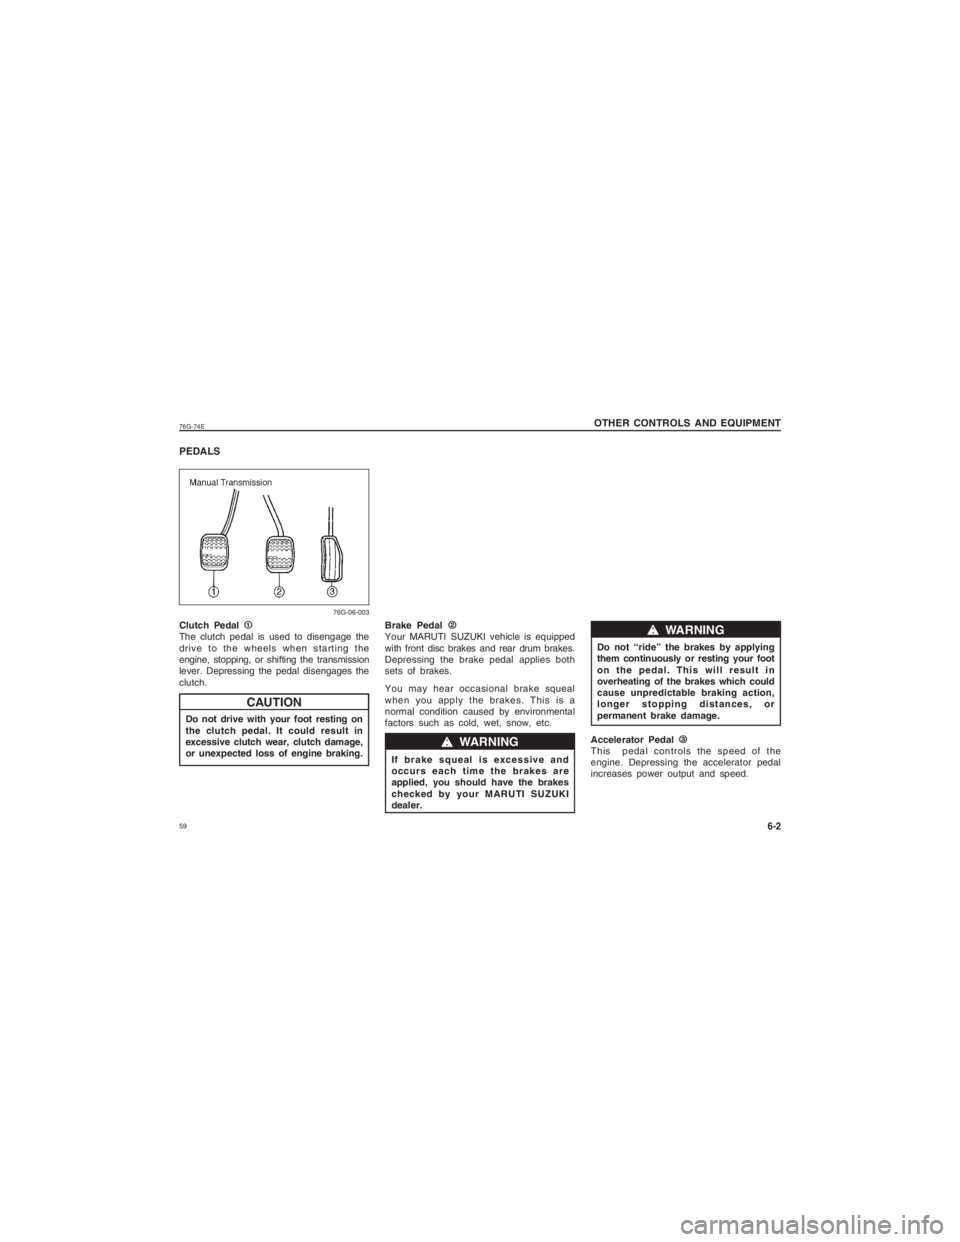
Clutch Pedal 11 11
1
The clutch pedal is used to disengage the
drive to the wheels when starting the
engine, stopping, or shifting the transmission
lever. Depressing the pedal disengages the
clutch.
Do not drive with your foot resting on
the clutch pedal. It could result in
excessive clutch wear, clutch damage,
or unexpected loss of engine braking. Brake Pedal
22 22
2
Your MARUTI SUZUKI vehicle is equipped
with front disc brakes and rear drum brakes.
Depressing the brake pedal applies both
sets of brakes.
You may hear occasional brake squeal
when you apply the brakes. This is a
normal condition caused by environmental
factors such as cold, wet, snow, etc.
If brake squeal is excessive and
occurs each time the brakes are
applied, you should have the brakes
checked by your MARUTI SUZUKI
dealer.
ww ww
w WARNING
CAUTION
ww
ww
w WARNING
OTHER CONTROLS AND EQUIPMENTDo not “ride” the brakes by applying
them continuously or resting your foot
on the pedal. This will result in
overheating of the brakes which could
cause unpredictable braking action,
longer stopping distances, or
permanent brake damage.
Accelerator Pedal 33 33
3
This pedal controls the speed of the
engine. Depressing the accelerator pedal
increases power output and speed.
76G-06-003
Page 69 of 139
70
76G-74E
EXHAUST GAS WARNING
with the engine running, make sure
the air intake lever is set to “FRESH
AIR” and the fan is at high speed.
Avoid operating the vehicle with the rearend door open. If it is necessary
to operate the vehicle with the
rearend door open, make sure all
the windows are closed and the fan
is at high speed with the air intake
lever set to "FRESH AIR".
To allow proper operation of your vehicle’s ventilation system, keep
the air inlet grille in front of the
windscreen clear of snow, leaves, or
other obstructions at all times.
Keep the exhaust tailpipe area clear of snow and other material to help
reduce the buildup of exhaust gases
under the vehicle. This is
particularly important when parked
in blizzard conditions.
Have the exhaust system inspected
periodically for damage and leaks.
Any damage or leaks should be
repaired immediately.
DAILY INSPECTION CHECKLIST
ww ww
w WARNING
7-1
ww
ww
w WARNING
Before driving:
1)
Make sure that windows, mirrors, lights,
and reflectors are clean and unobstructed.
2) Check the tyres.
3) Look for fluid and oil leaks.NOTE:
It is normal for water to drip from the air
conditioning system after use.4) Adjust the seat/head restraint.
5) Check the brake pedal and the parking brake lever.
6) Adjust the mirrors.
7) Make sure that you and passengers have properly fastened your seat belts.
8) Make sure that all warning lights come on as the key is turned to the “ON” or
“START” position.
9) Check all gauges.
10) Make sure that the brake fluid level warning light is off when the parking
brake is released with the engine
running.
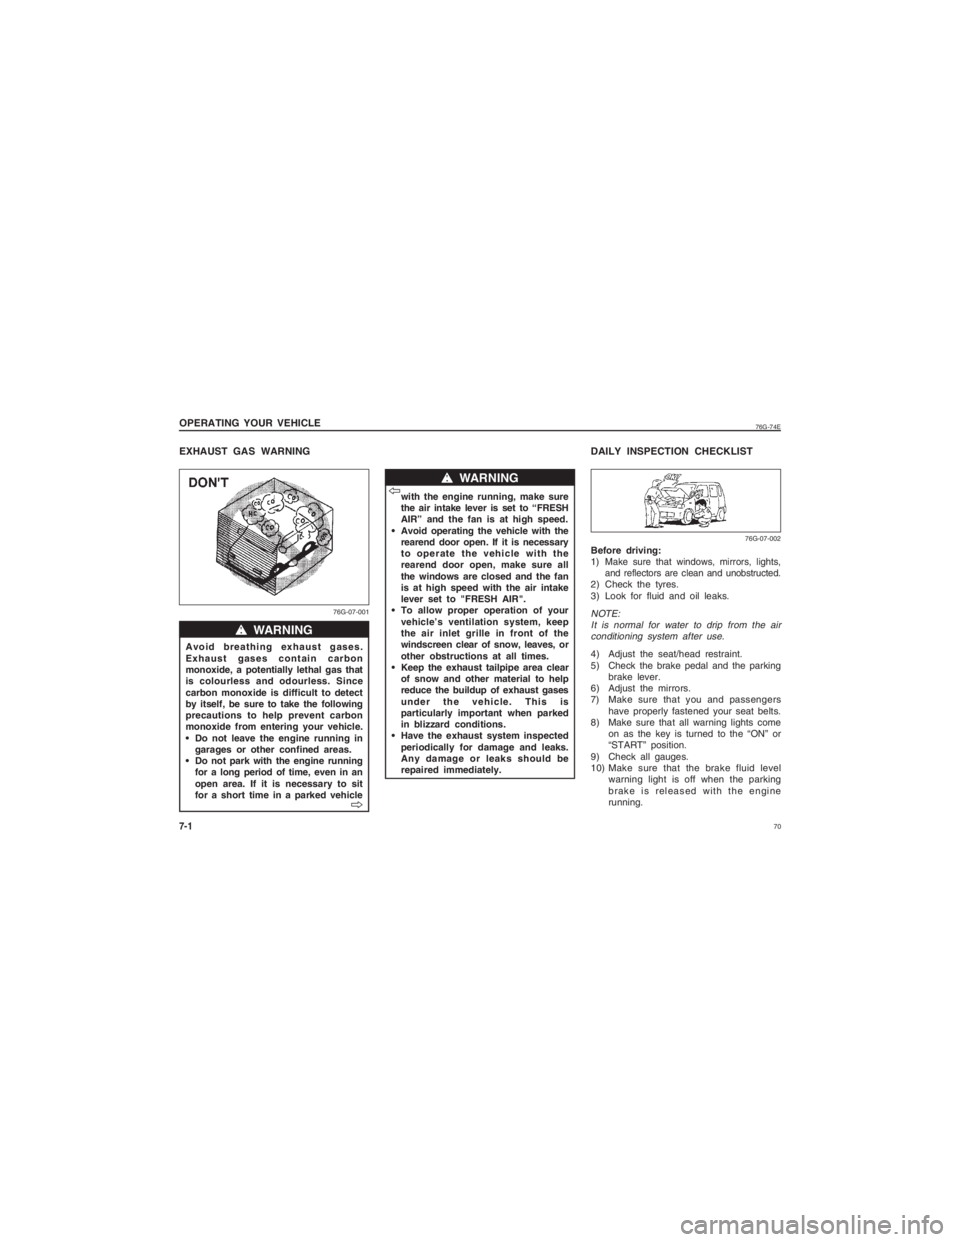
OPERATING YOUR VEHICLEAvoid breathing exhaust gases.
Exhaust gases contain carbon
monoxide, a potentially lethal gas that
is colourless and odourless. Since
carbon monoxide is difficult to detect
by itself, be sure to take the following
precautions to help prevent carbon
monoxide from entering your vehicle.
Do not leave the engine running ingarages or other confined areas.
Do not park with the engine running for a long period of time, even in an
open area. If it is necessary to sit
for a short time in a parked vehicle
VV VV
V
VV
VV
V
76G-07-001 76G-07-002
Page 78 of 139
7976G-74ESnow Chains
If you must use snow chains to increase tyre
traction, observe the following precautions:
Use cable type chains.
Choose a safe place away from traffic to install the chains.
When installing the chains carefully follow the manufacturer’s instructions.
Install the chains on the front tyres.
With the chains on, drive only at slow and moderate speeds.
If the chain hits the vehicle body while
driving, stop at a safe place and
retighten it as soon as possible.
If snow and/or ice on the road disappear, remove the chains as soon
as possible.
If Your Vehicle Gets Stuck If your vehicle gets stuck in snow, mud,
or sand, follow the directions below:
1) Change back and forth between a forward range (or first gear for manual
transmission) and reverse. This will
create a rocking motion which may give
you enough momentum to free the
vehicle. Press gently on the accelerator
to keep wheel spin to a minimum.
Remove your foot from the accelerator
while changing gear.
Do not race the engine. Excessive wheel
spin will cause the tyres to dig deeper,
making it more difficult to free the
vehicle. 2) If your vehicle remains stuck after a few
minutes of rocking, get another vehicle
to pull you out.
Do not allow anyone to stand near the
vehicle when you are rocking it, and
do not spin the wheels faster than an
indicated 40 km/h on the speedometer.
Personal injury and/or vehicle damage
may result from spinning the wheels
too fast.
Do not continue rocking the vehicle
for more than a few minutes.
Prolonged rocking can cause engine
overheating or transmission damage. Make sure your tyres are in good
condition and always maintain the
specified tyre pressure. Refer to
“TYRES” in the “INSPECTION AND
MAINTENANCE” section for details.
Do not use tyres other than those specified by MARUTI SUZUKI. Never
use different sizes or types of tyres
on the front and rear wheels. For
information regarding the specified
tyres, refer to the “SPECI-
FICATIONS” section.
Never use oversized tyres or special
shock absorbers and springs to
raise (jack up) your vehicle. This will
change the handling characteristics.
After driving through water, test the
brakes while driving at a slow speed
to see if they have maintained their
normal effectiveness. If the brakes
are less effective than normal, dry
them by repeatedly applying the
brakes while driving slowly until the
brakes have regained their normal
effectiveness.
ww ww
w WARNINGCAUTION
8-2
ww
ww
w WARNING
DRIVING TIPS AND SAFE DRIVING
DRIVING ON WET ROADS
When driving on wet roads, avoid driving through large amount of
standing water on the road. Large
amount of water entering the engine
compartment may cause damage to
the engine and or electrical
components.
If stuck in deep water, do not start till water level drops.
Water is incompressible substance, water inside engine is harmful to the
engine.
CAUTION
Page 79 of 139
80
76G-74E
DO’S AND DON’TS FOR SAFE
DRIVINGExercise care in handling your vehicle. Be
conscious of not only your own safety but
also the safety of others on the road, and
thus enjoy the best and most comfortable
driving experience.
This section contains basic rules for safe
driving. Read it carefully for good
understanding of the content so that you
can enjoy safe and pleasant driving in your
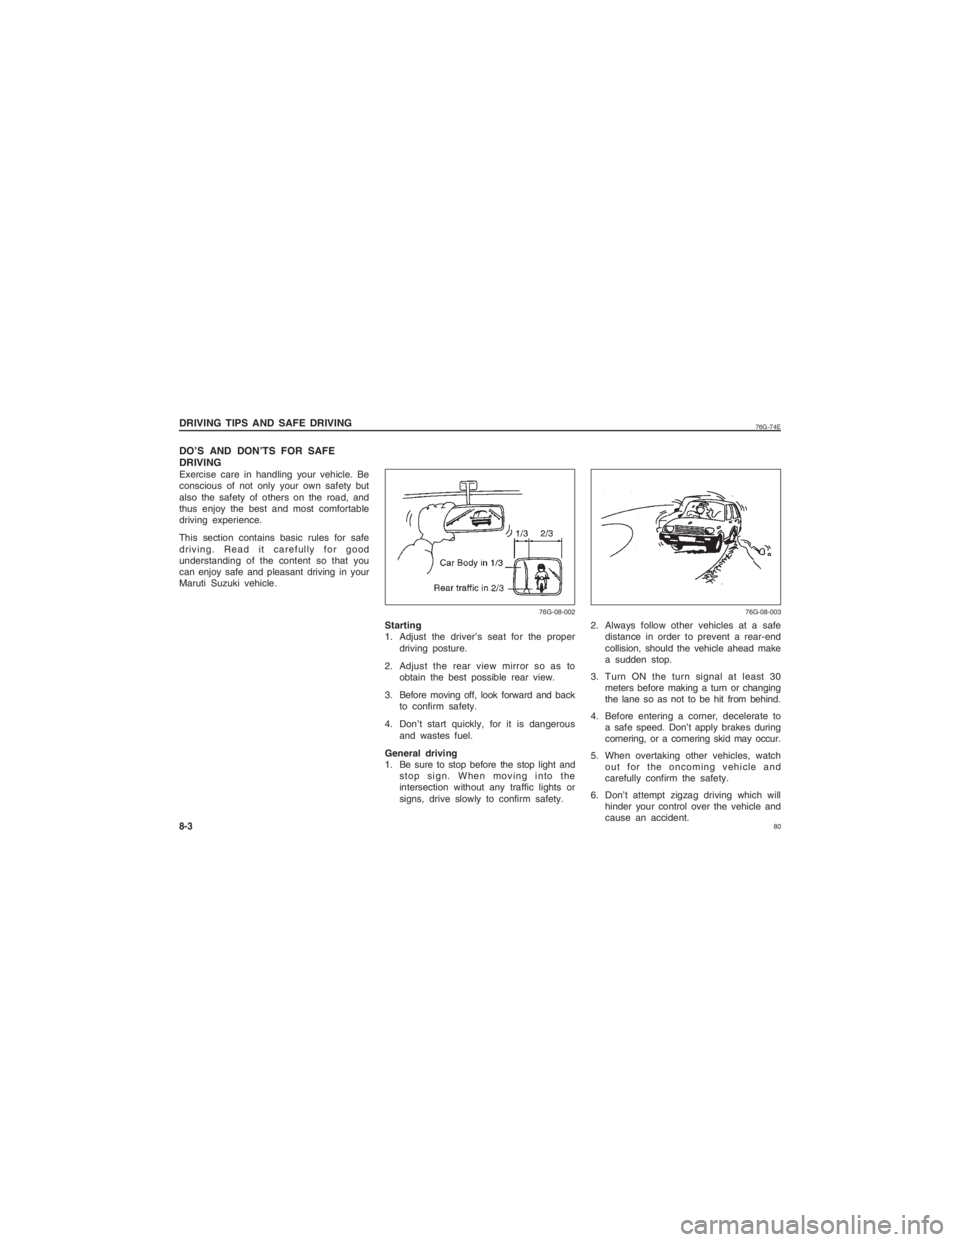
Maruti Suzuki vehicle.Starting
1. Adjust the driver’s seat for the properdriving posture.
2. Adjust the rear view mirror so as to obtain the best possible rear view.
3. Before moving off, look forward and back to confirm safety.
4. Don’t start quickly, for it is dangerous and wastes fuel.
General driving
1. Be sure to stop before the stop light and stop sign. When moving into the
intersection without any traffic lights or
signs, drive slowly to confirm safety.8-3DRIVING TIPS AND SAFE DRIVING
2. Always follow other vehicles at a safedistance in order to prevent a rear-end
collision, should the vehicle ahead make
a sudden stop.
3. Turn ON the turn signal at least 30 meters before making a turn or changing
the lane so as not to be hit from behind.
4. Before entering a corner, decelerate to a safe speed. Don’t apply brakes during
cornering, or a cornering skid may occur.
5. When overtaking other vehicles, watch out for the oncoming vehicle and
carefully confirm the safety.
6. Don’t attempt zigzag driving which will hinder your control over the vehicle and
cause an accident.
76G-08-002 76G-08-003
Page 80 of 139
8176G-74E
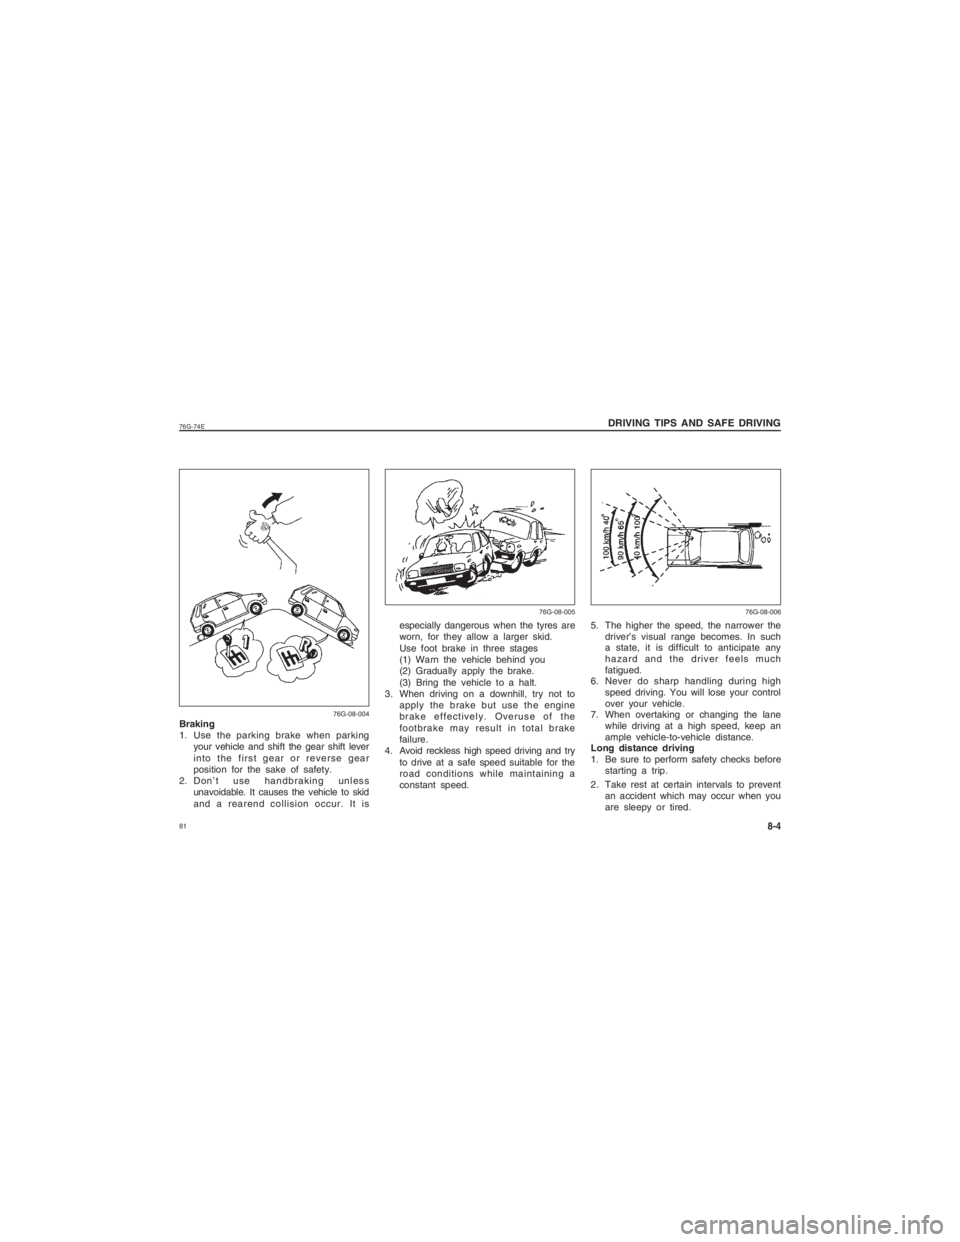
especially dangerous when the tyres are
worn, for they allow a larger skid.
Use foot brake in three stages
(1) Warn the vehicle behind you
(2) Gradually apply the brake.
(3) Bring the vehicle to a halt.
3. When driving on a downhill, try not to apply the brake but use the engine
brake effectively. Overuse of the
footbrake may result in total brake
failure.
4. Avoid reckless high speed driving and try
to drive at a safe speed suitable for the
road conditions while maintaining a
constant speed. 5. The higher the speed, the narrower the
driver’s visual range becomes. In such
a state, it is difficult to anticipate any
hazard and the driver feels much
fatigued.
6. Never do sharp handling during high
speed driving. You will lose your control
over your vehicle.
7. When overtaking or changing the lane
while driving at a high speed, keep an
ample vehicle-to-vehicle distance.
Long distance driving
1. Be sure to perform safety checks before
starting a trip.
2. Take rest at certain intervals to prevent an accident which may occur when you
are sleepy or tired.
Braking
1. Use the parking brake when parking
your vehicle and shift the gear shift lever
into the first gear or reverse gear
position for the sake of safety.
2. Don’t use handbraking unless unavoidable. It causes the vehicle to skid
and a rearend collision occur. It is
8-4
DRIVING TIPS AND SAFE DRIVING
76G-08-004 76G-08-005 76G-08-006
Page 105 of 139
106
76G-74E
INSPECTION AND MAINTENANCE9-23NOTE:When measuring the distance between the
brake pedal and floor wall, be sure not toinclude any floor covering other thansilencer mat in the measurement.If you experience any of the following
problems with your vehicle’s brake
system, have the vehicle inspected
immediately by your MARUTI SUZUKI
dealer.
Poor braking performance
Uneven braking (Brakes not working uniformly on all wheels.)
Excessive pedal travel
Brake dragging
Excessive noise
Pedal pulsation (Pedal pulsates
when depressed.)
ww ww
w WARNING
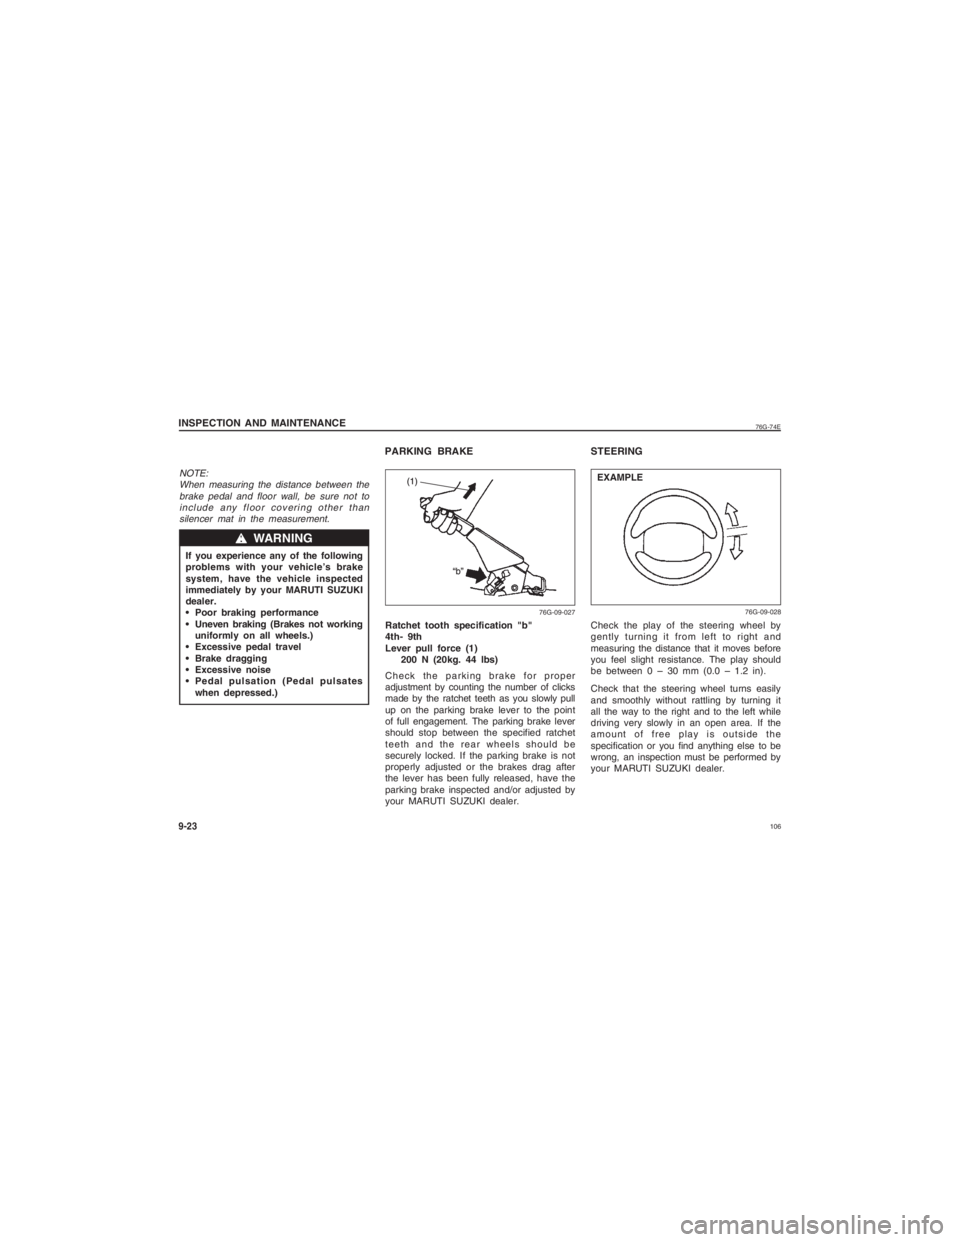
Ratchet tooth specification "b"
4th- 9th
Lever pull force (1)
200 N (20kg. 44 lbs)
Check the parking brake for proper
adjustment by counting the number of clicks
made by the ratchet teeth as you slowly pull
up on the parking brake lever to the point
of full engagement. The parking brake lever
should stop between the specified ratchet
teeth and the rear wheels should be
securely locked. If the parking brake is not
properly adjusted or the brakes drag after
the lever has been fully released, have the
parking brake inspected and/or adjusted by
your MARUTI SUZUKI dealer.
76G-09-027
STEERINGCheck the play of the steering wheel by
gently turning it from left to right and
measuring the distance that it moves before
you feel slight resistance. The play should
be between 0 – 30 mm (0.0 – 1.2 in).
Check that the steering wheel turns easily
and smoothly without rattling by turning it
all the way to the right and to the left while
driving very slowly in an open area. If the
amount of free play is outside the
specification or you find anything else to be
wrong, an inspection must be performed by
your MARUTI SUZUKI dealer.
76G-09-028
EXAMPLE
PARKING BRAKE
Page 121 of 139
122
76G-74E
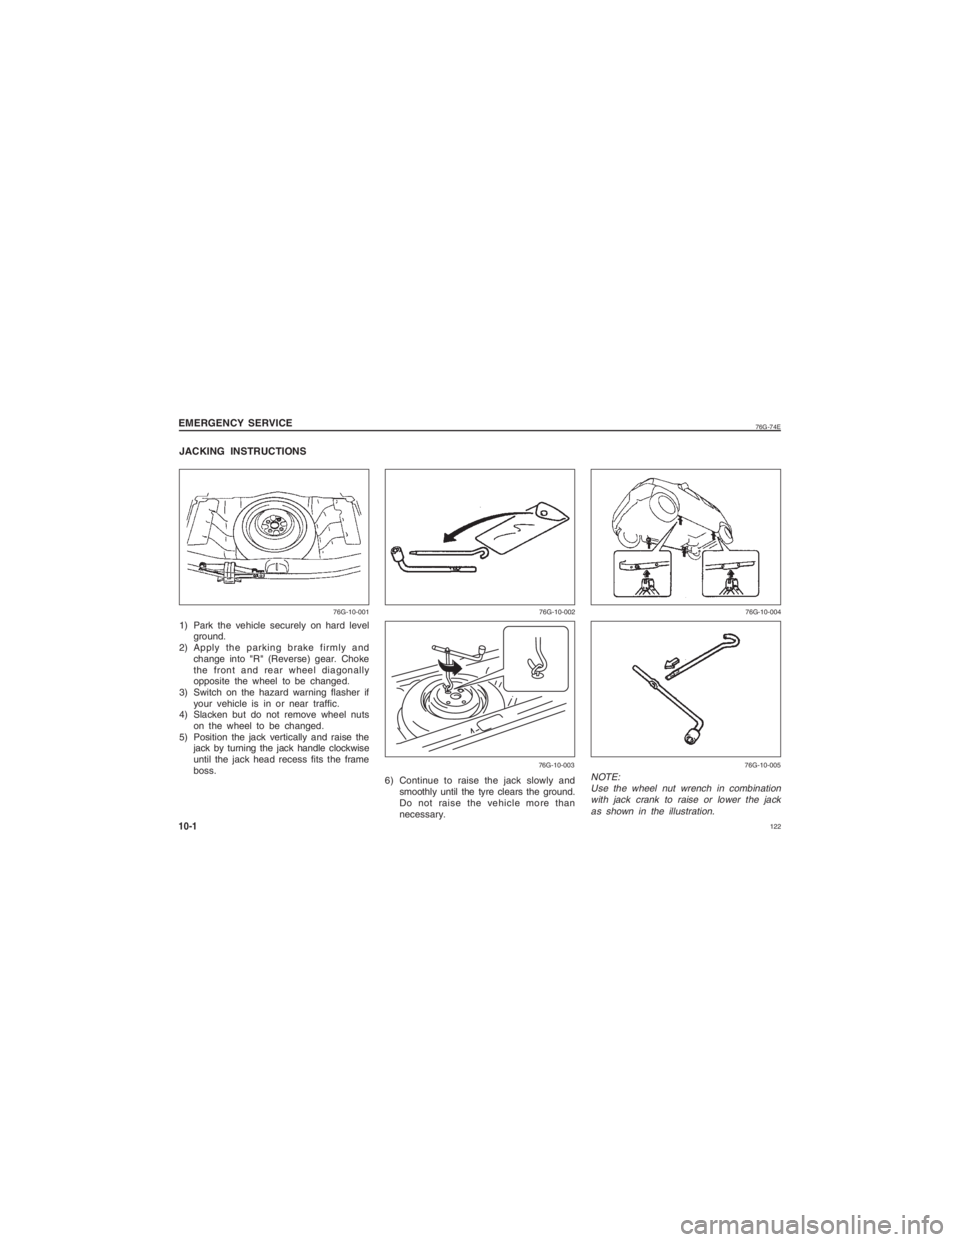
JACKING INSTRUCTIONS1) Park the vehicle securely on hard levelground.
2) Apply the parking brake firmly and
change into "R" (Reverse) gear. Choke
the front and rear wheel diagonally
opposite the wheel to be changed.
3) Switch on the hazard warning flasher if your vehicle is in or near traffic.
4) Slacken but do not remove wheel nuts
on the wheel to be changed.
5) Position the jack vertically and raise the jack by turning the jack handle clockwise
until the jack head recess fits the frame
boss.EMERGENCY SERVICE10-1
NOTE:
Use the wheel nut wrench in combinationwith jack crank to raise or lower the jack
as shown in the illustration.
76G-10-001 76G-10-002 76G-10-004
76G-10-003 76G-10-005
6) Continue to raise the jack slowly and
smoothly until the tyre clears the ground.
Do not raise the vehicle more than
necessary.
Page 135 of 139
136
76G-74E
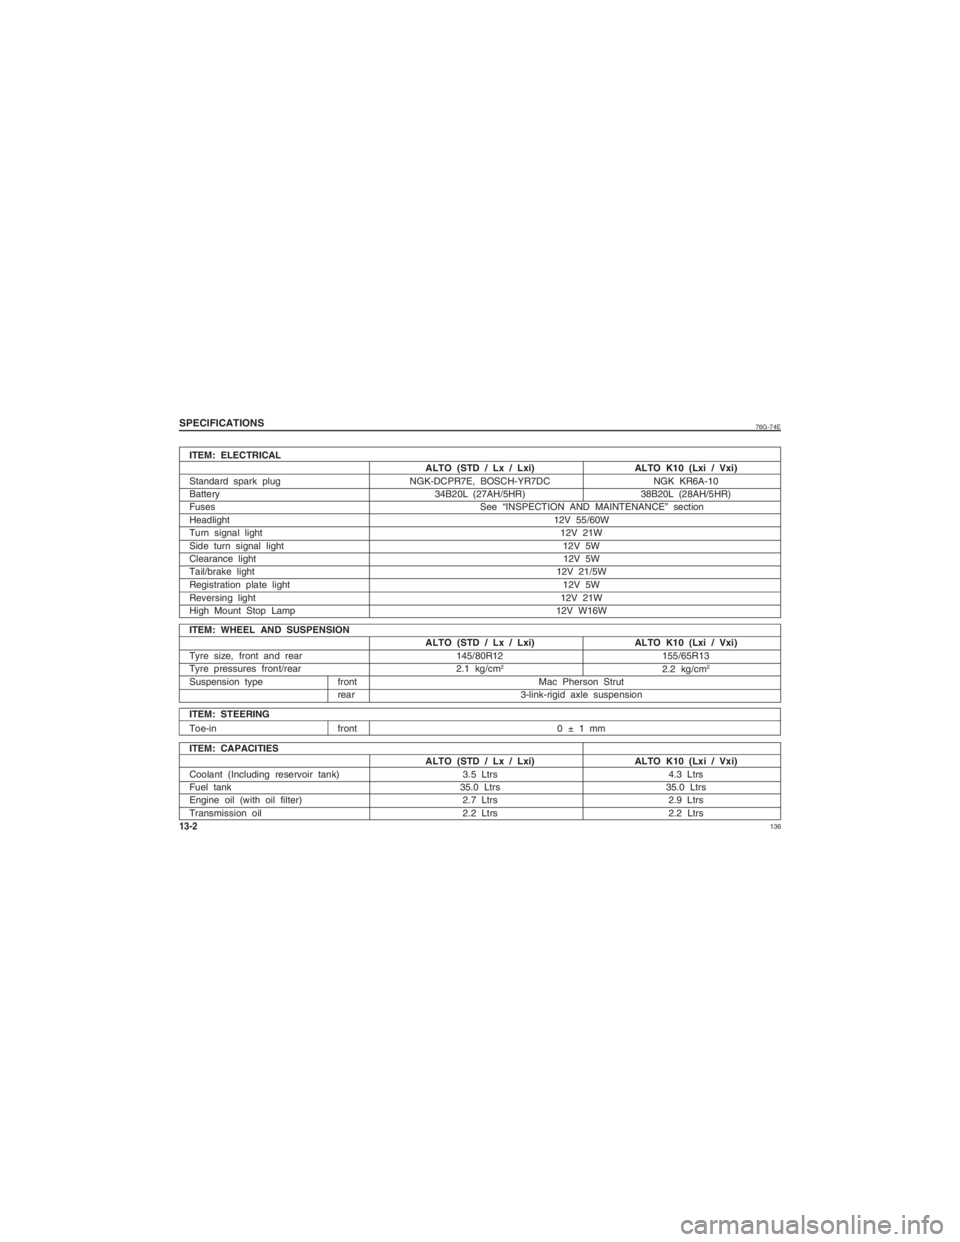
ITEM: ELECTRICALALTO (STD / Lx / Lxi) ALTO K10 (Lxi / Vxi)
Standard spark plug NGK-DCPR7E, BOSCH-YR7DC NGK KR6A-10
Battery 34B20L (27AH/5HR) 38B20L (28AH/5HR)
Fuses See “INSPECTION AND MAINTENANCE” section
Headlight 12V 55/60W
Turn signal light 12V 21W
Side turn signal light 12V 5W
Clearance light 12V 5W
Tail/brake light 12V 21/5W
Registration plate light 12V 5W
Reversing light 12V 21W
High Mount Stop Lamp 12V W16W
ITEM: WHEEL AND SUSPENSION ALTO (STD / Lx / Lxi) ALTO K10 (Lxi / Vxi)
Tyre size, front and rear 145/80R12 155/65R13
Tyre pressures front/rear 2.1 kg/cm
2
2.2 kg/cm
2
Suspension type front Mac Pherson Strut
rear 3-link-rigid axle suspension
ITEM: STEERING
Toe-in front 0 ± 1 mm
ITEM: CAPACITIES ALTO (STD / Lx / Lxi)ALTO K10 (Lxi / Vxi)
Coolant (Including reservoir tank) 3.5 Ltrs4.3 Ltrs
Fuel tank 35.0 Ltrs35.0 Ltrs
Engine oil (with oil filter) 2.7 Ltrs2.9 Ltrs
Transmission oil 2.2 Ltrs2.2 LtrsSPECIFICATIONS13-2