wiper SUZUKI CELERIO 2021 Owners Manual
[x] Cancel search | Manufacturer: SUZUKI, Model Year: 2021, Model line: CELERIO, Model: SUZUKI CELERIO 2021Pages: 201, PDF Size: 5.82 MB
Page 17 of 201
0-5
76MH1-74E
WARRANTY POLICY
Maruti Suzuki India Limited (hereinafter called “Maruti Suzuki”), warrants that each new Maruti Suzuki vehicle distributed in Indiaby Maruti Suzuki and sold by an authorised Maruti Suzuki dealerwill be free, under normal use and service, from any defects inmaterial and workmanship at the time of manufacture SUBJECTTO THE FOLLOWING TERMS AND CONDITIONS:
(1) Qualification:To qualify for this warranty:(a) The Maruti Suzuki vehicle must be delivered by MarutiSuzuki authorised dealer and set-up, serviced by MarutiSuzuki authorised dealer / service station.(b) The warranty registration card in respect of each vehiclemust be completed by the dealer at the time of delivery ofthe vehicle and dealer should retain the same.
(2) Term:The term of the warranty shall be twenty-four (24) months or40,000 kilometers (whichever occurs first) from the date ofdelivery to the first owner.
(3) Maruti Suzuki Warranty Obligation:If any defect(s) should be found in a Maruti Suzuki vehicle withinthe term stipulated above, Maruti Suzuki’s only obligation is torepair or replace at its sole discretion any part shown to be defec-tive, with a new part or the equivalent at no cost to the owner forparts or labour, when Maruti Suzuki acknowledges that such adefect is attributable to faulty material or workmanship at the timeof manufacture. The owner is responsible for any repair or replace-ments which are not covered by this warranty.
(4) Limitation:This warranty shall not apply to:1) Normal maintenance service required other than the threefree services, including without limitation, oil and fluidchanges, headlight aiming, fastener retightening, wheel bal-ancing, wheel alignment and tyre rotation, cleaning of injec-tors, adjustments of carburettor, ignition timing, clutch andvalve clearance.
2) The replacement of normal wear parts including without lim-itation, bulbs, tyres and tubes, spark plugs, belts, hoses, fil-ters, wiper blades, brushes, contact points, fuses, clutch disc,brake shoes, brake pads, cable and all rubber parts (exceptoil seal and glass run).
3) Any vehicle which has been used for competition or racing.
4) Any repairs or replacement required as a result of accidentsor collision.
5) Any defects caused by misuse, negligence, abnormal use orinsufficient care.
6) Any vehicle which has been modified or altered, includingwithout limitation, the installation of performance accesso- ries.
7) Any vehicle on which parts or accessories not approved byMaruti Suzuki have been used.
8) Any vehicle which has not been operated in accordance withthe operating instructions in the Maruti Suzuki Owner’s Man-ual.
9) Any vehicle which has not received, during the warranty term,the service inspections prescribed in the Maruti SuzukiOwner’s Manual.
10) Any vehicle which has been assembled, disassembled,adjusted or repaired by other than an Maruti Suzuki autho-rised dealer/service station.
6
Page 22 of 201
76MH1-74E
BEFORE DRIVINGKeys ...................................................................................... 2-1
Door Locks .......................................................................... 2-2
Keyless Entry System Transmitte r (if equipped) ............. 2-5
Security System (if equipped) ............................................ 2-7
Windows .............................................................................. 2-10
Mirrors .................................................................................. 2-11
Front Seats .......................................................................... 2-13
Rear Seats ............................................................................ 2-13
Seat Belts and Child Restraint Systems ........................... 2-15
Supplemental Restraint System (air bags)
(if equipped) ......................................................................... 2-23
Instrument Cluster .............................................................. 2-28
Speedometer ....................................................................... 2-29
Tachometer (if equipped) ................................................... 2-29
Brightness Control .............................................................. 2-29
Information Display ............................................................. 2-30
Fuel Gauge ........................................................................... 2-31
Warning and Indicator Lights ............................................ 2-37
Lighting Control Lever ........................................................ 2-42
Front Fog Light Switch (if equipped) ................................ 2-43
Headlight Leveling Switch .................................................. 2-43
Turn Signal Control Lever .................................................. 2-44
Hazard Warning Switch ...................................................... 2-45
Windshield Wiper and Washer L ever ................................ 2-45
Tilt Steering Lock Lever (if equipped) ............................... 2-47
Horn ...................................................................................... 2-47
Heated Rear Window Switch (if equipped) ....................... 2-47
11
76MH1-74E
Page 67 of 201
2-45
BEFORE DRIVING
76MH1-74E
76MH1-74E
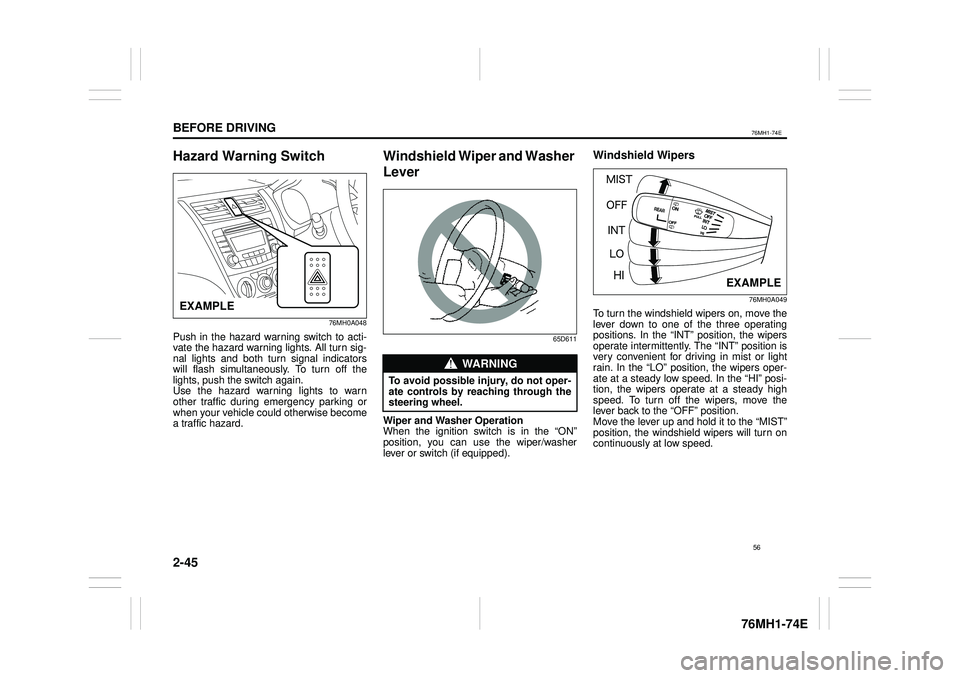
Hazard Warning Switch
76MH0A048
Push in the hazard warning switch to acti- vate the hazard warning lights. All turn sig-nal lights and both turn signal indicators will flash simultaneously. To turn off the lights, push the switch again.Use the hazard warning lights to warn other traffic during emergency parking or when your vehicle could otherwise becomea traffic hazard.
Windshield Wiper and Washer
Lever
65D611
Wiper and Washer Operation When the ignition switch is in the “ON”position, you can use the wiper/washer lever or switch (if equipped).
Windshield Wipers
76MH0A049
To turn the windshield wipers on, move the lever down to one of the three operating positions. In the “INT” position, the wipers operate intermittently. The “INT” position isvery convenient for driving in mist or light rain. In the “LO” position, the wipers oper- ate at a steady low speed. In the “HI” posi-tion, the wipers operate at a steady high speed. To turn off the wipers, move the lever back to the “OFF” position.Move the lever up and hold it to the “MIST” position, the windshield wipers will turn on continuously at low speed.
EXAMPLE
WA R N I N G
To avoid possible injury, do not oper- ate controls by reaching through the steering wheel.
EXAMPLE
56
Page 68 of 201

2-46
BEFORE DRIVING
76MH1-74E
76MH1-74E
Windshield Washer
76MH0A050
To spray windshield washer fluid, pull the lever toward you. The windshield wipers will automatically turn on at low speed ifthey are not already on and the “INT” posi- tion is equipped.
Rear Window Wiper/Washer Switch
(if equipped)
76MH0A051
To turn the rear wiper on, twist the rear wiper switch on the end of the lever for-ward to the “ON” position. To turn the rear wiper off, twist the switch rearward to the “OFF” position.
With the rear wiper in the “OFF” position, twist the switch rearward and hold it thereto spray window washer fluid.
With the rear wiper in the “ON” position, turn the switch forward and hold it there to spray window washer fluid.
WA R N I N G
• To prevent windshield icing in coldweather, turn on the defroster to heat the windshield before and during windshield washer use.• Do not use radiator antifreeze inthe windshield washer reservoir. Itcan severely impair visibility when sprayed on the windshield, and canalso damage your vehicle’s paint.
EXAMPLE
NOTICE
To help prevent damage to the wind-shield wiper and washer systemcomponents, you should take the fol- lowing precautions: • Do not continue to hold in the leverwhen there is no windshield washer fluid being sprayed or the washer motor can be damaged.• Do not attempt to remove dirt froma dry windshield with the wipers oryou can damage the windshieldand the wiper blades. Always wet the windshield with washer fluid before operating the wipers.• Clear ice or packed snow from thewiper blades before using the wip-ers.• Check the washer fluid level regu-larly. Check it often when theweather is bad.• Only fill the washer fluid reservoir3/4 full during cold weather to allowroom for expansion if the tempera-ture falls low enough to freeze thesolution.
NOTICE
Clear ice or snow from the rear win- dow and rear wiper blade before using the rear wiper. Accumulatedice or snow could prevent the wiper blade from moving, causing damage to the wiper motor.
Washer
Wiper
EXAMPLE
57
Page 98 of 201
5-2
OTHER CONTROLS AND EQUIPMENT
76MH1-74E
76MH1-74E
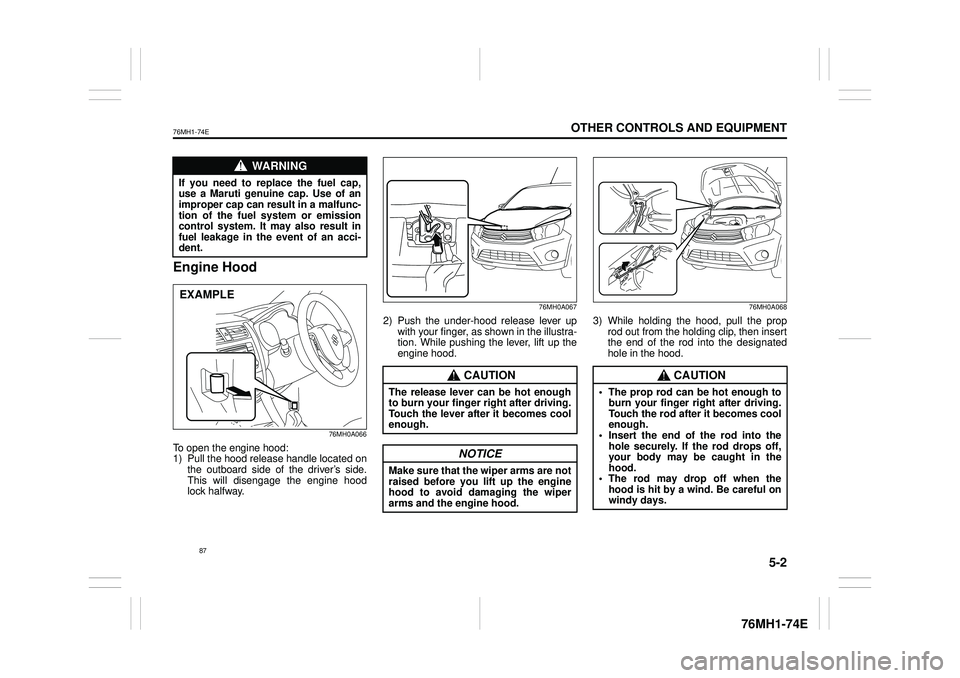
Engine Hood
76MH0A066
To open the engine hood: 1) Pull the hood release handle located onthe outboard side of the driver’s side. This will disengage the engine hood lock halfway.
76MH0A067
2) Push the under-hood release lever up with your finger, as shown in the illustra- tion. While pushing the lever, lift up theengine hood.
76MH0A068
3) While holding the hood, pull the prop rod out from the holding clip, then insert the end of the rod into the designatedhole in the hood.
WA R N I N G
If you need to replace the fuel cap,use a Maruti genuine cap. Use of animproper cap can result in a malfunc- tion of the fuel system or emission control system. It may also result infuel leakage in the event of an acci- dent.
EXAMPLE
CAUTION
The release lever can be hot enough to burn your finger right after driving. Touch the lever after it becomes cool enough.
NOTICE
Make sure that the wiper arms are notraised before you lift up the engine hood to avoid damaging the wiper arms and the engine hood.
CAUTION
• The prop rod can be hot enough toburn your finger right after driving. Touch the rod after it becomes cool enough.• Insert the end of the rod into the hole securely. If the rod drops off, your body may be caught in thehood. • The rod may drop off when the hood is hit by a wind. Be careful onwindy days.
87
Page 149 of 201
INSPECTION AND MAINTENANCE
76MH1-74E
76MH1-74E
138
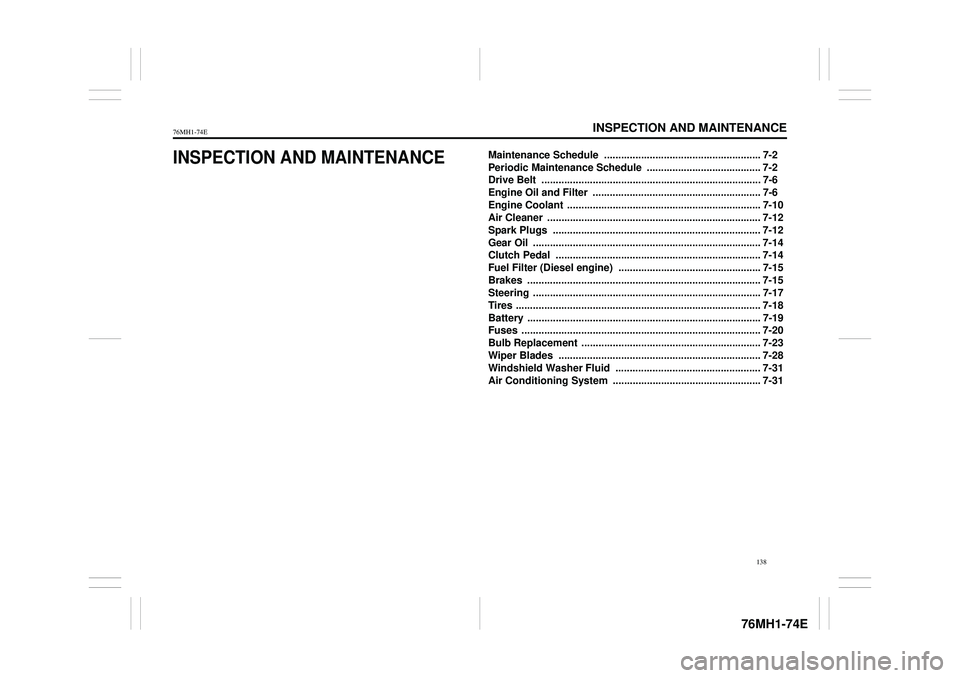
INSPECTION AND MAINTENANCEMaintenance Schedule ....................................................... 7-2
Periodic Maintenance Schedule . ....................................... 7-2
Drive Belt ............................................................................. 7-6
Engine Oil and Filter ........................................................... 7-6
Engine Coolant .................................................................... 7-10
Air Cleaner ........................................................................... 7-12
Spark Plugs ......................................................................... 7-12
Gear Oil ................................................................................ 7-14
Clutch Pedal ........................................................................ 7-14
Fuel Filter (Diesel engine) .................................................. 7-15
Brakes .......... ........................................................................ 7-15
Steering ................................................................................ 7-17
Tires ...................................................................................... 7-18
Battery .................................................................................. 7-19
Fuses .................................................................................... 7-20
Bulb Replacement ............................................................... 7-23
Wiper Blades ....................................................................... 7-28
Windshield Washer Fluid ................................................... 7-31
Air Conditioning System .................................................... 7-31
Page 172 of 201
7-23
INSPECTION AND MAINTENANCE
76MH1-74E
76MH1-74E
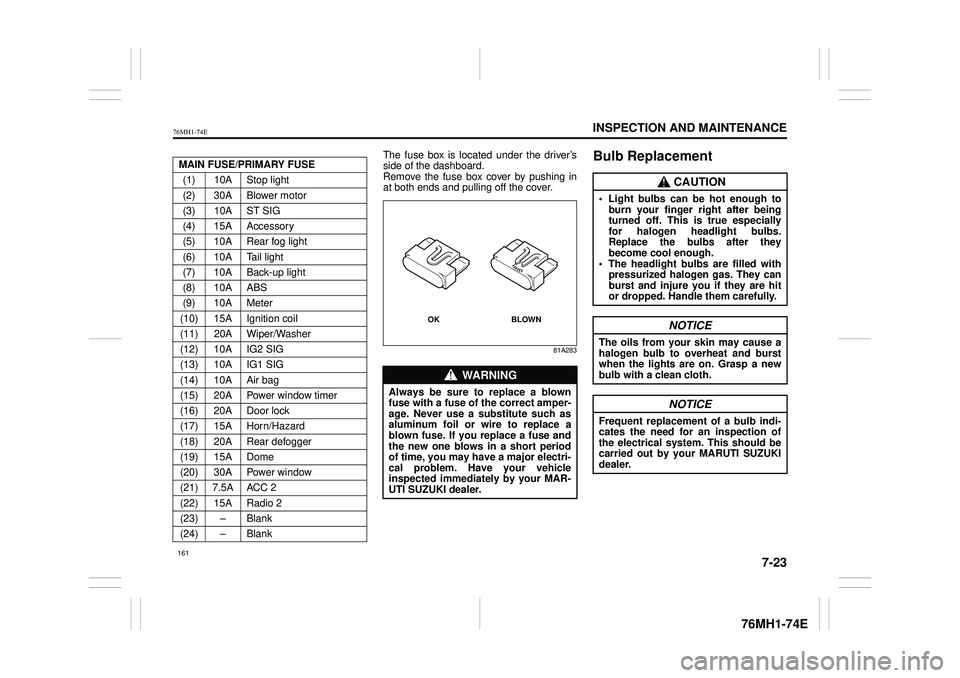
The fuse box is located under the driver’s side of the dashboard. Remove the fuse box cover by pushing inat both ends and pulling off the cover.
81A283
Bulb ReplacementMAIN FUSE/PRIMARY FUSE
(1) 10A Stop light
(2) 30A Blower motor
(3) 10A ST SIG
(4) 15A Accessory
(5) 10A Rear fog light
(6) 10A Tail light
(7) 10A Back-up light
(8) 10A ABS
(9) 10A Meter
(10) 15A Ignition coil
(11) 20A Wiper/Washer
(12) 10A IG2 SIG
(13) 10A IG1 SIG
(14) 10A Air bag
(15) 20A Power window timer
(16) 20A Door lock
(17) 15A Horn/Hazard
(18) 20A Rear defogger
(19) 15A Dome
(20) 30A Power window
(21) 7.5A ACC 2
(22) 15A Radio 2
(23) – Blank
(24) – Blank
WA R N I N G
Always be sure to replace a blown fuse with a fuse of the correct amper- age. Never use a substitute such as aluminum foil or wire to replace ablown fuse. If you replace a fuse and the new one blows in a short period of time, you may have a major electri-cal problem. Have your vehicle inspected immediately by your MAR- UTI SUZUKI dealer.
BLOWN OK
CAUTION
• Light bulbs can be hot enough toburn your finger right after being turned off. This is true especially for halogen headlight bulbs.Replace the bulbs after they become cool enough. • The headlight bulbs are filled withpressurized halogen gas. They can burst and injure you if they are hit or dropped. Handle them carefully.
NOTICE
The oils from your skin may cause ahalogen bulb to overheat and burst when the lights are on. Grasp a new bulb with a clean cloth.
NOTICE
Frequent replacement of a bulb indi-cates the need for an inspection of the electrical system. This should be carried out by your MARUTI SUZUKIdealer.
161
Page 177 of 201

7-28
INSPECTION AND MAINTENANCE
76MH1-74E
76MH1-74E
76MH0A128
(4) Removal (5) Install
4) To remove and install the bulb of the high-mount stop light (3), simply pull out or push in the bulb.
Interior LightRemove the lens by using a flat blade screwdriver covered with a soft cloth asshown. To install it, simply push it back in.
Ty p e A
60G115
Ty p e B
76MH0A139
Wiper Blades
54G129
If the wiper blades become brittle or dam- aged, or make streaks when wiping,replace the wiper blades.
To install new wiper blades, follow the pro- cedures below.
(3)
(4)
(5)
EXAMPLE
NOTICE
To avoid scratching or breaking the window, do not let the wiper arm strike the window while replacing the wiper blade.
166
Page 178 of 201

7-29
INSPECTION AND MAINTENANCE
76MH1-74E
76MH1-74E
NOTE: Some wiper blades may be different from the ones described here depending onvehicle specifications. If so, consult your MARUTI SUZUKI dealer for proper replacement method.
For windshield wipers:
70G119
1) Hold the wiper arm away from the win- dow.
54G130
2) Squeeze lock (1) towards wiper arm (2) and remove the wiper frame from the arm as shown.3) Unlock the lock end of the wiper blade and slide the blade out as shown.
Removal
60A260
Installation
54G132
(1) Locked end
EXAMPLE
EXAMPLE
167
Page 179 of 201
7-30
INSPECTION AND MAINTENANCE
76MH1-74E
76MH1-74E
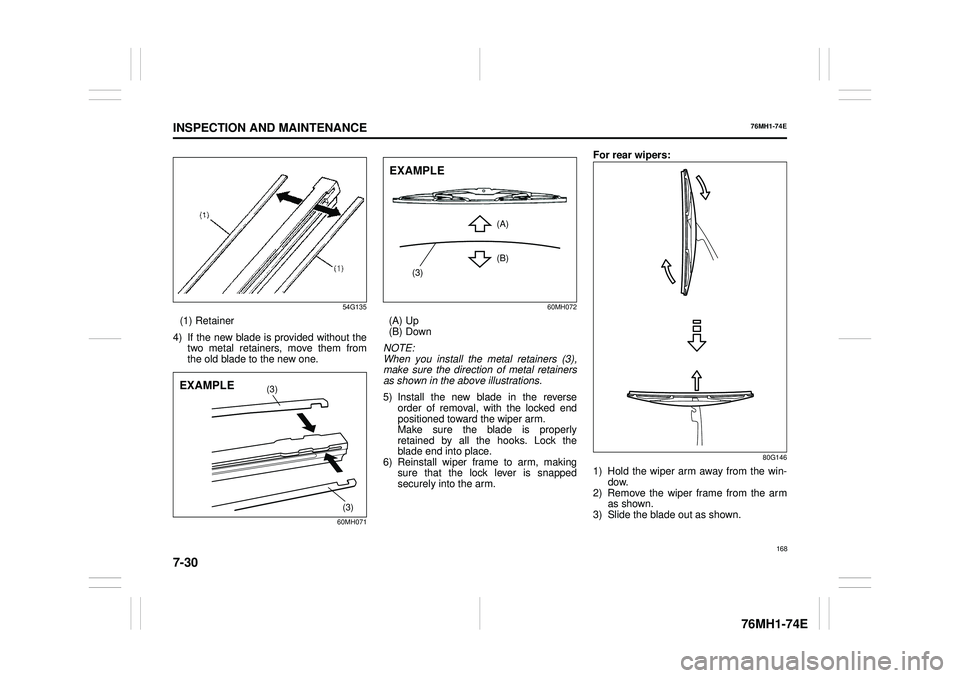
54G135
(1) Retainer
4) If the new blade is provided without the two metal retainers, move them from the old blade to the new one.
60MH071
60MH072
(A) Up (B) Down
NOTE: When you install the metal retainers (3), make sure the direction of metal retainersas shown in the above illustrations.
5) Install the new blade in the reverse order of removal, with the locked end positioned toward the wiper arm. Make sure the blade is properlyretained by all the hooks. Lock the blade end into place. 6) Reinstall wiper frame to arm, makingsure that the lock lever is snapped securely into the arm.
For rear wipers:
80G146
1) Hold the wiper arm away from the win- dow. 2) Remove the wiper frame from the armas shown. 3) Slide the blade out as shown.
(3)
(3)
EXAMPLE
(3)
(A)
(B)
EXAMPLE
168