passenger SUZUKI CELERIO 2022 Owners Manual
[x] Cancel search | Manufacturer: SUZUKI, Model Year: 2022, Model line: CELERIO, Model: SUZUKI CELERIO 2022Pages: 201, PDF Size: 5.82 MB
Page 24 of 201
2-2
BEFORE DRIVING
76MH1-74E
76MH1-74E
Door Locks
Side Door Locks
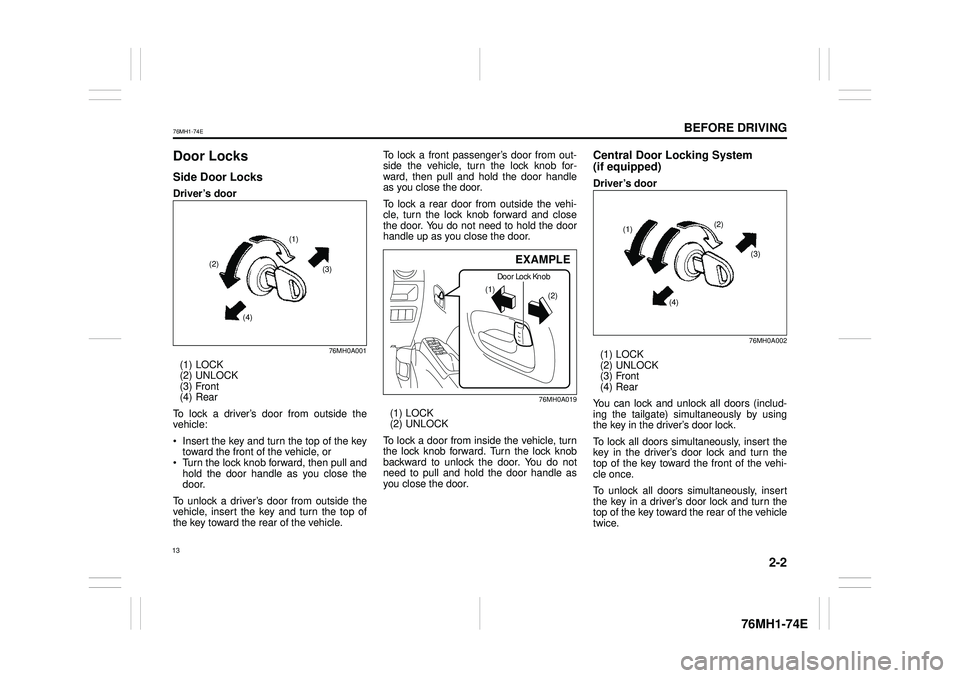
Driver’s door
76MH0A001
(1) LOCK (2) UNLOCK (3) Front (4) Rear
To lock a driver’s door from outside thevehicle:
Insert the key and turn the top of the keytoward the front of the vehicle, or Turn the lock knob forward, then pull andhold the door handle as you close the door.
To unlock a driver’s door from outside thevehicle, insert the key and turn the top ofthe key toward the rear of the vehicle.
To lock a front passenger’s door from out- side the vehicle, turn the lock knob for- ward, then pull and hold the door handleas you close the door.
To lock a rear door from outside the vehi- cle, turn the lock knob forward and close the door. You do not need to hold the door handle up as you close the door.
76MH0A019
(1) LOCK (2) UNLOCK
To lock a door from inside the vehicle, turnthe lock knob forward. Turn the lock knob backward to unlock the door. You do notneed to pull and hold the door handle as you close the door.
Central Door Locking System
(if equipped)
Driver’s door
76MH0A002
(1) LOCK (2) UNLOCK (3) Front (4) Rear
You can lock and unlock all doors (includ-ing the tailgate) simultaneously by usingthe key in the driver’s door lock.
To lock all doors simultaneously, insert the key in the driver’s door lock and turn the top of the key toward the front of the vehi- cle once.
To unlock all doors simultaneously, insert the key in a driver’s door lock and turn thetop of the key toward the rear of the vehicle twice.
(1)
(2)(3)
(4)
EXAMPLE(3)
(1)(2)
(4)
13
Page 32 of 201
2-10
BEFORE DRIVING
76MH1-74E
76MH1-74E
4) Push the lock end (4) (forward end) ofthe central door locking switch (5), and then push the unlock end (6) (backwardend). Repeat this operation 3 times.
Every time you perform the series of theabove steps, the state of the security sys- tem changes from the currently selected one to the other. You can check whetherthe system is enabled or disabled by the number of interior buzzer beeps at the end of the procedure as follows.
If you cannot complete the operations instep 3) and 4) within 15 seconds cor- rectly, the state of the security systemwill not change and the interior buzzer does not beep. Perform the procedure again from the beginning.
NOTE: You can also switch the security systemfrom the enabled state to the disabled state, and vice versa, via the setting mode of the information display. For details onhow to use the information display, refer to“Information Display” in this section.
Windows
Manual Window Control
(if equipped)
60G010
Raise or lower the door windows by turning the handle located on the door panel.
Electric Window Controls
(if equipped)The electric windows can only be operated when the ignition switch is in the “ON” posi- tion.
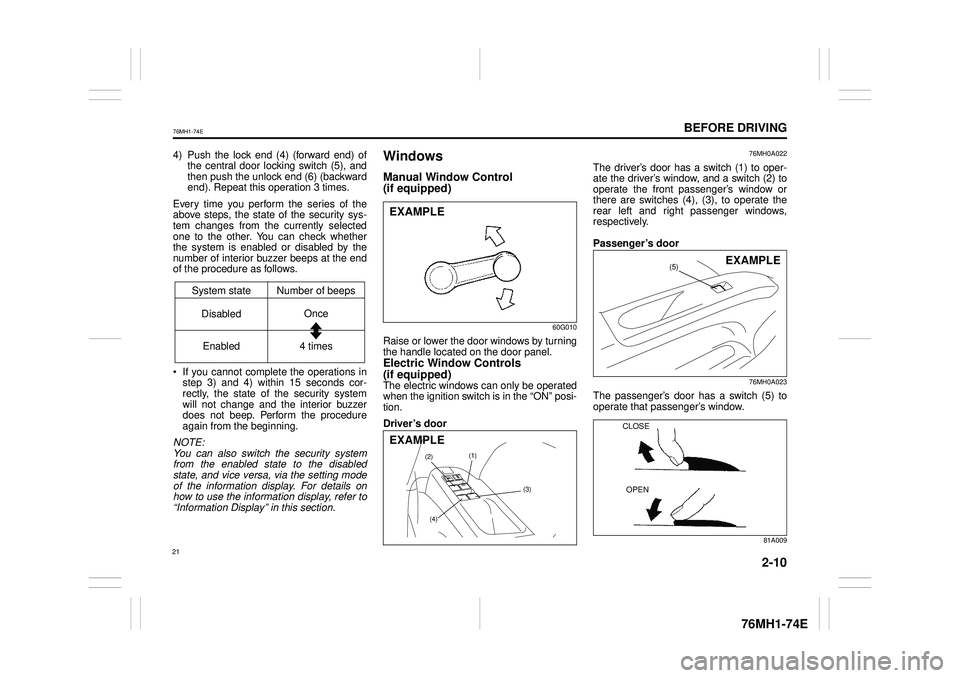
Driver’s door
76MH0A022
The driver’s door has a switch (1) to oper- ate the driver’s window, and a switch (2) tooperate the front passenger’s window or there are switches (4), (3), to operate the rear left and right passenger windows,respectively.
Passenger’s door
76MH0A023
The passenger’s door has a switch (5) to operate that passenger’s window.
81A009
System state Number of beeps
DisabledOnce
Enabled 4 times
EXAMPLE
(1)(2)
(3)
(4)
EXAMPLE
(5)EXAMPLE
CLOSE
OPEN
21
Page 33 of 201
2-11
BEFORE DRIVING
76MH1-74E
76MH1-74E
To open a window, push the top part of the switch and to close the window, lift up the top part of the switch.
The driver’s window has an “auto-down” featurefor added convenience (at toll booths or drive-through restaurants, for example). This means you can open the window without holding the window switch in the “Down” position. Press thedriver’s window switch completely down and release it. To stop the window before it reaches the bottom, pull the switch up briefly.
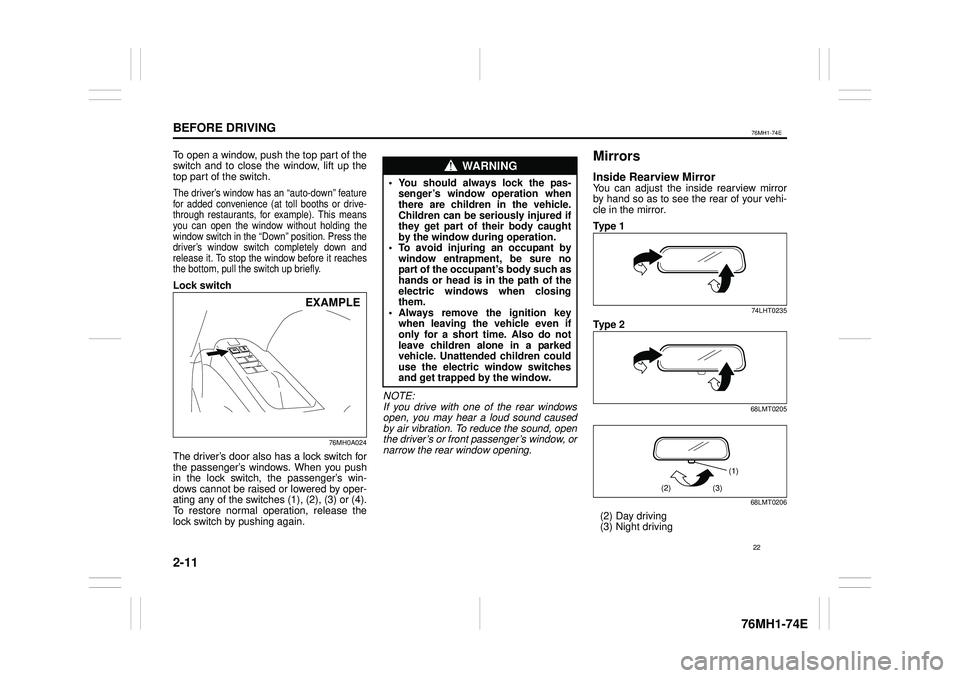
Lock switch
76MH0A024
The driver’s door also has a lock switch forthe passenger’s windows. When you pushin the lock switch, the passenger’s win- dows cannot be raised or lowered by oper- ating any of the switches (1), (2), (3) or (4).To restore normal operation, release the lock switch by pushing again.
NOTE:If you drive with one of the rear windows open, you may hear a loud sound causedby air vibration. To reduce the sound, open the driver’s or front passenger’s window, or narrow the rear window opening.
Mirrors
Inside Rearview MirrorYou can adjust the inside rearview mirrorby hand so as to see the rear of your vehi-cle in the mirror.
Ty p e 1
74LHT0235
Ty p e 2
68LMT0205
68LMT0206
(2) Day driving (3) Night driving
EXAMPLE
WA R N I N G
• You should always lock the pas-senger’s window operation whenthere are children in the vehicle. Children can be seriously injured if they get part of their body caughtby the window during operation.• To avoid injuring an occupant bywindow entrapment, be sure nopart of the occupant’s body such as hands or head is in the path of the electric windows when closingthem.• Always remove the ignition keywhen leaving the vehicle even ifonly for a short time. Also do not leave children alone in a parked vehicle. Unattended children coulduse the electric window switches and get trapped by the window.
(1)
(2)(3)
22
Page 34 of 201
2-12
BEFORE DRIVING
76MH1-74E
76MH1-74E
To adjust the mirror, set the selector tab (1) to the day position, then move the mirror up, down or sideways by hand to obtain thebest view.
When driving at night, you can move the selector tab to the night position to reduce glare from the headlights of vehicles behind you.
Outside Rearview MirrorsAdjust the outside rearview mirrors so you can just see the side of your vehicle in themirrors.
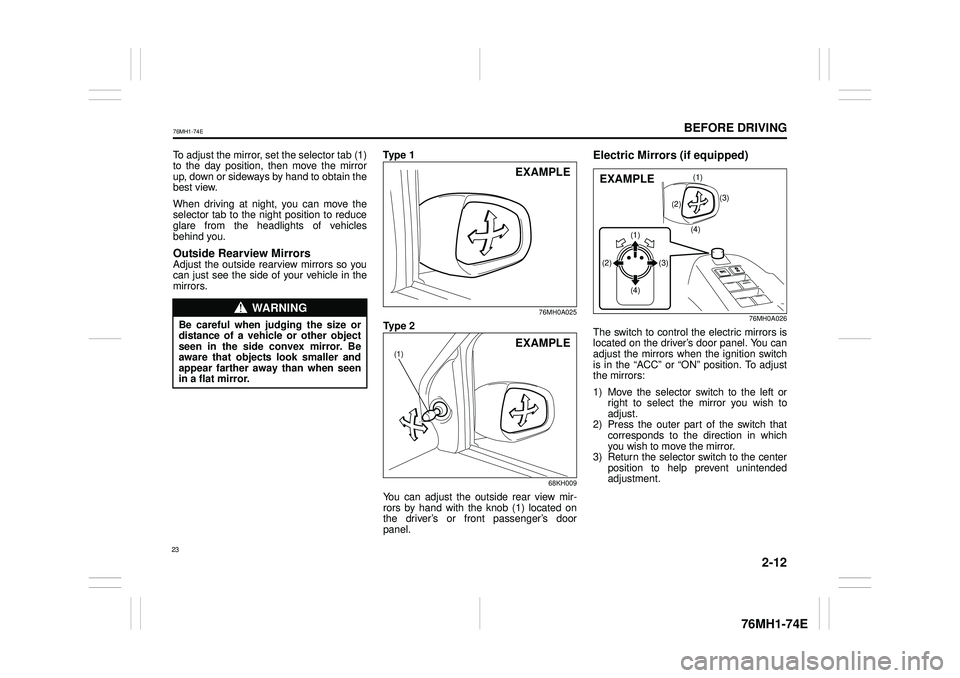
Ty p e 1
76MH0A025
Ty p e 2
68KH009
You can adjust the outside rear view mir-rors by hand with the knob (1) located on the driver’s or front passenger’s doorpanel.
Electric Mirrors (if equipped)
76MH0A026
The switch to control the electric mirrors islocated on the driver’s door panel. You can adjust the mirrors when the ignition switch is in the “ACC” or “ON” position. To adjustthe mirrors:
1) Move the selector switch to the left orright to select the mirror you wish to adjust.2) Press the outer part of the switch thatcorresponds to the direction in whichyou wish to move the mirror.3) Return the selector switch to the centerposition to help prevent unintendedadjustment.
WA R N I N G
Be careful when judging the size or distance of a vehicle or other objectseen in the side convex mirror. Be aware that objects look smaller and appear farther away than when seenin a flat mirror.
EXAMPLE
(1)EXAMPLE
(2)
(4)
(3)
(1)
(1)
(3)(2)
(4)
EXAMPLE
23
Page 40 of 201

2-18
BEFORE DRIVING
76MH1-74E
76MH1-74E
80JS029
To lengthen, release the latch plate from the buckle, pull the latch plate (adjuster) in the direction of the arrow, at right angles tothe belt. The latch plate should then be refitted into the buckle and the belt tight- ened as previously described.
To unfasten the belt, press the release but- ton on the buckle catch.
80JS031
NOTE: To identify the center seat belt buckle and latch plate in the rear seat, “CENTER” ismarked on the buckle and latch plate of the center lap belt. The buckles are designed so a latch plate cannot be inserted into thewrong buckle.
Driver’s Seat Belt Reminder
(if equipped)
With tachometer
76MH028
Without tachometer
76MS013
When the driver doesn’t buckle his or her seat belt with the ignition switch in the “ON” position, the driver’s seat belt reminderlight in the instrument cluster will blink until the driver’s seat belt is buckled.
TO LOOSEN
Right angleEXAMPLE
WA R N I N G
It is absolutely essential that thedriver and passengers wear their seat belts at all times. Persons who arenot wearing seat belts have a much greater risk of injury if an accident occurs. Make a regular habit of buck-ling your seat belt before putting the key in the ignition.
EXAMPLE
29
Page 42 of 201
2-20
BEFORE DRIVING
76MH1-74E
76MH1-74E
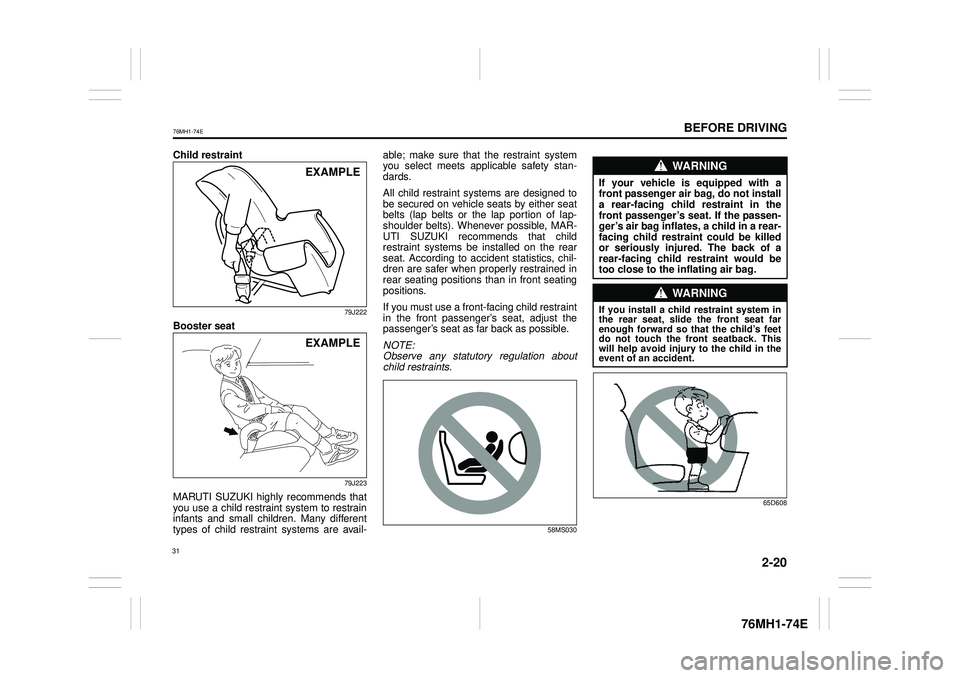
Child restraint
79J222
Booster seat
79J223
MARUTI SUZUKI highly recommends that you use a child restraint system to restrain infants and small children. Many differenttypes of child restraint systems are avail-
able; make sure that the restraint systemyou select meets applicable safety stan-dards.
All child restraint systems are designed tobe secured on vehicle seats by either seat belts (lap belts or the lap portion of lap- shoulder belts). Whenever possible, MAR- UTI SUZUKI recommends that childrestraint systems be installed on the rear seat. According to accident statistics, chil- dren are safer when properly restrained inrear seating positions than in front seating positions.
If you must use a front-facing child restraint in the front passenger’s seat, adjust the passenger’s seat as far back as possible.
NOTE: Observe any statutory regulation aboutchild restraints.
58MS030
65D608
EXAMPLE
EXAMPLE
WA R N I N G
If your vehicle is equipped with afront passenger air bag, do not installa rear-facing child restraint in the front passenger’s seat. If the passen- ger’s air bag inflates, a child in a rear-facing child restraint could be killed or seriously injured. The back of a rear-facing child restraint would betoo close to the inflating air bag.
WA R N I N G
If you install a child restraint system in the rear seat, slide the front seat farenough forward so that the child’s feet do not touch the front seatback. This will help avoid injury to the child in theevent of an accident.
31
Page 44 of 201
2-22
BEFORE DRIVING
76MH1-74E
76MH1-74E
Child Restraint System for India
Child Restraint
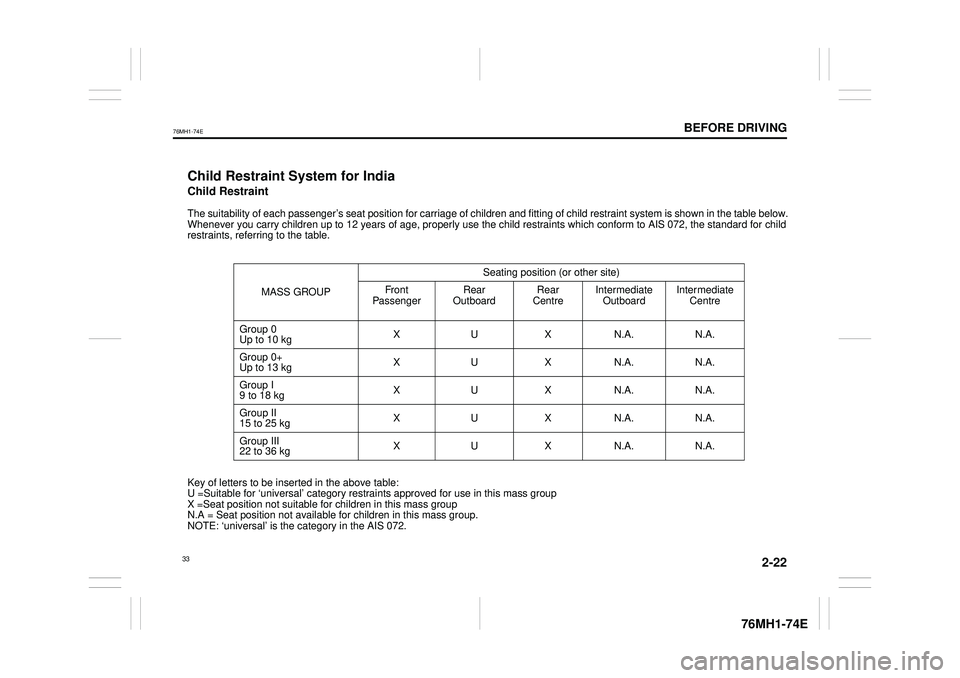
The suitability of each passenger’s seat position for carriage of children and fitting of child restraint system is shown in the table below. Whenever you carry children up to 12 years of age, properly use the child restraints which conform to AIS 072, the standard for child restraints, referring to the table.
MASS GROUP
Seating position (or other site)
Fr on t PassengerRear OutboardRear CentreIntermediate OutboardIntermediate Centre
Group 0 Up to 10 kgXUXN.A.N.A.
Group 0+Up to 13 kgXUXN.A.N.A.
Group I9 to 18 kgXUXN.A.N.A.
Group II15 to 25 kgXUXN.A.N.A.
Group III22 to 36 kgXUXN.A.N.A.
Key of letters to be inserted in the above table: U =Suitable for ‘universal’ category restraints approved for use in this mass group X =Seat position not suitable for children in this mass group N.A = Seat position not available for children in this mass group. NOTE: ‘universal’ is the category in the AIS 072.
33
Page 45 of 201
2-23
BEFORE DRIVING
76MH1-74E
76MH1-74E
Supplemental Restraint
System (air bags)
(if equipped)
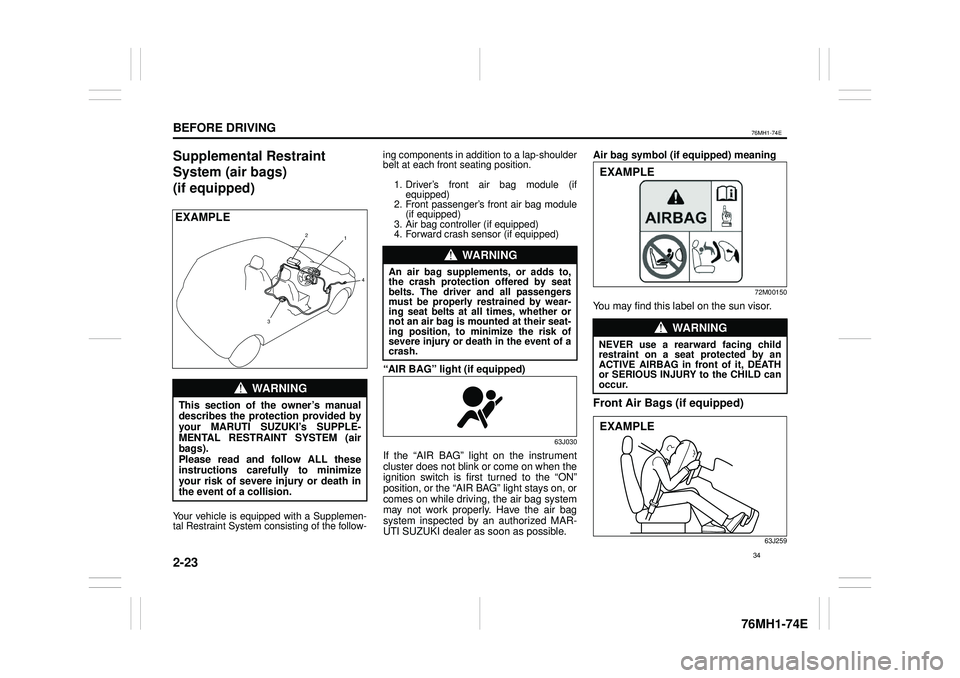
Your vehicle is equipped with a Supplemen- tal Restraint System consisting of the follow-
ing components in addition to a lap-shoulderbelt at each front seating position.
1. Driver’s front air bag module (ifequipped)2. Front passenger’s front air bag module(if equipped)3. Air bag controller (if equipped)4. Forward crash sensor (if equipped)
Page 48 of 201
2-26
BEFORE DRIVING
76MH1-74E
76MH1-74E
80J105E
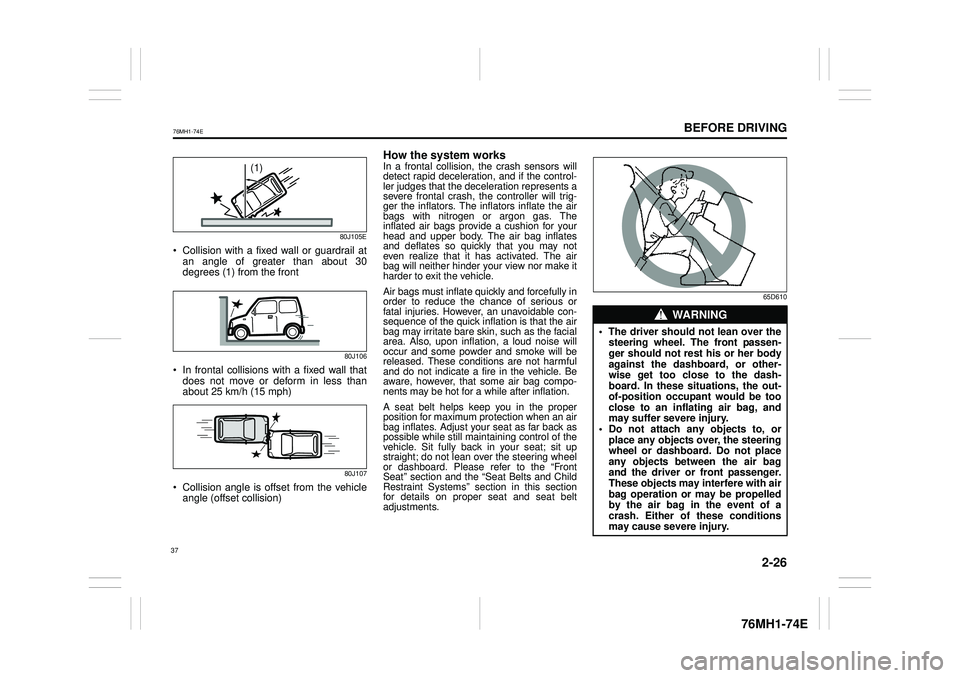
Collision with a fixed wall or guardrail atan angle of greater than about 30 degrees (1) from the front
80J106
In frontal collisions with a fixed wall thatdoes not move or deform in less thanabout 25 km/h (15 mph)
80J107
Collision angle is offset from the vehicleangle (offset collision)
How the system worksIn a frontal collision, the crash sensors will detect rapid deceleration, and if the control-ler judges that the deceleration represents asevere frontal crash, the controller will trig- ger the inflators. The inflators inflate the airbags with nitrogen or argon gas. The inflated air bags provide a cushion for yourhead and upper body. The air bag inflatesand deflates so quickly that you may noteven realize that it has activated. The airbag will neither hinder your view nor make itharder to exit the vehicle.
Air bags must inflate quickly and forcefully in order to reduce the chance of serious or fatal injuries. However, an unavoidable con-sequence of the quick inflation is that the airbag may irritate bare skin, such as the facialarea. Also, upon inflation, a loud noise willoccur and some powder and smoke will be released. These conditions are not harmful and do not indicate a fire in the vehicle. Beaware, however, that some air bag compo-nents may be hot for a while after inflation.
A seat belt helps keep you in the proper position for maximum protection when an airbag inflates. Adjust your seat as far back aspossible while still maintaining control of the vehicle. Sit fully back in your seat; sit upstraight; do not lean over the steering wheel or dashboard. Please refer to the “FrontSeat” section and the “Seat Belts and ChildRestraint Systems” section in this sectionfor details on proper seat and seat belt adjustments.
65D610
(1)
WA R N I N G
• The driver should not lean over thesteering wheel. The front passen- ger should not rest his or her body against the dashboard, or other- wise get too close to the dash-board. In these situations, the out- of-position occupant would be too close to an inflating air bag, andmay suffer severe injury.• Do not attach any objects to, orplace any objects over, the steeringwheel or dashboard. Do not place any objects between the air bag and the driver or front passenger.These objects may interfere with air bag operation or may be propelled by the air bag in the event of acrash. Either of these conditions may cause severe injury.
37
Page 72 of 201
3-2
OPERATING YOUR VEHICLE
76MH1-74E
76MH1-74E
NOTE: It is normal for water to drip from the air conditioning system after use.
4) Make sure the hood is fully closed and latched.5) Check the headlights, turn signal lights, brake lights and horn for proper opera- tion.6) Adjust the seat and head restraint (if equipped). 7) Check the brake pedal and the parkingbrake lever. 8) Adjust the mirrors. 9) Make sure that you and all passengershave properly fastened your seat belts. 10)Make sure that all warning lights come on as the key is turned to the “ON” posi-tion. 11)Check all gauges. 12)Make sure that the BRAKE SYSTEMWARNING light turns off when the parking brake is released.
Once a week, or each time you fill your fuel tank, perform the following under-hood checks:
1) Engine oil level 2) Coolant level3) Brake fluid level 4) Windshield washer fluid level 5) Battery solution level6) Hood latch operation Pull the hood release handle inside the vehicle. Make sure that you cannotopen the hood all the way without
releasing the secondary latch. Be sure to close the hood securely after check- ing for proper latch operation. See “Alllatches, hinges & locks” of “CHASSIS AND BODY” in the “Periodic Mainte- nance Schedule” in the “INSPECTIONAND MAINTENANCE” section for lubri- cation schedule.
Once a month, or each time you fill your fuel tank, check the tire pressure using a tire pressure gauge. Also check the tirepressure of the spare tire.
Engine Oil Consumption
It is normal for the engine to consume some engine oil during normal vehicle operation.
The amount of engine oil consumed depends on the viscosity of the oil, thequality of the oil and the conditions the vehicle is driven under. More oil is consumed during high-speeddriving and when there is frequent acceler- ation and deceleration. Under high loads, your engine also will consume more oil.A new engine also consumes more oil, since its pistons, piston rings and cylinder
walls have not yet become conditioned. New engines reach the normal level of oil consumption only after approximately 5000km (3000 miles) driving.
Oil consumption: Max. 1.0 L per 1000 km (1 Qt. per 600 miles)
When judging the amount of oil consump- tion, note that the oil may become diluted and make it difficult to accurately judge thetrue oil level. As an example, if a vehicle is used for repeated short trips, and consumes a nor-mal amount of oil, the dipstick may not show any drop in the oil level at all, even after 1000 km (600 miles) or more of driv-ing. This is because the oil is gradually becoming diluted with fuel or moisture, making it appear that the oil level has notchanged. You should also be aware that the diluting ingredients evaporate out when the vehicleis subsequently driven at high speeds, such as on an expressway, making it appear that oil is excessively consumedafter high-speed driving.
WA R N I N G
Make sure the hood is fully closed and latched before driv ing. If it is not, it can fly up unexpectedly duringdriving, obstructing your view and resulting in an accident.
61