check engine SUZUKI CELERIO 2022 Owner's Manual
[x] Cancel search | Manufacturer: SUZUKI, Model Year: 2022, Model line: CELERIO, Model: SUZUKI CELERIO 2022Pages: 201, PDF Size: 5.82 MB
Page 163 of 201
7-14
INSPECTION AND MAINTENANCE
76MH1-74E
76MH1-74E
Gear Oil
Manual Transaxle Oil/
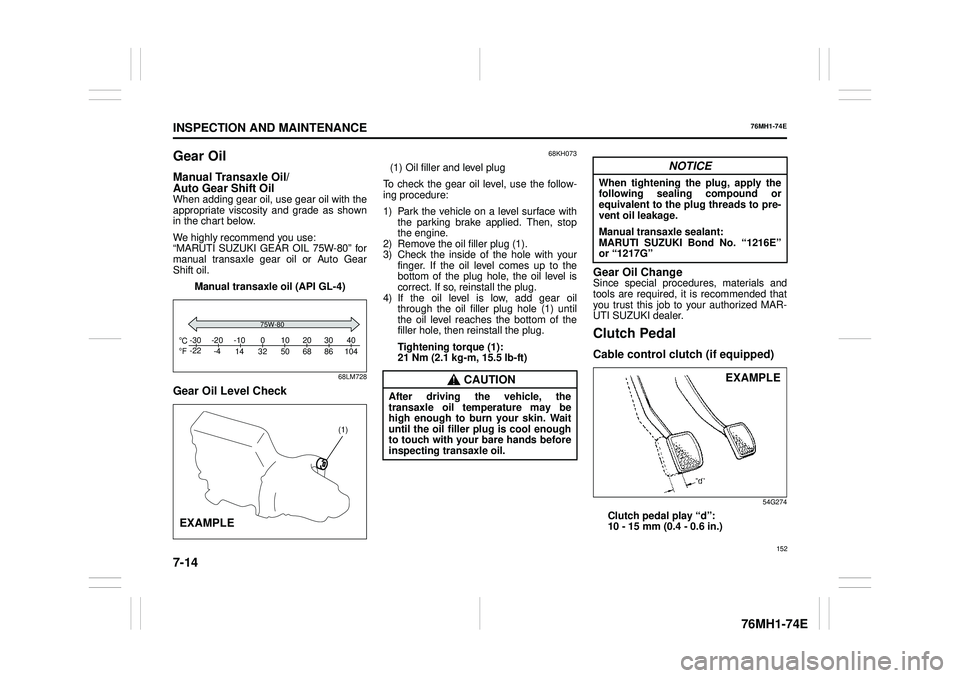
Auto Gear Shift OilWhen adding gear oil, use gear oil with the appropriate viscosity and grade as shown in the chart below.
We highly recommend you use: “MARUTI SUZUKI GEAR OIL 75W-80” formanual transaxle gear oil or Auto Gear Shift oil.
Manual transaxle oil (API GL-4)
68LM728
Gear Oil Level Check
68KH073
(1) Oil filler and level plug
To check the gear oil level, use the follow- ing procedure:
1) Park the vehicle on a level surface with the parking brake applied. Then, stop the engine.2) Remove the oil filler plug (1). 3) Check the inside of the hole with your finger. If the oil level comes up to thebottom of the plug hole, the oil level is correct. If so, reinstall the plug. 4) If the oil level is low, add gear oilthrough the oil filler plug hole (1) until the oil level reaches the bottom of the filler hole, then reinstall the plug.
Tightening torque (1): 21 Nm (2.1 kg -m, 15.5 lb-ft)
Gear Oil ChangeSince special procedures, materials and tools are required, it is recommended that you trust this job to your authorized MAR-UTI SUZUKI dealer.
Clutch Pedal
Cable control clutch (if equipped)
54G274
Clutch pedal play “d”: 10 - 15 mm (0.4 - 0.6 in.)
C Fo o-30 -22 -20 -4 -10 14 32 50 68 86 104 010203040
75W-80
(1)
EXAMPLE
CAUTION
After driving the vehicle, the transaxle oil temperature may behigh enough to burn your skin. Wait until the oil filler plug is cool enough to touch with your bare hands beforeinspecting transaxle oil.
NOTICE
When tightening the plug, apply thefollowing sealing compound orequivalent to the plug threads to pre- vent oil leakage.
Manual transaxle sealant: MARUTI SUZUKI Bond No. “1216E” or “1217G”
EXAMPLE
152
Page 164 of 201
7-15
INSPECTION AND MAINTENANCE
76MH1-74E
76MH1-74E
Measure the clutch pedal play by moving the clutch pedal with your hand and mea- suring the distance it moves until you feelslight resistance. The play in the clutch pedal should be between the specified val- ues. If the play is more or less than theabove, or clutch dragging is felt with the pedal fully depressed, have the clutch inspected by your MARUTI SUZUKIdealer.
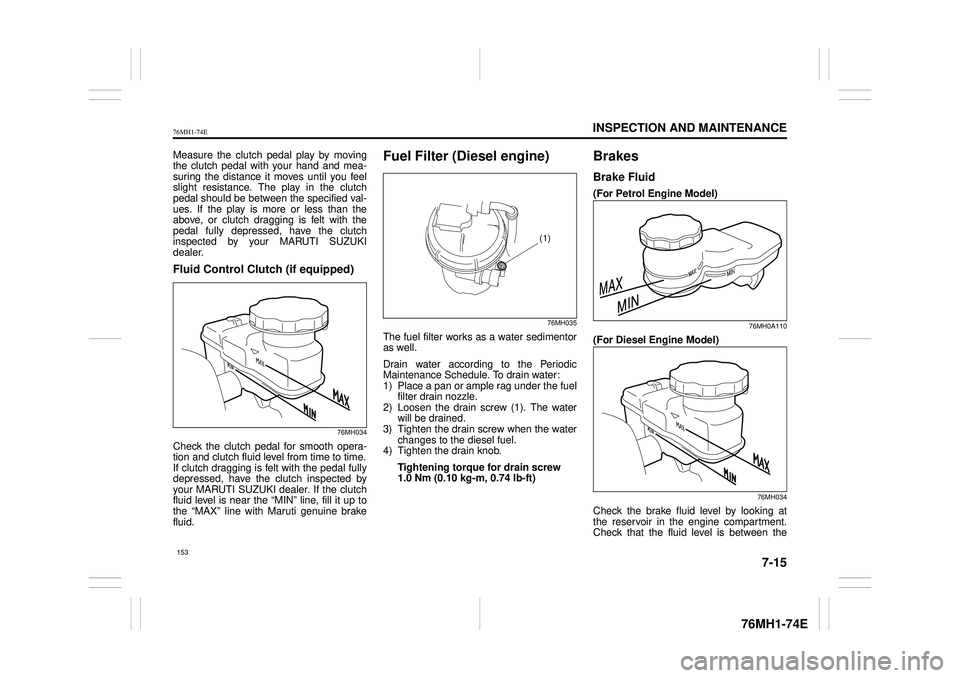
Fluid Control Clutch (if equipped)
76MH034
Check the clutch pedal for smooth opera-tion and clutch fluid level from time to time.If clutch dragging is felt with the pedal fully depressed, have the clutch inspected by your MARUTI SUZUKI dealer. If the clutchfluid level is near the “MIN” line, fill it up to the “MAX” line with Maruti genuine brake fluid.
Fuel Filter (Diesel engine)
76MH035
The fuel filter works as a water sedimentoras well.
Drain water according to the Periodic Maintenance Schedule. To drain water:1) Place a pan or ample rag under the fuel filter drain nozzle. 2) Loosen the drain screw (1). The waterwill be drained. 3) Tighten the drain screw when the water changes to the diesel fuel.4) Tighten the drain knob.
Tightening torque for drain screw 1.0 Nm (0.10 kg-m, 0.74 lb-ft)
Brakes
Brake Fluid
(For Petrol Engine Model)
76MH0A110
(For Diesel Engine Model)
76MH034
Check the brake fluid level by looking atthe reservoir in the engine compartment.Check that the fluid level is between the
(1)
153
Page 165 of 201
7-16
INSPECTION AND MAINTENANCE
76MH1-74E
76MH1-74E
“MAX” and “MIN” lines. If the brake fluid level is near the “MIN” line, fill it up to the “MAX” line with Maruti genuine brake fluid.
NOTE: With disc brakes, the fluid level can beexpected to gradually fall as the brake pads wear.
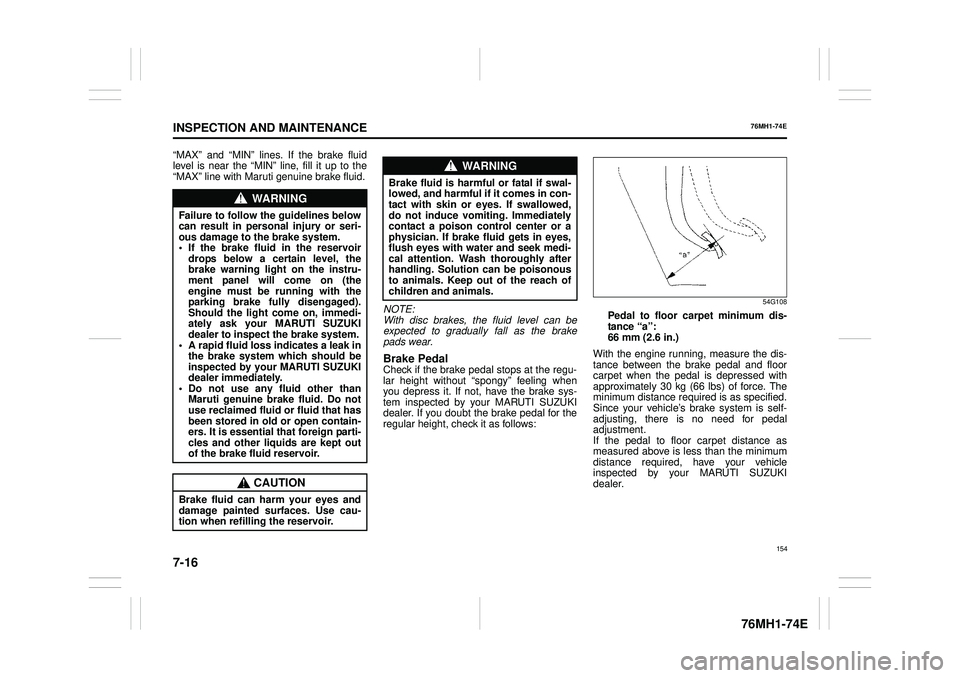
Brake PedalCheck if the brake peda l stops at the regu- lar height without “spongy” feeling when you depress it. If not, have the brake sys- tem inspected by your MARUTI SUZUKIdealer. If you doubt the brake pedal for the regular height, check it as follows:
54G108
Pedal to floor car pet minimum dis- tance “a”: 66 mm (2.6 in.)
With the engine running, measure the dis- tance between the brake pedal and floorcarpet when the pedal is depressed with approximately 30 kg (66 lbs) of force. The minimum distance required is as specified.Since your vehicle’s brake system is self- adjusting, there is no need for pedal adjustment. If the pedal to floor carpet distance as measured above is less than the minimum distance required, have your vehicleinspected by your MARUTI SUZUKI dealer.
WA R N I N G
Failure to follow the guidelines below can result in personal injury or seri-ous damage to the brake system. • If the brake fluid in the reservoir drops below a certain level, thebrake warning light on the instru- ment panel will come on (the engine must be running with theparking brake fully disengaged). Should the light come on, immedi- ately ask your MARUTI SUZUKIdealer to inspect the brake system. • A rapid fluid loss indicates a leak in the brake system which should beinspected by your MARUTI SUZUKI dealer immediately. • Do not use any fluid other thanMaruti genuine brake fluid. Do not use reclaimed fluid or fluid that has been stored in old or open contain-ers. It is essential that foreign parti- cles and other liquids are kept out of the brake fluid reservoir.
CAUTION
Brake fluid can harm your eyes anddamage painted surfaces. Use cau- tion when refilling the reservoir.
WA R N I N G
Brake fluid is harmful or fatal if swal- lowed, and harmful if it comes in con-tact with skin or e yes. If swallowed, do not induce vomiting. Immediately contact a poison control center or aphysician. If brake fluid gets in eyes, flush eyes with water and seek medi- cal attention. Wash thoroughly afterhandling. Solution can be poisonous to animals. Keep out of the reach of children and animals.
154
Page 169 of 201
7-20
INSPECTION AND MAINTENANCE
76MH1-74E
76MH1-74E
76MH0A136
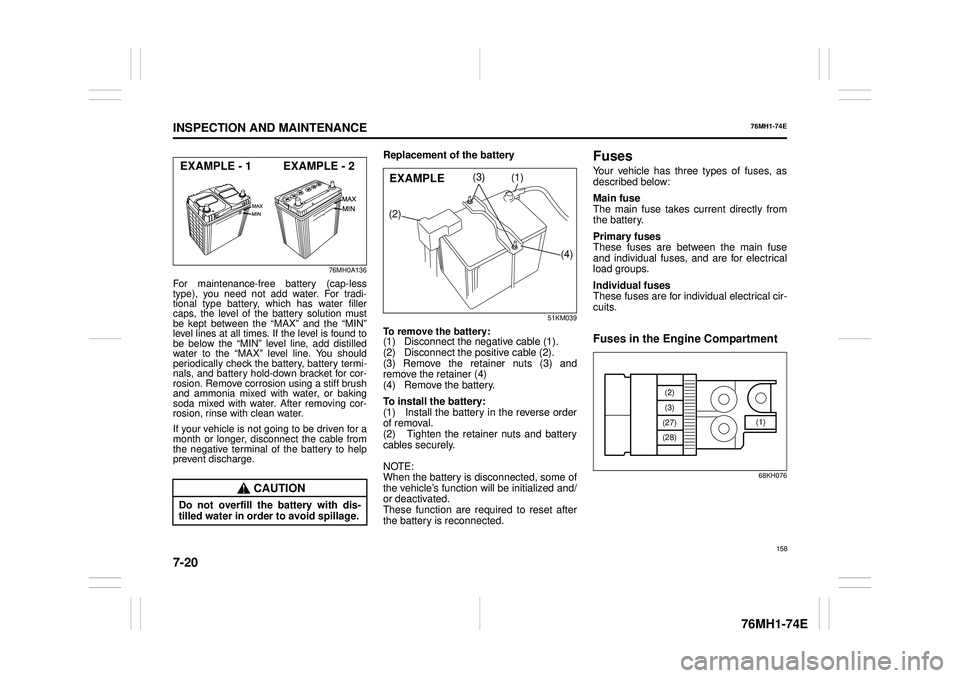
For maintenance-free battery (cap-less type), you need not add water. For tradi-tional type battery, which has water filler caps, the level of the battery solution must be kept between the “MAX” and the “MIN”level lines at all times. If the level is found tobe below the “MIN” level line, add distilledwater to the “MAX” level line. You shouldperiodically check the battery, battery termi- nals, and battery hold-down bracket for cor- rosion. Remove corrosion using a stiff brushand ammonia mixed with water, or bakingsoda mixed with water. After removing cor-rosion, rinse with clean water.
If your vehicle is not going to be driven for amonth or longer, disconnect the cable fromthe negative terminal of the battery to help prevent discharge.
Replacement of the battery
51KM039
To remove the battery: (1) Disconnect the negative cable (1). (2) Disconnect the positive cable (2). (3) Remove the retainer nuts (3) andremove the retainer (4) (4) Remove the battery.
To install the battery: (1) Install the battery in the reverse order of removal. (2) Tighten the retainer nuts and battery cables securely.
NOTE: When the battery is disconnected, some of the vehicle’s function will be initialized and/or deactivated. These function are required to reset after the battery is reconnected.
Fuses
Your vehicle has three types of fuses, asdescribed below:
Main fuse The main fuse takes current directly fromthe battery.
Primary fuses These fuses are between the main fuse and individual fuses, and are for electrical load groups.
Individual fuses These fuses are for individual electrical cir-cuits.
Fuses in the Engine Compartment
68KH076
CAUTION
Do not overfill th e battery with dis- tilled water in order to avoid spillage.
EXAMPLE - 1 EXAMPLE - 2(1)
(2)
(3)
(4)
EXAMPLE
(1)
(2)
(3)
(27)
(28)
158
Page 180 of 201
7-31
INSPECTION AND MAINTENANCE
76MH1-74E
76MH1-74E
65D151
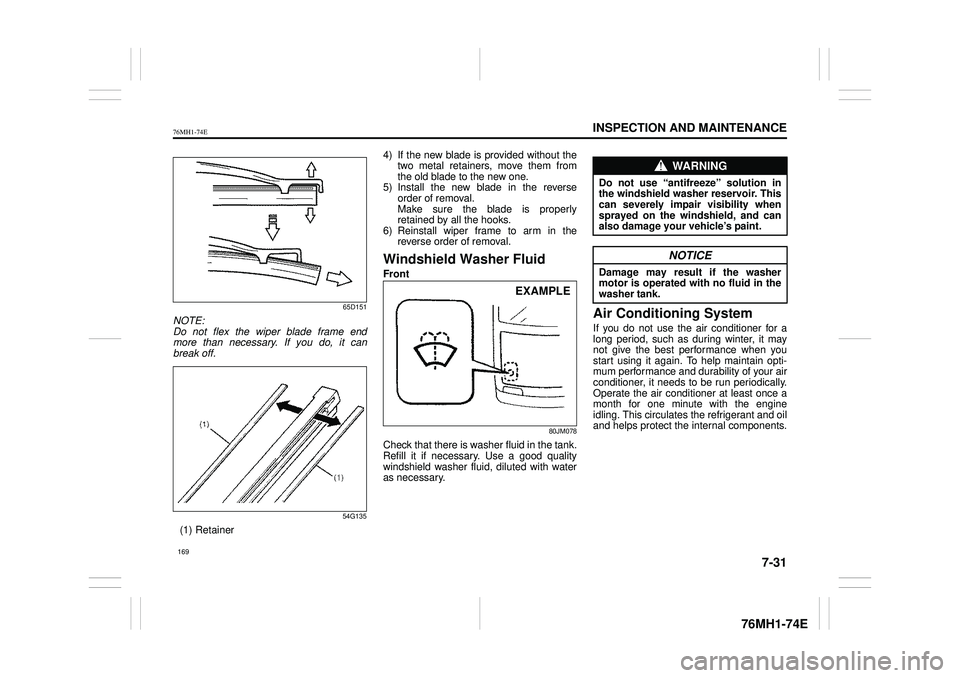
NOTE: Do not flex the wiper blade frame end more than necessary. If you do, it canbreak off.
54G135
(1) Retainer
4) If the new blade is provided without the two metal retainers, move them from the old blade to the new one.5) Install the new blade in the reverse order of removal. Make sure the blade is properlyretained by all the hooks. 6) Reinstall wiper frame to arm in the reverse order of removal.
Windshield Washer Fluid
Front
80JM078
Check that there is washer fluid in the tank.Refill it if necessary. Use a good quality windshield washer fluid, diluted with water as necessary.
Air Conditioning System
If you do not use the air conditioner for along period, such as during winter, it maynot give the best performance when you start using it again. To help maintain opti- mum performance and durability of your airconditioner, it needs to be run periodically. Operate the air condit ioner at least once a month for one minute with the engineidling. This circulates the refrigerant and oil and helps protect the internal components.
EXAMPLE
WA R N I N G
Do not use “antifreeze” solution in the windshield washer reservoir. Thiscan severely impair visibility when sprayed on the windshield, and can also damage your vehicle’s paint.
NOTICE
Damage may result if the washermotor is operated with no fluid in the washer tank.
169
Page 184 of 201
8-3
EMERGENCY SERVICE
76MH1-74E
76MH1-74E
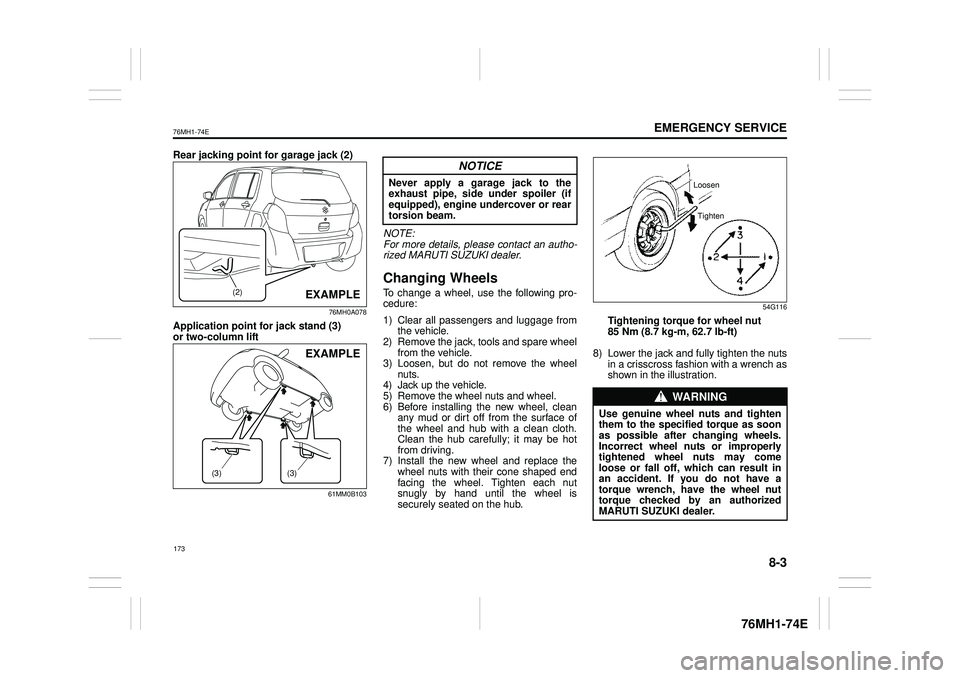
Rear jacking point for garage jack (2)
76MH0A078
Application point for jack stand (3) or two-column lift
61MM0B103
NOTE:For more details, please contact an autho- rized MARUTI SUZUKI dealer.
Changing Wheels
To change a wheel, use the following pro-cedure:
1) Clear all passengers and luggage from the vehicle. 2) Remove the jack, tools and spare wheel from the vehicle.3) Loosen, but do not remove the wheel nuts. 4) Jack up the vehicle.5) Remove the wheel nuts and wheel. 6) Before installing the new wheel, clean any mud or dirt off from the surface ofthe wheel and hub with a clean cloth. Clean the hub carefully; it may be hot from driving.7) Install the new wheel and replace the wheel nuts with their cone shaped end facing the wheel. Tighten each nutsnugly by hand until the wheel is securely seated on the hub.
54G116
Tightening torque for wheel nut85 Nm (8.7 kg -m, 62.7 lb-ft)
8) Lower the jack and fully tighten the nuts in a crisscross fashion with a wrench as shown in the illustration.
(2)EXAMPLE
(3)(3)
EXAMPLE
NOTICE
Never apply a garage jack to theexhaust pipe, side under spoiler (ifequipped), engine undercover or rear torsion beam.
WA R N I N G
Use genuine wheel nuts and tighten them to the specified torque as soonas possible after changing wheels. Incorrect wheel nuts or improperly tightened wheel nuts may comeloose or fall off, which can result in an accident. If you do not have a torque wrench, have the wheel nuttorque checked by an authorized MARUTI SUZUKI dealer.
Loosen
Tighten
173
Page 186 of 201
8-5
EMERGENCY SERVICE
76MH1-74E
76MH1-74E
3) Make jump lead connections as follows:
1. Connect one end of the first jump lead to the positive (+) terminal of the flat battery (1). 2. Connect the other end to the positive(+) terminal of the booster battery (2). 3. Connect one end of the second jumplead to the negative (–) terminal of the booster battery (2). 4. Make the final connection to anunpainted, heavy metal part (i.e. engine mount bracket (3)) of the engine of the vehicle with the flatbattery (1).
4) If the booster battery you are using is fitted to another vehicle, start the
engine of the vehicle with the booster battery. Run the engine at moderate speed.5) Start the engine of the vehicle with the flat battery. 6) Remove the jump leads in the exactreverse order in which you connected them.
Towing
If you need to have your vehicle towed, contact a professional service. Your dealercan provide you with detailed towing instructions.
2-Wheel Drive (2WD) Manual Tran- saxle or Auto Gear ShiftManual transaxle vehicles or Auto Gear Shift vehicles may be towed using either of the following methods.
1) From the front, with the front wheels lifted and the rear wheels on the ground. Before towing, make sure thatthe parking brake is released. 2) From the rear, with the rear wheels lifted and the front wheels on theground, provided the steering and drivetrain are in operational condition. Before towing, make sure that transaxleis in neutral, the steering wheel is
unlocked (the ignition key should be in the “ACC” position), and the steering wheel is secured with a clampingdevice designed for towing service.
WA R N I N G
Never connect the jump lead directlyto the negative (–) terminal of the dis- charged battery, or an explosion may occur.
CAUTION
Connect the jump le ad to the engine mount bracket securely. If the jump lead disconnects from the engine mount bracket because of vibrationat the start of the engine, the jump lead could be caught in the drive belts.
NOTICE
To help avoid damage to your vehicle during towing, proper equipment and towing procedures must be used.
NOTICE
After shifting the Auto Gear Shiftlever to the “N” position, always check the gear position indicator in the instrument cluster shows the “N”position to make sure that the transaxle is disengaged. If the transaxle cannot be put in neu-tral, turn the key from the “LOCK” to the “ON” position, and move the Auto Gear Shift lever from “N” to “D”,“M” or “R”, then back to “N” again. Then turn the key from the “ON” to the “LOCK” position.These procedures may help put the transaxle in neutral. If the transaxle still cannot be put in neutral, you can-not tow the vehicle without using a towing dolly. The steering column is not strongenough to with stand shocks trans- mitted from the fr ont wheels during towing. Always unlock the steeringwheel before towing.
175
Page 187 of 201
8-6
EMERGENCY SERVICE
76MH1-74E
76MH1-74E
If the Starter Does Not
Operate
1) Try turning the ignition switch to the “START” position with the headlights turned on to determine the battery con- dition. If the headlights go excessivelydim or go off, it usually means that either the battery is flat or the battery terminal contact is poor. Recharge thebattery or correct battery terminal con- tact as necessary. 2) If the headlights remain bright, checkthe fuses. If the reason for failure of the starter is not obvious, there may be a major electrical problem. Have the vehi-cle inspected by your authorized MAR- UTI SUZUKI dealer.
If the Engine is Flooded
If the engine is flooded with petrol, it may be hard to start. If this happens, press theaccelerator pedal all the way to the floor and hold it there while cranking the engine. For petrol engine model, do not operatethe starter motor for more than 12 sec- onds. For diesel engine model, do not operatethe starter motor for more than 30 sec- onds.
If the Engine Overheats
The engine could overheat temporarily under severe driving conditions. If the highengine coolant temperature warning light comes on as overheating during driving: 1) Turn off the air conditioner, if equipped.2) Take the vehicle to a safe place and park. 3) Let the engine run at the normal idlespeed for a few minutes until the high engine coolant temperature warning light goes off.
If the high engine coolant temperature warning light does not go off: 1) Turn off the engine and check that the water pump belt and pulleys are notdamaged or slipping. If any abnormality is found, correct it.
2) Check the coolant level in the reservoir. If it is found to be lower than the “LOW” line, look for leaks at the radiator, waterpump, and radiator and heater hoses. If you locate any leaks that may have caused the overheating, do not run theengine until these problems have been corrected. 3) If you do not find a leak, carefully addcoolant to the reservoir and then the radiator, if necessary. (Refer to “Engine Coolant” in the “INSPECTION ANDMAINTENANCE” section.)
NOTE: If your engine overheats and you are unsure what to do, contact your MARUTI SUZUKI dealer.
WA R N I N G
If you see or hear escaping steam,stop the vehicle in a safe place andimmediately turn off the engine to let it cool. Do not open the hood when steam is present. When the steamcan no longer be seen or heard, open the hood to see if the coolant is still boiling. If it is, you must wait until itstops boiling before you proceed.
176
Page 192 of 201
9-3
APPEARANCE CARE
76MH1-74E
76MH1-74E
Caring for Aluminum Wheels
NOTE: • Do not use an acidic or alkaline deter- gent to wash aluminum wheels. These types of detergent will cause permanentspots, discoloration and cracks on fin- ished surfaces. • Do not use a bristle brush and soap con-taining an abrasive material. These will damage finished surfaces.
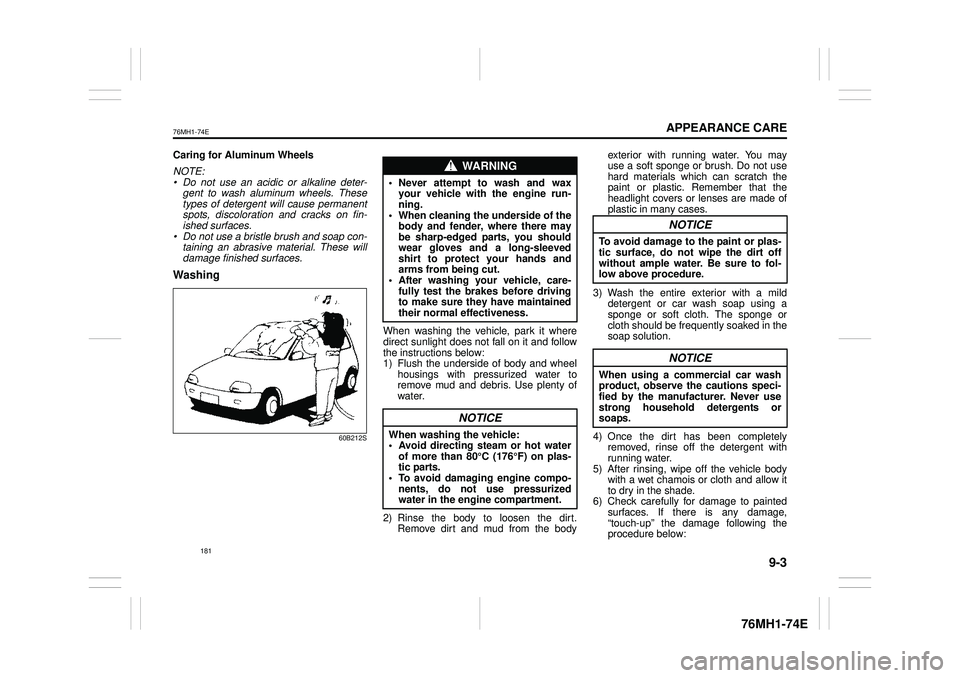
Washing
60B212S
When washing the vehicle, park it wheredirect sunlight does not fall on it and follow the instructions below:1) Flush the underside of body and wheel housings with pressurized water to remove mud and debris. Use plenty ofwater.
2) Rinse the body to loosen the dirt. Remove dirt and mud from the body
exterior with running water. You may use a soft sponge or brush. Do not use hard materials which can scratch thepaint or plastic. Remember that the headlight covers or lenses are made of plastic in many cases.
3) Wash the entire exterior with a mild detergent or car wash soap using a sponge or soft cloth. The sponge or cloth should be frequently soaked in thesoap solution.
4) Once the dirt has been completely removed, rinse off the detergent with running water. 5) After rinsing, wipe off the vehicle bodywith a wet chamois or cloth and allow it to dry in the shade. 6) Check carefully for damage to paintedsurfaces. If there is any damage, “touch-up” the damage following the procedure below:
WA R N I N G
• Never attempt to wash and waxyour vehicle with the engine run-ning. • When cleaning the underside of the body and fender, where there maybe sharp-edged parts, you should wear gloves and a long-sleeved shirt to protect your hands andarms from being cut. • After washing your vehicle, care- fully test the brakes before drivingto make sure they have maintained their normal effectiveness.
NOTICE
When washing the vehicle: • Avoid directing steam or hot water of more than 80