buttons SUZUKI CELERIO 2022 Owners Manual
[x] Cancel search | Manufacturer: SUZUKI, Model Year: 2022, Model line: CELERIO, Model: SUZUKI CELERIO 2022Pages: 201, PDF Size: 5.82 MB
Page 27 of 201
2-5
BEFORE DRIVING
76MH1-74E
76MH1-74E
Keyless Entry System
Transmitter (if equipped)
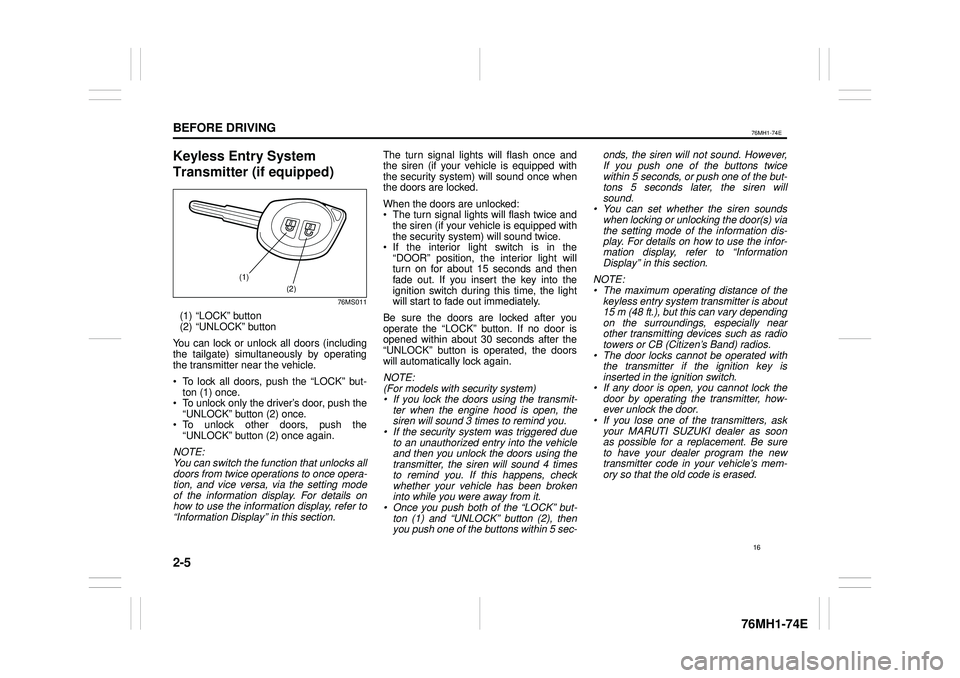
76MS011
(1) “LOCK” button (2) “UNLOCK” button
You can lock or unlock all doors (includingthe tailgate) simultaneously by operating the transmitter near the vehicle.
To lock all doors, push the “LOCK” but-ton (1) once. To unlock only the driver’s door, push the“UNLOCK” button (2) once. To unlock other doors, push the“UNLOCK” button (2) once again.
NOTE: You can switch the function that unlocks alldoors from twice operations to once opera- tion, and vice versa, via the setting modeof the information display. For details onhow to use the information display, refer to“Information Display” in this section.
The turn signal lights will flash once and the siren (if your vehicle is equipped with the security system) will sound once whenthe doors are locked.
When the doors are unlocked: The turn signal lights will flash twice andthe siren (if your vehicle is equipped withthe security system) will sound twice. If the interior light switch is in the“DOOR” position, the interior light willturn on for about 15 seconds and thenfade out. If you insert the key into the ignition switch during this time, the light will start to fade out immediately.
Be sure the doors are locked after youoperate the “LOCK” button. If no door isopened within about 30 seconds after the “UNLOCK” button is operated, the doors will automatically lock again.
NOTE: (For models with security system)• If you lock the doors using the transmit-ter when the engine hood is open, thesiren will sound 3 times to remind you.• If the security system was triggered dueto an unauthorized entry into the vehicleand then you unlock the doors using thetransmitter, the siren will sound 4 times to remind you. If this happens, check whether your vehicle has been brokeninto while you were away from it.• Once you push both of the “LOCK” but-ton (1) and “UNLOCK” button (2), thenyou push one of the buttons within 5 sec-
onds, the siren will not sound. However, If you push one of the buttons twice within 5 seconds, or push one of the but-tons 5 seconds later, the siren willsound.• You can set whether the siren soundswhen locking or unlocking the door(s) via the setting mode of the information dis- play. For details on how to use the infor-mation display, refer to “InformationDisplay” in this section.
NOTE: • The maximum operating distance of thekeyless entry system transmitter is about 15 m (48 ft.), but this can vary depending on the surroundings, especially near other transmitting devices such as radiotowers or CB (Citizen’s Band) radios.• The door locks cannot be operated withthe transmitter if the ignition key isinserted in the ignition switch.• If any door is open, you cannot lock thedoor by operating the transmitter, how-ever unlock the door.• If you lose one of the transmitters, askyour MARUTI SUZUKI dealer as soonas possible for a replacement. Be sure to have your dealer program the new transmitter code in your vehicle’s mem-ory so that the old code is erased.
(1)
(2)
16
Page 113 of 201
5-17
OTHER CONTROLS AND EQUIPMENT
76MH1-74E
76MH1-74E
2) Turn the TUNE FOLDER PUSH SOUND knob (2) to select the desired AVC adjustment level. (Initial setting:LEVEL 2)
Preset-EQ Preset-EQ calls up various sound types in accordance with the listening music type. 1) Press the TUNE FOLDER PUSHSOUND knob (2) several times until “PRESET-EQ” appears. 2) Turn the TUNE FOLDER PUSHSOUND knob (2). Each time the knob is turned, preset EQ mode will change as follows:
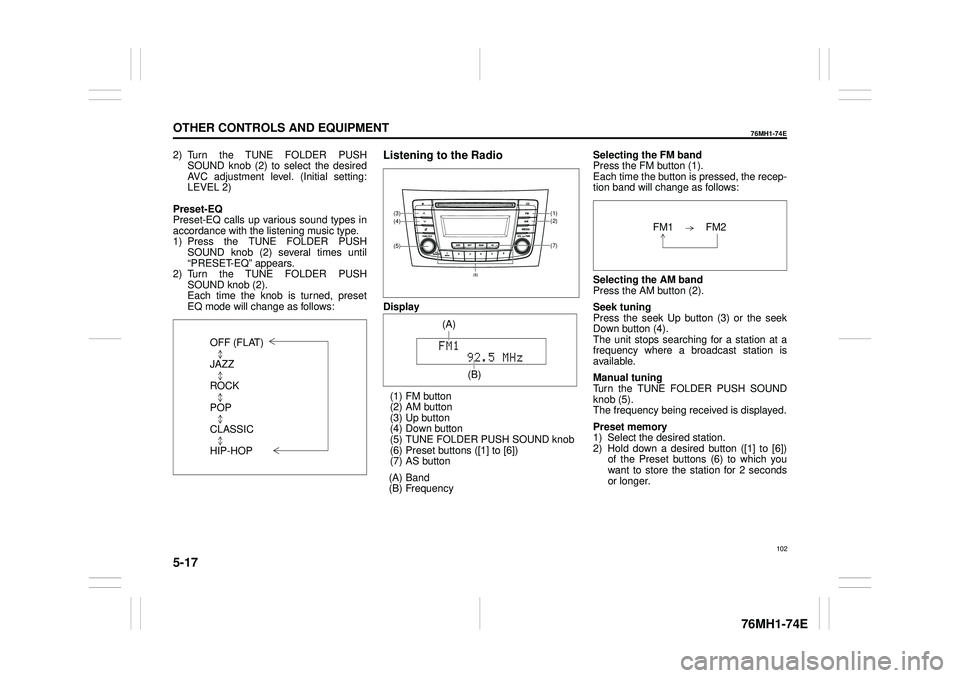
Listening to the Radio
Display
(1) FM button (2) AM button (3) Up button (4) Down button(5) TUNE FOLDER PUSH SOUND knob (6) Preset buttons ([1] to [6]) (7) AS button
(A) Band (B) Frequency
Selecting the FM band Press the FM button (1). Each time the button is pressed, the recep-tion band will change as follows:
Selecting the AM band Press the AM button (2).
Seek tuning Press the seek Up button (3) or the seekDown button (4). The unit stops searching for a station at a frequency where a broadcast station is available.
Manual tuning Turn the TUNE FOLDER PUSH SOUND knob (5).The frequency being received is displayed.
Preset memory 1) Select the desired station. 2) Hold down a desired button ([1] to [6]) of the Preset buttons (6) to which youwant to store the station for 2 seconds or longer.
OFF (FLAT)
JAZZ
ROCK
POP
CLASSIC
HIP-HOP
(7)
(1)(2)
(5)
(4)(3)
(6)
(A)
(B)
102
Page 114 of 201
5-18
OTHER CONTROLS AND EQUIPMENT
76MH1-74E
76MH1-74E
Auto store Hold down the AS button (7) for 2 seconds or longer.Six stations in good reception will automat- ically be stored to the Preset buttons (6) in order, starting from a station whose fre-quency is the lowest.
NOTE: • Auto store can be released by pressing AS button (7) while auto store is under way.• When the auto store is performed, the station previously stored in the memory at the position is overwritten.• When there are fewer than 6 stations that can be stored even if 1 round of auto store operation is performed, nostation will be stored at the remaining Preset buttons (6). • 6 stations can be preset for FM1 andFM2 in common, and 6 stations for AM in auto store mode.
Auto store mode on/off Press the AS button (7). Each time the button is pressed, the modeis switched as follows:
Radio Reception Radio reception can be affected by envi- ronment, atmospheric conditions, or radiosignal’s power and distance from the sta- tion. Nearby mountains and buildings may interfere or deflect radio reception, causingpoor reception. Poor reception or radio static can also be caused by electric cur- rent from overhead wires or high voltagepower lines.
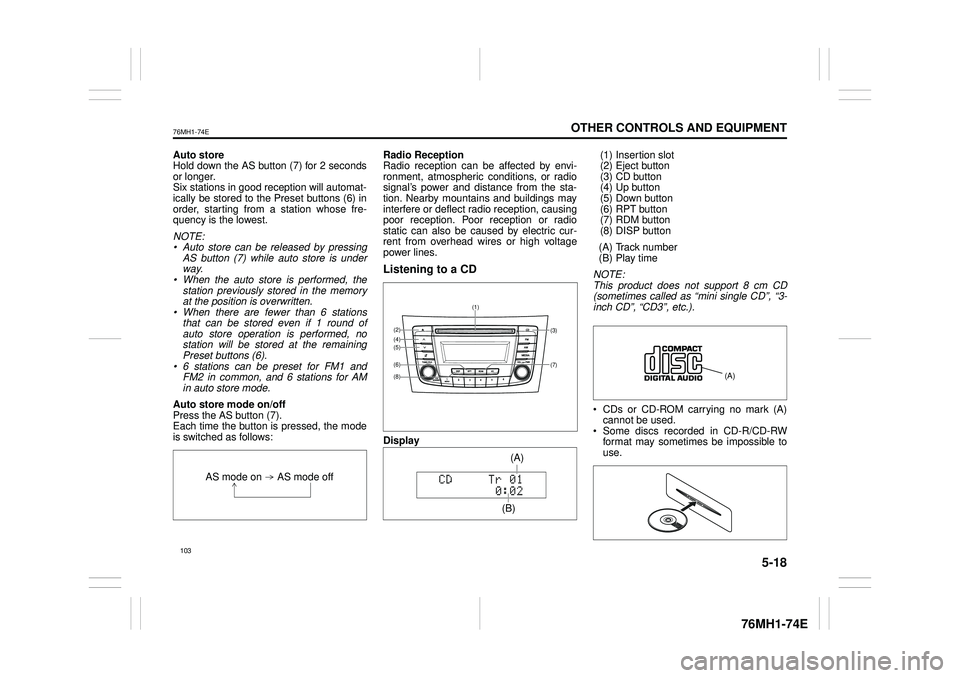
Listening to a CD
Display
(1) Insertion slot (2) Eject button (3) CD button(4) Up button (5) Down button (6) RPT button(7) RDM button (8) DISP button
(A) Track number (B) Play time
NOTE: This product does not support 8 cm CD (sometimes called as “mini single CD”, “3-inch CD”, “CD3”, etc.).
CDs or CD-ROM carrying no mark (A) cannot be used. Some discs recorded in CD-R/CD-RWformat may sometimes be impossible to use.
AS mode on AS mode off
(7)
(3)
(8)
(6)
(5)(4)(2)
(1)
(B)
(A)
Page 121 of 201
5-25
OTHER CONTROLS AND EQUIPMENT
76MH1-74E
76MH1-74E
AAC* Bit rate: ABR 16k - 320 kbbs Sampling frequency: 32 k/44.1 k/48 kHz* Apple Lossless is not supported.
Maximum number of files/folders Maximum number of files: 2500 Maximum number of files in a folder: 255 Maximum depth of tree structure: 8 Maximum number of folders: 255 (Root folder is included.)
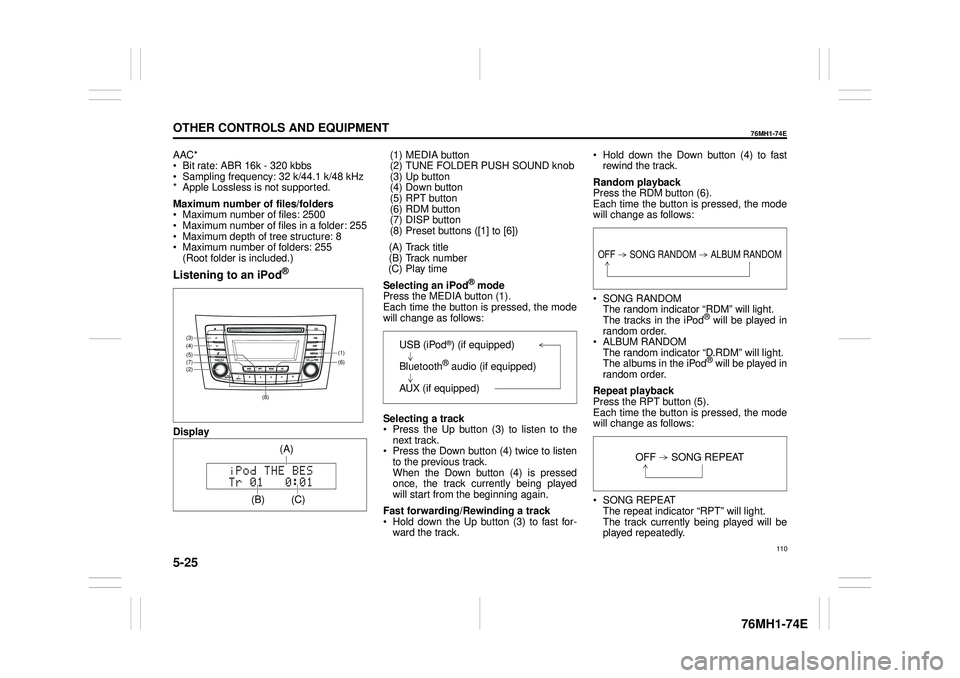
Listening to an iPod®
Display
(1) MEDIA button (2) TUNE FOLDER PUSH SOUND knob (3) Up button(4) Down button (5) RPT button (6) RDM button(7) DISP button (8) Preset buttons ([1] to [6])
(A) Track title (B) Track number (C) Play time
Selecting an iPod® mode Press the MEDIA button (1).Each time the button is pressed, the mode will change as follows:
Selecting a track Press the Up button (3) to listen to the next track. Press the Down button (4) twice to listento the previous track. When the Down button (4) is pressed once, the track currently being playedwill start from the beginning again.
Fast forwarding/Rewinding a track Hold down the Up button (3) to fast for- ward the track.
Hold down the Down button (4) to fast rewind the track.
Random playback Press the RDM button (6). Each time the button is pressed, the modewill change as follows:
SONG RANDOM The random indicator “RDM” will light.The tracks in the iPod® will be played in random order. ALBUM RANDOM The random indicator “D.RDM” will light. The albums in the iPod® will be played inrandom order.
Repeat playback Press the RPT button (5). Each time the button is pressed, the mode will change as follows:
SONG REPEAT The repeat indicator “RPT” will light. The track currently being played will beplayed repeatedly.
(6) (7)
(4)
(2)
(3)
(5)(1)
(8)
(C)
(A)
OFF SONG RANDOM ALBUM RANDOM
OFF SONG REPEAT
110
Page 122 of 201
5-26
OTHER CONTROLS AND EQUIPMENT
76MH1-74E
76MH1-74E
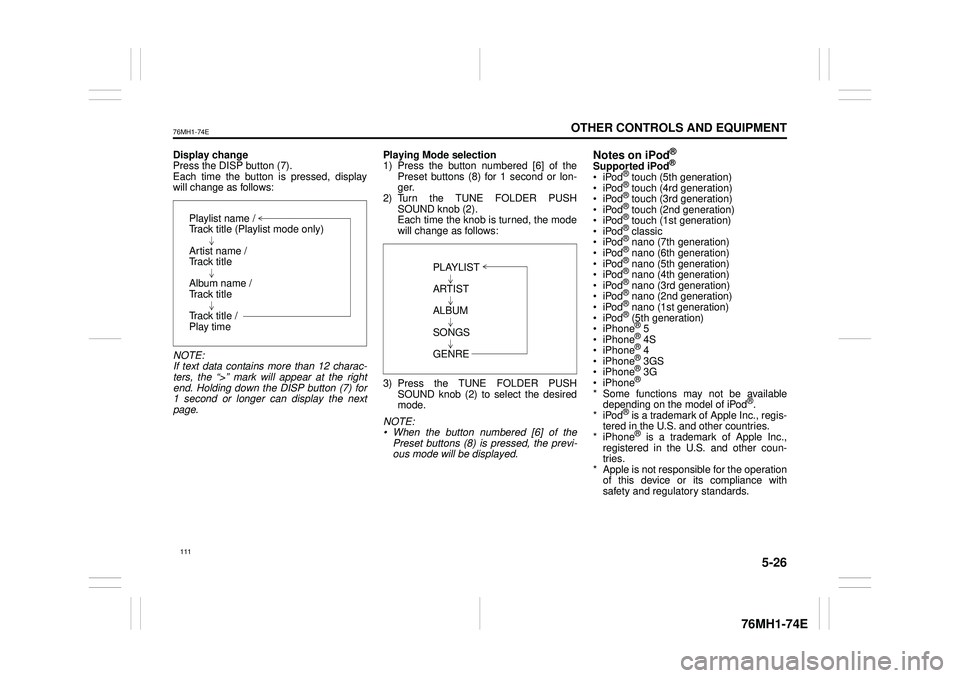
Display change Press the DISP button (7). Each time the button is pressed, displaywill change as follows:
NOTE: If text data contains more than 12 charac- ters, the “>” mark will appear at the right end. Holding down the DISP button (7) for1 second or longer can display the next page.
Playing Mode selection 1) Press the button numbered [6] of the Preset buttons (8) for 1 second or lon-ger. 2) Turn the TUNE FOLDER PUSH SOUND knob (2).Each time the knob is turned, the mode will change as follows:
3) Press the TUNE FOLDER PUSH SOUND knob (2) to select the desired mode.
NOTE: • When the button numbered [6] of thePreset buttons (8) is pressed, the previ- ous mode will be displayed.
Notes on iPod®
Supported iPod®
® touch (5th generation)® touch (4rd generation) ® touch (3rd generation)® touch (2nd generation) ® touch (1st generation) ® classic® nano (7th generation) ® nano (6th generation) ® nano (5th generation)® nano (4th generation) ® nano (3rd generation) ® nano (2nd generation)® nano (1st generation) ® (5th generation) iPhone® 5 iPhone® 4S iPhone® 4 iPhone® 3GS iPhone® 3G iPhone®
* Some functions may not be available depending on the model of iPod®. *iPod® is a trademark of Apple Inc., regis- tered in the U.S. and other countries.* iPhone® is a trademark of Apple Inc., registered in the U.S. and other coun- tries.* Apple is not responsible for the operation of this device or its compliance with safety and regulatory standards.
Playlist name /Track title (Playlist mode only)
Artist name / Track title
Album name / Track title
Track title / Play time
PLAYLIST
ARTIST
ALBUM
SONGS
GENRE
111
Page 123 of 201
5-27
OTHER CONTROLS AND EQUIPMENT
76MH1-74E
76MH1-74E
iPod® connection Make sure to detach the iPod® after pressing the engine switch to change theignition switch is in “LOCK” position. The iPod® may not be shut down when it is being connected and may result in bat-tery depletion. Please do not connect iPod® accesso- ries such as an iPod® remote control orheadphones while connecting the iPod®
with the unit. The unit may not operatecorrectly.
AUX Function
(1) MEDIA button
AUX connection To listen to auxiliary audio sources (sold separately) through the unit, follow theinstruction below. 1) Connect the auxiliary audio source to the AUX/USB socket (separatelyattached) with an AUX cable.
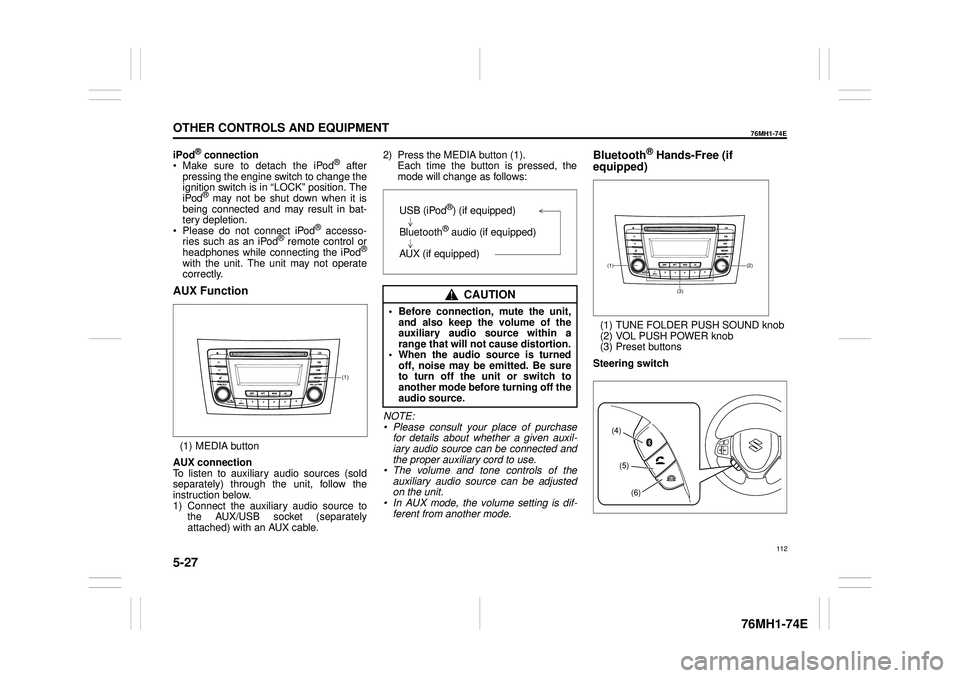
2) Press the MEDIA button (1). Each time the button is pressed, the mode will change as follows:
NOTE: • Please consult your place of purchasefor details about whether a given auxil- iary audio source can be connected and the proper auxiliary cord to use.• The volume and tone controls of the auxiliary audio source can be adjusted on the unit.• In AUX mode, the volume setting is dif- ferent from another mode.
Bluetooth® Hands-Free (if
equipped)
(1) TUNE FOLDER PUSH SOUND knob (2) VOL PUSH POWER knob(3) Preset buttons
Steering switch
(1)
CAUTION
• Before connection, mute the unit, and also keep the volume of the auxiliary audio source within arange that will not cause distortion. • When the audio source is turned off, noise may be emitted. Be sureto turn off the unit or switch to another mode before turning off the audio source.
USB (iPod®) (if equipped)
Bluetooth® audio (if equipped)
AUX (if equipped)(2)(1)
(3)
(4)
(5)
(6)
112
Page 127 of 201
5-31
OTHER CONTROLS AND EQUIPMENT
76MH1-74E
76MH1-74E
Deletion of registered data (Delete Entry) Follow the instructions below to delete anumber registered in Phonebook. 1) Press the Bluetooth® setup button (4). The Bluetooth® setup menu will be dis-played. 2) Turn the TUNE FOLDER PUSH SOUND knob (1) to select “Setup Tele-phone”, and press the knob (1) to deter- mine the selection. 3) Turn the TUNE FOLDER PUSHSOUND knob (1) to select “Setup Phonebook”, and press the knob (1) to determine the selection.4) Turn the TUNE FOLDER PUSH SOUND knob (1) to select “Delete Con- tacts”, and press the knob (1) to deter-mine the selection. 5) Turn the TUNE FOLDER PUSH SOUND knob (1) to select a number tobe deleted, and press the knob (1) to determine the selection. 6) Turn the TUNE FOLDER PUSHSOUND knob (1) to select “Delete?”, and press the knob (1) to determine the selection.1) Turn the TUNE FOLDER PUSH SOUND knob (1) to select “Confirm”, and press the knob (1) to complete thedeletion.
NOTE: When selecting “Go Back”, the previous menu will be displayed.
Registration in speed dial Follow the instructions below to assign a number to one of the Preset buttons to useas the speed dial. 1) Press the Bluetooth® setup button (4). The Bluetooth® setup menu will be dis-played. 2) Turn the TUNE FOLDER PUSH SOUND knob (1) to select “Setup Tele-phone”, and press the knob (1) to deter- mine the selection. 3) Turn the TUNE FOLDER PUSHSOUND knob (1) to select “Setup Phonebook”, and press the knob (1) to determine the selection.4) Turn the TUNE FOLDER PUSH SOUND knob (1) to select “Add Speed Dial”, and press the knob (1) to deter-mine the selection. 5) Turn the TUNE FOLDER PUSH SOUND knob (1) to select a number tobe assigned, and press the knob (1) to determine the selection. 6) Turn the TUNE FOLDER PUSHSOUND knob (1) to select “Choose Preset”, and press the knob (1) to determine the selection.7) Press one of the Preset buttons (3) to which the selected number is to be assigned. If a number is alreadyassigned to the selected button, a con- firmation message will be displayed. Turn the TUNE FOLDER PUSHSOUND knob (1) to select “Confirm”, and press the knob (1) to complete the assignment.
When the assignment is completed, the “Setup Phonebook” will be displayed.
NOTE: When selecting “Go Back”, the previous menu will be displayed.
One-touch call (Speed dial) Follow the instructions below to dial thenumber assigned to each of the Preset buttons (3). 1) Press the Off Hook button (5). The Bluetooth® phonebook menu will be displayed. 2) Turn the TUNE FOLDER PUSHSOUND knob (1) to select “Speed Dials”, and press the knob (1) to deter- mine the selection.3) Press one of the Preset buttons (3). When no number is assigned, “No Entry” is displayed.4) Press the Off Hook button (5). The selected number will be dialed.
116
Page 128 of 201
5-32
OTHER CONTROLS AND EQUIPMENT
76MH1-74E
76MH1-74E
Deletion of speed dial (Del Speed Dial) To delete a number assigned for the speed dial, follow the instructions below.1) Press the Off Hook button (5). The Bluetooth® phonebook menu will be displayed.2) Turn the TUNE FOLDER PUSH SOUND knob (1) to select “Speed Dials”, and press the knob (1) to deter-mine the selection. 3) Press one of the Preset buttons (3) to which the number to be deleted isassigned. “No Entry” appears if the number is not registered.4) Turn the TUNE FOLDER PUSH SOUND knob (1) to select “Delete”, and press the knob (1) to determine theselection. 5) Turn the TUNE FOLDER PUSH SOUND knob (1) to select “Del Speed Dial”, and press the knob (1) to deter- mine the selection. 6) Turn the TUNE FOLDER PUSHSOUND knob (1) to select “Confirm”, and press the knob (1) to complete the deletion.
NOTE: When selecting “Go Back”, the previousmenu will be displayed.
Display of device data (Device Name) Follow the instructions below to display the BD (Bluetooth® Device) address anddevice name. 1) Press the Bluetooth® setup button (4). The Bluetooth® setup menu will be dis-played. 2) Turn the TUNE FOLDER PUSH SOUND knob (1) to select “Setup Blue-tooth”, and press the knob (1) to deter- mine the selection. 3) Turn the TUNE FOLDER PUSHSOUND knob (1) to select “Bluetooth Info”, and press the knob (1) to deter- mine the selection.4) Turn the TUNE FOLDER PUSH SOUND knob (1) to select “Device Name” or “Device Address”, and pressthe knob (1) to display the device name or the BD (Bluetooth® Device) address.
NOTE: When selecting “Go Back”, the previous menu will be displayed.
Reset to the factory defaults Follow the instructions below to reset all the settings to the factory defaults.1) Press the Bluetooth® setup button (4). The Bluetooth® setup menu will be dis- played.2) Turn the TUNE FOLDER PUSH SOUND knob (1) to select “Setup Blue- tooth”, and press the knob (1) to deter-mine the selection. 3) Turn the TUNE FOLDER PUSH SOUND knob (1) to se lect “Initialize”, and press the knob (1) to determine the selection. 4) Turn the TUNE FOLDER PUSHSOUND knob (1) to select “All Initial- ize”, and press the knob (1) to deter- mine the selection.5) Turn the TUNE FOLDER PUSH SOUND knob (1) to select “Confirm”, and press the knob (1) to start thereset.
NOTE: When selecting “Go Back”, the previous menu will be displayed.
117
Page 134 of 201
5-38
OTHER CONTROLS AND EQUIPMENT
76MH1-74E
76MH1-74E
Selecting the radio station (FM1, FM2, AM mode) To select the next pr eset station, press “ ” of the switch (4) only for a moment. To select the previous preset station, press “ ” of the switch (4) only for amoment. To scan a higher frequency radio station, press “ ” of the switch (4) for 1 secondor longer. To scan a lower frequency radio station, press “ ” of the switch (4) for 1 secondor longer.
Selecting the track (CD, USB (iPod®), Bluetooth® audio mode) To skip to the next track, press “ ” of the switch (4) only for a moment. To skip to the previous track, press “ ” of the switch (4) twice only for a moment. When the switch (4) is pushed downonce only for a moment, the track cur- rently being played will start from the beginning again.
Fast forwarding/Rewinding a track To fast forward, press “ ” of the switch(4) for 1 second or longer. To fast rewind, press “ ” of the switch (4) for 1 second or longer.
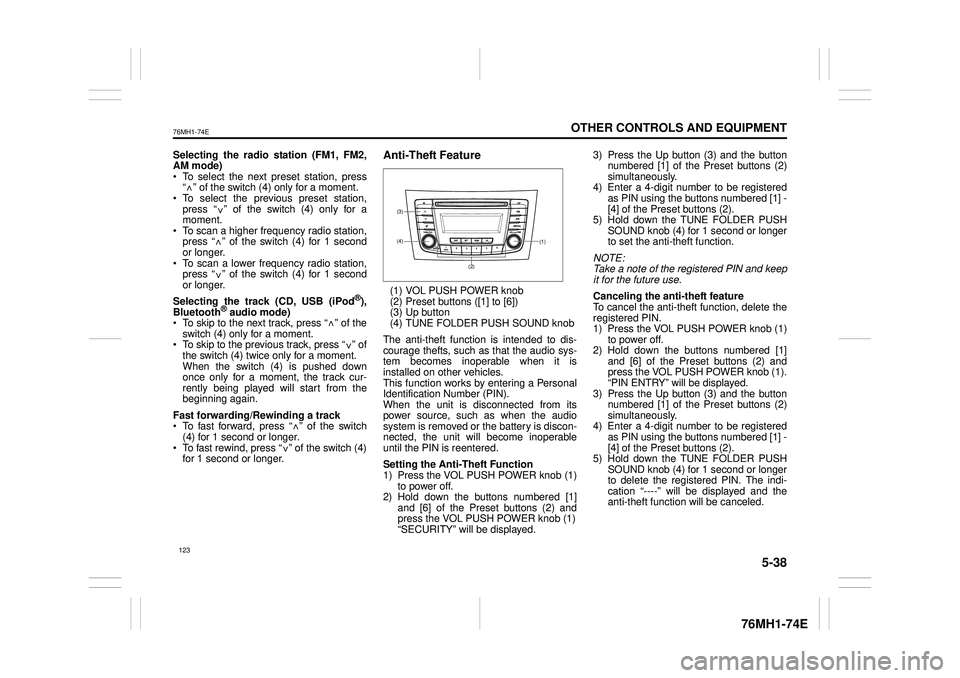
Anti-Theft Feature
(1) VOL PUSH POWER knob(2) Preset buttons ([1] to [6])(3) Up button (4) TUNE FOLDER PUSH SOUND knob
The anti-theft function is intended to dis- courage thefts, such as that the audio sys- tem becomes inoperable when it isinstalled on other vehicles. This function works by entering a Personal Identification Number (PIN).When the unit is disconnected from its power source, such as when the audio system is removed or the battery is discon-nected, the unit will become inoperable until the PIN is reentered.
Setting the Anti-Theft Function 1) Press the VOL PUSH POWER knob (1) to power off.2) Hold down the buttons numbered [1] and [6] of the Preset buttons (2) and press the VOL PUSH POWER knob (1)“SECURITY” will be displayed.
3) Press the Up button (3) and the button numbered [1] of the Preset buttons (2) simultaneously.4) Enter a 4-digit number to be registered as PIN using the buttons numbered [1] - [4] of the Preset buttons (2).5) Hold down the TUNE FOLDER PUSH SOUND knob (4) for 1 second or longer to set the anti-theft function.
NOTE: Take a note of the registered PIN and keepit for the future use.
Canceling the anti -theft feature To cancel the anti-theft function, delete the registered PIN. 1) Press the VOL PUSH POWER knob (1)to power off. 2) Hold down the buttons numbered [1] and [6] of the Preset buttons (2) andpress the VOL PUSH POWER knob (1). “PIN ENTRY” will be displayed. 3) Press the Up button (3) and the buttonnumbered [1] of the Preset buttons (2) simultaneously. 4) Enter a 4-digit number to be registeredas PIN using the buttons numbered [1] - [4] of the Preset buttons (2). 5) Hold down the TUNE FOLDER PUSHSOUND knob (4) for 1 second or longer to delete the registered PIN. The indi- cation “----” will be displayed and theanti-theft function will be canceled.
<
<
<
<
<
<
<
<
(1)(4)
(3)
(2)
123
Page 135 of 201
5-39
OTHER CONTROLS AND EQUIPMENT
76MH1-74E
76MH1-74E
NOTE: To change your PIN, first delete your cur- rent PIN, then set a new one.
Confirming the Personal Identification Number (PIN)When the main power source is discon- nected such as when the battery is replaced, etc, it is required to enter the PINto make the unit operable again. 1) Set the ignition switch to the “ACC” position. “SECURITY” will be displayed. 2) Press the Up button (3) and the button numbered [1] of the Preset buttons (2)simultaneously. 3) Enter a 4-digit number to be registered as PIN using the buttons numbered [1] -[4] of the Preset buttons (2). 4) Hold down TUNE FOLDER PUSH SOUND knob (4) for 1 second or lon-ger. When the PIN same as registered is entered, the power of the audio systemwill be turned off automatically and it will become operable again.
NOTE: If an incorrect PIN is entered, “ERROR” and the total number of incorrect entryattempts will be displayed. If an incorrect PIN is entered 10 times, “HELP” will be displayed and the audiosystem will become inoperable.
Battery Installation
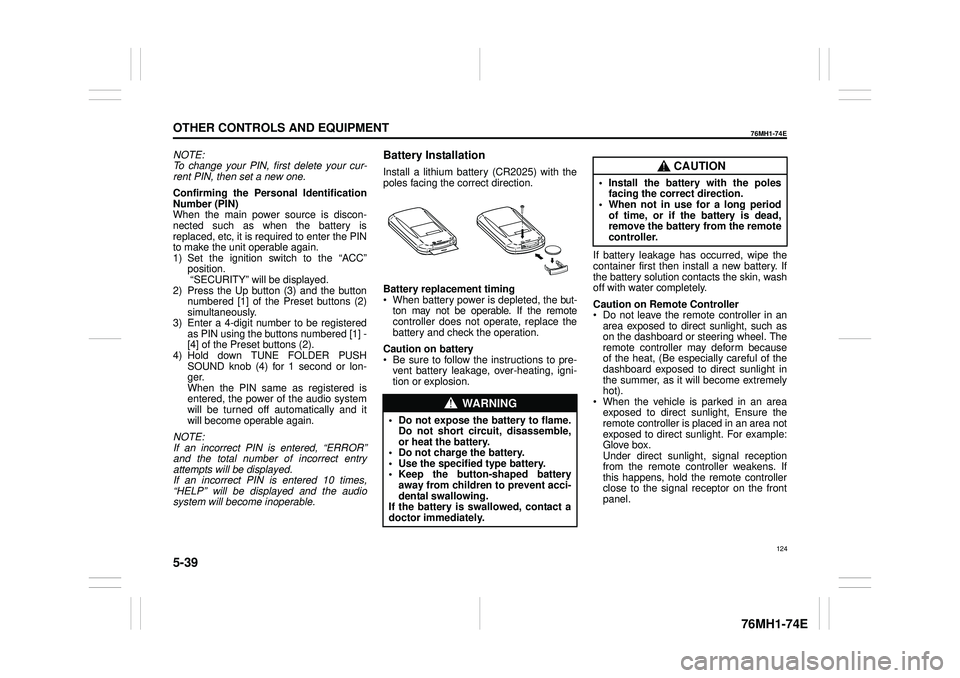
Install a lithium battery (CR2025) with the poles facing the correct direction.
Battery replacement timing When battery power is depleted, the but-ton may not be operable. If the remote controller does not operate, replace the battery and check the operation.
Caution on battery Be sure to follow the instructions to pre- vent battery leakage, over-heating, igni- tion or explosion.
If battery leakage has occurred, wipe the container first then install a new battery. If the battery solution contacts the skin, wash off with water completely.
Caution on Remote Controller Do not leave the remote controller in anarea exposed to direct sunlight, such as on the dashboard or steering wheel. The remote controller may deform becauseof the heat, (Be especially careful of the dashboard exposed to direct sunlight in the summer, as it will become extremelyhot). When the vehicle is parked in an area exposed to direct sunlight, Ensure theremote controller is placed in an area not exposed to direct sunlight. For example: Glove box.Under direct sunlight , signal reception from the remote controller weakens. If this happens, hold the remote controllerclose to the signal receptor on the front panel.
WA R N I N G
• Do not expose the battery to flame. Do not short circuit, disassemble,or heat the battery. • Do not charge the battery. • Use the specified type battery.• Keep the button-shaped battery away from children to prevent acci- dental swallowing.If the battery is swallowed, contact a doctor immediately.
CAUTION
• Install the battery with the poles facing the correct direction.• When not in use for a long period of time, or if the battery is dead, remove the battery from the remotecontroller.
124