air SUZUKI FORENZA 2007 Owners Manual
[x] Cancel search | Manufacturer: SUZUKI, Model Year: 2007, Model line: FORENZA, Model: SUZUKI FORENZA 2007Pages: 225, PDF Size: 4.39 MB
Page 5 of 225
85Z03-03E
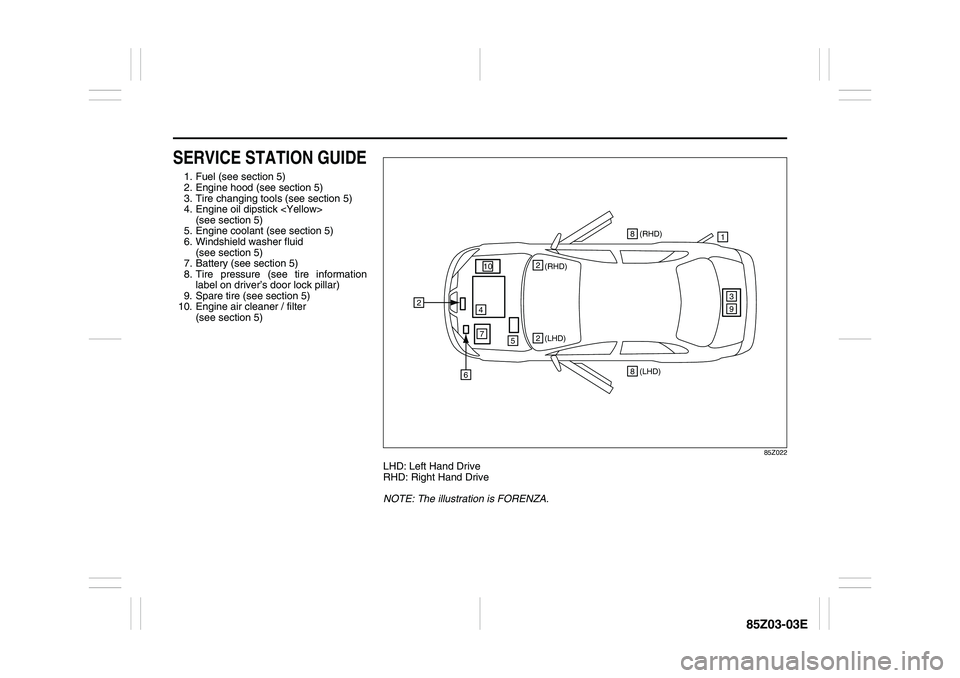
SERVICE STATION GUIDE1. Fuel (see section 5)
2. Engine hood (see section 5)
3. Tire changing tools (see section 5)
4. Engine oil dipstick
(see section 5)
5. Engine coolant (see section 5)
6. Windshield washer fluid
(see section 5)
7. Battery (see section 5)
8. Tire pressure (see tire information
label on driver’s door lock pillar)
9. Spare tire (see section 5)
10. Engine air cleaner / filter
(see section 5)
85Z022
LHD: Left Hand Drive
RHD: Right Hand Drive
NOTE: The illustration is FORENZA.
(LHD) (RHD)1
2
22
39
4
5
6
7
(LHD) 8(RHD) 8
10
Page 7 of 225
85Z03-03E
LOCATION OF WARNING
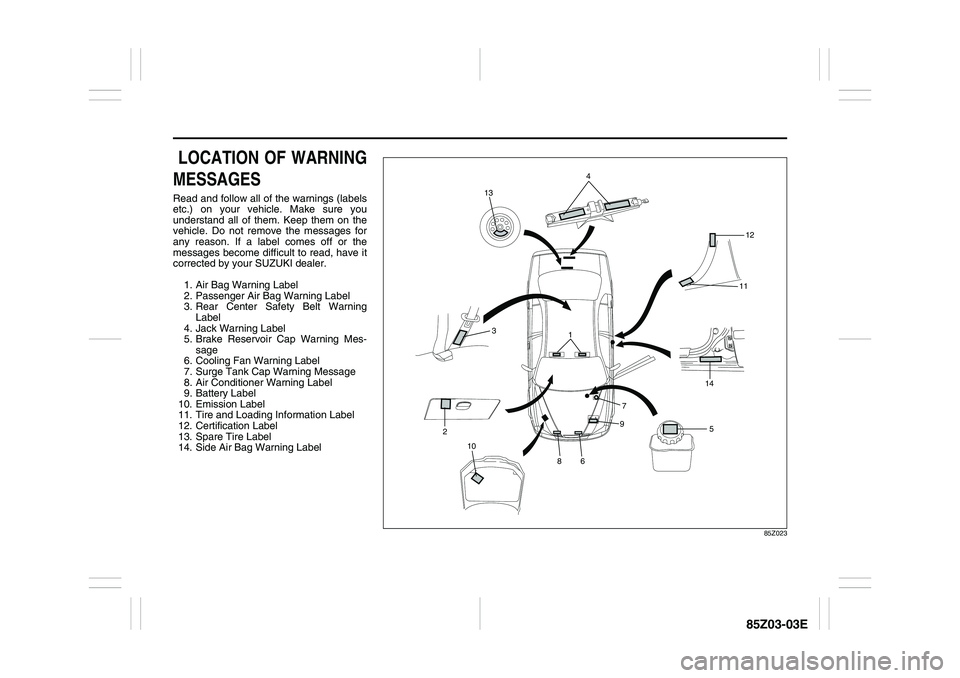
MESSAGESRead and follow all of the warnings (labels
etc.) on your vehicle. Make sure you
understand all of them. Keep them on the
vehicle. Do not remove the messages for
any reason. If a label comes off or the
messages become difficult to read, have it
corrected by your SUZUKI dealer.
1. Air Bag Warning Label
2. Passenger Air Bag Warning Label
3. Rear Center Safety Belt Warning
Label
4. Jack Warning Label
5. Brake Reservoir Cap Warning Mes-
sage
6. Cooling Fan Warning Label
7. Surge Tank Cap Warning Message
8. Air Conditioner Warning Label
9. Battery Label
10. Emission Label
11. Tire and Loading Information Label
12. Certification Label
13. Spare Tire Label
14. Side Air Bag Warning Label
85Z023
1
9
6
13
7
4
5
2
10
8
3
1112
14
Page 10 of 225
0-3
85Z03-03E
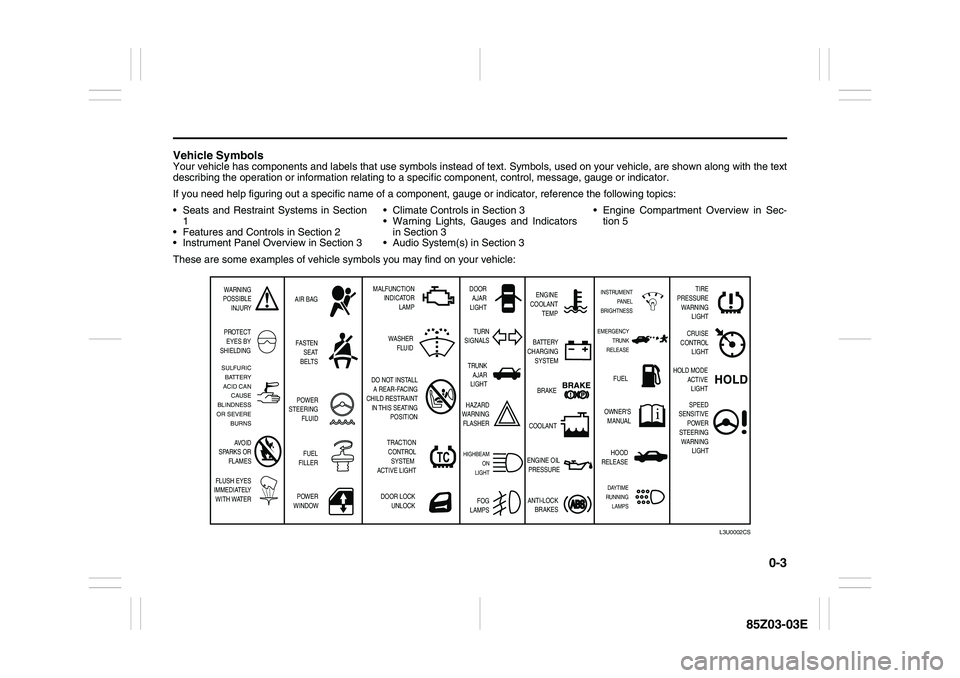
Vehicle SymbolsYour vehicle has components and labels that use symbols instead of text. Symbols, used on your vehicle, are shown along with the text
describing the operation or information relating to a specific component, control, message, gauge or indicator.
If you need help figuring out a specific name of a component, gauge or indicator, reference the following topics:
Seats and Restraint Systems in Section
1
Features and Controls in Section 2
Instrument Panel Overview in Section 3 Climate Controls in Section 3
Warning Lights, Gauges and Indicators
in Section 3
Audio System(s) in Section 3 Engine Compartment Overview in Sec-
tion 5
These are some examples of vehicle symbols you may find on your vehicle:
WARNING
POSSIBLE
INJURY
PROTECT
EYES BY
SHIELDINGFASTEN
SEAT
BELTS
POWER
WINDOWDOOR LOCK
UNLOCK DO NOT INSTALL
A REAR-FACING
CHILD RESTRAINT
IN THIS SEATING
POSITION AIR BAGMALFUNCTION
INDICATOR
LAMPENGINE
COOLANT
TEMP
FUEL
OWNER'S
MANUAL BATTERY
CHARGING
SYSTEM
BRAKE
COOLANT
ENGINE OIL
PRESSURE
ANTI-LOCK
BRAKES TURN
SIGNALS
HAZARD
WARNING
FLASHER
HIGHBEAM
ON
LIGHT
FOG
LAMPS
SULFURIC
BATTERY
ACID CAN
CAUSE
BLINDNESS
OR SEVERE
BURNS
AVOID
SPARKS OR
FLAMES
FLUSH EYES
IMMEDIATELY
WITH WATER
L3U0002CS
DOOR
AJAR
LIGHT
POWER
STEERING
FLUID
FUEL
FILLER
EMERGENCY
TRUNK
RELEASEINSTRUMENT
PANEL
BRIGHTNESS
TRUNK
AJAR
LIGHT
HOOD
RELEASEDAYTIME
RUNNING
LAMPS
TRACTION
CONTROL
SYSTEM
ACTIVE LIGHTWASHER
FLUID
TIRE
PRESSURE
WARNING
LIGHT
CRUISE
CONTROL
LIGHT
HOLD MODE
ACTIVE
LIGHT
SPEED
SENSITIVE
POWER
STEERING
WARNING
LIGHT
Page 12 of 225
SEATS AND RESTRAINT SYSTEMS
1
85Z03-03E
SEATS AND RESTRAINT SYSTEMSFront Seats .......................................................................... 1-1
Rear Seats ............................................................................ 1-4
Safety Belts .......................................................................... 1-5
Child Restraints ................................................................... 1-16
Supplemental Restraint System (air bags) ....................... 1-27
Restraint System Check ..................................................... 1-34
Page 15 of 225
1-3 SEATS AND RESTRAINT SYSTEMS
85Z03-03E
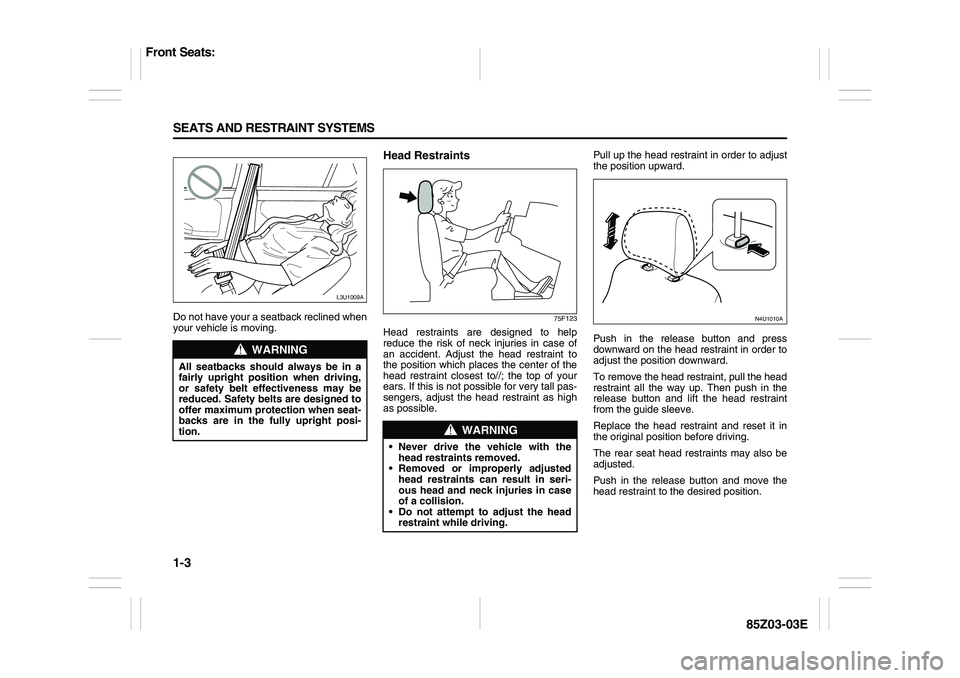
Do not have your a seatback reclined when
your vehicle is moving.
Head Restraints
75F123
Head restraints are designed to help
reduce the risk of neck injuries in case of
an accident. Adjust the head restraint to
the position which places the center of the
head restraint closest to//; the top of your
ears. If this is not possible for very tall pas-
sengers, adjust the head restraint as high
as possible.Pull up the head restraint in order to adjust
the position upward.
Push in the release button and press
downward on the head restraint in order to
adjust the position downward.
To remove the head restraint, pull the head
restraint all the way up. Then push in the
release button and lift the head restraint
from the guide sleeve.
Replace the head restraint and reset it in
the original position before driving.
The rear seat head restraints may also be
adjusted.
Push in the release button and move the
head restraint to the desired position.
WARNING
All seatbacks should always be in a
fairly upright position when driving,
or safety belt effectiveness may be
reduced. Safety belts are designed to
offer maximum protection when seat-
backs are in the fully upright posi-
tion.
L3U1009A
WARNING
Never drive the vehicle with the
head restraints removed.
Removed or improperly adjusted
head restraints can result in seri-
ous head and neck injuries in case
of a collision.
Do not attempt to adjust the head
restraint while driving.
N4U1010A
Front Seats:
Page 19 of 225
1-7 SEATS AND RESTRAINT SYSTEMS
85Z03-03E
strongest bones take the forces. That’s
why safety belts make such good sense.Questions and Answers About
Safety BeltsQuestion: Won’t I be trapped in the
vehicle after an accident if I’m wearing a
safety belt?
Answer: You could be – whether you’re
wearing a safety belt or not. But you can
unbuckle a safety belt, even if you’re
upside down. And your chance of being
conscious during and after an accident, so
you can unbuckle and get out, is much
greater if you are belted.
Question: If my vehicle has air bags,
why should I have to wear safety belts?
Answer: Air bags are in many vehicles
today and will be in most of them in the
future. But they are supplemental systems
only; so they work with safety belts – not
instead of them. Every air bag system ever
offered for sale has required the use of
safety belts. Even if you’re in a vehicle that
has air bags, you still have to buckle up to
get the most protection. That’s true not
only in frontal collisions, but especially in
side and other collisions.Question: If I’m a good driver, and I
never drive far from home, why should I
wear safety belts?
Answer: You may be an excellent driver,
but if you’re in an accident – even one that
isn’t your fault – you and your passengers
can be hurt. Being a good driver doesn’t
protect you from things beyond your con-
trol, such as bad drivers.
Most accidents occur within 25 miles (40
km) of home. And the greatest number of
serious injuries and deaths occur at
speeds of less than 40 mph (65 km/h).
Safety belts are for everyone.
How to Wear Safety Belts ProperlyThis section is only for people of adult size.
Be aware that there are special things to
know about safety belts and children. And
there are different rules for smaller children
and babies. If a child will be riding in your
vehicle, see “Older Children” or “Infants
and Young Children” in this section. Follow
those rules for everyone’s protection.
First, you’ll want to know which restraint
systems your vehicle has.
We’ll start with the driver position.Driver PositionThis section describes the driver’s restraint
system.Lap-Shoulder Belt
The driver has a lap-shoulder belt. Here’s
how to wear it properly.
1) Close and lock the door.
2) Adjust the seat so you can sit up
straight. To see how, see “Seats” in the
Index.
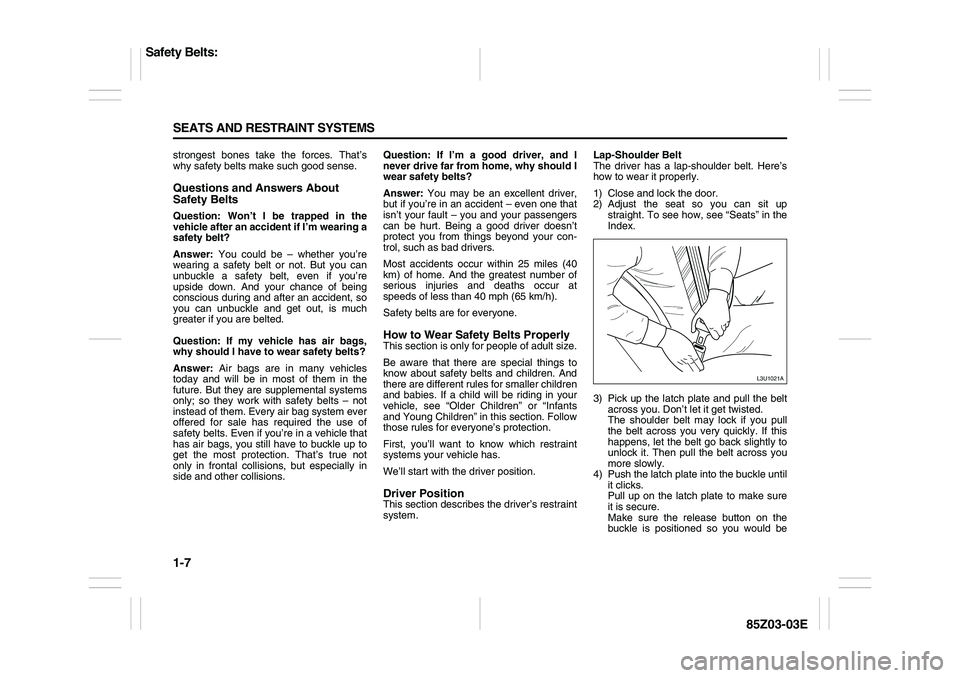
3) Pick up the latch plate and pull the belt
across you. Don’t let it get twisted.
The shoulder belt may lock if you pull
the belt across you very quickly. If this
happens, let the belt go back slightly to
unlock it. Then pull the belt across you
more slowly.
4) Push the latch plate into the buckle until
it clicks.
Pull up on the latch plate to make sure
it is secure.
Make sure the release button on the
buckle is positioned so you would be
L3U1021A
Safety Belts:
Page 26 of 225
1-14 SEATS AND RESTRAINT SYSTEMS
85Z03-03E
85Z018
Safety Belt Pretensioner System
52D011
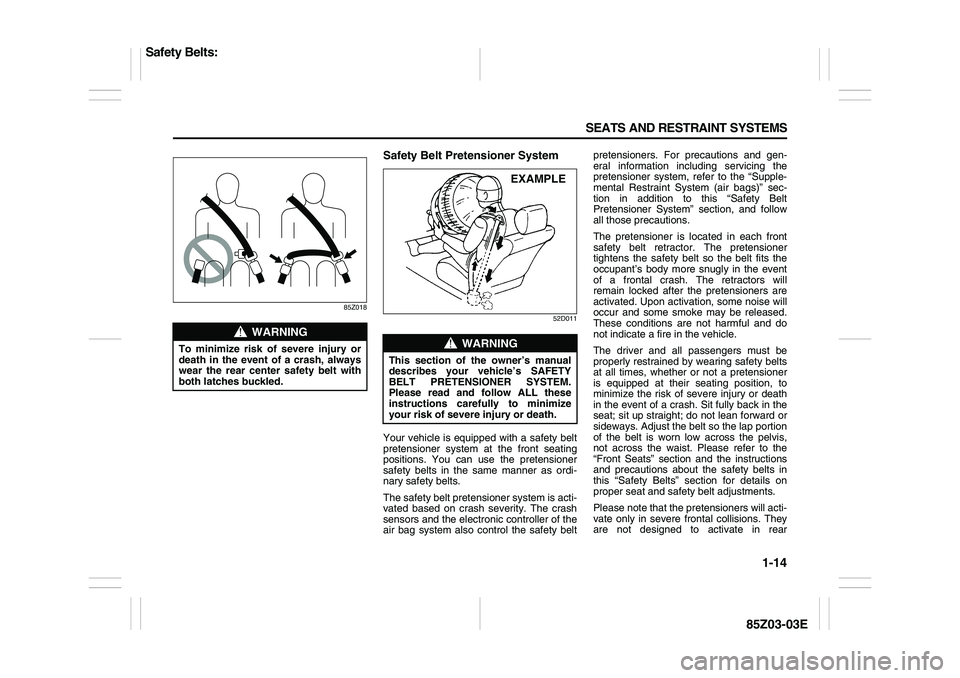
Your vehicle is equipped with a safety belt
pretensioner system at the front seating
positions. You can use the pretensioner
safety belts in the same manner as ordi-
nary safety belts.
The safety belt pretensioner system is acti-
vated based on crash severity. The crash
sensors and the electronic controller of the
air bag system also control the safety beltpretensioners. For precautions and gen-
eral information including servicing the
pretensioner system, refer to the “Supple-
mental Restraint System (air bags)” sec-
tion in addition to this “Safety Belt
Pretensioner System” section, and follow
all those precautions.
The pretensioner is located in each front
safety belt retractor. The pretensioner
tightens the safety belt so the belt fits the
occupant’s body more snugly in the event
of a frontal crash. The retractors will
remain locked after the pretensioners are
activated. Upon activation, some noise will
occur and some smoke may be released.
These conditions are not harmful and do
not indicate a fire in the vehicle.
The driver and all passengers must be
properly restrained by wearing safety belts
at all times, whether or not a pretensioner
is equipped at their seating position, to
minimize the risk of severe injury or death
in the event of a crash. Sit fully back in the
seat; sit up straight; do not lean forward or
sideways. Adjust the belt so the lap portion
of the belt is worn low across the pelvis,
not across the waist. Please refer to the
“Front Seats” section and the instructions
and precautions about the safety belts in
this “Safety Belts” section for details on
proper seat and safety belt adjustments.
Please note that the pretensioners will acti-
vate only in severe frontal collisions. They
are not designed to activate in rear
WARNING
To minimize risk of severe injury or
death in the event of a crash, always
wear the rear center safety belt with
both latches buckled.
WARNING
This section of the owner’s manual
describes your vehicle’s SAFETY
BELT PRETENSIONER SYSTEM.
Please read and follow ALL these
instructions carefully to minimize
your risk of severe injury or death.
EXAMPLE
Safety Belts:
Page 27 of 225
1-15 SEATS AND RESTRAINT SYSTEMS
85Z03-03E
impacts, side impacts, rollovers or minor
frontal collisions. The pretensioners can be
activated only once. If the pretensioners
are activated, have the pretensioner sys-
tem serviced by an authorized SUZUKI
dealer as soon as possible.
If the air bag readiness light on the instru-
ment cluster does not blink or come on
briefly when the ignition switch is turned to
the “ON” position, stays on for more than
10 seconds, or comes on while driving, the
pretensioner system or the air bag system
may not work properly. Have both systems
inspected by an authorized SUZUKI dealer
as soon as possible.
Service on or around the pretensioner sys-
tem components or wiring must be per-
formed only by an authorized SUZUKI
dealer who is specially trained. Improper
service could result in unintended activa-
tion of pretensioners or could render the
pretensioners inoperative. Either of these
two conditions may result in personal
injury.
To prevent damage or unintended activa-
tion of the pretensioners, be sure the bat-
tery is disconnected and the ignition switch
has been in the “LOCK” position for at least
60 seconds before performing any electri-
cal service work on your SUZUKI. Do not
touch pretensioner system components or
wiring. The wires are wrapped with yellow
tape or yellow tubing, and the couplers are
yellow. When scrapping your SUZUKI, askyour SUZUKI dealer, body repair shop or
scrap yard for assistance.
Safety Belt Extender
65D613
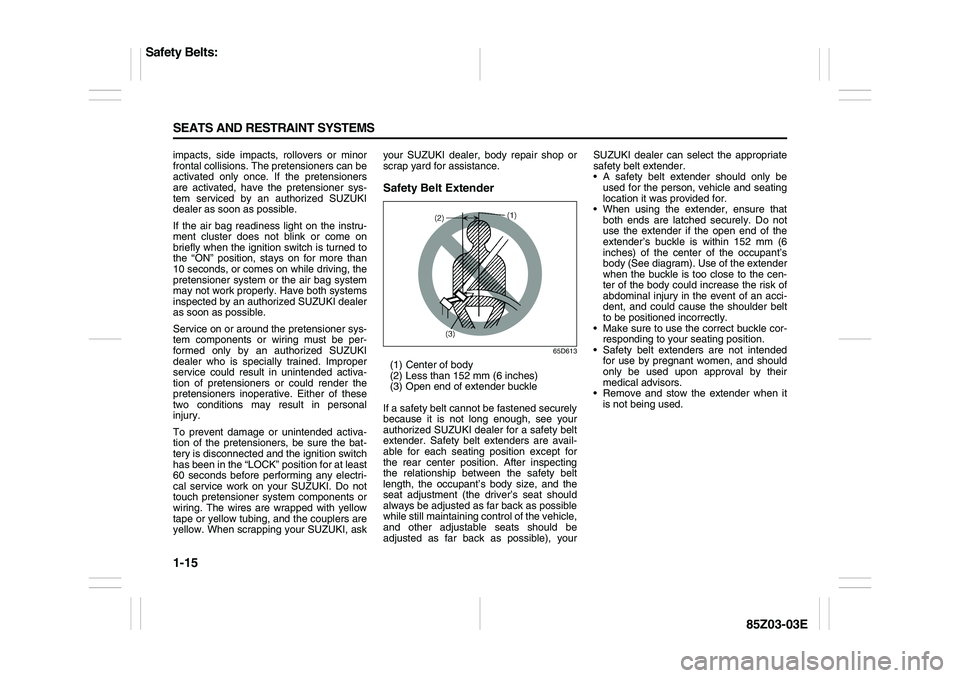
(1) Center of body
(2) Less than 152 mm (6 inches)
(3) Open end of extender buckle
If a safety belt cannot be fastened securely
because it is not long enough, see your
authorized SUZUKI dealer for a safety belt
extender. Safety belt extenders are avail-
able for each seating position except for
the rear center position. After inspecting
the relationship between the safety belt
length, the occupant’s body size, and the
seat adjustment (the driver’s seat should
always be adjusted as far back as possible
while still maintaining control of the vehicle,
and other adjustable seats should be
adjusted as far back as possible), yourSUZUKI dealer can select the appropriate
safety belt extender.
A safety belt extender should only be
used for the person, vehicle and seating
location it was provided for.
When using the extender, ensure that
both ends are latched securely. Do not
use the extender if the open end of the
extender’s buckle is within 152 mm (6
inches) of the center of the occupant’s
body (See diagram). Use of the extender
when the buckle is too close to the cen-
ter of the body could increase the risk of
abdominal injury in the event of an acci-
dent, and could cause the shoulder belt
to be positioned incorrectly.
Make sure to use the correct buckle cor-
responding to your seating position.
Safety belt extenders are not intended
for use by pregnant women, and should
only be used upon approval by their
medical advisors.
Remove and stow the extender when it
is not being used.
Safety Belts:
Page 30 of 225
1-18 SEATS AND RESTRAINT SYSTEMS
85Z03-03E
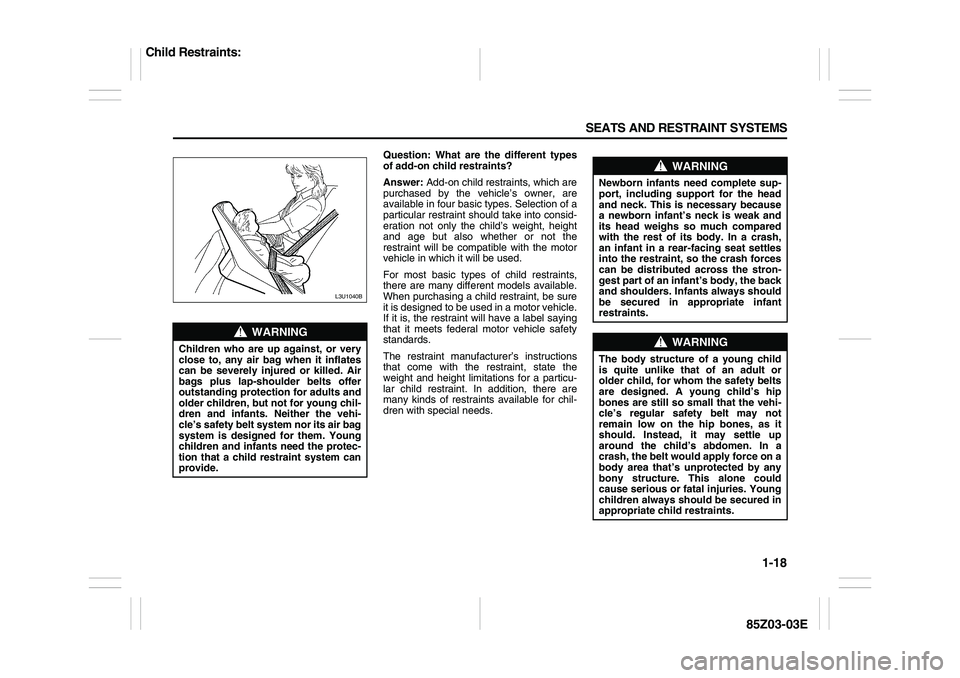
Question: What are the different types
of add-on child restraints?
Answer: Add-on child restraints, which are
purchased by the vehicle’s owner, are
available in four basic types. Selection of a
particular restraint should take into consid-
eration not only the child’s weight, height
and age but also whether or not the
restraint will be compatible with the motor
vehicle in which it will be used.
For most basic types of child restraints,
there are many different models available.
When purchasing a child restraint, be sure
it is designed to be used in a motor vehicle.
If it is, the restraint will have a label saying
that it meets federal motor vehicle safety
standards.
The restraint manufacturer’s instructions
that come with the restraint, state the
weight and height limitations for a particu-
lar child restraint. In addition, there are
many kinds of restraints available for chil-
dren with special needs.
WARNING
Children who are up against, or very
close to, any air bag when it inflates
can be severely injured or killed. Air
bags plus lap-shoulder belts offer
outstanding protection for adults and
older children, but not for young chil-
dren and infants. Neither the vehi-
cle’s safety belt system nor its air bag
system is designed for them. Young
children and infants need the protec-
tion that a child restraint system can
provide.
L3U1040B
WARNING
Newborn infants need complete sup-
port, including support for the head
and neck. This is necessary because
a newborn infant’s neck is weak and
its head weighs so much compared
with the rest of its body. In a crash,
an infant in a rear-facing seat settles
into the restraint, so the crash forces
can be distributed across the stron-
gest part of an infant’s body, the back
and shoulders. Infants always should
be secured in appropriate infant
restraints.
WARNING
The body structure of a young child
is quite unlike that of an adult or
older child, for whom the safety belts
are designed. A young child’s hip
bones are still so small that the vehi-
cle’s regular safety belt may not
remain low on the hip bones, as it
should. Instead, it may settle up
around the child’s abdomen. In a
crash, the belt would apply force on a
body area that’s unprotected by any
bony structure. This alone could
cause serious or fatal injuries. Young
children always should be secured in
appropriate child restraints.
Child Restraints:
Page 32 of 225
1-20 SEATS AND RESTRAINT SYSTEMS
85Z03-03E
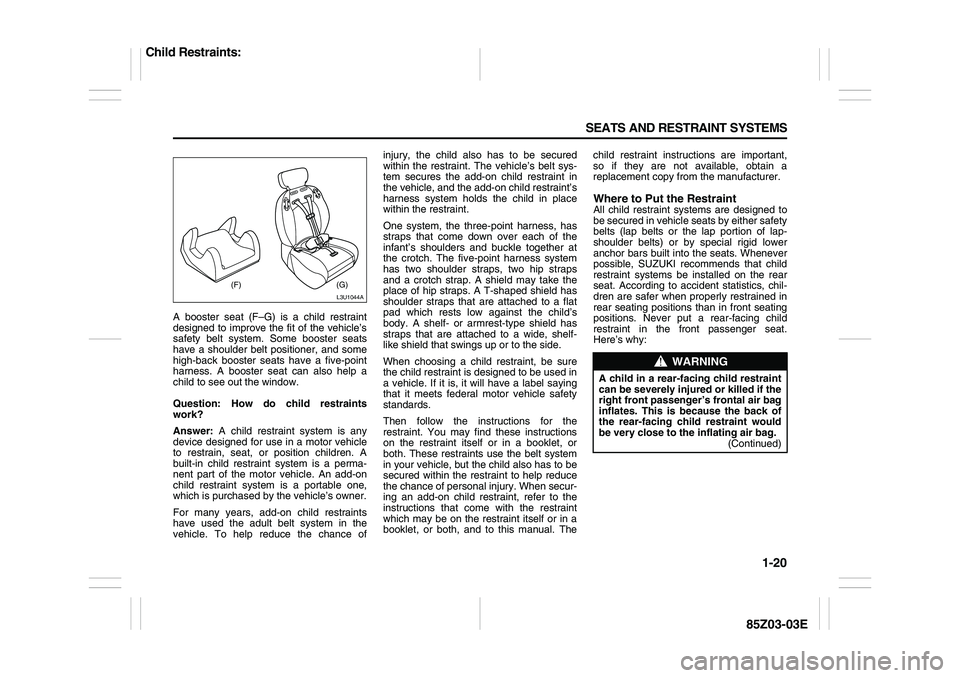
A booster seat (F–G) is a child restraint
designed to improve the fit of the vehicle’s
safety belt system. Some booster seats
have a shoulder belt positioner, and some
high-back booster seats have a five-point
harness. A booster seat can also help a
child to see out the window.
Question: How do child restraints
work?
Answer: A child restraint system is any
device designed for use in a motor vehicle
to restrain, seat, or position children. A
built-in child restraint system is a perma-
nent part of the motor vehicle. An add-on
child restraint system is a portable one,
which is purchased by the vehicle’s owner.
For many years, add-on child restraints
have used the adult belt system in the
vehicle. To help reduce the chance ofinjury, the child also has to be secured
within the restraint. The vehicle’s belt sys-
tem secures the add-on child restraint in
the vehicle, and the add-on child restraint’s
harness system holds the child in place
within the restraint.
One system, the three-point harness, has
straps that come down over each of the
infant’s shoulders and buckle together at
the crotch. The five-point harness system
has two shoulder straps, two hip straps
and a crotch strap. A shield may take the
place of hip straps. A T-shaped shield has
shoulder straps that are attached to a flat
pad which rests low against the child’s
body. A shelf- or armrest-type shield has
straps that are attached to a wide, shelf-
like shield that swings up or to the side.
When choosing a child restraint, be sure
the child restraint is designed to be used in
a vehicle. If it is, it will have a label saying
that it meets federal motor vehicle safety
standards.
Then follow the instructions for the
restraint. You may find these instructions
on the restraint itself or in a booklet, or
both. These restraints use the belt system
in your vehicle, but the child also has to be
secured within the restraint to help reduce
the chance of personal injury. When secur-
ing an add-on child restraint, refer to the
instructions that come with the restraint
which may be on the restraint itself or in a
booklet, or both, and to this manual. Thechild restraint instructions are important,
so if they are not available, obtain a
replacement copy from the manufacturer.
Where to Put the RestraintAll child restraint systems are designed to
be secured in vehicle seats by either safety
belts (lap belts or the lap portion of lap-
shoulder belts) or by special rigid lower
anchor bars built into the seats. Whenever
possible, SUZUKI recommends that child
restraint systems be installed on the rear
seat. According to accident statistics, chil-
dren are safer when properly restrained in
rear seating positions than in front seating
positions. Never put a rear-facing child
restraint in the front passenger seat.
Here’s why:
(F) (G)
L3U1044A
WARNING
A child in a rear-facing child restraint
can be severely injured or killed if the
right front passenger’s frontal air bag
inflates. This is because the back of
the rear-facing child restraint would
be very close to the inflating air bag.
(Continued)
Child Restraints: