roof SUZUKI FORENZA 2007 Owners Manual
[x] Cancel search | Manufacturer: SUZUKI, Model Year: 2007, Model line: FORENZA, Model: SUZUKI FORENZA 2007Pages: 225, PDF Size: 4.39 MB
Page 34 of 225
1-22 SEATS AND RESTRAINT SYSTEMS
85Z03-03E
Once you have the top strap anchored,
you’ll be ready to secure the child restraint
itself. Tighten the top strap when and as
the child restraint manufacturer’s instruc-
tions say.Top Strap Anchor LocationTop strap anchors are already installed in
your vehicle for the three rear seating posi-
tions.
Do not use a child restraint with a top strap
in the right front passenger’s position
because there is no place to anchor the
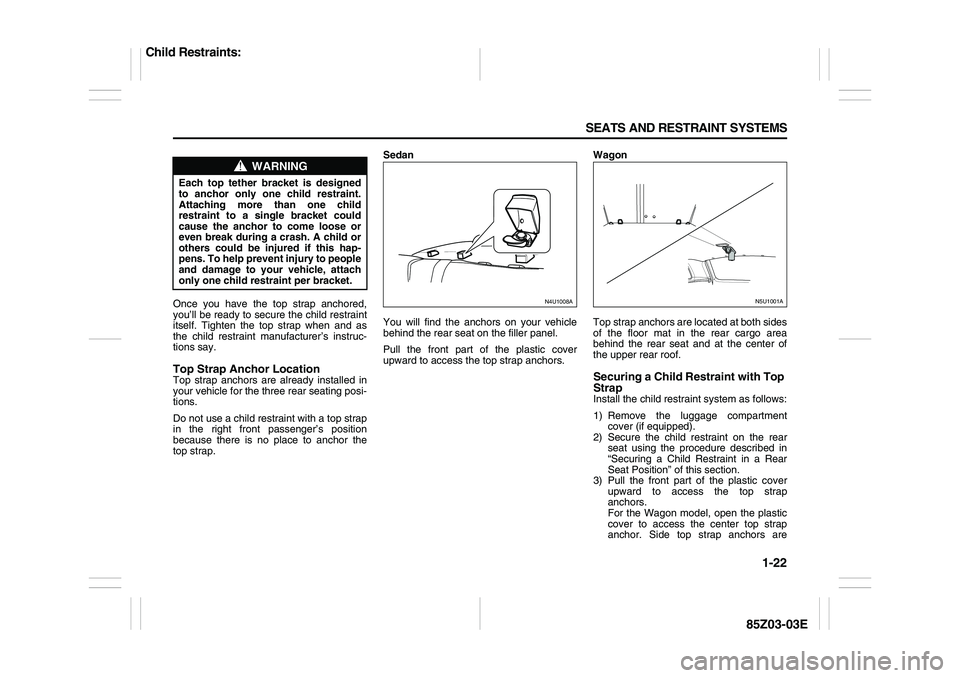
top strap.Sedan
You will find the anchors on your vehicle
behind the rear seat on the filler panel.
Pull the front part of the plastic cover
upward to access the top strap anchors.Wagon
Top strap anchors are located at both sides
of the floor mat in the rear cargo area
behind the rear seat and at the center of
the upper rear roof.
Securing a Child Restraint with Top
StrapInstall the child restraint system as follows:
1) Remove the luggage compartment
cover (if equipped).
2) Secure the child restraint on the rear
seat using the procedure described in
“Securing a Child Restraint in a Rear
Seat Position” of this section.
3) Pull the front part of the plastic cover
upward to access the top strap
anchors.
For the Wagon model, open the plastic
cover to access the center top strap
anchor. Side top strap anchors are
WARNING
Each top tether bracket is designed
to anchor only one child restraint.
Attaching more than one child
restraint to a single bracket could
cause the anchor to come loose or
even break during a crash. A child or
others could be injured if this hap-
pens. To help prevent injury to people
and damage to your vehicle, attach
only one child restraint per bracket.
N4U1008A
N5U1001A
Child Restraints:
Page 48 of 225
FEATURES AND CONTROLS
2
85Z03-03E
FEATURES AND CONTROLSKeys ...................................................................................... 2-1
Doors and Locks ................................................................. 2-4
Windows .............................................................................. 2-8
Theft-Deterrent Systems .................................................... 2-10
Daily Inspection Checklist .................................................. 2-11
Starting and Operating Your Vehicle ................................ 2-12
Mirrors .................................................................................. 2-21
Storage Areas ...................................................................... 2-22
Sunroof ................................................................................ 2-26
Page 73 of 225
2-25 FEATURES AND CONTROLS
85Z03-03E
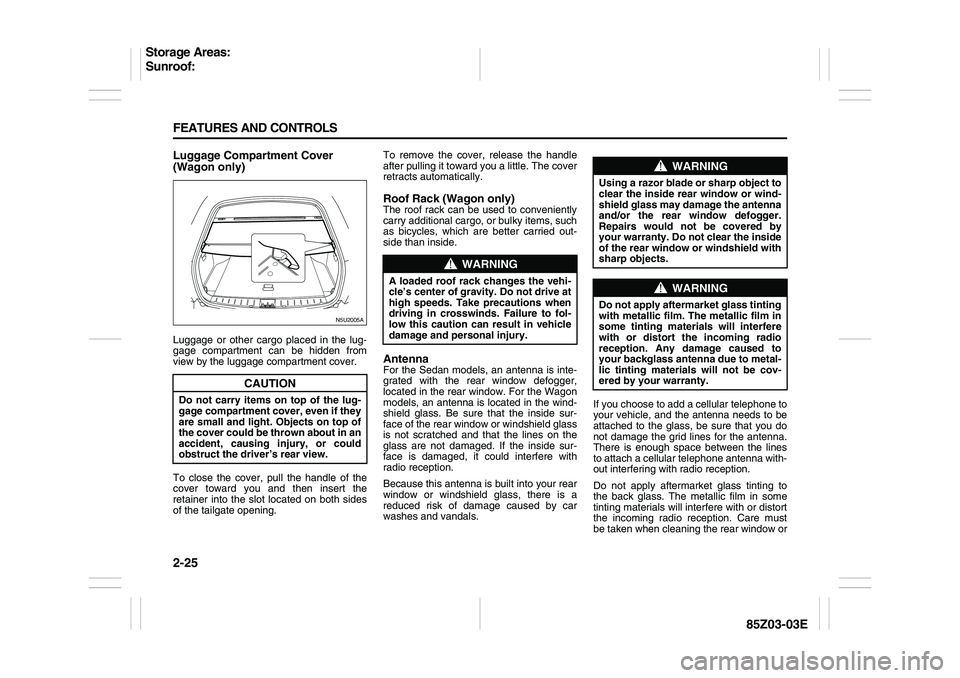
Luggage Compartment Cover
(Wagon only)Luggage or other cargo placed in the lug-
gage compartment can be hidden from
view by the luggage compartment cover.
To close the cover, pull the handle of the
cover toward you and then insert the
retainer into the slot located on both sides
of the tailgate opening.To remove the cover, release the handle
after pulling it toward you a little. The cover
retracts automatically.
Roof Rack (Wagon only)The roof rack can be used to conveniently
carry additional cargo, or bulky items, such
as bicycles, which are better carried out-
side than inside.AntennaFor the Sedan models, an antenna is inte-
grated with the rear window defogger,
located in the rear window. For the Wagon
models, an antenna is located in the wind-
shield glass. Be sure that the inside sur-
face of the rear window or windshield glass
is not scratched and that the lines on the
glass are not damaged. If the inside sur-
face is damaged, it could interfere with
radio reception.
Because this antenna is built into your rear
window or windshield glass, there is a
reduced risk of damage caused by car
washes and vandals.If you choose to add a cellular telephone to
your vehicle, and the antenna needs to be
attached to the glass, be sure that you do
not damage the grid lines for the antenna.
There is enough space between the lines
to attach a cellular telephone antenna with-
out interfering with radio reception.
Do not apply aftermarket glass tinting to
the back glass. The metallic film in some
tinting materials will interfere with or distort
the incoming radio reception. Care must
be taken when cleaning the rear window or
CAUTION
Do not carry items on top of the lug-
gage compartment cover, even if they
are small and light. Objects on top of
the cover could be thrown about in an
accident, causing injury, or could
obstruct the driver’s rear view.
N5U2005A
WARNING
A loaded roof rack changes the vehi-
cle’s center of gravity. Do not drive at
high speeds. Take precautions when
driving in crosswinds. Failure to fol-
low this caution can result in vehicle
damage and personal injury.
WARNING
Using a razor blade or sharp object to
clear the inside rear window or wind-
shield glass may damage the antenna
and/or the rear window defogger.
Repairs would not be covered by
your warranty. Do not clear the inside
of the rear window or windshield with
sharp objects.
WARNING
Do not apply aftermarket glass tinting
with metallic film. The metallic film in
some tinting materials will interfere
with or distort the incoming radio
reception. Any damage caused to
your backglass antenna due to metal-
lic tinting materials will not be cov-
ered by your warranty.
Storage Areas:
Sunroof:
Page 74 of 225
2-26 FEATURES AND CONTROLS
85Z03-03E
windshield glass to avoid causing breaks in
the resistive material heating element
which can adversely affect radio and
defogger performance. See your SUZUKI
dealer for details.
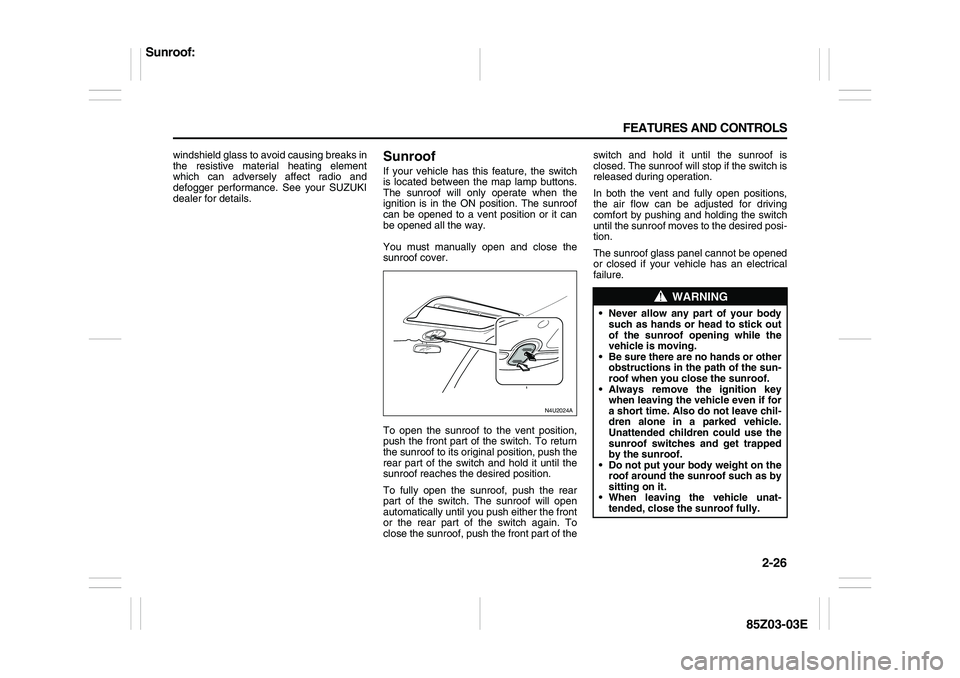
SunroofIf your vehicle has this feature, the switch
is located between the map lamp buttons.
The sunroof will only operate when the
ignition is in the ON position. The sunroof
can be opened to a vent position or it can
be opened all the way.
You must manually open and close the
sunroof cover.
To open the sunroof to the vent position,
push the front part of the switch. To return
the sunroof to its original position, push the
rear part of the switch and hold it until the
sunroof reaches the desired position.
To fully open the sunroof, push the rear
part of the switch. The sunroof will open
automatically until you push either the front
or the rear part of the switch again. To
close the sunroof, push the front part of theswitch and hold it until the sunroof is
closed. The sunroof will stop if the switch is
released during operation.
In both the vent and fully open positions,
the air flow can be adjusted for driving
comfort by pushing and holding the switch
until the sunroof moves to the desired posi-
tion.
The sunroof glass panel cannot be opened
or closed if your vehicle has an electrical
failure.
N4U2024A
WARNING
Never allow any part of your body
such as hands or head to stick out
of the sunroof opening while the
vehicle is moving.
Be sure there are no hands or other
obstructions in the path of the sun-
roof when you close the sunroof.
Always remove the ignition key
when leaving the vehicle even if for
a short time. Also do not leave chil-
dren alone in a parked vehicle.
Unattended children could use the
sunroof switches and get trapped
by the sunroof.
Do not put your body weight on the
roof around the sunroof such as by
sitting on it.
When leaving the vehicle unat-
tended, close the sunroof fully.
Sunroof:
Page 176 of 225
5-32 SERVICE AND APPEARANCE CARE
85Z03-03E
mounted on a vehicle. The side of the tire
that contains a whitewall, bears white let-
tering or bears manufacturer, brand and or
model name molding that is higher or
deeper than the same moldings on the
other sidewall of the tire.
Passenger (P-Metric) Tire:
A tire used on passenger cars and some
light duty trucks and multipurpose vehicles.
Production Options Weight:
The combined weight of those installed
regular production options weighing over
2.3 kilograms in excess of those standard
items which they replace, not previously
considered in curb weight or accessory
weight, including heavy duty brakes, ride
levelers, roof rack, heavy duty battery, and
special trim.
Recommended Inflation Pressure:
Vehicle manufacturer’s recommended tire
inflation pressure shown on the tire plac-
ard.
Radial Ply Tire:
A pneumatic tire in which the ply cords that
extend to the beads are laid at 90 degrees
to the centerline of the tread.
Rim:
A metal support for a tire and upon which
the tire beads are seated.
Sidewall:
The portion of a tire between the tread and
the bead.Speed Rating:
An alphanumeric code assigned to a tire
indicating the maximum speed at which a
tire can operate.
Traction:
The friction between the tire and the road
surface. The amount of grip provided.
Tread:
The portion of a tire that comes into con-
tact with the road.
Tread wear Indicators:
Narrow bands, sometimes called “wear
bars,” that show across the tread of a tire
when only 2/32 inch of tread remains.
UTQGS:
Uniform Tire Quality Grading Standards, a
tire information system that provides con-
sumers with ratings for a tire’s traction,
temperature and tread wear. Ratings are
determined by tire manufacturers using
government testing procedures. The rat-
ings are molded into the sidewall of the
tire.
Vehicle Capacity Weight:
The number of designated seating posi-
tions multiplied by 150 lbs (68 kg) plus the
rated cargo load.
Vehicle Maximum Load on the Tire:
The load on an individual tire that is deter-
mined by distributing to each axle its share
of the maximum loaded vehicle weight and
dividing by two.Vehicle Normal Load on the Tire:
The load on an individual tire that is deter-
mined by distributing to each axle its share
of the curb weight, accessory weight, and
normal occupant weight (distributed in
accordance with Table 1 shown below) and
dividing by 2.
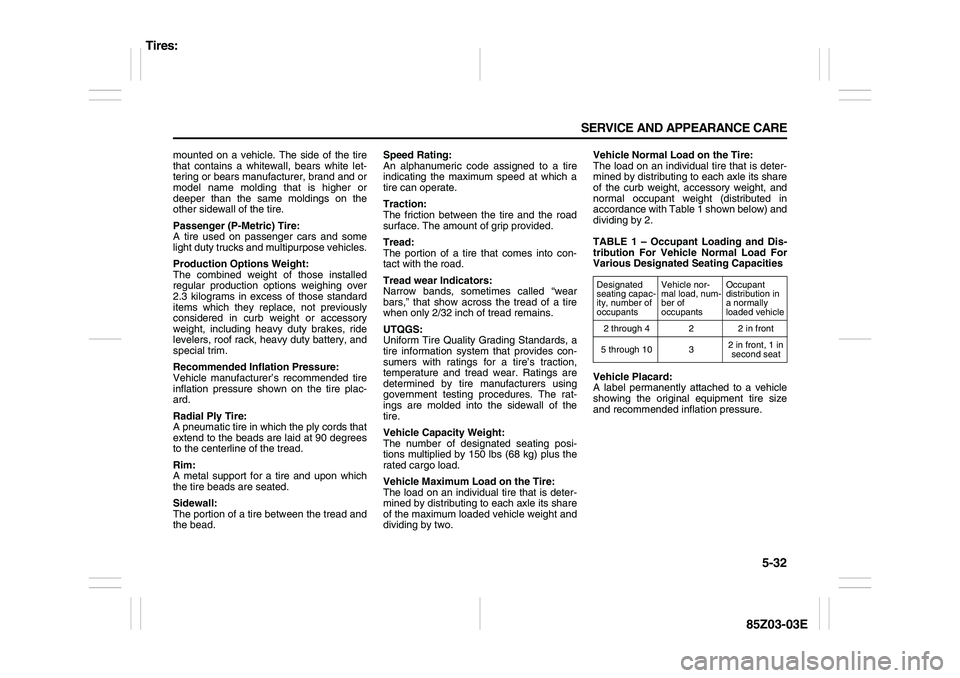
TABLE 1 – Occupant Loading and Dis-
tribution For Vehicle Normal Load For
Various Designated Seating Capacities
Vehicle Placard:
A label permanently attached to a vehicle
showing the original equipment tire size
and recommended inflation pressure.
Designated
seating capac-
ity, number of
occupantsVehicle nor-
mal load, num-
ber of
occupantsOccupant
distribution in
a normally
loaded vehicle
2 through 4 2 2 in front
5 through 10 32 in front, 1 in
second seat
Tires:
Page 194 of 225
5-50 SERVICE AND APPEARANCE CARE
85Z03-03E
Power Windows and Other Power
OptionsCircuit breakers in the fuse block protect
the power windows and other power
accessories. When the current load is too
heavy, the circuit breaker opens, protecting
the circuit until the problem is fixed or goes
away.Fuses and Circuit BreakersThe wiring circuits in your vehicle are pro-
tected from short circuits by a combination
of fuses, circuit breakers and fusible ther-
mal links in the wiring itself.
Look at the silver-colored band inside the
fuse. If the band is broken or melted,
replace the fuse. Be sure you replace a
bad fuse with a new one of the identical
size and rating.
There are spare fuses provided in the
engine compartment fuse block. If you ever
have a problem on the road and don’t have
a spare fuse, you can borrow one that has
the same amperage. Just pick a feature of
your vehicle that you can get along without
– like the radio or cigarette lighter – and
use its fuse, if it is the correct amperage.
Replace it as soon as you can.
There are two fuse blocks in your vehicle:
the instrument panel fuse block and the
engine compartment fuse block.
There is a fuse puller located on the
engine compartment fuse block. It can beused to easily remove fuses from the fuse
block.
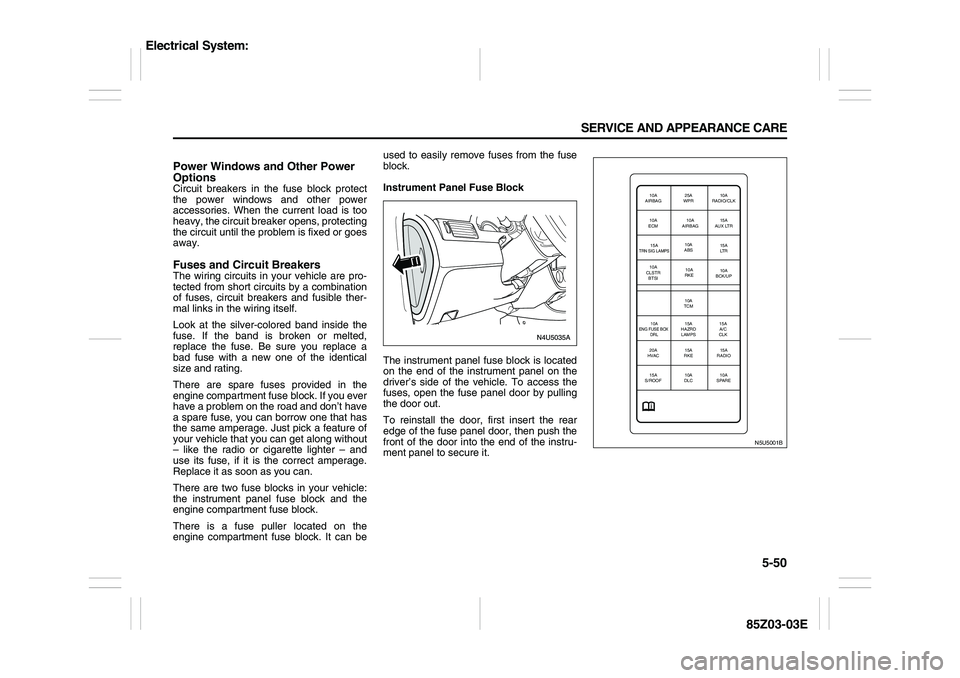
Instrument Panel Fuse Block
The instrument panel fuse block is located
on the end of the instrument panel on the
driver’s side of the vehicle. To access the
fuses, open the fuse panel door by pulling
the door out.
To reinstall the door, first insert the rear
edge of the fuse panel door, then push the
front of the door into the end of the instru-
ment panel to secure it.
N5U5001B
10A
AIRBAG25A
WPR10A
RADIO/CLK
10A
ECM10A
AIRBAG15A
AUX LTR
15ATRN SIG LAMPS
10A
ABS15A
LT R
10A
CLSTR
BTSI10A
BCK/UP
15A
A/C
CLK 10A
TCM10A
RKE
10A
ENG FUSE BOX
DRL
15A
HAZRD
LAMPS
20A
HVAC15A
RKE15A
RADIO
15A
S/ROOF10A
DLC10A
SPARE
Electrical System:
Page 195 of 225
5-51 SERVICE AND APPEARANCE CARE
85Z03-03E
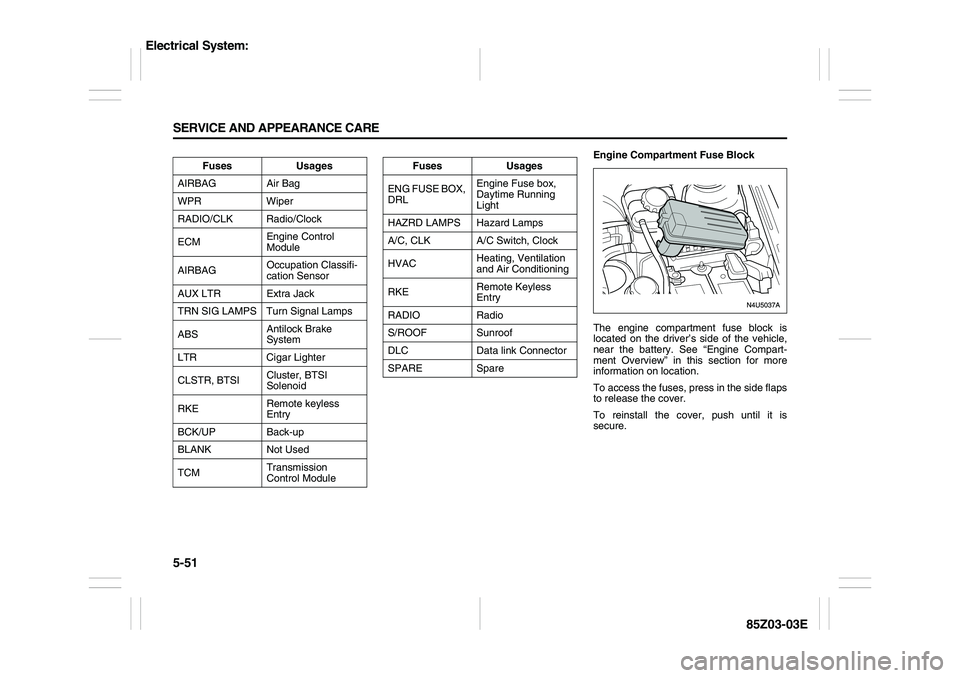
Engine Compartment Fuse Block
The engine compartment fuse block is
located on the driver’s side of the vehicle,
near the battery. See “Engine Compart-
ment Overview” in this section for more
information on location.
To access the fuses, press in the side flaps
to release the cover.
To reinstall the cover, push until it is
secure. Fuses Usages
AIRBAG Air Bag
WPR Wiper
RADIO/CLK Radio/Clock
ECMEngine Control
Module
AIRBAGOccupation Classifi-
cation Sensor
AUX LTR Extra Jack
TRN SIG LAMPS Turn Signal Lamps
ABSAntilock Brake
System
LTR Cigar Lighter
CLSTR, BTSICluster, BTSI
Solenoid
RKERemote keyless
Entry
BCK/UP Back-up
BLANK Not Used
TCMTransmission
Control Module
Fuses Usages
ENG FUSE BOX,
DRLEngine Fuse box,
Daytime Running
Light
HAZRD LAMPS Hazard Lamps
A/C, CLK A/C Switch, Clock
HVACHeating, Ventilation
and Air Conditioning
RKERemote Keyless
Entry
RADIO Radio
S/ROOF Sunroof
DLC Data link Connector
SPARE Spare
Electrical System:
Page 199 of 225
5-55 SERVICE AND APPEARANCE CARE
85Z03-03E
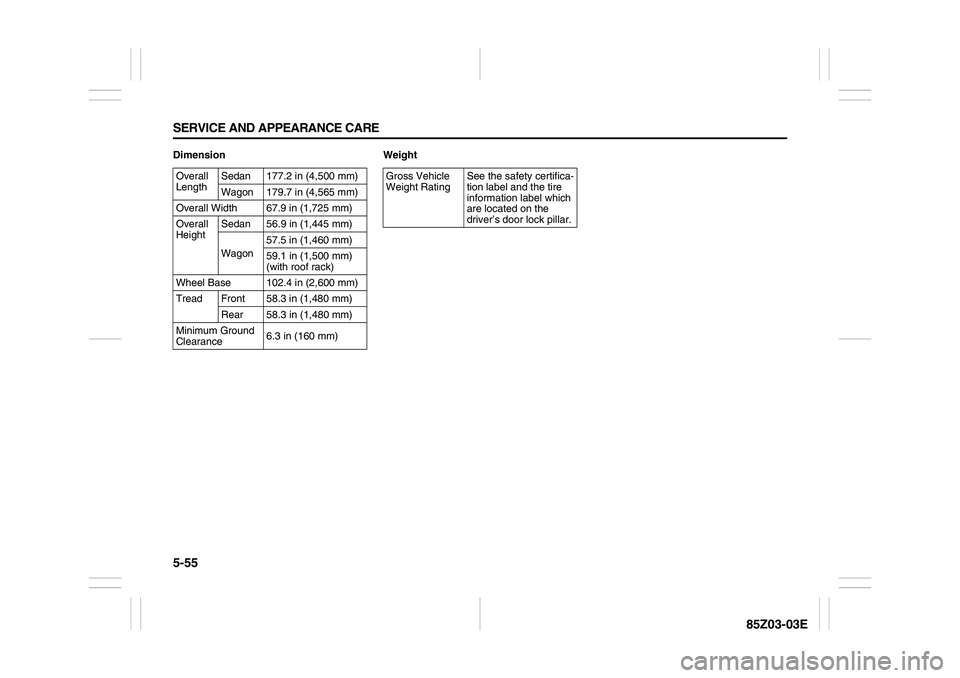
Dimension Weight
Overall
LengthSedan 177.2 in (4,500 mm)
Wagon 179.7 in (4,565 mm)
Overall Width 67.9 in (1,725 mm)
Overall
HeightSedan 56.9 in (1,445 mm)
Wagon57.5 in (1,460 mm)
59.1 in (1,500 mm)
(with roof rack)
Wheel Base 102.4 in (2,600 mm)
Tread Front 58.3 in (1,480 mm)
Rear 58.3 in (1,480 mm)
Minimum Ground
Clearance6.3 in (160 mm)
Gross Vehicle
Weight RatingSee the safety certifica-
tion label and the tire
information label which
are located on the
driver’s door lock pillar.
Page 201 of 225
6-1 MAINTENANCE SCHEDULE
85Z03-03E
General InformationNOTICE (for U.S.A.)
Maintenance, replacement or repair of
the emission control devices and sys-
tems may be performed by any automo-
bile repair establishment or individual
using any part which has been certified
under the provisions in the Clean Air
Act sec. 207. (a) (2).
This section provides the maintenance
schedule which is necessary to ensure that
your vehicle gives many years of satisfying
motoring.
You are responsible for properly operating
and maintaining your vehicle in accor-
dance with the instructions described in
this manual. Failure to do so is likely to
result in the denial of warranty coverage.
It is your responsibility to properly maintain
and operate your vehicle. Be sure that you
follow the periodic required maintenance
schedule and general operation instruc-
tions in this manual.
It is also your responsibility to keep records
and receipts as proof of regular mainte-
nance. Records and receipts together with
this owner’s manual should be transferred
to any subsequent owner.
You may have maintenance services per-
formed on your vehicle by any qualified
person or facility. However, it is recom-
mended that the maintenance services beperformed by an authorized SUZUKI
dealer who will have well-trained techni-
cians and genuine parts.
Non-SUZUKI genuine parts and accesso-
ries have not been examined or approved
by SUZUKI. SUZUKI can certify neither the
suitability nor the safety of non-SUZUKI
parts and accessories and is not liable for
damage caused by their use.
Inadequate, incomplete, or insufficient ser-
vicing may result in operational problems
with your vehicle that could even lead to
vehicle damage, an accident, or personal
injury.
Selecting the Right ConditionFirst you’ll need to decide which of the two
conditions is right for your vehicle. Here’s
how to decide which condition to follow.
You should follow the required mainte-
nance schedule for the condition that best
describes your driving.
Normal Condition
The normal condition for driving means
driving under typical, everyday driving con-
ditions. You may follow the ordinary main-
tenance schedule.
Severe Condition
If the vehicle is operated under any of the
following conditions, some of the mainte-
nance schedule items need to be serviced
more frequently. See “Maintenance Rec-ommended under Severe Driving Condi-
tions” in this section.
Repeated short-distance driving less
than 5 miles (8 km).
Extensive idling and/or slow-speed driv-
ing in stop-and-go traffic.
Driving on dusty roads.
Driving on hilly or mountainous terrain.
Driving in heavy city traffic where the
outside temperatures regularly reach
90°F (32°C) or higher.
Driving as a taxi, police or delivery vehi-
cle.
Frequent driving when outside tempera-
ture remains below freezing.
Page 223 of 225
8-4 INDEX
85Z03-03E
Passenger Air Bag Off Indicator
........................................3-26
Passenger Compartment Air Filter ....................................3-17
Passenger Sensing System
................................................1-31
Power Door Locks
...............................................................2-5
Power Steering Fluid ...........................................................5-17
Power Windows
...................................................................2-9
Power Windows and Other Power Options
.......................5-50
QQuestions and Answers About Safety Belts
.....................1-7
RRadio with Six-Disc CD (Double Display, MP3/WMA)
(AGH-5400)
...........................................................................3-37
Rear Center Safety Belt (Sedan only)
................................1-13
Rear Door Security Locks
...................................................2-5
Rear Seat Armrest
...............................................................2-23
Rear Seat Passengers
.........................................................1-11
Rear Seats
............................................................................1-4
Rear Sidemarker Lamps
.....................................................5-27
Rear Window and Outside Rearview Mirror Defogger
.....3-16
Rear Window Washer/Wiper
...............................................3-7
Reclining Seatbacks
............................................................1-2
Recommended Fluids and Lubricants
..............................6-10
Recreational Vehicle Towing
..............................................4-16
Remote Keyless Entry System ...........................................2-1
Remote Keyless Entry System Operation
.........................2-2
Replacement Bulbs
.............................................................5-27
Replacing Restraint System Parts After a Crash
.............1-35
Reporting Safety Defects
....................................................7-4
Restraint System Check .....................................................1-34
Right Front Passenger Position
.........................................1-11
Roof Rack (Wagon only)
.....................................................2-25Running Your Engine While You Are Parked
................... 2-20
SSafety Belt: They are for Everyone .................................... 1-5
Safety Belt Extender
........................................................... 1-15
Safety Belt Pretensioner System
....................................... 1-14
Safety Belt Reminder Light
................................................ 3-19
Safety Belt Reminder Tone ................................................ 3-19
Safety Belt Use During Pregnancy
.................................... 1-10
Safety Belts
......................................................................... 1-5
Safety Certification Label
................................................... 7-2
Scheduled Maintenance Services
..................................... 6-2
Securing a Child Restraint Designed for the LATCH
System
................................................................................. 1-24
Securing a Child Restraint in a Rear Seat Position
......... 1-25
Securing a Child Restraint in the Right Front Seat
Position
................................................................................ 1-26
Securing a Child Restraint with Top Strap
....................... 1-22
Selecting the Right Condition
............................................ 6-1
Service
................................................................................. 5-1
Servicing Your Air Bag-Equipped Vehicle
........................ 1-34
Sheet Metal Damage
........................................................... 5-48
Shifting Into Park (P) .......................................................... 2-18
Shifting Out of Park (P) ...................................................... 2-18
Side Storage Box (Wagon only)
........................................ 2-24
Spare Tire
............................................................................ 5-44
Specifications
...................................................................... 5-54
Speed Sensitive Power Steering (SSPS) Warning
Light
..................................................................................... 3-22
Speedometer and Odometer
.............................................. 3-18
Starting and Operating Your Vehicle
................................ 2-12
Starting Your Engine
.......................................................... 2-13