load SUZUKI FORENZA 2008 1.G Owners Manual
[x] Cancel search | Manufacturer: SUZUKI, Model Year: 2008, Model line: FORENZA, Model: SUZUKI FORENZA 2008 1.GPages: 226, PDF Size: 5.25 MB
Page 7 of 226
85Z04-03E
LOCATION OF WARNING
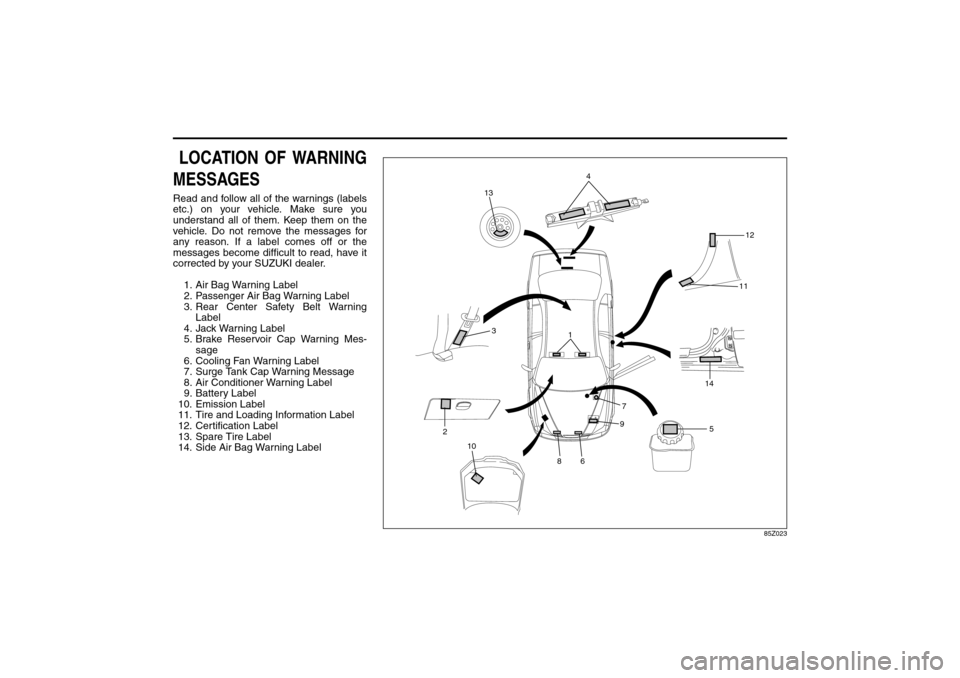
MESSAGESRead and follow all of the warnings (labels
etc.) on your vehicle. Make sure you
understand all of them. Keep them on the
vehicle. Do not remove the messages for
any reason. If a label comes off or the
messages become difficult to read, have it
corrected by your SUZUKI dealer.
1. Air Bag Warning Label
2. Passenger Air Bag Warning Label
3. Rear Center Safety Belt Warning
Label
4. Jack Warning Label
5. Brake Reservoir Cap Warning Mes-
sage
6. Cooling Fan Warning Label
7. Surge Tank Cap Warning Message
8. Air Conditioner Warning Label
9. Battery Label
10. Emission Label
11. Tire and Loading Information Label
12. Certification Label
13. Spare Tire Label
14. Side Air Bag Warning Label
85Z023
1
9
6
13
7
4
5
2
10
8
3
1112
14
Page 63 of 226
2-15FEATURES AND CONTROLS
85Z04-03E
SECOND (2):
This position gives you more power than
THIRD (3) but lower fuel economy. You can
use SECOND (2) on hills. It can help con-
trol your speed as you go down steep
mountain roads, but then you would also
want to use your brakes off and on.
FIRST (1):
This position gives you even more power
than SECOND (2) but lower fuel economy.
You can use it on very steep hills, or in
deep snow or mud. If the shift lever is put
in FIRST (1), the transmission won’t shift
into first gear until the vehicle is going
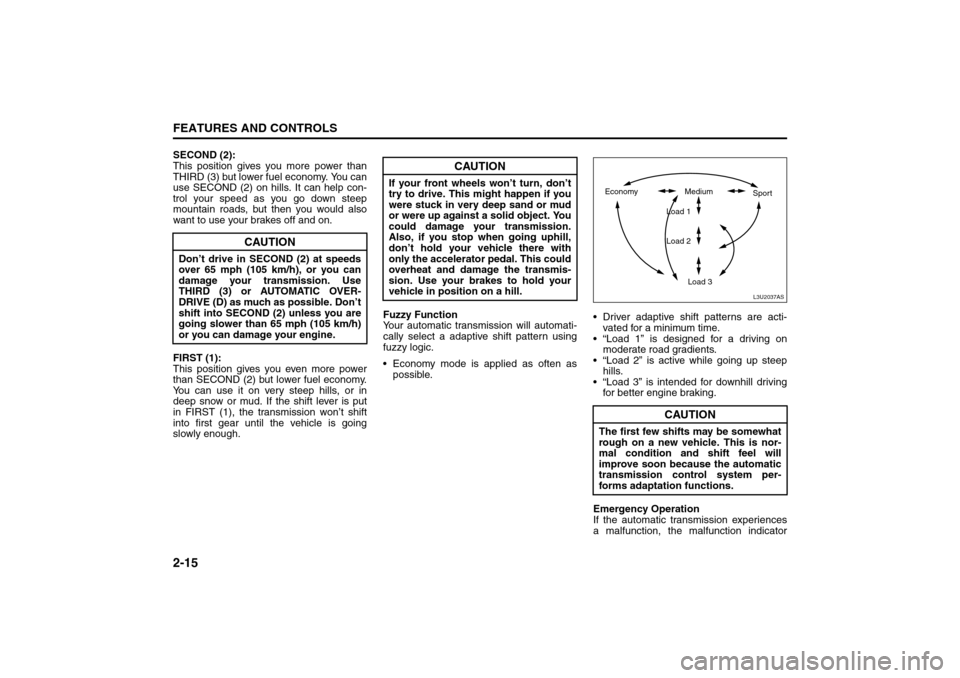
slowly enough.Fuzzy Function
Your automatic transmission will automati-
cally select a adaptive shift pattern using
fuzzy logic.
Economy mode is applied as often as
possible. Driver adaptive shift patterns are acti-
vated for a minimum time.
“Load 1” is designed for a driving on
moderate road gradients.
“Load 2” is active while going up steep
hills.
“Load 3” is intended for downhill driving
for better engine braking.
Emergency Operation
If the automatic transmission experiences
a malfunction, the malfunction indicator
CAUTION
Don’t drive in SECOND (2) at speeds
over 65 mph (105 km/h), or you can
damage your transmission. Use
THIRD (3) or AUTOMATIC OVER-
DRIVE (D) as much as possible. Don’t
shift into SECOND (2) unless you are
going slower than 65 mph (105 km/h)
or you can damage your engine.
CAUTION
If your front wheels won’t turn, don’t
try to drive. This might happen if you
were stuck in very deep sand or mud
or were up against a solid object. You
could damage your transmission.
Also, if you stop when going uphill,
don’t hold your vehicle there with
only the accelerator pedal. This could
overheat and damage the transmis-
sion. Use your brakes to hold your
vehicle in position on a hill.
CAUTION
The first few shifts may be somewhat
rough on a new vehicle. This is nor-
mal condition and shift feel will
improve soon because the automatic
transmission control system per-
forms adaptation functions.
L3U2037AS
Economy Medium
Load 1
Load 2
Load 3Sport
Starting and Operating Your Vehicle:
Page 72 of 226
2-24
FEATURES AND CONTROLS
85Z04-03E
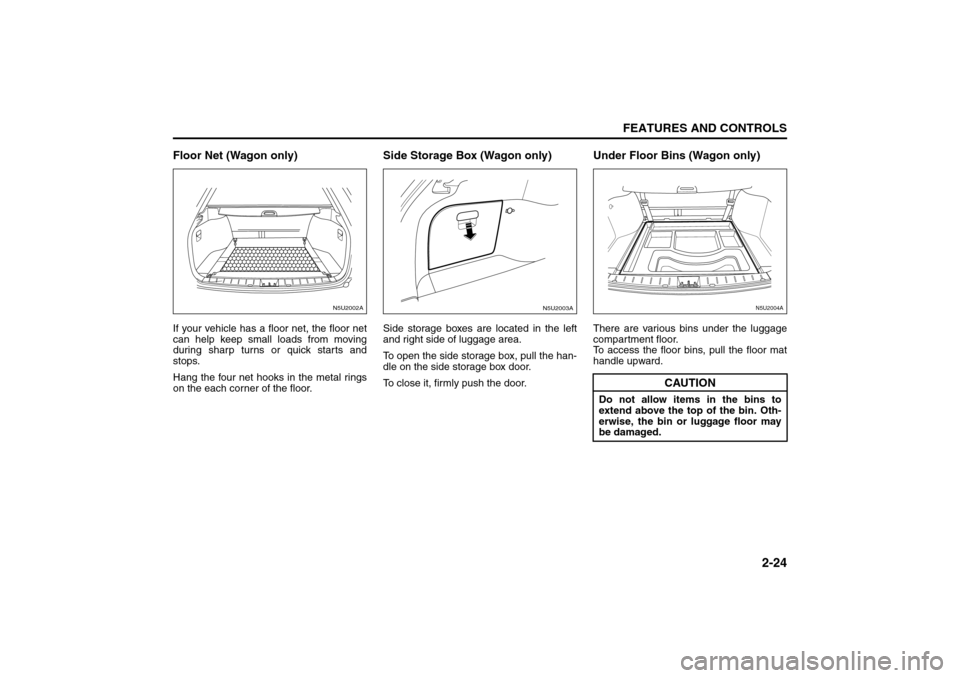
Floor Net (Wagon only)If your vehicle has a floor net, the floor net
can help keep small loads from moving
during sharp turns or quick starts and
stops.
Hang the four net hooks in the metal rings
on the each corner of the floor.
Side Storage Box (Wagon only)Side storage boxes are located in the left
and right side of luggage area.
To open the side storage box, pull the han-
dle on the side storage box door.
To close it, firmly push the door.
Under Floor Bins (Wagon only)There are various bins under the luggage
compartment floor.
To access the floor bins, pull the floor mat
handle upward.
N5U2002A
N5U2003A
CAUTION
Do not allow items in the bins to
extend above the top of the bin. Oth-
erwise, the bin or luggage floor may
be damaged.
N5U2004A
Storage Areas:
Page 73 of 226
2-25FEATURES AND CONTROLS
85Z04-03E
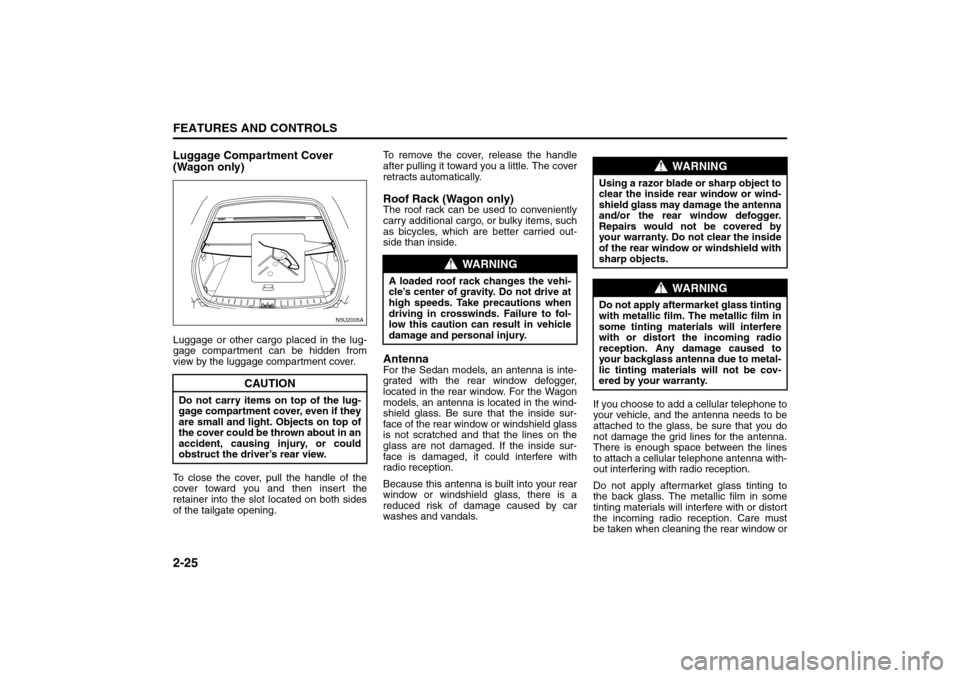
Luggage Compartment Cover
(Wagon only)Luggage or other cargo placed in the lug-
gage compartment can be hidden from
view by the luggage compartment cover.
To close the cover, pull the handle of the
cover toward you and then insert the
retainer into the slot located on both sides
of the tailgate opening.To remove the cover, release the handle
after pulling it toward you a little. The cover
retracts automatically.
Roof Rack (Wagon only)The roof rack can be used to conveniently
carry additional cargo, or bulky items, such
as bicycles, which are better carried out-
side than inside.AntennaFor the Sedan models, an antenna is inte-
grated with the rear window defogger,
located in the rear window. For the Wagon
models, an antenna is located in the wind-
shield glass. Be sure that the inside sur-
face of the rear window or windshield glass
is not scratched and that the lines on the
glass are not damaged. If the inside sur-
face is damaged, it could interfere with
radio reception.
Because this antenna is built into your rear
window or windshield glass, there is a
reduced risk of damage caused by car
washes and vandals.If you choose to add a cellular telephone to
your vehicle, and the antenna needs to be
attached to the glass, be sure that you do
not damage the grid lines for the antenna.
There is enough space between the lines
to attach a cellular telephone antenna with-
out interfering with radio reception.
Do not apply aftermarket glass tinting to
the back glass. The metallic film in some
tinting materials will interfere with or distort
the incoming radio reception. Care must
be taken when cleaning the rear window or
CAUTION
Do not carry items on top of the lug-
gage compartment cover, even if they
are small and light. Objects on top of
the cover could be thrown about in an
accident, causing injury, or could
obstruct the driver’s rear view.
N5U2005A
WARNING
A loaded roof rack changes the vehi-
cle’s center of gravity. Do not drive at
high speeds. Take precautions when
driving in crosswinds. Failure to fol-
low this caution can result in vehicle
damage and personal injury.
WARNING
Using a razor blade or sharp object to
clear the inside rear window or wind-
shield glass may damage the antenna
and/or the rear window defogger.
Repairs would not be covered by
your warranty. Do not clear the inside
of the rear window or windshield with
sharp objects.
WARNING
Do not apply aftermarket glass tinting
with metallic film. The metallic film in
some tinting materials will interfere
with or distort the incoming radio
reception. Any damage caused to
your backglass antenna due to metal-
lic tinting materials will not be cov-
ered by your warranty.
Storage Areas:
Sunroof:
Page 82 of 226
3-6
INSTRUMENT PANEL
85Z04-03E
between wipes. The wiper speed can only
be adjusted when the lever is in the INT
position.
OFF (Off):
Move the lever to this position to turn off
the windshield wipers.
Misting Function
Move the lever toward, but not completely
in, the INT position for a single wiping
cycle. Hold it there until the windshield wip-
ers start; then let go. The windshield wip-
ers will stop after one cycle. If you want
more wipes, hold the lever toward the INT
position longer.
Remember that damaged wiper blades
may prevent you from seeing well enough
to drive safely. To avoid damage, be sure to
clear ice and snow from the wiper blades
before using them.
If they’re frozen to the windshield, carefully
loosen or thaw them. If your blades do
become damaged, get new blades or
blade inserts.
Heavy snow or ice can overload the wiper
motor. A circuit breaker will stop the motor
until it cools. Clear away snow or ice to
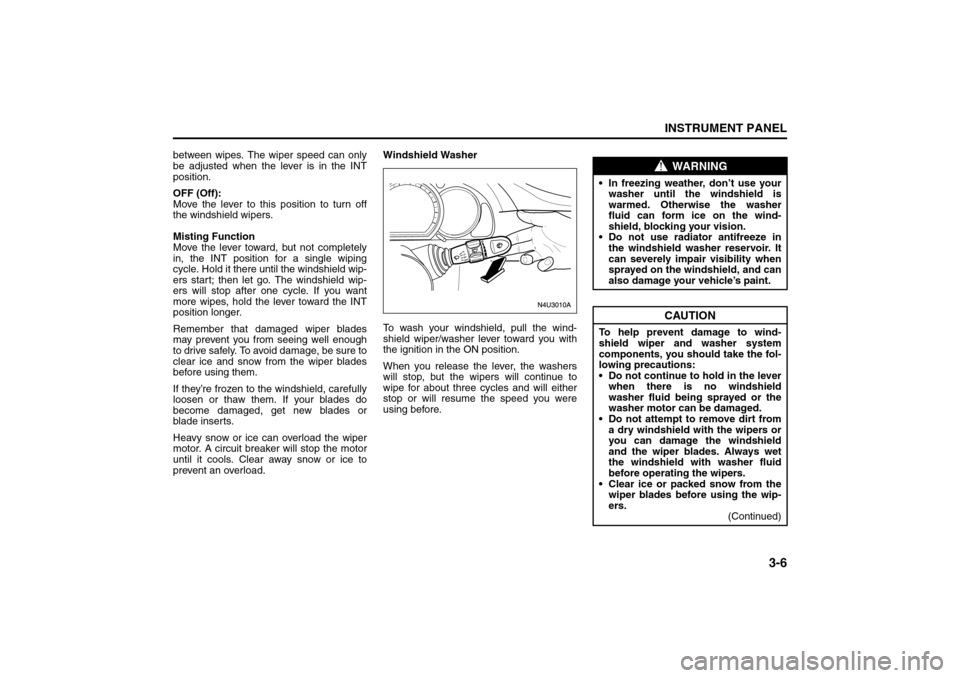
prevent an overload.Windshield Washer
To wash your windshield, pull the wind-
shield wiper/washer lever toward you with
the ignition in the ON position.
When you release the lever, the washers
will stop, but the wipers will continue to
wipe for about three cycles and will either
stop or will resume the speed you were
using before.
WARNING
In freezing weather, don’t use your
washer until the windshield is
warmed. Otherwise the washer
fluid can form ice on the wind-
shield, blocking your vision.
Do not use radiator antifreeze in
the windshield washer reservoir. It
can severely impair visibility when
sprayed on the windshield, and can
also damage your vehicle’s paint.
CAUTION
To help prevent damage to wind-
shield wiper and washer system
components, you should take the fol-
lowing precautions:
Do not continue to hold in the lever
when there is no windshield
washer fluid being sprayed or the
washer motor can be damaged.
Do not attempt to remove dirt from
a dry windshield with the wipers or
you can damage the windshield
and the wiper blades. Always wet
the windshield with washer fluid
before operating the wipers.
Clear ice or packed snow from the
wiper blades before using the wip-
ers.
(Continued)
Instrument Panel Overview:
Page 84 of 226
3-8
INSTRUMENT PANEL
85Z04-03E
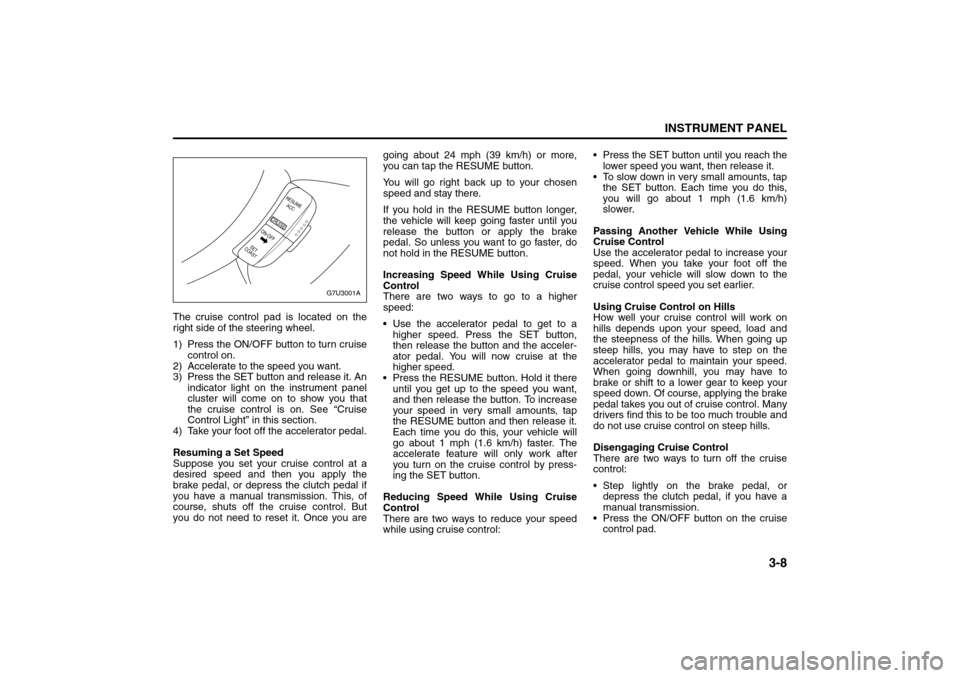
The cruise control pad is located on the
right side of the steering wheel.
1) Press the ON/OFF button to turn cruise
control on.
2) Accelerate to the speed you want.
3) Press the SET button and release it. An
indicator light on the instrument panel
cluster will come on to show you that
the cruise control is on. See “Cruise
Control Light” in this section.
4) Take your foot off the accelerator pedal.
Resuming a Set Speed
Suppose you set your cruise control at a
desired speed and then you apply the
brake pedal, or depress the clutch pedal if
you have a manual transmission. This, of
course, shuts off the cruise control. But
you do not need to reset it. Once you aregoing about 24 mph (39 km/h) or more,
you can tap the RESUME button.
You will go right back up to your chosen
speed and stay there.
If you hold in the RESUME button longer,
the vehicle will keep going faster until you
release the button or apply the brake
pedal. So unless you want to go faster, do
not hold in the RESUME button.
Increasing Speed While Using Cruise
Control
There are two ways to go to a higher
speed:
Use the accelerator pedal to get to a
higher speed. Press the SET button,
then release the button and the acceler-
ator pedal. You will now cruise at the
higher speed.
Press the RESUME button. Hold it there
until you get up to the speed you want,
and then release the button. To increase
your speed in very small amounts, tap
the RESUME button and then release it.
Each time you do this, your vehicle will
go about 1 mph (1.6 km/h) faster. The
accelerate feature will only work after
you turn on the cruise control by press-
ing the SET button.
Reducing Speed While Using Cruise
Control
There are two ways to reduce your speed
while using cruise control: Press the SET button until you reach the
lower speed you want, then release it.
To slow down in very small amounts, tap
the SET button. Each time you do this,
you will go about 1 mph (1.6 km/h)
slower.
Passing Another Vehicle While Using
Cruise Control
Use the accelerator pedal to increase your
speed. When you take your foot off the
pedal, your vehicle will slow down to the
cruise control speed you set earlier.
Using Cruise Control on Hills
How well your cruise control will work on
hills depends upon your speed, load and
the steepness of the hills. When going up
steep hills, you may have to step on the
accelerator pedal to maintain your speed.
When going downhill, you may have to
brake or shift to a lower gear to keep your
speed down. Of course, applying the brake
pedal takes you out of cruise control. Many
drivers find this to be too much trouble and
do not use cruise control on steep hills.
Disengaging Cruise Control
There are two ways to turn off the cruise
control:
Step lightly on the brake pedal, or
depress the clutch pedal, if you have a
manual transmission.
Press the ON/OFF button on the cruise
control pad.
G7U3001A
RESUME
ACC
CRUISE
SET
COASTON-OFF
Instrument Panel Overview:
Page 87 of 226
3-11INSTRUMENT PANEL
85Z04-03E
Accessory Power OutletWith the accessory power outlet you can
plug in auxiliary electrical equipment such
as a cellular phone or CB radio.
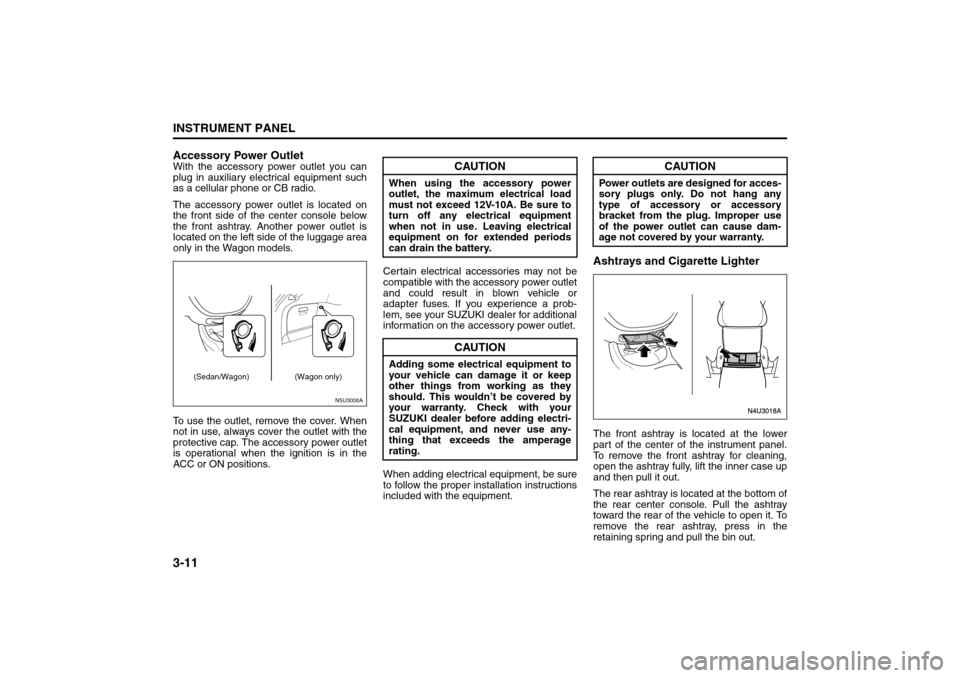
The accessory power outlet is located on
the front side of the center console below
the front ashtray. Another power outlet is
located on the left side of the luggage area
only in the Wagon models.
To use the outlet, remove the cover. When
not in use, always cover the outlet with the
protective cap. The accessory power outlet
is operational when the ignition is in the
ACC or ON positions.Certain electrical accessories may not be
compatible with the accessory power outlet
and could result in blown vehicle or
adapter fuses. If you experience a prob-
lem, see your SUZUKI dealer for additional
information on the accessory power outlet.
When adding electrical equipment, be sure
to follow the proper installation instructions
included with the equipment.
Ashtrays and Cigarette LighterThe front ashtray is located at the lower
part of the center of the instrument panel.
To remove the front ashtray for cleaning,
open the ashtray fully, lift the inner case up
and then pull it out.
The rear ashtray is located at the bottom of
the rear center console. Pull the ashtray
toward the rear of the vehicle to open it. To
remove the rear ashtray, press in the
retaining spring and pull the bin out.
N5U3006A
(Sedan/Wagon) (Wagon only)
CAUTION
When using the accessory power
outlet, the maximum electrical load
must not exceed 12V-10A. Be sure to
turn off any electrical equipment
when not in use. Leaving electrical
equipment on for extended periods
can drain the battery.
CAUTION
Adding some electrical equipment to
your vehicle can damage it or keep
other things from working as they
should. This wouldn’t be covered by
your warranty. Check with your
SUZUKI dealer before adding electri-
cal equipment, and never use any-
thing that exceeds the amperage
rating.
CAUTION
Power outlets are designed for acces-
sory plugs only. Do not hang any
type of accessory or accessory
bracket from the plug. Improper use
of the power outlet can cause dam-
age not covered by your warranty.
Instrument Panel Overview:
Page 108 of 226
3-32
INSTRUMENT PANEL
85Z04-03E
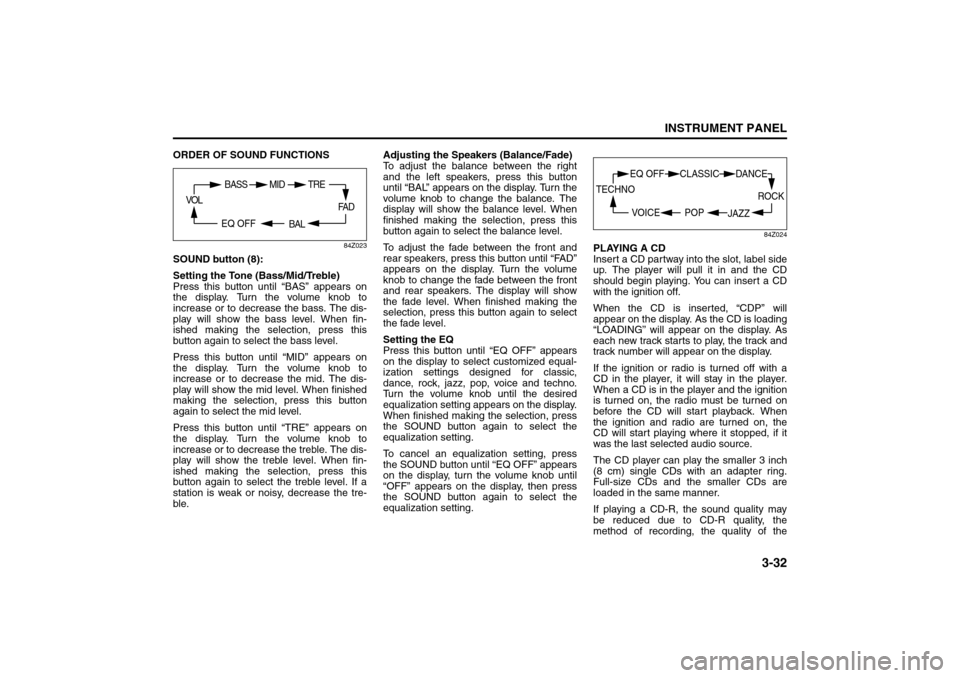
ORDER OF SOUND FUNCTIONS
84Z023
SOUND button (8):
Setting the Tone (Bass/Mid/Treble)
Press this button until “BAS” appears on
the display. Turn the volume knob to
increase or to decrease the bass. The dis-
play will show the bass level. When fin-
ished making the selection, press this
button again to select the bass level.
Press this button until “MID” appears on
the display. Turn the volume knob to
increase or to decrease the mid. The dis-
play will show the mid level. When finished
making the selection, press this button
again to select the mid level.
Press this button until “TRE” appears on
the display. Turn the volume knob to
increase or to decrease the treble. The dis-
play will show the treble level. When fin-
ished making the selection, press this
button again to select the treble level. If a
station is weak or noisy, decrease the tre-
ble. Adjusting the Speakers (Balance/Fade)
To adjust the balance between the right
and the left speakers, press this button
until “BAL” appears on the display. Turn the
volume knob to change the balance. The
display will show the balance level. When
finished making the selection, press this
button again to select the balance level.
To adjust the fade between the front and
rear speakers, press this button until “FAD”
appears on the display. Turn the volume
knob to change the fade between the front
and rear speakers. The display will show
the fade level. When finished making the
selection, press this button again to select
the fade level.
Setting the EQ
Press this button until “EQ OFF” appears
on the display to select customized equal-
ization settings designed for classic,
dance, rock, jazz, pop, voice and techno.
Turn the volume knob until the desired
equalization setting appears on the display.
When finished making the selection, press
the SOUND button again to select the
equalization setting.
To cancel an equalization setting, press
the SOUND button until “EQ OFF” appears
on the display, turn the volume knob until
“OFF” appears on the display, then press
the SOUND button again to select the
equalization setting.
84Z024
PLAYING A CD
Insert a CD partway into the slot, label side
up. The player will pull it in and the CD
should begin playing. You can insert a CD
with the ignition off.
When the CD is inserted, “CDP” will
appear on the display. As the CD is loading
“LOADING” will appear on the display. As
each new track starts to play, the track and
track number will appear on the display.
If the ignition or radio is turned off with a
CD in the player, it will stay in the player.
When a CD is in the player and the ignition
is turned on, the radio must be turned on
before the CD will start playback. When
the ignition and radio are turned on, the
CD will start playing where it stopped, if it
was the last selected audio source.
The CD player can play the smaller 3 inch
(8 cm) single CDs with an adapter ring.
Full-size CDs and the smaller CDs are
loaded in the same manner.
If playing a CD-R, the sound quality may
be reduced due to CD-R quality, the
method of recording, the quality of the
FA D
BAL
BASS MID
EQ OFF VOL
TRE
ROCK
JAZZ
EQ OFF CLASSIC
POP VOICE TECHNO
DANCE
Page 109 of 226
3-33INSTRUMENT PANEL
85Z04-03E
music that has been recorded, and the way
the CD-R has been handled. There may be
an increase in skipping, difficulty in finding
tracks, and/or difficulty in loading and
ejecting. If these problems occur, check
the bottom surface of the CD. If the surface
of the CD is damaged, such as cracked,
broken, or scratched, the CD will not play
properly. If there is no apparent damage,
try a known good CD.
Do not add any label to a CD, it could get
caught in the CD player. If a CD is
recorded on a personal computer and a
description label is needed, try labeling the
top of the recorded CD with a marking pen
instead.
If an error appears on the display, see “CD
Messages” later in this section.
RPT (Repeat) button (7):
Press this button to repeat the current
track. RPT will appear on the display.
Press this button again to turn off repeat
play.
RDM (Random) button (7):
Press this button to hear the tracks in ran-
dom, rather than sequential, order. “RDM”
will appear on the display. Press this button
again to turn off random play.
INT (Scan) button (7):
Press this button to listen to the first few
seconds of each track on each loaded CD.
“INTRO” will appear on the display. To stopscanning, press this button again. The cur-
rent track will begin to play.
TUNE (Previous/Next Track) button (4):
Press the down arrows to go to the start of
the current track or press the up arrows to
go to the next track. The track number will
appear on the display. The player will con-
tinue moving backward or forward through
the CD with each press of the up or down
arrows.
AM button (2):
Press this button to listen to the radio when
a CD is playing. The inactive CD will
remain safely inside the radio for future lis-
tening.
FM button (3):
Press this button to listen to the radio when
a CD is playing. The inactive CD will
remain safely inside the radio for future lis-
tening.
CD/AUX button (9):
Press this button to play a CD when listen-
ing to the radio. “CDP” will appear on the
display when the CD player has been
selected. The CD symbol will appear on
the display when a CD is loaded.
Press this button while a CD is playing to
pause the CD. “PAUSE” will flash on the
display. Press this button again to resume
playing the CD.
Press this button to play a CD when listen-
ing to the audio contents from other device
(AUX mode). “CDP” will appear on the dis-play when the CD player has been
selected. The CD symbol will appear on
the display when a CD is loaded.
EJECT button (10):
Press this button to eject a CD. The only
way a CD can be ejected from the player is
by pressing the eject button. The CD will
not eject when the ignition or the radio is
turned off.
Using an MP3/WMA CD
MP3/WMA Format
If you burn your own MP3/WMA disc on a
personal computer:
Make sure the MP3/WMA files are
recorded on a CD-R disc.
Make sure to finalize the disc when burn-
ing an MP3/WMA disc, using multiple
sessions. It is usually better to burn the
disc all at once.
Files can be recorded with a variety of
fixed or variable bit rates. Song title, art-
ist name, and album will be available for
display by the radio when recorded using
ID3 tags version 1 and 2.
Do not mix standard audio and MP3/
WMA files on one disc.
Make sure each MP3/WMA file has a
“.mp3” or “.wma” extension, other file
extensions may not work.
The player will be able to read and play a
maximum of 50 folders, 5 sessions, and
999 files. Long file names and folder
names may use more disc memory space
Page 110 of 226
3-34
INSTRUMENT PANEL
85Z04-03E
than necessary. To conserve space on the
disc, minimize the length of the file, and
folder names. You can also play an MP3/
WMA CD that was recorded using no file
folders. The system can support up to 8
folders in depth, but, keep the depth of the
folders to a minimum in order to keep down
the complexity and confusion in trying to
locate a particular folder during playback. If
a CD contains more than the maximum of
50 folders, 5 sessions, and 999 files the
player will let you access and navigate up
to the maximum, but all items over the
maximum will be ignored.
Root Directory
The root directory will be treated as a
folder. If the root directory has compressed
audio files, the directory will be displayed
as “ROOT”. All files contained directly
under the root directory will be accessed
prior to any other directory.
Empty Directory or Folder
If a root directory or a folder exists some-
where in the file structure that contains
only folders/subfolders and no compressed
files directly beneath them, the player will
advance to the next folder in the file struc-
ture that contains compressed audio files
and the empty folder will not be displayed
or numbered.
No Folder
When the CD contains only compressed
files, the files will be located under the root
folder. The next and previous folder func-tions will have no function on a CD that
was recorded without folders or playlists.
When displaying the name of the folder the
radio will display “ROOT”.
When the CD contains only compressed
audio files, but no folders, all files will be
located under the root folder. When the
radio displays the name of the folder the
radio will display “ROOT”.
Order of Play
Tracks will be played in the following order:
Play will begin from the first track under the
root directory. When all tracks from the root
directory have been played, play will con-
tinue from files according to their numerical
listing. After playing the last track from the
last folder, the player will begin playing
again at the first track of the first folder or
root directory.
File System and Naming
The song name in the ID3 tag will be dis-
played. If the song name is not present in
the ID3 tag, then the radio will display the
file name without the extension (such as
MP3/WMA) instead.
Track names longer than 32 characters or
4 pages will be shortened. The display will
not show parts of words on the last page of
text and the extension of the filename will
not be displayed.Playing an MP3/WMA
With the ignition on, insert a CD partway
into the slot, label side up. The player will
pull it in, then “LOADING”, and then “MP3”
or “WMA” will appear on the display. The
CD should begin playing. You can’t insert a
CD with the acc off. As each new track
starts to play, the track number, and the
song name will appear on the display.
If the ignition or radio is turned off with a
CD in the player, it will stay in the player.
When a CD is in the player and the ignition
is turned on, the radio must be turned on
before the CD will start playback. When
the ignition and radio are turned on, the
CD will start playing where it stopped, if it
was the last selected audio source.
The CD player can play the smaller 3 inch
(8 cm) single CDs with an adapter ring.
Full-size CDs and the smaller CDs are
loaded in the same manner.
If playing a CD-R, the sound quality may
be reduced due to CD-R quality, the
method of recording, the quality of the
music that has been recorded, and the way
the CD-R has been handled. There may be
an increase in skipping, difficulty in finding
tracks, and/or difficulty in loading and
ejecting. If these problems occur, check
the bottom surface of the CD. If the surface
of the CD is damaged, such as cracked,
broken, or scratched, the CD will not play
properly.