seats SUZUKI GRAND VITARA 2012 User Guide
[x] Cancel search | Manufacturer: SUZUKI, Model Year: 2012, Model line: GRAND VITARA, Model: SUZUKI GRAND VITARA 2012Pages: 337, PDF Size: 6.21 MB
Page 68 of 337
2-51BEFORE DRIVING
79K21-03E
How the System WorksIn a frontal collision, the crash sensors will
detect rapid deceleration and send a signal
to the controller. If the controller judges
that the deceleration represents a severe
frontal crash, the controller will trigger the
inflators. The controller also judges:
Whether the front air bags should deploy
at reduced power or at full power accord-
ing to crash severity.
Whether the front passenger’s front air
bag should deploy or not based on clas-
sification of the occupant of the front
passenger’s seat.
Since your vehicle is equipped with side air
bags, and side curtain air bags, crash sen-
sors will detect a side collision, and if the
controller judges that the side collision is
severe enough, it will trigger the side air
bag and side curtain air bag inflators.
Your vehicle also has rollover sensors that
work with the controller to predict whether
a rollover may occur and if the controller
judges that a severe rollover is about to
occur, it triggers the side curtain air bag
inflators on both sides of the vehicle.
The inflators inflate the appropriate air
bags with nitrogen or argon gas. The
inflated air bags provide a cushion for your
head (front air bags and side curtain air
bags only) and upper body. The air bag
inflates and deflates so quickly that you
may not even realize that it has activated.
WARNING
The front passenger sensing system
may not work properly in the follow-
ing situations:
The occupant is sitting near the
dashboard or is not sitting in the
proper position.
Objects placed under the seat are
pushing up on the seat cushion.
WARNING
If the “PASS AIR BAG OFF” indicator
on the instrument panel turns on
even though there is no occupant or
an adult occupant in the front pas-
senger’s seat, it means that some-
thing may be wrong with the
passenger sensing system. Have the
system inspected by an authorized
SUZUKI dealer as soon as possible.
WARNING
Do not spill any liquids on the seat.
Liquids can damage the sensors
under the front seat.
Have front passenger’s sensor mat
inspected by your dealer after a
collision.
Do not replace the front seats. If
you replace them, the air bags and
front passenger sensing system
may not work properly.
Do not use a seat cover. If you use
a seat cover, the front passenger
sensing system may not work prop-
erly.
Page 70 of 337
2-53BEFORE DRIVING
79K21-03E
Note that even though your vehicle may be
moderately damaged in a collision, the col-
lision may not have been severe enough to
trigger the front, side, or side curtain air
bags to inflate. If your car sustains ANY
front-end or side damage, have the air bag
system inspected by an authorized
SUZUKI dealer to ensure it is in proper
working order.
Your vehicle is equipped with a diagnostic
module which records information about
the air bag system if the air bags deploy in
a crash. The module records information
about overall system status, which sensors
activated the deployment, and whether the
front seat belts were in use.
Servicing the Air Bag SystemIf the air bags inflate, have the air bags and
related components replaced by an autho-
rized SUZUKI dealer as soon as possible.
If your vehicle ever gets in deep water and
the driver’s floor is submerged, the air bag
controller could be damaged. If this hap-
pens, have the air bag system inspected
by the SUZUKI dealer as soon as possible.
Special procedures are required for servic-
ing or replacing an air bag. For that reason,
only an authorized SUZUKI dealer should
be allowed to service or replace your air
bags. Please remind anyone who services
your SUZUKI that it has air bags.
Service on or around air bag components
or wiring must be performed only by an
authorized SUZUKI dealer. Improper ser-
vice could result in unintended air bag
deployment or could render the air bags
inoperative. Either of these two conditions
may result in severe injury.
To prevent damage or unintended inflation
of the air bag system, be sure the battery
is disconnected and the ignition switch has
been in the “LOCK” position for at least 90
seconds before performing any electrical
service work on your SUZUKI. Do not
touch air bag system components or wires.
The wires are wrapped with yellow tape or
yellow tubing, and the couplers are yellow
for easy identification.Scrapping a car that has an undeployed air
bag can be hazardous. Ask your dealer,
body repair shop or scrap yard for help
with disposal.
If it is necessary to modify the advanced
front air bag system to accommodate a
person with disabilities, owners in the con-
tinental United States can call American
Suzuki toll-free at 1-800-934-0934, or write
to:
American Suzuki Motor Corporation
Automotive Customer Relations
3251 East Imperial Highway
Brea, CA 92821-6795
If you purchased your SUZUKI in Canada
please contact the Suzuki Canada Cus-
tomer Relations Department by telephone
at 1-905-889-2677 extension 2254 or in
writing at:
Suzuki Canada Inc.
Customer Relations
100 East Beaver Creek Road
Richmond Hill, On
L4B 1J6
WARNING
(Continued)
For vehicles with side air bags, do
not place seat covers on the front
seats, because seat covers could
restrict the air bag’s inflation. Also,
do not place any cup holders or
other objects on the door, as these
objects could be propelled by the
air bag in the event of a crash.
Either of these conditions may
cause severe injury.
Page 108 of 337
3-7OPERATING YOUR VEHICLE
79K21-03E
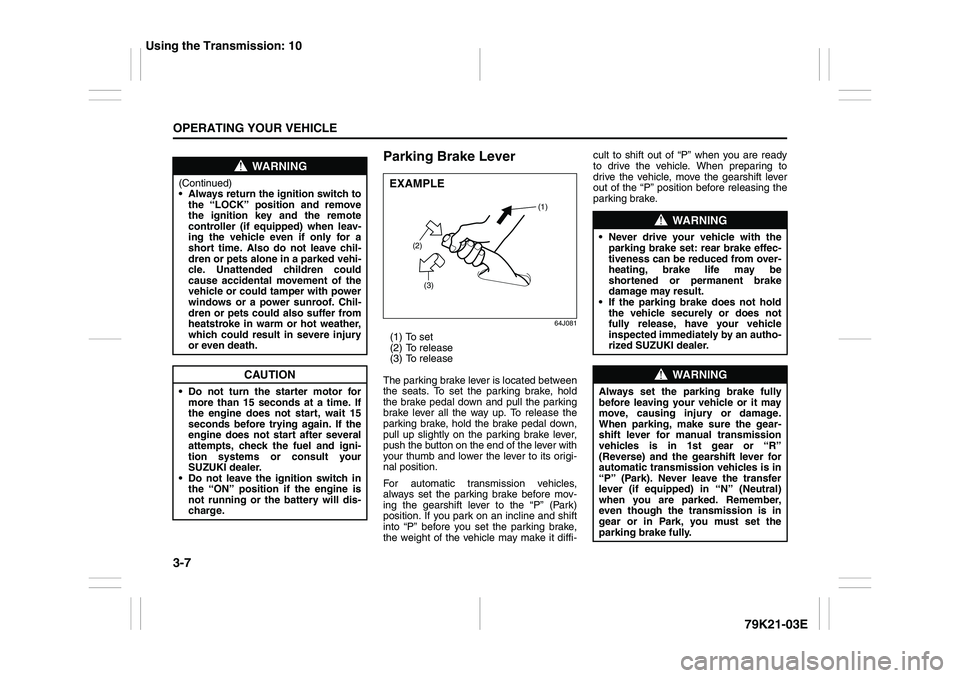
Parking Brake Lever
64J081
(1) To set
(2) To release
(3) To release
The parking brake lever is located between
the seats. To set the parking brake, hold
the brake pedal down and pull the parking
brake lever all the way up. To release the
parking brake, hold the brake pedal down,
pull up slightly on the parking brake lever,
push the button on the end of the lever with
your thumb and lower the lever to its origi-
nal position.
For automatic transmission vehicles,
always set the parking brake before mov-
ing the gearshift lever to the “P” (Park)
position. If you park on an incline and shift
into “P” before you set the parking brake,
the weight of the vehicle may make it diffi-cult to shift out of “P” when you are ready
to drive the vehicle. When preparing to
drive the vehicle, move the gearshift lever
out of the “P” position before releasing the
parking brake.
WARNING
(Continued)
Always return the ignition switch to
the “LOCK” position and remove
the ignition key and the remote
controller (if equipped) when leav-
ing the vehicle even if only for a
short time. Also do not leave chil-
dren or pets alone in a parked vehi-
cle. Unattended children could
cause accidental movement of the
vehicle or could tamper with power
windows or a power sunroof. Chil-
dren or pets could also suffer from
heatstroke in warm or hot weather,
which could result in severe injury
or even death.
CAUTION
Do not turn the starter motor for
more than 15 seconds at a time. If
the engine does not start, wait 15
seconds before trying again. If the
engine does not start after several
attempts, check the fuel and igni-
tion systems or consult your
SUZUKI dealer.
Do not leave the ignition switch in
the “ON” position if the engine is
not running or the battery will dis-
charge.
EXAMPLE
(2)
(3)(1)
WARNING
Never drive your vehicle with the
parking brake set: rear brake effec-
tiveness can be reduced from over-
heating, brake life may be
shortened or permanent brake
damage may result.
If the parking brake does not hold
the vehicle securely or does not
fully release, have your vehicle
inspected immediately by an autho-
rized SUZUKI dealer.
WARNING
Always set the parking brake fully
before leaving your vehicle or it may
move, causing injury or damage.
When parking, make sure the gear-
shift lever for manual transmission
vehicles is in 1st gear or “R”
(Reverse) and the gearshift lever for
automatic transmission vehicles is in
“P” (Park). Never leave the transfer
lever (if equipped) in “N” (Neutral)
when you are parked. Remember,
even though the transmission is in
gear or in Park, you must set the
parking brake fully.
Using the Transmission: 10
Page 157 of 337
5-4
OTHER CONTROLS AND EQUIPMENT
79K21-03E
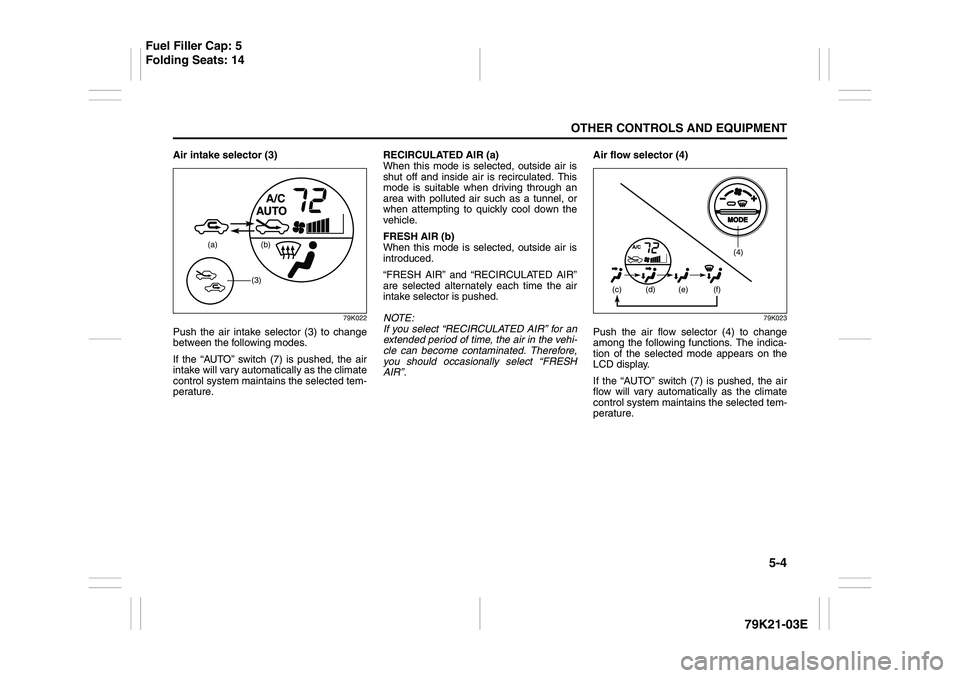
Air intake selector (3)
79K022
Push the air intake selector (3) to change
between the following modes.
If the “AUTO” switch (7) is pushed, the air
intake will vary automatically as the climate
control system maintains the selected tem-
perature.RECIRCULATED AIR (a)
When this mode is selected, outside air is
shut off and inside air is recirculated. This
mode is suitable when driving through an
area with polluted air such as a tunnel, or
when attempting to quickly cool down the
vehicle.
FRESH AIR (b)
When this mode is selected, outside air is
introduced.
“FRESH AIR” and “RECIRCULATED AIR”
are selected alternately each time the air
intake selector is pushed.
NOTE:
If you select “RECIRCULATED AIR” for an
extended period of time, the air in the vehi-
cle can become contaminated. Therefore,
you should occasionally select “FRESH
AIR”.Air flow selector (4)
79K023
Push the air flow selector (4) to change
among the following functions. The indica-
tion of the selected mode appears on the
LCD display.
If the “AUTO” switch (7) is pushed, the air
flow will vary automatically as the climate
control system maintains the selected tem-
perature.
(a) (b)
(3)
(4)
(c)
(d) (e) (f)
Fuel Filler Cap: 5
Folding Seats: 14
Page 158 of 337
5-5OTHER CONTROLS AND EQUIPMENT
79K21-03E
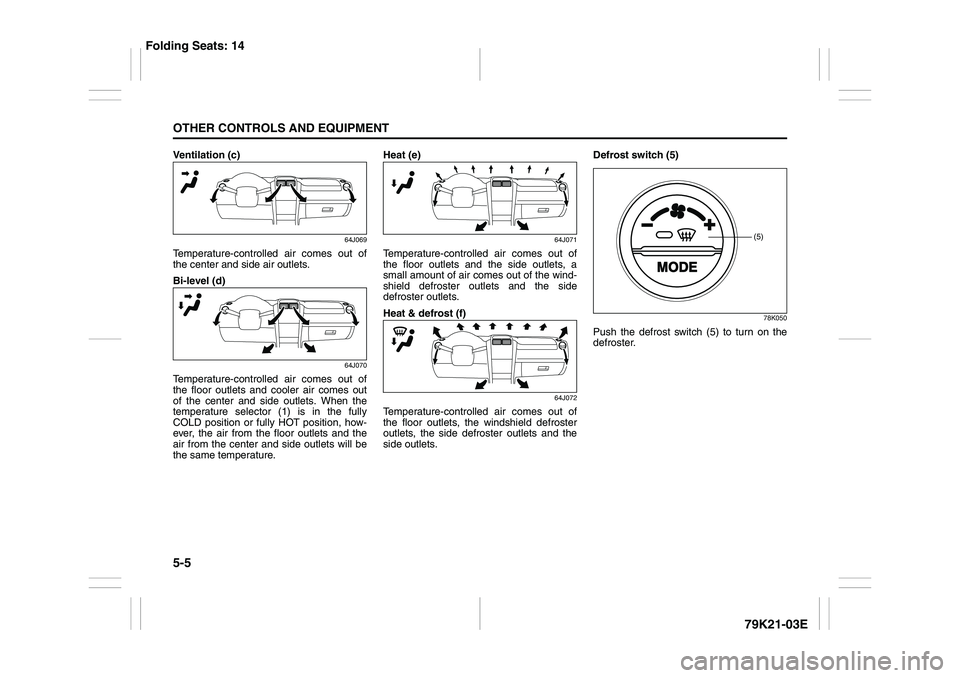
Ventilation (c)
64J069
Temperature-controlled air comes out of
the center and side air outlets.
Bi-level (d)
64J070
Temperature-controlled air comes out of
the floor outlets and cooler air comes out
of the center and side outlets. When the
temperature selector (1) is in the fully
COLD position or fully HOT position, how-
ever, the air from the floor outlets and the
air from the center and side outlets will be
the same temperature.Heat (e)
64J071
Temperature-controlled air comes out of
the floor outlets and the side outlets, a
small amount of air comes out of the wind-
shield defroster outlets and the side
defroster outlets.
Heat & defrost (f)
64J072
Temperature-controlled air comes out of
the floor outlets, the windshield defroster
outlets, the side defroster outlets and the
side outlets.Defrost switch (5)
78K050
Push the defrost switch (5) to turn on the
defroster.
(5)
Folding Seats: 14
Page 159 of 337
5-6
OTHER CONTROLS AND EQUIPMENT
79K21-03E
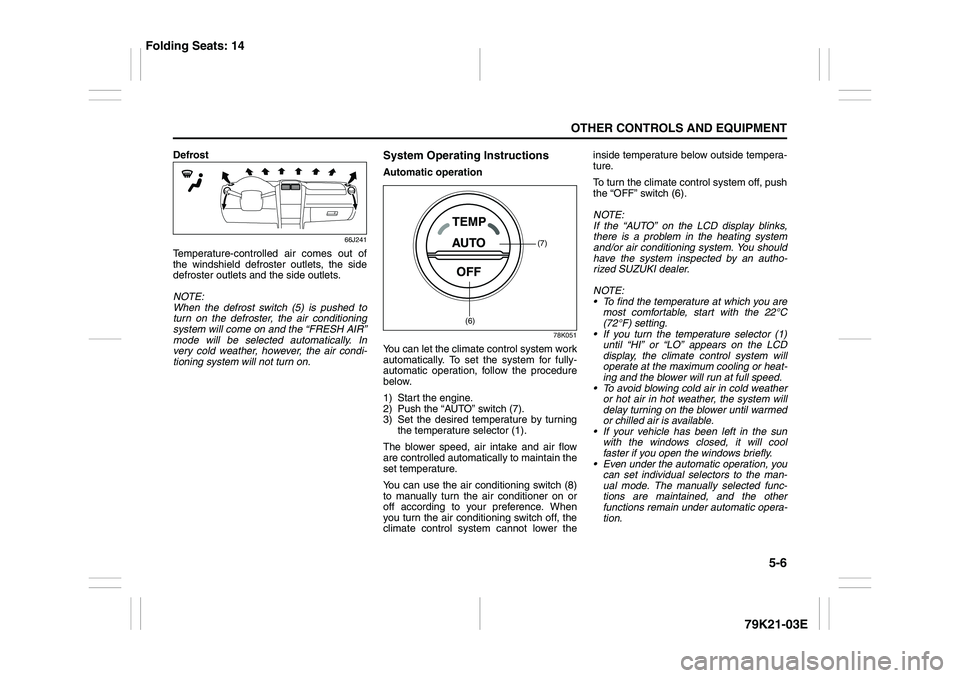
Defrost
66J241
Temperature-controlled air comes out of
the windshield defroster outlets, the side
defroster outlets and the side outlets.
NOTE:
When the defrost switch (5) is pushed to
turn on the defroster, the air conditioning
system will come on and the “FRESH AIR”
mode will be selected automatically. In
very cold weather, however, the air condi-
tioning system will not turn on.
System Operating InstructionsAutomatic operation
78K051
You can let the climate control system work
automatically. To set the system for fully-
automatic operation, follow the procedure
below.
1) Start the engine.
2) Push the “AUTO” switch (7).
3) Set the desired temperature by turning
the temperature selector (1).
The blower speed, air intake and air flow
are controlled automatically to maintain the
set temperature.
You can use the air conditioning switch (8)
to manually turn the air conditioner on or
off according to your preference. When
you turn the air conditioning switch off, the
climate control system cannot lower theinside temperature below outside tempera-
ture.
To turn the climate control system off, push
the “OFF” switch (6).
NOTE:
If the “AUTO” on the LCD display blinks,
there is a problem in the heating system
and/or air conditioning system. You should
have the system inspected by an autho-
rized SUZUKI dealer.
NOTE:
To find the temperature at which you are
most comfortable, start with the 22°C
(72°F) setting.
If you turn the temperature selector (1)
until “HI” or “LO” appears on the LCD
display, the climate control system will
operate at the maximum cooling or heat-
ing and the blower will run at full speed.
To avoid blowing cold air in cold weather
or hot air in hot weather, the system will
delay turning on the blower until warmed
or chilled air is available.
If your vehicle has been left in the sun
with the windows closed, it will cool
faster if you open the windows briefly.
Even under the automatic operation, you
can set individual selectors to the man-
ual mode. The manually selected func-
tions are maintained, and the other
functions remain under automatic opera-
tion.
(7)
(6)
Folding Seats: 14
Page 270 of 337
7-21INSPECTION AND MAINTENANCE
79K21-03E
NOTE:
Do not check the fluid level if you have just
driven the vehicle for a long time at high
speed, if you have driven in city traffic in
hot weather, or if the vehicle has been pull-
ing a trailer. Wait until the fluid cools down
(about 30 minutes), or the fluid level indica-
tion will not be correct.
3) Park your vehicle on level ground.
4) Apply the parking brake and then start
the engine in “P” (Park). Let it idle for
two minutes and keep it running during
the fluid level check.
5) With your foot on the brake pedal, move
the gearshift lever through each gear,
pausing for about three seconds in
each range. Then move it back to the
“P” (Park) position.
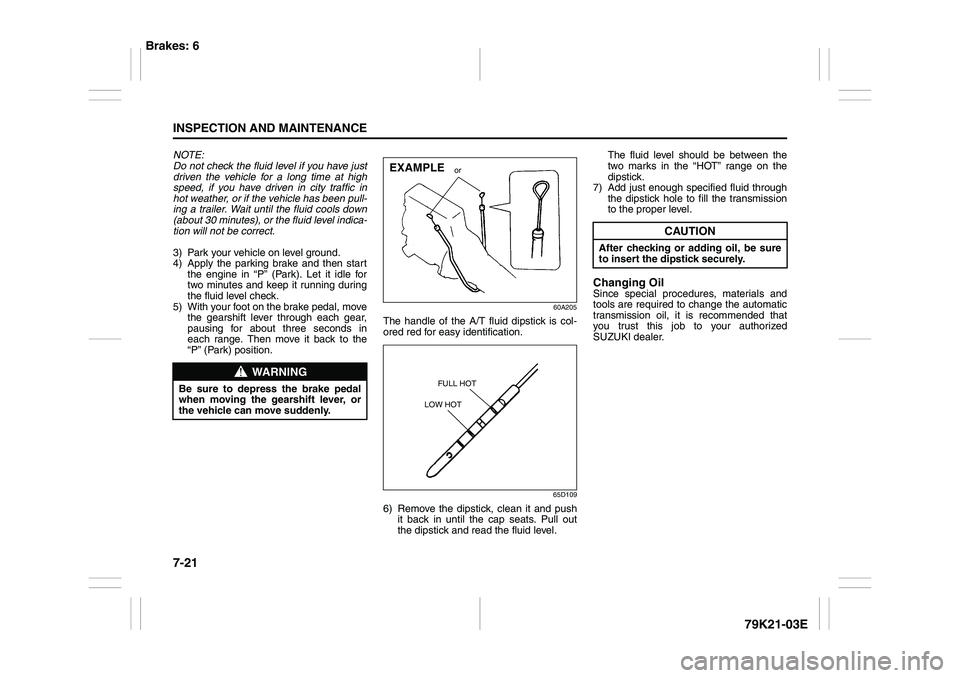
60A205
The handle of the A/T fluid dipstick is col-
ored red for easy identification.
65D109
6) Remove the dipstick, clean it and push
it back in until the cap seats. Pull out
the dipstick and read the fluid level. The fluid level should be between the
two marks in the “HOT” range on the
dipstick.
7) Add just enough specified fluid through
the dipstick hole to fill the transmission
to the proper level.
Changing OilSince special procedures, materials and
tools are required to change the automatic
transmission oil, it is recommended that
you trust this job to your authorized
SUZUKI dealer.
WARNING
Be sure to depress the brake pedal
when moving the gearshift lever, or
the vehicle can move suddenly.
EXAMPLE
or
FULL HOT
LOW HOT
CAUTION
After checking or adding oil, be sure
to insert the dipstick securely.
Brakes: 6
Page 281 of 337
7-32
INSPECTION AND MAINTENANCE
79K21-03E Snow Tires
Your vehicle is equipped with all-sea-
son tires which are designed for use in
summer and most winter conditions.
For improved traction in severe winter
conditions, SUZUKI recommends
mounting radial snow tires on all four
wheels. Snow tires must be the same
size as the standard tires. Also be sure
to use the tires of the same type and
brand on all four wheels of your vehi-
cle.
GLOSSARY OF TIRE TERMI-
NOLOGYAccessory Weight – the combined
weight (in excess of those standard
items which may be replaced) of auto-
matic transmission, power steering,
power brakes, power windows, power
seats, radio, and heater, to the extent
that these items are available as fac-
tory-installed equipment (whether
installed or not).
Cold Tire Inflation Pressure – the pres-
sure in a tire that has been driven less
than 1 mile or has been standing for
three hours or more.
Curb Weight – the weight of a motor
vehicle with standard equipment
including the maximum capacity of
fuel, oil, and coolant, and, if so
equipped, air conditioning and addi-
tional weight optional engine.
Intended Outboard Sidewall – (1) the
sidewall that contains a whitewall,
bears white lettering or bears manu-
facturer, brand, and/or model name
molding that is higher or deeper than
the same molding on the other side-
wall of the tire, or (2) the outward fac-
ing sidewall of an asymmetrical tire
that has a particular side that mustalways face outward when mounted
on a vehicle.
Maximum Inflation Pressure – the
maximum cold inflation pressure a tire
is designed to support in normal ser-
vice.
Maximum Loaded Vehicle Weight –
the sum of curb weight, accessory
weight, vehicle capacity weight (total
load capacity), and production options
weight.
Normal Occupant Weight – 68 kilo-
grams times the number of occupants
specified in the second column of
Table 1 (shown below).
Occupant distribution – distribution of
occupants in a vehicle as specified in
the third column of Table 1 (shown
below).
Production Options Weight – the com-
bined weight of those installed regular
production options weighing over 2.3
kilograms in excess of those standard
items which they replace, not previ-
ously considered in curb weight or
accessory weight, including heavy
duty brakes, ride levelers, roof rack,
heavy duty battery, and special trim.
WARNING
(Continued) Do not use tire chains on the
spare tire. If you must use tire
chains, rearrange the wheels so
standard tires and wheels are
fitted to the rear axle.
Replace the spare tire with a
new one as soon as the tread
wear indicator appears.
When replacing the spare tire,
use a replacement tire with the
exact same size and construc-
tion.
Battery: 9
Fuses: 7
Page 332 of 337
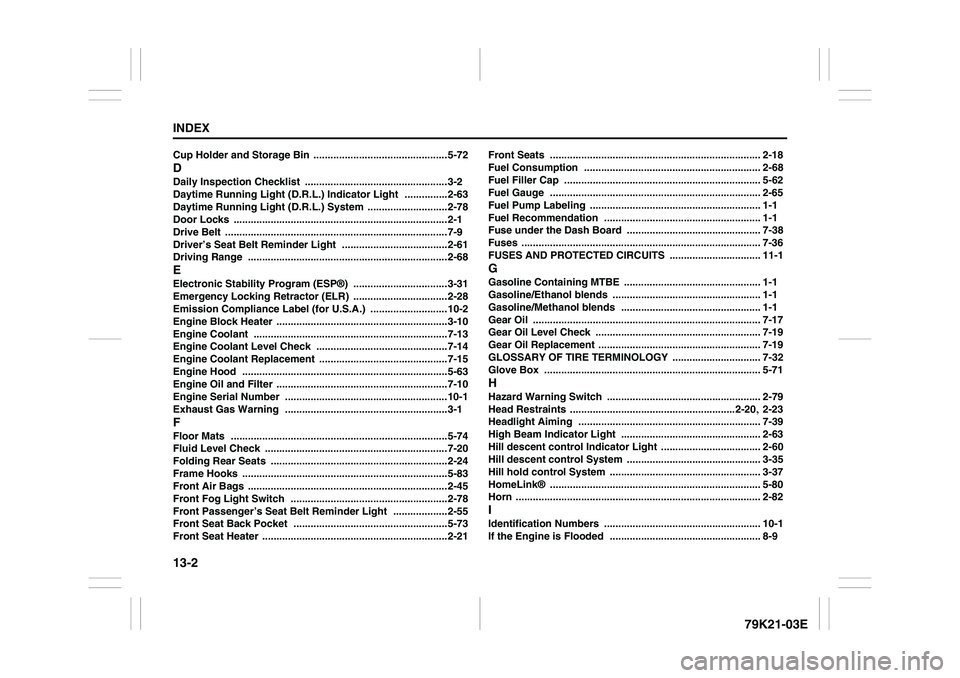
13-2INDEX
79K21-03E
Cup Holder and Storage Bin
...............................................5-72
DDaily Inspection Checklist
..................................................3-2
Daytime Running Light (D.R.L.) Indicator Light
...............2-63
Daytime Running Light (D.R.L.) System
............................2-78
Door Locks
...........................................................................2-1
Drive Belt
..............................................................................7-9
Driver’s Seat Belt Reminder Light
.....................................2-61
Driving Range
......................................................................2-68
EElectronic Stability Program (ESP®)
.................................3-31
Emergency Locking Retractor (ELR) .................................2-28
Emission Compliance Label (for U.S.A.)
...........................10-2
Engine Block Heater
............................................................3-10
Engine Coolant
....................................................................7-13
Engine Coolant Level Check
..............................................7-14
Engine Coolant Replacement .............................................7-15
Engine Hood
........................................................................5-63
Engine Oil and Filter
............................................................7-10
Engine Serial Number .........................................................10-1
Exhaust Gas Warning .........................................................3-1
FFloor Mats
............................................................................5-74
Fluid Level Check
................................................................7-20
Folding Rear Seats ..............................................................2-24
Frame Hooks
........................................................................5-83
Front Air Bags ......................................................................2-45
Front Fog Light Switch
.......................................................2-78
Front Passenger’s Seat Belt Reminder Light
...................2-55
Front Seat Back Pocket
......................................................5-73
Front Seat Heater
.................................................................2-21Front Seats
.......................................................................... 2-18
Fuel Consumption
.............................................................. 2-68
Fuel Filler Cap
..................................................................... 5-62
Fuel Gauge
.......................................................................... 2-65
Fuel Pump Labeling
............................................................ 1-1
Fuel Recommendation ....................................................... 1-1
Fuse under the Dash Board
............................................... 7-38
Fuses
.................................................................................... 7-36
FUSES AND PROTECTED CIRCUITS
................................ 11-1
GGasoline Containing MTBE
................................................ 1-1
Gasoline/Ethanol blends
.................................................... 1-1
Gasoline/Methanol blends ................................................. 1-1
Gear Oil
................................................................................ 7-17
Gear Oil Level Check
.......................................................... 7-19
Gear Oil Replacement ......................................................... 7-19
GLOSSARY OF TIRE TERMINOLOGY
............................... 7-32
Glove Box
............................................................................ 5-71
HHazard Warning Switch
...................................................... 2-79
Head Restraints
..........................................................2-20
, 2-23
Headlight Aiming
................................................................ 7-39
High Beam Indicator Light
................................................. 2-63
Hill descent control Indicator Light
................................... 2-60
Hill descent control System
............................................... 3-35
Hill hold control System
..................................................... 3-37
HomeLink®
.......................................................................... 5-80
Horn
...................................................................................... 2-82
IIdentification Numbers
....................................................... 10-1
If the Engine is Flooded ..................................................... 8-9
Page 334 of 337
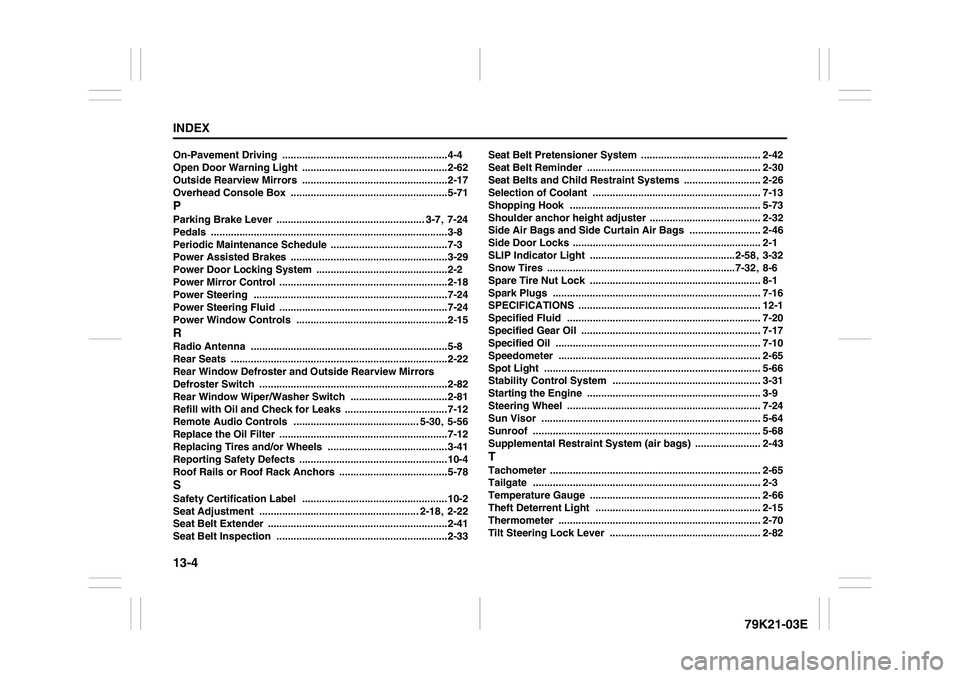
13-4INDEX
79K21-03E
On-Pavement Driving
..........................................................4-4
Open Door Warning Light
...................................................2-62
Outside Rearview Mirrors ...................................................2-17
Overhead Console Box
.......................................................5-71
PParking Brake Lever
.................................................... 3-7
, 7-24
Pedals
...................................................................................3-8
Periodic Maintenance Schedule
.........................................7-3
Power Assisted Brakes
.......................................................3-29
Power Door Locking System
..............................................2-2
Power Mirror Control
...........................................................2-18
Power Steering
....................................................................7-24
Power Steering Fluid
...........................................................7-24
Power Window Controls
.....................................................2-15
RRadio Antenna
.....................................................................5-8
Rear Seats
............................................................................2-22
Rear Window Defroster and Outside Rearview Mirrors
Defroster Switch
..................................................................2-82
Rear Window Wiper/Washer Switch
..................................2-81
Refill with Oil and Check for Leaks ....................................7-12
Remote Audio Controls
............................................ 5-30
, 5-56
Replace the Oil Filter
...........................................................7-12
Replacing Tires and/or Wheels
..........................................3-41
Reporting Safety Defects
....................................................10-4
Roof Rails or Roof Rack Anchors
......................................5-78
SSafety Certification Label
...................................................10-2
Seat Adjustment
........................................................ 2-18
, 2-22
Seat Belt Extender
...............................................................2-41
Seat Belt Inspection ............................................................2-33Seat Belt Pretensioner System
.......................................... 2-42
Seat Belt Reminder
............................................................. 2-30
Seat Belts and Child Restraint Systems
........................... 2-26
Selection of Coolant
........................................................... 7-13
Shopping Hook
................................................................... 5-73
Shoulder anchor height adjuster
....................................... 2-32
Side Air Bags and Side Curtain Air Bags
......................... 2-46
Side Door Locks
.................................................................. 2-1
SLIP Indicator Light
...................................................2-58
, 3-32
Snow Tires
..................................................................7-32
, 8-6
Spare Tire Nut Lock
............................................................ 8-1
Spark Plugs
......................................................................... 7-16
SPECIFICATIONS
................................................................ 12-1
Specified Fluid
.................................................................... 7-20
Specified Gear Oil ............................................................... 7-17
Specified Oil
........................................................................ 7-10
Speedometer ....................................................................... 2-65
Spot Light
............................................................................ 5-66
Stability Control System
.................................................... 3-31
Starting the Engine
............................................................. 3-9
Steering Wheel
.................................................................... 7-24
Sun Visor
............................................................................. 5-64
Sunroof
................................................................................ 5-68
Supplemental Restraint System (air bags)
....................... 2-43
TTachometer
.......................................................................... 2-65
Tailgate
................................................................................ 2-3
Temperature Gauge
............................................................ 2-66
Theft Deterrent Light .......................................................... 2-15
Thermometer
....................................................................... 2-70
Tilt Steering Lock Lever
..................................................... 2-82