Interior SUZUKI GRAND VITARA 2013 Owners Manual
[x] Cancel search | Manufacturer: SUZUKI, Model Year: 2013, Model line: GRAND VITARA, Model: SUZUKI GRAND VITARA 2013Pages: 337, PDF Size: 6.21 MB
Page 11 of 337
ILLUSTRATED TABLE OF CONTENTS
79K21-03E
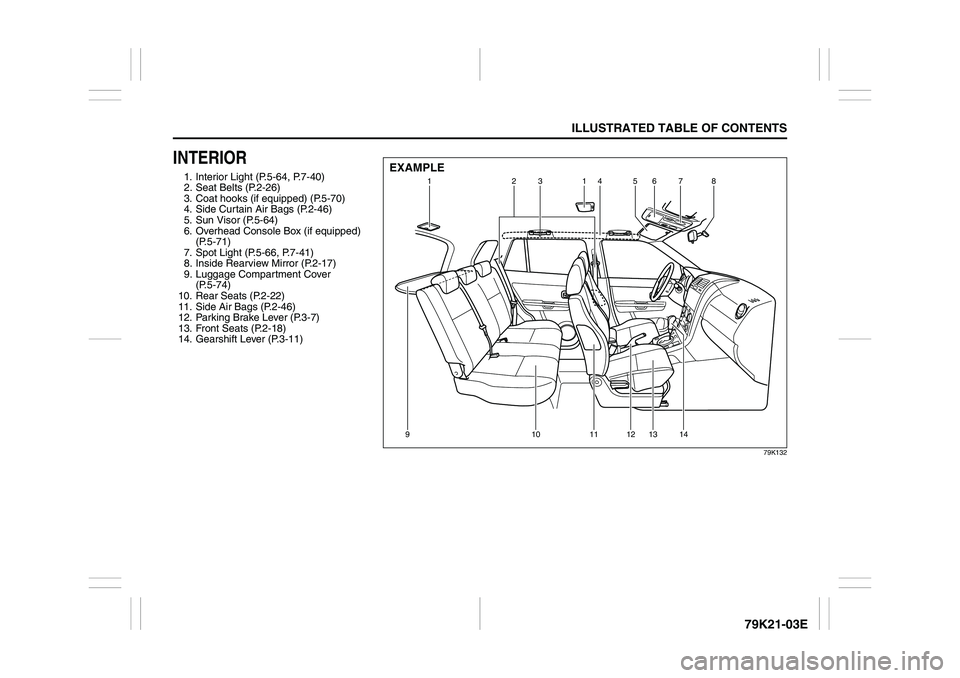
INTERIOR1. Interior Light (P.5-64, P.7-40)
2. Seat Belts (P.2-26)
3. Coat hooks (if equipped) (P.5-70)
4. Side Curtain Air Bags (P.2-46)
5. Sun Visor (P.5-64)
6. Overhead Console Box (if equipped)
(P.5-71)
7. Spot Light (P.5-66, P.7-41)
8. Inside Rearview Mirror (P.2-17)
9. Luggage Compartment Cover
(P.5-74)
10. Rear Seats (P.2-22)
11. Side Air Bags (P.2-46)
12. Parking Brake Lever (P.3-7)
13. Front Seats (P.2-18)
14. Gearshift Lever (P.3-11)
79K132
1231
45678
91011121314
EXAMPLE
Page 22 of 337
2-5BEFORE DRIVING
79K21-03E
Keyless Start System Remote
Controller (Type A)The remote controller enables the following
operations:
You can lock or unlock the doors by
operating the LOCK/UNLOCK buttons
on the remote controller. Refer to the
explanation in this section.
You can lock or unlock the doors (includ-
ing the tailgate) by pushing the request
switch on the door handle of each door
or the tailgate. For details, refer to the
explanation in this section.
You can start the engine without using
an ignition key. For details, refer to “Igni-
tion Switch” in the “OPERATING YOUR
VEHICLE” section.
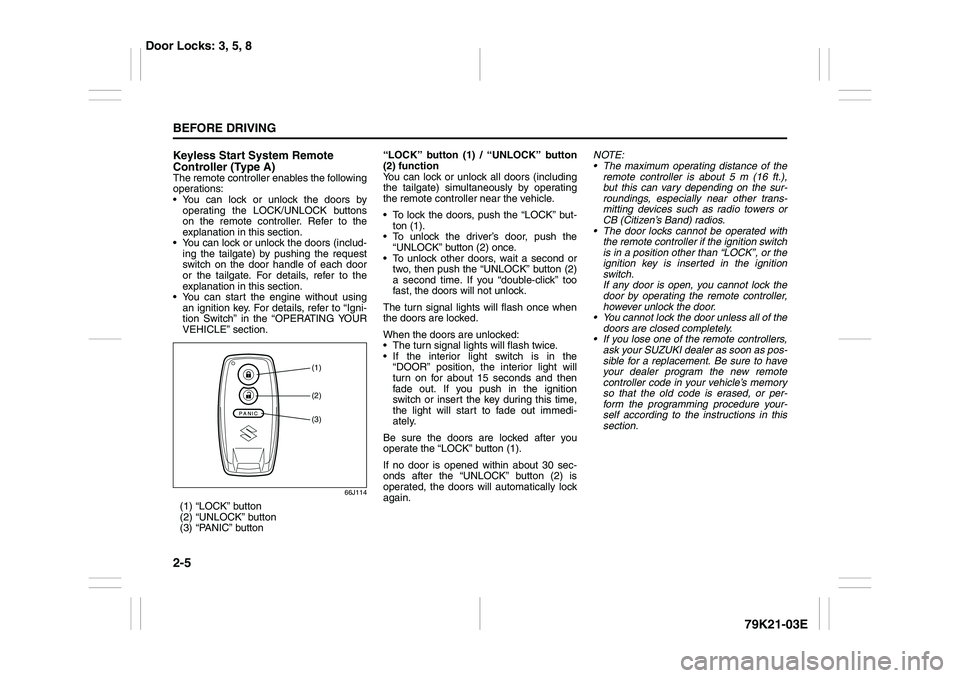
66J114
(1) “LOCK” button
(2) “UNLOCK” button
(3) “PANIC” button“LOCK” button (1) / “UNLOCK” button
(2) function
You can lock or unlock all doors (including
the tailgate) simultaneously by operating
the remote controller near the vehicle.
To lock the doors, push the “LOCK” but-
ton (1).
To unlock the driver’s door, push the
“UNLOCK” button (2) once.
To unlock other doors, wait a second or
two, then push the “UNLOCK” button (2)
a second time. If you “double-click” too
fast, the doors will not unlock.
The turn signal lights will flash once when
the doors are locked.
When the doors are unlocked:
The turn signal lights will flash twice.
If the interior light switch is in the
“DOOR” position, the interior light will
turn on for about 15 seconds and then
fade out. If you push in the ignition
switch or insert the key during this time,
the light will start to fade out immedi-
ately.
Be sure the doors are locked after you
operate the “LOCK” button (1).
If no door is opened within about 30 sec-
onds after the “UNLOCK” button (2) is
operated, the doors will automatically lock
again.NOTE:
The maximum operating distance of the
remote controller is about 5 m (16 ft.),
but this can vary depending on the sur-
roundings, especially near other trans-
mitting devices such as radio towers or
CB (Citizen’s Band) radios.
The door locks cannot be operated with
the remote controller if the ignition switch
is in a position other than “LOCK”, or the
ignition key is inserted in the ignition
switch.
If any door is open, you cannot lock the
door by operating the remote controller,
however unlock the door.
You cannot lock the door unless all of the
doors are closed completely.
If you lose one of the remote controllers,
ask your SUZUKI dealer as soon as pos-
sible for a replacement. Be sure to have
your dealer program the new remote
controller code in your vehicle’s memory
so that the old code is erased, or per-
form the programming procedure your-
self according to the instructions in this
section.
(1)(2)(3)
Door Locks: 3, 5, 8
Page 23 of 337
2-6
BEFORE DRIVING
79K21-03E
“PANIC” button (3) function
This function is to get the attention of oth-
ers.
Press the “PANIC” button (3) for more than
1 second. The headlights and taillights will
blink for about 30 seconds. Also, the horn
will sound intermittently for about 30 sec-
onds at the same time.
To cancel the “PANIC” mode, press any
button (PANIC, LOCK or UNLOCK) on the
remote controller. You can also insert the
key in the ignition switch and turn to the
“ON” position to cancel the “PANIC” mode.
NOTE:
The “PANIC” button function will not acti-
vate when the key is in the ignition switch.Keyless unlocking/locking using the
request switches
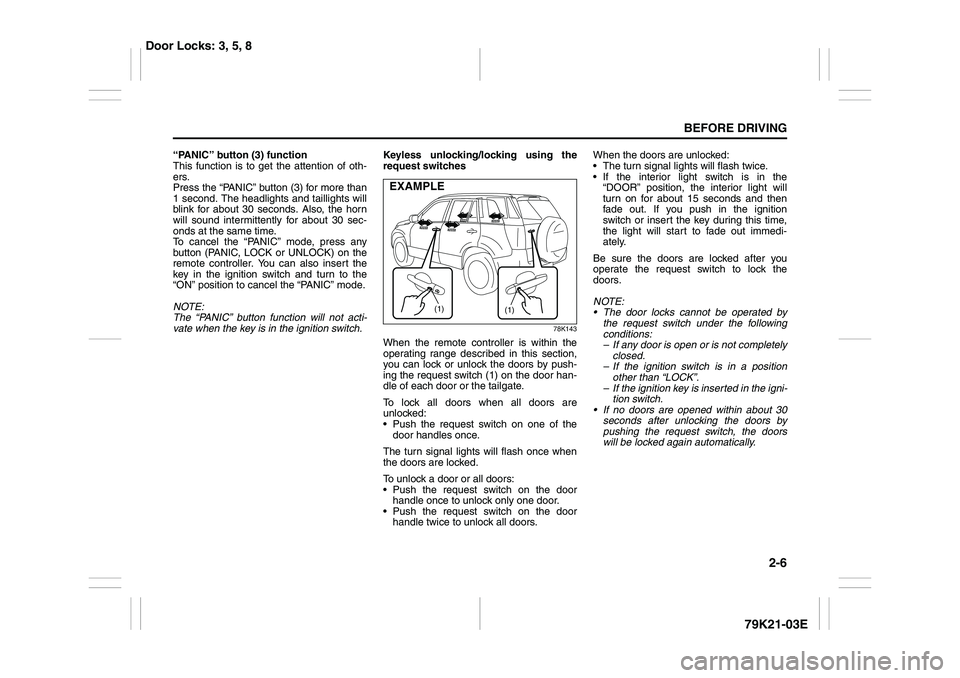
78K143
When the remote controller is within the
operating range described in this section,
you can lock or unlock the doors by push-
ing the request switch (1) on the door han-
dle of each door or the tailgate.
To lock all doors when all doors are
unlocked:
Push the request switch on one of the
door handles once.
The turn signal lights will flash once when
the doors are locked.
To unlock a door or all doors:
Push the request switch on the door
handle once to unlock only one door.
Push the request switch on the door
handle twice to unlock all doors.When the doors are unlocked:
The turn signal lights will flash twice.
If the interior light switch is in the
“DOOR” position, the interior light will
turn on for about 15 seconds and then
fade out. If you push in the ignition
switch or insert the key during this time,
the light will start to fade out immedi-
ately.
Be sure the doors are locked after you
operate the request switch to lock the
doors.
NOTE:
The door locks cannot be operated by
the request switch under the following
conditions:
– If any door is open or is not completely
closed.
– If the ignition switch is in a position
other than “LOCK”.
– If the ignition key is inserted in the igni-
tion switch.
If no doors are opened within about 30
seconds after unlocking the doors by
pushing the request switch, the doors
will be locked again automatically.
(1)
(1)
EXAMPLE
Door Locks: 3, 5, 8
Page 29 of 337
2-12
BEFORE DRIVING
79K21-03E
The turn signal lights will flash once when
the doors are locked.
When the doors are unlocked:
The turn signal lights will flash twice.
If the interior light switch is in the
“DOOR” position, the interior light will
turn on for about 15 seconds and then
fade out. If you insert the key into the
ignition switch during this time, the light
will start to fade out immediately.
Be sure the doors are locked after you
operate the “LOCK” button (1).
If no door is opened within about 30 sec-
onds after the “UNLOCK” button (2) is
operated, the doors will automatically lock
again.
NOTE:
The maximum operating distance of the
keyless entry system transmitter is about
5 m (16 ft.), but this can vary depending
on the surroundings, especially near
other transmitting devices such as radio
towers or CB (Citizen’s Band) radios.
The door locks cannot be operated with
the transmitter, if the ignition key is
inserted in the ignition switch.
If you lose one of the transmitters, ask
your SUZUKI dealer as soon as possible
for a replacement. Be sure to have your
dealer program the new transmitter code
in your vehicle’s memory so that the old
code is erased, or perform the program-ming procedure yourself according to the
instructions in this section.
“PANIC” button (3) function
This function is to get the attention of oth-
ers.
Press the “PANIC” button (3) for more than
1 second. The headlights and taillights will
blink for about 30 seconds. Also, the horn
will sound intermittently for about 30 sec-
onds at the same time.
To cancel the “PANIC” mode, press any
button (PANIC, LOCK or UNLOCK) on the
transmitter. You can also insert the key in
the ignition switch and turn to the “ON”
position to cancel the “PANIC” mode.
NOTE:
The “PANIC” button function will not acti-
vate when the key is in the ignition switch.Replacement of the battery
If the transmitter becomes unreliable,
replace the battery.
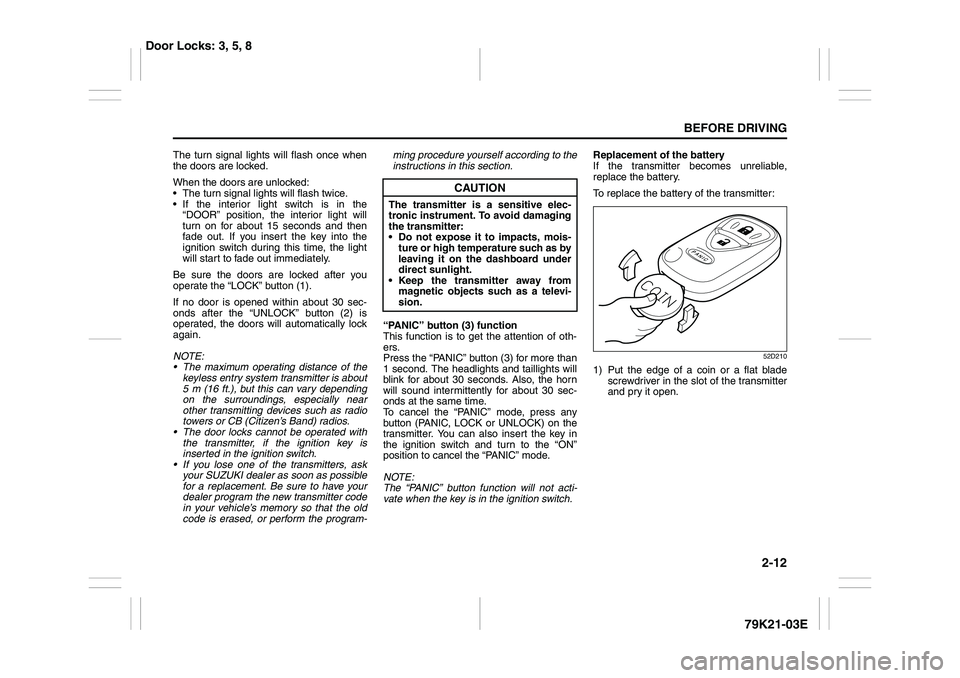
To replace the battery of the transmitter:
52D210
1) Put the edge of a coin or a flat blade
screwdriver in the slot of the transmitter
and pry it open.
CAUTION
The transmitter is a sensitive elec-
tronic instrument. To avoid damaging
the transmitter:
Do not expose it to impacts, mois-
ture or high temperature such as by
leaving it on the dashboard under
direct sunlight.
Keep the transmitter away from
magnetic objects such as a televi-
sion.
Door Locks: 3, 5, 8
Page 153 of 337
OTHER CONTROLS AND EQUIPMENT
5
79K21-03E
60G407
OTHER CONTROLS AND EQUIPMENTAutomatic Heating and Air Conditioning System
(Climate Control) ................................................................. 5-1
Radio Antenna ..................................................................... 5-8
Audio Systems (Type A) ..................................................... 5-8
Audio Systems (Type B) ..................................................... 5-36
Fuel Filler Cap ..................................................................... 5-62
Engine Hood ........................................................................ 5-63
Sun Visor ............................................................................. 5-64
Interior Light Switch ........................................................... 5-64
Luggage Compartment Light ............................................. 5-65
Spot Light ............................................................................ 5-66
Accessory Socket (if equipped) ......................................... 5-66
Cigarette Lighter and Ashtray (if equipped) ..................... 5-67
Sunroof (if equipped) .......................................................... 5-68
Assist Grips (if equipped) .................................................. 5-70
Coat Hooks (if equipped) .................................................... 5-70
Glove Box ............................................................................ 5-71
Overhead Console Box (if equipped) ................................ 5-71
Cup Holder and Storage Bin (if equipped) ........................ 5-72
Front Seat Back Pocket (if equipped) ............................... 5-73
Shopping Hook (if equipped) ............................................. 5-73
Armrest ................................................................................ 5-73
Floor Mats (if equipped) ..................................................... 5-74
Luggage Compartment Cover ............................................ 5-74
Underfloor Bins (if equipped) ............................................ 5-77
Luggage Restraint Loops (if equipped) ............................ 5-78
Roof Rails or Roof Rack Anchors (if equipped) ............... 5-78
HomeLink® (if equipped) .................................................... 5-80
Frame Hooks ....................................................................... 5-83
Page 160 of 337
5-7OTHER CONTROLS AND EQUIPMENT
79K21-03E
To return the blower speed selector (2),
air intake selector (3), and air flow selec-
tor (4) to automatic operation, push the
“AUTO” switch.
64J080
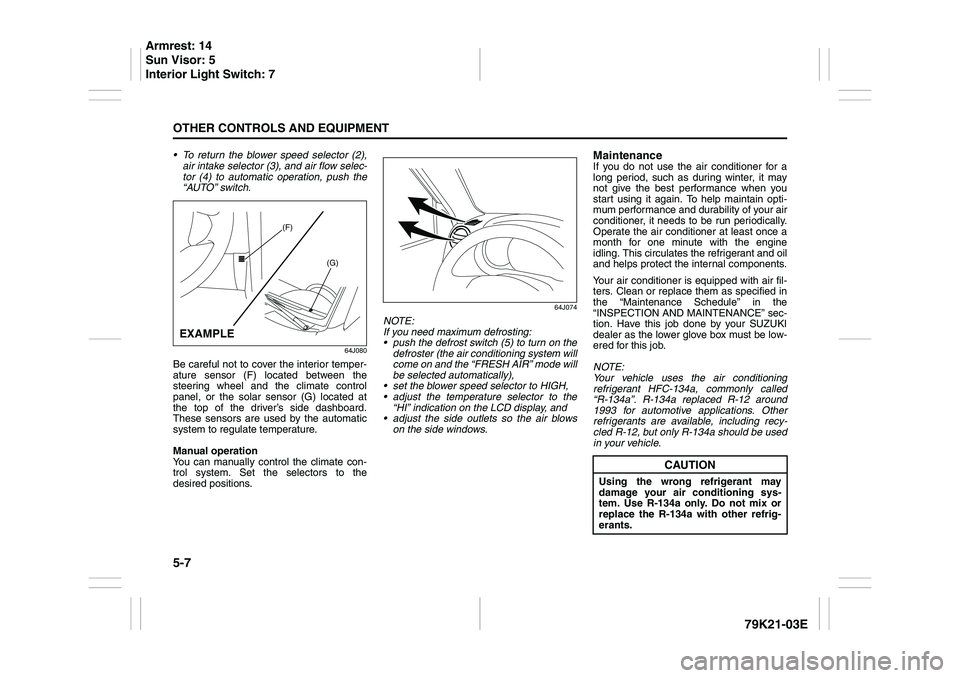
Be careful not to cover the interior temper-
ature sensor (F) located between the
steering wheel and the climate control
panel, or the solar sensor (G) located at
the top of the driver’s side dashboard.
These sensors are used by the automatic
system to regulate temperature.
Manual operation
You can manually control the climate con-
trol system. Set the selectors to the
desired positions.
64J074
NOTE:
If you need maximum defrosting:
push the defrost switch (5) to turn on the
defroster (the air conditioning system will
come on and the “FRESH AIR” mode will
be selected automatically),
set the blower speed selector to HIGH,
adjust the temperature selector to the
“HI” indication on the LCD display, and
adjust the side outlets so the air blows
on the side windows.
MaintenanceIf you do not use the air conditioner for a
long period, such as during winter, it may
not give the best performance when you
start using it again. To help maintain opti-
mum performance and durability of your air
conditioner, it needs to be run periodically.
Operate the air conditioner at least once a
month for one minute with the engine
idling. This circulates the refrigerant and oil
and helps protect the internal components.
Your air conditioner is equipped with air fil-
ters. Clean or replace them as specified in
the “Maintenance Schedule” in the
“INSPECTION AND MAINTENANCE” sec-
tion. Have this job done by your SUZUKI
dealer as the lower glove box must be low-
ered for this job.
NOTE:
Your vehicle uses the air conditioning
refrigerant HFC-134a, commonly called
“R-134a”. R-134a replaced R-12 around
1993 for automotive applications. Other
refrigerants are available, including recy-
cled R-12, but only R-134a should be used
in your vehicle.
(F)
(G)
EXAMPLE
CAUTION
Using the wrong refrigerant may
damage your air conditioning sys-
tem. Use R-134a only. Do not mix or
replace the R-134a with other refrig-
erants.
Armrest: 14
Sun Visor: 5
Interior Light Switch: 7
Page 161 of 337
5-8
OTHER CONTROLS AND EQUIPMENT
79K21-03E
Radio Antenna
63J055
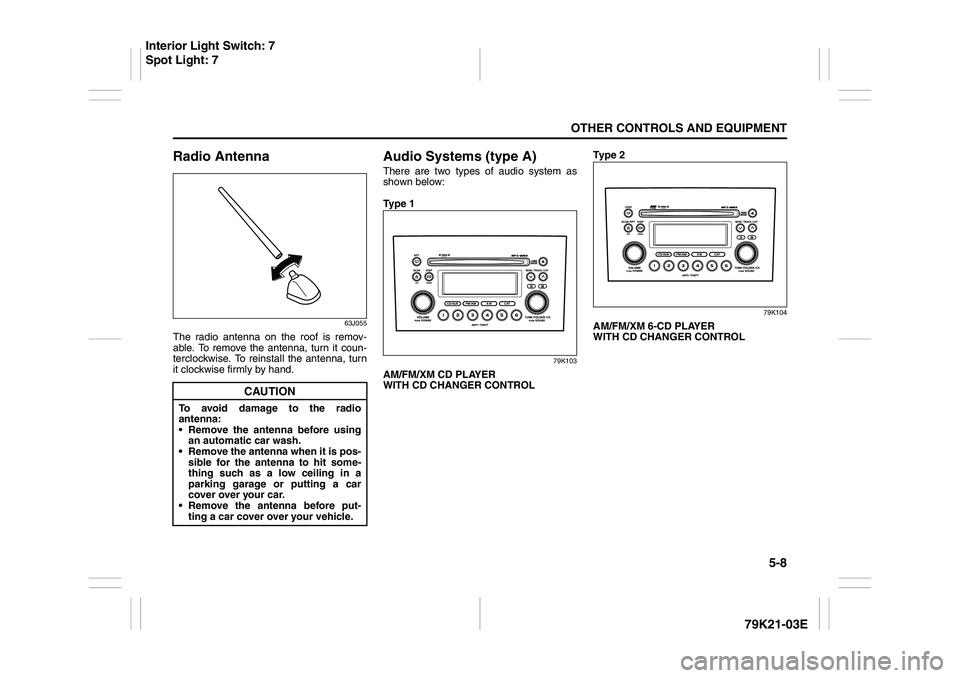
The radio antenna on the roof is remov-
able. To remove the antenna, turn it coun-
terclockwise. To reinstall the antenna, turn
it clockwise firmly by hand.
Audio Systems (type A)There are two types of audio system as
shown below:
Ty p e 1
79K103
AM/FM/XM CD PLAYER
WITH CD CHANGER CONTROLTy p e 2
79K104
AM/FM/XM 6-CD PLAYER
WITH CD CHANGER CONTROL
CAUTION
To avoid damage to the radio
antenna:
Remove the antenna before using
an automatic car wash.
Remove the antenna when it is pos-
sible for the antenna to hit some-
thing such as a low ceiling in a
parking garage or putting a car
cover over your car.
Remove the antenna before put-
ting a car cover over your vehicle.
Interior Light Switch: 7
Spot Light: 7
Page 217 of 337
5-64
OTHER CONTROLS AND EQUIPMENT
79K21-03E
64J112
3) Continue to lift up the hood until it is
high enough to support with the prop
rod.
To close the engine hood:
1) Lift the hood up slightly and remove the
prop rod from the hole. Put the prop rod
back to the holding clip.
2) Lower the hood close to the bumper,
then let it drop down.
Make sure the hood is securely latched
after closing.
Sun Visor
79K055
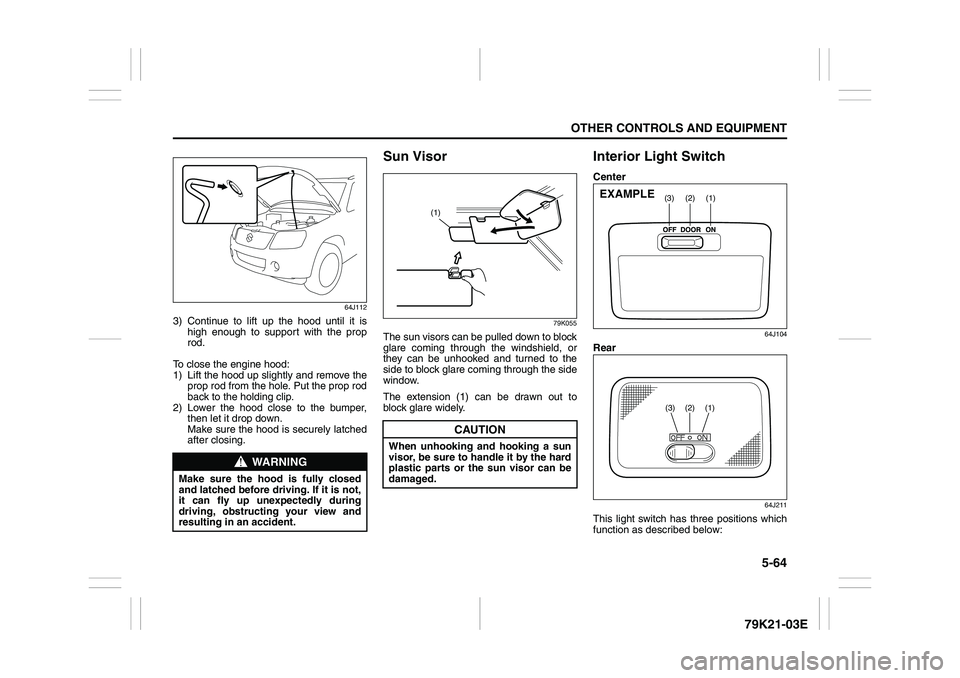
The sun visors can be pulled down to block
glare coming through the windshield, or
they can be unhooked and turned to the
side to block glare coming through the side
window.
The extension (1) can be drawn out to
block glare widely.
Interior Light SwitchCenter
64J104
Rear
64J211
This light switch has three positions which
function as described below:
WARNING
Make sure the hood is fully closed
and latched before driving. If it is not,
it can fly up unexpectedly during
driving, obstructing your view and
resulting in an accident.
CAUTION
When unhooking and hooking a sun
visor, be sure to handle it by the hard
plastic parts or the sun visor can be
damaged.
(1)
(1)
(2)
(3)
EXAMPLE
(3)
(2)
(1)
Page 218 of 337

5-65OTHER CONTROLS AND EQUIPMENT
79K21-03E
ON (1)
The light comes on and stays on regard-
less of whether the door is open or closed.
DOOR (2)
The light comes on when the door is
opened.
After closing all doors (including the tail-
gate), the light will remain on for about 15
seconds and then fade out. If you push in
the ignition switch or insert the key during
this time, the light will start to fade out
immediately.
After removing the key from the ignition
switch, the light will turn on for about 15
seconds and then fade out.
OFF (3)
The light remains off even when the door is
opened.
78K146
NOTE:
The number of doors involved in the light-
ing operation of the interior light depends
on the vehicle specification. If there is a
switch (rubber projection) at the door
opening as shown, the door is involved in
the lighting operation.
Luggage Compartment Light
66J047
The luggage compartment light is located
at the left side of the rear luggage com-
partment.
When you open any of the doors including
the tailgate with the luggage compartment
light switch in the “DOOR” position (1), the
light comes on and remains on as long as
you keep the door open.
After closing all doors, the light will remain
on for about 15 seconds and then fade out.
If you push in the ignition switch or insert
the key during this time, the light will start
to fade out immediately.
After removing the key from the ignition
switch, the light will turn on for about 15
seconds and then fade out.
When the luggage compartment light
switch is in the “OFF” position (2), the light
EXAMPLE
(1)(2)
Page 289 of 337
7-40
INSPECTION AND MAINTENANCE
79K21-03E
Bulb ReplacementNOTE:
If it is difficult to replace headlight bulbs or
clearance light bulbs due to under-hood
components trust this job to your dealer.
Center Interior Light (if equipped)
64J159
Pull down the lens by using a flat blade
screwdriver covered with a soft cloth as
shown. To install it, simply push it back in.
The bulb can be removed by simply pulling
it out. When replacing the bulb, make sure
that the contact springs are holding the
bulb securely.
Rear Interior Light (if equipped)
64J160
Pull down the lens by using a flat blade
screwdriver covered with a soft cloth as
shown. To install it, simply push it back in.
The bulb can be removed by simply pulling
it out.
WARNING
Light bulbs can be hot enough to
burn your finger right after being
turned off. This is true especially
for halogen headlight bulbs.
Replace the bulbs after they
become cool enough.
The headlight bulbs are filled with
pressurized halogen gas. They can
burst and injure you if they are hit
or dropped. Handle them carefully.
CAUTION
The oils from your skin may cause a
halogen bulb to overheat and burst
when the lights are on. Grasp a new
bulb with a clean cloth.
CAUTION
Frequent replacement of a bulb indi-
cates the need for an inspection of
the electrical system. This should be
carried out by your SUZUKI dealer.
Wiper Blades: 3