child lock SUZUKI GRAND VITARA 2014 Owners Manual
[x] Cancel search | Manufacturer: SUZUKI, Model Year: 2014, Model line: GRAND VITARA, Model: SUZUKI GRAND VITARA 2014Pages: 337, PDF Size: 6.21 MB
Page 17 of 337
BEFORE DRIVING
2
79K21-03E
60G404
BEFORE DRIVINGKeys ...................................................................................... 2-1
Door Locks .......................................................................... 2-1
Keyless Start System Remote Controller/Keyless Entry
System Transmitter ............................................................. 2-4
Theft Deterrent Light ........................................................... 2-15
Windows .............................................................................. 2-15
Mirrors .................................................................................. 2-17
Front Seats .......................................................................... 2-18
Rear Seats ............................................................................ 2-22
Seat Belts and Child Restraint Systems ........................... 2-26
Supplemental Restraint System (air bags) ....................... 2-43
Instrument Cluster .............................................................. 2-54
Warning and Indicator Lights ............................................ 2-55
Speedometer ....................................................................... 2-65
Tachometer .......................................................................... 2-65
Fuel Gauge ........................................................................... 2-65
Temperature Gauge ............................................................ 2-66
Brightness Control .............................................................. 2-66
Information Display (if equipped) ...................................... 2-67
Lighting Control Lever ........................................................ 2-75
Front Fog Light Switch (if equipped) ................................ 2-78
Turn Signal Control Lever .................................................. 2-78
Hazard Warning Switch ...................................................... 2-79
Windshield Wiper and Washer Lever ................................ 2-79
Tilt Steering Lock Lever ..................................................... 2-82
Horn ...................................................................................... 2-82
Rear Window Defroster and Outside Rearview Mirrors
Defroster (if equipped) Switch ........................................... 2-82
Page 20 of 337
2-3BEFORE DRIVING
79K21-03E
(when using the power door locking
switch)
To lock or unlock all the doors simulta-
neously, depress the front or rear of the
switch respectively.
NOTE:
If your vehicle is equipped with the key-
less entry system, you can also lock or
unlock all doors by operating the remote
controller/transmitter. Refer to “Keyless
Start System Remote Controller/Key-
less Entry System Transmitter” in this
section.
If your vehicle is equipped with the key-
less start system, you can also lock or
unlock all doors by pushing the request
switch on the door handle. Refer to “Key-
less Start System Remote Controller/
Keyless Entry System Transmitter” in
this section.
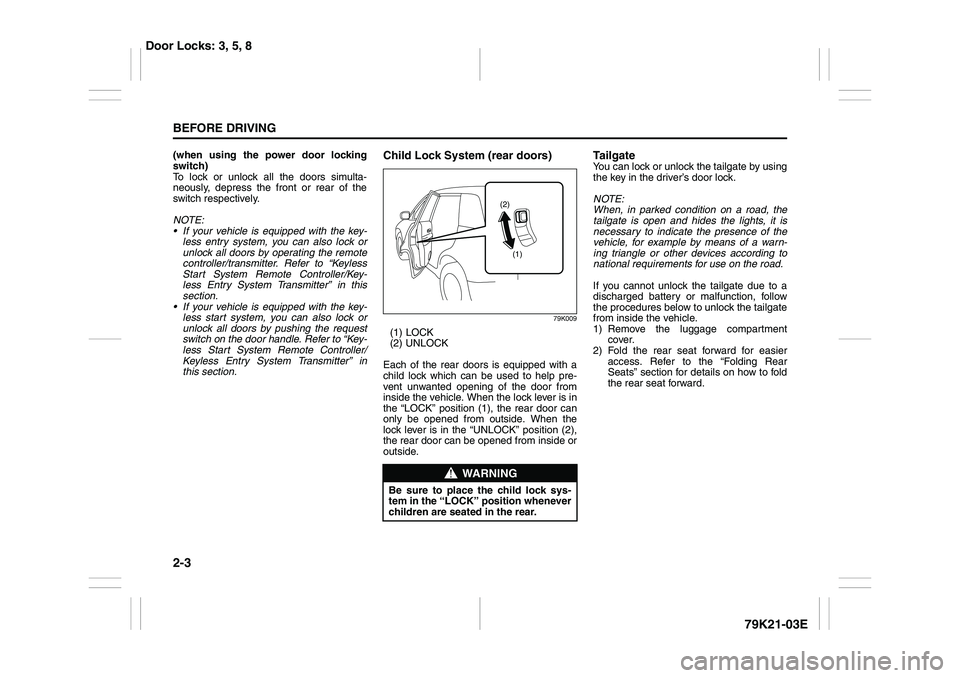
Child Lock System (rear doors)
79K009
(1) LOCK
(2) UNLOCK
Each of the rear doors is equipped with a
child lock which can be used to help pre-
vent unwanted opening of the door from
inside the vehicle. When the lock lever is in
the “LOCK” position (1), the rear door can
only be opened from outside. When the
lock lever is in the “UNLOCK” position (2),
the rear door can be opened from inside or
outside.
Ta i l g a t eYou can lock or unlock the tailgate by using
the key in the driver’s door lock.
NOTE:
When, in parked condition on a road, the
tailgate is open and hides the lights, it is
necessary to indicate the presence of the
vehicle, for example by means of a warn-
ing triangle or other devices according to
national requirements for use on the road.
If you cannot unlock the tailgate due to a
discharged battery or malfunction, follow
the procedures below to unlock the tailgate
from inside the vehicle.
1) Remove the luggage compartment
cover.
2) Fold the rear seat forward for easier
access. Refer to the “Folding Rear
Seats” section for details on how to fold
the rear seat forward.
WARNING
Be sure to place the child lock sys-
tem in the “LOCK” position whenever
children are seated in the rear.
(1) (2)
Door Locks: 3, 5, 8
Page 26 of 337
2-9BEFORE DRIVING
79K21-03E
Replacement of the battery
If the remote controller becomes unreli-
able, replace the battery.
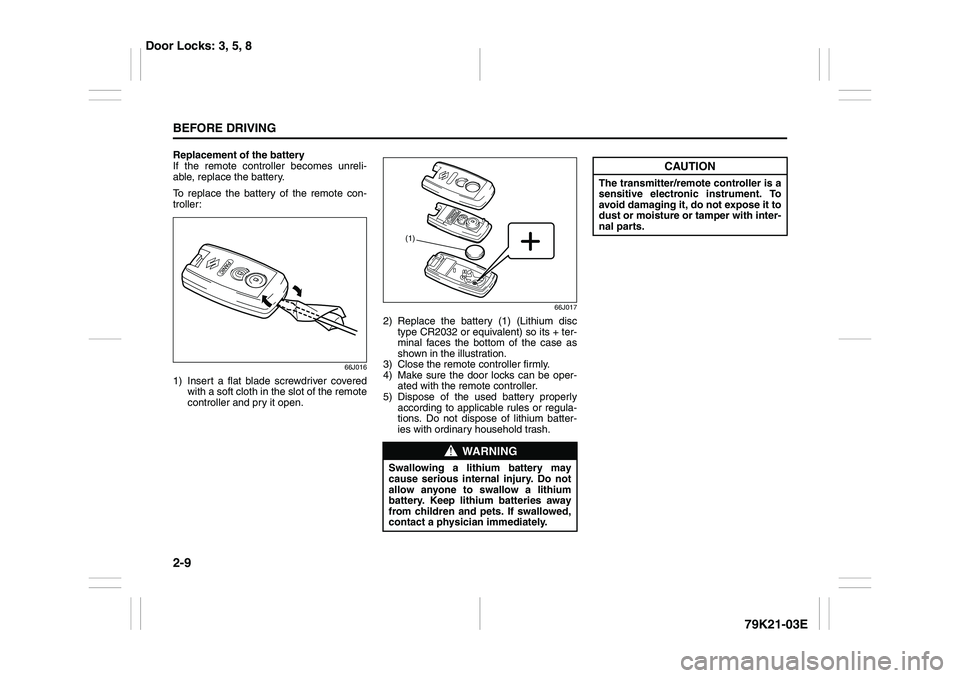
To replace the battery of the remote con-
troller:
66J016
1) Insert a flat blade screwdriver covered
with a soft cloth in the slot of the remote
controller and pry it open.
66J017
2) Replace the battery (1) (Lithium disc
type CR2032 or equivalent) so its + ter-
minal faces the bottom of the case as
shown in the illustration.
3) Close the remote controller firmly.
4) Make sure the door locks can be oper-
ated with the remote controller.
5) Dispose of the used battery properly
according to applicable rules or regula-
tions. Do not dispose of lithium batter-
ies with ordinary household trash.
WARNING
Swallowing a lithium battery may
cause serious internal injury. Do not
allow anyone to swallow a lithium
battery. Keep lithium batteries away
from children and pets. If swallowed,
contact a physician immediately.
(1)
CAUTION
The transmitter/remote controller is a
sensitive electronic instrument. To
avoid damaging it, do not expose it to
dust or moisture or tamper with inter-
nal parts.
Door Locks: 3, 5, 8
Page 30 of 337
2-13BEFORE DRIVING
79K21-03E
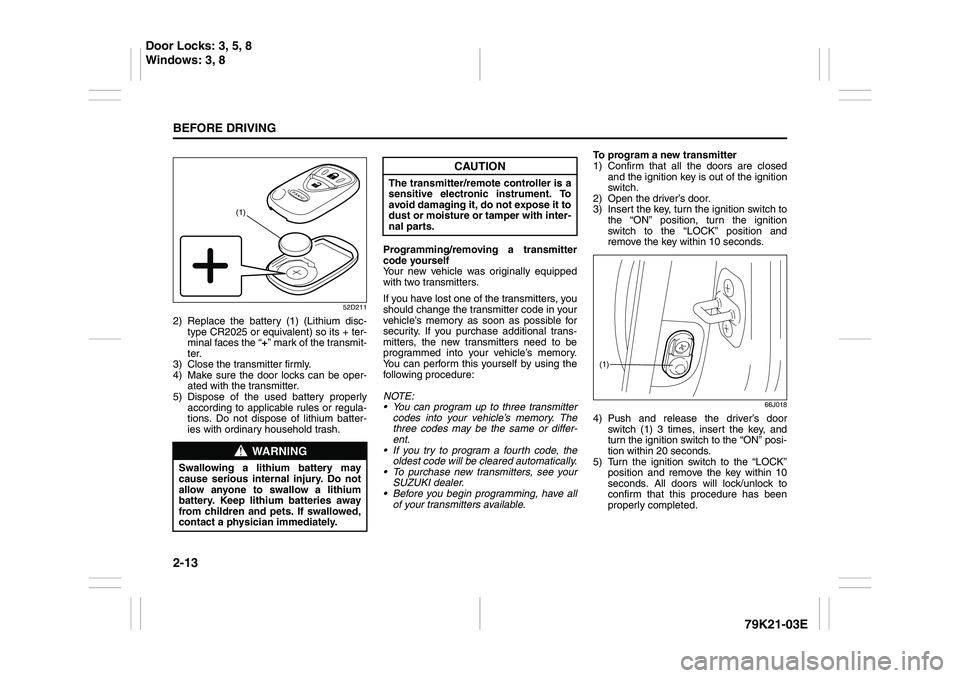
52D211
2) Replace the battery (1) (Lithium disc-
type CR2025 or equivalent) so its + ter-
minal faces the “+” mark of the transmit-
ter.
3) Close the transmitter firmly.
4) Make sure the door locks can be oper-
ated with the transmitter.
5) Dispose of the used battery properly
according to applicable rules or regula-
tions. Do not dispose of lithium batter-
ies with ordinary household trash.Programming/removing a transmitter
code yourself
Your new vehicle was originally equipped
with two transmitters.
If you have lost one of the transmitters, you
should change the transmitter code in your
vehicle’s memory as soon as possible for
security. If you purchase additional trans-
mitters, the new transmitters need to be
programmed into your vehicle’s memory.
You can perform this yourself by using the
following procedure:
NOTE:
You can program up to three transmitter
codes into your vehicle’s memory. The
three codes may be the same or differ-
ent.
If you try to program a fourth code, the
oldest code will be cleared automatically.
To purchase new transmitters, see your
SUZUKI dealer.
Before you begin programming, have all
of your transmitters available.To program a new transmitter
1) Confirm that all the doors are closed
and the ignition key is out of the ignition
switch.
2) Open the driver’s door.
3) Insert the key, turn the ignition switch to
the “ON” position, turn the ignition
switch to the “LOCK” position and
remove the key within 10 seconds.
66J018
4) Push and release the driver’s door
switch (1) 3 times, insert the key, and
turn the ignition switch to the “ON” posi-
tion within 20 seconds.
5) Turn the ignition switch to the “LOCK”
position and remove the key within 10
seconds. All doors will lock/unlock to
confirm that this procedure has been
properly completed.
WARNING
Swallowing a lithium battery may
cause serious internal injury. Do not
allow anyone to swallow a lithium
battery. Keep lithium batteries away
from children and pets. If swallowed,
contact a physician immediately.
(1)
CAUTION
The transmitter/remote controller is a
sensitive electronic instrument. To
avoid damaging it, do not expose it to
dust or moisture or tamper with inter-
nal parts.
(1)
Door Locks: 3, 5, 8
Windows: 3, 8
Page 33 of 337
2-16
BEFORE DRIVING
79K21-03E
81A009
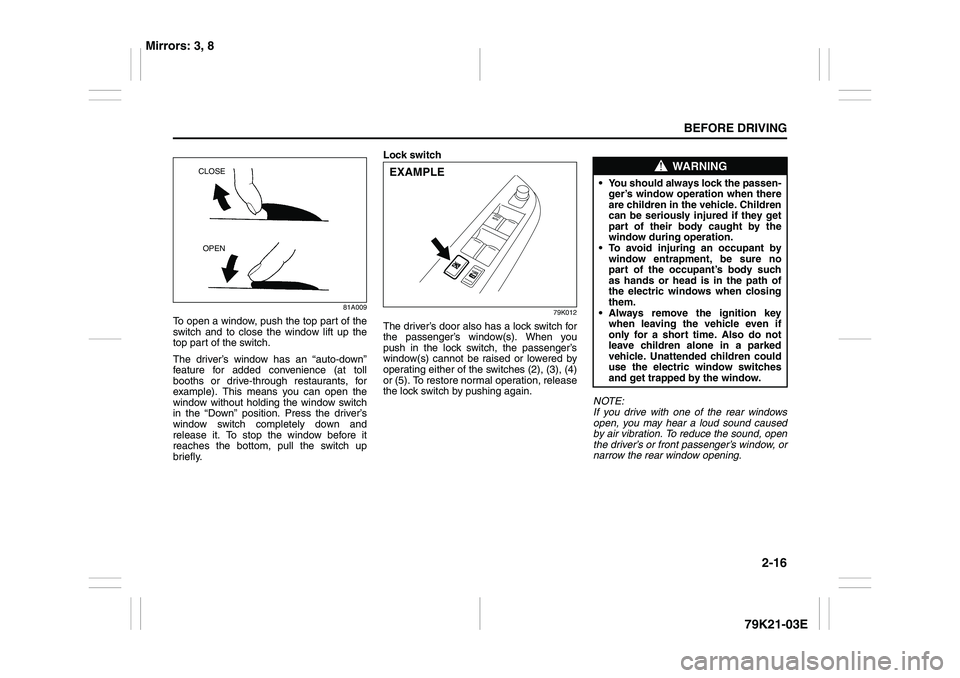
To open a window, push the top part of the
switch and to close the window lift up the
top part of the switch.
The driver’s window has an “auto-down”
feature for added convenience (at toll
booths or drive-through restaurants, for
example). This means you can open the
window without holding the window switch
in the “Down” position. Press the driver’s
window switch completely down and
release it. To stop the window before it
reaches the bottom, pull the switch up
briefly.Lock switch
79K012
The driver’s door also has a lock switch for
the passenger’s window(s). When you
push in the lock switch, the passenger’s
window(s) cannot be raised or lowered by
operating either of the switches (2), (3), (4)
or (5). To restore normal operation, release
the lock switch by pushing again.
NOTE:
If you drive with one of the rear windows
open, you may hear a loud sound caused
by air vibration. To reduce the sound, open
the driver’s or front passenger’s window, or
narrow the rear window opening.
CLOSE
OPEN
EXAMPLE
WARNING
You should always lock the passen-
ger’s window operation when there
are children in the vehicle. Children
can be seriously injured if they get
part of their body caught by the
window during operation.
To avoid injuring an occupant by
window entrapment, be sure no
part of the occupant’s body such
as hands or head is in the path of
the electric windows when closing
them.
Always remove the ignition key
when leaving the vehicle even if
only for a short time. Also do not
leave children alone in a parked
vehicle. Unattended children could
use the electric window switches
and get trapped by the window.
Mirrors: 3, 8
Page 36 of 337
2-19BEFORE DRIVING
79K21-03E
Adjusting Seat Position
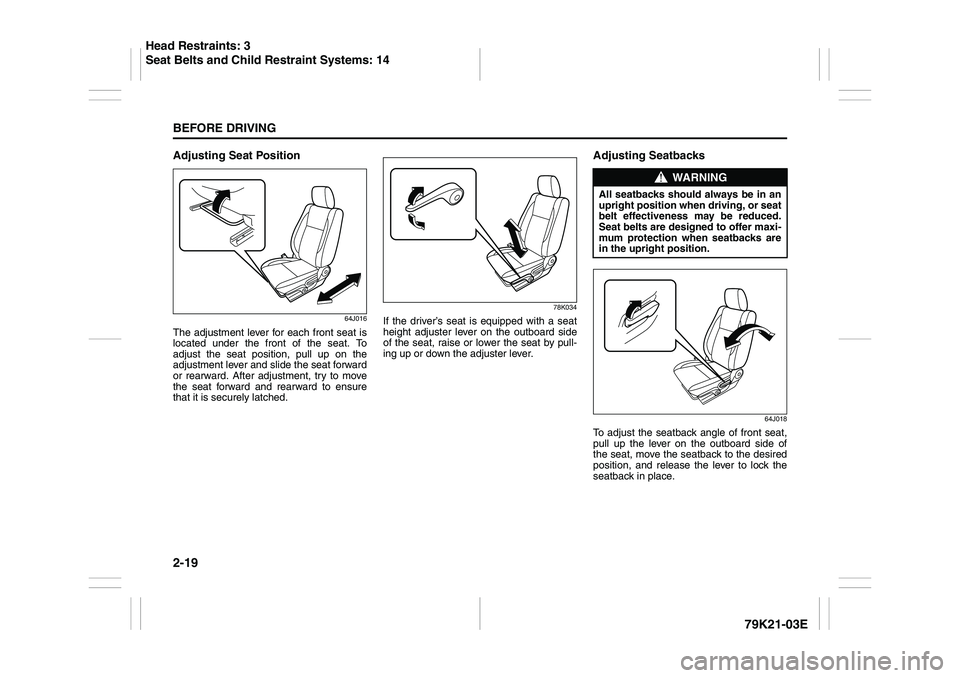
64J016
The adjustment lever for each front seat is
located under the front of the seat. To
adjust the seat position, pull up on the
adjustment lever and slide the seat forward
or rearward. After adjustment, try to move
the seat forward and rearward to ensure
that it is securely latched.
78K034
If the driver’s seat is equipped with a seat
height adjuster lever on the outboard side
of the seat, raise or lower the seat by pull-
ing up or down the adjuster lever.
Adjusting Seatbacks
64J018
To adjust the seatback angle of front seat,
pull up the lever on the outboard side of
the seat, move the seatback to the desired
position, and release the lever to lock the
seatback in place.
WARNING
All seatbacks should always be in an
upright position when driving, or seat
belt effectiveness may be reduced.
Seat belts are designed to offer maxi-
mum protection when seatbacks are
in the upright position.
Head Restraints: 3
Seat Belts and Child Restraint Systems: 14
Page 39 of 337
2-22
BEFORE DRIVING
79K21-03E
Rear SeatsSeat Adjustment
Adjusting Seatbacks
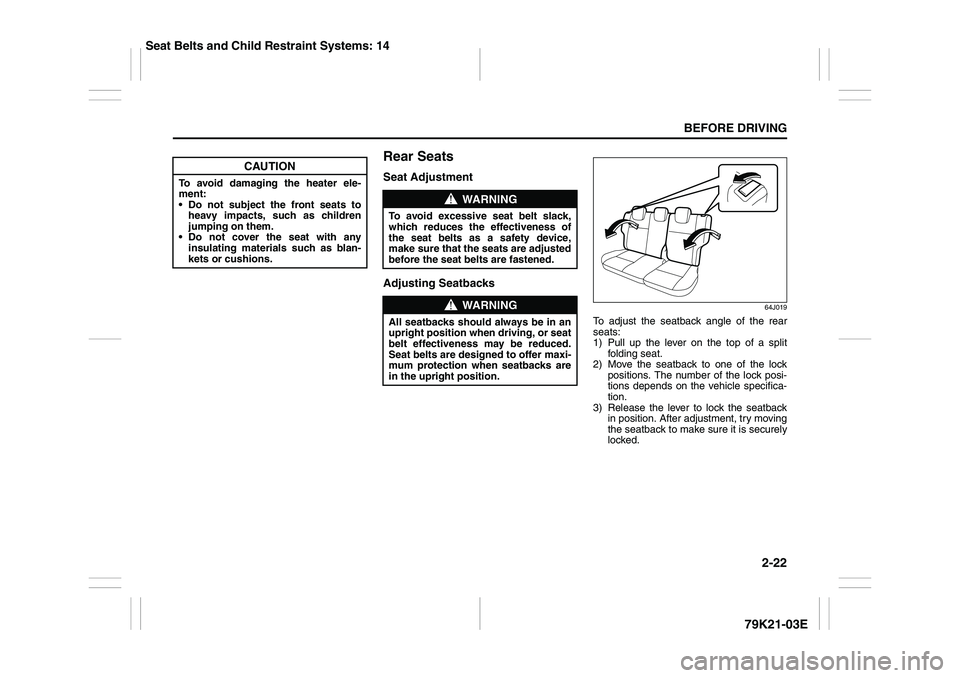
64J019
To adjust the seatback angle of the rear
seats:
1) Pull up the lever on the top of a split
folding seat.
2) Move the seatback to one of the lock
positions. The number of the lock posi-
tions depends on the vehicle specifica-
tion.
3) Release the lever to lock the seatback
in position. After adjustment, try moving
the seatback to make sure it is securely
locked.
CAUTION
To avoid damaging the heater ele-
ment:
Do not subject the front seats to
heavy impacts, such as children
jumping on them.
Do not cover the seat with any
insulating materials such as blan-
kets or cushions.
WARNING
To avoid excessive seat belt slack,
which reduces the effectiveness of
the seat belts as a safety device,
make sure that the seats are adjusted
before the seat belts are fastened.
WARNING
All seatbacks should always be in an
upright position when driving, or seat
belt effectiveness may be reduced.
Seat belts are designed to offer maxi-
mum protection when seatbacks are
in the upright position.
Seat Belts and Child Restraint Systems: 14
Page 41 of 337
2-24
BEFORE DRIVING
79K21-03E
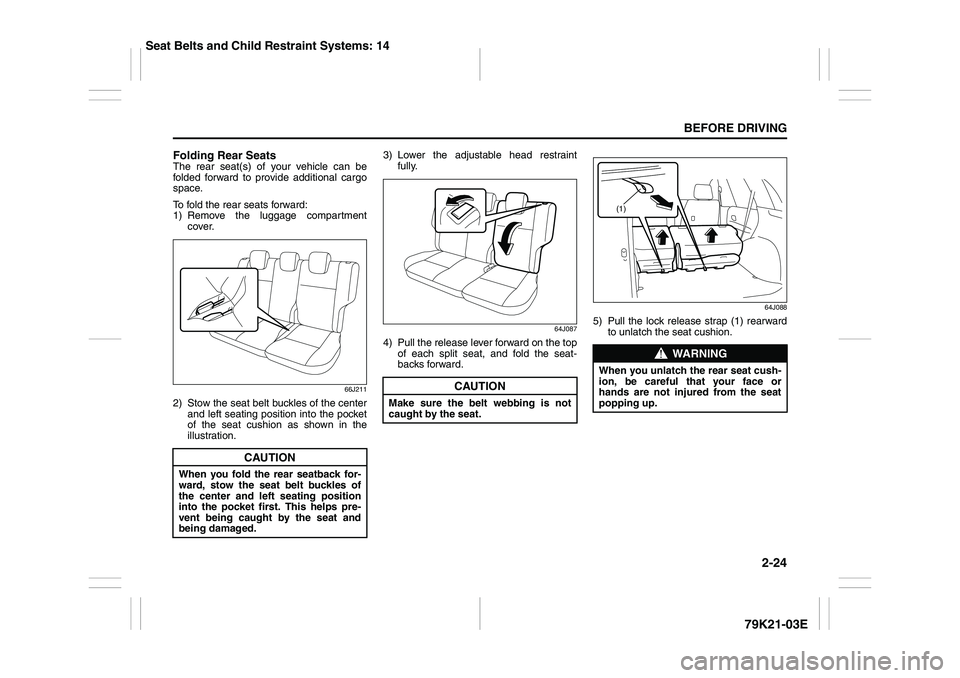
Folding Rear SeatsThe rear seat(s) of your vehicle can be
folded forward to provide additional cargo
space.
To fold the rear seats forward:
1) Remove the luggage compartment
cover.
66J211
2) Stow the seat belt buckles of the center
and left seating position into the pocket
of the seat cushion as shown in the
illustration.3) Lower the adjustable head restraint
fully.
64J087
4) Pull the release lever forward on the top
of each split seat, and fold the seat-
backs forward.
64J088
5) Pull the lock release strap (1) rearward
to unlatch the seat cushion.
CAUTION
When you fold the rear seatback for-
ward, stow the seat belt buckles of
the center and left seating position
into the pocket first. This helps pre-
vent being caught by the seat and
being damaged.
CAUTION
Make sure the belt webbing is not
caught by the seat.
WARNING
When you unlatch the rear seat cush-
ion, be careful that your face or
hands are not injured from the seat
popping up.
(1)
Seat Belts and Child Restraint Systems: 14
Page 43 of 337
2-26
BEFORE DRIVING
79K21-03E
64J091
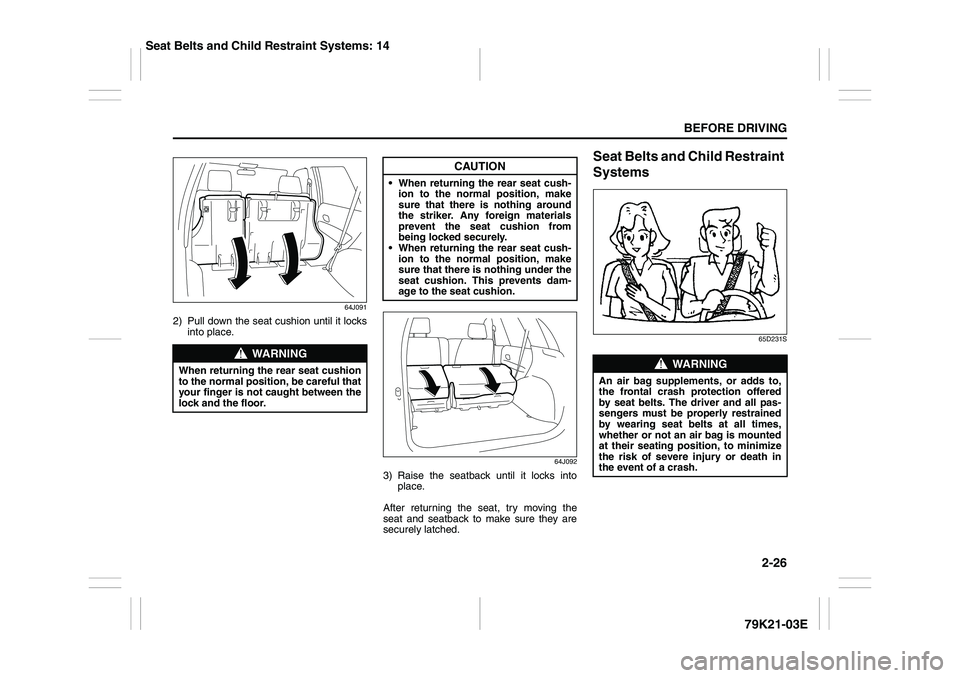
2) Pull down the seat cushion until it locks
into place.
64J092
3) Raise the seatback until it locks into
place.
After returning the seat, try moving the
seat and seatback to make sure they are
securely latched.
Seat Belts and Child Restraint
Systems
65D231S
WARNING
When returning the rear seat cushion
to the normal position, be careful that
your finger is not caught between the
lock and the floor.
CAUTION
When returning the rear seat cush-
ion to the normal position, make
sure that there is nothing around
the striker. Any foreign materials
prevent the seat cushion from
being locked securely.
When returning the rear seat cush-
ion to the normal position, make
sure that there is nothing under the
seat cushion. This prevents dam-
age to the seat cushion.
WARNING
An air bag supplements, or adds to,
the frontal crash protection offered
by seat belts. The driver and all pas-
sengers must be properly restrained
by wearing seat belts at all times,
whether or not an air bag is mounted
at their seating position, to minimize
the risk of severe injury or death in
the event of a crash.
Seat Belts and Child Restraint Systems: 14
Page 45 of 337
2-28
BEFORE DRIVING
79K21-03E
Lap-Shoulder BeltEmergency Locking Retractor (ELR)
The lap-shoulder seat belt has an emer-
gency locking retractor (ELR), which is
designed to lock the seat belt only during a
sudden stop or impact. It also may lock if
you pull the belt across your body very
quickly. If this happens, let the belt go back
to unlock it, then pull the belt across your
body more slowly.
Automatic Locking Retractor (ALR)
The front passenger’s seat belt and the
rear seat belts have emergency locking
retractors (ELRs) that can be temporarily
converted to function as automatic locking
retractors (ALRs). The ALR mode should
be used if you need to secure a child
restraint system in the seat. Refer to the
“Child Restraint Systems” section for
details.
WARNING
(Continued)
Do not wear your seat belt over
hard or breakable objects in your
pockets or on your clothing. If an
accident occurs, objects such as
glasses, pens, etc. under the seat
belt can cause injury.
Never use the same seat belt on
more than one occupant and never
attach a seat belt over an infant or
child being held on an occupant’s
lap. Such seat belt use could cause
serious injury in the event of an
accident.
Periodically inspect seat belt
assemblies for excessive wear and
damage. Seat belts should be
replaced if webbing becomes
frayed, contaminated, or damaged
in any way. It is essential to replace
the entire seat belt assembly after it
has been worn in a severe impact,
even if damage to the assembly is
not obvious.
Children age 12 and under should
ride properly restrained in the rear
seat, if equipped.
(Continued)
WARNING
(Continued)
Infants and small children should
never be transported unless they
are properly restrained. Restraint
systems for infants and small chil-
dren can be purchased commer-
cially and should be used. Make
sure that the system you purchase
meets Federal Motor Vehicle Safety
Standards. Read and follow all the
directions provided by the manu-
facturer.
Avoid contamination of seat belt
webbing by polishes, oils, chemi-
cals and particularly battery acid.
Cleaning may safely be carried out
using mild soap and water.
For children, if the shoulder belt
irritates the neck or face, move the
child closer to the center of the
vehicle.
All seatbacks should always be in
an upright position when driving,
or seat belt effectiveness may be
reduced. Seat belts are designed to
offer maximum protection when
seatbacks are in the upright posi-
tion.
Seat Belts and Child Restraint Systems: 14