belt SUZUKI GRAND VITARA 2021 User Guide
[x] Cancel search | Manufacturer: SUZUKI, Model Year: 2021, Model line: GRAND VITARA, Model: SUZUKI GRAND VITARA 2021Pages: 482, PDF Size: 21 MB
Page 54 of 482
2-32
BEFORE DRIVING
54P00-01E
61MM0A060
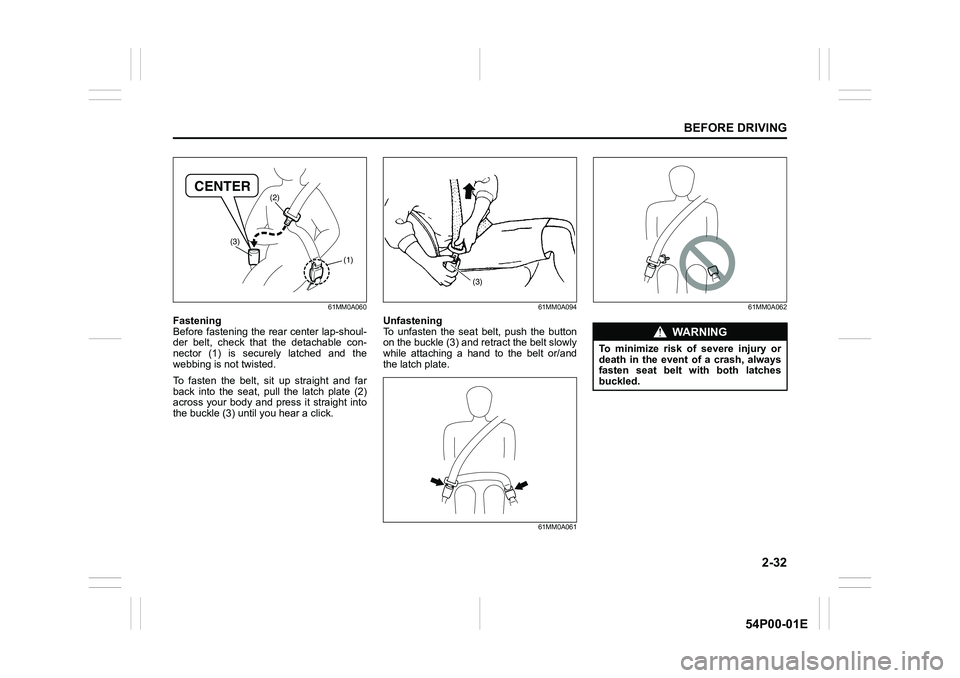
Fastening
Before fastening the rear center lap-shoul-
der belt, check that the detachable con-
nector (1) is securely latched and the
webbing is not twisted.
To fasten the belt, sit up straight and far
back into the seat, pull the latch plate (2)
across your body and press it straight into
the buckle (3) until you hear a click.
61MM0A094
Unfastening
To unfasten the seat belt, push the button
on the buckle (3) and retract the belt slowly
while attaching a hand to the belt or/and
the latch plate.
61MM0A06161MM0A062
(1) (2)
(3)
CENTER
(3)
WA R N I N G
To minimize risk of severe injury or
death in the event of a crash, always
fasten seat belt with both latches
buckled.
Page 55 of 482
2-33
BEFORE DRIVING
54P00-01E
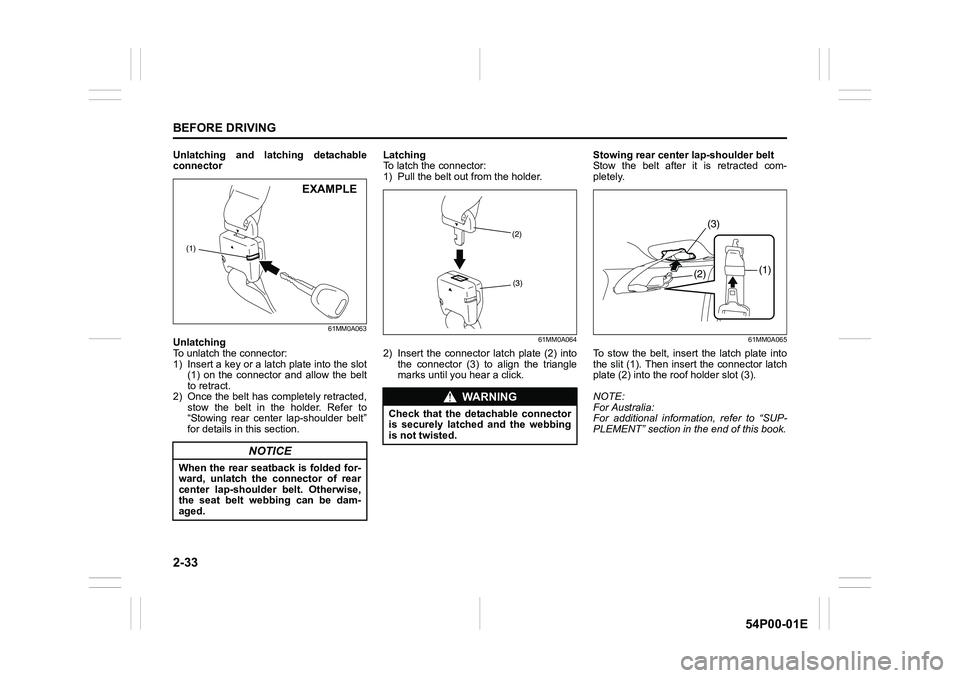
Unlatching and latching detachable
connector
61MM0A063
Unlatching
To unlatch the connector:
1) Insert a key or a latch plate into the slot
(1) on the connector and allow the belt
to retract.
2) Once the belt has completely retracted,
stow the belt in the holder. Refer to
“Stowing rear center lap-shoulder belt”
for details in this section.Latching
To latch the connector:
1) Pull the belt out from the holder.61MM0A064
2) Insert the connector latch plate (2) into
the connector (3) to align the triangle
marks until you hear a click.Stowing rear center lap-shoulder belt
Stow the belt after it is retracted com-
pletely.
61MM0A065
To stow the belt, insert the latch plate into
the slit (1). Then insert the connector latch
plate (2) into the roof holder slot (3).
NOTE:
For Australia:
For additional information, refer to “SUP-
PLEMENT” section in the end of this book.
NOTICE
When the rear seatback is folded for-
ward, unlatch the connector of rear
center lap-shoulder belt. Otherwise,
the seat belt webbing can be dam-
aged.
(1)
EXAMPLE
WA R N I N G
Check that the detachable connector
is securely latched and the webbing
is not twisted.
(2)
(3)(3)
(2)
(1)
Page 56 of 482
2-34
BEFORE DRIVING
54P00-01E
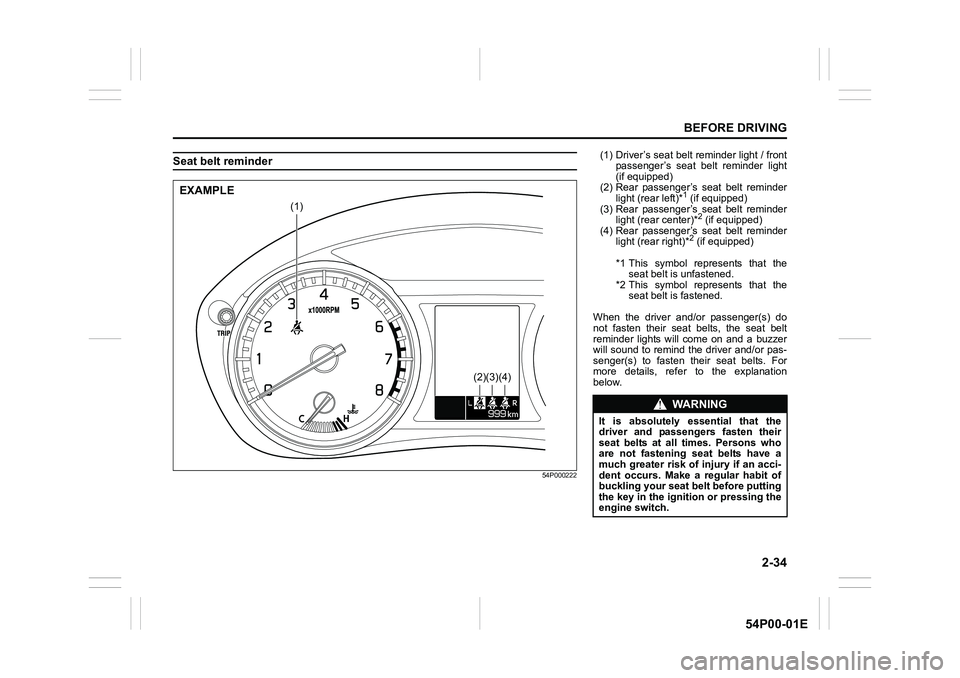
Seat belt reminder
54P000222
(1)
(2)(3)(4)
EXAMPLE
(1) Driver’s seat belt reminder light / front
passenger’s seat belt reminder light
(if equipped)
(2) Rear passenger’s seat belt reminder
light (rear left)*
1 (if equipped)
(3) Rear passenger’s seat belt reminder
light (rear center)*
2 (if equipped)
(4) Rear passenger’s seat belt reminder
light (rear right)*
2 (if equipped)
*1 This symbol represents that the
seat belt is unfastened.
*2 This symbol represents that the
seat belt is fastened.
When the driver and/or passenger(s) do
not fasten their seat belts, the seat belt
reminder lights will come on and a buzzer
will sound to remind the driver and/or pas-
senger(s) to fasten their seat belts. For
more details, refer to the explanation
below.
WA R N I N G
It is absolutely essential that the
driver and passengers fasten their
seat belts at all times. Persons who
are not fastening seat belts have a
much greater risk of injury if an acci-
dent occurs. Make a regular habit of
buckling your seat belt before putting
the key in the ignition or pressing the
engine switch.
Page 57 of 482
2-35
BEFORE DRIVING
54P00-01E
Driver’s seat belt reminder
If the driver’s seat belt remains unbuckled
when the ignition switch is turned to “ON”
position or the engine switch is pressed to
change the ignition mode to “ON”, the
reminder works as follows:
1) The driver’s seat belt reminder light will
come on. The front passenger’s seat
belt reminder light (if equipped) will also
come on if a front passenger does not
fasten his/her seat belt.
2) After the vehicle’s speed has reached
about 15 km/h, the driver’s seat belt
reminder light will blink and a buzzer
will sound for about 95 seconds.
3) The reminder light will remain on until
the driver’s seat belt is buckled.
If the driver has buckled his or her seat belt
and later unbuckles the seat belt, the
reminder system will be activated from
Step 1) or 2) according to the vehicle’s
speed. When the vehicle’s speed is less
than 15 km/h, the reminder will start from
Step 1). When the vehicle’s speed is more
than 15 km/h, the reminder will start from
Step 2).
The reminder will be automatically can-
celed when the driver’s seat belt is buckled
or the ignition switch is turned off, or the
engine switch is pressed to change the
ignition mode to “LOCK” (OFF).Front passenger’s seat belt reminder (if
equipped)
The front passenger’s seat belt reminder
will activate only when there is a passen-
ger sitting in the front seat. In some situa-
tions, however, such as when you place
heavy objects in the front seat, the seat
belt reminder can be activated as if a pas-
senger was present. The front passenger’s
seat belt reminder works in the same man-
ner as the driver’s seat belt reminder.
Rear passenger’s seat belt reminder (if
equipped)
If a rear seat belt is not fastened when the
engine is started, all the rear passenger’s
seat belt reminder lights will come on for
about 35 seconds and then go out. Within
this 35 seconds, the corresponding
reminder is highlighted. The reminder
fades when the seat belt is fastened.
The rear passenger’s seat belt reminder
lights will also come on for about 35 sec-
onds in the following conditions.
• If a seat belt is unfastened when the
vehicle speed is less than 15 km/h, the
corresponding light will be highlighted.
• If a seat belt is unfastened when the
vehicle speed is more than 15 km/h, the
corresponding light will be highlighted
and a buzzer will sound.The reminder will be automatically can-
celed when the rear seat belt is buckled or
the ignition switch is turned off, or the
engine switch is pressed to change the
ignition mode to “LOCK” (OFF).
Page 58 of 482
2-36
BEFORE DRIVING
54P00-01E
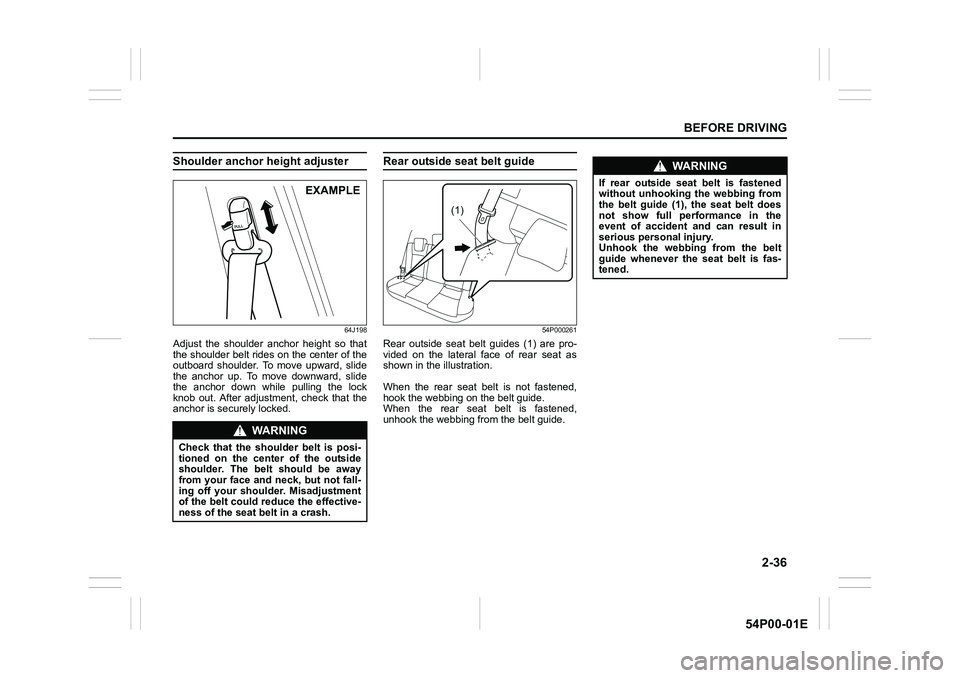
Shoulder anchor height adjuster
64J198
Adjust the shoulder anchor height so that
the shoulder belt rides on the center of the
outboard shoulder. To move upward, slide
the anchor up. To move downward, slide
the anchor down while pulling the lock
knob out. After adjustment, check that the
anchor is securely locked.
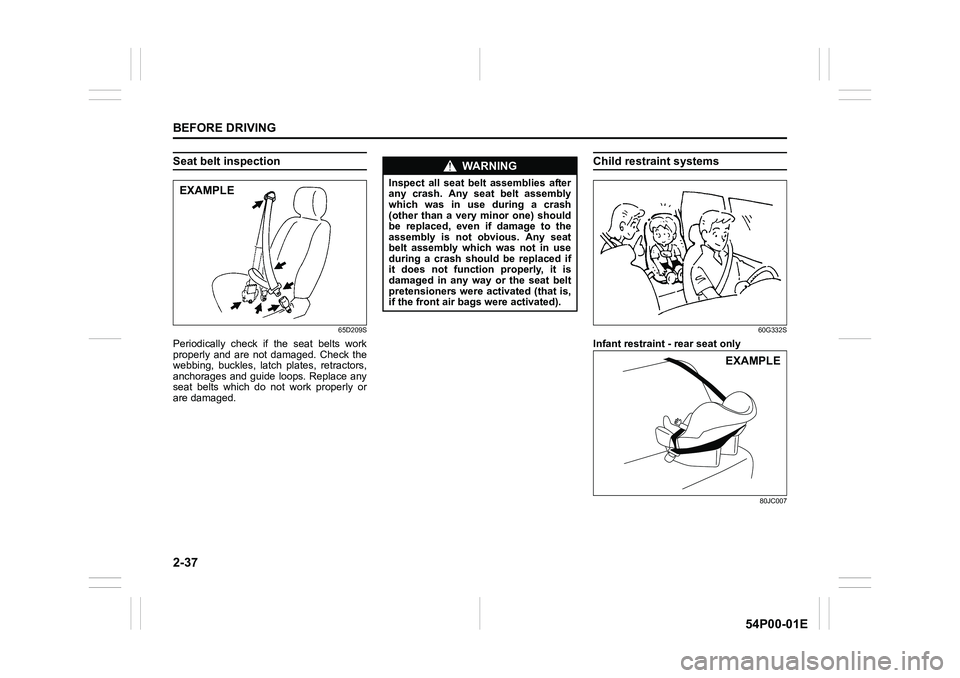
Rear outside seat belt guide
54P000261
Rear outside seat belt guides (1) are pro-
vided on the lateral face of rear seat as
shown in the illustration.
When the rear seat belt is not fastened,
hook the webbing on the belt guide.
When the rear seat belt is fastened,
unhook the webbing from the belt guide.
WA R N I N G
Check that the shoulder belt is posi-
tioned on the center of the outside
shoulder. The belt should be away
from your face and neck, but not fall-
ing off your shoulder. Misadjustment
of the belt could reduce the effective-
ness of the seat belt in a crash.
EXAMPLE
(1)
WA R N I N G
If rear outside seat belt is fastened
without unhooking the webbing from
the belt guide (1), the seat belt does
not show full performance in the
event of accident and can result in
serious personal injury.
Unhook the webbing from the belt
guide whenever the seat belt is fas-
tened.
Page 59 of 482
2-37
BEFORE DRIVING
54P00-01E
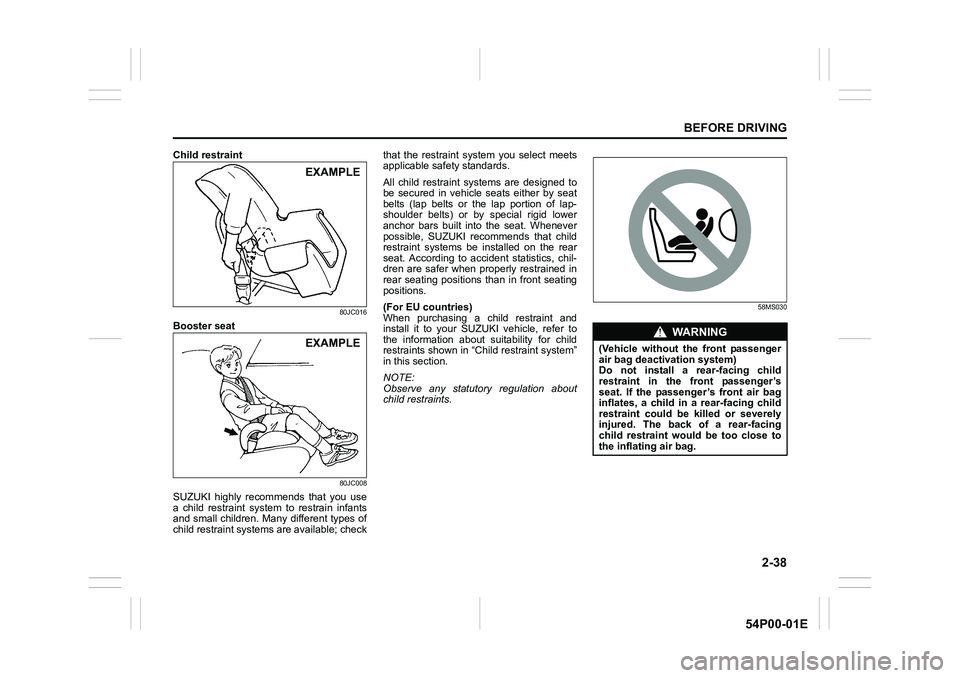
Seat belt inspection
65D209S
Periodically check if the seat belts work
properly and are not damaged. Check the
webbing, buckles, latch plates, retractors,
anchorages and guide loops. Replace any
seat belts which do not work properly or
are damaged.
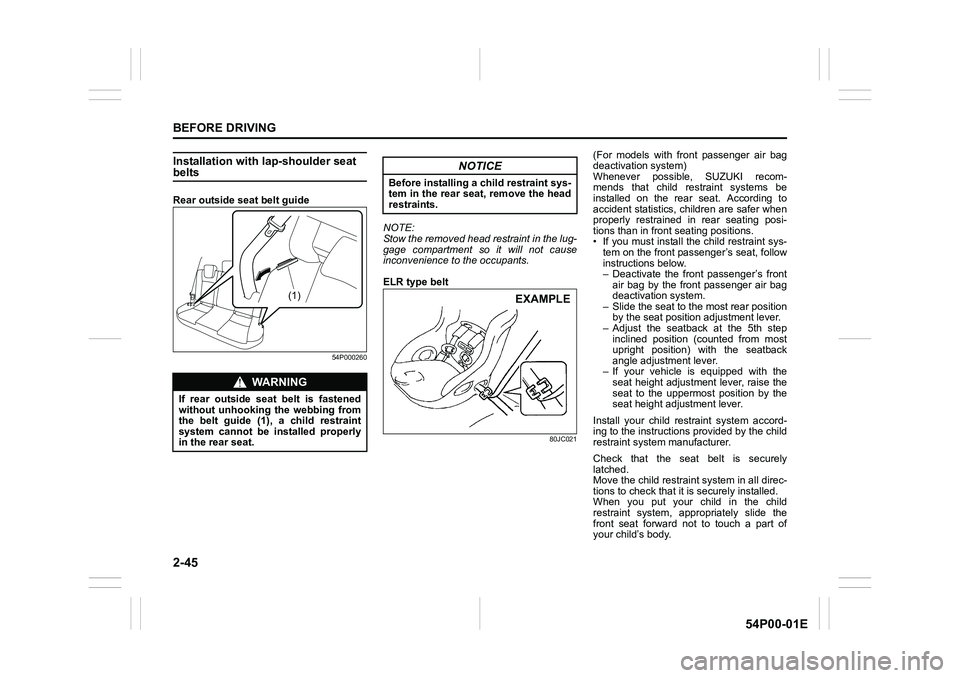
Child restraint systems
60G332S
Infant restraint - rear seat only
80JC007
EXAMPLE
WA R N I N G
Inspect all seat belt assemblies after
any crash. Any seat belt assembly
which was in use during a crash
(other than a very minor one) should
be replaced, even if damage to the
assembly is not obvious. Any seat
belt assembly which was not in use
during a crash should be replaced if
it does not function properly, it is
damaged in any way or the seat belt
pretensioners were activated (that is,
if the front air bags were activated).
EXAMPLE
Page 60 of 482
2-38
BEFORE DRIVING
54P00-01E
Child restraint
80JC016
Booster seat
80JC008
SUZUKI highly recommends that you use
a child restraint system to restrain infants
and small children. Many different types of
child restraint systems are available; checkthat the restraint system you select meets
applicable safety standards.
All child restraint systems are designed to
be secured in vehicle seats either by seat
belts (lap belts or the lap portion of lap-
shoulder belts) or by special rigid lower
anchor bars built into the seat. Whenever
possible, SUZUKI recommends that child
restraint systems be installed on the rear
seat. According to accident statistics, chil-
dren are safer when properly restrained in
rear seating positions than in front seating
positions.
(For EU countries)
When purchasing a child restraint and
install it to your SUZUKI vehicle, refer to
the information about suitability for child
restraints shown in “Child restraint system”
in this section.
NOTE:
Observe any statutory regulation about
child restraints.
58MS030
EXAMPLE
EXAMPLEWA R N I N G
(Vehicle without the front passenger
air bag deactivation system)
Do not install a rear-facing child
restraint in the front passenger’s
seat. If the passenger’s front air bag
inflates, a child in a rear-facing child
restraint could be killed or severely
injured. The back of a rear-facing
child restraint would be too close to
the inflating air bag.
Page 67 of 482
2-45
BEFORE DRIVING
54P00-01E
Installation with lap-shoulder seat belts
Rear outside seat belt guide
54P000260
NOTE:
Stow the removed head restraint in the lug-
gage compartment so it will not cause
inconvenience to the occupants.
ELR type belt
80JC021
(For models with front passenger air bag
deactivation system)
Whenever possible, SUZUKI recom-
mends that child restraint systems be
installed on the rear seat. According to
accident statistics, children are safer when
properly restrained in rear seating posi-
tions than in front seating positions.
• If you must install the child restraint sys-
tem on the front passenger’s seat, follow
instructions below.
– Deactivate the front passenger’s front
air bag by the front passenger air bag
deactivation system.
– Slide the seat to the most rear position
by the seat position adjustment lever.
– Adjust the seatback at the 5th step
inclined position (counted from most
upright position) with the seatback
angle adjustment lever.
– If your vehicle is equipped with the
seat height adjustment lever, raise the
seat to the uppermost position by the
seat height adjustment lever.
Install your child restraint system accord-
ing to the instructions provided by the child
restraint system manufacturer.
Check that the seat belt is securely
latched.
Move the child restraint system in all direc-
tions to check that it is securely installed.
When you put your child in the child
restraint system, appropriately slide the
front seat forward not to touch a part of
your child’s body.
WA R N I N G
If rear outside seat belt is fastened
without unhooking the webbing from
the belt guide (1), a child restraint
system cannot be installed properly
in the rear seat.
(1)
NOTICE
Before installing a child restraint sys-
tem in the rear seat, remove the head
restraints.
EXAMPLE
Page 70 of 482
2-48
BEFORE DRIVING
54P00-01E
1) Remove the luggage compartment cover.2) Secure the child restraint on the rear
seat using the procedure described
above for securing a restraint system
that does not require a top tether strap.
3) Hook the top tether strap to the top
tether anchorage bracket and tighten
the top tether strap according to the
instructions provided by the child
restraint system manufacturer. Attach
the top tether strap to the correspond-
ing top tether anchorage bracket
located directly behind the child
restraint. Do not attach the top tether
strap to the luggage restraint loops.
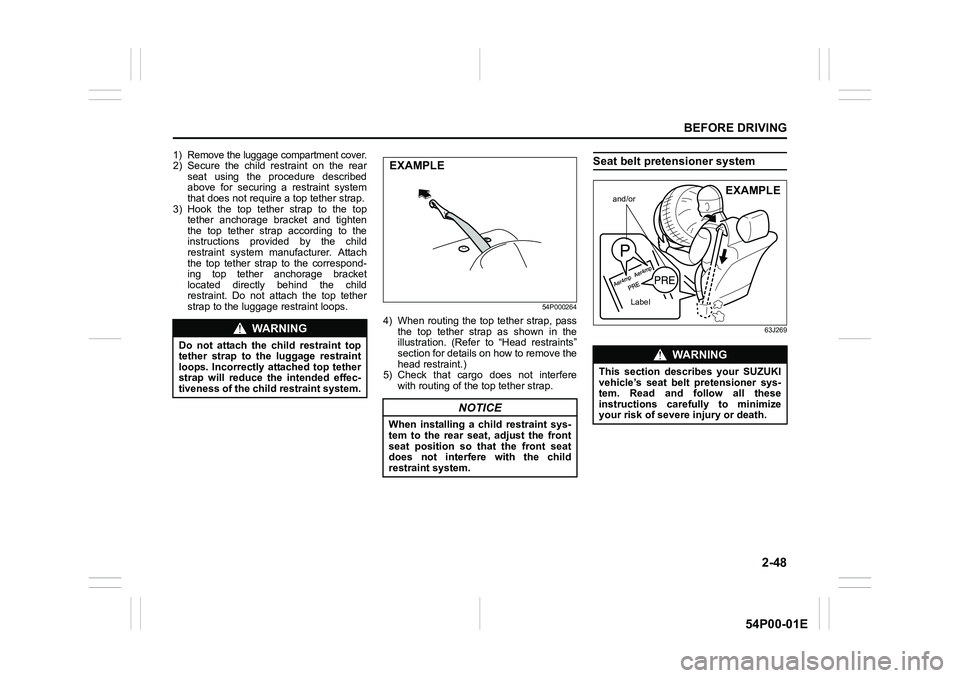
54P000264
4) When routing the top tether strap, pass
the top tether strap as shown in the
illustration. (Refer to “Head restraints”
section for details on how to remove the
head restraint.)
5) Check that cargo does not interfere
with routing of the top tether strap.
Seat belt pretensioner system
63J269WA R N I N G
Do not attach the child restraint top
tether strap to the luggage restraint
loops. Incorrectly attached top tether
strap will reduce the intended effec-
tiveness of the child restraint system.
NOTICE
When installing a child restraint sys-
tem to the rear seat, adjust the front
seat position so that the front seat
does not interfere with the child
restraint system.
EXAMPLE
WA R N I N G
This section describes your SUZUKI
vehicle’s seat belt pretensioner sys-
tem. Read and follow all these
instructions carefully to minimize
your risk of severe injury or death.
and/or
Label
EXAMPLE
Page 71 of 482
2-49
BEFORE DRIVING
54P00-01E
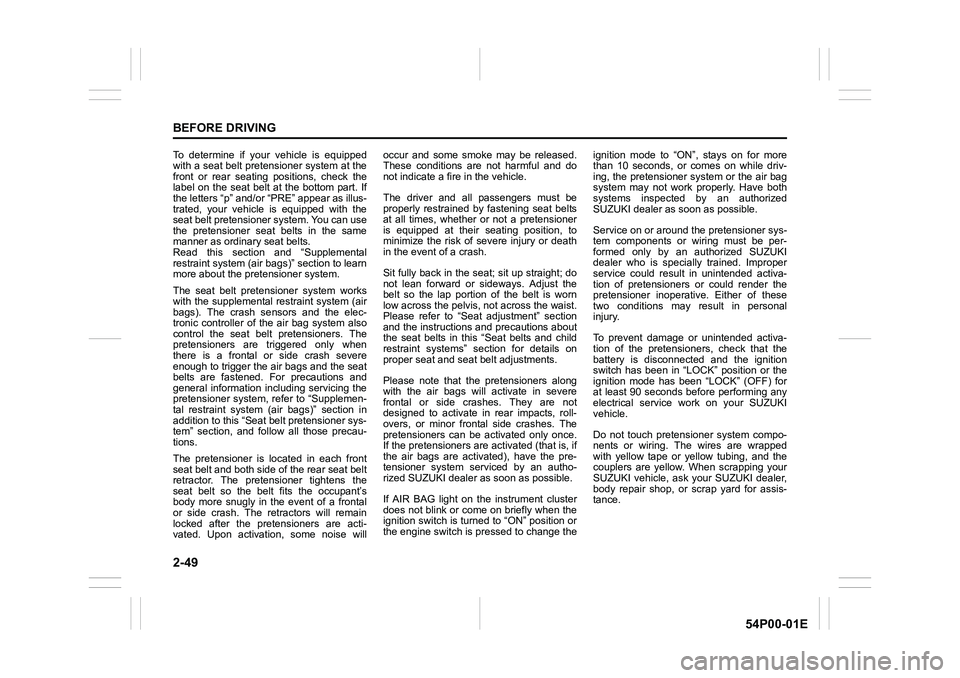
To determine if your vehicle is equipped
with a seat belt pretensioner system at the
front or rear seating positions, check the
label on the seat belt at the bottom part. If
the letters “p” and/or “PRE” appear as illus-
trated, your vehicle is equipped with the
seat belt pretensioner system. You can use
the pretensioner seat belts in the same
manner as ordinary seat belts.
Read this section and “Supplemental
restraint system (air bags)” section to learn
more about the pretensioner system.
The seat belt pretensioner system works
with the supplemental restraint system (air
bags). The crash sensors and the elec-
tronic controller of the air bag system also
control the seat belt pretensioners. The
pretensioners are triggered only when
there is a frontal or side crash severe
enough to trigger the air bags and the seat
belts are fastened. For precautions and
general information including servicing the
pretensioner system, refer to “Supplemen-
tal restraint system (air bags)” section in
addition to this “Seat belt pretensioner sys-
tem” section, and follow all those precau-
tions.
The pretensioner is located in each front
seat belt and both side of the rear seat belt
retractor. The pretensioner tightens the
seat belt so the belt fits the occupant’s
body more snugly in the event of a frontal
or side crash. The retractors will remain
locked after the pretensioners are acti-
vated. Upon activation, some noise willoccur and some smoke may be released.
These conditions are not harmful and do
not indicate a fire in the vehicle.
The driver and all passengers must be
properly restrained by fastening seat belts
at all times, whether or not a pretensioner
is equipped at their seating position, to
minimize the risk of severe injury or death
in the event of a crash.
Sit fully back in the seat; sit up straight; do
not lean forward or sideways. Adjust the
belt so the lap portion of the belt is worn
low across the pelvis, not across the waist.
Please refer to “Seat adjustment” section
and the instructions and precautions about
the seat belts in this “Seat belts and child
restraint systems” section for details on
proper seat and seat belt adjustments.
Please note that the pretensioners along
with the air bags will activate in severe
frontal or side crashes. They are not
designed to activate in rear impacts, roll-
overs, or minor frontal side crashes. The
pretensioners can be activated only once.
If the pretensioners are activated (that is, if
the air bags are activated), have the pre-
tensioner system serviced by an autho-
rized SUZUKI dealer as soon as possible.
If AIR BAG light on the instrument cluster
does not blink or come on briefly when the
ignition switch is turned to “ON” position or
the engine switch is pressed to change theignition mode to “ON”, stays on for more
than 10 seconds, or comes on while driv-
ing, the pretensioner system or the air bag
system may not work properly. Have both
systems inspected by an authorized
SUZUKI dealer as soon as possible.
Service on or around the pretensioner sys-
tem components or wiring must be per-
formed only by an authorized SUZUKI
dealer who is specially trained. Improper
service could result in unintended activa-
tion of pretensioners or could render the
pretensioner inoperative. Either of these
two conditions may result in personal
injury.
To prevent damage or unintended activa-
tion of the pretensioners, check that the
battery is disconnected and the ignition
switch has been in “LOCK” position or the
ignition mode has been “LOCK” (OFF) for
at least 90 seconds before performing any
electrical service work on your SUZUKI
vehicle.
Do not touch pretensioner system compo-
nents or wiring. The wires are wrapped
with yellow tape or yellow tubing, and the
couplers are yellow. When scrapping your
SUZUKI vehicle, ask your SUZUKI dealer,
body repair shop, or scrap yard for assis-
tance.