accelerator SUZUKI IGNIS 2021 Owner's Manual
[x] Cancel search | Manufacturer: SUZUKI, Model Year: 2021, Model line: IGNIS, Model: SUZUKI IGNIS 2021Pages: 505, PDF Size: 8.36 MB
Page 202 of 505
3-49OPERATING YOUR VEHICLE
75RM4-01E
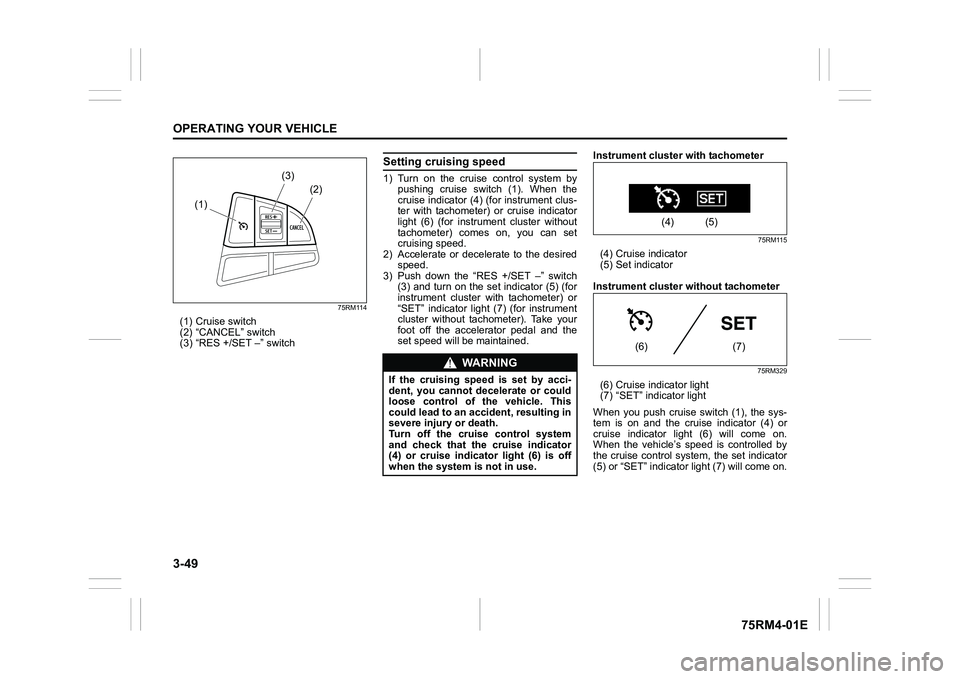
75RM114
(1) Cruise switch
(2) “CANCEL” switch
(3) “RES +/SET –” switch
Setting cruising speed1) Turn on the cruise control system bypushing cruise switch (1). When the
cruise indicator (4) (for instrument clus-
ter with tachometer) or cruise indicator
light (6) (for instrument cluster without
tachometer) comes on, you can set
cruising speed.
2) Accelerate or decelerate to the desired
speed.
3) Push down the “RES +/SET –” switch (3) and turn on the set indicator (5) (for
instrument cluster with tachometer) or
“SET” indicator light (7) (for instrument
cluster without tachometer). Take your
foot off the accelerator pedal and the
set speed will be maintained. Instrument cluster with tachometer
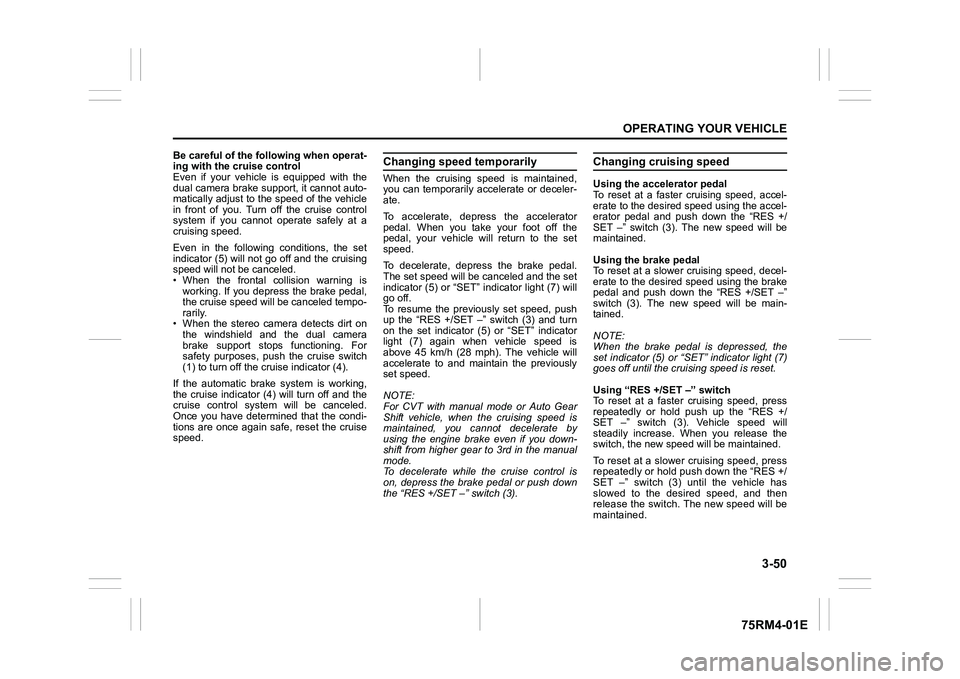
75RM115
(4) Cruise indicator
(5) Set indicator
Instrument cluster without tachometer
75RM329
(6) Cruise indicator light
(7) “SET” indicator light
When you push cruise switch (1), the sys-
tem is on and the cruise indicator (4) or
cruise indicator light (6) will come on.
When the vehicle’s speed is controlled by
the cruise control system , the set indicator
(5) or “SET” indicator light (7) will come on.
(1) (2)
(3)
WA R N I N G
If the cruising speed is set by acci-
dent, you cannot decelerate or could
loose control of the vehicle. This
could lead to an accident, resulting in
severe injury or death.
Turn off the cruise control system
and check that the cruise indicator
(4) or cruise indicator light (6) is off
when the system
is not in use.
(4) (5)
(6) (7)
Page 203 of 505
3-50
OPERATING YOUR VEHICLE
75RM4-01E
Be careful of the following when operat-
ing with the cruise control
Even if your vehicle is equipped with the
dual camera brake support, it cannot auto-
matically adjust to the speed of the vehicle
in front of you. Turn off the cruise control
system if you cannot operate safely at a
cruising speed.
Even in the following conditions, the set
indicator (5) will not go off and the cruising
speed will not be canceled.
• When the frontal collision warning isworking. If you depress the brake pedal,
the cruise speed will be canceled tempo-
rarily.
• When the stereo camera detects dirt on
the windshield and the dual camera
brake support stops functioning. For
safety purposes, push the cruise switch
(1) to turn off the cru ise indicator (4).
If the automatic brake system is working,
the cruise indicator (4) will turn off and the
cruise control system will be canceled.
Once you have determined that the condi-
tions are once again safe, reset the cruise
speed.
Changing speed temporarilyWhen the cruising speed is maintained,
you can temporarily accelerate or deceler-
ate.
To accelerate, depre ss the accelerator
pedal. When you take your foot off the
pedal, your vehicle will return to the set
speed.
To decelerate, depress the brake pedal.
The set speed will be canceled and the set
indicator (5) or “SET” indicator light (7) will
go off.
To resume the previously set speed, push
up the “RES +/SET –” switch (3) and turn
on the set indicator (5) or “SET” indicator
light (7) again when vehicle speed is
above 45 km/h (28 mph). The vehicle will
accelerate to and maintain the previously
set speed.
NOTE:
For CVT with manual mode or Auto Gear
Shift vehicle, when the cruising speed is
maintained, you cannot decelerate by
using the engine brake even if you down-
shift from higher gear to 3rd in the manual
mode.
To decelerate while the cruise control is
on, depress the brake pedal or push down
the “RES +/SET –” switch (3).
Changing cruising speedUsing the accelerator pedal
To reset at a faster cruising speed, accel-
erate to the desired speed using the accel-
erator pedal and push down the “RES +/
SET –” switch (3). The new speed will be
maintained.
Using the brake pedal
To reset at a slower cruising speed, decel-
erate to the desired speed using the brake
pedal and push down the “RES +/SET –”
switch (3). The new speed will be main-
tained.
NOTE:
When the brake pedal is depressed, the
set indicator (5) or “ SET” indicator light (7)
goes off until the cruising speed is reset.
Using “RES +/ SET –” switch
To reset at a faster cruising speed, press
repeatedly or hold push up the “RES +/
SET –” switch (3). Vehicle speed will
steadily increase. When you release the
switch, the new speed will be maintained.
To reset at a slower cruising speed, press
repeatedly or hold push down the “RES +/
SET –” switch (3) until the vehicle has
slowed to the desired speed, and then
release the switch. The new speed will be
maintained.
Page 205 of 505

3-52
OPERATING YOUR VEHICLE
75RM4-01E
Setting maximum speed1) Turn on the speed limiter system bypushing “LIMIT” switch (1). When the
limit indicator (4) comes on, you can set
the maximum speed.
2) Accelerate or decelerate to the desired
speed.
3) Push down the “RES +/SET –” switch (3) and turn on the set indicator (5). The
current vehicle speed is set as the max-
imum speed.
NOTE:If you push down the “RES +/SET –” switch
(3) when the vehicle speed is less than 30
km/h or 20 mph, the maximum speed will be
set to 30 km/h or 20 mph.Information display
75RM117
(4) Limit indicator
(5) Set indicator
(6) Speed indication
When you push “LIMIT” switch (1), the sys-
tem is on and the limit indicator (4) will come
on. When the vehicle’s maximum speed is
set, the set indicator (5) will come on.
Exceeding maximum speedYou can exceed the maximum speed tem-
porarily by quickly depressing the acceler-
ator pedal all the way down . While the
vehicle speed is exceeded, the speed indi-
cation (6) on the information display will
flash and the buzzer will sound briefly.
If the accelerator pedal is released to
return below the maximum speed, the
speed indication (6) will stop flashing and
then stay lit, and the function will restore.
NOTE:
• When you depress the accelerator pedal slowly, the vehicl e speed may not
exceed the maximum speed. If you wish
to exceed the maximum speed, depress
the accelerator pedal all the way down
quickly or push “CANCEL” switch (2) to
cancel the maximum speed temporarily.
• The speed indication (6) will also flash
and the buzzer will sound if the speed
limiter cannot prevent the vehicle from
exceeding the maximum speed in such
cases as when going down a steep hill,
or under excessive acceleration. In this
case, decelerate to return below the
maximum speed using the brake pedal.
Changing speed settingSetting to the current speed
1) Push “CANCEL” switch (2).
2) Accelerate or decelerate to the desired speed.
3) Push down the “RES +/SET –” switch (3) and turn on the se t indicator (5). The
current vehicle speed is set as the max-
imum speed.
Using “RES +/ SET –” switch
To change to a faster speed, press repeat-
edly or hold push up the “RES +/SET –”
switch (3).
To change to a slower speed, press
repeatedly or hold push down the “RES +/
SET –” switch (3).
NOTE:
• You can adjust the set speed by 1 km/h or 1 mph by pushing “RES +/SET –”
switch (3) quickly.
• You can adjust the set speed by 5 km/h or 5 mph by pushing and holding “RES +/
SET –” switch (3)
• If the current vehicle speed exceeds the maximum speed when changing to the
slower speed using “RES +/SET –”
switch (3), the speed indication (6) will
flash and the buzzer will sound.
(4) (5) (6)
EXAMPLE
Page 212 of 505
3-59OPERATING YOUR VEHICLE
75RM4-01E
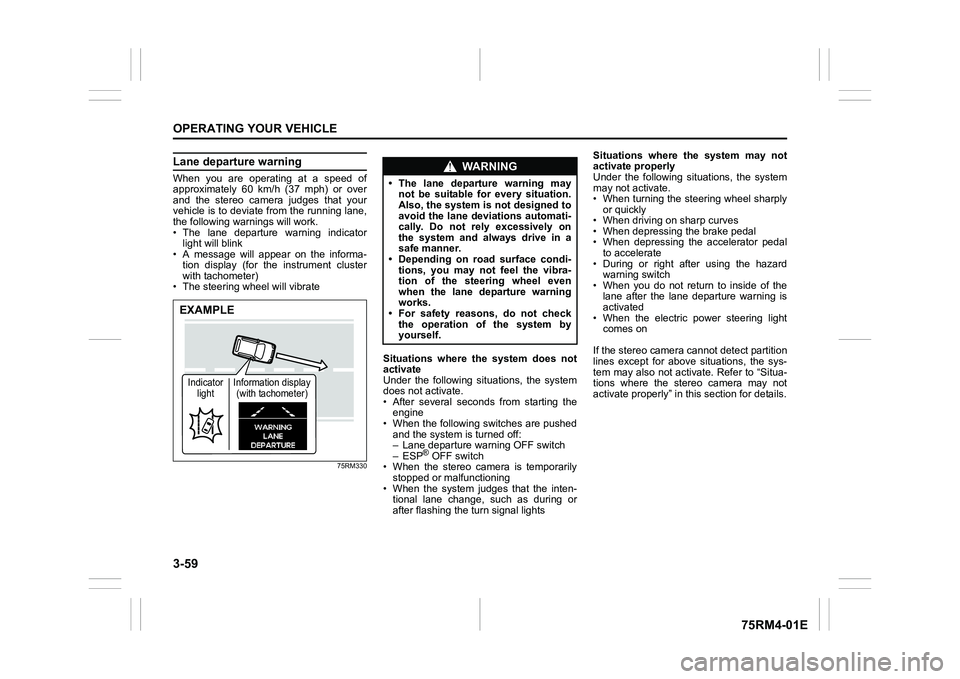
Lane departure warningWhen you are operating at a speed of
approximately 60 km/h (37 mph) or over
and the stereo camera judges that your
vehicle is to deviate from the running lane,
the following warnings will work.
• The lane departure warning indicatorlight will blink
• A message will appear on the informa-
tion display (for the instrument cluster
with tachometer)
• The steering wheel will vibrate
75RM330
Situations where the system does not
activate
Under the following situations, the system
does not activate.
• After several seconds from starting the engine
• When the following switches are pushed and the system is turned off:
– Lane departure warning OFF switch
– ESP
® OFF switch
• When the stereo camera is temporarily stopped or malfunctioning
• When the system judges that the inten- tional lane change, such as during or
after flashing the turn signal lights Situations where the system may not
activate properly
Under the following situations, the system
may not activate.
• When turning the steering wheel sharply
or quickly
• When driving on sharp curves
• When depressing the brake pedal
• When depressing the accelerator pedal to accelerate
• During or right after using the hazard warning switch
• When you do not return to inside of the lane after the lane departure warning is
activated
• When the electric power steering light comes on
If the stereo camera cannot detect partition
lines except for above situations, the sys-
tem may also not activ ate. Refer to “Situa-
tions where the stereo camera may not
activate properly” in this section for details.
EXAMPLEIndicator light Information display
(with tachometer)
WA R N I N G
• The lane departure warning may not be suitable for every situation.
Also, the system is not designed to
avoid the lane deviations automati-
cally. Do not rely excessively on
the system and always drive in a
safe manner.
• Depending on road surface condi-
tions, you may not feel the vibra-
tion of the steering wheel even
when the lane departure warning
works.
• For safety reasons, do not check
the operation of the system by
yourself.
Page 234 of 505

3-81OPERATING YOUR VEHICLE
75RM4-01E
Hill descent control switch
75RM056
(1) Hill descent control switch
To activate the hill descent control system:
1) Shift the gearshift lever into a forward
gear or reverse gear.2) Push the hill descent control switch (1) when the vehicle speed is under 25 km/h
(15 mph). The hill descent control indica-
tor on the instrument cluster will come on
and the hill descent control system will be
activated.
When the vehicle speed exceeds about 7
km/h (4 mph) without depressing the
accelerator pedal, the hill descent control
system applies the brak es automatically to
maintain the vehicle speed at about 7 km/h
(4 mph).
• When braking, the brake/tail lights come on and the ESP
® warning light blinks.
• When the vehicle speed exceeds about
40 km/h (25 mph), the hill descent con-
trol system stops functioning and the hill
descent control indicator goes off. When
the vehicle slows down below about 25
km/h (16 mph), the hill descent control
system will be activated again and the
hill descent control indicator will come
on.
NOTE:
You may hear a sound coming from the
engine when the hill descent control sys-
tem is activated. This sound is normal and
does not indicate a malfunction.
To turn off the hill descent control system,
push the hill descent control switch and
turn off the hill descent control indicator
light.
(1)
WA R N I N G
• When the hill descent control sys- tem is used continuously for a long
time, the temperature of the brake
system may increase and the hill
descent control system may be
deactivated tempor arily to protect
the device of the brake system. The
hill descent control indicator blinks
to let you know the system is deac-
tivated. Depress the brake pedal
and stop the vehicle in a safe place.
When the temperature of the brake
system goes down, the hill descent
control indicator will come on and
the system is activated again. (Continued)
WA R N I N G
(Continued)
• The hill descent control system
may be activated when the gear-
shift lever is in “N” (Neutral) posi-
tion, but engine braking will not
work. Always use the hill descent
control system with the gearshift
lever in a forward gear or reverse
gear.
• When using the hill descent control system, push the hill descent con-
trol switch and ma ke sure that the
hill descent control indicator light
comes on and no warning message
indicates on the information dis-
play.
• While operating the hill descent control system, the dual camera
brake support (if equipped) may
not operate depending on the
accelerating.
Page 237 of 505
3-84
OPERATING YOUR VEHICLE
75RM4-01E
How grip control system works
When the grip control switch is on and one
side of the tires is slipping, the grip control
system assists you in smooth starting by
controlling the driving force and brake
force of all wheels.
• When the ESP
® system is off, the grip
control system cannot be activated.
NOTE:
While the grip control system is working,
the ESP
® warning light blinks.
Hill hold control sys tem (if equipped)The hill hold control system is designed to
assist you in starting to move up hills.
When you start to move up a hill, the sys-
tem helps to prevent the vehicle from roll-
ing downward (for approximately 2
seconds) while you move your foot from
the brake pedal to the accelerator pedal.
The hill hold control system activates for a
maximum of about 2 seconds if your foot is
moved from the brake pedal when the fol-
lowing conditions are all met.
1) The gearshift lever is in a forward gear or reverse gear.
2) The parking brake is released.
3) For manual transaxle models, the clutch pedal is depressed.
4) The vehicle is o n an upward incline.
CAUTION
To activate the grip control system,
push the grip control switch and
check that the indicator on the switch
turns on.
WA R N I N G
• Do not rely excessively on the hill
hold control system. The hill hold
control system may not prevent the
vehicle from rolling downward on a
hill under all load or road condi-
tions. Always be prepared to
depress the brake pedal to prevent
the vehicle from rolling downward.
Failure to pay attention and
depress the brake pedal to hold the
vehicle on a hill when necessary,
may result in loss of control or an
accident.
• The hill hold control system is not designed to stop the vehicle on a
hill. (Continued)
WA R N I N G
(Continued)
• After you release your foot from the
brake pedal, accelerate the vehicle
to move up immediately. If you
release your foot from the brake
pedal over 2 seconds, the hill hold
control system will be canceled. If
so, the vehicle may roll downward,
which can result in an accident
depending on the degree of slope.
And, the engine may stall and the
power assist for the steering and
brakes will not work so steering
and braking will be much harder
than usual which can result in an
accident or vehicle damage.
Page 252 of 505
4-5DRIVING TIPS
75RM4-01E
Tire chainsTire chains should only be used if they are
needed to increase traction or are required
by law. Check that the chains you use are
the correct size for your vehicle’s tires.
Also check that there is enough clearance
between the fenders and the chains as
installed on the tires.
Install the chains on the front tires tightly,
according to the chain manufacturer’s
instructions. Retighten the chains after
driving about 1.0 km (1/2 mile) if neces-
sary. With the chains installed, drive slowly.
Stuck vehicleIf your vehicle gets stuck in snow, mud or
sand, follow the directions below:
1) Shift the transaxle back and forthbetween a forward range (or first gear
for manual transaxle/Auto Gear Shift)
and reverse. This will create a rocking
motion which may give you enough
momentum to free the vehicle. Press
gently on the accelerator to keep wheel
spinning to a minimum wheel rpm.
Remove your foot from the accelerator
while shifting.
Do not race the engine. Excessive
wheel spin will cause the tires to dig
deeper, making it more difficult to free
the vehicle.
NOTE:
If your vehicle is equipped with the ESP
®
and/or grip control system, you may have
to turn the systems off in order to spin the
wheels. 2) If your vehicle rema
ins stuck after a few
minutes of rocking, we recommend you
to consult your SUZUKI dealer or a road-
side assistance service. If a towing ser-
vice is not available in an emergency,
your vehicle may be temporarily towed by
a towing cable or chain secured to the
towing hook either on the front of the
vehicle or on the rear of the vehicle. Refer
to “Frame hooks” in the “OTHER CON-
TROLS AND EQUIPMENT” section.
NOTICE
• If you hear the chains hitting against the vehicle body while driv-
ing, stop and tighten them.
• If your vehicle is equipped with full wheel caps, remove the wheel caps
before installing the chains or the
wheel caps can be damaged by the
chain bands.
WA R N I N G
Do not allow anyone to stand near
the vehicle when you are rocking it,
and do not spin the wheels faster
than an indicated 40 km/h (25 mph)
on the speedometer. Personal injury
and/or vehicle damage may result
from spinning the wheels too fast.
NOTICE
Do not continue rocking the vehicle
for more than a few minutes. Pro-
longed rocking can cause engine
overheating or transaxle damage.
Page 422 of 505
8-13EMERGENCY SERVICE
75RM4-01E
Engine trouble: Starter does not operate1) Try turning the ignition switch to“START” position or try pressing the
engine switch to change the ignition
mode to START with the headlights
turned on to determine the lead-acid
battery condition. If the headlights go
excessively dim or go off, it usually
means that either the lead-acid battery
is flat or the battery terminal contact is
poor. Recharge the lead-acid battery or
correct battery terminal contact as nec-
essary.
2) If the headlights remain bright, check the fuses. If the reas on for failure of the
starter is not obvious, there may be a
major electrical problem. Have the vehi-
cle inspected by your authorized
SUZUKI dealer.
Engine trouble: Flooded engine(Vehicle without keyless push start sys-
tem)
If the engine is flooded with gasoline, it
may be hard to start. If this happens, press
the accelerator pedal all the way to the
floor and hold it there while cranking the
engine.
• Do not operate the starter motor for more than 12 seconds.
(Vehicle with keyless push start system)
If the engine is flooded with gasoline, it
may be hard to start. If this happens, press
the accelerator pedal all the way to the
floor and hold it there while cranking the
engine.
• Do not operate the starter motor for more than 12 seconds.
NOTE:
If the engine refuses to start, the starter
motor automatically stops after a certain
period of time. After the starter motor has
automatically stopped or if there is any-
thing abnormal in the engine starting sys-
tem, the starter motor runs only while the
engine switch is held pressed.
Engine trouble: OverheatingThe engine could overheat temporarily
under severe driving conditions. If the high
engine coolant temperature warning light
comes on as overheating during driving:
1) Turn off the air conditioner, if equipped.
2) Take the vehicle to a safe place and park.
3) Let the engine run at the normal idle speed for a few minutes until the high
engine coolant temperature warning
light goes off.
WA R N I N G
If you see or hear escaping steam,
stop the vehicle in a safe place and
immediately turn off the engine to
cool it. Do not open the hood when
steam is present. When the steam
can no longer be seen or heard, open
the hood to see if the coolant is still
boiling. If it is, you must wait until it
stops boiling before you proceed.
Page 449 of 505
13-1
INDEX
13
75RM4-01E
INDEXSymbols“SET” indicator light ......................................................... 2-115AAccelerator pedal................................................................. 3-12
Accessory socket ............. .................................. ................... 5-6
Adding coolant................................................. .................... 7-28
Adjusting headlight pattern .................................... .......... 2-120
AIR BAG light .................................................. .......... 2-55, 2-106
Air cleaner .................................................... ........................ 7-29
Air conditioner filter replacement ............................. ......... 7-59
Air conditioning system ...... ................................................ 7-58
AM/FM CD player ................................................ ................. 5-33
AM/FM/DAB CD player ........... ............................................. 5-33
Anti-lock brake system (ABS) ................................... 3-76, 3-78
Anti-lock brake system (ABS) warning light ................... 2- 104
Anti-theft feature ............................................. ..................... 5-79
Assist grips ................................................... ......................... 5-7
Audio system ................................................... .................... 5-33
Auto Gear Shift ................................................ .................... 3-25
Auto Gear Shift oil ............................................ ................... 7-34
Automatic headlight leveling system warning light ....... 2-111
Automatic heating and air conditioning system
(climate control) .............................................. ..................... 5-26
Auto-on headlight system...... ........................................... 2-117
AUX function ................................................... ..................... 5-63
AUX/USB socket ................................................. ................... 5-7
Average fuel consumption....................................... .. 2-74, 2-94
Average speed .................................................. ................... 2-74
BBattery ................................................................................... 7-42
Battery replacement........... .........................................2-12, 2-15
Bluetooth
® audio......................................................... ......... 5-74
Bluetooth® hands-free .................................................... ..... 5-65
Brake assist system............................................ ................. 3-76
Brake discs and brake drums .................................... ......... 7-38
Brake fluid.................................................... ......................... 7-36
Brake pedal .................................................... ..............3-12, 7-37
Brake system warning light ..................................... ......... 2-103
Brakes ......................................................... .......................... 7-36
Braking ........................................................ .......................... 3-75
Brightness control ............................................. .................. 2-70
Built date ..................................................... .......................... 12-1
Bulb replacement ............................................... .................. 7-49
CCable control clutch........................................... .................. 7-36
Catalytic converter ........ ......................................................... 4-1
Center console tray......... ....................................................... 5-9
Central door locking system .................................... ............. 2-3
Changing engine oil and filter................................. ............ 7-25
Changing wheels................................................ .................... 8-4
Charging light ................................................. .................... 2-106
Chassis serial number ....... .................................................. 10-1
Child restraint ................................................ ....................... 12-1
Child restraint system f or countries applied for
UN Regulation No.16............................................ ................ 2-43
Child restraint systems ........................................ ............... 2-40
Child-proof locks (rear door) .................................. .............. 2-5
Clock .......................................................... ..................2-74, 2-98
Clutch pedal................................................... ..............3-12, 7-36