engine SUZUKI IGNIS 2021 Owner's Manual
[x] Cancel search | Manufacturer: SUZUKI, Model Year: 2021, Model line: IGNIS, Model: SUZUKI IGNIS 2021Pages: 505, PDF Size: 8.36 MB
Page 75 of 505
2-52
BEFORE DRIVING
75RM4-01E
Seat belt pretensioner system
63J269
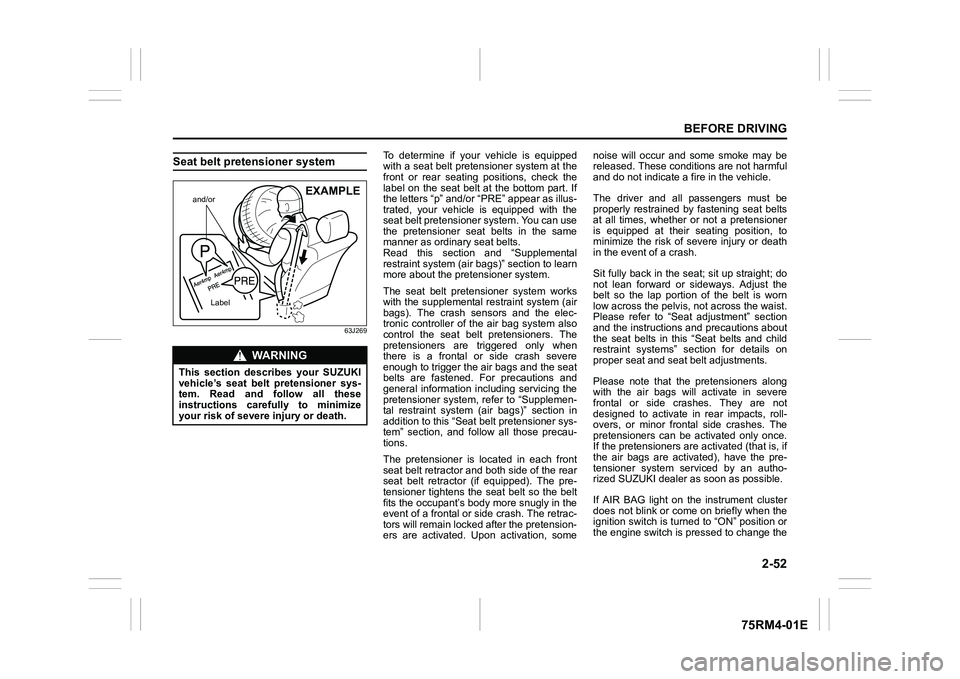
To determine if your vehicle is equipped
with a seat belt pretensioner system at the
front or rear seating positions, check the
label on the seat belt at the bottom part. If
the letters “p” and/or “PRE” appear as illus-
trated, your vehicle is equipped with the
seat belt pretensioner system. You can use
the pretensioner seat belts in the same
manner as ordinary seat belts.
Read this section and “Supplemental
restraint system (air bags)” section to learn
more about the pretensioner system.
The seat belt pretensioner system works
with the supplemental r estraint system (air
bags). The crash sensors and the elec-
tronic controller of t he air bag system also
control the seat belt pretensioners. The
pretensioners are triggered only when
there is a frontal or side crash severe
enough to trigger the air bags and the seat
belts are fastened. For precautions and
general information including servicing the
pretensioner system, refer to “Supplemen-
tal restraint system (air bags)” section in
addition to this “Seat belt pretensioner sys-
tem” section, and follow all those precau-
tions.
The pretensioner is located in each front
seat belt retractor and both side of the rear
seat belt retractor (if equipped). The pre-
tensioner tightens the seat belt so the belt
fits the occupant’s body more snugly in the
event of a frontal or side crash. The retrac-
tors will remain locked after the pretension-
ers are activated. Upon activation, some noise will occur and some smoke may be
released. These conditions are not harmful
and do not indicate a fire in the vehicle.
The driver and all passengers must be
properly restrained by fastening seat belts
at all times, whether or not a pretensioner
is equipped at their seating position, to
minimize the risk of severe injury or death
in the event o
f a crash.
Sit fully back in the seat; sit up straight; do
not lean forward or sideways. Adjust the
belt so the lap portion of the belt is worn
low across the pelvis , not across the waist.
Please refer to “Seat adjustment” section
and the instructions and precautions about
the seat belts in this “Seat belts and child
restraint systems” section for details on
proper seat and seat belt adjustments.
Please note that the pretensioners along
with the air bags will activate in severe
frontal or side crashes. They are not
designed to activate in rear impacts, roll-
overs, or minor frontal side crashes. The
pretensioners can be activated only once.
If the pretensioners are activated (that is, if
the air bags are activated), have the pre-
tensioner system serviced by an autho-
rized SUZUKI dealer as soon as possible.
If AIR BAG light on the instrument cluster
does not blink or come on briefly when the
ignition switch is turned to “ON” position or
the engine switch is pressed to change the
WA R N I N G
This section describes your SUZUKI
vehicle’s seat belt pretensioner sys-
tem. Read and follow all these
instructions carefully to minimize
your risk of severe injury or death.
and/or
Label
EXAMPLE
Page 88 of 505
2-65BEFORE DRIVING
75RM4-01E
Your vehicle is equipped with a diagnostic
module which records information about
the air bag system if the air bags deploy in
a crash. The module records information
about overall system status, and which
sensors activated the deployment.
Servicing the air bag system
If the air bags inflate, have the air bags
and related components replaced by an
authorized SUZUKI dealer as soon as pos-
sible.
If your vehicle ever gets in deep water and
the driver’s floor is submerged, the air bag
controller could be damaged. If this hap-
pens, ask your SUZUKI dealer to check
the air bag system as soon as possible.
Special procedures are required for servic-
ing or replacing an air bag. For that rea-
son, only an authorized SUZUKI dealer
should be allowed to service or replace
your air bags. Remind anyone who ser-
vices your SUZUKI vehicle that it has air
bags.
Service on or around air bag components
or wiring must be performed only by an
authorized SUZUKI dealer. Improper ser-
vice could result in unintended air bag
deployment or could render the air bag
inoperative. Either of these two conditions
may result in severe injury. To prevent damage or unintended inflation
of the air bag system, check that the lead-
acid battery is disconnected and the igni-
tion switch has been in “LOCK” position or
the ignition mode has been LOCK (OFF)
for at least 90 seconds before performing
any electrical service work on your
SUZUKI vehicle. Do not touch air bag sys-
tem components or wires. The wires are
wrapped with yellow tape or yellow tubing,
and the couplers are yellow for easy identi-
fication.
Scrapping a vehicle that has an uninflated
air bag can be hazardous. Ask your dealer,
body repair shop or scrap yard for help
with disposal.
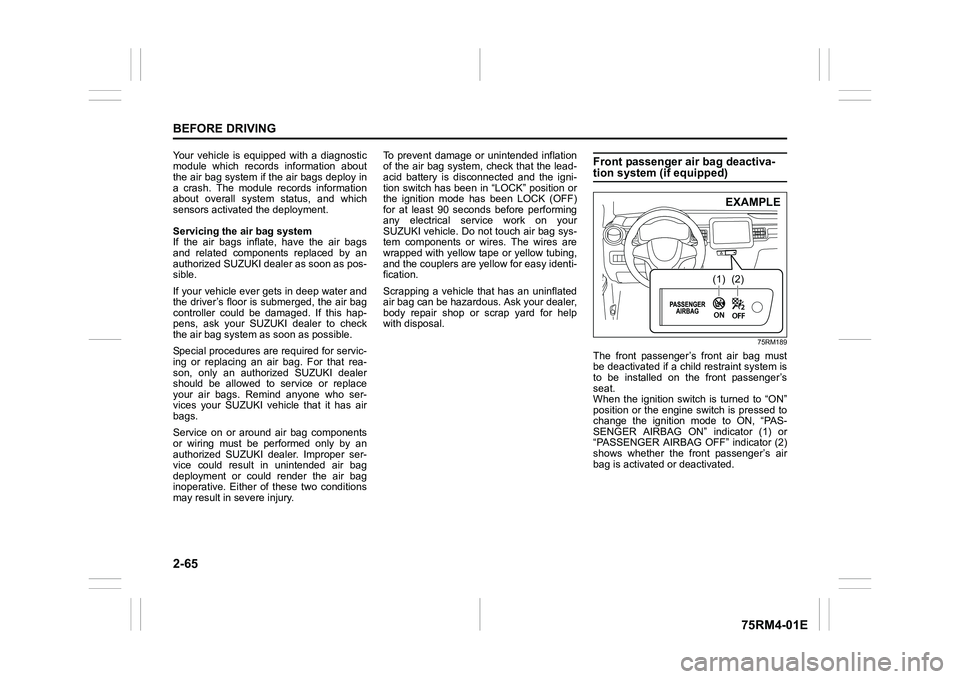
Front passenger air bag deactiva-tion system (if equipped)
75RM189
The front passenger’s front air bag must
be deactivated if a child restraint system is
to be installed on the front passenger’s
seat.
When the ignition switch is turned to “ON”
position or the engine switch is pressed to
change the ignition mode to ON, “PAS-
SENGER AIRBAG ON” indicator (1) or
“PASSENGER AIRBAG OFF” indicator (2)
shows whether the front passenger’s air
bag is activated or deactivated.
(1)
(2)EXAMPLE
Page 89 of 505
2-66
BEFORE DRIVING
75RM4-01E
When the front passenger’s air bag is acti-
vated, both “PASSENGER AIRBAG ON”
indicator (1) and “PASSENGER AIRBAG
OFF” indicator (2) come on for a few sec-
onds and then go out.
After that, only “PASSENGER AIRBAG
ON” indicator (1) comes on for about 1
minute and then goes out.
When the front passenger’s air bag is
deactivated, both “PASSENGER AIRBAG
ON” indicator (1) and “PASSENGER AIR-
BAG OFF” indicator (2 ) come on for a few
seconds and t hen go out.
After that, only “PASSENGER AIRBAG
OFF” indicator (2) comes on.
When you activate or deactivate the front
passenger’s air bag, check which indicator
is on before starting the engine.
Side air bags, side curtain air bags and
seat belt pretensioners are not connected
to the air bag deactivation system. Even if
the front passenger’s air bag is deacti-
vated, side air bags, side curtain air bags
and seat belt pretensioners are still acti-
vated.
58MS030
According to accident s tatistics, children
are safer when properly restrained in rear
seating positions than front seating posi-
tions. Whenever possible, SUZUKI recom-
mends that child restraint systems be
installed on the rear seat.
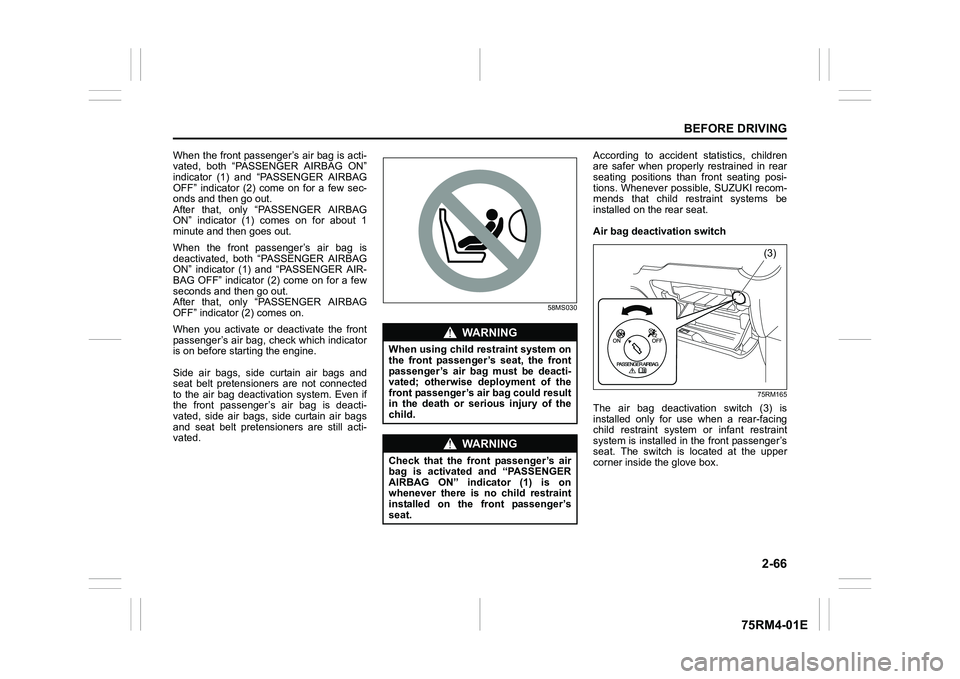
Air bag deactivation switch
75RM165
The air bag deactivation switch (3) is
installed only for use when a rear-facing
child restraint system or infant restraint
system is installed in the front passenger’s
seat. The switch is located at the upper
corner inside the glove box.
WA R N I N G
When using child restraint system on
the front passenger’s seat, the front
passenger’s air bag must be deacti-
vated; otherwise deployment of the
front passenger’s air bag could result
in the death or serious injury of the
child.
WA R N I N G
Check that the front passenger’s air
bag is activated and “PASSENGER
AIRBAG ON” indicator (1) is on
whenever there is no child restraint
installed on the front passenger’s
seat.
(3)
Page 90 of 505
2-67BEFORE DRIVING
75RM4-01E
To deactivate the front passenger’s air
bag, follow the instructions below before
starting the engine.
1) Check that the ignition switch is in“LOCK” position or the engine switch is
in LOCK (OFF) mode.
2) Insert the key into the air bag deactiva- tion switch (3), then push and turn the
key to “OFF” (air bag off) position, and
pull out the key.
3) Turn the ignition switch to “ON” position or press the engine switch to change
the ignition mode to ON. Both indica-
tors come on for a few seconds and
then go out.
After that, only “PASSENGER AIRBAG
OFF” indicator (2) comes on to remind
you that the front pa ssenger’s air bag is
deactivated. To activate the front passenger’s air bag,
follow the instructions below before start-
ing the engine.
1) Check that the ignition switch is in
“LOCK” position or the engine switch is
in LOCK (OFF) mode.
2) Insert the key into the air bag deactiva- tion switch (3), then push and turn the
key to “ON” (air bag on) position, and
pull out the key.
3) Turn the ignition switch to “ON” position or press the engine switch to change
the ignition mode to ON. Both indica-
tors come on for a few seconds and
then go out.
After that, only “PASSENGER AIRBAG
ON” indicator (1) co mes on for about 1
minute and then goes out to remind you
that the front passenger’s air bag is
activated.
Page 92 of 505
2-69BEFORE DRIVING
75RM4-01E
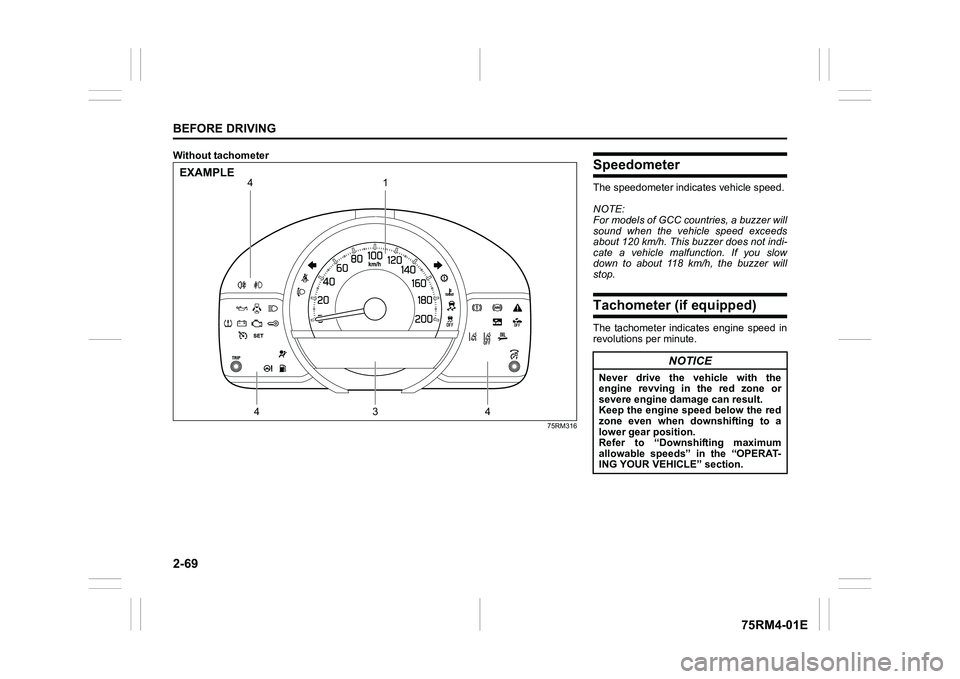
Without tachometer
75RM316
13
4
44
EXAMPLE
SpeedometerThe speedometer indicates vehicle speed.
NOTE:
For models of GCC countries, a buzzer will
sound when the vehicle speed exceeds
about 120 km/h. This buzzer does not indi-
cate a vehicle malfunction. If you slow
down to about 118 km/h, the buzzer will
stop.Tachometer (if equipped)The tachometer indicates engine speed in
revolutions per minute.
NOTICE
Never drive the vehicle with the
engine revving in the red zone or
severe engine damage can result.
Keep the engine speed below the red
zone even when downshifting to a
lower gear position.
Refer to “Downshifting maximum
allowable speeds” in the “OPERAT-
ING YOUR VEHIC LE” section.
Page 93 of 505
2-70
BEFORE DRIVING
75RM4-01E
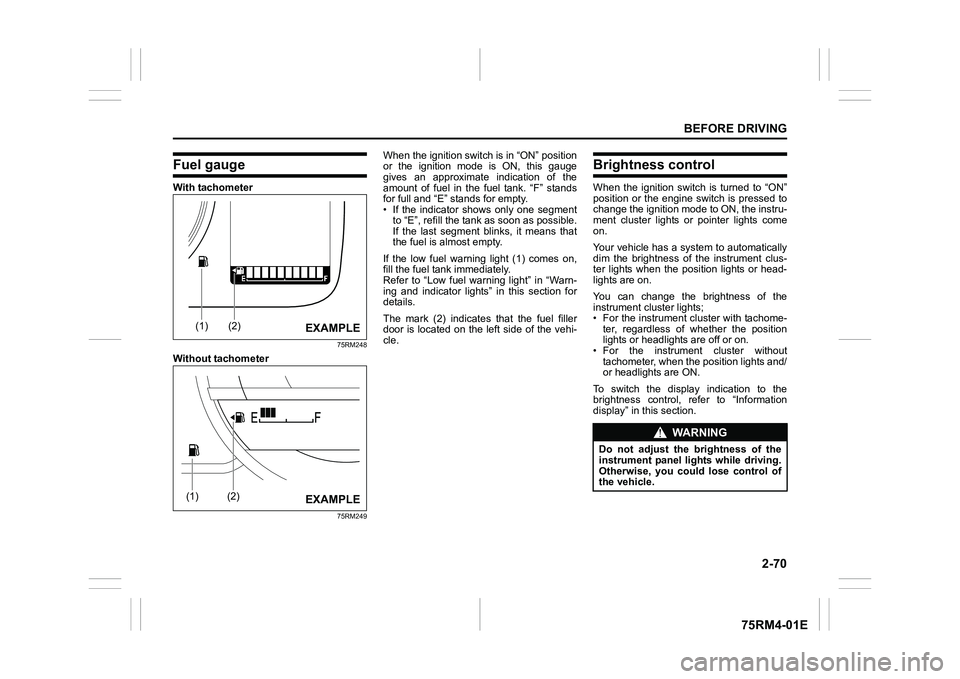
Fuel gaugeWith tachometer
75RM248
Without tachometer
75RM249
When the ignition switch is in “ON” position
or the ignition mode is ON, this gauge
gives an approximate indication of the
amount of fuel in the fuel tank. “F” stands
for full and “E” stands for empty.
• If the indicator shows only one segmentto “E”, refill the tank as soon as possible.
If the last segment blinks, it means that
the fuel is almost empty.
If the low fuel warning light (1) comes on,
fill the fuel tank immediately.
Refer to “Low fuel warning light” in “Warn-
ing and indicator lights” in this section for
details.
The mark (2) indicates that the fuel filler
door is located on the left side of the vehi-
cle.
Brightness controlWhen the ignition switch is turned to “ON”
position or the engine switch is pressed to
change the ignition mode to ON, the instru-
ment cluster lights or pointer lights come
on.
Your vehicle has a system to automatically
dim the brightness of the instrument clus-
ter lights when the position lights or head-
lights are on.
You can change the brightness of the
instrument cluster lights;
• For the instrument c luster with tachome-
ter, regardless of whether the position
lights or headlights are off or on.
• For the instrum ent cluster without
tachometer, when the position lights and/
or headlights are ON.
To switch the display indication to the
brightness control, re fer to “Information
display” in this section.
(1)
(2)
EXAMPLE
(1)
(2)
EXAMPLE
WA R N I N G
Do not adjust the brightness of the
instrument panel lights while driving.
Otherwise, you could lose control of
the vehicle.
Page 96 of 505
2-73BEFORE DRIVING
75RM4-01E
75RM183
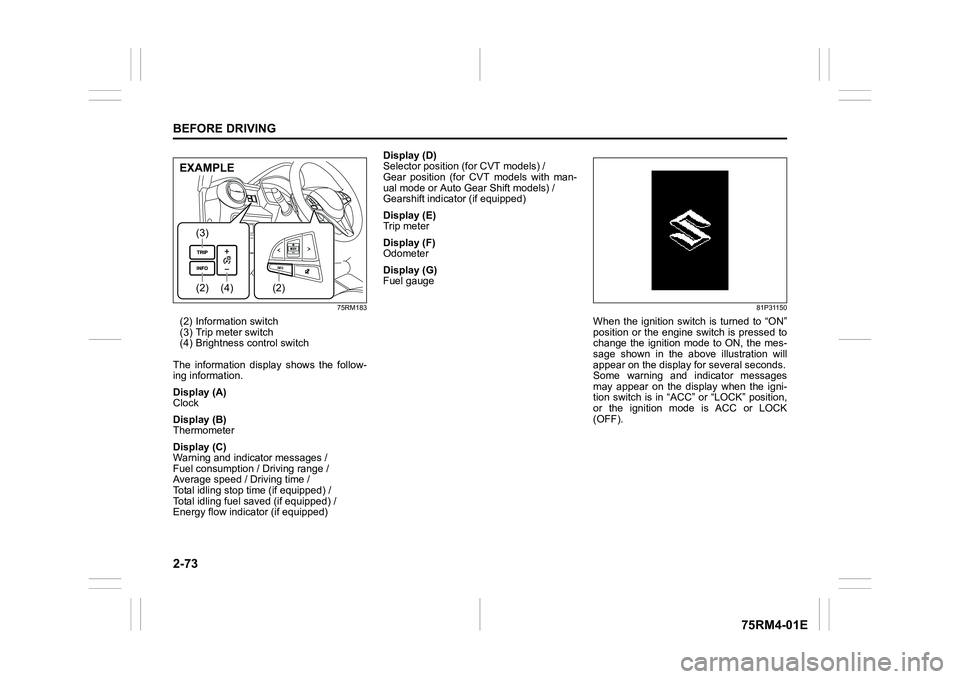
(2) Information switch
(3) Trip meter switch
(4) Brightness control switch
The information display shows the follow-
ing information.
Display (A)
Clock
Display (B)
Thermometer
Display (C)
Warning and indicator messages /
Fuel consumption / Driving range /
Average speed / Driving time /
Total idling stop time (if equipped) /
Total idling fuel saved (if equipped) /
Energy flow indicator (if equipped) Display (D)
Selector position (for CVT models) /
Gear position (for CVT models with man-
ual mode or Auto Gear Shift models) /
Gearshift indicator (if equipped)
Display (E)
Trip meter
Display (F)
Odometer
Display (G)
Fuel gauge
81P31150
When the ignition switch is turned to “ON”
position or the engine switch is pressed to
change the ignition mode to ON, the mes-
sage shown in the above illustration will
appear on the display
for several seconds.
Some warning and indicator messages
may appear on the display when the igni-
tion switch is in “ACC” or “LOCK” position,
or the ignition mode is ACC or LOCK
(OFF).
(4)
(2)(3)
(2)
EXAMPLE
Page 98 of 505
2-75BEFORE DRIVING
75RM4-01E
(a) Instantaneous fuel consumption
(b) Average fuel consumption(c) Driving range
(d) Average speed
(e) Driving time (f) Total idling stop time (if equipped)
(g) Total idling fuel saved (if equipped)
(h) Energy flow indicator (if equipped) (i) No indication
To switch the display indication, push the
information switch (2) quickly.
NOTE:
The value of fuel consumption, driving
range, average speed and total idling fuel
saved shown on the display are affected
by the following conditions;
• road condition
• surrounding traffic condition
• driving condition
• vehicle condition
• a malfunction which causes the malfunc- tion indicator light to come on or blink Instantaneous fuel consumption
The display shows instantaneous fuel con-
sumption with a bar graph only when the
vehicle is moving.
NOTE:
• The display does not show the bar graph
unless the vehicle is moving.
• Depending on the vehicle’s specification,
the fuel consumption units of initial set-
ting are indicated as L/100km, km/L,
MPG (UK) or MPG (US).
• The indicated maximum value of instan- taneous fuel consumption is one of the
followings. No more than the maximum
value will be indicated on the display
even if the actual instantaneous fuel
consumption is higher.
– For L/100km setting: 30
– For km/L setting: 50
– For MPG (UK) setting: 80
– For MPG (US) setting: 60
• The indication on the display may be
delayed if fuel consumption is greatly
affected by driving conditions.
• The display shows estimated values.
Indications may not be the same as
actual values. Average fuel consumption
If you selected average fuel consumption
the last time you drove
the vehicle, the dis-
play shows the last value of average fuel
consumption from previous driving when
the ignition switch is turned to “ON” posi-
tion or the engine switch is pressed to
change the ignition mode to ON. Unless
you reset the value of average fuel con-
sumption, the display indicates the value of
average fuel consumption based on the
average fuel consumption during previous
driving.
NOTE:
When you reconnect the negative (–) ter-
minal to the lead-acid battery, the value of
average fuel consumption will be shown
after driving for a period of time.
You can select when the value of average
fuel consumption is reset from among the
following three methods;
• Reset after refuel: the value of average fuel consumption will be reset automati-
cally by refueling.
• Reset with trip meter A: the value of average fuel consumption will be reset
automatically by resetting trip meter A.
• Reset manually: the value of average fuel consumption will be reset by push-
ing and holding the information switch
(2) when the display indicates the aver-
age fuel consumption.
Page 99 of 505
2-76
BEFORE DRIVING
75RM4-01E
To change when the value of average fuel
consumption is reset, refer to “Setting
mode” in this section.
NOTE:
If you add only a small amount of fuel
when you select “Reset after refuel”, the
average fuel consumption value may not
be reset.
Driving range
If you selected driving range the last time
you drove the vehicle, the display indicates
“---” for a few seconds and then indicates
the current driving range when the ignition
switch is turned to “ON” position or the
engine switch is pressed to change the
ignition mode to ON.
The driving range shown in the display is
the approximate distance you can drive
until the fuel gauge indicates “E”, based on
current driving conditions.
When the low fuel warning light comes on,
the display “---” will appear.
If the low fuel warning light comes on, fill
the fuel tank immediately regardless of the
value of driving range shown in the display.
As the driving range after refueling is cal-
culated based on the most recent driving
condition, the value is different each time
you refuel. NOTE:
• If you refuel when the ignition switch is in
“ON” position or the i gnition mode is ON,
the driving range may not indicate the
correct value.
• When you reconnect the negative (–)
terminal to the lead-acid battery, the
value of driving range will be shown after
driving for a period of time.
Average Speed
If you selected average speed the last time
you drove the vehicle, the display indicates
the last value of average speed from previ-
ous driving when the ignition switch is
turned to “ON” position or the engine
switch is pressed to change the ignition
mode to ON. Unless you reset the value of
average speed, the display indicates the
value of average speed which includes
average speed during previous driving.
To reset the value of average speed, push
and hold the information switch (2) for a
while when the display indicates an aver-
age speed. The display shows “---” and
then indicates a new average speed after
driving for a short time.
NOTE:
When you reconnect the negative (–) ter-
minal to the lead-acid battery, the value of
average speed will be shown after driving
for a period of time. Driving time
The display shows the total amount of driv-
ing time since the indication was reset.
• To reset the driving time to zero, push
and hold the information switch (2) for a
while when the display shows the driving
time.
NOTE:
When you reset the indication or reconnect
the negative (–) terminal to the lead-acid
battery, the driving time will be shown after
driving for a while.
Total idling stop time (if equipped)
The display shows the total length (in
hours, minutes and seconds) of engine
stopping time by ENG A-STOP system
since the indication was reset.
• To reset the total idling stop time to zero, push and hold the information switch (2)
for a while when the display shows the
total idling stop time.
NOTE:
• The indicated maximum value of the total idling stop time is 99:59:59.
• When you reconnect the negative (–) terminal to the lead-acid battery, the
value of the total idling stop time will be
reset.
Page 100 of 505
2-77BEFORE DRIVING
75RM4-01E
Total idling fuel saved (if equipped)
The display shows the total amount (in mil-
liliters) of fuel conservation by ENG A-
STOP system since the indication was
reset.
• To reset the total idling fuel saved tozero, push and hold the information
switch (2) for a while when the display
shows the total idling fuel saved.
NOTE:
When you reconnect the negative (–) ter-
minal to the lead-acid battery, the value of
the total idling fuel saved will be reset.
Energy flow indicator (if equipped)
Refer to “ENG A-ST OP system (engine
auto stop start system)” in the “OPERAT-
ING YOUR VEHICLE” section.
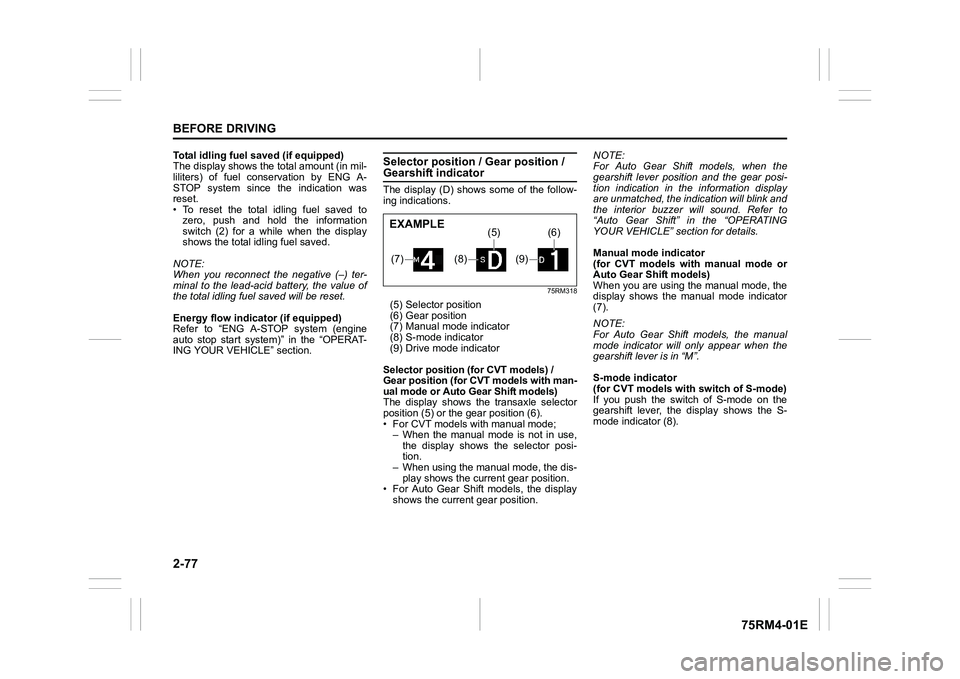
Selector position / Gear position / Gearshift indicatorThe display (D) shows some of the follow-
ing indications.
75RM318
(5) Selector position
(6) Gear position
(7) Manual mode indicator
(8) S-mode indicator
(9) Drive mode indicator
Selector position (for CVT models) /
Gear position (for CVT models with man-
ual mode or Auto Gear Shift models)
The display shows th e transaxle selector
position (5) or the gear position (6).
• For CVT models with manual mode; – When the manual mode is not in use,
the display shows the selector posi-
tion.
– When using the manual mode, the dis-
play shows the current gear position.
• For Auto Gear Shift models, the display shows the current gear position. NOTE:
For Auto Gear Shif
t models, when the
gearshift lever position and the gear posi-
tion indication in the information display
are unmatched, the indication will blink and
the interior buzzer will sound. Refer to
“Auto Gear Shift” in the “OPERATING
YOUR VEHICLE” section for details.
Manual mode indicator
(for CVT models with manual mode or
Auto Gear Shift models)
When you are using the manual mode, the
display shows the manual mode indicator
(7).
NOTE:
For Auto Gear Shift models, the manual
mode indicator will only appear when the
gearshift lever is in “M”.
S-mode indicator
(for CVT models with switch of S-mode)
If you push the switch of S-mode on the
gearshift lever, the display shows the S-
mode indicator (8).(7)
(8)
(5)
(9)
(6)
EXAMPLE