key SUZUKI IGNIS 2022 Owner's Manual
[x] Cancel search | Manufacturer: SUZUKI, Model Year: 2022, Model line: IGNIS, Model: SUZUKI IGNIS 2022Pages: 505, PDF Size: 8.36 MB
Page 61 of 505
2-38
BEFORE DRIVING
75RM4-01E
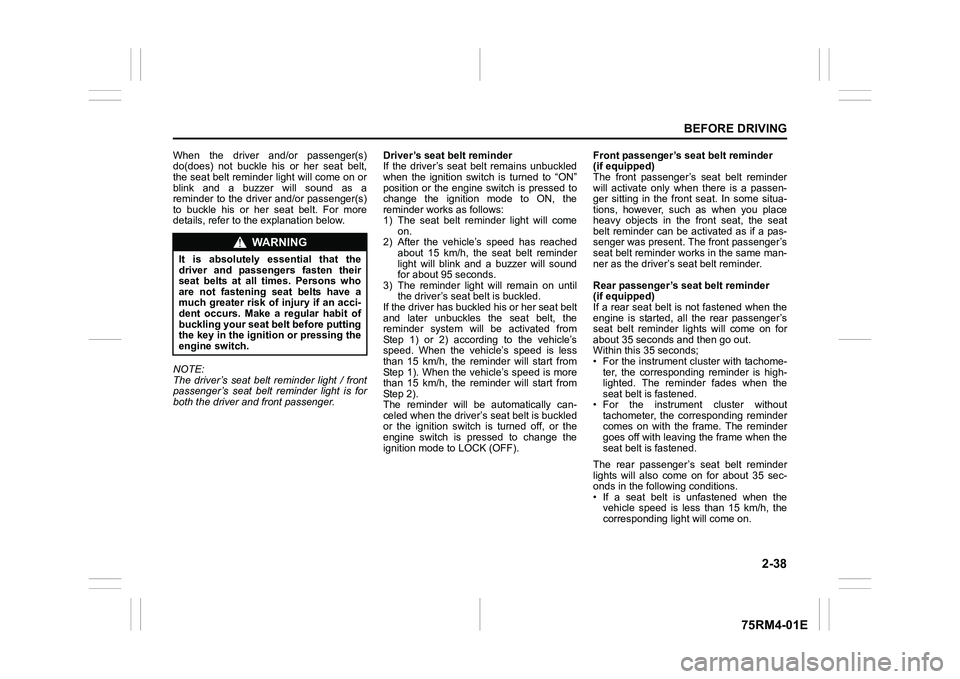
When the driver and/or passenger(s)
do(does) not buckle his or her seat belt,
the seat belt reminder light will come on or
blink and a buzzer will sound as a
reminder to the driver and/or passenger(s)
to buckle his or her seat belt. For more
details, refer to the explanation below.
NOTE:
The driver’s seat belt reminder light / front
passenger’s seat belt reminder light is for
both the driver and front passenger. Driver’s seat belt reminder
If the driver’s seat belt remains unbuckled
when the ignition switch is turned to “ON”
position or the engine switch is pressed to
change the ignition mode to ON, the
reminder works as follows:
1) The seat belt reminder light will come
on.
2) After the vehicle’s speed has reached
about 15 km/h, the seat belt reminder
light will blink and a buzzer will sound
for about 95 seconds.
3) The reminder light will remain on until the driver’s seat belt is buckled.
If the driver has buckled his or her seat belt
and later unbuckles the seat belt, the
reminder system will be activated from
Step 1) or 2) according to the vehicle’s
speed. When the vehicle’s speed is less
than 15 km/h, the reminder will start from
Step 1). When the vehicle’s speed is more
than 15 km/h, the reminder will start from
Step 2).
The reminder will be automatically can-
celed when the driver’s seat belt is buckled
or the ignition switch is turned off, or the
engine switch is pressed to change the
ignition mode to LOCK (OFF). Front passenger’s seat belt reminder
(if equipped)
The front passenger’s seat belt reminder
will activate only when there is a passen-
ger sitting in the front seat. In some situa-
tions, however, such as when you place
heavy objects in the front seat, the seat
belt reminder can be activated as if a pas-
senger was present. The front passenger’s
seat belt reminder wo
rks in the same man-
ner as the driver’s seat belt reminder.
Rear passenger’s seat belt reminder
(if equipped)
If a rear seat belt is not fastened when the
engine is started, all the rear passenger’s
seat belt reminder lights will come on for
about 35 seconds and then go out.
Within this 35 seconds;
• For the instrument c luster with tachome-
ter, the corresponding reminder is high-
lighted. The reminder fades when the
seat belt is fastened.
• For the instrum ent cluster without
tachometer, the corresponding reminder
comes on with the frame. The reminder
goes off with leaving the frame when the
seat belt is fastened.
The rear passenger’s seat belt reminder
lights will also come on for about 35 sec-
onds in the following conditions.
• If a seat belt is unfastened when the vehicle speed is less than 15 km/h, the
corresponding light will come on.
WA R N I N G
It is absolutely essential that the
driver and passengers fasten their
seat belts at all times. Persons who
are not fastening seat belts have a
much greater risk of injury if an acci-
dent occurs. Make a regular habit of
buckling your seat belt before putting
the key in the ignition or pressing the
engine switch.
Page 67 of 505
2-44
BEFORE DRIVING
75RM4-01E
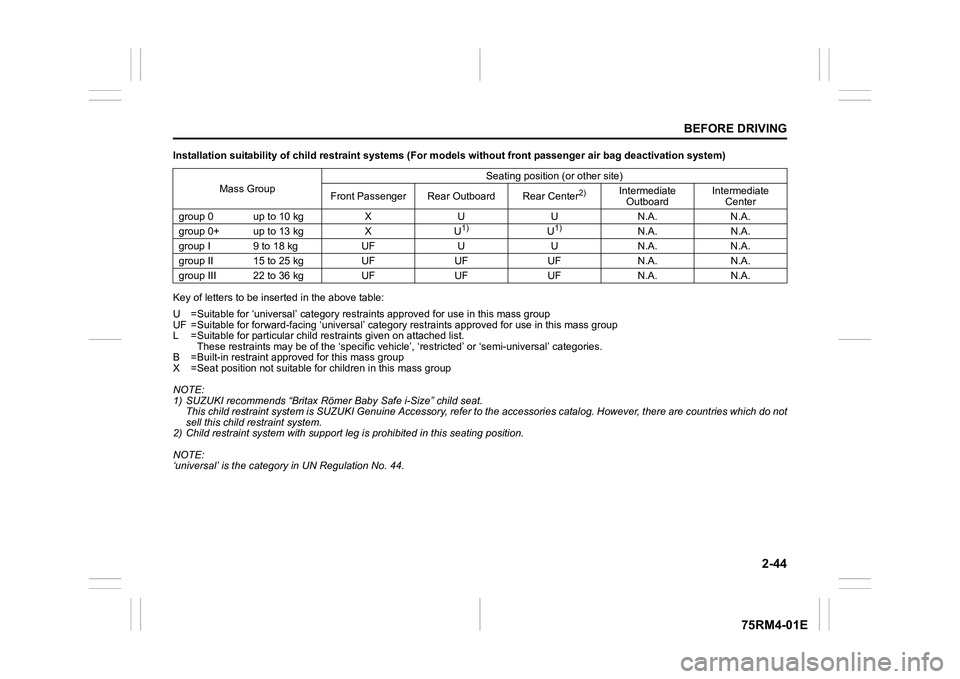
Installation suitability of child restraint systems (For models without front passenger air bag deactivation system)
Key of letters to be inse rted in the above table:
U =Suitable for ‘universal’ category restraints approved for use in this mass group
UF =Suitable for forward-facing ‘ universal’ category restraints approved for use in this mass group
L =Suitable for particular child r estraints given on attached list.
These restraints may be of the ‘ specific vehicle’, ‘restricted’ or ‘semi-universal’ categories.
B =Built-in restraint approved for this mass group
X =Seat position not suitable fo r children in this mass group
NOTE:
1) SUZUKI recommends “Britax Röme r Baby Safe i-Size” child seat.
This child restraint system is SUZUKI Genu ine Accessory, refer to the accessories cata log. However, there are countries which d o not
sell this child restraint system.
2) Child restraint system with support leg is prohibited in this seating position.
NOTE:
‘universal’ is the category in UN Regulation No. 44. Mass Group
Seating position (or other site)
Front Passenger Rear Outboard Rear Center
2)
Intermediate Outboard Intermediate
Center
group 0 up to 10 kg X U U N.A. N.A.
group 0+ up to 13 kg X U
1)
U1)
N.A. N.A.
group I 9 to 18 kg UF U U N.A. N.A.
group II 15 to 25 kg UF UF UF N.A. N.A.
group III 22 to 36 kg UF UF UF N.A. N.A.
Page 70 of 505
2-47BEFORE DRIVING
75RM4-01E
Key of letters to be inserted in the above table
IUF =Suitable for ISOFIX forward child restraints systems of universal category approved for use in this mass group
IL =Suitable for particular ISOFI X CRS are those of “specific vehicle”, “restricted” or “semi-universal” categories.
X =ISOFIX position not suitable fo r ISOFIX child restraint systems in this mass group and/or this size class.
NOTE:
1) SUZUKI recommends “Britax Römer Duo Plus” child seat.
2) SUZUKI recommends “Britax Römer KidFix XP” child seat.
These child restraint systems are SUZUKI Ge nuine Accessory, refer to the accessories catalog. However, there are countries which do
not sell these child restraint system.
NOTE:
‘universal’ is the category in UN Regulation No. 44.
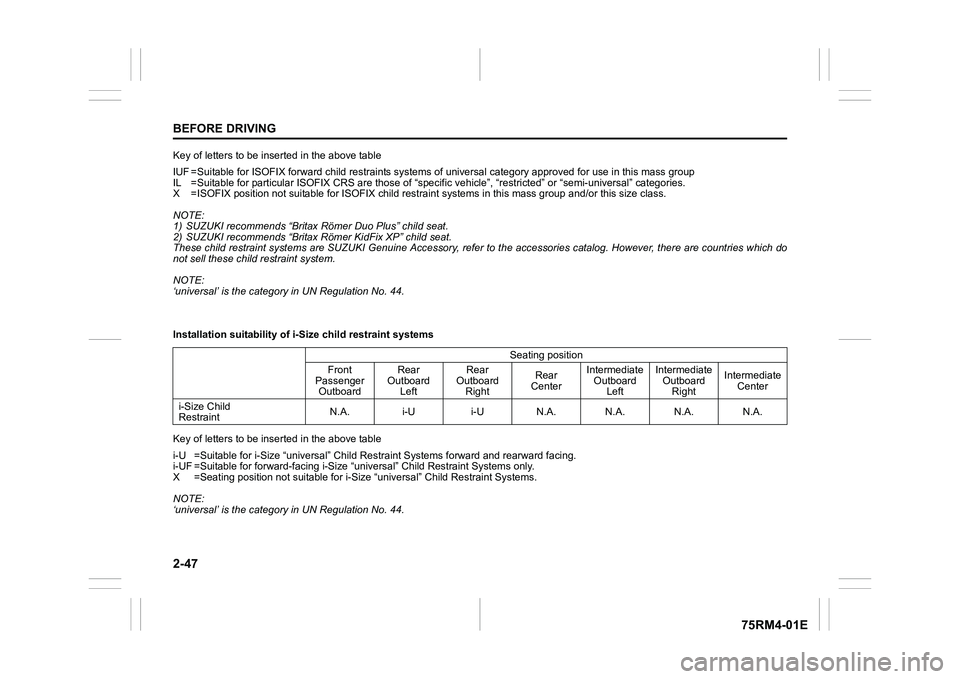
Installation suitability of i-Size child restraint systems
Key of letters to be inse rted in the above table
i-U =Suitable for i-Siz e “universal” Child Restraint Systems for ward and rearward facing.
i-UF =Suitable for forward-facing i-Size “universal” Child Restraint Systems only.
X =Seating position not suitable for i-Size “universal” Child Re straint Systems.
NOTE:
‘universal’ is the category in UN Regulation No. 44. Seating position
Front
Passenger Outboard Rear
Outboard Left Rear
Outboard Right Rear
Center Intermediate
Outboard Left Intermediate
Outboard Right Intermediate
Center
i-Size Child
Restraint N.A. i-U i-U N.A. N.A. N.A. N.A.
Page 90 of 505
2-67BEFORE DRIVING
75RM4-01E
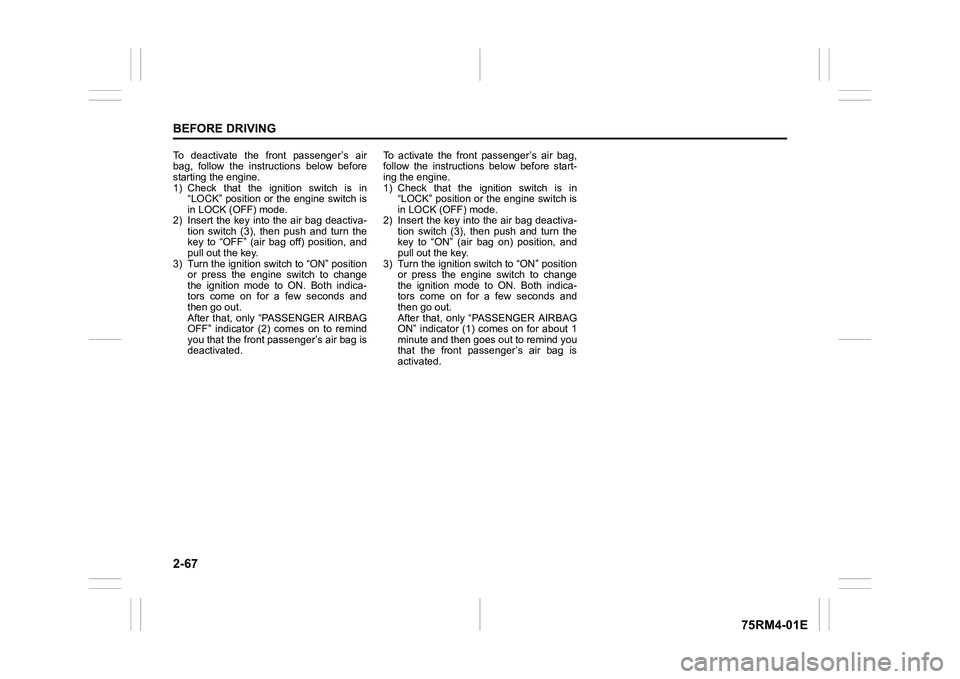
To deactivate the front passenger’s air
bag, follow the instructions below before
starting the engine.
1) Check that the ignition switch is in“LOCK” position or the engine switch is
in LOCK (OFF) mode.
2) Insert the key into the air bag deactiva- tion switch (3), then push and turn the
key to “OFF” (air bag off) position, and
pull out the key.
3) Turn the ignition switch to “ON” position or press the engine switch to change
the ignition mode to ON. Both indica-
tors come on for a few seconds and
then go out.
After that, only “PASSENGER AIRBAG
OFF” indicator (2) comes on to remind
you that the front pa ssenger’s air bag is
deactivated. To activate the front passenger’s air bag,
follow the instructions below before start-
ing the engine.
1) Check that the ignition switch is in
“LOCK” position or the engine switch is
in LOCK (OFF) mode.
2) Insert the key into the air bag deactiva- tion switch (3), then push and turn the
key to “ON” (air bag on) position, and
pull out the key.
3) Turn the ignition switch to “ON” position or press the engine switch to change
the ignition mode to ON. Both indica-
tors come on for a few seconds and
then go out.
After that, only “PASSENGER AIRBAG
ON” indicator (1) co mes on for about 1
minute and then goes out to remind you
that the front passenger’s air bag is
activated.
Page 103 of 505
2-80
BEFORE DRIVING
75RM4-01E
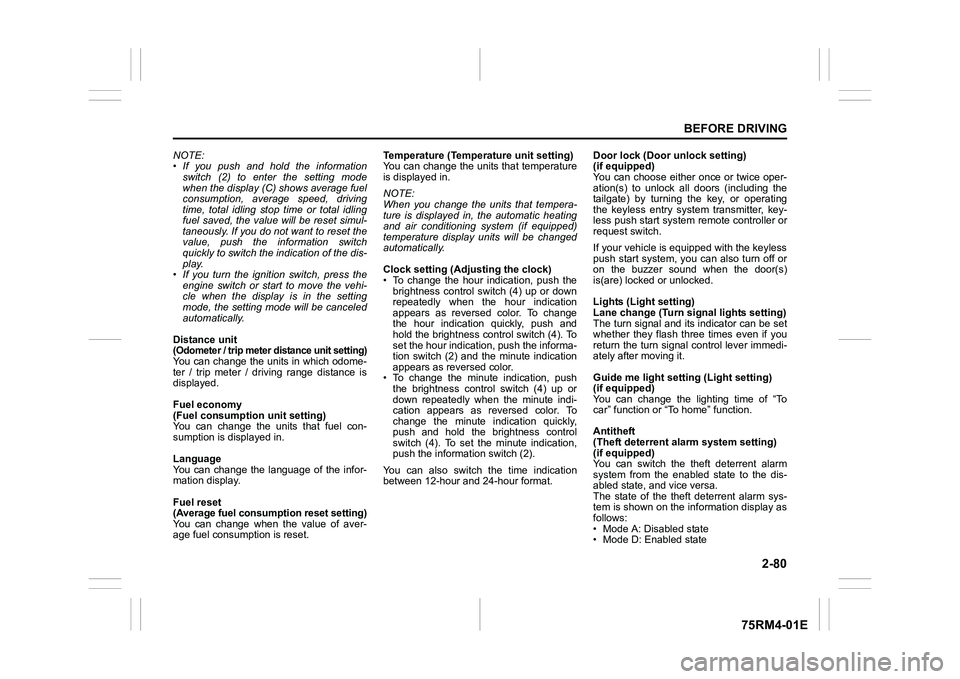
NOTE:
• If you push and hold the informationswitch (2) to enter the setting mode
when the display (C) shows average fuel
consumption, average speed, driving
time, total idling stop time or total idling
fuel saved, the value will be reset simul-
taneously. If you do not want to reset the
value, push the information switch
quickly to switch the indication of the dis-
play.
• If you turn the ignition switch, press the
engine switch or start to move the vehi-
cle when the display is in the setting
mode, the setting mode will be canceled
automatically.
Distance unit (Odometer / trip meter distance unit setting)You can change the units in which odome-
ter / trip meter / driving range distance is
displayed.
Fuel economy
(Fuel consumption unit setting)
You can change the units that fuel con-
sumption is displayed in.
Language
You can change the language of the infor-
mation display.
Fuel reset
(Average fuel consumption reset setting)
You can change when the value of aver-
age fuel consumption is reset. Temperature (Tempera
ture unit setting)
You can change the units that temperature
is displayed in.
NOTE:
When you change the units that tempera-
ture is displayed in, the automatic heating
and air conditioning system (if equipped)
temperature display units will be changed
automatically.
Clock setting (Adjusting the clock)
• To change the hour indication, push the brightness control switch (4) up or down
repeatedly when the hour indication
appears as reversed color. To change
the hour indication quickly, push and
hold the brightness control switch (4). To
set the hour indication, push the informa-
tion switch (2) and the minute indication
appears as reversed color.
• To change the minute indication, push the brightness control switch (4) up or
down repeatedly when the minute indi-
cation appears as reversed color. To
change the minute indication quickly,
push and hold the brightness control
switch (4). To set the minute indication,
push the information switch (2).
You can also switch the time indication
between 12-hour and 24-hour format. Door lock (Door
unlock setting)
(if equipped)
You can choose either once or twice oper-
ation(s) to unlock all doors (including the
tailgate) by turning the key, or operating
the keyless entry syst em transmitter, key-
less push start system remote controller or
request switch.
If your vehicle is equip ped with the keyless
push start system, you can also turn off or
on the buzzer sound when the door(s)
is(are) locked or unlocked.
Lights (Light setting)
Lane change (Turn signal lights setting)
The turn signal and its indicator can be set
whether they flash three times even if you
return the turn signal control lever immedi-
ately after moving it.
Guide me light setting (Light setting)
(if equipped)
You can change the lighting time of “To
car” function or “To home” function.
Antitheft
(Theft deterrent alarm system setting)
(if equipped)
You can switch the theft deterrent alarm
system from the enabled state to the dis-
abled state, and vice versa.
The state of the theft deterrent alarm sys-
tem is shown on the information display as
follows:
• Mode A: Disabled state
• Mode D: Enabled state
Page 108 of 505
2-85BEFORE DRIVING
75RM4-01E
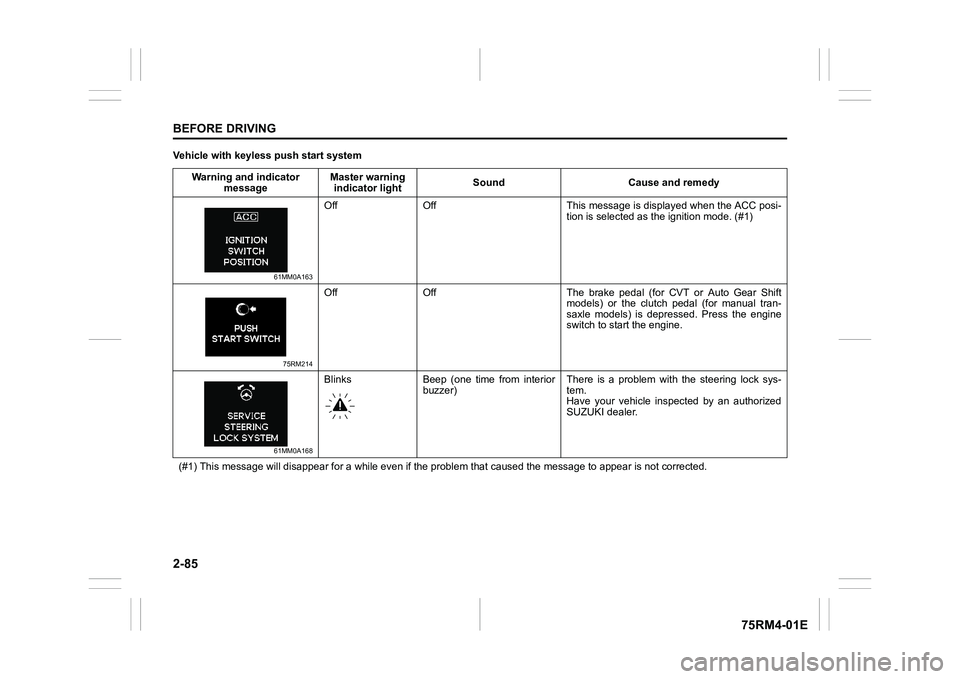
Vehicle with keyless push start systemWarning and indicator message Master warning
indicator light Sound Cause and remedy
61MM0A163
Off Off This message is displayed when the ACC posi-
tion is selected as the ignition mode. (#1)
75RM214
Off Off The brake pedal (for CVT or Auto Gear Shift
models) or the clutch pedal (for manual tran-
saxle models) is depressed. Press the engine
switch to start the engine.
61MM0A168
Blinks Beep (one time from interiorbuzzer) There is a problem with the steering lock sys-
tem.
Have your vehicle inspected by an authorized
SUZUKI dealer.
(#1) This message will disappear for a while even if the proble m that caused the message to appear is not corrected.
Page 109 of 505
2-86
BEFORE DRIVING
75RM4-01E
75RM215
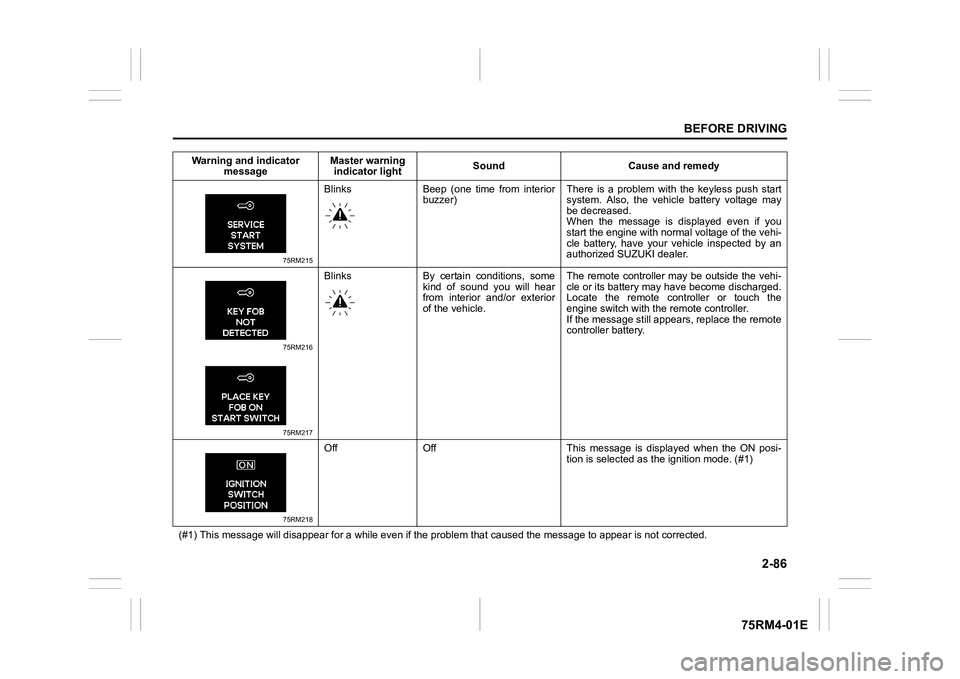
Blinks Beep (one time from interiorbuzzer) There is a problem with the keyless push start
system. Also, the vehicl
e battery voltage may
be decreased.
When the message is displayed even if you
start the engine with normal voltage of the vehi-
cle battery, have your vehicle inspected by an
authorized SUZUKI dealer.
75RM216
75RM217
Blinks By certain conditions, some
kind of sound you will hear
from interior and/or exterior
of the vehicle. The remote controller may be outside the vehi-
cle or its battery may have become discharged.
Locate the remote controller or touch the
engine switch with the
remote controller.
If the message still appears, replace the remote
controller battery.
75RM218
Off Off This message is displayed when the ON posi- tion is selected as the ignition mode. (#1)
(#1) This message will disappear for a while even if the proble m that caused the message to appear is not corrected.
Warning and indicator
message Master warning
indicator light Sound Cause and remedy
Page 123 of 505
2-100
BEFORE DRIVING
75RM4-01E
NOTE:
Depending on vehicle’s specifications,
some items may not be displayed.
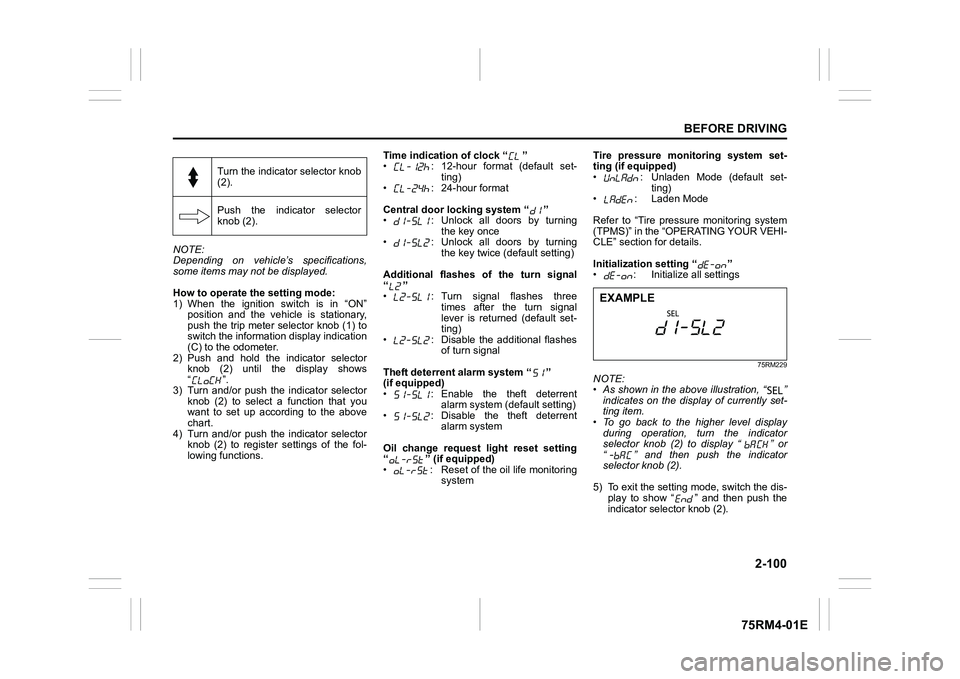
How to operate the setting mode:
1) When the ignition switch is in “ON”
position and the vehicle is stationary,
push the trip meter selector knob (1) to
switch the information display indication
(C) to the odometer.
2) Push and hold the indicator selector knob (2) until the display shows
“”.
3) Turn and/or push the indicator selector knob (2) to select a function that you
want to set up according to the above
chart.
4) Turn and/or push the indicator selector knob (2) to register settings of the fol-
lowing functions. Time indication of clock “ ”
• : 12-hour format (default set-
ting)
• : 24-hour format
Central door locking system “ ”
• : Unlock all doors by turning the key once
• : Unlock all doors by turning
the key twice (default setting)
Additional flashes of the turn signal
“”
• : Turn signal flashes three times after the turn signal
lever is returned (default set-
ting)
• : Disable the additional flashes of turn signal
Theft deterrent alarm system “ ”
(if equipped)
• : Enable the theft deterrent alarm system (default setting)
• : Disable the theft deterrent alarm system
Oil change request light reset setting
“ ” (if equipped)
• : Reset of the oil life monitoring system Tire pressure monitoring system set-
ting (if equipped)
• : Unladen Mode (default set-
ting)
• : Laden Mode
Refer to “Tire pressure monitoring system
(TPMS)” in the “OPERATING YOUR VEHI-
CLE” section for details.
Initialization setting “ ”
• : Initialize all settings
75RM229
NOTE:
• As shown in the above illustration, “ ”
indicates on the disp lay of currently set-
ting item.
• To go back to the higher level display
during operation, turn the indicator
selector knob (2) to display “ ” or
“ ” and then push the indicator
selector knob (2).
5) To exit the setting mode, switch the dis- play to show “ ” and then push the
indicator selector knob (2).
Turn the indicator selector knob
(2).
Push the indicator selector
knob (2).EXAMPLE
Page 131 of 505
2-108
BEFORE DRIVING
75RM4-01E
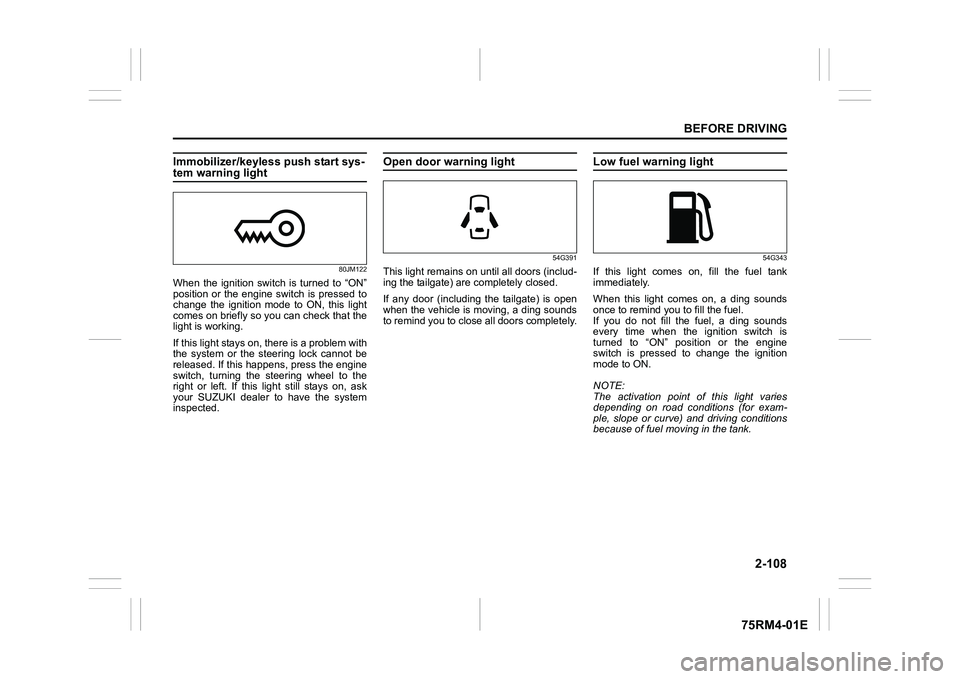
Immobilizer/keyless push start sys-tem warning light
80JM122
When the ignition switch is turned to “ON”
position or the engine switch is pressed to
change the ignition mode to ON, this light
comes on briefly so you can check that the
light is working.
If this light stays on, there is a problem with
the system or the steering lock cannot be
released. If this happens, press the engine
switch, turning the steering wheel to the
right or left. If this light still stays on, ask
your SUZUKI dealer to have the system
inspected.
Open door warning light
54G391
This light remains on until all doors (includ-
ing the tailgate) are completely closed.
If any door (including the tailgate) is open
when the vehicle is moving, a ding sounds
to remind you to close all doors completely.
Low fuel warning light
54G343
If this light comes on, fill the fuel tank
immediately.
When this light comes on, a ding sounds
once to remind you to fill the fuel.
If you do not fill the fuel, a ding sounds
every time when the ignition switch is
turned to “ON” position or the engine
switch is pressed to change the ignition
mode to ON.
NOTE:
The activation point of this light varies
depending on road conditions (for exam-
ple, slope or curve) and driving conditions
because of fuel moving in the tank.
Page 141 of 505
2-118
BEFORE DRIVING
75RM4-01E
Light reminder buzzerThe interior buzzer continuously beeps if
you open the driver’s door without turning
off the headlights and position lights. This
function is triggered under the following
condition:
The headlights and/or position lights are
on even after the ignition switch is turned
off, or the engine switch is pressed to
change the ignition mode to LOCK (OFF).
The buzzer stops sounding when you turn
off the headlights and position lights.
NOTE:
A message is indicated on the information
display in the instrument cluster with
tachometer while the buzzer is sounding.Daytime running light (D.R.L.) sys-tem (if equipped)When the engine is started, this system
turns on the daytime running lights.
Conditions for D.R.L. system operation
1) The engine is running.
2) Headlights and front fog light (if equipped) are off.
NOTE:
Brightness of the daytime running lights is
different from the bri ghtness of the position
lights, but it is not a malfunction.
Guide me light (if equipped)To home function
This function turns on the front position
lights and the headlights in the low beam
setting for about 10 seconds after the igni-
tion switch is turned to “LOCK” position or
the engine switch is pressed to change the
ignition mode to LOCK (OFF).
To set the function:
1) Turn the lighting switch to “AUTO” posi- tion
2) Turn the ignition switch to “LOCK” posi- tion or press the engine switch to
change the ignition mode to LOCK
(OFF).
3) Pull the lighting control lever toward you once and open the driver’s side
door within 60 seconds. Or pull the
lighting control lever toward you once
while the driver’s side door is open.
To cancel the function:
Perform any of the following operations.
• Pull the lighting control lever toward you once.
• Insert the key into the ignition switch or
change the ignition mode to ACC or ON
by pressing the engine switch.
• Turn the lighting switch to any other
position than “AUTO” position. NOTE:
• When the “To home” is functioning, the
front fog lights, rear fog lights and the
headlights (high beam) are not turned
on.
• Lighting time of the “To home” function
can be changed on the information dis-
play. Refer to “Information display” in this
section.
To car function
If UNLOCK button of the keyless push start
system remote controller or the keyless
entry system transmitter is pressed while
the lighting switch is positioned in “AUTO”,
the front position lights and the headlights
in the low beam are turned on for 10 sec-
onds.
This function will operate only when it is
dark outside the vehicle.
To cancel the function:
Perform any of the following operations.
• Lock the doors by using the keyless push start system rem ote controller, the
request switch or the keyless entry sys-
tem transmitter, or insert the key into the
driver’s door lock.
• Insert the key into the ignition switch or
change the ignition mode to ACC or ON
by pressing the engine switch.
• Turn the lighting switch to any other
position than “AUTO” position.