jacking SUZUKI IGNIS 2022 Owners Manual
[x] Cancel search | Manufacturer: SUZUKI, Model Year: 2022, Model line: IGNIS, Model: SUZUKI IGNIS 2022Pages: 505, PDF Size: 8.36 MB
Page 125 of 505
2-102
BEFORE DRIVING
75RM4-01E
Refer to “Tire pressure monitoring system
(TPMS)” in the “OPERATING YOUR VEHI-
CLE” section for additional details on the
tire pressure monitoring system. Refer to
“Tires” in the “INSPECTION AND MAIN-
TENANCE” section for information on
maintaining proper tire pressure.
WA R N I N G
The load-carrying capacity of your
tires is reduced at lower inflation
pressures. If your tires are even mod-
erately under-inflated, the load on the
tires may exceed the load-carrying
capacity of the tires, which could lead
to tire failure. The low tire pressure
warning light will not alert you to this
condition, because it only comes on
when one or more of your tires
becomes significan tly under-inflated.
Check and adjust your tire inflation
pressure at least once a month. Refer
to “Tires” in the “INSPECTION AND
MAINTENANCE” section.
WA R N I N G
Continuing to drive with the low tire
pressure warning light on can lead to
an accident, resulting in severe injury
or death.
If the low tire pressure warning light
comes on and stays on, reduce your
speed and avoid abrupt steering and
braking. Be aware that driving on a
significantly unde r-inflated tire can
cause the tire to overheat and can
lead to tire failure, and may affect
steering control and brake effective-
ness. Stop the vehicle in a safe place
as soon as possible and check your
tires.
• If you have a flat tire, replace it with
the spare tire (if e quipped). Refer to
“Jacking instructions” in the
“EMERGENCY SERVICE” section
for the tire replacement method.
Also refer to “Replacing tires and/
or wheels” for instructions on how
to restore normal operation of the
TPMS after you have had a flat tire. (Continued)
WA R N I N G
(Continued)
• If your vehicle is equipped with a
flat tire repair kit instead of a spare
tire, refer to “Flat tire repair kit (if
equipped)” in the “EMERGENCY
SERVICE” section for instructions
on how to perform an emergency
repair of a flat tire.
• If one or more of your tires is under-inflated, adjust the inflation
pressure of all tires to the recom-
mended inflation pressure as soon
as possible.
Page 240 of 505
3-87OPERATING YOUR VEHICLE
75RM4-01E
The low tire pressure warning light can
come on due to normal causes such as
natural air leakage and pressure changes
caused by changes in temperature or
atmospheric pressure. Adjusting the air
pressure in the tires to the pressure shown
on the tire information placard should
cause the low tire pressure warning light to
turn off.
To make the low tire pressure warning light
go off, adjust the tire pressures when the
tires are cold, and drive the vehicle for
about 10 minutes.
When the adjusted tire pressure is recog-
nized, the low tire pressure warning light
will go off and the information display
shows the current tire pressure (if you
select the TPMS monitor).If the light turns on again shortly after
adjusting the pressure in your tires, you
may have a flat tire. If you have a flat tire,
replace it with the spare tire (if equipped).
Refer to “Jacking instructions” in the
“EMERGENCY SERVICE” section. Refer
to “Replacing tires and/or wheels” for
instructions on how to restore normal oper-
ation of the tire pressure monitoring sys-
tem after you have
had a flat tire.
WA R N I N G
Continuing to drive with the low tire
pressure warning light on can lead to
an accident, resulting in severe injury
or death.
If the low tire pressure warning light
comes on and stays on, reduce your
speed and avoid abrupt steering and
braking. Be aware that driving on a
significantly unde r-inflated tire can
cause the tire to overheat and can
lead to tire failure, and may affect
steering control and brake effective-
ness. Stop in a safe place as soon as
possible and check your tires.
• If you have a flat tire, replace it with the spare tire (if e quipped). Refer to
“Jacking instructions” in the
“EMERGENCY SERVICE” section
for tire replacement. Also refer to
“Replacing tires and/or wheels” for
instructions on how to restore nor-
mal operation of the TPMS after
you have had a flat tire. (Continued)
WA R N I N G
(Continued)
• If your vehicle is equipped with a
flat tire repair kit instead of a spare
tire, refer to “Flat tire repair kit” in
the “EMERGENCY SERVICE” sec-
tion for instructions on how to per-
form an emergency repair of a flat
tire.
• If one or more of your tires is under-inflated, adjust the inflation
pressure in all of your tires to the
recommended inflation pressure as
soon as possible.
NOTICE
If the low tire pressure warning light
does not go off even when you drive
for more than 10 minutes after adjust-
ing the cold tire pressure, there may
be a problem with the TPMS. Have
your vehicle inspected by an autho-
rized SUZUKI dealer.
Page 409 of 505
EMERGENCY SERVICE
8
75RM4-01E
60G411
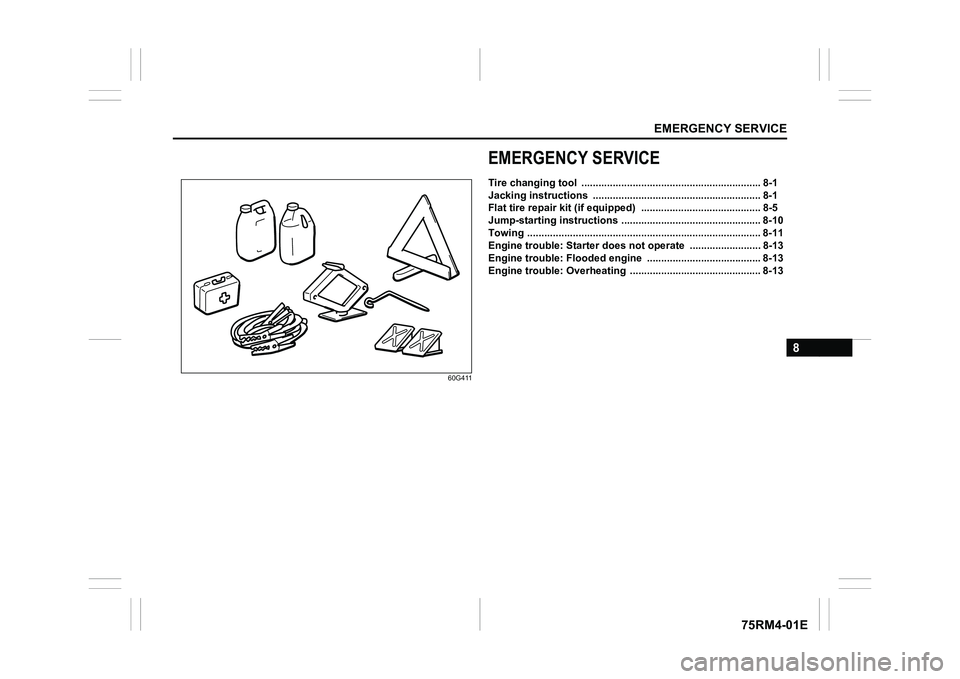
EMERGENCY SERVICETire changing tool ............................................................... 8-1
Jacking instructions .......................................... ................. 8-1
Flat tire repair kit (if equ ipped) .......................................... 8-5
Jump-starting instructions .................................... ............. 8-10
Towing ........................................................ .......................... 8-11
Engine trouble: Starter does not operate ...................... ... 8-13
Engine trouble: Flooded engine ................................ ........ 8-13
Engine trouble: Overheating ................................... ........... 8-13
Page 410 of 505
8-1EMERGENCY SERVICE
75RM4-01E
Tire changing tool
75RM076
(1) Jack (if equipped)
(2) Wheel brace
(3) Jack handle
The tire changing tools are stowed in the
luggage compartment.
Refer to “LUGGAGE COMPARTMENT” in
the “ILLUSTRATED TABLE OF CON-
TENTS” section.
75RM374
To remove the spare tire (if equipped), turn
its bolt (4) countercl ockwise and remove it.
Jacking instructions
75F062
1) Place the vehicle on level, hard ground.
2) Set the parking brake firmly and shift into “P” (Park) if your vehicle has a
CVT, or shift into “R” (Reverse) if your
vehicle has a manual transaxle/Auto
Gear Shift.
(3)(2)
(1)
EXAMPLE
WA R N I N G
After using the tire changing tools,
stow them securely or they can
cause injury if an accident occurs.
CAUTION
The jack should be used only to
change wheels. It is important to read
the jacking instructions in this sec-
tion before attempting to use the
jack.
(4)
�:�Ν �5 �1 �, �1 �*
�
Page 411 of 505
8-2
EMERGENCY SERVICE
75RM4-01E
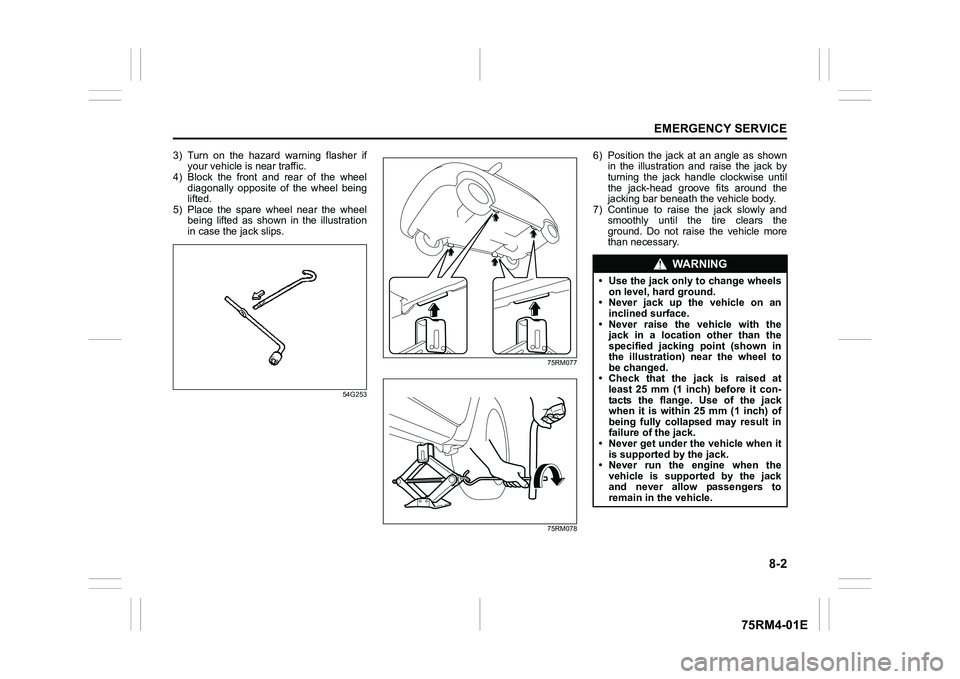
3) Turn on the hazard warning flasher ifyour vehicle is near traffic.
4) Block the front and rear of the wheel
diagonally opposite of the wheel being
lifted.
5) Place the spare wheel near the wheel
being lifted as shown in the illustration
in case the jack slips.
54G253 75RM077
75RM078
6) Position the jack at an angle as shown
in the illustration and raise the jack by
turning the jack handle clockwise until
the jack-head groove fits around the
jacking bar beneath the vehicle body.
7) Continue to raise the jack slowly and
smoothly until the tire clears the
ground. Do not raise the vehicle more
than necessary.
WA R N I N G
• Use the jack only to change wheelson level, hard ground.
• Never jack up the vehicle on an inclined surface.
• Never raise the vehicle with the jack in a location other than the
specified jacking point (shown in
the illustration) near the wheel to
be changed.
• Check that the jack is raised at
least 25 mm (1 inch) before it con-
tacts the flange. Use of the jack
when it is within 25 mm (1 inch) of
being fully collapsed may result in
failure of the jack.
• Never get under the vehicle when it
is supported by the jack.
• Never run the engine when the vehicle is supported by the jack
and never allow passengers to
remain in the vehicle.
Page 412 of 505
8-3EMERGENCY SERVICE
75RM4-01E
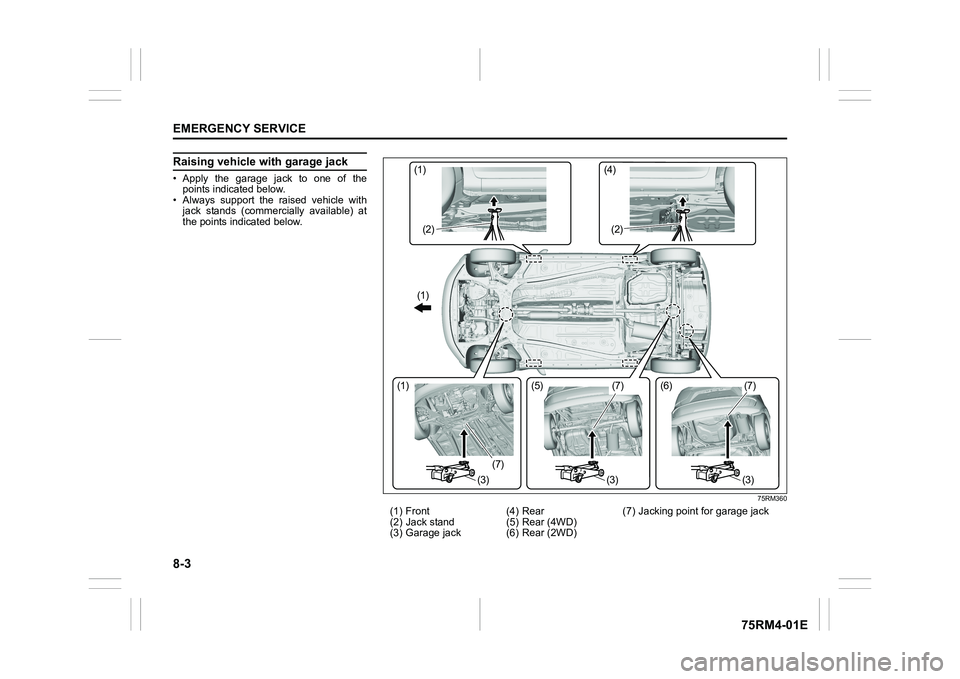
Raising vehicle with garage jack• Apply the garage jack to one of thepoints indicated below.
• Always support the raised vehicle with jack stands (commercially available) at
the points indicated below.
75RM360
(1) Front
(2) Jack stand
(3) Garage jack (4) Rear
(5) Rear (4WD)
(6) Rear (2WD) (7) Jacking point for garage jack
(4)
(1)(1)(2)
(2)
(7)
(1)
(3)
(3)
(3)
(5)
(6)
(7) (7)
Page 413 of 505
8-4
EMERGENCY SERVICE
75RM4-01E
NOTE:
For more details, contact an authorized
SUZUKI dealer.Changing wheelsTo change a wheel, use the following pro-
cedure:
1) Remove the jack (if equipped), toolsand spare wheel from the vehicle.
2) Loosen, but do not remove the wheel
nuts.
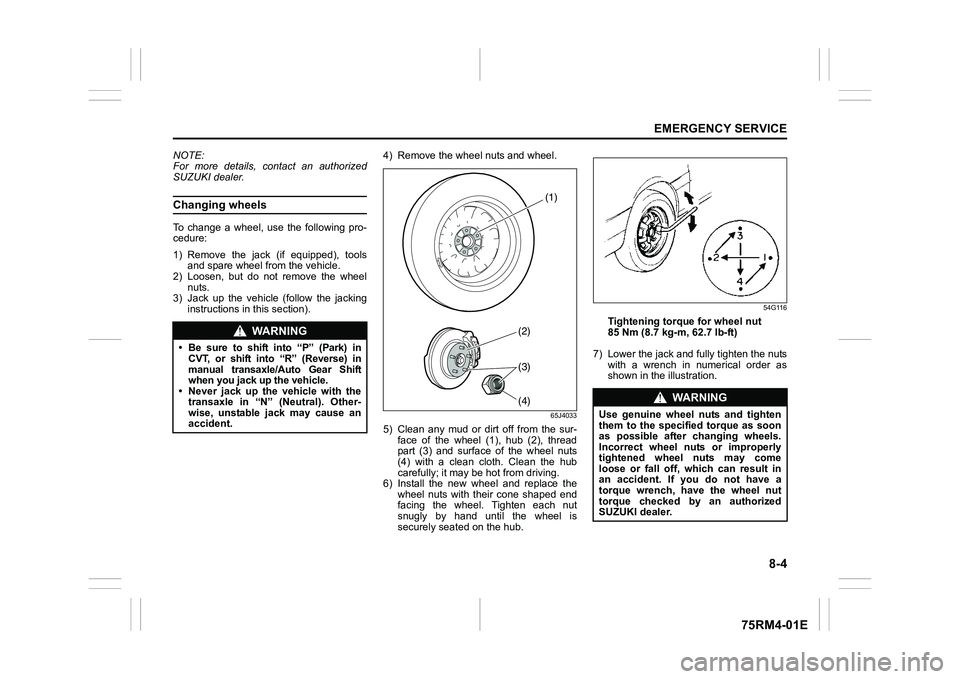
3) Jack up the vehicle (follow the jacking instructions in this section). 4) Remove the wheel nuts and wheel.
65J4033
5) Clean any mud or dirt off from the sur-
face of the wheel (1), hub (2), thread
part (3) and surface of the wheel nuts
(4) with a clean cloth. Clean the hub
carefully; it m ay be hot from driving.
6) Install the new wheel and replace the
wheel nuts with their cone shaped end
facing the wheel. Tighten each nut
snugly by hand until the wheel is
securely seated on the hub.
54G116
Tightening torque for wheel nut
85 Nm (8.7 kg-m, 62.7 lb-ft)
7) Lower the jack and fully tighten the nuts with a wrench in numerical order as
shown in the illustration.
WA R N I N G
• Be sure to shift into “P” (Park) inCVT, or shift into “R” (Reverse) in
manual transaxle/Auto Gear Shift
when you jack up the vehicle.• Never jack up the vehicle with the
transaxle in “N” (Neutral). Other-
wise, unstable jack may cause an
accident.
(2)(4)
(1)
(3)
WA R N I N G
Use genuine wheel nuts and tighten
them to the specified torque as soon
as possible after changing wheels.
Incorrect wheel nut s or improperly
tightened wheel nuts may come
loose or fall off, which can result in
an accident. If you do not have a
torque wrench, have the wheel nut
torque checked by an authorized
SUZUKI dealer.
Page 452 of 505
13-4INDEX
75RM4-01E
Horn .................................................................................... 2-128
How ABS works .................................................. ................. 3-77II/S AC Settings ..................................................................... 3-48
Idling stop time ............................................... ..................... 2-78
If you cannot shift CVT gearshift lever
out of “P” (PARK) .............................................. .................. 3-23
Ignition key reminder .......................................... .................. 2-2
Ignition switch................................................ ........................ 3-3
Illumination indicator light ................................... ............. 2-112
Immobilizer system ............................................. .................. 2-1
Immobilizer/keyless push start system warning light.... 2-108
Improving fuel economy ......................................... .............. 4-2
Information display
(instrument cluster with tachometer) ........................... ..... 2-72
Information display
(instrument cluster without tachometer) ........................ ... 2-93
Inside rearview mirror ...... ................................................... 2-23
Installation of child restraint with top tether ................ ..... 2-51
Installation of radio frequenc y transmitters...................... 5-32
Installation with ISOFIX type anchorages ....................... .. 2-49
Installation with lap-shoulder seat belts ........................... 2-48
Instantaneous fuel consumption .............................. 2-7 4, 2-94
Instrument cluster ............................................. .................. 2-68
Interior light ................................................. .................. 5-5, 7-49
Interior workable area for engi ne starting ........................... 3-9JJacking instructions ........................................... ................... 8-1
Jump-starting instructions ..................................... ............ 8-10
KKeyless entry system transmitter............................... .2-7, 2-13
Keyless push start system ... ................................................. 3-6
Keyless push start system rem ote controller.....................2-7
Keys........................................................... .............................. 2-1LLane departure warning indicator light......................... ... 2-110
Lane departure warning OFF indicator light ................... 2- 111
Lane departure warning OFF switch .............................. .... 3-62
Lap-shoulder belt .............................................. ................... 2-35
Lead-acid battery .............................................. ................... 7-42
LED headlight warning light.................................... .......... 2-112
LED headlights ................................................. .................... 7-49
License plate light ............................................ .................... 7-54
Light reminder buzzer.......................................... .............. 2-118
Lighting control lever ......................................... ............... 2-116
Lighting operation............................................. ................. 2-116
Listening to a CD.............................................. .................... 5-50
Listening to an iPod
®........................................................... 5-60
Listening to an MP3/WMA/AAC disc ............................... ... 5-53
Listening to files stored in a USB device...................... ..... 5-57
Listening to the radio......................................... .........5-43, 5-45
Lithium-ion battery............................................ ................... 7-45
Low engine coolant temperature l ight (blue color)......... 2-113
Low fuel warning light ......................................... .............. 2-108
Low tire pressure warning light ...............................2 -101, 3-85
Luggage compartment cover ...................................... ........ 5-11
MMain beam (high beam) indicator light ............................ 2-112
Maintenance recommended under severe driving
conditions (except for EU countries and Israel) ................ .7-8