oil SUZUKI IGNIS 2022 Owners Manual
[x] Cancel search | Manufacturer: SUZUKI, Model Year: 2022, Model line: IGNIS, Model: SUZUKI IGNIS 2022Pages: 505, PDF Size: 8.36 MB
Page 1 of 505
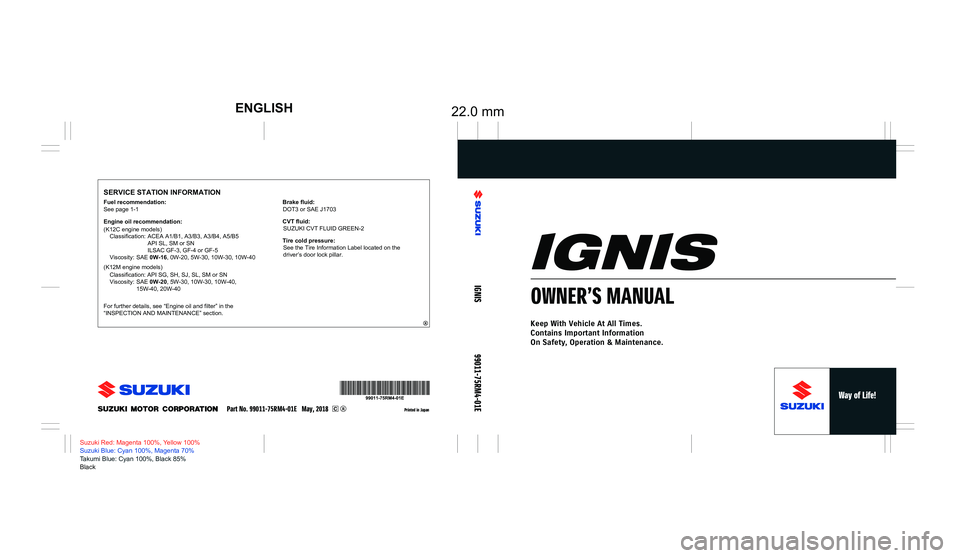
Classification: API SG, SH, SJ, SL, SM or SN
Viscosity: SAE 0W-20, 5W-30, 10W-30, 10W-40,
15W-40, 20W-40
(K12M engine models)
(K12C engine models)
22.0 mmENGLISH
SERVICE STATION INFORMATION
Printed in Japan
Suzuki Red: Magenta 100%, Yellow 100%
Suzuki Blue: Cyan 100%, Magenta 70%
Takumi Blue: Cyan 100%, Black 85%
Black
IGNIS
99011-75RM4-01E
OWNER’S MANUAL
Keep With Vehicle At All Times.
Contains Important Information
On Safety, Operation & Maintenance.
See page 1-1
Fuel recommendation:
Engine oil recommendation:
Classification: ACEA A1/B1, A3/B3, A3/B4, A5/B5
API SL, SM or SN
ILSAC GF-3, GF-4 or GF-5
Viscosity: SAE 0W-16, 0W-20, 5W-30, 10W-30, 10W-40
For further details, see “Engine oil and filter” in the
“INSPECTION AND MAINTENANCE” section.
Part No. 99011-75RM4-01E May, 2018
Brake fluid: DOT3 or SAE J1703
Tire cold pressure: See the Tire Information Label located on the
driver’s door lock pillar.
CVT fluid:
SUZUKI CVT FLUID GREEN-2
Page 9 of 505
75RM4-01E
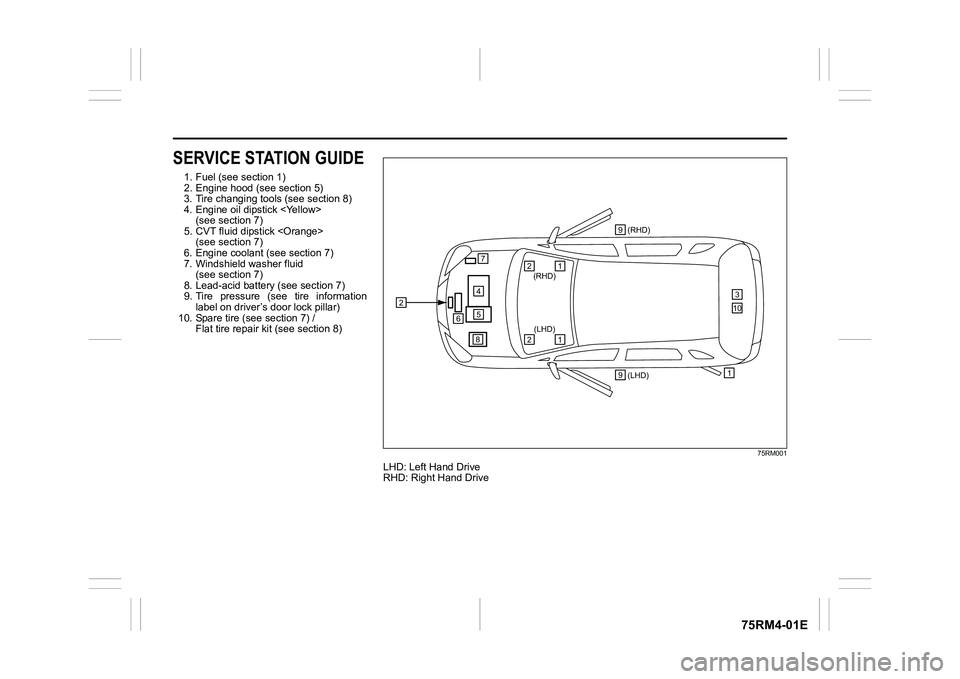
SERVICE STATION GUIDE1. Fuel (see section 1)
2. Engine hood (see section 5)
3. Tire changing tools (see section 8)
4. Engine oil dipstick
5. CVT fluid dipstick
6. Engine coolant (see section 7)
7. Windshield washer fluid (see section 7)
8. Lead-acid battery (see section 7)
9. Tire pressure (see tire information label on driver’s door lock pillar)
10. Spare tire (see section 7) / Flat tire repair kit (see section 8)
75RM001
LHD: Left Hand Drive
RHD: Right Hand Drive
2
457
6
(LHD) 1(RHD)
3
1
(RHD)
2
1
(LHD)
2
8 9
9
10
Page 58 of 505
2-35BEFORE DRIVING
75RM4-01E
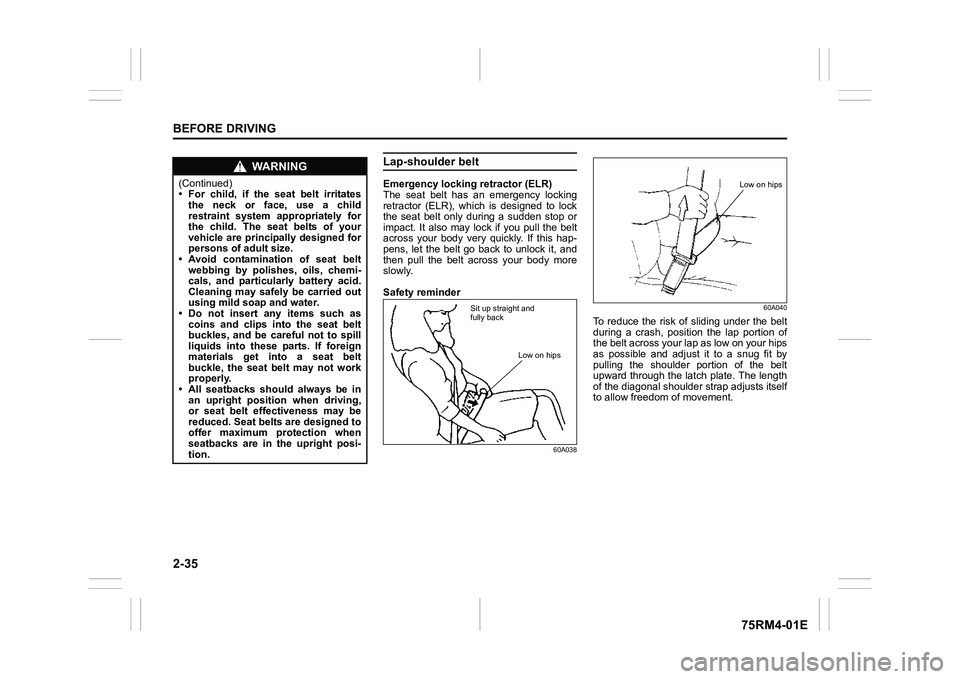
Lap-shoulder beltEmergency locking retractor (ELR)
The seat belt has an emergency locking
retractor (ELR), which is designed to lock
the seat belt only during a sudden stop or
impact. It also may lock if you pull the belt
across your body very quickly. If this hap-
pens, let the belt go back to unlock it, and
then pull the belt across your body more
slowly.
Safety reminder
60A03860A040
To reduce the risk of sliding under the belt
during a crash, position the lap portion of
the belt across your lap as low on your hips
as possible and adjust it to a snug fit by
pulling the shoulder portion of the belt
upward through the latch plate. The length
of the diagonal shoulder s
trap adjusts itself
to allow freedom of movement.
WA R N I N G
(Continued)
• For child, if the seat belt irritates
the neck or face, use a child
restraint system appropriately for
the child. The seat belts of your
vehicle are principally designed for
persons of adult size.
• Avoid contamination of seat belt
webbing by polishes, oils, chemi-
cals, and particularly battery acid.
Cleaning may safely be carried out
using mild soap and water.
• Do not insert any items such as
coins and clips into the seat belt
buckles, and be careful not to spill
liquids into these parts. If foreign
materials get into a seat belt
buckle, the seat belt may not work
properly.
• All seatbacks should always be in an upright position when driving,
or seat belt effectiveness may be
reduced. Seat belts are designed to
offer maximum protection when
seatbacks are in the upright posi-
tion.
Sit up straight and
fully back
Low on hips
Low on hips
Page 104 of 505
2-81BEFORE DRIVING
75RM4-01E
NOTE:
For the theft deterrent alarm system of
other than Australia, Israel, Germany and
Taiwan models, refer to “Theft deterrent
alarm system” in this section.
Oil change
(Oil life monitoring system reset setting)
(if equipped)
The oil life monitoring system must be
reset after changing the engine oil and oil
filter.
IS A/C (ENG A-STOP system setting)
(if equipped)
• When using the automatic heating and air conditioning system (if equipped),
you can select one of the following
engine auto stop settings.
– Standard
– Economy
–Comfort
• When “Economy” is selected, engine
auto stop condition is eased, compared
with “Standard”. Engine auto stop condi-
tion will occur more f requently, the stop
time will be longer, leading to reduction
of fuel consumption.
• When “Comfort” is sel ected, engine auto
stop condition becomes severe, com-
pared with “Standard”. Engine auto stop
condition will occur less frequently, the
stop time will be shorter, leading to more
comfortable cabin condition by air condi-
tioner. TPMS
(Tire pressure monitoring system set-
ting) (if equipped)
• You can check the current tire inflation
pressure on the information display.
• You can set one of the initial values of
tire pressure below that are indicated on
the tire information label.
– Comfort Mode
– Load Mode
Refer to “Tire pressure monitoring system
(TPMS)” in the “OPERATING YOUR VEHI-
CLE” section for details.
Display item (if equipped)
(Idling stop setting)
You can switch whether the information
display shows the engine stopping time by
the ENG A-STOP system.
(Idling disp setting)
You can switch whether the information
display shows the Eco-driving display
when the ignition switch is turned to
“LOCK” position or the ignition mode is
changed to LOCK (OFF).
(Idling warn setting)
You can switch whether the information
display shows the warning and indicator
messages related on the ENG A-STOP
system.
(Regen disp setting)
You can choose that the deceleration
energy regenerating indicator light comes
on or does not come on. Default (initialization setting)
If you select “YES” and push the informa-
tion switch (2), all settings will be reinitial-
ized.
Page 112 of 505
2-89BEFORE DRIVING
75RM4-01E
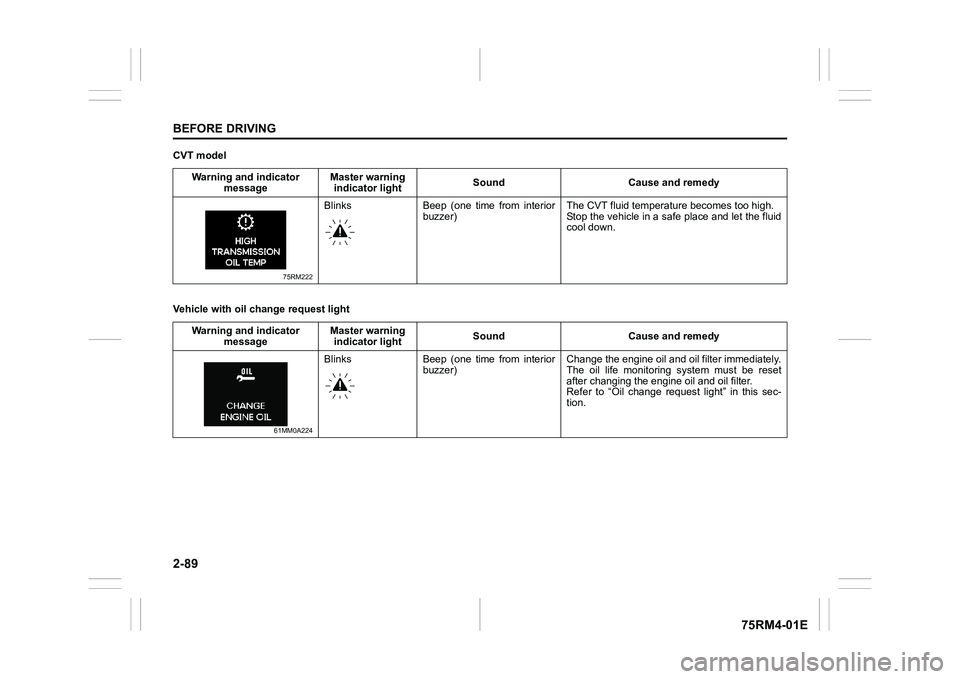
CVT model
Vehicle with oil change request lightWarning and indicator
message Master warning
indicator light Sound Cause and remedy
75RM222
Blinks Beep (one time from interior
buzzer) The CVT fluid temper
ature becomes too high.
Stop the vehicle in a safe place and let the fluid
cool down.
Warning and indicator message Master warning
indicator light Sound Cause and remedy
61MM0A224
Blinks Beep (one time from interior
buzzer) Change the engine oil and oil filter immediately.
The oil life monitoring system must be reset
after changing the engine oil and oil filter.
Refer to “Oil change request light” in this sec-
tion.
Page 116 of 505
2-93BEFORE DRIVING
75RM4-01E
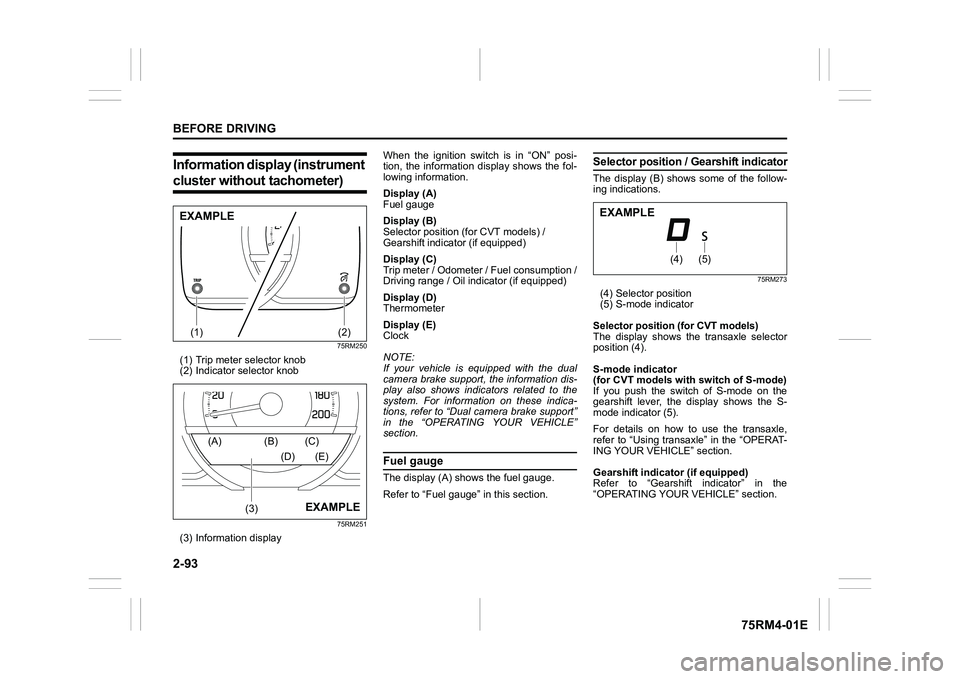
Information display (instrument cluster without tachometer)
75RM250
(1) Trip meter selector knob
(2) Indicator selector knob
75RM251
(3) Information display When the ignition switch is in “ON” posi-
tion, the information display shows the fol-
lowing information.
Display (A)
Fuel gauge
Display (B)
Selector position (for CVT models) /
Gearshift indicator (if equipped)
Display (C)
Trip meter / Odometer / Fuel consumption /
Driving range / Oil indicator (if equipped)
Display (D)
Thermometer
Display (E)
Clock
NOTE:
If your vehicle is equipped with the dual
camera brake support, the information dis-
play also shows indicators related to the
system. For information on these indica-
tions, refer to “Dual camera brake support”
in the “OPERATING YOUR VEHICLE”
section.
Fuel gaugeThe display (A) shows the fuel gauge.
Refer to “Fuel gauge” in this section.
Selector position
/ Gearshift indicatorThe display (B) shows some of the follow-
ing indications.
75RM273
(4) Selector position
(5) S-mode indicator
Selector position (for CVT models)
The display shows the transaxle selector
position (4).
S-mode indicator
(for CVT models with switch of S-mode)
If you push the switch of S-mode on the
gearshift lever, the display shows the S-
mode indicator (5).
For details on how to use the transaxle,
refer to “Using transaxle” in the “OPERAT-
ING YOUR VEHICLE” section.
Gearshift indicator (if equipped)
Refer to “Gearshift indicator” in the
“OPERATING YOUR VEHICLE” section.
(1)
(2)
EXAMPLE
(3)
(A) (B) (C)
(D) (E)
EXAMPLE
(4)
(5)
EXAMPLE
Page 117 of 505
2-94
BEFORE DRIVING
75RM4-01E
Trip meter / Odometer /
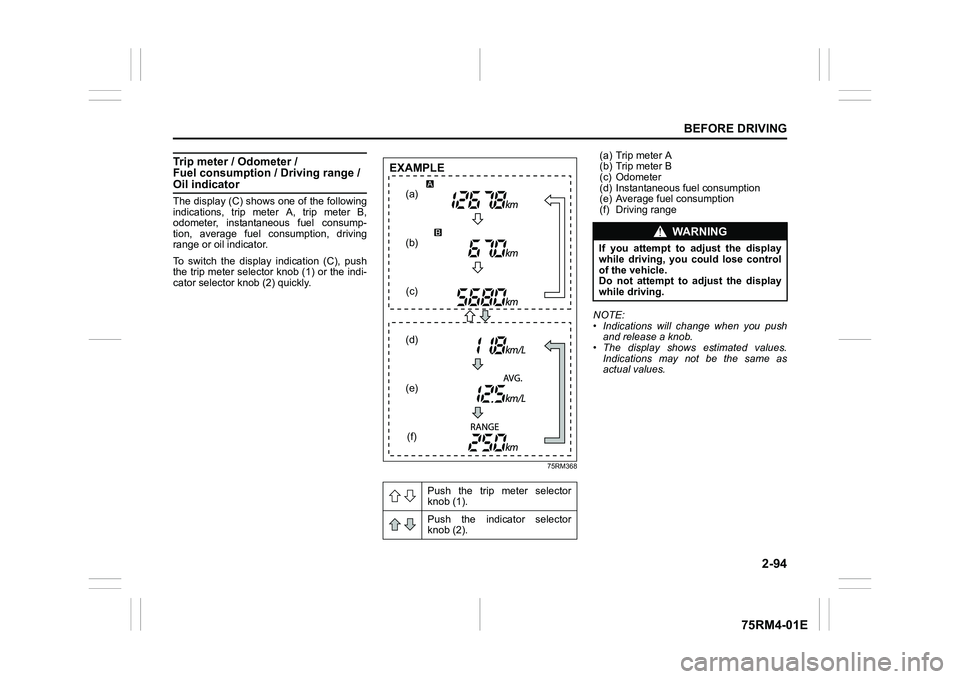
Fuel consumption / Driving range / Oil indicatorThe display (C) shows one of the following
indications, trip meter A, trip meter B,
odometer, instantaneous fuel consump-
tion, average fuel consumption, driving
range or oil indicator.
To switch the display indication (C), push
the trip meter selector knob (1) or the indi-
cator selector knob (2) quickly.
75RM368
(a) Trip meter A
(b) Trip meter B
(c) Odometer
(d) Instantaneous fuel consumption
(e) Average fuel consumption
(f) Driving range
NOTE:
• Indications will change when you push and release a knob.
• The display shows estimated values.
Indications may not be the same as
actual values.
Push the trip meter selector
knob (1).
Push the indicator selector
knob (2).
(a)
(b) (c)
(d)
(e) (f)
EXAMPLE
WA R N I N G
If you attempt to a djust the display
while driving, you could lose control
of the vehicle.
Do not attempt to adjust the display
while driving.
Page 119 of 505
2-96
BEFORE DRIVING
75RM4-01E
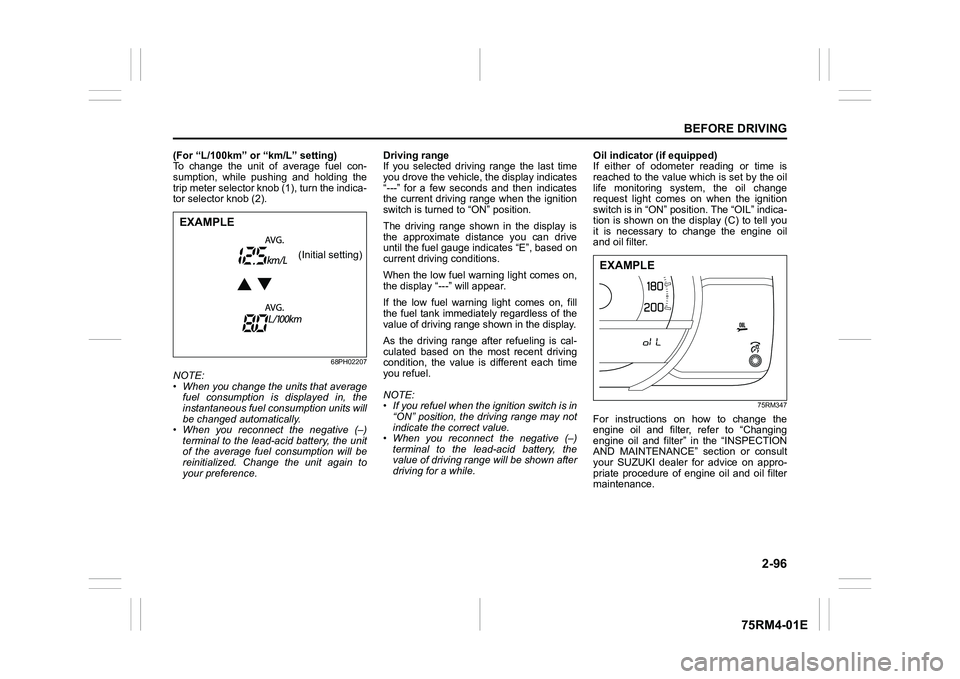
(For “L/100km” or “km/L” setting)
To change the unit of average fuel con-
sumption, while pushing and holding the
trip meter selector knob (1), turn the indica-
tor selector knob (2).
68PH02207
NOTE:
• When you change the units that averagefuel consumption is displayed in, the
instantaneous fuel consumption units will
be changed automatically.
• When you reconnect the negative (–)
terminal to the lead-acid battery, the unit
of the average fuel consumption will be
reinitialized. Change the unit again to
your preference. Driving range
If you selected driving range the last time
you drove the vehicle, the display indicates
“
--- ” for a few seconds and then indicates
the current driving range when the ignition
switch is turned to “ON” position.
The driving range shown in the display is
the approximate distance you can drive
until the fuel gauge indicates “E”, based on
current driving conditions.
When the low fuel warning light comes on,
the display “---” will appear.
If the low fuel warning light comes on, fill
the fuel tank immediately regardless of the
value of driving range shown in the display.As the driving range after refueling is cal-
culated based on the most recent driving
condition, the value is different each time
you refuel.
NOTE:
• If you refuel when the ignition switch is in
“ON” position, the driving range may not
indicate the correct value.
• When you reconnect the negative (–)
terminal to the lead-acid battery, the
value of driving range will be shown after
driving for a while. Oil indicator (if equipped)
If either of odometer reading or time is
reached to the value which is set by the oil
life monitoring system, the oil change
request light comes on when the ignition
switch is in “ON” position. The “OIL” indica-
tion is shown on the display (C) to tell you
it is necessary to change the engine oil
and oil filter.
75RM347
For instructions on how to change the
engine oil and filter, refer to “Changing
engine oil and filter” in the “INSPECTION
AND MAINTENANCE” section or consult
your SUZUKI dealer for advice on appro-
priate procedure of engine oil and oil filter
maintenance.
EXAMPLE
(Initial setting)
EXAMPLE
Page 120 of 505
2-97BEFORE DRIVING
75RM4-01E
To monitor the next oil and oil filter change
timing properly, it is necessary to reset the
odometer reading and the time for the
light. The light will go out after the reset.
For the resetting procedure, it is recom-
mended to consult your SUZUKI dealer. If
you reset it by yourself, follow the proce-
dure described below:
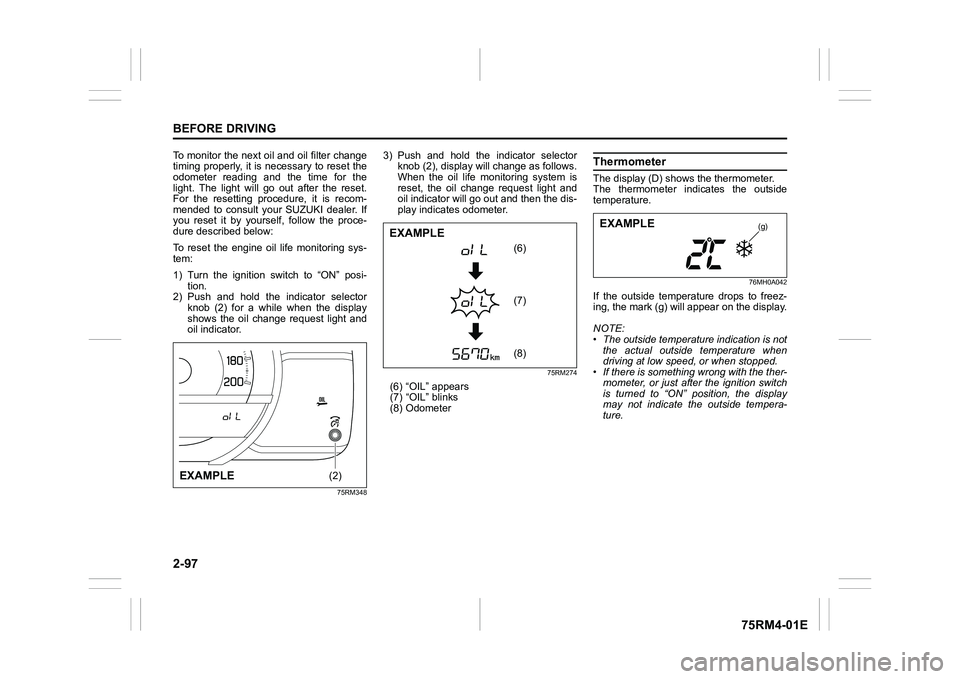
To reset the engine oil life monitoring sys-
tem:
1) Turn the ignition switch to “ON” posi- tion.
2) Push and hold the indicator selector
knob (2) for a while when the display
shows the oil change request light and
oil indicator.
75RM348
3) Push and hold the indicator selectorknob (2), display will change as follows.
When the oil life m onitoring system is
reset, the oil change request light and
oil indicator will go out and then the dis-
play indicates odometer.
75RM274
(6) “OIL” appears
(7) “OIL” blinks
(8) Odometer
ThermometerThe display (D) shows the thermometer.
The thermometer indicates the outside
temperature.
76MH0A042
If the outside temperature drops to freez-
ing, the mark (g) will appear on the display.
NOTE:
• The outside temperature indication is not
the actual outside temperature when
driving at low speed, or when stopped.
• If there is something wrong with the ther-
mometer, or just after the ignition switch
is turned to “ON” position, the display
may not indicate the outside tempera-
ture.
(2)
EXAMPLE
(8)
(7)
(6)
EXAMPLE
(g)
EXAMPLE
Page 122 of 505
2-99BEFORE DRIVING
75RM4-01E
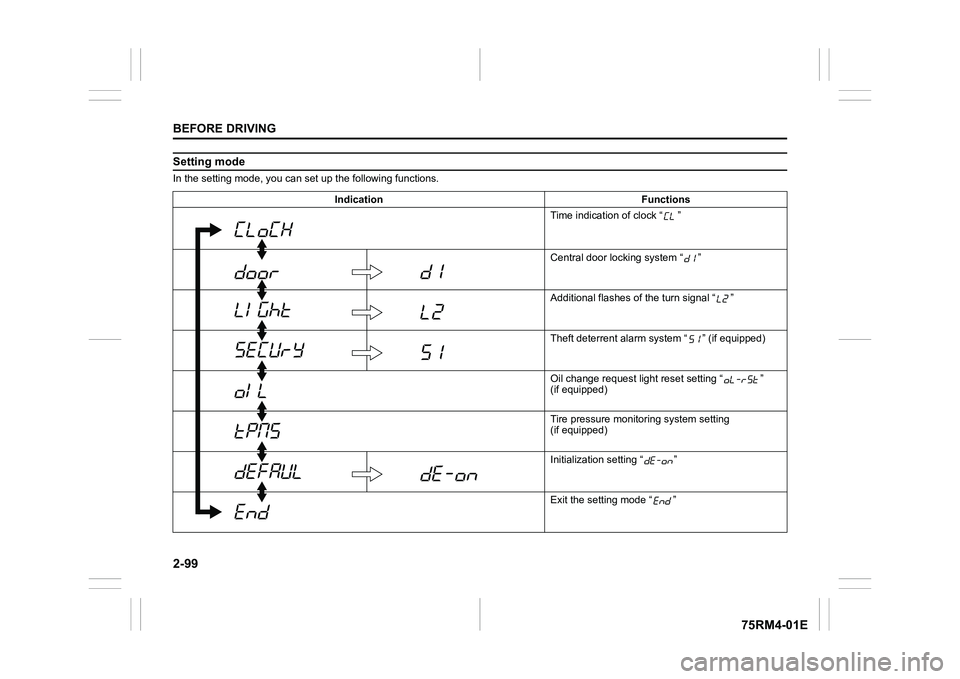
Setting modeIn the setting mode, you can set up the following functions.
Indication Functions Time indication of clock “ ”
Central door locking system “ ”
Additional flashes of the turn signal “ ”
Theft deterrent alarm system “ ” (if equipped)
Oil change request lig ht reset setting “ ”
(if equipped)
Tire pressure monito ring system setting
(if equipped)
Initialization setting “ ”
Exit the setting mode “ ”