KINGPIN SUZUKI JIMNY 2005 3.G Service Workshop Manual
[x] Cancel search | Manufacturer: SUZUKI, Model Year: 2005, Model line: JIMNY, Model: SUZUKI JIMNY 2005 3.GPages: 687, PDF Size: 13.38 MB
Page 49 of 687
Downloaded from www.Manualslib.com manuals search engine 0B-18 MAINTENANCE AND LUBRICATION
Steering System
INSPECTION
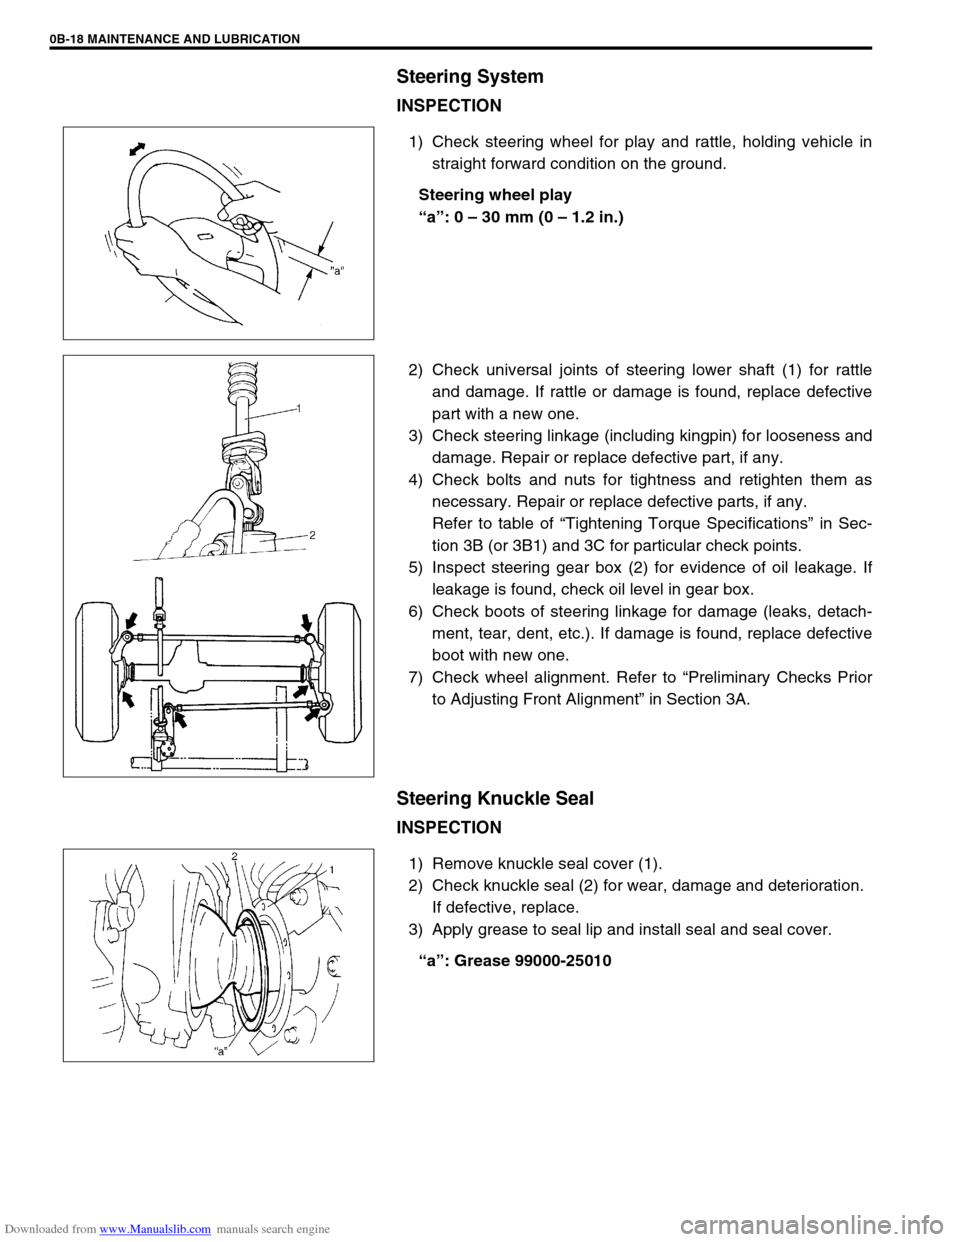
1) Check steering wheel for play and rattle, holding vehicle in
straight forward condition on the ground.
Steering wheel play
“a”: 0 – 30 mm (0 – 1.2 in.)
2) Check universal joints of steering lower shaft (1) for rattle
and damage. If rattle or damage is found, replace defective
part with a new one.
3) Check steering linkage (including kingpin) for looseness and
damage. Repair or replace defective part, if any.
4) Check bolts and nuts for tightness and retighten them as
necessary. Repair or replace defective parts, if any.
Refer to table of “Tightening Torque Specifications” in Sec-
tion 3B (or 3B1) and 3C for particular check points.
5) Inspect steering gear box (2) for evidence of oil leakage. If
leakage is found, check oil level in gear box.
6) Check boots of steering linkage for damage (leaks, detach-
ment, tear, dent, etc.). If damage is found, replace defective
boot with new one.
7) Check wheel alignment. Refer to “Preliminary Checks Prior
to Adjusting Front Alignment” in Section 3A.
Steering Knuckle Seal
INSPECTION
1) Remove knuckle seal cover (1).
2) Check knuckle seal (2) for wear, damage and deterioration.
If defective, replace.
3) Apply grease to seal lip and install seal and seal cover.
“a”: Grease 99000-25010
Page 174 of 687
Downloaded from www.Manualslib.com manuals search engine FRONT SUSPENSION 3D-1
6F1
6F2
6G
1A
6K
7A
7A1
3D
7F
8A
8A
8B
8C
8D
8E
9
10
10A
10B
SECTION 3D
FRONT SUSPENSION
CONTENTS
General Description ....................................... 3D-2
4WD Control System .................................... 3D-2
Diagnosis ........................................................ 3D-8
Diagnosis Table ........................................... 3D-8
4WD Controller and ITS Circuit Check ....... 3D-10
4WD Control System Check ...................... 3D-11
Stabilizer bar / bushing check ................ 3D-13
Shock Absorber and/or Coil Spring
Check ......................................................... 3D-14
Leading Arm / Lateral Rod / Steering
Knuckle Check ........................................... 3D-14
Leading Arm Bushing / Lateral Rod
Bushing Check ........................................... 3D-15
Kingpin / Kingpin Bearing Check ................ 3D-15
Barfield Joint Check ................................... 3D-15
Steering Knuckle Seal Check ..................... 3D-15
Wheel Disc, Nut and Bearing Check .......... 3D-16On-Vehicle Service ...................................... 3D-17
Stabilizer Bar / Bushings ............................ 3D-17
Front Shock Absorber ................................ 3D-19
Coil Spring ................................................. 3D-19
Bump Stopper and Spring Upper Seat ...... 3D-21
Wheel Hub / Bearing / Oil Seal .................. 3D-21
Steering Knuckle / Wheel Spindle.............. 3D-28
Front Axle Shaft / Oil Seal / Kingpin
Bearing Outer Race ................................... 3D-32
Steering Knuckle Seal................................ 3D-34
Lateral Rod ................................................ 3D-35
Leading Arm / Bushing............................... 3D-36
Front Axle Housing .................................... 3D-38
Tightening Torque Specifications .............. 3D-44
Required Service Material ........................... 3D-44
Special Tool .................................................. 3D-45
WARNING:
When hoisting vehicle, be sure to select the lifting point suitable for the service work referring to Sec-
tion 0A.
NOTE:
All front suspension fasteners are an important attaching part in that it could affect the performance
of vital parts and systems, and/or could result in major repair expense. They must be replaced with
one of the same part number or with an equivalent part if replacement becomes necessary. Do not
use a replacement part of lesser quality or substitute design. Torque values must be used as speci-
fied during reassembly to assure proper retention of this part.
Never attempt to heat, quench or straighten any front suspension part. Replace it with a new part or
damage to the part may result.
Page 175 of 687
Downloaded from www.Manualslib.com manuals search engine 3D-2 FRONT SUSPENSION
General Description
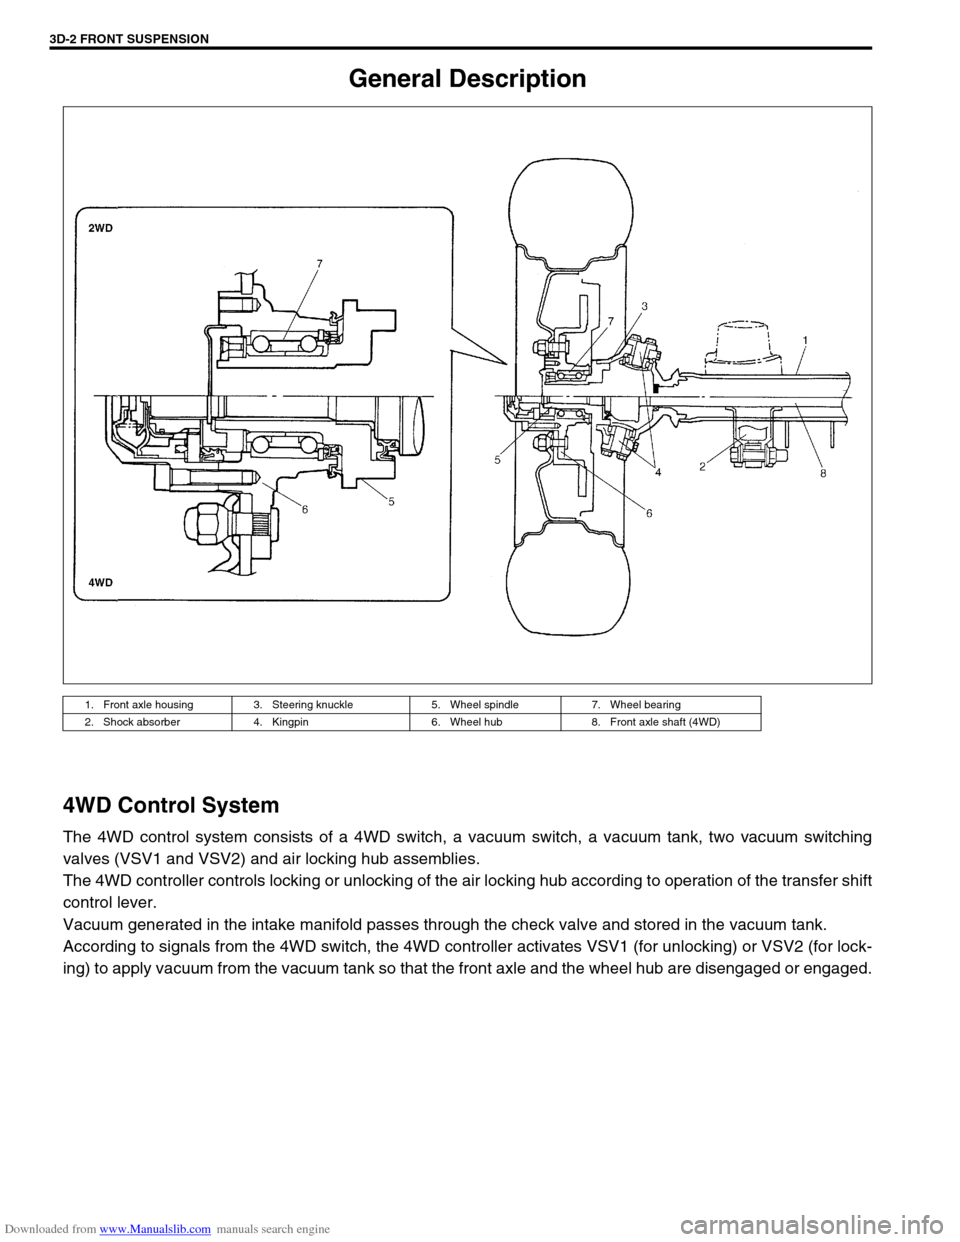
4WD Control System
The 4WD control system consists of a 4WD switch, a vacuum switch, a vacuum tank, two vacuum switching
valves (VSV1 and VSV2) and air locking hub assemblies.
The 4WD controller controls locking or unlocking of the air locking hub according to operation of the transfer shift
control lever.
Vacuum generated in the intake manifold passes through the check valve and stored in the vacuum tank.
According to signals from the 4WD switch, the 4WD controller activates VSV1 (for unlocking) or VSV2 (for lock-
ing) to apply vacuum from the vacuum tank so that the front axle and the wheel hub are disengaged or engaged.
1. Front axle housing 3. Steering knuckle 5. Wheel spindle 7. Wheel bearing
2. Shock absorber 4. Kingpin 6. Wheel hub 8. Front axle shaft (4WD)
Page 188 of 687
Downloaded from www.Manualslib.com manuals search engine FRONT SUSPENSION 3D-15
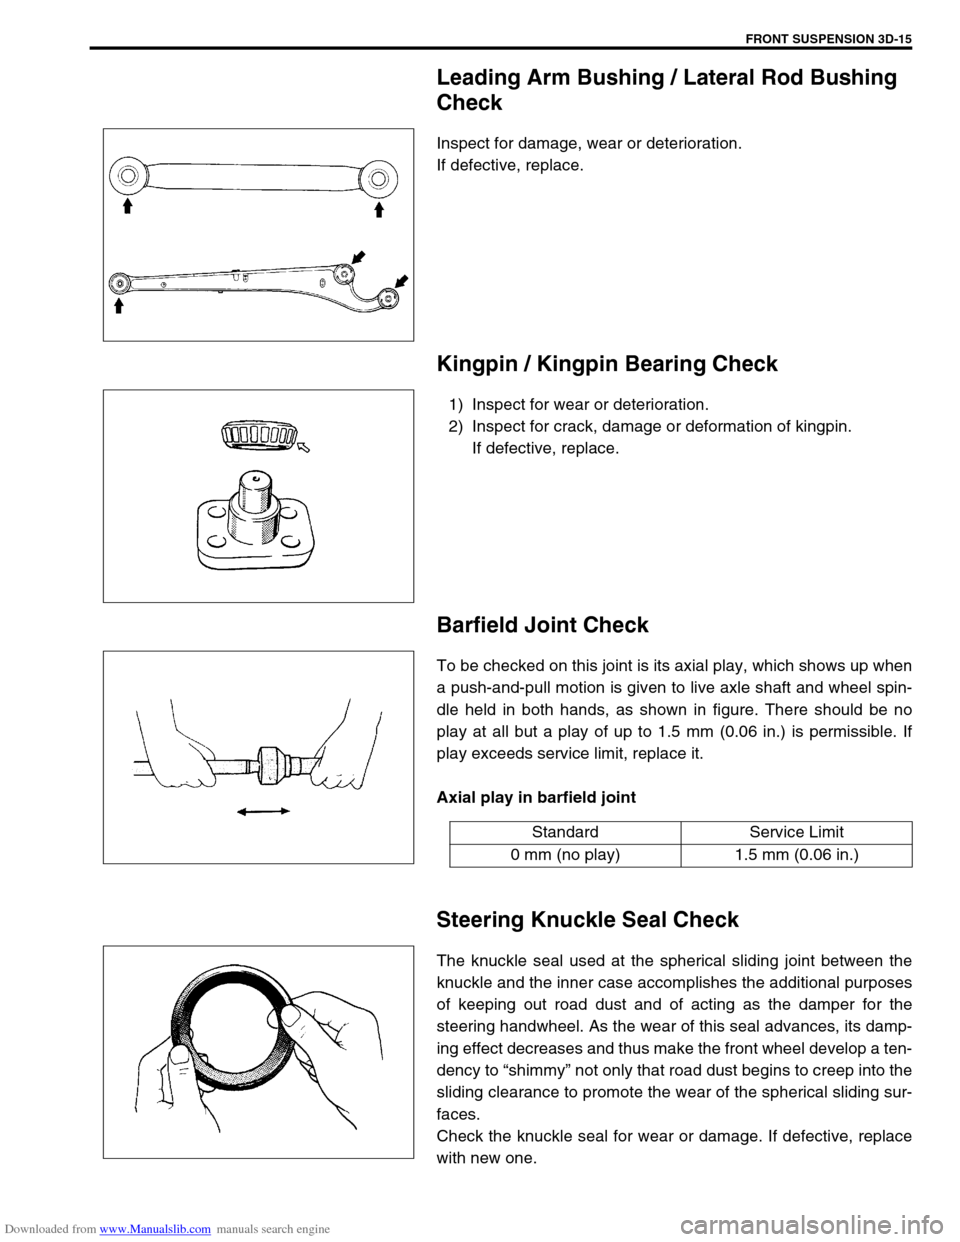
Leading Arm Bushing / Lateral Rod Bushing
Check
Inspect for damage, wear or deterioration.
If defective, replace.
Kingpin / Kingpin Bearing Check
1) Inspect for wear or deterioration.
2) Inspect for crack, damage or deformation of kingpin.
If defective, replace.
Barfield Joint Check
To be checked on this joint is its axial play, which shows up when
a push-and-pull motion is given to live axle shaft and wheel spin-
dle held in both hands, as shown in figure. There should be no
play at all but a play of up to 1.5 mm (0.06 in.) is permissible. If
play exceeds service limit, replace it.
Axial play in barfield joint
Steering Knuckle Seal Check
The knuckle seal used at the spherical sliding joint between the
knuckle and the inner case accomplishes the additional purposes
of keeping out road dust and of acting as the damper for the
steering handwheel. As the wear of this seal advances, its damp-
ing effect decreases and thus make the front wheel develop a ten-
dency to “shimmy” not only that road dust begins to creep into the
sliding clearance to promote the wear of the spherical sliding sur-
faces.
Check the knuckle seal for wear or damage. If defective, replace
with new one.
Standard Service Limit
0 mm (no play) 1.5 mm (0.06 in.)
Page 202 of 687
Downloaded from www.Manualslib.com manuals search engine FRONT SUSPENSION 3D-29
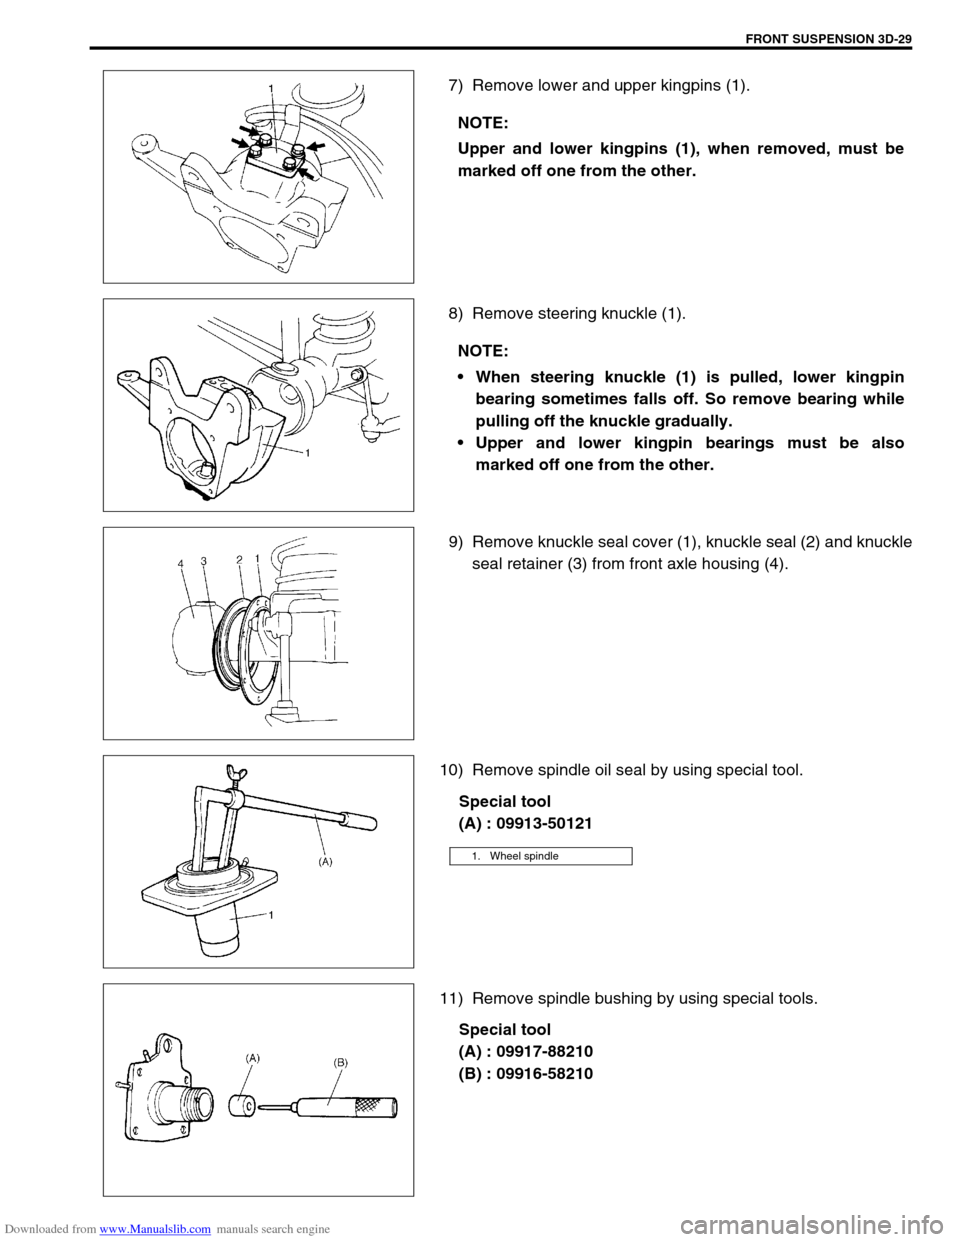
7) Remove lower and upper kingpins (1).
8) Remove steering knuckle (1).
9) Remove knuckle seal cover (1), knuckle seal (2) and knuckle
seal retainer (3) from front axle housing (4).
10) Remove spindle oil seal by using special tool.
Special tool
(A) : 09913-50121
11) Remove spindle bushing by using special tools.
Special tool
(A) : 09917-88210
(B) : 09916-58210 NOTE:
Upper and lower kingpins (1), when removed, must be
marked off one from the other.
NOTE:
When steering knuckle (1) is pulled, lower kingpin
bearing sometimes falls off. So remove bearing while
pulling off the knuckle gradually.
Upper and lower kingpin bearings must be also
marked off one from the other.
1. Wheel spindle
Page 203 of 687
Downloaded from www.Manualslib.com manuals search engine 3D-30 FRONT SUSPENSION
INSTALLATION
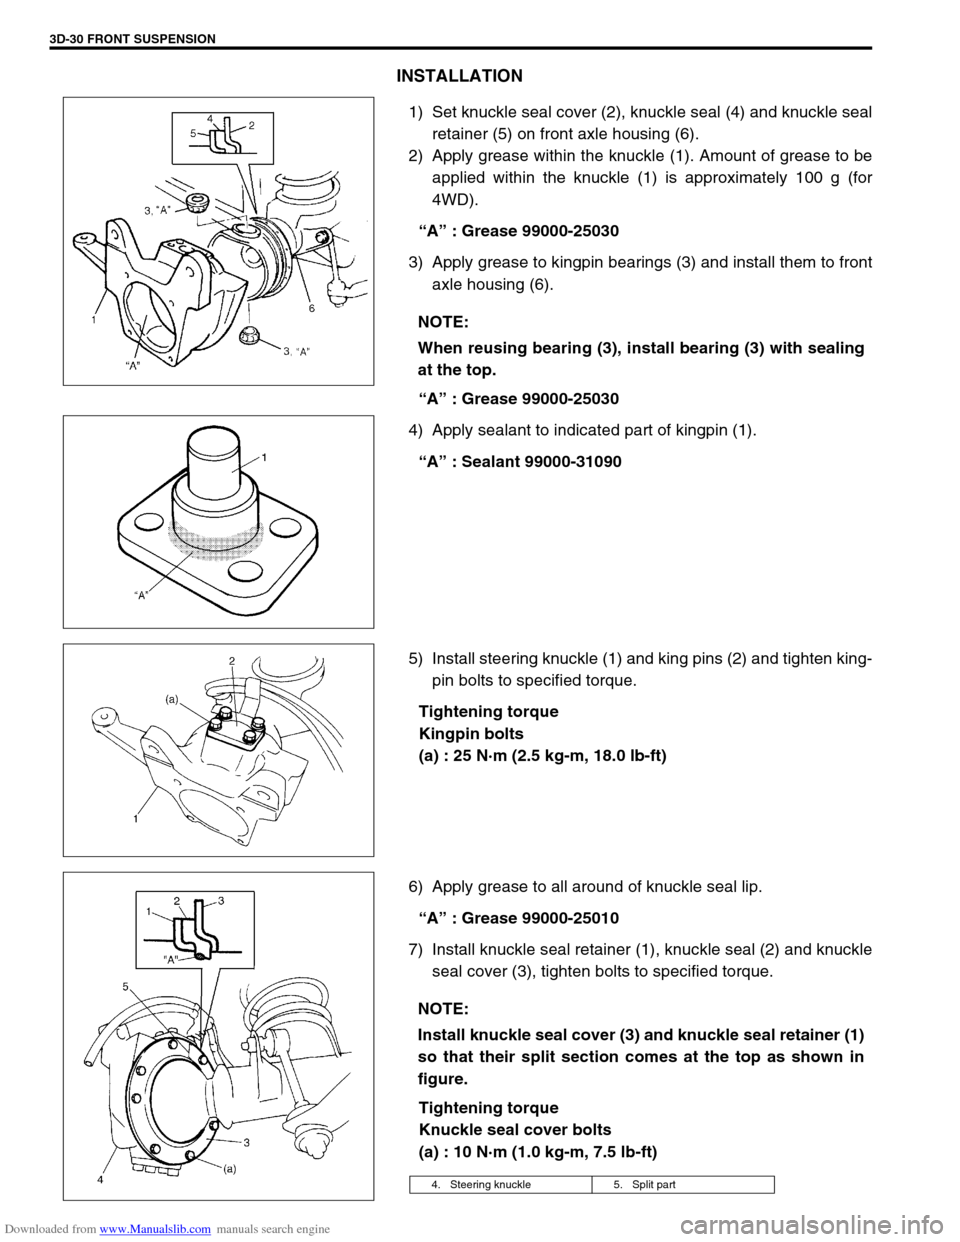
1) Set knuckle seal cover (2), knuckle seal (4) and knuckle seal
retainer (5) on front axle housing (6).
2) Apply grease within the knuckle (1). Amount of grease to be
applied within the knuckle (1) is approximately 100 g (for
4WD).
“A” : Grease 99000-25030
3) Apply grease to kingpin bearings (3) and install them to front
axle housing (6).
“A” : Grease 99000-25030
4) Apply sealant to indicated part of kingpin (1).
“A” : Sealant 99000-31090
5) Install steering knuckle (1) and king pins (2) and tighten king-
pin bolts to specified torque.
Tightening torque
Kingpin bolts
(a) : 25 N·m (2.5 kg-m, 18.0 lb-ft)
6) Apply grease to all around of knuckle seal lip.
“A” : Grease 99000-25010
7) Install knuckle seal retainer (1), knuckle seal (2) and knuckle
seal cover (3), tighten bolts to specified torque.
Tightening torque
Knuckle seal cover bolts
(a) : 10 N·m (1.0 kg-m, 7.5 lb-ft) NOTE:
When reusing bearing (3), install bearing (3) with sealing
at the top.
NOTE:
Install knuckle seal cover (3) and knuckle seal retainer (1)
so that their split section comes at the top as shown in
figure.
4. Steering knuckle 5. Split part
Page 205 of 687
Downloaded from www.Manualslib.com manuals search engine 3D-32 FRONT SUSPENSION
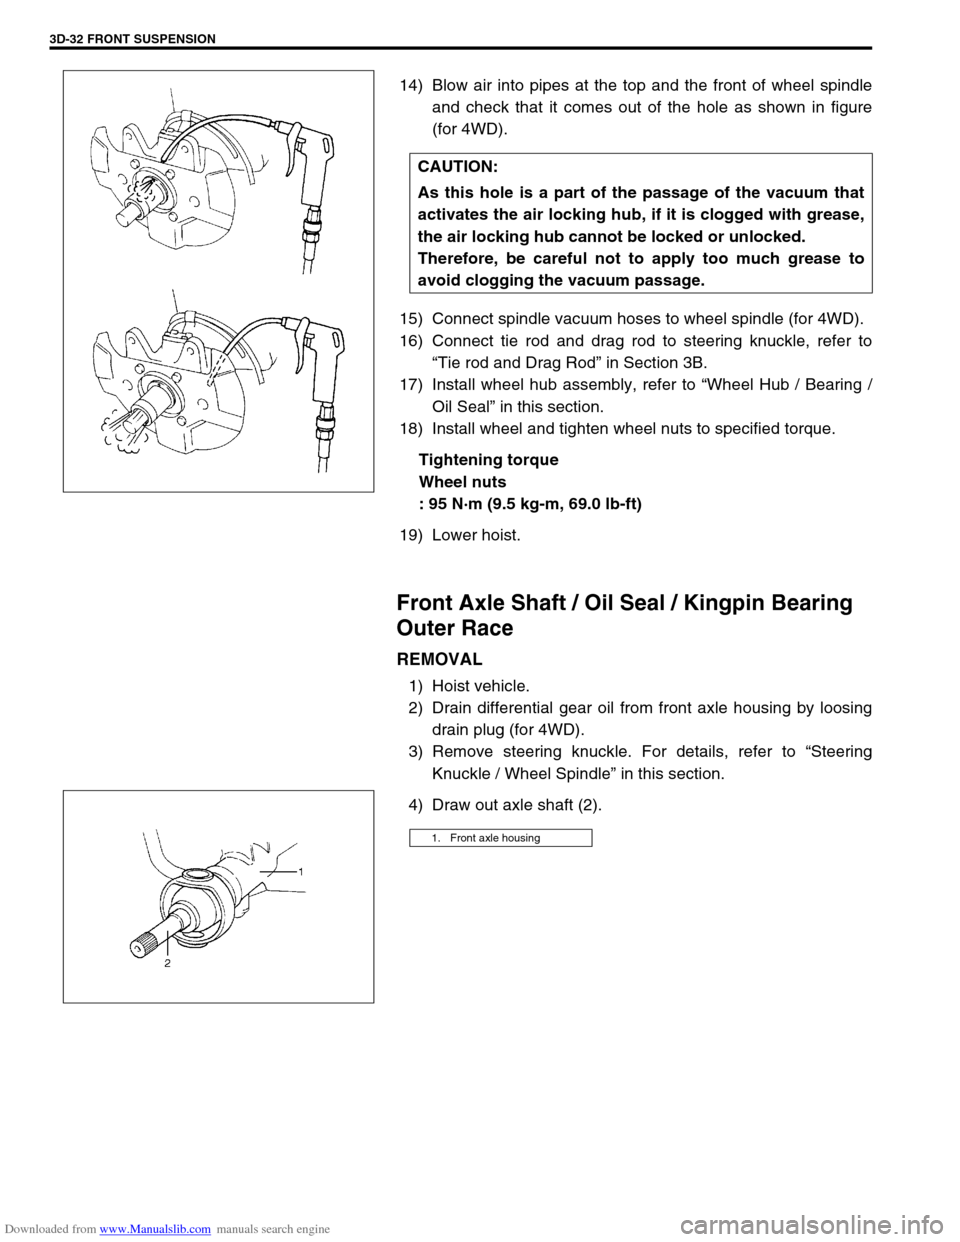
14) Blow air into pipes at the top and the front of wheel spindle
and check that it comes out of the hole as shown in figure
(for 4WD).
15) Connect spindle vacuum hoses to wheel spindle (for 4WD).
16) Connect tie rod and drag rod to steering knuckle, refer to
“Tie rod and Drag Rod” in Section 3B.
17) Install wheel hub assembly, refer to “Wheel Hub / Bearing /
Oil Seal” in this section.
18) Install wheel and tighten wheel nuts to specified torque.
Tightening torque
Wheel nuts
: 95 N·m (9.5 kg-m, 69.0 lb-ft)
19) Lower hoist.
Front Axle Shaft / Oil Seal / Kingpin Bearing
Outer Race
REMOVAL
1) Hoist vehicle.
2) Drain differential gear oil from front axle housing by loosing
drain plug (for 4WD).
3) Remove steering knuckle. For details, refer to “Steering
Knuckle / Wheel Spindle” in this section.
4) Draw out axle shaft (2).CAUTION:
As this hole is a part of the passage of the vacuum that
activates the air locking hub, if it is clogged with grease,
the air locking hub cannot be locked or unlocked.
Therefore, be careful not to apply too much grease to
avoid clogging the vacuum passage.
1. Front axle housing
Page 206 of 687
Downloaded from www.Manualslib.com manuals search engine FRONT SUSPENSION 3D-33
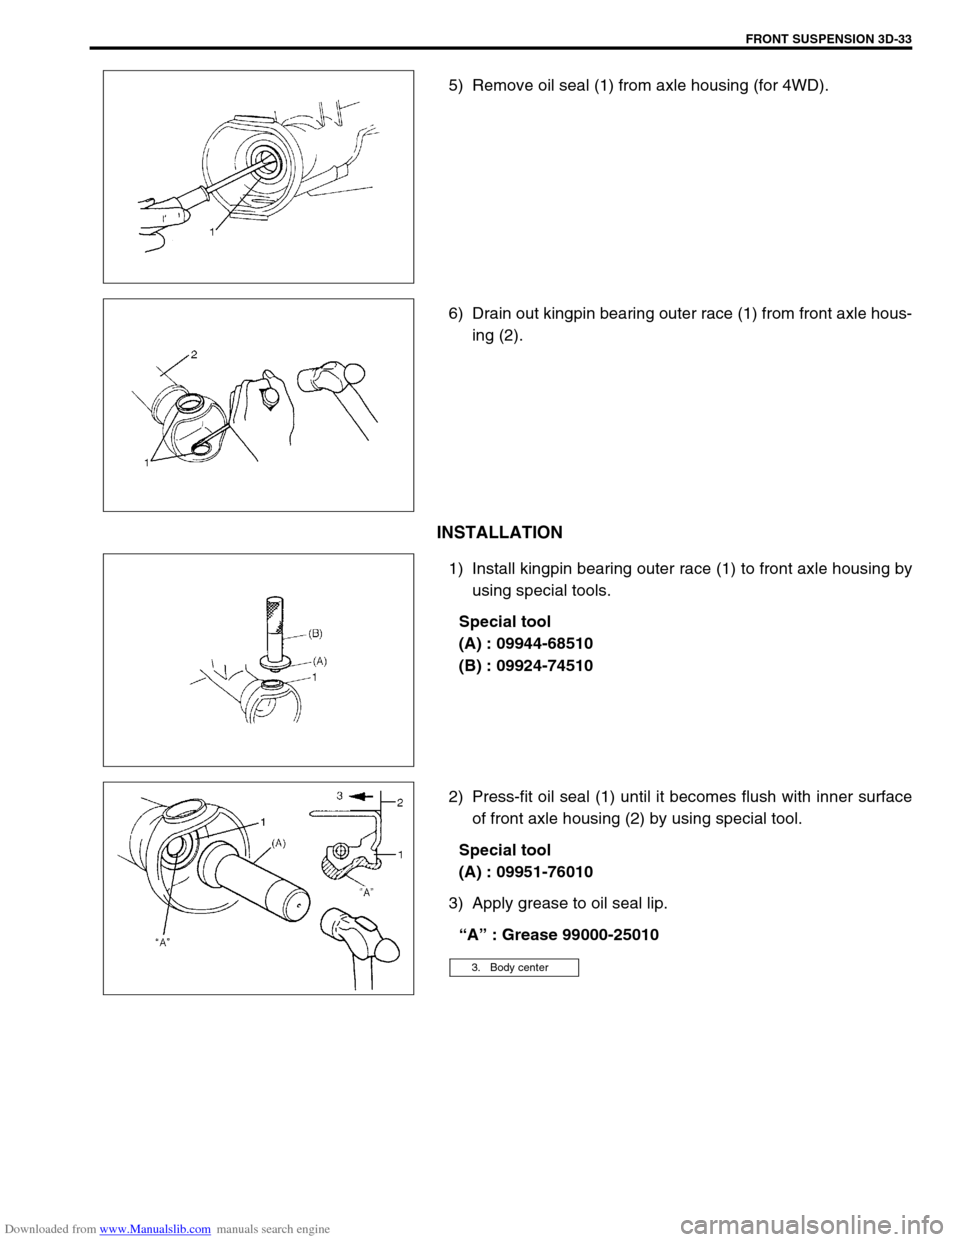
5) Remove oil seal (1) from axle housing (for 4WD).
6) Drain out kingpin bearing outer race (1) from front axle hous-
ing (2).
INSTALLATION
1) Install kingpin bearing outer race (1) to front axle housing by
using special tools.
Special tool
(A) : 09944-68510
(B) : 09924-74510
2) Press-fit oil seal (1) until it becomes flush with inner surface
of front axle housing (2) by using special tool.
Special tool
(A) : 09951-76010
3) Apply grease to oil seal lip.
“A” : Grease 99000-25010
3. Body center
Page 212 of 687
Downloaded from www.Manualslib.com manuals search engine FRONT SUSPENSION 3D-39
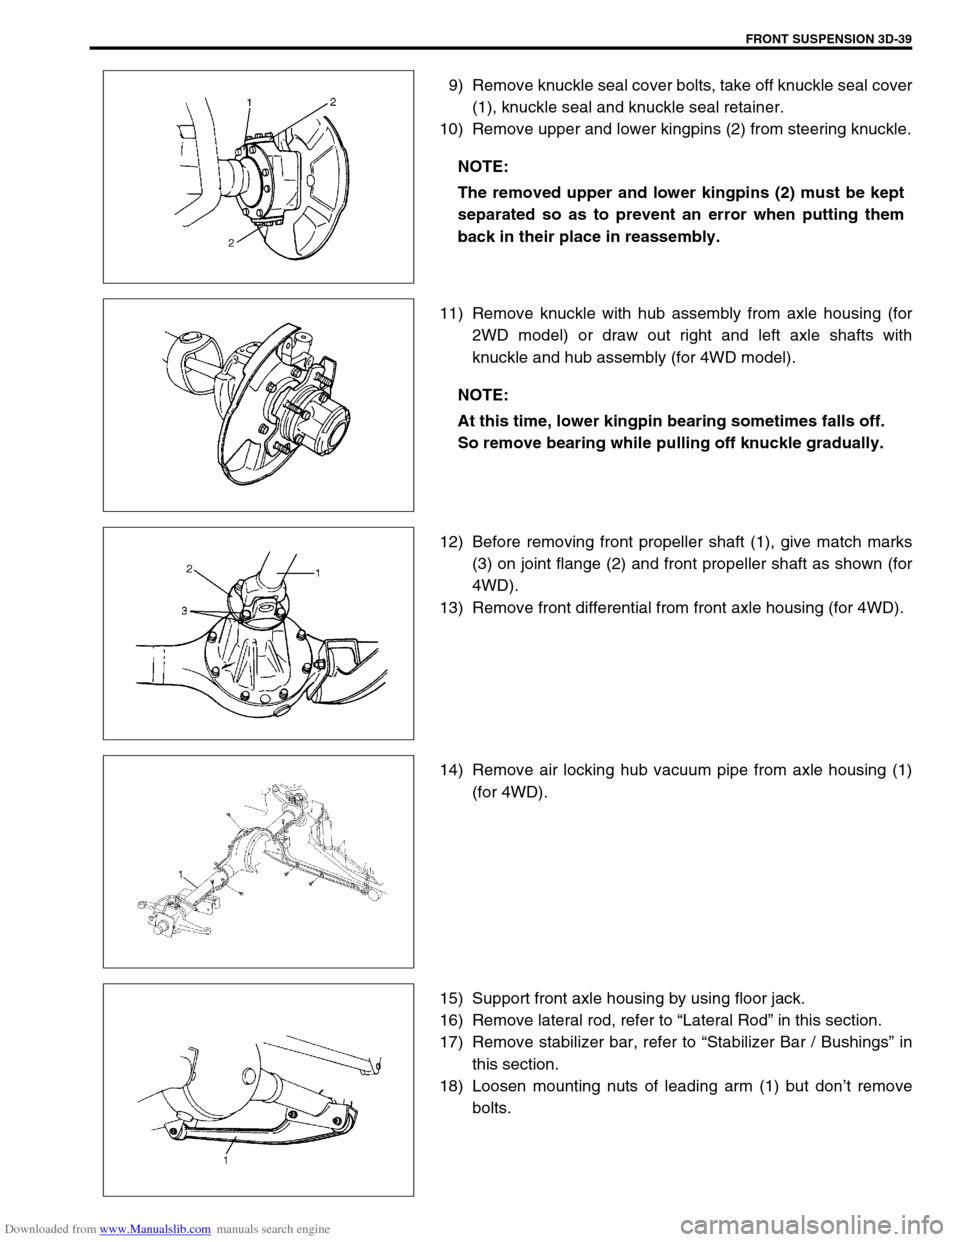
9) Remove knuckle seal cover bolts, take off knuckle seal cover
(1), knuckle seal and knuckle seal retainer.
10) Remove upper and lower kingpins (2) from steering knuckle.
11) Remove knuckle with hub assembly from axle housing (for
2WD model) or draw out right and left axle shafts with
knuckle and hub assembly (for 4WD model).
12) Before removing front propeller shaft (1), give match marks
(3) on joint flange (2) and front propeller shaft as shown (for
4WD).
13) Remove front differential from front axle housing (for 4WD).
14) Remove air locking hub vacuum pipe from axle housing (1)
(for 4WD).
15) Support front axle housing by using floor jack.
16) Remove lateral rod, refer to “Lateral Rod” in this section.
17) Remove stabilizer bar, refer to “Stabilizer Bar / Bushings” in
this section.
18) Loosen mounting nuts of leading arm (1) but don’t remove
bolts. NOTE:
The removed upper and lower kingpins (2) must be kept
separated so as to prevent an error when putting them
back in their place in reassembly.
NOTE:
At this time, lower kingpin bearing sometimes falls off.
So remove bearing while pulling off knuckle gradually.
Page 215 of 687
Downloaded from www.Manualslib.com manuals search engine 3D-42 FRONT SUSPENSION
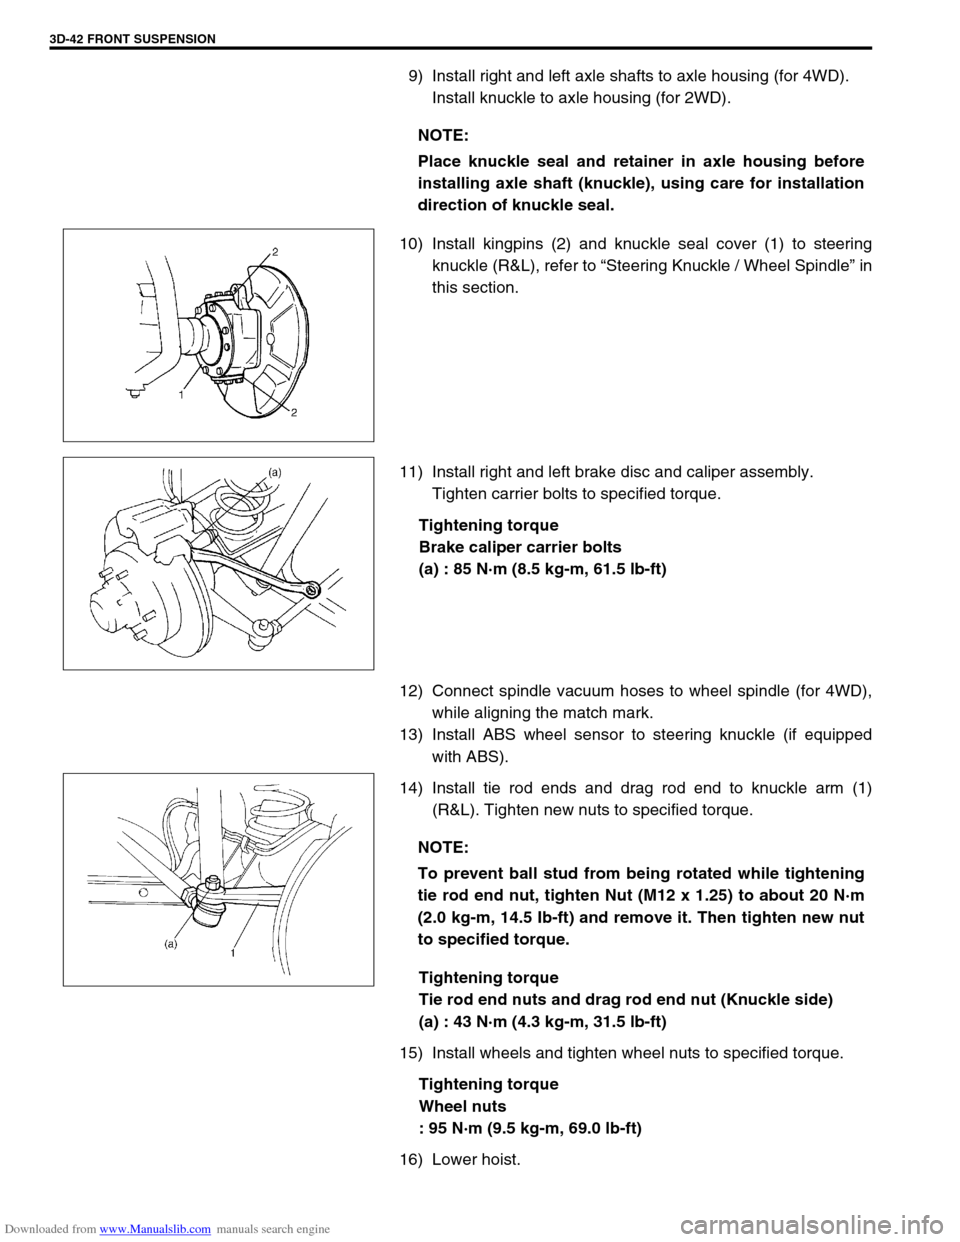
9) Install right and left axle shafts to axle housing (for 4WD).
Install knuckle to axle housing (for 2WD).
10) Install kingpins (2) and knuckle seal cover (1) to steering
knuckle (R&L), refer to “Steering Knuckle / Wheel Spindle” in
this section.
11) Install right and left brake disc and caliper assembly.
Tighten carrier bolts to specified torque.
Tightening torque
Brake caliper carrier bolts
(a) : 85 N·m (8.5 kg-m, 61.5 lb-ft)
12) Connect spindle vacuum hoses to wheel spindle (for 4WD),
while aligning the match mark.
13) Install ABS wheel sensor to steering knuckle (if equipped
with ABS).
14) Install tie rod ends and drag rod end to knuckle arm (1)
(R&L). Tighten new nuts to specified torque.
Tightening torque
Tie rod end nuts and drag rod end nut (Knuckle side)
(a) : 43 N·m (4.3 kg-m, 31.5 lb-ft)
15) Install wheels and tighten wheel nuts to specified torque.
Tightening torque
Wheel nuts
: 95 N·m (9.5 kg-m, 69.0 lb-ft)
16) Lower hoist.NOTE:
Place knuckle seal and retainer in axle housing before
installing axle shaft (knuckle), using care for installation
direction of knuckle seal.
NOTE:
To prevent ball stud from being rotated while tightening
tie rod end nut, tighten Nut (M12 x 1.25) to about 20 N·m
(2.0 kg-m, 14.5 Ib-ft) and remove it. Then tighten new nut
to specified torque.