monitor connector SUZUKI JIMNY 2005 3.G Service User Guide
[x] Cancel search | Manufacturer: SUZUKI, Model Year: 2005, Model line: JIMNY, Model: SUZUKI JIMNY 2005 3.GPages: 687, PDF Size: 13.38 MB
Page 338 of 687
Downloaded from www.Manualslib.com manuals search engine ANTILOCK BRAKE SYSTEM (ABS) 5E-21
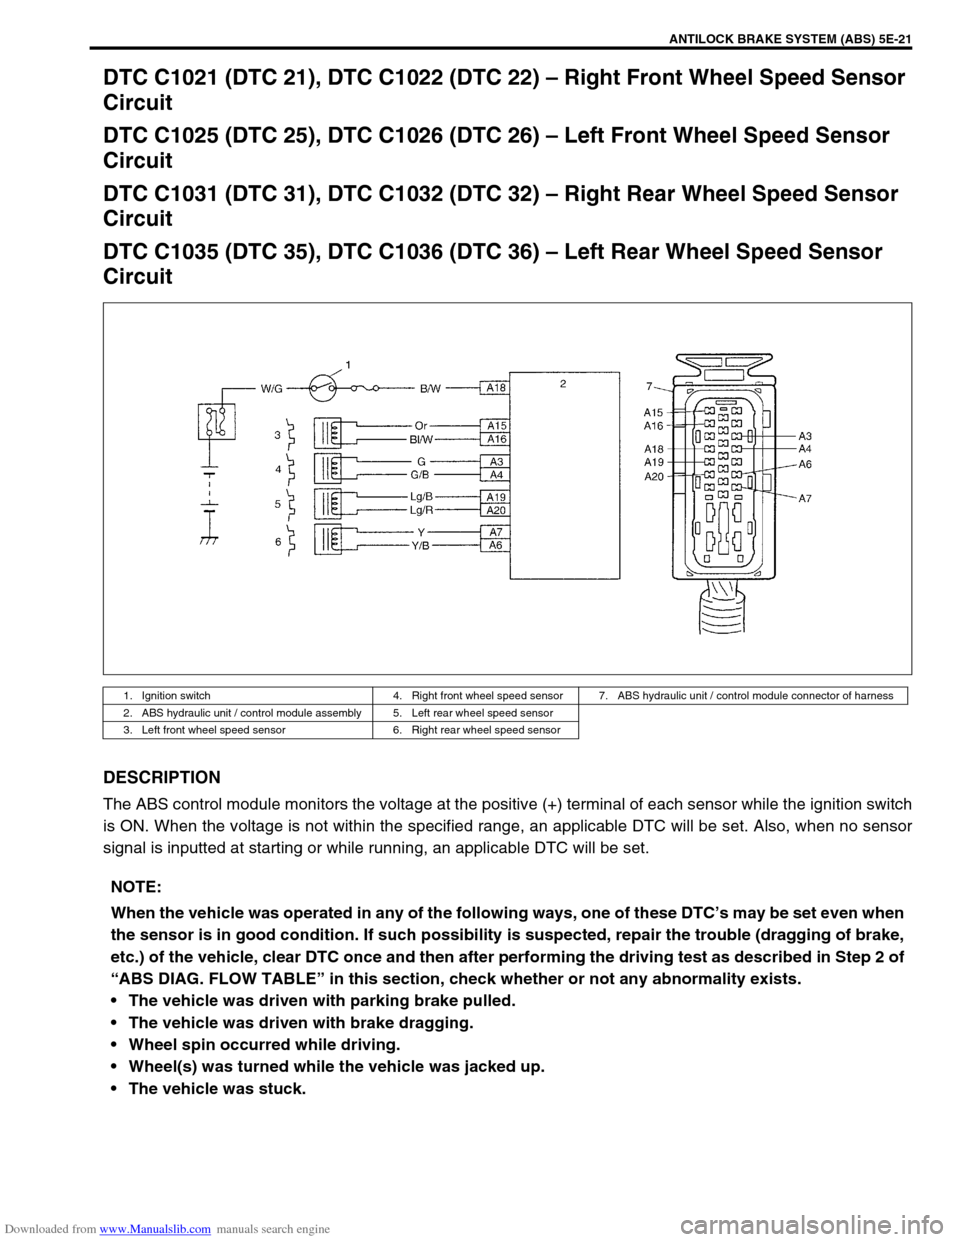
DTC C1021 (DTC 21), DTC C1022 (DTC 22) – Right Front Wheel Speed Sensor
Circuit
DTC C1025 (DTC 25), DTC C1026 (DTC 26) – Left Front Wheel Speed Sensor
Circuit
DTC C1031 (DTC 31), DTC C1032 (DTC 32) – Right Rear Wheel Speed Sensor
Circuit
DTC C1035 (DTC 35), DTC C1036 (DTC 36) – Left Rear Wheel Speed Sensor
Circuit
DESCRIPTION
The ABS control module monitors the voltage at the positive (+) terminal of each sensor while the ignition switch
is ON. When the voltage is not within the specified range, an applicable DTC will be set. Also, when no sensor
signal is inputted at starting or while running, an applicable DTC will be set.
1. Ignition switch 4. Right front wheel speed sensor 7. ABS hydraulic unit / control module connector of harness
2. ABS hydraulic unit / control module assembly 5. Left rear wheel speed sensor
3. Left front wheel speed sensor 6. Right rear wheel speed sensor
NOTE:
When the vehicle was operated in any of the following ways, one of these DTC’s may be set even when
the sensor is in good condition. If such possibility is suspected, repair the trouble (dragging of brake,
etc.) of the vehicle, clear DTC once and then after performing the driving test as described in Step 2 of
“ABS DIAG. FLOW TABLE” in this section, check whether or not any abnormality exists.
The vehicle was driven with parking brake pulled.
The vehicle was driven with brake dragging.
Wheel spin occurred while driving.
Wheel(s) was turned while the vehicle was jacked up.
The vehicle was stuck.
Page 341 of 687
Downloaded from www.Manualslib.com manuals search engine 5E-24 ANTILOCK BRAKE SYSTEM (ABS)
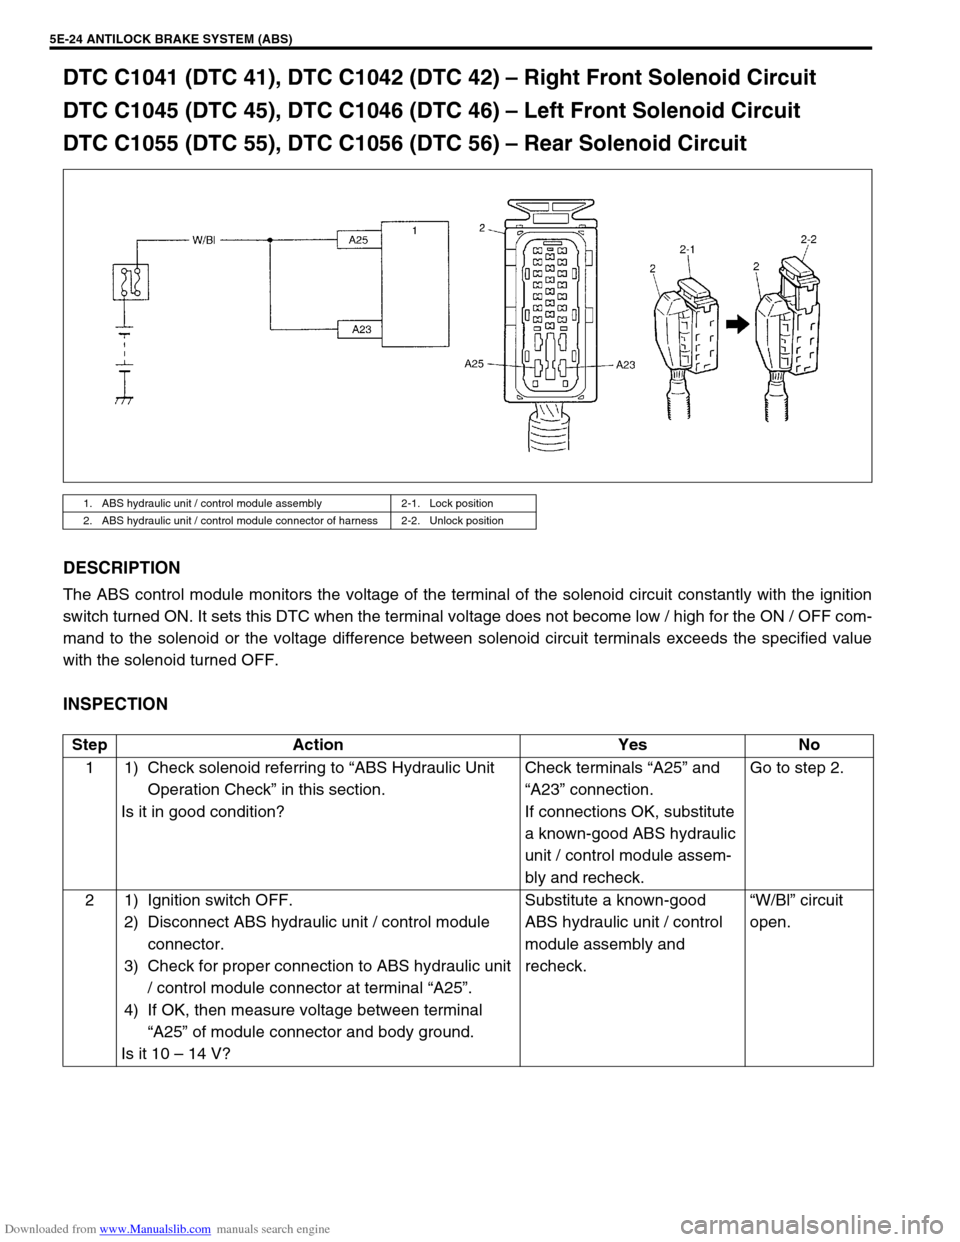
DTC C1041 (DTC 41), DTC C1042 (DTC 42) – Right Front Solenoid Circuit
DTC C1045 (DTC 45), DTC C1046 (DTC 46) – Left Front Solenoid Circuit
DTC C1055 (DTC 55), DTC C1056 (DTC 56) – Rear Solenoid Circuit
DESCRIPTION
The ABS control module monitors the voltage of the terminal of the solenoid circuit constantly with the ignition
switch turned ON. It sets this DTC when the terminal voltage does not become low / high for the ON / OFF com-
mand to the solenoid or the voltage difference between solenoid circuit terminals exceeds the specified value
with the solenoid turned OFF.
INSPECTION
1. ABS hydraulic unit / control module assembly 2-1. Lock position
2. ABS hydraulic unit / control module connector of harness 2-2. Unlock position
Step Action Yes No
1 1) Check solenoid referring to “ABS Hydraulic Unit
Operation Check” in this section.
Is it in good condition?Check terminals “A25” and
“A23” connection.
If connections OK, substitute
a known-good ABS hydraulic
unit / control module assem-
bly and recheck.Go to step 2.
2 1) Ignition switch OFF.
2) Disconnect ABS hydraulic unit / control module
connector.
3) Check for proper connection to ABS hydraulic unit
/ control module connector at terminal “A25”.
4) If OK, then measure voltage between terminal
“A25” of module connector and body ground.
Is it 10 – 14 V?Substitute a known-good
ABS hydraulic unit / control
module assembly and
recheck.“W/Bl” circuit
open.
Page 342 of 687
Downloaded from www.Manualslib.com manuals search engine ANTILOCK BRAKE SYSTEM (ABS) 5E-25
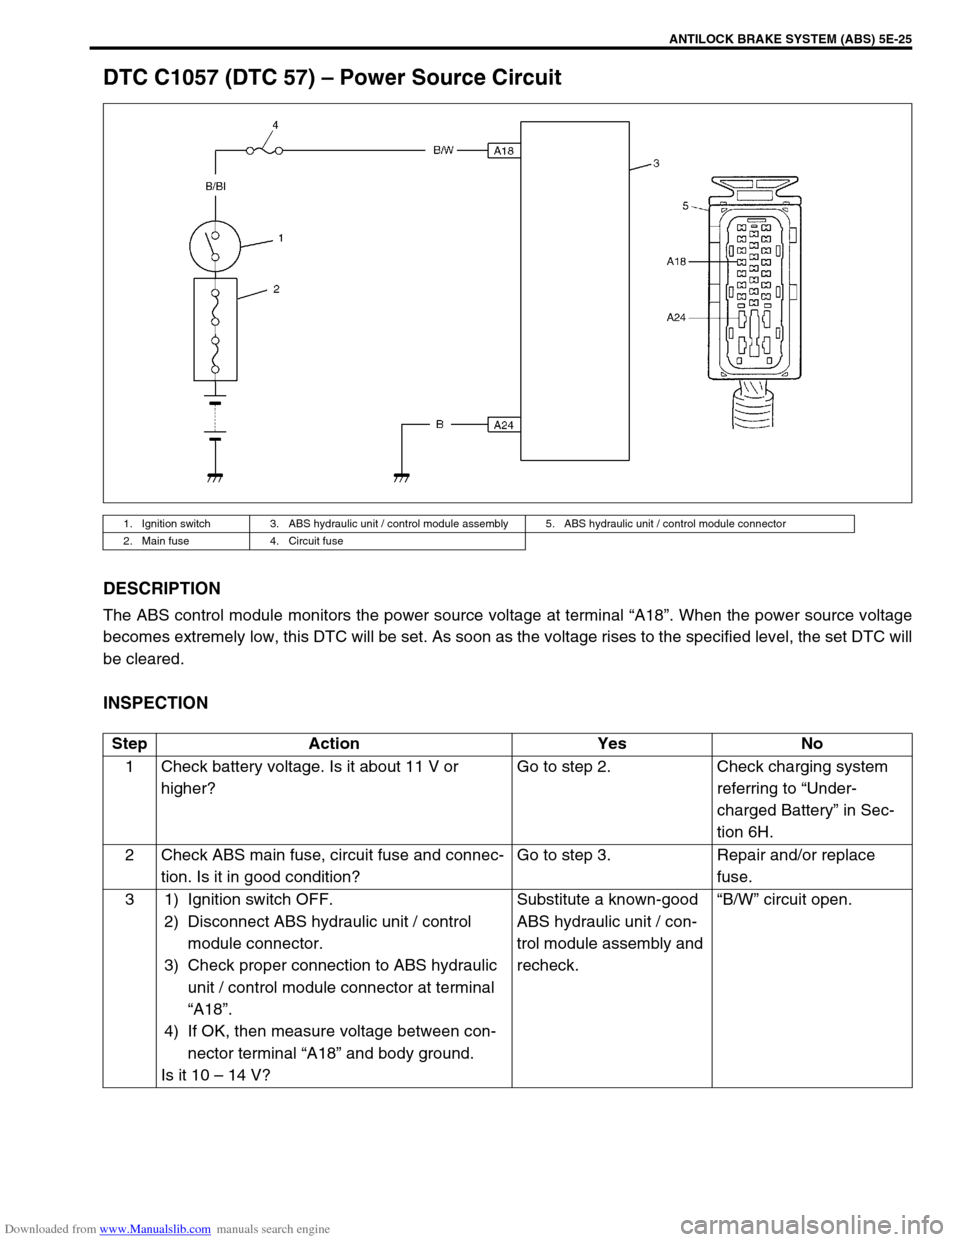
DTC C1057 (DTC 57) – Power Source Circuit
DESCRIPTION
The ABS control module monitors the power source voltage at terminal “A18”. When the power source voltage
becomes extremely low, this DTC will be set. As soon as the voltage rises to the specified level, the set DTC will
be cleared.
INSPECTION
1. Ignition switch 3. ABS hydraulic unit / control module assembly 5. ABS hydraulic unit / control module connector
2. Main fuse 4. Circuit fuse
Step Action Yes No
1 Check battery voltage. Is it about 11 V or
higher?Go to step 2. Check charging system
referring to “Under-
charged Battery” in Sec-
tion 6H.
2 Check ABS main fuse, circuit fuse and connec-
tion. Is it in good condition?Go to step 3. Repair and/or replace
fuse.
3 1) Ignition switch OFF.
2) Disconnect ABS hydraulic unit / control
module connector.
3) Check proper connection to ABS hydraulic
unit / control module connector at terminal
“A18”.
4) If OK, then measure voltage between con-
nector terminal “A18” and body ground.
Is it 10 – 14 V?Substitute a known-good
ABS hydraulic unit / con-
trol module assembly and
recheck.“B/W” circuit open.
Page 343 of 687
Downloaded from www.Manualslib.com manuals search engine 5E-26 ANTILOCK BRAKE SYSTEM (ABS)
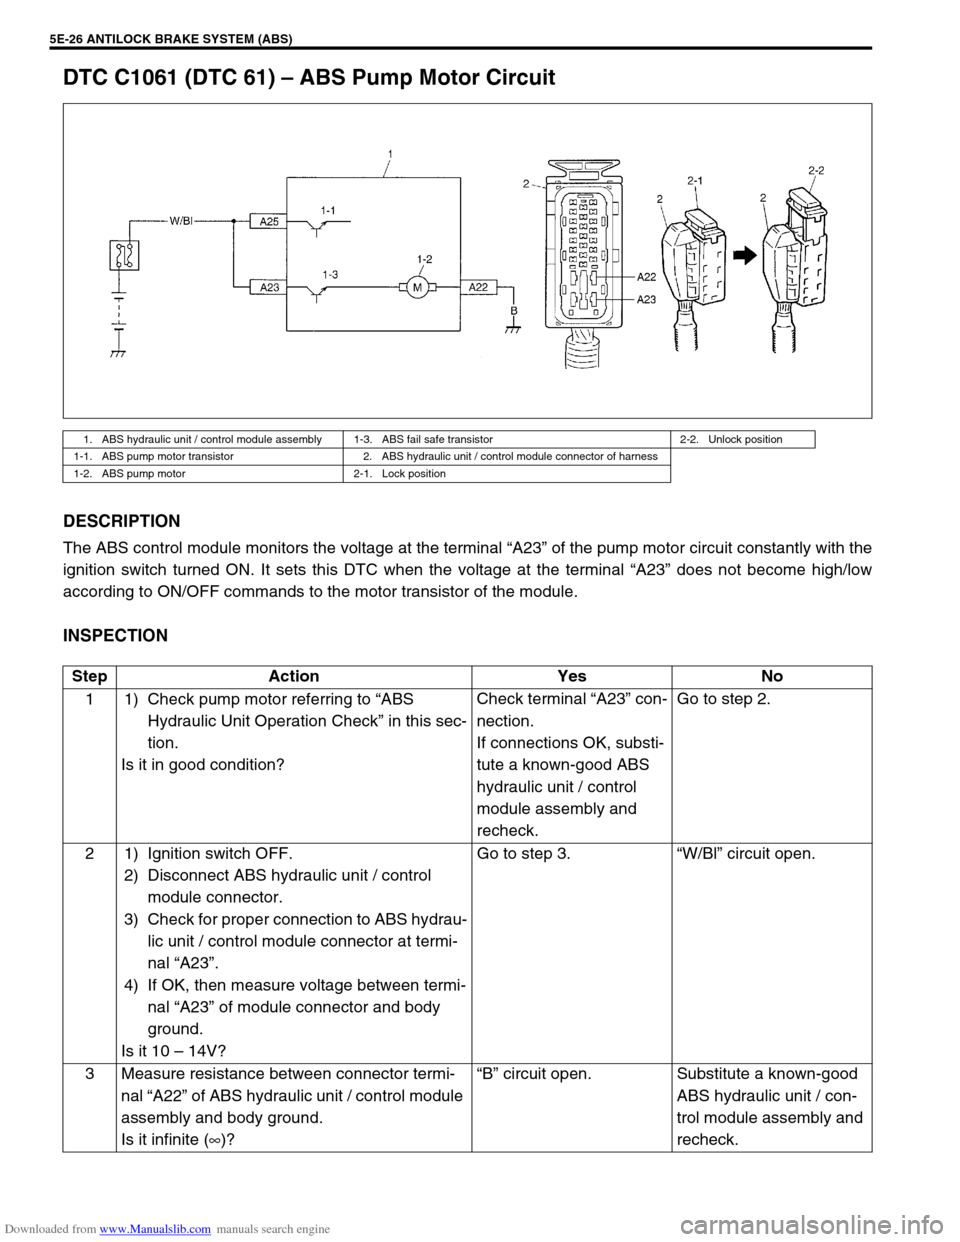
DTC C1061 (DTC 61) – ABS Pump Motor Circuit
DESCRIPTION
The ABS control module monitors the voltage at the terminal “A23” of the pump motor circuit constantly with the
ignition switch turned ON. It sets this DTC when the voltage at the terminal “A23” does not become high/low
according to ON/OFF commands to the motor transistor of the module.
INSPECTION
1. ABS hydraulic unit / control module assembly 1-3. ABS fail safe transistor 2-2. Unlock position
1-1. ABS pump motor transistor 2. ABS hydraulic unit / control module connector of harness
1-2. ABS pump motor 2-1. Lock position
Step Action Yes No
1 1) Check pump motor referring to “ABS
Hydraulic Unit Operation Check” in this sec-
tion.
Is it in good condition?Check terminal “A23” con-
nection.
If connections OK, substi-
tute a known-good ABS
hydraulic unit / control
module assembly and
recheck.Go to step 2.
2 1) Ignition switch OFF.
2) Disconnect ABS hydraulic unit / control
module connector.
3) Check for proper connection to ABS hydrau-
lic unit / control module connector at termi-
nal “A23”.
4) If OK, then measure voltage between termi-
nal “A23” of module connector and body
ground.
Is it 10 – 14V?Go to step 3.“W/Bl” circuit open.
3 Measure resistance between connector termi-
nal “A22” of ABS hydraulic unit / control module
assembly and body ground.
Is it infinite (∞)?“B” circuit open. Substitute a known-good
ABS hydraulic unit / con-
trol module assembly and
recheck.
Page 344 of 687
Downloaded from www.Manualslib.com manuals search engine ANTILOCK BRAKE SYSTEM (ABS) 5E-27
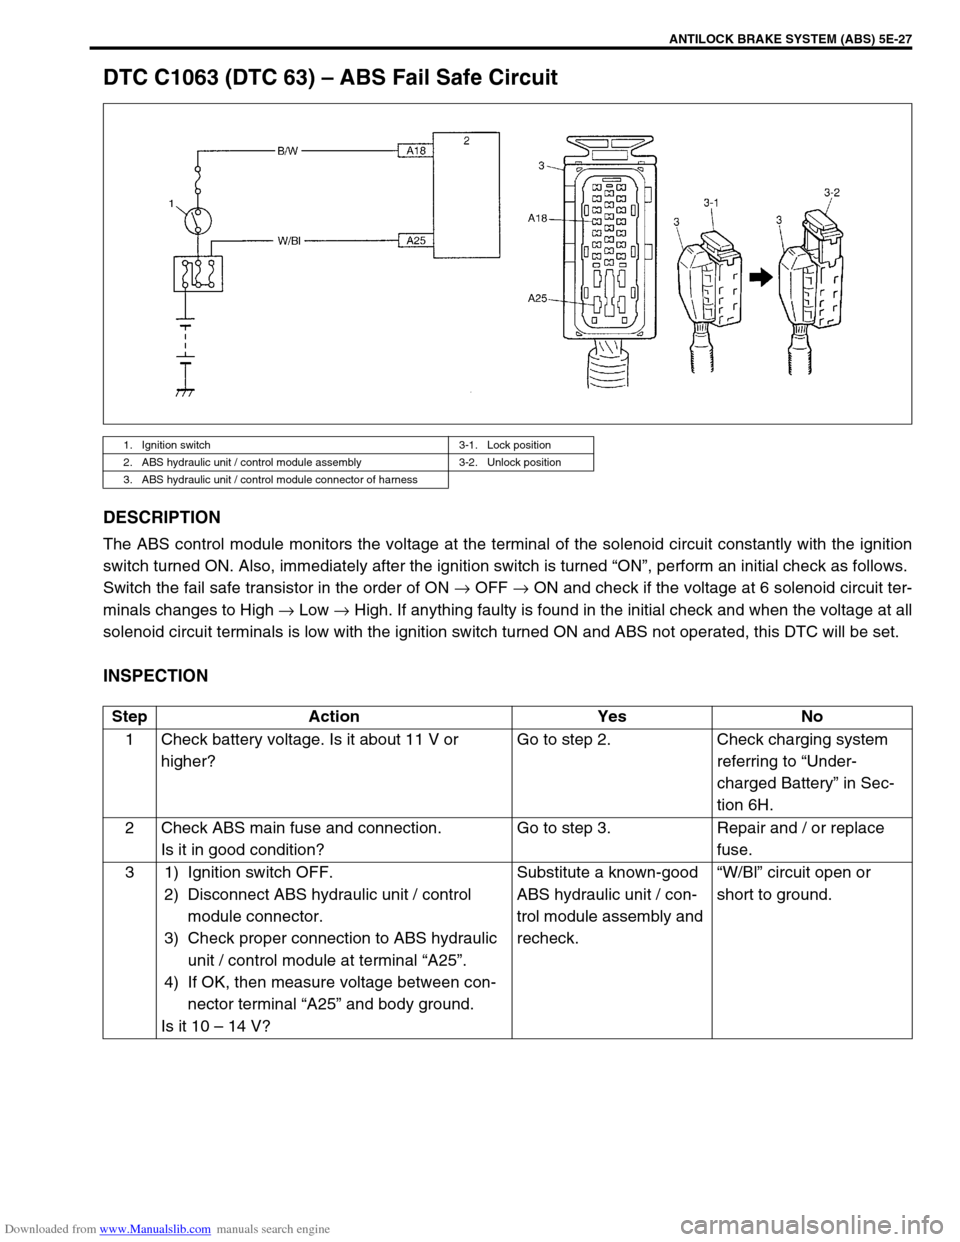
DTC C1063 (DTC 63) – ABS Fail Safe Circuit
DESCRIPTION
The ABS control module monitors the voltage at the terminal of the solenoid circuit constantly with the ignition
switch turned ON. Also, immediately after the ignition switch is turned “ON”, perform an initial check as follows.
Switch the fail safe transistor in the order of ON → OFF → ON and check if the voltage at 6 solenoid circuit ter-
minals changes to High → Low → High. If anything faulty is found in the initial check and when the voltage at all
solenoid circuit terminals is low with the ignition switch turned ON and ABS not operated, this DTC will be set.
INSPECTION
1. Ignition switch 3-1. Lock position
2. ABS hydraulic unit / control module assembly 3-2. Unlock position
3. ABS hydraulic unit / control module connector of harness
Step Action Yes No
1 Check battery voltage. Is it about 11 V or
higher?Go to step 2. Check charging system
referring to “Under-
charged Battery” in Sec-
tion 6H.
2 Check ABS main fuse and connection.
Is it in good condition?Go to step 3. Repair and / or replace
fuse.
3 1) Ignition switch OFF.
2) Disconnect ABS hydraulic unit / control
module connector.
3) Check proper connection to ABS hydraulic
unit / control module at terminal “A25”.
4) If OK, then measure voltage between con-
nector terminal “A25” and body ground.
Is it 10 – 14 V?Substitute a known-good
ABS hydraulic unit / con-
trol module assembly and
recheck.“W/Bl” circuit open or
short to ground.
Page 346 of 687
Downloaded from www.Manualslib.com manuals search engine ANTILOCK BRAKE SYSTEM (ABS) 5E-29
On-Vehicle Service
Precaution
When connectors are connected to ABS hydraulic unit / control
module assembly, do not disconnect connectors of sensors, fuse
etc. and turn ignition switch ON. Then DTC will be set in ABS con-
trol module.
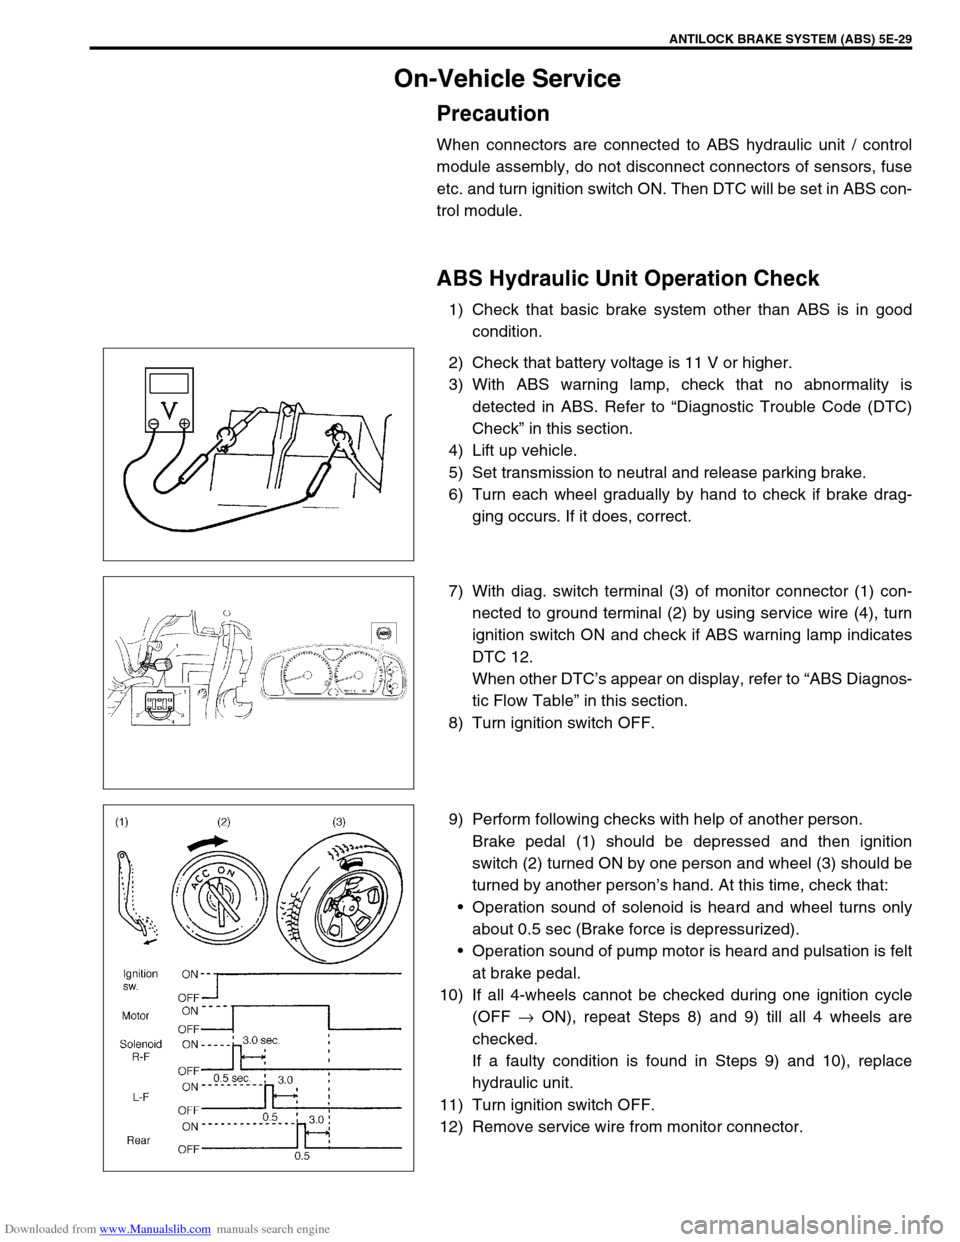
ABS Hydraulic Unit Operation Check
1) Check that basic brake system other than ABS is in good
condition.
2) Check that battery voltage is 11 V or higher.
3) With ABS warning lamp, check that no abnormality is
detected in ABS. Refer to “Diagnostic Trouble Code (DTC)
Check” in this section.
4) Lift up vehicle.
5) Set transmission to neutral and release parking brake.
6) Turn each wheel gradually by hand to check if brake drag-
ging occurs. If it does, correct.
7) With diag. switch terminal (3) of monitor connector (1) con-
nected to ground terminal (2) by using service wire (4), turn
ignition switch ON and check if ABS warning lamp indicates
DTC 12.
When other DTC’s appear on display, refer to “ABS Diagnos-
tic Flow Table” in this section.
8) Turn ignition switch OFF.
9) Perform following checks with help of another person.
Brake pedal (1) should be depressed and then ignition
switch (2) turned ON by one person and wheel (3) should be
turned by another person’s hand. At this time, check that:
Operation sound of solenoid is heard and wheel turns only
about 0.5 sec (Brake force is depressurized).
Operation sound of pump motor is heard and pulsation is felt
at brake pedal.
10) If all 4-wheels cannot be checked during one ignition cycle
(OFF → ON), repeat Steps 8) and 9) till all 4 wheels are
checked.
If a faulty condition is found in Steps 9) and 10), replace
hydraulic unit.
11) Turn ignition switch OFF.
12) Remove service wire from monitor connector.
Page 366 of 687
Downloaded from www.Manualslib.com manuals search engine ENGINE GENERAL INFORMATION AND DIAGNOSIS 6-9
On-Board Diagnostic System (Vehicle without
Immobilizer Indicator Lamp)
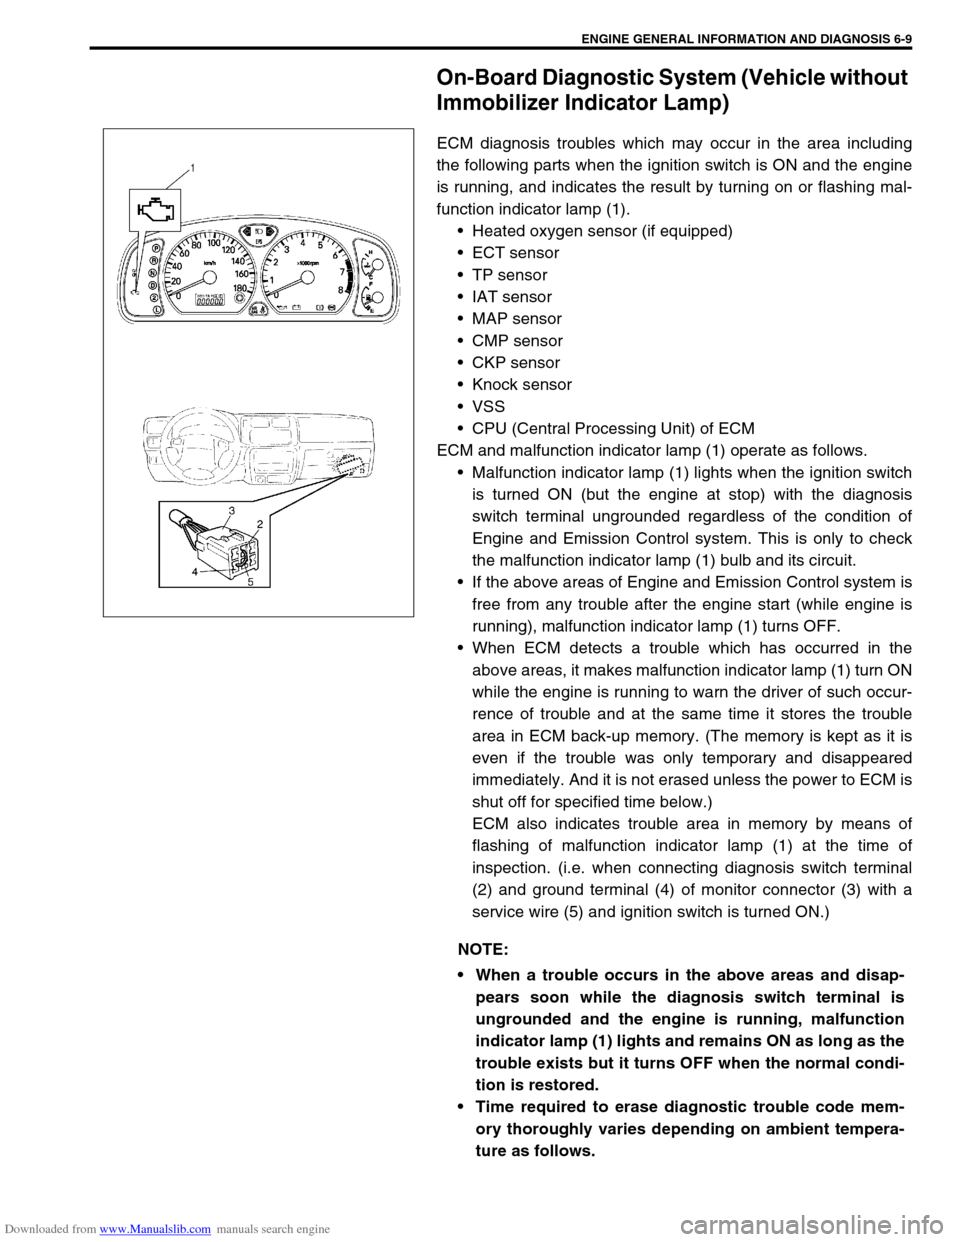
ECM diagnosis troubles which may occur in the area including
the following parts when the ignition switch is ON and the engine
is running, and indicates the result by turning on or flashing mal-
function indicator lamp (1).
Heated oxygen sensor (if equipped)
ECT sensor
TP sensor
IAT sensor
MAP sensor
CMP sensor
CKP sensor
Knock sensor
VSS
CPU (Central Processing Unit) of ECM
ECM and malfunction indicator lamp (1) operate as follows.
Malfunction indicator lamp (1) lights when the ignition switch
is turned ON (but the engine at stop) with the diagnosis
switch terminal ungrounded regardless of the condition of
Engine and Emission Control system. This is only to check
the malfunction indicator lamp (1) bulb and its circuit.
If the above areas of Engine and Emission Control system is
free from any trouble after the engine start (while engine is
running), malfunction indicator lamp (1) turns OFF.
When ECM detects a trouble which has occurred in the
above areas, it makes malfunction indicator lamp (1) turn ON
while the engine is running to warn the driver of such occur-
rence of trouble and at the same time it stores the trouble
area in ECM back-up memory. (The memory is kept as it is
even if the trouble was only temporary and disappeared
immediately. And it is not erased unless the power to ECM is
shut off for specified time below.)
ECM also indicates trouble area in memory by means of
flashing of malfunction indicator lamp (1) at the time of
inspection. (i.e. when connecting diagnosis switch terminal
(2) and ground terminal (4) of monitor connector (3) with a
service wire (5) and ignition switch is turned ON.)
NOTE:
When a trouble occurs in the above areas and disap-
pears soon while the diagnosis switch terminal is
ungrounded and the engine is running, malfunction
indicator lamp (1) lights and remains ON as long as the
trouble exists but it turns OFF when the normal condi-
tion is restored.
Time required to erase diagnostic trouble code mem-
ory thoroughly varies depending on ambient tempera-
ture as follows.
Page 371 of 687
Downloaded from www.Manualslib.com manuals search engine 6-14 ENGINE GENERAL INFORMATION AND DIAGNOSIS
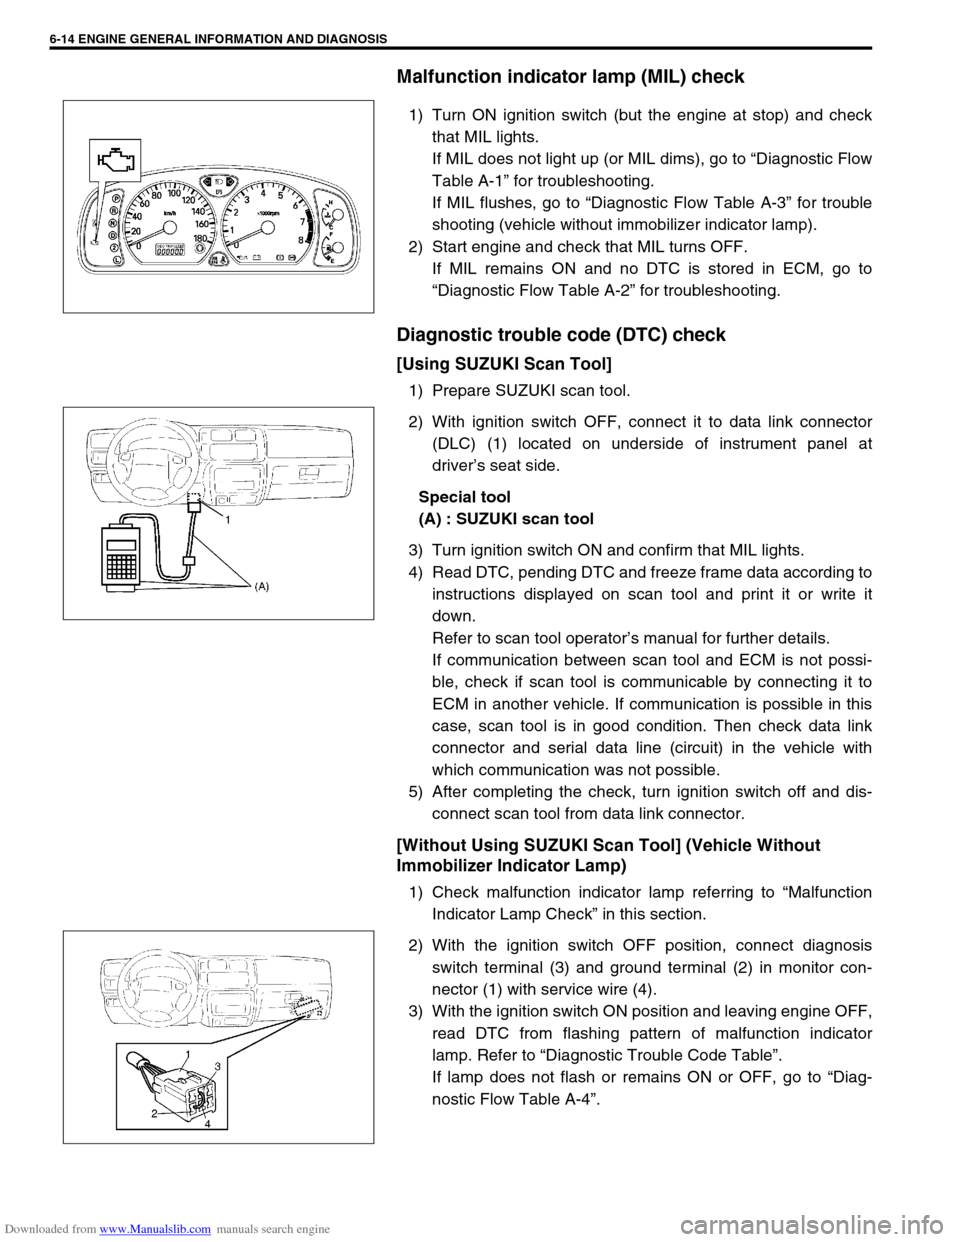
Malfunction indicator lamp (MIL) check
1) Turn ON ignition switch (but the engine at stop) and check
that MIL lights.
If MIL does not light up (or MIL dims), go to “Diagnostic Flow
Table A-1” for troubleshooting.
If MIL flushes, go to “Diagnostic Flow Table A-3” for trouble
shooting (vehicle without immobilizer indicator lamp).
2) Start engine and check that MIL turns OFF.
If MIL remains ON and no DTC is stored in ECM, go to
“Diagnostic Flow Table A-2” for troubleshooting.
Diagnostic trouble code (DTC) check
[Using SUZUKI Scan Tool]
1) Prepare SUZUKI scan tool.
2) With ignition switch OFF, connect it to data link connector
(DLC) (1) located on underside of instrument panel at
driver’s seat side.
Special tool
(A) : SUZUKI scan tool
3) Turn ignition switch ON and confirm that MIL lights.
4) Read DTC, pending DTC and freeze frame data according to
instructions displayed on scan tool and print it or write it
down.
Refer to scan tool operator’s manual for further details.
If communication between scan tool and ECM is not possi-
ble, check if scan tool is communicable by connecting it to
ECM in another vehicle. If communication is possible in this
case, scan tool is in good condition. Then check data link
connector and serial data line (circuit) in the vehicle with
which communication was not possible.
5) After completing the check, turn ignition switch off and dis-
connect scan tool from data link connector.
[Without Using SUZUKI Scan Tool] (Vehicle Without
Immobilizer Indicator Lamp)
1) Check malfunction indicator lamp referring to “Malfunction
Indicator Lamp Check” in this section.
2) With the ignition switch OFF position, connect diagnosis
switch terminal (3) and ground terminal (2) in monitor con-
nector (1) with service wire (4).
3) With the ignition switch ON position and leaving engine OFF,
read DTC from flashing pattern of malfunction indicator
lamp. Refer to “Diagnostic Trouble Code Table”.
If lamp does not flash or remains ON or OFF, go to “Diag-
nostic Flow Table A-4”.
Page 372 of 687

Downloaded from www.Manualslib.com manuals search engine ENGINE GENERAL INFORMATION AND DIAGNOSIS 6-15
4) After completing the check, turn the ignition switch OFF posi-
tion and disconnect service wire from monitor coupler.
Diagnostic trouble code (DTC) clearance
[Using SUZUKI Scan Tool]
1) Connect SUZUKI scan tool to data link connector in the
same manner as when making this connection for DTC
check.
2) Turn ignition switch ON.
3) Erase DTC and pending DTC according to instructions dis-
played on scan tool. Refer to scan tool operator’s manual for
further details.
4) After completing the clearance, turn ignition switch off and
disconnect scan tool from data link connector.
[Without Using SUZUKI Scan Tool]
1) Turn the ignition switch OFF position.
2) Disconnect battery negative cable for specified time below to
erase diagnostic trouble code stored in ECM memory and
reconnect it.
Time required to erase DTC NOTE:
If abnormality or malfunction lies in two or more areas,
malfunction indicator lamp indicates applicable codes
three times each.
And flashing of these codes is repeated as long as
diagnosis terminal is grounded and ignition switch is
held at ON position.
Take a note of diagnostic trouble code indicated first.
NOTE:
DTC and freeze frame data stored in ECM memory are
also cleared in following cases. Be careful not to clear
them before keeping their record.
When power to ECM is cut off (by disconnecting bat-
tery cable, removing fuse or disconnecting ECM con-
nectors)
When the same malfunction (DTC) is not detected
again during 40 engine warm-up cycles.
Ambient temperature Time to cut power to ECM
Over 0 °C (32 °F) 30 sec. or longer
Under 0 °C (32 °F)Not specifiable.
Select a place with higher than
0 °C (32 °F) temperature.
Page 399 of 687
Downloaded from www.Manualslib.com manuals search engine 6-42 ENGINE GENERAL INFORMATION AND DIAGNOSIS
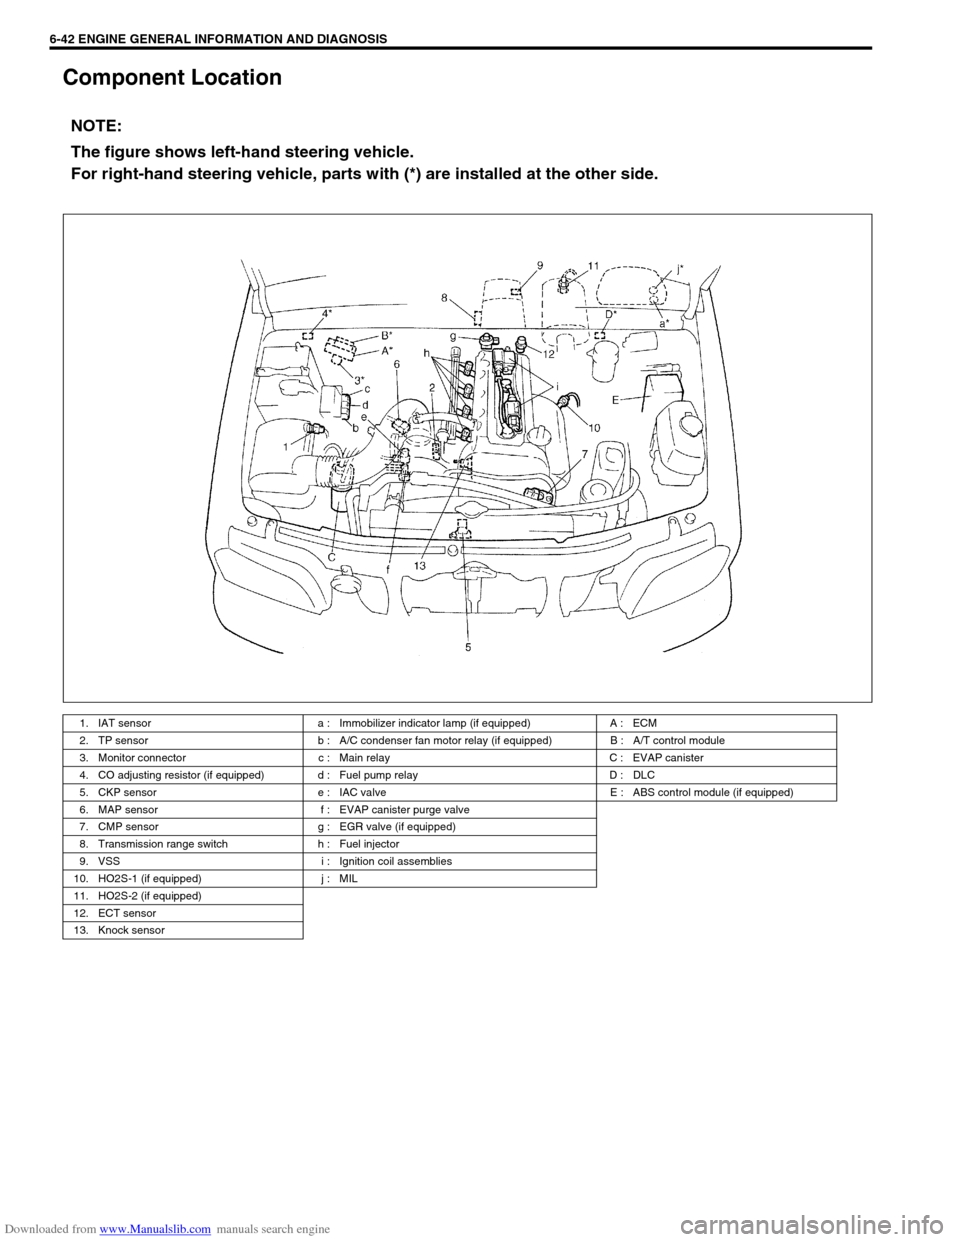
Component Location
NOTE:
The figure shows left-hand steering vehicle.
For right-hand steering vehicle, parts with (*) are installed at the other side.
1. IAT sensor a : Immobilizer indicator lamp (if equipped) A : ECM
2. TP sensor b : A/C condenser fan motor relay (if equipped) B : A/T control module
3. Monitor connector c : Main relay C : EVAP canister
4. CO adjusting resistor (if equipped) d : Fuel pump relay D : DLC
5. CKP sensor e : IAC valve E : ABS control module (if equipped)
6. MAP sensor f : EVAP canister purge valve
7. CMP sensor g : EGR valve (if equipped)
8. Transmission range switch h : Fuel injector
9. VSS i : Ignition coil assemblies
10. HO2S-1 (if equipped) j : MIL
11. HO2S-2 (if equipped)
12. ECT sensor
13. Knock sensor