reset SUZUKI JIMNY 2020 Owner's Manual
[x] Cancel search | Manufacturer: SUZUKI, Model Year: 2020, Model line: JIMNY, Model: SUZUKI JIMNY 2020Pages: 421, PDF Size: 6.35 MB
Page 297 of 421
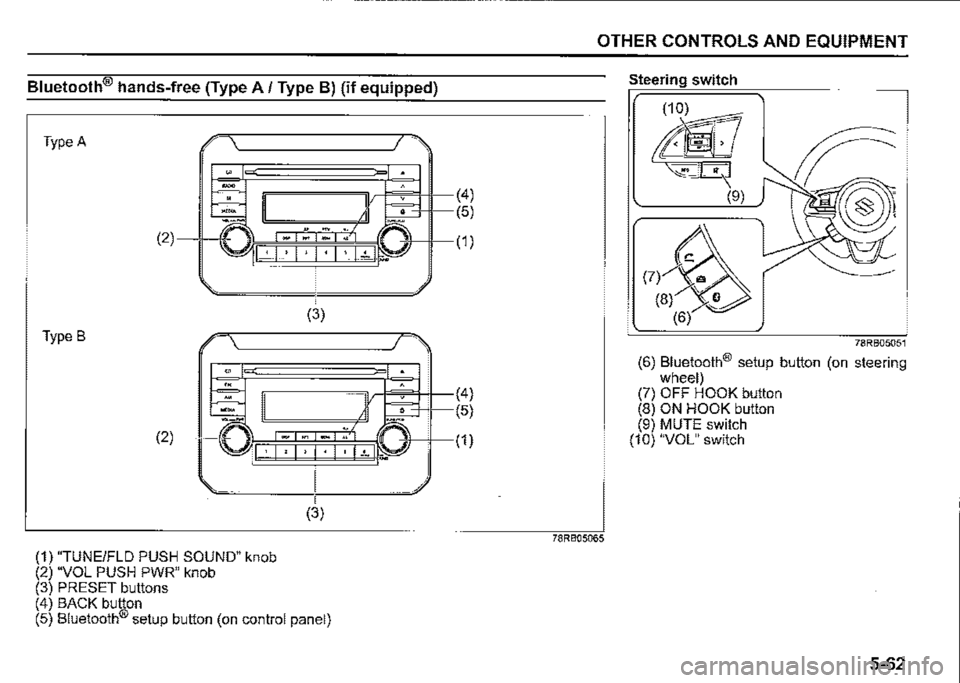
Bluetooth® hands-free (Type A/ Type B) (if equipped)
Type A
. -.
-m -" (2)
I · I , I • I · I • I ~t 1.. ...
(3)
Type B
"" '" -.. (2) ·□ I· I, I, I· I· 1~1.-
(1) "TUNEIFLD PUSH SOUND" knob (2) "VOL PUSH PWR" knob (3) PRESET buttons
(3)
(4) BACK button (5) Bluetooth® setup button (on control panel)
(4)
(5)
(1)
(4)
(5)
(1)
OTHER CONTROLS AND EQUIPMENT
78RB05065
Steering switch
78RB05051
(6) Bluetooth® setup button (on steering wheel) (7) OFF HOOK button (8) ON HOOK button (9) MUTE switch (10) "VOL" switch
5-62
Page 302 of 421
OTHER CONTROLS AND EQUIPMENT
NOTE: When selecting "Go Back" or pressing BACK button (4), the previous menu will be displayed.
Registration in speed dial Follow the instructions below to assign a number to one of PRESET buttons (3) to use as the speed dial. 1) Press the Bluetooth® setup button (5) or (6). The Bluetooth® setup menu will be displayed. 2) Turn "TUNEIFLD PUSH SOUND" knob (1) to select "Setup Telephone", and press the knob (1) to determine the selection. 3) Turn "TUNEIFLD PUSH SOUND" knob (1) to select "Setup Phonebook", and press the knob (1) to determine the selection. 4) Turn "TUNEIFLD PUSH SOUND" knob (1) to select "Add Speed Dial", and press the knob (1) to determine the selection.
5-67
5) Turn "TUNEIFLD PUSH SOUND" knob (1) to select the initial of the name you would like to register in speed dial, and press the knob (1) to determine the selection. The registered numbers will be displayed in sequence. If names have been registered together with numbers, the names will be displayed. Turn "TUNEIFLD PUSH SOUND" knob (1) to select the name you would like to register in speed dial, and press the knob (1) to determine the selection. 6) Turn "TUNEIFLD PUSH SOUND" knob (1) to select "Choose Preset", and press one of PRESET buttons (3) to which the selected number is to be assigned. If a number is already assigned to the selected button, a confirmation message will be displayed. Turn "TUNEIFLD PUSH SOUND" knob (1) to select a confirmation message, and press the knob (1) to complete the assignment. Turn "TUNEIFLD PUSH SOUND" knob (1) to select "Confirm", and press the knob (1) to complete the assignment. When the assignment is completed, the "Setup Phonebook" will be displayed.
NOTE: When selecting "Go Back" or pressing BACK button (4), the previous menu will be displayed.
One-touch call (Speed dial) Follow the instructions below to dial the . number assigned to each of the PRESET buttons (3). 1) Press OFF HOOK button (7). The Bluetooth® phonebook menu will be displayed. Pressing one of PRESET buttons (3) can skip step 2) and the 1 st line of step 3). 2) Turn "TUNEIFLD PUSH SOUND" knob (1) to select "Speed Dials", and press the knob (1) to determine the selection. 3) Press one of PRESET buttons (3). The assigned number will be displayed. If no number is assigned, "No Entry" is displayed. 4) Press OFF HOOK button (7). The selected number will be dialed.
Page 303 of 421
Deletion of speed dial (Del Speed Dial) Follow the instructions below to delete the number assigned for the speed dial. 1) Press OFF HOOK button (7). The Bluetooth® phonebook menu will be displayed. 2) Turn "TUNE/FLO PUSH SOUND" knob (1) to select "Speed Dials", and press the knob (1) to determine the selection. 3) Press one of PRESET buttons (3) to which the number to be deleted is
assigned. If the number is not registered, "No
Entry" is displayed. 4) Turn "TUNE/FLO PUSH SOUND" knob (1) to select "Delete", and press the knob (1) to determine the selection. 5) Turn "TUNE/FLD PUSH SOUND" knob (1) to select "Del Speed Dial", and press the knob (1) to determine the
selection. 6) Turn "TUNE/FLO PUSH SOUND" knob (1) to select "Confirm", and press the knob (1) to complete the deletion.
NOTE: When selecting "Go Back" or pressing BACK button /4), the previous menu will be displayed.
OTHER CONTROLS AND EQUIPMENT
Display of device data (Device Name) Follow the instructions below to display the BD (Bluetooth® Device) address and
device name. 1) Press the Bluetooth® setup button (5)
or (6). The Bluetooth® setup menu will be dis
played. 2) Turn "TUNE/FLD PUSH SOUND" knob (1) to select "Setup Bluetooth", and press the knob (1) to determine the selection. 3) Turn "TUNE/FLD PUSH SOUND" knob (1) to select "Bluetooth Info", and press the knob (1) to determine the selection. 4) Turn "TUNE/FLD PUSH SOUND" knob (1) to select "Device Name" or "Device Address", and press the knob (1) to display the device name or the BD (Bluetooth® Device) address.
NOTE: When selecting "Go Back" or pressing BACK button /4), the previous menu will
be displayed.
Reset to the factory defaults Follow the instructions below to reset all the settings to the facto\¥ defaults. 1) Press the Bluetooth setup button (5)
or (6). The Bluetooth® setup menu will be dis
played. 2) Turn "TUNE/FLD PUSH SOUND" knob (1) to select "Setup Bluetooth", and press the knob (1) to determine the
selection. 3) Turn "TUNE/FLD PUSH SOUND" knob (1) to select "Initialize", and press the knob (1) to determine the selection. 4) Turn "TUNE/FLD PUSH SOUND" knob (1) to select "All Initialize", and press the knob (1) to determine the selection. 5) Turn "TUNE/FLD PUSH SOUND" knob (1) to select "Confirm", and press the knob (1) to start the reset.
NOTE: When selecting "Go Back" or pressing BACK button /4), the previous menu will
be displayed.
5-68
Page 310 of 421
OTHER CONTROLS AND EQUIPMENT
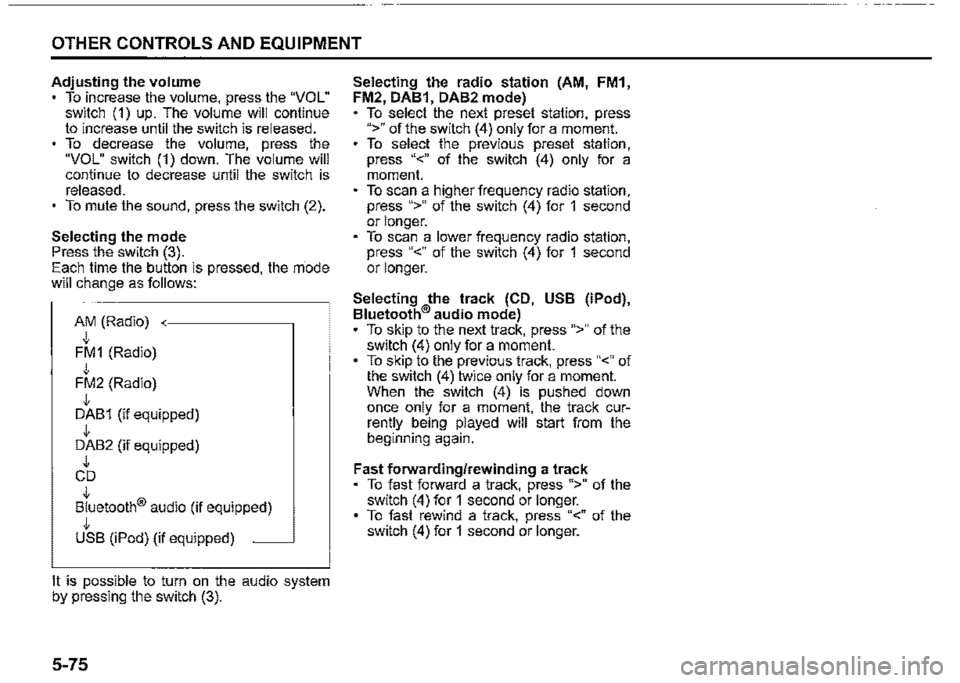
Adjusting the volume To increase the volume, press the "VOL" switch (1) up. The volume will continue to increase until the switch is released. To decrease the volume, press the "VOL" switch (1) down. The volume will continue to decrease until the switch is released. To mute the sound, press the switch (2).
Selecting the mode Press the switch (3). Each time the button is pressed, the rriode will change as follows:
AM (Radio) J, FM1 (Radio) J, FM2 (Radio) J, DAB1 (if equipped) J, DAB2 (if equipped) J, CD J, Bluetooth® audio (if equipped) J, USB (iPod) (if equipped) ~
It is possible to turn on the audio system by pressing the switch (3).
5-75
Selecting the radio station (AM, FM1, FM2, DAB1, DAB2 mode) To select the next preset station, press ">" of the switch (4) only for a moment. To select the previous preset station, press "<" of the switch (4) only for a moment. To scan a higher frequency radio station, press ">" of the switch (4) for 1 second or longer. To scan a lower frequency radio station, press "<" of the switch (4) for 1 second or longer.
Selecting the track (CD, USB (iPod), Bluetooth® audio mode) To skip to the next track, press ">" of the switch (4) only for a moment. To skip to the previous track, press "<" of the switch (4) twice only for a moment. When the switch (4) is pushed down once only for a moment, the track currently being played will start from the beginning again.
Fast forwarding/rewinding a track To fast forward a track, press ">" of the switch (4) for 1 second or longer. To fast rewind a track, press "<" of the switch (4) for 1 second or longer.
Page 311 of 421
![SUZUKI JIMNY 2020 Owners Manual Anti-theft feature
Type A ,,,-.,--------,-,
(1)
(2)
Type B -...------------,,~
(1)
(2)
(1) VOL PUSH PWR" knob (2) PRESET buttons ([1] to [6]) (3) UP button (4) "TUNE/FLO PUSH SOUND" knob
(3)
SUZUKI JIMNY 2020 Owners Manual Anti-theft feature
Type A ,,,-.,--------,-,
(1)
(2)
Type B -...------------,,~
(1)
(2)
(1) VOL PUSH PWR" knob (2) PRESET buttons ([1] to [6]) (3) UP button (4) "TUNE/FLO PUSH SOUND" knob
(3)](/img/20/43483/w960_43483-310.png)
Anti-theft feature
Type A ,,,-.,--------,-,
(1)
(2)
Type B -...------------,,~
(1)
(2)
(1) VOL PUSH PWR" knob (2) PRESET buttons ([1] to [6]) (3) UP button (4) "TUNE/FLO PUSH SOUND" knob
(3)
(4)
TypeC -...----------,-
(3)
(4) (1)
(2)
OTHER CONTROLS AND EQUIPMENT
78RB05067
The anti-theft function is intended to dis
courage thefts. For example, when the
audio system is installed in another vehi
cle, it will become unable to operate.
This function works by entering a Personal
Identification Number (PIN).
When the unit is disconnected from its
power source, such as when the audio
system is removed or the lead-acid battery
is disconnected, the unit will become inop
erable until the PIN is reentered.
5-76
Page 312 of 421
![SUZUKI JIMNY 2020 Owners Manual OTHER CONTROLS AND EQUIPMENT
Setting the anti-theft function
1) Press "VOL PUSH PWR" knob (1) to
power off.
2) Hold down the buttons numbered [1]
and [6] of PRESET buttons (2) and
press "VOL PUS SUZUKI JIMNY 2020 Owners Manual OTHER CONTROLS AND EQUIPMENT
Setting the anti-theft function
1) Press "VOL PUSH PWR" knob (1) to
power off.
2) Hold down the buttons numbered [1]
and [6] of PRESET buttons (2) and
press "VOL PUS](/img/20/43483/w960_43483-311.png)
OTHER CONTROLS AND EQUIPMENT
Setting the anti-theft function
1) Press "VOL PUSH PWR" knob (1) to
power off.
2) Hold down the buttons numbered [1]
and [6] of PRESET buttons (2) and
press "VOL PUSH PWR" knob (1).
"SECURITY" will be displayed.
3) Press UP button (3) and the button
numbered [1] of PRESET buttons (2)
simultaneously.
4) Enter a 4-digit number to be registered
as PIN using the buttons numbered [1]
-[4] of PRESET buttons (2).
5) Hold down "TUNE/FLO PUSH
SOUND" knob (4) for 1 second or lon
ger to set the anti-theft function.
NOTE:
Take a note of the registered PIN and keep
it for the future use.
5-77
Canceling the anti-theft feature
To cancel the anti-theft function, delete the
registered PIN.
1) Press "VOL PUSH PWR" knob (1) to
power off.
2) Hold down the buttons numbered [1]
and [6] of PRESET buttons (2) and
press "VOL PUSH PWR" knob (1).
"PIN ENTRY" will be displayed.
3) Press UP button (3) and the button
numbered [1] of PRESET buttons (2)
simultaneously.
4) Enter a 4-digit number to be registered
as PIN using the buttons numbered [1]
-[4] of PRESET buttons (2).
5) Hold down "TUNE/FLO PUSH
SOUND" knob (4) for 1 second or lon
ger to delete the registered PIN. The
indication "---" will be displayed and
the anti-theft function will be canceled.
NOTE:
To change your PIN, first delete your cur
rent PIN, and then set a new one.
Confirming the Personal Identification
Number (PIN)
When the main power source is discon
nected such as when the lead-acid battery
is replaced, etc. it is required to enter the
PIN to operate the unit again.
1) Set the ignition switch to "ACC" posi
tion.
"SECURITY" will be displayed.
2) Press UP button (3) and the button
numbered [1] of PRESET buttons (2)
simultaneously.
3) Enter a 4-digit number to be registered
as PIN using the buttons numbered [1]
-[4] of PRESET buttons (2).
4) Hold down "TUNE/FLO PUSH
SOUND" knob (4) for 1 second or lon
ger.
When the same PIN as registered is
entered, the power of the audio system
will be turned off automatically and it
will become operable again.
NOTE:
If an incorrect PIN is entered, "ERROR"
and the total number of incorrect entry
attempts will be displayed.
If an incorrect PIN is entered 10 times or
more, "HELP" will be displayed and the
audio system will become inoperable.
Page 343 of 421
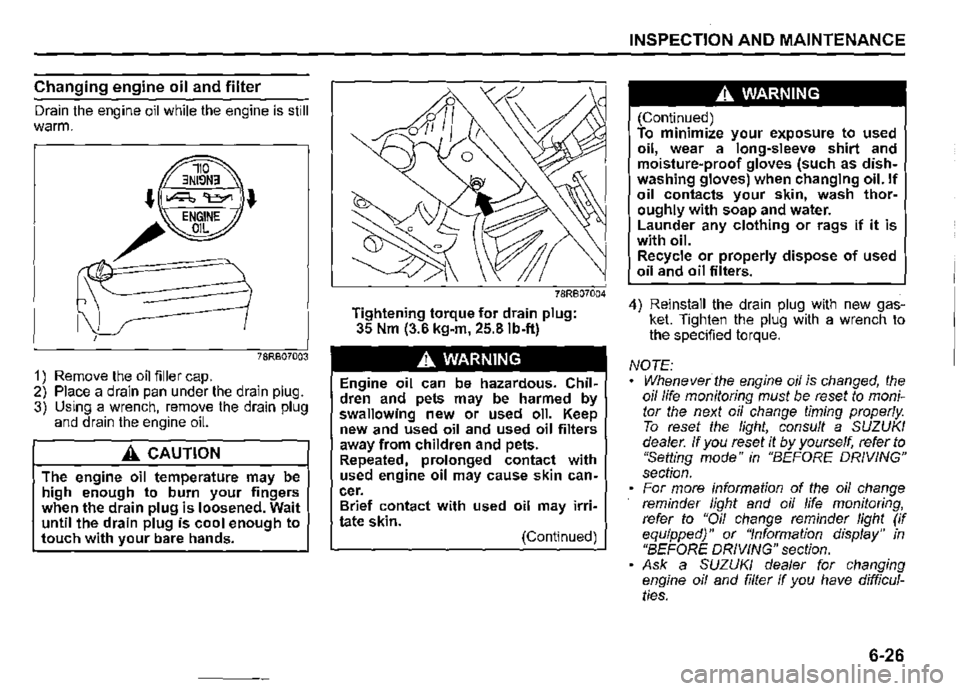
Changing engine oil and filter
Drain the engine oil while the engine is still warm.
78RB07003
1) Remove the oil filler cap. 2) Place a drain pan under the drain plug. 3) Using a wrench, remove the drain plug and drain the engine oil.
A CAUTION
The engine oil temperature may be high enough to burn your fingers when the drain plug is loosened. Wait until the drain plug is cool enough to touch with your bare hands.
Tightening torque for drain plug: 35 Nm (3.6 kg-m, 25.8 lb-ft)
A WARNING
Engine oil can be hazardous. Children and pets may be harmed by swallowing new or used oil. Keep new and used oil and used oil filters away from children and pets. Repeated, prolonged contact with used engine oil may cause skin cancer. Brief contact with used oil may irritate skin. (Continued)
INSPECTION AND MAINTENANCE
A WARNING
(Continued) To minimize your exposure to used oil, wear a long-sleeve shirt and moisture-proof gloves (such as dishwashing gloves) when changing oil. If oil contacts your skin, wash thoroughly with soap and water. Launder any clothing or rags if it is with oil. Recycle or properly dispose of used oil and oil filters.
4) Reinstall the drain plug with new gasket. Tighten the plug with a wrench to the specified torque.
NOTE: • Whenever the engine oil is changed, the oil life monitoring must be reset to monitor the next oil change timing properly To reset the light, consult a SUZUKI dealer. If you reset it by yourself, refer to "Setting mode" in "BEFORE DRIVING" section. For more information of the oil change reminder light and oil life monitoring, refer to "Oil change reminder light (if equipped)" or "Information display" in "BEFORE DRIVING" section. Ask a SUZUKI dealer for changing engine oil and filter If you have difficulties.
6-26
Page 359 of 421

NOTE: (Battery label) When the battery is disconnected, some i::::-==-=="---------
of the vehicle's functions will be initialized and/or deactivated. These functions must be required to reset after the battery is reconnected. Do not disconnect the battery terminals for at least one minute after the ignition switch is turned off.
A WARNING
Batteries contain toxic substances including sulfuric acid and lead. They could have potential negative consequences for the environment and human health. Used batteries must be disposed of or recycled according to applicable rules or regulations and must not be disposed of with ordinary household trash. Make sure not to tip over the battery when you remove it from the vehicle. Otherwise, sulfuric acid could run out and you might get injury.
NOTICE
After stopping the engine, controller and system are operated for a while. Therefore, before removing the battery, wait for more than one minute after turning the ignition switch to 110FF".
Pb>----(5)
51KM042
(5) Crossed-out wheeled bin symbol (6) Chemical symbol of "Pb"
The crossed-out wheeled bin symbol (5) located on the battery label indicates that the used battery should be collected separately from ordinary household trash. The chemical symbol of "Pb" (6) indicates the battery contains more than 0.004% lead.
By ensuring the used battery is disposed of or recycled correctly, you will help prevent potential negative consequences for the environment and human health, which could otherwise be caused by inappropriate trash handling of the battery. The recycling of materials will help to conserve natural resources. For more detailed information about disposing of or recycling the used battery, consult a SUZUKI dealer.
INSPECTION AND MAINTENANCE
Fuses
Your vehicle has three types of fuses, as described below:
Main fuse The main fuse takes current directly from the lead-acid battery.
Primary fuses These fuses are between the main fuse and individual fuses, and are for electrical load groups.
Individual fuses These fuses are for individual electrical cir
cuits.
To remove a fuse, use the fuse puller provided in the fuse box cover.
78R807020
6-42