bluetooth SUZUKI JIMNY 2020 Owners Manual
[x] Cancel search | Manufacturer: SUZUKI, Model Year: 2020, Model line: JIMNY, Model: SUZUKI JIMNY 2020Pages: 421, PDF Size: 6.35 MB
Page 266 of 421
OTHER CONTROLS AND EQUIPMENT
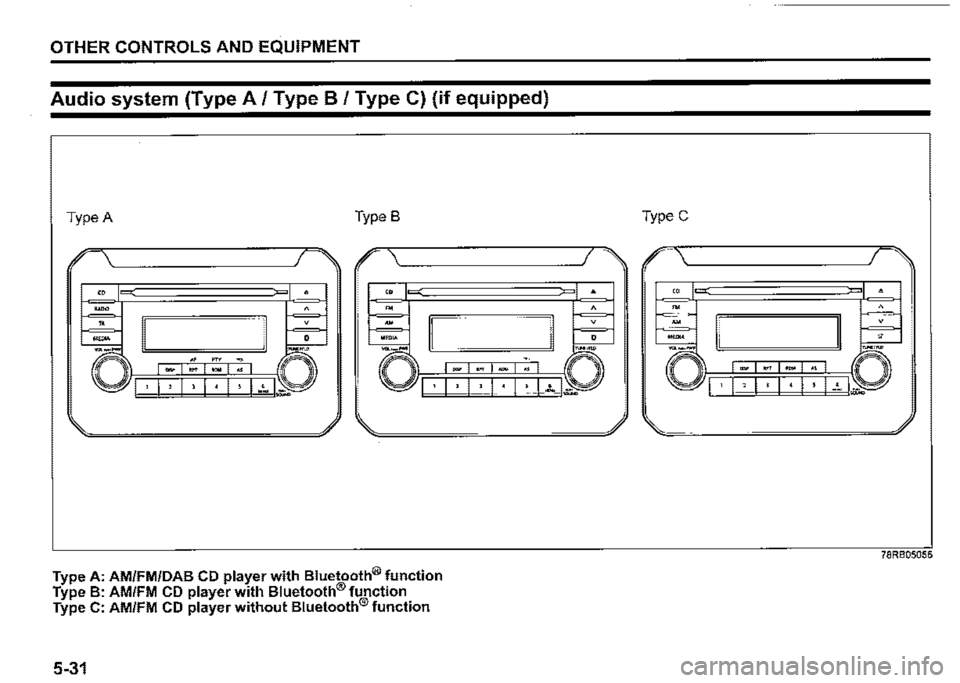
Audio system (Type A/ Type B / Type C) (if equipped)
Type A Type B
I .-------------. I
Type A: AM/FM/DAB CD player with Bluetooth® function Type B: AM/FM CD player with Bluetooth® function Type C: AM/FM CD player without Bluetooth® function
5-31
-.,.,. "°" .,
TypeC
-·--· □ I · 1 , I I I • I ! I-~ I~
78RB05056
Page 270 of 421
OTHER CONTROLS AND EQUIPMENT
0 Bluetooth"
The Bluetooth® word mark and logo are
registered trademarks and are owned by
the Bluetooth SIG, Ink.
Stop using this unit and a Bluetooth®
ready device whenever requested.
This unit shares the communication fre
quency with other private or public wireless
communication equipment such as a wire
less LAN and other wireless communica
tion radios.
You should stop using this unit whenever
you are notified that your unit disturbs
other wireless communication immediately.
5-35
CE:
Access to http://www.ptc.panasonic.eu/,
enter the below
Model No. into the keyword search box,
you can download the latest "DECLARA
TION of CONFORMITY" (DoC).
Set No. AZ1601
Page 272 of 421
OTHER CONTROLS AND EQUIPMENT
Part 15 of the FCC Rules
FCC ID: ACJ932AZ1601
NOTE: Properly shielded and grounded cables and connectors must be used for connection to host computers and/or peripherals in order to meet FCC emission limits.
.A. WARNING
RF Exposure This equipment complies with FCC radiation exposure limits set forth for an uncontrolled environment and meets the FCC radio frequency (RF) Exposure Guidelines. This equipment has very low levels of RF energy that it deemed to comply without maximum permissive exposure evaluation (MPE). [But it is desirable that it should be installed and operated keeping the radiator at least 20 cm or more away from person's body.]
.A. CAUTION
Changes or modifications not expressly approved by the party responsible for compliance could void the user's authority to operate the equipment.
5-37
.A. WARNING
This is a class I laser product. Use of controls or adjustments or performance of procedures other than those specified herein may result in hazardous radiation exposure. Do not open covers and do not attempt to repair this unit by yourself. Ask an authorized dealer for the repair.
0 Bluetooth'
The Bluetooth® word mark and logo are
registered trademarks and are owned by
the Bluetooth SIG, Ink.
NOTE:
This equipment complies with FCC radiation exposure limits set forth for uncontrolled equipment and meets the FCC radio frequency (RF) Exposure Guidelines in Supplement C to OET65. This equipment has very low level of RF energy which does not comply with maximum permissive exposure (MPE) evaluation. But it is desirable that it should be installed and operated with at least 20cm and more between the radiator and person's body (excluding extremities: hands, wrists, feet and ankles).
Page 273 of 421
Stop using this unit and a Bluetooth®
ready device whenever requested.
This unit shares the communication fre
quency with other private or public wireless
communication equipment such as a wire
less LAN and other wireless communica
tion radios.
You should stop using this unit whenever
you are notified that your unit disturbs
other wireless communication immediately.
OTHER CONTROLS AND EQUIPMENT
NOTE:
These limits are designed to provide rea
sonable protection against harmful interfer
ence in a residential installation. This
equipment generates, uses and can radi
ate radio frequency energy and, if not
installed and used in accordance with the
instructions, may cause harmful interfer
ence to radio communications. However,
there is no guarantee that interference will
not occur in a particular installation. If this
equipment does cause harmful interfer
ence to radio or television reception, which
can be determined by turning the equip
ment off and on, the user is encouraged to
try to correct the interference by one or
more of the following measures:
Reorient or relocate the receiving anten
na.
Increase the separation between the
equipment and receiver.
Connect the equipment into an outlet on
a circuit different from that to which the
receiver is connected.
Consult the dealer or an experienced
radio/TV technician for help.
This transmitter must not be co-located
or operated in conjunction with any other
antenna or transmitter.
5-38
Page 282 of 421
OTHER CONTROLS AND EQUIPMENT
TA standby
At the moment traffic information is
received while the source is set to CD,
USB, iPod, DAB, or Bluetooth®audio with
TA activated, the source is automatically
changed to radio. After reception of traffic
information, the source, which was
selected before being changed to radio,
resumes.
NOTE:
If no TP station can be received while the
unit stands by for TA, it automatically
searches for a TP station.
EON (Enhanced Other Network)
When the EON data is received with TP or
TA activated, "EON" indicator lights up,
and the traffic information from a network
other than the currently received station is
allowed to be received.
Emergency announcement reception
Emergency announcements are automati
cally received and displayed.
5-47
Page 297 of 421
Bluetooth® hands-free (Type A/ Type B) (if equipped)
Type A
. -.
-m -" (2)
I · I , I • I · I • I ~t 1.. ...
(3)
Type B
"" '" -.. (2) ·□ I· I, I, I· I· 1~1.-
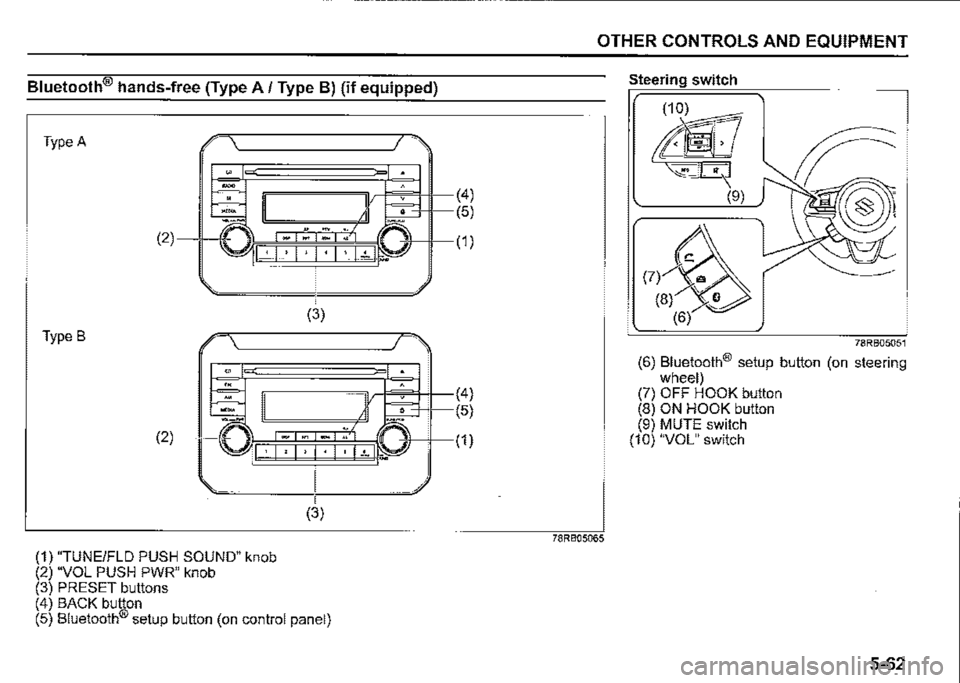
(1) "TUNEIFLD PUSH SOUND" knob (2) "VOL PUSH PWR" knob (3) PRESET buttons
(3)
(4) BACK button (5) Bluetooth® setup button (on control panel)
(4)
(5)
(1)
(4)
(5)
(1)
OTHER CONTROLS AND EQUIPMENT
78RB05065
Steering switch
78RB05051
(6) Bluetooth® setup button (on steering wheel) (7) OFF HOOK button (8) ON HOOK button (9) MUTE switch (10) "VOL" switch
5-62
Page 298 of 421
OTHER CONTROLS AND EQUIPMENT
Phone registration
To use the hands-free function with this unit, it is required to register the phone in advance.
NOTE: Up to 5 phones can be registered. To set up a new phone, disconnect the audio player from the unit. Connect the audio player again after phone setup is completed if necessary. When attempts to establish the pairing fail within 60 seconds, the connecting operation will be cance/ed. Try to establish the pairing again or refer to the manual of the phone in use for how to establish the pairing with the phone. 1) Press the Bluetooth® setup button (5)
or (6). The Bluetooth® setup menu will be dis
played. 2) Turn "TUNE/FLO PUSH SOUND" knob (1) to select "Setup Bluetooth", and press the knob (1) to determine the selection. 3) Turn "TUNE/FLO PUSH SOUND" knob (1) to select "Pairing", and press the knob (1) to determine the selection. 4) Select "CAR AUDIO" from the Bluetooth® menu of the phone and establish the pairing. Refer to the manual of the phone in use for further information. 5) Enter the passkey displayed on the unit to the phone.
5-63
6) When the pamng with the phone is established, automatic transfer of the phonebook and the call history becomes selectable. The automatic transfer starts with "Yes" and it does not with "No". 7) Press ON HOOK button (8).
NOTE: When selecting "Go Back" or pressing BACK button (4), the previous menu will be displayed. When registering an additional phone, repeat Step from 1).
Receiving a call Press OFF HOOK button (7) to receive a call.
Ending a call Press ON HOOK button (8) to end a call.
Rejecting a call (only for supported models) Press ON HOOK button (8) to reject a incoming call.
Mute of hands-free microphone Press MUTE switch (9) to mute the microphone. To cancel the mute, press MUTE switch (9) again.
Adjusting the listening volume Turn "VOL PUSH PWR" knob (2) during a call. Turning it clockwise increases the volume; turning it counterclockwise decreases the volume. Press "VOL" switch (10) during a call. Pressing the switch up increases the volume; pressing the switch down decreases the volume.
Adjusting the ring volume Turn "VOL PUSH PWR" knob (2) while a call is coming in. Turning it clockwise increases the volume; turning it counterclockwise decreases the volume. Press "VOL" switch (10) during a call. Pressing the switch up increases the volume; pressing the switch down decreases the volume.
Page 299 of 421
Adjusting the call or ringtone volume Follow the instructions below to adjust the call or ringtone volume. 1) Press the Bluetooth® setup button (5)
or (6). The Bluetooth® setup menu will be dis
played. 2) Turn "TUNE/FLD PUSH SOUND" knob (1) to select "Setup Telephone", and press the knob (1) to determine the
selection. 3) Turn "TUNE/FLD PUSH SOUND" knob (1) to select "Sound Setting", and press the knob (1) to determine the selection. 4) Turn "TUNE/FLD PUSH SOUND" knob (1) to select "Call Volume" or "Ringtone Volume", and press the knob (1) to determine the selection. The current call or ringtone volume will be displayed. 5) Turn "TUNE/FLD PUSH SOUND" knob (1) to select the desired call or ringtone volume, and press the knob (1) to determine the selection.
NOTE: When selecting "Go Back" or pressing BACK button (4), the previous menu will
be displayed.
OTHER CONTROLS AND EQUIPMENT
Dialing using missed/incoming/ outgoing calls Follow the instructions below to dial to the previously dialed number again.
NOTE: Up to 30 phone numbers of the latest calls can be stored. (30 calls including missed, received and dia/ed call)
1) Press OFF HOOK button (7). The Bluetooth® phonebook menu will
be displayed. 2) Turn "TUNE/FLD PUSH SOUND" knob (1) to select "All Calls", "Missed Calls", "Incoming Calls" or "Outgoing Calls", and press the knob (1) to determine the selection. To dial from the dialed history or the received history, select "All Calls", "Missed Calls", "Incoming Calls" or "Outgoing Calls" respectively. 3) Turn "TUNE/FLD PUSH SOUND" knob (1) to select the desired number, and press the knob (1) to determine the
selection. 4) Turn "TUNE/FLD PUSH SOUND" knob (1) to select "Dial", and press the knob (1) or OFF HOOK button (7) to dial to the selected number.
NOTE: When selecting "Go Back" or pressing BACK button (4), the previous menu will be displayed.
Pressing "Confirm" after selecting ''Add Speed Dial" can register the selected number in the speed dial. Pressing "Confirm" after selecting "Delete" can delete the selected number from the call history.
Deletion of call history Follow the instructions below to delete a missed/incoming/outgoing call history. 1) Press the Bluetooth® setup button (5)
or (6). The Bluetooth® setup menu will be dis
played. 2) Turn "TUNE/FLD PUSH SOUND" knob (1) to select "Setup Telephone", and press the knob (1) to determine the
selection. 3) Turn "TUNE/FLO PUSH SOUND" knob (1) to select "Setup Phonebook", and press the knob (1) to determine the
selection. 4) Turn "TUNE/FLD PUSH SOUND" knob (1) to select "Delete History", and press the knob (1) to determine the selection. 5) Turn "TUNE/FLD PUSH SOUND" knob (1) to select "Missed Calls", "Incoming Calls", or "Outgoing Calls", and press the knob (1) to determine the selection. 6) Turn "TUNE/FLD PUSH SOUND" knob (1) to select a number to be deleted or "ALL", and press the knob (1) to determine the selection.
5-64
Page 300 of 421
OTHER CONTROLS AND EQUIPMENT
7) Turn "TUNE/FLO PUSH SOUND" knob (1) to select "Delete?" or "Delete All?", and press the knob (1) to determine the selection. 8) Turn "TUNE/FLO PUSH SOUND" knob (1) to select "Confirm", and press the knob (1) to complete the deletion.
NOTE: When selecting "Go Back" or pressing BACK button (4), the previous menu will be displayed.
Registration in Phonebook Follow the instructions below to register phone numbers in the Phonebook of the unit. 1) Press the Bluetooth® setup button (5) or (6). The Bluetooth® setup menu will be displayed. 2) Turn "TUNE/FLO PUSH SOUND" knob (1) to select "Setup Telephone", and press the knob (1) to determine the selection. 3) Turn "TUNE/FLO PUSH SOUND" knob (1) to select "Setup Phonebook", and press the knob (1) to determine the selection. 4) Turn "TUNE/FLO PUSH SOUND" knob (1) to select "Add Contacts", and press the knob (1) to determine the selection.
5-65
5) Turn "TUNE/FLO PUSH SOUND" knob (1) to select "Overwrite All" or "Add One Contact", and press the knob (1) to determine the selection. "Rewrite All (MAX1000): Ok?" or "Rest of Memory XXXX: Ok?" will be displayed. 6) Press or turn "TUNE/FLO PUSH SOUND" knob (1) to select "Confirm", and press the knob (1) to determine the selection. 7) Transfer contacts from the phone. When the registration is completed, the "Setup Phonebook" will be displayed.
NOTE: When selecting "Go Back" or pressing BACK button (4), the previous menu will be displayed.
Up to 1000 numbers can be registered in Phonebook.
Transfer of call history (Call History) Follow the instructions below to transfer call history of the registered phone. 1) Press the Bluetooth® setup button (5) or (6). The Bluetooth® setup menu will be displayed. 2) Turn "TUNE/FLO PUSH SOUND" knob (1) to select "Setup Telephone", and press the knob (1) to determine the selection. 3) Turn "TUNE/FLO PUSH SOUND" knob (1) to select "Call History", and press the knob (1) to determine.the selection. 4) Turn "TUNE/FLO PUSH SOUND" knob (1) to select "Overwrite Call History?", and press the knob (1) to determine the selection. 5) Turn "TUNE/FLO PUSH SOUND" knob (1) to select "Confirm", and press the knob (1) to transfer the call history from the phone.
NOTE: When selecting "Go Back" or pressing BACK button (4), the previous menu will be displayed.
Page 301 of 421
Automatic transfer of phonebook/call history You can select whether or not the device transfers the phonebook and the call history automatically when the phone is regis
tered. Follow the instructions below to select. 1) Press the Bluetooth® setup button (5)
or (6). The Bluetooth® setup menu will be dis
played. 2) Turn "TUNE/FLO PUSH SOUND" knob (1) to select "Setup Telephone", and press the knob (1) to determine the
selection. 3) Turn "TUNE/FLO PUSH SOUND" knob (1) to select "A.Transfer", and press the knob (1) to determine the selection. 4) Pressing "TUNE/FLO PUSH SOUND" knob (1) switches between "A.transfer On" and "A.transfer Off'. 5) Selecting "Go Back" or pressing the BACK button (4) stores displayed setting and the previous menu is displayed.
OTHER CONTROLS AND EQUIPMENT
Making a call by phonebook Follow the instructions below to dial a number registered in phonebook. 1) Press OFF HOOK button (7). The Bluetooth® phonebook menu will
be displayed. 2) Turn "TUNE/FLO PUSH SOUND" knob (1) to select "Phonebook", and press the knob (1) to determine the selection. 3) Turn "TUNE/FLO PUSH SOUND" knob (1) to select the initial of the name you would like to make a call, and press the knob (1) to determine the selection. The registered numbers will be displayed in sequence. If names have been registered together with numbers, the names will be displayed. Turn "TUNE/FLO PUSH SOUND" knob (1) to select the name you would like to make a call, and press the knob (1) to determine the selection. 4) Turn "TUNE/FLO PUSH SOUND" knob (1) to select "Dial", and press the knob (1) or OFF HOOK button (7). The displayed number or the number registered with the displayed name will be dialed.
Deletion of registered data (Delete
Entry) Follow the instructions below to delete a number registered in phonebook. 1) Press the Bluetooth® setup button (5) or (6). The Bluetooth® setup menu will be dis
played. 2) Turn "TUNE/FLO PUSH SOUND" knob (1) to select "Setup Telephone", and press the knob (1) to determine the
selection. 3) Turn "TUNE/FLO PUSH SOUND" knob (1) to select "Setup Phonebook", and press the knob (1) to determine the
selection. 4) Turn "TUNE/FLO PUSH SOUND" knob (1) to select "Delete Contacts", and press the knob (1) to determine the selection. 5) Turn "TUNE/FLO PUSH SOUND" knob (1) to select the initial of the name you would like to delete or "ALL", and press the knob (1) to determine the selection. Turn "TUNE/FLO PUSH SOUND" knob (1) to select the name you would like to delete, and press the knob (1) to determine the selection. 6) Turn "TUNE/FLO PUSH SOUND" knob (1) to select "Delete?" or "Delete All?", and press the knob (1) to determine the selection. 7) Turn "TUNE/FLO PUSH SOUND" knob (1) to select "Confirm", and press the knob (1) to complete the deletion.
5-66