torque SUZUKI JIMNY 2020 Owners Manual
[x] Cancel search | Manufacturer: SUZUKI, Model Year: 2020, Model line: JIMNY, Model: SUZUKI JIMNY 2020Pages: 421, PDF Size: 6.35 MB
Page 343 of 421

Changing engine oil and filter
Drain the engine oil while the engine is still warm.
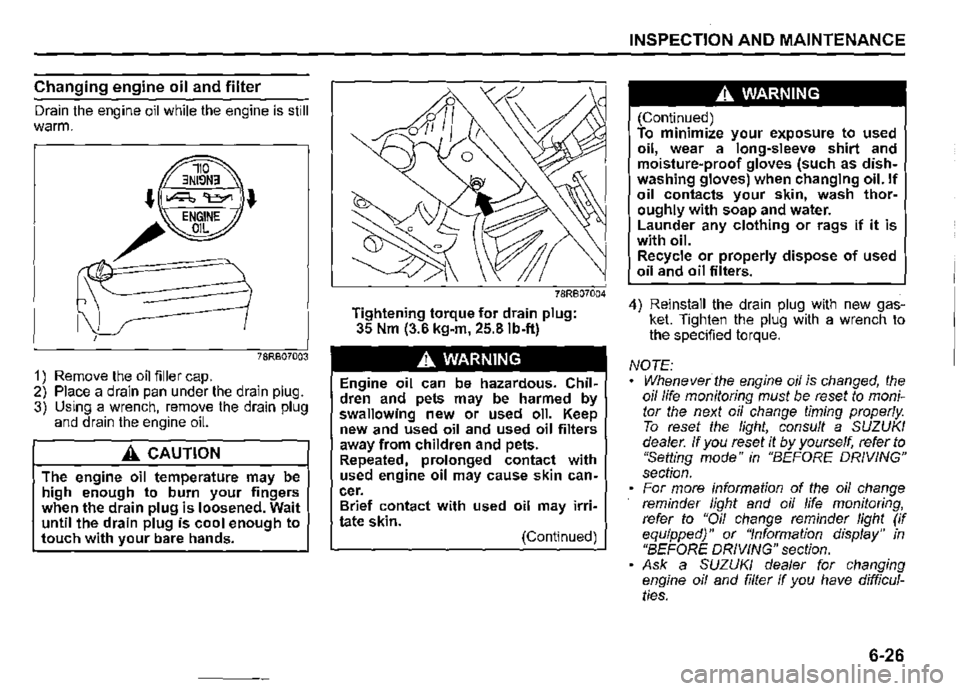
78RB07003
1) Remove the oil filler cap. 2) Place a drain pan under the drain plug. 3) Using a wrench, remove the drain plug and drain the engine oil.
A CAUTION
The engine oil temperature may be high enough to burn your fingers when the drain plug is loosened. Wait until the drain plug is cool enough to touch with your bare hands.
Tightening torque for drain plug: 35 Nm (3.6 kg-m, 25.8 lb-ft)
A WARNING
Engine oil can be hazardous. Children and pets may be harmed by swallowing new or used oil. Keep new and used oil and used oil filters away from children and pets. Repeated, prolonged contact with used engine oil may cause skin cancer. Brief contact with used oil may irritate skin. (Continued)
INSPECTION AND MAINTENANCE
A WARNING
(Continued) To minimize your exposure to used oil, wear a long-sleeve shirt and moisture-proof gloves (such as dishwashing gloves) when changing oil. If oil contacts your skin, wash thoroughly with soap and water. Launder any clothing or rags if it is with oil. Recycle or properly dispose of used oil and oil filters.
4) Reinstall the drain plug with new gasket. Tighten the plug with a wrench to the specified torque.
NOTE: • Whenever the engine oil is changed, the oil life monitoring must be reset to monitor the next oil change timing properly To reset the light, consult a SUZUKI dealer. If you reset it by yourself, refer to "Setting mode" in "BEFORE DRIVING" section. For more information of the oil change reminder light and oil life monitoring, refer to "Oil change reminder light (if equipped)" or "Information display" in "BEFORE DRIVING" section. Ask a SUZUKI dealer for changing engine oil and filter If you have difficulties.
6-26
Page 344 of 421

INSPECTION AND MAINTENANCE
Oil filler replacement
1) Using an oil filter wrench, turn the oil filter counterclockwise and remove ii. 2) Using a clean rag, wipe off the mounting surface on the engine where the new filter will be seated. 3) Smear a small amount of engine oil around the rubber gasket of the new oil filter. 4) Screw the new filter by hand until the filter gasket contacts the mounting surface.
(1) Loosen (2) Tighten
6-27
54G092
Tightening (viewed from filter top)
(1)
(1) Oil filter (2) 3/4 turn
NOTICE
(2)
54G093
To tighten the oil filter properly, it is important to accurately identify the position at which the filter gasket first contacts the mounting surface.
5) Tighten the filter as specified below from the point of contact with the mounting surface (or to the specified torque) using an oil filter wrench.
Tightening torque for oil filter: 3/4 turn or 14 Nm (1.4 kg-m, 10.3 lb-ft)
NOTICE
To prevent oil leakage, check that the oil filter is tight, but do not overtighten it.
Page 348 of 421

INSPECTION AND MAINTENANCE
60G160
NOTICE
When installing the spark plugs, screw them in with your fingers to avoid stripping the threads. Tighten the spark plugs with a torque wrench to 17.5 Nm (1.7 kgm, 12.9 lb-ft). Do not allow contaminants to enter the engine through the spark plug holes when the plugs are removed. Never use spark plugs with the wrong thread size.
6-31
Spark plug gap "a":
ZXU20PR11 1.0-1.1 mm (0.039-0.043 in.) KR6A-10 0.95-1.0Smm (0.037-0.041 in.)
NOTICE
54G106
When replacing spark plugs, you ".hould use the ~rand and type specified for your vehicle. For the specified plugs, refer to "SPECIFICATIONS" section in the end of this book. If you wish to use a brand of spark plug other than the specified plugs, consult a SUZUKI dealer.
Gear oil
Manual transmission oil / transfer
oil/ rear differential oil
When adding gear oil, use gear oil with the appropriate viscosity and grade as shown in the chart below.
We highly recommend you use "SUZUKI GEAR OIL 75W" for manual transmission oil and transfer oil.
Manual transmission oil Transfer oil
<: ==:llil:::======> 75W
°C-30 -20 -10 0 10 20 30 40 °F-22 -4 14 32 50 68 86 104
54P120706
We highly recommend you use "SUZUKI SUPER GEAR OIL 75W-85 SYNTHETIC" for front/rear differential oil.
Front/rear differential oil
<~==~7[fil5Wtfi-B~5====>
'C-30 -~0 -10 Of.22 4 14 0 ' 32
20 ' 68 83,60 4p 104
78RB07007
Page 349 of 421

Gear oil level check
Manual transmission
(2)
(1) Oil filler and level plug (2) Oil drain plug
78RB07008
Transfer
4)
(3) Oil filter and level plug (4) Oil drain plug
Front/rear differential
(5) Oil filter and level plug (6) Oil drain plug
INSPECTION AND MAINTENANCE
To check the gear oil level, use the following procedure:
1) Park the vehicle on a level surface with the parking brake applied. Then, stop the engine. 2) Remove the oil filler and level plug.
For the manual transmission;
3) If gear oil fiows from the plug hole, the oil level is correct. Reinstall the plug. If gear oil does not fiow from the plug hole, add oil through the filler plug hole until oil fiows a little from the plug hole.
78Rs0100, For the transfer and front/rear differential;
78RB07010
3) Check the inside of the hole with your finger. If the oil level comes up to the bottom of the plug hole, the oil level is correct. If so, reinstall the plug. 4) If the oil level is low, add gear oil through the oil filler and level plug hole until the oil level reaches the bottom of the filler hole, and then reinstall the plug.
Tightening torque for oil filler and level plug
Manual transmission (1 )(2): 23 Nm (2.3 kg-m, 16.6 lb-ft)
Transfer (3)(4): 23 Nm (2.3 kg-m, 16.6 lb-ft)
Front/rear differential (5)(6): (5)50 Nm (5.0 kg-m, 36.2 lb-ft) (6)55 Nm (5.6 kg-m, 40.5 lb-ft)
6-32
Page 357 of 421

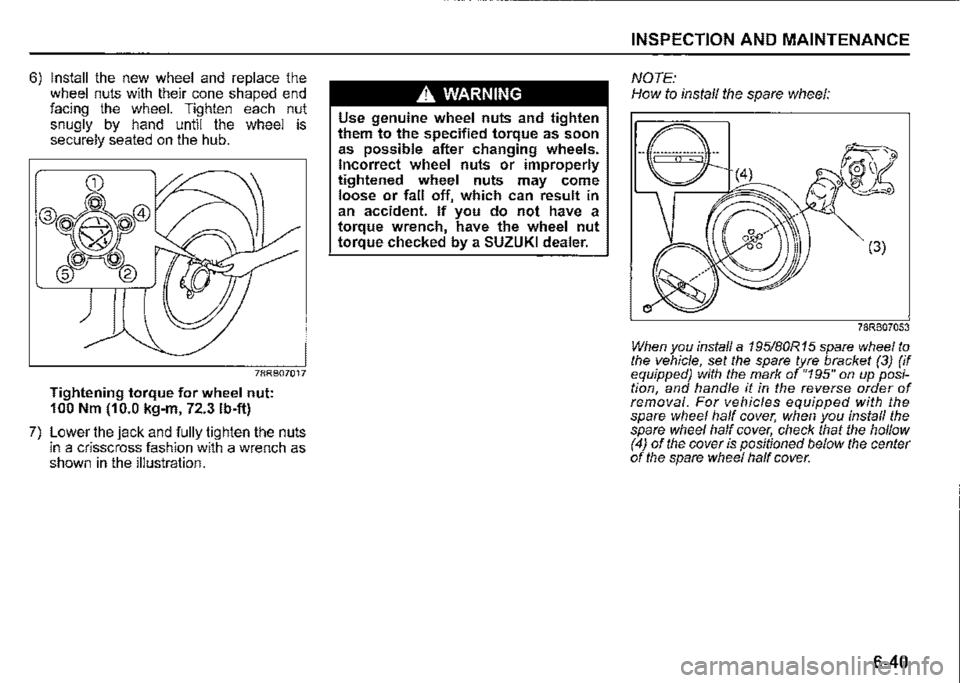
6) Install the new wheel and replace the wheel nuts with their cone shaped end facing the wheel. Tighten each nut snugly by hand until the wheel is securely seated on the hub.
78RB07017
Tightening torque for wheel nut: 100 Nm (10.0 kg-m, 72.3 lb-ft)
7) Lower the jack and fully tighten the nuts in a crisscross fashion with a wrench as shown in the illustration.
A WARNING
Use genuine wheel nuts and tighten them to the specified torque as soon as possible after changing wheels. Incorrect wheel nuts or improperly tightened wheel nuts may come loose or fall off, which can result in an accident. If you do not have a torque wrench, have the wheel nut torque checked by a SUZUKI dealer.
INSPECTION AND MAINTENANCE
NOTE: How to install the spare wheel:
(3)
78RB07053
When you install a 195/B0R 15 spare wheel to the vehicle, set the spare tyre bracket (3) (if equipped) with the mark of "195" on up position, and handle it in the reverse order of removal. For vehicles equipped with the spare wheel half cover; when you install the spare wheel half cover, check that the hollow (4) of the cover is positioned below the center of the spare wheel half cover.
6-40
Page 381 of 421

NOTICE
Never apply a garage jack to the exhaust pipe, front fender splash guard, side sill splash, rear fender splash guard, front differential or rear differential.
NOTE: For more details, contact a SUZUKI dealer.
Changing wheels
To change a wheel, use the following pro
cedure: 1) Prepare the jack, tools and spare tyre. 2) Loosen, but do not remove the wheel nuts. 3) Jack up the vehicle (follow the jacking instructions in this section).
A WARNING
Shift into "P" (Park) for an automatic transmission, or into 11R" (Reverse) for a manual transmission vehicle when you jack up the vehicle. Never jack up the vehicle with the transmission in "N" (Neutral). OthR erwise, unstable jack may cause an accident.
4) Remove the wheel nuts and wheel.
65J4033
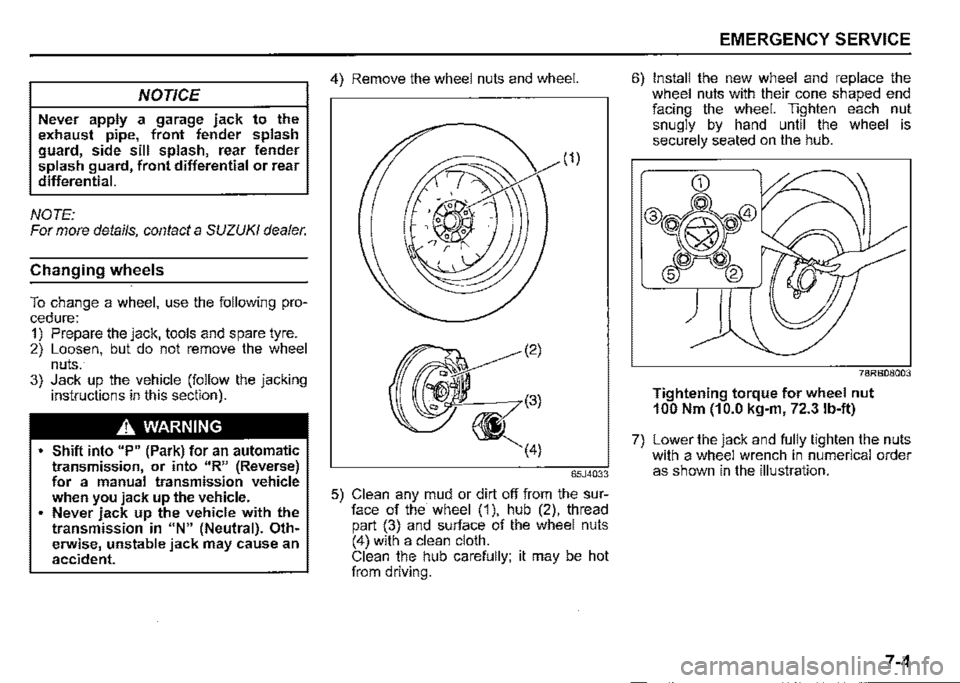
5) Clean any mud or dirt off from the surface of the wheel (1 ), hub (2), thread part (3) and surface of the wheel nuts (4) with a clean cloth. Clean the hub carefully; it may be hot from driving.
EMERGENCY SERVICE
6) Install the new wheel and replace the wheel nuts with their cone shaped end facing the wheel. Tighten each nut snugly by hand until the wheel is securely seated on the hub.
78RB08003
Tightening torque for wheel nut 100 Nm (10.0 kg-m, 72.3 lb-ft)
7) Lower the jack and fully tighten the nuts with a wheel wrench in numerical order as shown in the illustration.
7-4
Page 382 of 421

EMERGENCY SERVICE
A. WARNING
Use genuine wheel nuts and tighten them to the specified torque as soon as possible after changing wheels. Incorrect wheel nuts or improperly tightened wheel nuts may come loose or fall off, which can result in an accident. If you do not have a torque wrench, have the wheel nut torque checked by a SUZUKI dealer.
7-5
Jump-starting instructions
A. WARNING
Never attempt to jump-start your vehicle if the lead-acid battery appears to be frozen. Batteries in this condition may explode. When making jump lead connections, check that your hands and the jump leads remain clear from pulleys, belts or fans. Lead-acid batteries produce flammable hydrogen gas. Keep flames and sparks away from the battery or an explosion may occur. Never smoke when working near the battery. If the booster battery you use for jump-starting is installed in another vehicle, check that the two vehicles are not touching each other. If your lead-acid battery discharges repeatedly, for no apparent reason, have your vehicle inspected by a SUZUKI dealer. • To avoid harm to yourself or damage to your vehicle or battery, follow the jump-starting instructions below. If you are in doubt, call for qualified road service.
NOTICE
Your vehicle should not be started by pushing or towing. This starting method could result in permanent damage to the catalytic converter. Use jump leads to start a vehicle with a weak or flat battery.
1) Use only a 12-volt lead-acid battery to jump-start your vehicle. Position the good 12-volt lead-acid battery close to your vehicle so that the jump leads will reach both batteries. When using a battery installed on another vehicle, check that two vehicles do not touch each other. Set the parking brakes fully on both vehicles. 2) Turn off all vehicle accessories, except those necessary for safety reasons (for example, headlights or hazard lights).