window SUZUKI JIMNY 2020 Owners Manual
[x] Cancel search | Manufacturer: SUZUKI, Model Year: 2020, Model line: JIMNY, Model: SUZUKI JIMNY 2020Pages: 421, PDF Size: 6.35 MB
Page 13 of 421
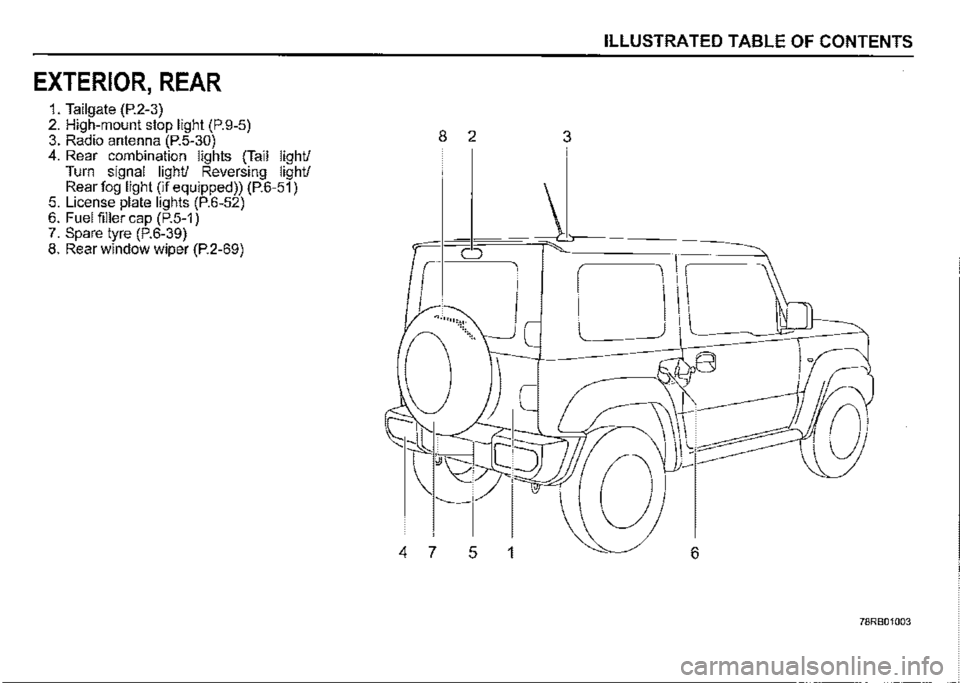
EXTERIOR, REAR
1. Tailgate (P.2-3) 2. High-mount stop light (P.9-5) 3. Radio antenna (P.5-30) 4. Rear combination lights (Tail light/ Turn signal light/ Reversing light/ Rear fog light (if equipped)) (P.6-51) 5. License plate lights (P.6-52) 6. Fuel filler cap (P.5-1) 7. Spare tyre (P.6-39) 8. Rear window wiper (P.2-69)
ILLUSTRATED TABLE OF CONTENTS
8 2 3
0
.... ,,.,,:\:<.
'----
4 7 5 1 6
78RB01003
Page 17 of 421
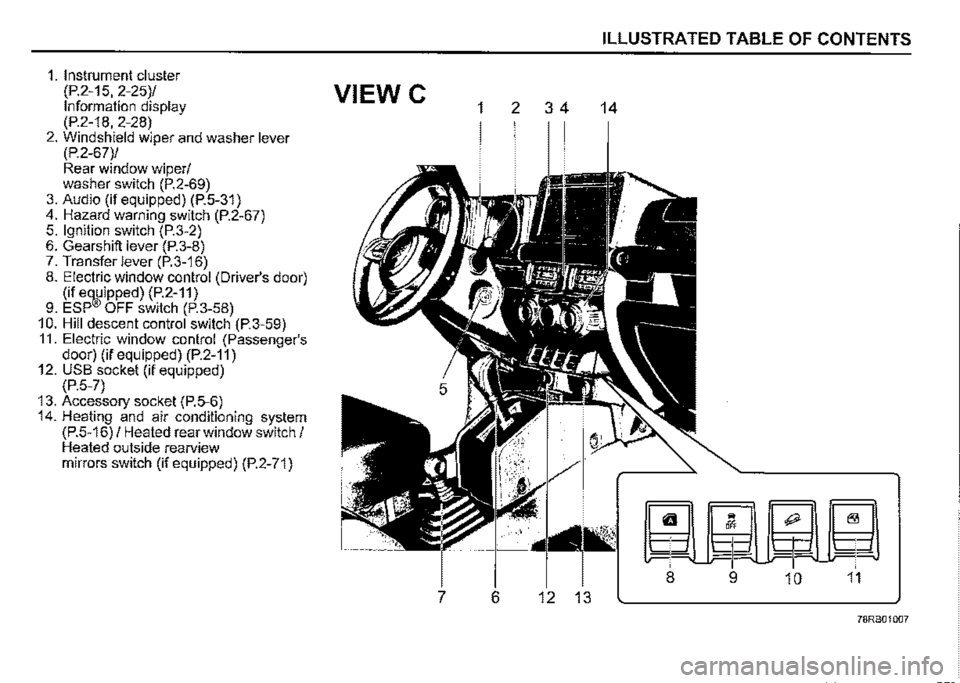
1. Instrument cluster
(P.2-15, 2-25)/ VIEW C Information display (P.2-18, 2-28) 2. Windshield wiper and washer lever (P.2-67)/ Rear window wiper/ washer switch (P.2-69) 3. Audio (if equipped) (P.5-31) 4. Hazard warning switch (P.2-67) 5. Ignition switch (P.3-2) 6. Gearshift lever (P.3-8) 7. Transfer lever (P.3-16) 8. Electric window control (Driver's door) (if e~ipped) (P.2-11) 9. ESP OFF switch (P.3-58) 10. Hill descent control switch (P.3-59) 11. Electric window control (Passenger's door) (if equipped) (P.2-11) 12. USB socket (if equipped) (P.5-7) 13. Accessory socket (P.5-6) 14. Heating and air conditioning system (P.5-16) / Heated rear window switch/ Heated outside rearview mirrors switch (if equipped) (P.2-71)
1 2 3 4
7 6 12 13
ILLUSTRATED TABLE OF CONTENTS
14
~m0~
-P-~ ¥ -1-
8 9 10 11
78RB01007
Page 71 of 421
BEFORE DRIVING
BEFORE DRIVING
Brightness control .............................................................. 2-17
Information display ............................................................. 2-18 -
Instrument cluster (Type B) (if equipped) ......................... 2-25
Speedometer ....................................................................... 2-26
Tachometer .......................................................................... 2-26
Fuel gauge ........................................................................... 2-26
Brightness control .............................................................. 2-26
Information switch
(if equipped) ......................................................................... 2-27
Information display ............................................................. 2-28
Warning and indicator lights .............................................. 2-39
Lighting control lever ......................................................... 2-55
Headlight leveling switch
(if equipped) ......................................................................... 2-65
Headlight washer switch
(if equipped) ........................................................................ 2-65
60G404 Turn signal control lever .................................................... 2-66
Keys ...................................................................................... 2-1 Hazard warning switch ....................................................... 2-67
Door locks ............................................................................ 2-2 Windshield wiper and washer lever .................................. 2-67
Keyless entry system transmitter (if equipped) ................ 2-6 Tilt steering lock lever ........................................................ 2-70
Theft deterrent alarm system (if equipped) ....................... 2-8 Horn ...................................................................................... 2-70
Theft deterrent light Heated rear window switch /
(if equipped) ........................................................................ 2-10 heated outside rearview mirror switch (if equipped) ...... 2-71
Windows ............................................................................... 2-1 o Vehicle loading .................................................................... 2-72
Mirrors .................................................................................. 2-13 Trailer towing ....................................................................... 2-72
Instrument cluster (Type A) (if equipped) ......................... 2-15
Speedometer ........................................................................ 2-16
Tachometer .......................................................................... 2-16
Fuel gauge ............................................................................ 2-16
Page 81 of 421

Checking whether the alarm has been triggered during parking If the alarm was triggered due to an unauthorized entry into the vehicle and you then turn the ignition switch to "ON" position, the theft deterrent light will blink rapidly for about 8 seconds and a buzzer will beep 4 times during this period. If this happens, check whether your vehicle has been broken into while you were away from it.
Theft deterrent light
(if equipped)
This light will blink with the ignition switch in "LOCK" or "ACC" position. The blinking light is intended to deter theft by leading others to believe that the vehicle is equipped with a security system.
BEFORE DRIVING
Windows
Manual window control
(if equipped)
~
{J
60G010A
Raise or lower the door windows by turning the handle located on the door panel.
2-10
Page 82 of 421

BEFORE DRIVING
Electric window controls
(if equipped)
The electric windows can only be operated when the ignition switch is in "ON" position.
(1)
The center console has a switch (1) to operate the driver's window, and a switch (2) to operate the front passenger's window.
2-11
OPEN CLOSE
78RB02007
To open a window, push the switch. To close the window, lift up the switch.
The driver's window has AUTO-DOWN and AUTO-UP (if equipped) features for greater convenience (at toll booths or drive-through restaurants, for example). These features allow the driver to open or close the window without holding the window switch in DOWN or UP position. Press down or lift up the driver's window switch completely and release it. To stop the window before it reaches the FULL-DOWN or FULL-UP position, pull up or push down the switch briefly.
A WARNING
• You should always prevent children from operating the electric window switches when there are children in the vehicle. Children can be seriously injured if they get part of their body caught by the window during operation. To avoid injuring an occupant by window entrapment, check that no part of the occupant's body such as hands or head is in the path of the electric windows when closing them. Always remove the ignition key when leaving the vehicle even only for a short time. Also do not leave children alone in a parked vehicle. Unattended children could use the electric window switches and get trapped by the window.
Page 83 of 421
Pinching prevention function
(if equipped)
The driver's window is equipped with a pinching prevention function. This function detects a foreign object that is caught in the window as it is being closed by AUTOUP feature, which allows you to close the window without holding the window switch in UP position, and stops the window from closing to prevent damage.
A. WARNING
To avoid injuring an occupant by window entrapment, check that no part of the occupant's body such as hands or head is in the path of the electric window when closing it. This function may not detect an object due to the size, hardness, or position of the object being caught in the closing window.
A.CAUTION
The pinching prevention function does not operate while you are holding the window switch in UP position. The pinching prevention function may not detect an object caught in the window just before the window is fully closed.
NOTE: Even if you cannot close the window by the AUTO-UP feature because there may be something wrong with the pinching prevention function, you can close the window by holding the window switch in UP position. If you drive in extreme off-road condition, the pinching prevention function may operate accidentally because the window reacts to vehicle jolting.
Pinching prevention function initialization When you disconnect and reconnect the lead-acid battery or replace the fuse, the function will be deactivated. In this condition, the AUTO-DOWN feature will be deactivated, while the AUTO-UP feature may remain activated. The pinching prevention function needs to be initialized.
BEFORE DRIVING
To initialize the pinching prevention function, use the following procedure: 1) Turn the ignition switch to "ON" posi
tion. 2) Open the driver's window fully by holding the window switch in DOWN position. 3) Close the driver's window by holding the switch in UP position, and keep holding the switch for 2 seconds after the window is fully closed. 4) Check the driver's window to see if the AUTO-DOWN/UP feature works.
A. WARNING
Whenever you disconnect and reconnect the lead-acid battery or replace the fuse, the pinching prevention function needs to be initialized. The pinching prevention function will not be activated until the initialization is completed.
If the AUTO-DOWN/UP feature will not work after initialization, there might be something wrong with the pinching prevention function. Have your vehicle inspected by a SUZUKI dealer.
2-12
Page 85 of 421
Electric mirrors (if equipped)
78RB02082
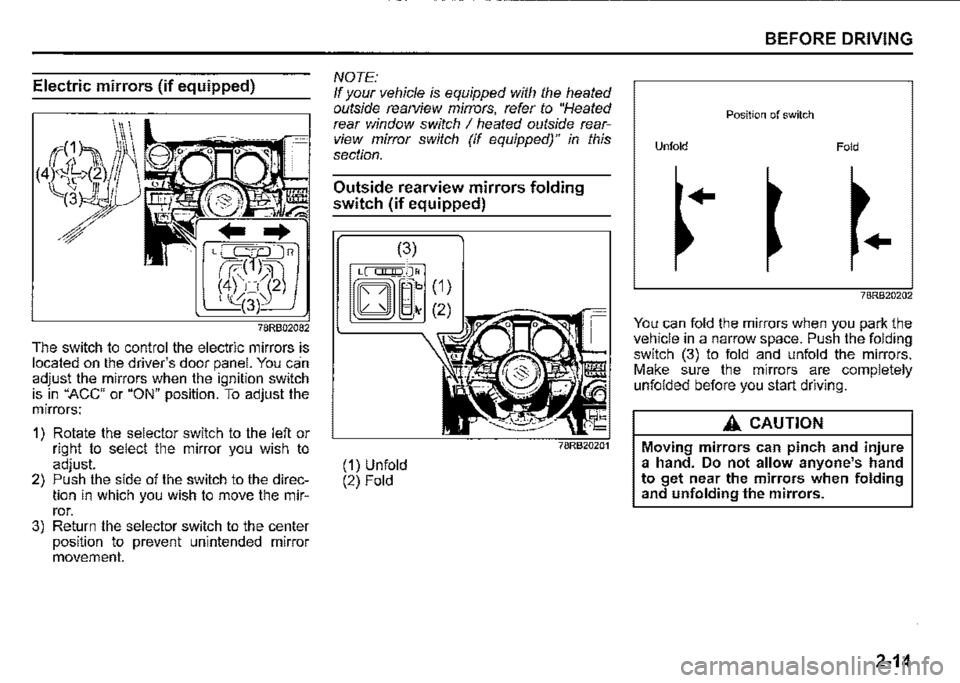
The switch to control the electric mirrors is located on the driver's door panel. You can adjust the mirrors when the ignition switch is in "ACC" or "ON" position. To adjust the mirrors:
1) Rotate the selector switch to the left or right to select the mirror you wish to adjust. 2) Push the side of the switch to the direction in which you wish to move the mirror. 3) Return the selector switch to the center position to prevent unintended mirror movement.
NOTE: If your vehicle is equipped with the heated outside rearview mirrors, refer to "Heated rear window switch I heated outside rearview mirror switch (if equipped)" in this section.
Outside rearview mirrors folding
switch (if equipped)
(1) Unfold (2) Fold
(1)
(2
BEFORE DRIVING
Position of switch
Unfold Fold
..
..
78RB20202
You can fold the mirrors when you park the vehicle in a narrow space. Push the folding switch (3) to fold and unfold the mirrors. Make sure the mirrors are completely unfolded before you start driving.
A_ CAUTION
Moving mirrors can pinch and injure a hand. Do not allow anyone's hand to get near the mirrors when folding and unfolding the mirrors.
2-14
Page 140 of 421
BEFORE DRIVING
NOTICE
To help prevent damage to the windshield wiper and washer system components, you should take the following precautions: Do not continue to hold in the lever when there is no windshield washer fluid being sprayed or the washer motor can be damaged. • Do not attempt to remove dirt from a dry windshield with the wipers or you can damage the windshield and the wiper blades. Always wet the windshield with washer fluid before operating the wipers. Clear ice or packed snow from the wiper blades before using the wipers. Check the washer fluid level regularly. Check it often when the weather is bad. Fill a reservoir to 3/4 level with washer fluid for its expansion, if temperature falls low enough to freeze the fluid.
2-69
Rear window wiper/washer switch
Washer
Wiper
""'
78RB02061
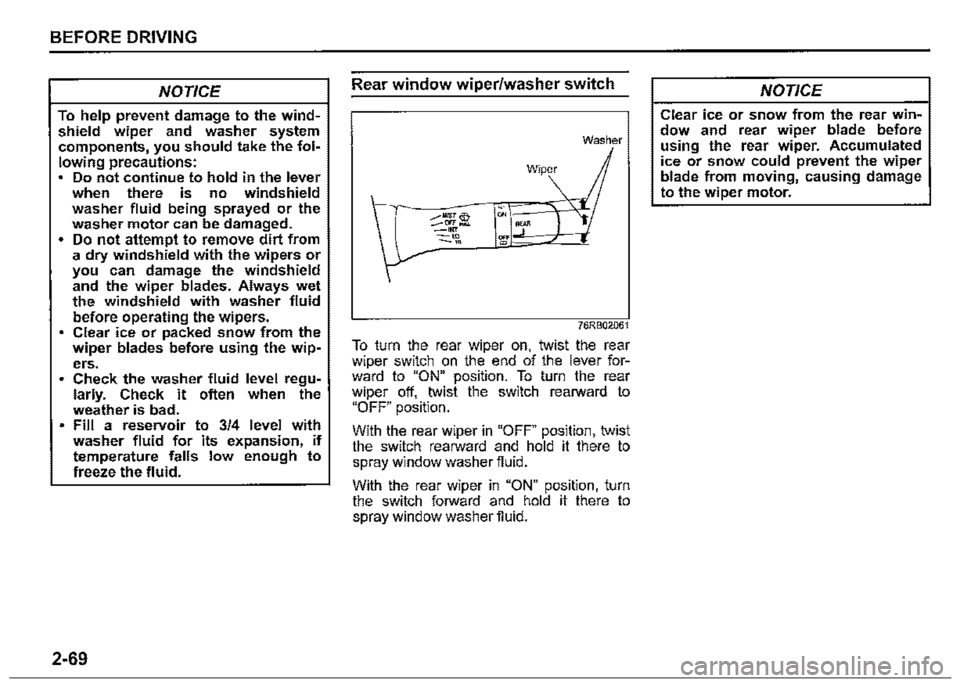
To turn the rear wiper on. twist the rear wiper switch on the end of the lever forward to "ON" position. To turn the rear wiper off, twist the switch reaiward to "OFF'" position.
With the rear wiper in "OFF"" position, twist the switch reaiward and hold it there to spray window washer fluid.
With the rear wiper in "ON"" position, turn the switch foiward and hold it there to spray window washer fluid.
NOTICE
Clear ice or snow from the rear winw dow and rear wiper blade before using the rear wiper. Accumulated ice or snow could prevent the wiper blade from moving, causing damage to the wiper motor.
Page 142 of 421

BEFORE DRIVING
Heated rear window switch/
heated outside rearview
mirror switch (if equipped)
Type 1
(1)
78RB02064
2-71
Type2
78RB02065
When the rear window is misted, push this switch (1) to clear the window.
If the outside rearview mirror has the mark (2), it is also equipped with the heated outside rearview mirrors. When you push the switch (1 ), both the heated outside rearview mirrors and the heated rear window will operate simultaneously.
An indicator light will come on when the defogger is on. The defogger will work only when the engine is running. To turn off the defogger, push the switch (1) again.
NOTICE
The heated rear window and the heated outside rearview mirrors (if equipped) use a large amount of electricity. Turn off the switch after the window and mirrors have become clear.
NOTE: The defogger will work only when the engine is running. The defogger will automatically turn off after the defogger remains on for 15 minutes to prevent discharging of the lead-acid battery.
Page 152 of 421
OPERATING YOUR VEHICLE
Daily inspection checklist
Before driving
60A187
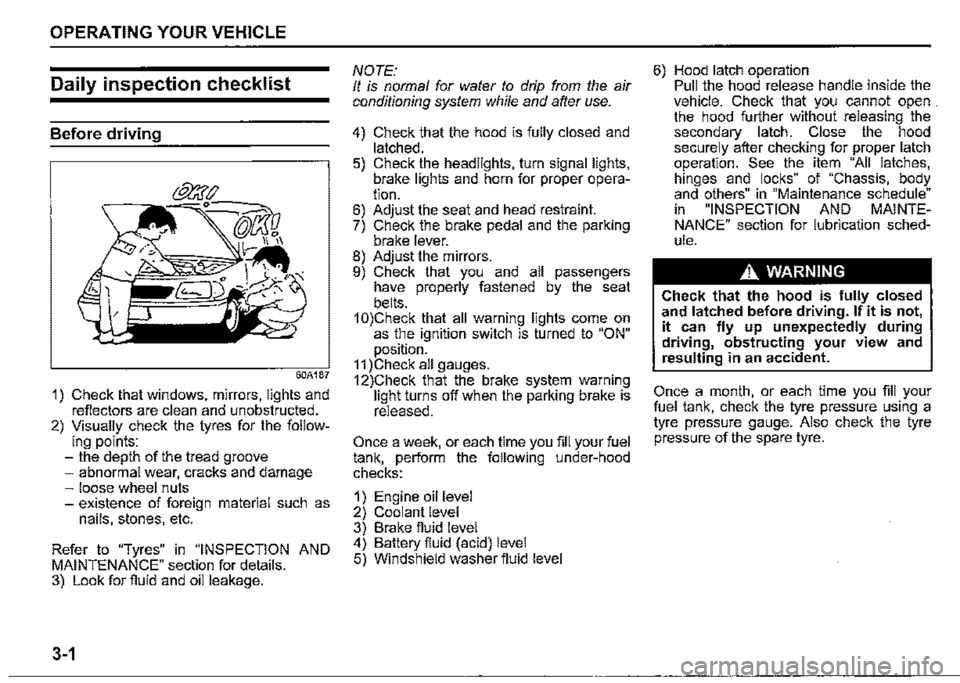
1) Check that windows, mirrors, lights and reflectors are clean and unobstructed. 2) Visually check the tyres for the follow-ing points: -the depth of the tread groove -abnormal wear, cracks and damage -loose wheel nuts -existence of foreign material such as nails, stones, etc.
Refer to "Tyres" in "INSPECTION AND MAINTENANCE" section for details. 3) Look for fluid and oil leakage.
3-1
NOTE: It is normal for water to drip from the air conditioning system while and after use.
4) Check that the hood is fully closed and latched. 5) Check the headlights, turn signal lights, brake lights and horn for proper operation. 6) Adjust the seat and head restraint. 7) Check the brake pedal and the parking brake lever. 8) Adjust the mirrors. 9) Check that you and all passengers have properly fastened by the seat belts. 1 0)Check that all warning lights come on as the ignition switch is turned to "ON" position. 11 )Check all gauges. 12)Check that the brake system warning light turns off when the parking brake is released.
Once a week, or each time you fill your fuel tank, perform the following under-hood checks:
1) Engine oil level 2) Coolant level 3) Brake fluid level 4) Battery fluid (acid) level 5) Windshield washer fluid level
6) Hood latch operation Pull the hood release handle inside the vehicle. Check that you cannot open . the hood further without releasing the secondary latch. Close the hood securely after checking for proper latch operation. See the item "All latches, hinges and locks" of "Chassis, body and others" in "Maintenance schedule" in "INSPECTION AND MAINTENANCE" section for lubrication schedule.
A WARNING
Check that the hood is fully closed and latched before driving. If it is not, it can fly up unexpectedly during driving, obstructing your view and resulting in an accident.
Once a month, or each time you fill your fuel tank, check the tyre pressure using a tyre pressure gauge. Also check the tyre pressure of the spare tyre.