ECO mode SUZUKI JIMNY 2021 Owner's Guide
[x] Cancel search | Manufacturer: SUZUKI, Model Year: 2021, Model line: JIMNY, Model: SUZUKI JIMNY 2021Pages: 421, PDF Size: 6.35 MB
Page 298 of 421
OTHER CONTROLS AND EQUIPMENT
Phone registration
To use the hands-free function with this unit, it is required to register the phone in advance.
NOTE: Up to 5 phones can be registered. To set up a new phone, disconnect the audio player from the unit. Connect the audio player again after phone setup is completed if necessary. When attempts to establish the pairing fail within 60 seconds, the connecting operation will be cance/ed. Try to establish the pairing again or refer to the manual of the phone in use for how to establish the pairing with the phone. 1) Press the Bluetooth® setup button (5)
or (6). The Bluetooth® setup menu will be dis
played. 2) Turn "TUNE/FLO PUSH SOUND" knob (1) to select "Setup Bluetooth", and press the knob (1) to determine the selection. 3) Turn "TUNE/FLO PUSH SOUND" knob (1) to select "Pairing", and press the knob (1) to determine the selection. 4) Select "CAR AUDIO" from the Bluetooth® menu of the phone and establish the pairing. Refer to the manual of the phone in use for further information. 5) Enter the passkey displayed on the unit to the phone.
5-63
6) When the pamng with the phone is established, automatic transfer of the phonebook and the call history becomes selectable. The automatic transfer starts with "Yes" and it does not with "No". 7) Press ON HOOK button (8).
NOTE: When selecting "Go Back" or pressing BACK button (4), the previous menu will be displayed. When registering an additional phone, repeat Step from 1).
Receiving a call Press OFF HOOK button (7) to receive a call.
Ending a call Press ON HOOK button (8) to end a call.
Rejecting a call (only for supported models) Press ON HOOK button (8) to reject a incoming call.
Mute of hands-free microphone Press MUTE switch (9) to mute the microphone. To cancel the mute, press MUTE switch (9) again.
Adjusting the listening volume Turn "VOL PUSH PWR" knob (2) during a call. Turning it clockwise increases the volume; turning it counterclockwise decreases the volume. Press "VOL" switch (10) during a call. Pressing the switch up increases the volume; pressing the switch down decreases the volume.
Adjusting the ring volume Turn "VOL PUSH PWR" knob (2) while a call is coming in. Turning it clockwise increases the volume; turning it counterclockwise decreases the volume. Press "VOL" switch (10) during a call. Pressing the switch up increases the volume; pressing the switch down decreases the volume.
Page 307 of 421
Registration of audio devices
To use Bluetooth® ready audio devices with this unit, it is required to register the devices.
NOTE: • To set up a new audio player, disconnect the phone from the unit. Connect the phone after audio player setup is completed if necessary. When. attempts to establish the pairing fail within 60 seconds, the connecting operation will be cance/ed. Try to establish the pairing again or refer to the audio player manual for assistance with the pairing process. 1) Press the Bluetooth® setup button (7) or (8). The Bluetooth® setup menu will be displayed. 2) Turn "TUNE/FLO PUSH SOUND" knob (2) to select "Setup Bluetooth", and press the knob (2) to determine the selection. 3) Turn "TUNE/FLO PUSH SOUND" knob (2) to select "Pairing", and press the knob (2) to determine the selection. 4) Select "My Car" from the Bluetooth® menu of the audio player and establish the pairing. Refer to the manual of the audio player in use for further information. 5) Enter the passkey displayed on the unit to the audio player.
OTHER CONTROLS AND EQUIPMENT
NOTE: When selecting "Go Back" or pressing BACK button (6), the previous menu will be displayed. When registering additional audio devices, repeat Step from 1 ).
Selecting Bluetooth® audio mode Press "MEDIA" button (1). Each time the button is pressed, the mode will change as follows:
USB (iPod) (if equipped) ~
Bltetooth® audio (if equipped) __J
Selecting a group (only for supported models) Turn "TUNE/FLO PUSH SOUND" knob (2) to select a group.
Selecting a track • Press UP button (3) to listen to the next track. Press DOWN button (4) twice to listen to the previous track. When DOWN button (4) is pressed once, the track currently being played will start from the beginning again.
Fast forwarding/rewinding a track • Hold down UP button (3) to fast forward the track. • Hold down DOWN button (4) to fast rewind the track.
NOTE: Some functions may not be available depending on B/uetooth® audio.
Display change Press "DISP" button (5). Each time the button is pressed, display will change as follows:
Play time ~-------~
• Track name
• Artist name
• Album name _______ __J
NOTE: If text data contains more than 16 characters, ">" mark will appear at the right end. Holding down "D/SP" button (5) for 1 second or longer can display the next page.
5-72
Page 309 of 421
Deletion of audio device information (Delete Audio) Follow the instructions below to delete the registered audio device information. 1) Press the Bluetooth® setup button (7) or (8). The Bluetooth® setup menu will be displayed. 2) Turn "TUNE/FLD PUSH SOUND" knob (2) to select "Setup Bluetooth", and press the knob (2) to determine the selection. 3) Turn "TUNE/FLD PUSH SOUND" knob (2) to select "List Audio", and press the knob (2) to determine the selection. 4) Turn "TUNE/FLD PUSH SOUND" knob (2) to select an audio device to be deleted, and press the knob (2) to determine the selection. 5) Turn "TUNE/FLD PUSH SOUND" knob (2) to select "Delete", and press the knob (2) to determine the selection. 6) Turn "TUNE/FLD PUSH SOUND" knob (2) to select "Delete?", and press the knob (2) to determine the selection. 7) Turn "TUNE/FLD PUSH SOUND" knob (2) to select "Confirm", and press the knob (2) to complete the deletion.
NOTE: When selecting "Go Back" or pressing BACK button (6), the previous menu will be displayed.
OTHER CONTROLS AND EQUIPMENT
Disclaimer for Bluetooth® function
Depending on compatibility of mobile phone models, no Bluetooth® function can be used, or some Bluetooth® func
tions may be restricted. Connectivity or voice quality may get affected depending on circumstances. After the ignition switch is turned "ON" to change the ignition mode to ON, the audio system takes few seconds to detect and connect to the Bluetooth®
device (if already paired).
Remote audio controls (if equipped)
Controlling basic functions of the audio system is available using the switches on the steering wheel.
(1) (3) (4)
(4l M'r ~<@
~--- (2)
78RB05053
5-74
Page 310 of 421
OTHER CONTROLS AND EQUIPMENT
Adjusting the volume To increase the volume, press the "VOL" switch (1) up. The volume will continue to increase until the switch is released. To decrease the volume, press the "VOL" switch (1) down. The volume will continue to decrease until the switch is released. To mute the sound, press the switch (2).
Selecting the mode Press the switch (3). Each time the button is pressed, the rriode will change as follows:
AM (Radio) J, FM1 (Radio) J, FM2 (Radio) J, DAB1 (if equipped) J, DAB2 (if equipped) J, CD J, Bluetooth® audio (if equipped) J, USB (iPod) (if equipped) ~
It is possible to turn on the audio system by pressing the switch (3).
5-75
Selecting the radio station (AM, FM1, FM2, DAB1, DAB2 mode) To select the next preset station, press ">" of the switch (4) only for a moment. To select the previous preset station, press "<" of the switch (4) only for a moment. To scan a higher frequency radio station, press ">" of the switch (4) for 1 second or longer. To scan a lower frequency radio station, press "<" of the switch (4) for 1 second or longer.
Selecting the track (CD, USB (iPod), Bluetooth® audio mode) To skip to the next track, press ">" of the switch (4) only for a moment. To skip to the previous track, press "<" of the switch (4) twice only for a moment. When the switch (4) is pushed down once only for a moment, the track currently being played will start from the beginning again.
Fast forwarding/rewinding a track To fast forward a track, press ">" of the switch (4) for 1 second or longer. To fast rewind a track, press "<" of the switch (4) for 1 second or longer.
Page 325 of 421
INSPECTION AND MAINTENANCE
Maintenance recommended under severe driving conditions (except for EU countries and Israel)
Follow this schedule if your vehicle is mainly operated under one or more of the following conditions: • When most trips are less than 6 km (4 miles). • When most trips are less than 16 km (10 miles) and outside temperature remains below freezing. Idling and/or low-speed operation in stop-and-go traffic. Operating in extremely cold weather and/or on salted roads. Operating in rough and/or muddy areas. Operating in dusty areas. Repeated high speed drive or high engine revolutions. Towing a trailer, if admitted. Schedule should also be followed if the vehicle is used for delivery service, police, taxi or other commercial applications.
NdTE: For the Maintenance Recommended under Severe Driving Conditions of Russian models, refer to "For Russia" in the "SUPPLEMENT" section.
6-8
Page 341 of 421

(For EU countries and Israel) The replacement timing varies with the type of engine oil that you choose. Refer to "Maintenance schedule" in this section for corresponding maintenance schedule.
SAE 0W-16 ( 1 ) is the best choice for good fuel economy and good startability in cold weather.
NOTE: SUZUKI highly recommends the use of ECSTAR brand engine oil. ECSTAR has been specially formulated for your SUZUKI product and contributes to the desired vehicle performance and ideal driving experience.
Models except for EU countries and Israel
~OW:i!O >
rnw-== '!'° s 10W--JO > (1)< 5W:3o >
"< QW:2~ ~o 'C -30 -20 -10 0 10 20 30 'f -22 -4 14 32 50 68 86 104
78RB07050
(1) Preferred
Be sure that the engine oil you use comes under the quality classification of SG, SH, SJ, SL, SM or SN. Select the appropriate oil viscosity according to the above chart.
SAE 0W-20 (1) is the best choice for good fuel economy, and good starting in cold weather.
NOTE: We recommend that you use SUZUKI genuine oil. To purchase it, see a SUZUKI dealer or a qualified workshop.
INSPECTION AND MAINTENANCE
Oil level check
B0G064
52D084
6-24
Page 383 of 421
78R808004
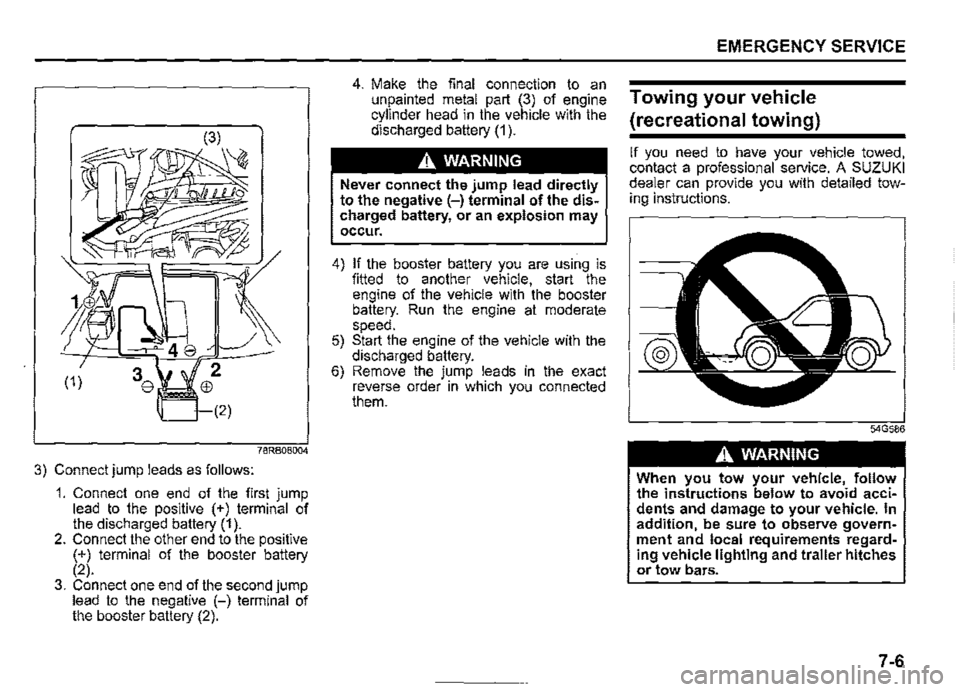
3) Connect jump leads as follows:
1. Connect one end of the first jump lead to the positive (+) terminal of the discharged battery (1 ). 2. Connect the other end to the positive (+) terminal of the booster battery (2). 3. Connect one end of the second jump lead to the negative (-) terminal of the booster battery (2).
4. Make the final connection to an unpainted metal part (3) of engine cylinder head in the vehicle with the discharged battery (1 ).
A WARNING
Never connect the jump lead directly to the negative (-) terminal of the discharged battery, or an explosion may occur.
4) If the booster battery you are using is fitted to another vehicle, start the engine of the vehicle with the booster battery. Run the engine at moderate speed. 5) Start the engine of the vehicle with the discharged battery. 6) Remove the jump leads in the exact reverse order in which you connected them.
EMERGENCY SERVICE
Towing your vehicle
(recreational towing)
If you need to have your vehicle towed, contact a professional service. A SUZUKI dealer can provide you with detailed towing instructions.
A WARNING
When you tow your vehicle, follow the instructions below to avoid accidents and damage to your vehicle. In addition, be sure to observe government and local requirements regarding vehicle lighting and trailer hitches or tow bars.
7-6
Page 399 of 421

Fuel recommendation
78RB0901R
To avoid damaging catalytic converter, you must use unleaded gasoline with an octane number (RON) of 91 or higher (or 95 or higher if a "RON 95" label is attached on the fuel filler lid), which complies with the European standard EN228. Do not use gasoline with additives containing metal.This is identified by a label attached on fuel lid that states: "UNLEADED FUEL ONLY", "NUR UNVERBLEITES BENZIN", "ENDAST BLYFRI BENSIN" or "SOLO GASOLINA SIN PLOMO".
Gasoline-ethanol blends Blends of unleaded gasoline and ethanol (grain alcohol), also known as gasohol, are commercially available in certain areas. Blends of this type may be used in your vehicle if they are no more than 10% ethanol. Check that this gasoline-ethanol blend has octane ratings no lower than those recommended for the gasoline.
Use the recommended gasoline which conforms to the following labels.
NOTE: If you are not satisfied with the driveability or fuel economy of your vehicle when you use a gasoline-alcohol blend, you should switch back to unleaded gasoline containing no alcohol.
Gasoline containing MTBE (where legally available) Unleaded gasoline containing MTB_E (methyl tertiary butyl ether) may be used in your vehicle if the MTBE content 1s not greater than 15%. This oxygenated fuel does not contain alcohol.
SPECIFICATION
NOTICE
The fuel tank has an air space to allow for fuel expansion in hot weather. If you continue to add fuel after the filler nozzle has automati-cally shut off or an initial blowback occurs, the air chamber will become full. Exposure to heat when fully fuelled in this manner will result in leakage due to fuel expansion. To prevent such fuel leakage, stop filling after the filler nozzle has automati-cally shut off, or when initial vent blowback occurs, if using an alterna-tive non-automatic system.
NOTICE
Be careful not to spill fuel containing alcohol while refueling. If fuel is spilled on the vehicle body, wipe it up immediately. Fuels containing alco-hol can cause paint damage, which is not covered under the New Vehicle Limited Warranty.
NOTE: For the fuel recommendation of Chile, Panama and Argentina models, refer to "For Chile, Panama and Argentina" in the "SUPPLEMENT" section.
9-2
Page 415 of 421
INDEX
Seat belt warning ................................................................. 10-3 Transfer lever ....................................................................... 3-16
Seat belts and child restraint systems ................................ 1-7 Transfer oil.. .......................................................................... 6-31
Seat position adjustment lever ............................................. 1-3 Trip meter ..................................................................... 2-20, 2-32
Seatback angle adjustment lever ......................................... 1-3 Turn signal control lever ..................................................... 2-66
Selection of coolant. ............................................................ 6-28 Turn signal indicators .......................................................... 2-52
Selector position/ Gearshift indicator ............................... 2-19 Turn signal operation .......................................................... 2-66
Setting mode ........................................................................ 2-23 Tyre changing tool ................................................................. 7-1
Side airbags and side curtain airbags ............................... 1-41 Tyre inspection ..................................................................... 6-37
Side door locks ...................................................................... 2-2 Tyre pressure monitoring system (TPMS) ......................... 3-63
Side turn signal light ........................................................... 6-49 Tyre rotation ......................................................................... 6-38
Spark plugs .......................................................................... 6-30 Tyres ...................................................................................... 6-36
Specified oil .......................................................................... 6-23 u Speed limiter ........................................................................ 3-25 USB socket ............................................................................. 5-7 Speedometer ............................................................... 2-16, 2-26 Using transmission ................................................................ 3-8 Stability control system ...................................................... 3-56 V Starting engine ....................................................................... 3-7
Steering wheel ..................................................................... 6-36 Vehicle cleaning ..................................................................... 8-2
Vehicle identification ............................................................. 9-1 Sun visor ................................................................................ 5-4
Supplemental restraint system (airbags) .......................... 1-35
SUZUKI SAFETY SUPPORT ................................................ 3-27
T
Tachometer ................................................................. 2-16, 2-26
Tailgate ................................................................................... 2-3
Theft deterrent alarm system ............................................... 2-8
Vehicle swaying warning ..................................................... 3-34
w
Warning and indicator lights ............................................... 2-39
Warning and indicator messages ....................................... 2-35
Washing .................................................................................. 8-4
Waxing .................................................................................... 8-6
Windows ............................................................................... 2-10 Theft deterrent light ............................................................. 2-10 Windshield washer ............................................................... 2-68 Thermometer ............................................................... 2-19, 2-29 Windshield washer fluid ...................................................... 6-57 Tilt steering lock lever. ........................................................ 2-70
Towing your vehicle (recreational towing) .......................... 7-6
Traction control system ...................................................... 3-56
Traffic sign recognition ....................................................... 3-39
Trailer towing ....................................................................... 2-72
Windshield wiper and washer lever ................................... 2-67
Windshield wipers ................................................................ 2-68
Wiper and washer operation ............................................... 2-68
Wiper blades ......................................................................... 6-54
11-5