diff SUZUKI JIMNY 2021 Workshop Manual
[x] Cancel search | Manufacturer: SUZUKI, Model Year: 2021, Model line: JIMNY, Model: SUZUKI JIMNY 2021Pages: 421, PDF Size: 6.35 MB
Page 348 of 421

INSPECTION AND MAINTENANCE
60G160
NOTICE
When installing the spark plugs, screw them in with your fingers to avoid stripping the threads. Tighten the spark plugs with a torque wrench to 17.5 Nm (1.7 kgm, 12.9 lb-ft). Do not allow contaminants to enter the engine through the spark plug holes when the plugs are removed. Never use spark plugs with the wrong thread size.
6-31
Spark plug gap "a":
ZXU20PR11 1.0-1.1 mm (0.039-0.043 in.) KR6A-10 0.95-1.0Smm (0.037-0.041 in.)
NOTICE
54G106
When replacing spark plugs, you ".hould use the ~rand and type specified for your vehicle. For the specified plugs, refer to "SPECIFICATIONS" section in the end of this book. If you wish to use a brand of spark plug other than the specified plugs, consult a SUZUKI dealer.
Gear oil
Manual transmission oil / transfer
oil/ rear differential oil
When adding gear oil, use gear oil with the appropriate viscosity and grade as shown in the chart below.
We highly recommend you use "SUZUKI GEAR OIL 75W" for manual transmission oil and transfer oil.
Manual transmission oil Transfer oil
<: ==:llil:::======> 75W
°C-30 -20 -10 0 10 20 30 40 °F-22 -4 14 32 50 68 86 104
54P120706
We highly recommend you use "SUZUKI SUPER GEAR OIL 75W-85 SYNTHETIC" for front/rear differential oil.
Front/rear differential oil
<~==~7[fil5Wtfi-B~5====>
'C-30 -~0 -10 Of.22 4 14 0 ' 32
20 ' 68 83,60 4p 104
78RB07007
Page 349 of 421

Gear oil level check
Manual transmission
(2)
(1) Oil filler and level plug (2) Oil drain plug
78RB07008
Transfer
4)
(3) Oil filter and level plug (4) Oil drain plug
Front/rear differential
(5) Oil filter and level plug (6) Oil drain plug
INSPECTION AND MAINTENANCE
To check the gear oil level, use the following procedure:
1) Park the vehicle on a level surface with the parking brake applied. Then, stop the engine. 2) Remove the oil filler and level plug.
For the manual transmission;
3) If gear oil fiows from the plug hole, the oil level is correct. Reinstall the plug. If gear oil does not fiow from the plug hole, add oil through the filler plug hole until oil fiows a little from the plug hole.
78Rs0100, For the transfer and front/rear differential;
78RB07010
3) Check the inside of the hole with your finger. If the oil level comes up to the bottom of the plug hole, the oil level is correct. If so, reinstall the plug. 4) If the oil level is low, add gear oil through the oil filler and level plug hole until the oil level reaches the bottom of the filler hole, and then reinstall the plug.
Tightening torque for oil filler and level plug
Manual transmission (1 )(2): 23 Nm (2.3 kg-m, 16.6 lb-ft)
Transfer (3)(4): 23 Nm (2.3 kg-m, 16.6 lb-ft)
Front/rear differential (5)(6): (5)50 Nm (5.0 kg-m, 36.2 lb-ft) (6)55 Nm (5.6 kg-m, 40.5 lb-ft)
6-32
Page 354 of 421

INSPECTION AND MAINTENANCE
specified pressure when tyres cool down. Also, tyres that are inflated to the specified pressure in a warm garage may have pressure below the specification when the vehicle is driven outside in very cold temperature. If you adjust the tyre pressure in a garage that is warmer than the outside temperature, you should add 1 kPa to the recommended cold tyre pressure for every O.B'C difference between garage temperature and outside temperature.
6-37
Tyre inspection
Inspect your vehicle's tyres at least once a month or before long trip by performing the following checks:
1) Measure the air pressure with a tyre gauge. Adjust the pressure if necessary. Remember to check the spare tyre, too.
A WARNING
• Air pressures should be checked when the tyres are cold or you may get inaccurate readings. Check the inflation pressure from time to time while inflating the tyre gradually, until the specified pressure is obtained. Never under-inflate or over-inflate the tyres. Under-inflation can cause unusual handling characteristics or can cause the rim to slip on the tyre bead, resulting in an accident or damage to the tyre or rim. Over-inflation can cause the lyre to burst, resulting in personal injury. Over-inflation can also cause unusual handling characteristics which may result in an accident.
(1)
~ (2)
78RB07048
(1) Tread wear indicator (2) Indicator location mark
2) Check that the depth of the tread groove is more than 1.6 mm (0.06 in.). To help you check this, the tyres have molded-in tread wear indicators in the grooves. When the indicators appear on the tread surface, the remaining depth of the tread is 1.6 mm (0.06 in.) or less and the tyre should be replaced. 3) Check for abnormal wear, cracks and damage. Any tyres with cracks or other damage should be replaced. If any tyres show abnormal wear, have them inspected by a SUZUKI dealer.
Page 355 of 421

A CAUTION
Hitting curbs and running over rocks can damage tyres and affect wheel alignment. Have tyres and wheel alignment checked periodically by a SUZUKI dealer.
4) Check for loose wheel nuts. 5) Check that there are no nails, stones or other objects sticking into the tyres.
A WARNING
• Your SUZUKI vehicle is equipped with tyres which are all the same type and size. This is important to ensure proper steering and handling of the vehicle. Never mix tyres of different size or type on the four wheels of your vehicle. The size and type of tyres used should be only those approved by SUZUKI as standard or optional equipment for your vehicle. Replacing the wheels and tyres equipped on your vehicle with certain combinations of aftermarket wheels and tyres can significantly change the steering and handling characteristics of your vehicle. Therefore, use only those wheel and tyre combinations approved by SUZUKI as standard or optional equipment for your vehicle.
NOTICE
Replacing the original tyres with tyres of a different size may result in false speedometer or odometer readings. Check with a SUZUKI dealer before purchasing replacement tyres that differ in size from the original tyres. Replacing a tyre with one of a different size, or using different brands among the four tyres can result in damage to the drive train.
INSPECTION AND MAINTENANCE
Tyre rotation
5-tyre rotation
L A
65D445
L: Left hand drive R: Right hand drive
NOTE: If your vehicle is equipped with the tyre pressure monitoring system, the spare tyre TPMS sensor must be recognized when you include the spare tyre during a tyre rotation. For details, refer to "Replacing Tyres and/or Wheels" in "Tyre Pressure Monitoring System (TPMS)" in the "OPERATING YOUR VEHICLE" section.
6-38
Page 371 of 421
Wiper blades
54G129
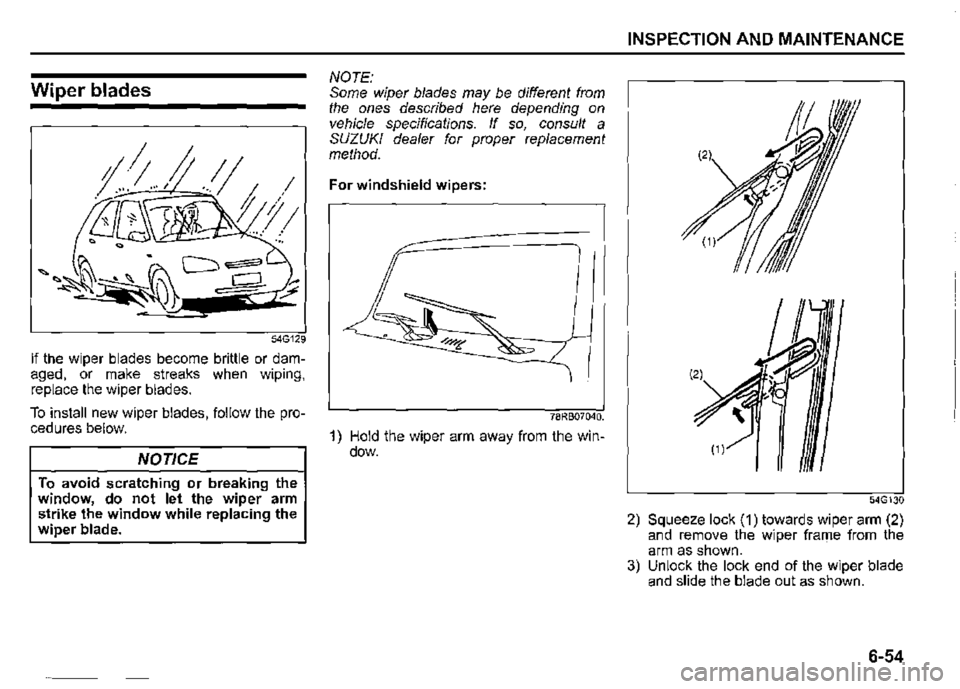
If the wiper blades become brittle or damaged, or make streaks when wiping, replace the wiper blades.
To install new wiper blades, follow the procedures below.
NOTICE
To avoid scratching or breaking the window, do not let the wiper arm strike the window while replacing the wiper blade.
NOTE: Some wiper blades may be different from the ones described here depending on vehicle specifications. If so, consult a SUZUKI dealer for proper replacement method.
For windshield wipers:
78RB07040.
1) Hold the wiper arm away from the window.
INSPECTION AND MAINTENANCE
54G130
2) Squeeze lock (1) towards wiper arm (2) and remove the wiper frame from the arm as shown. 3) Unlock the lock end of the wiper blade and slide the blade out as shown.
6-54
Page 381 of 421
NOTICE
Never apply a garage jack to the exhaust pipe, front fender splash guard, side sill splash, rear fender splash guard, front differential or rear differential.
NOTE: For more details, contact a SUZUKI dealer.
Changing wheels
To change a wheel, use the following pro
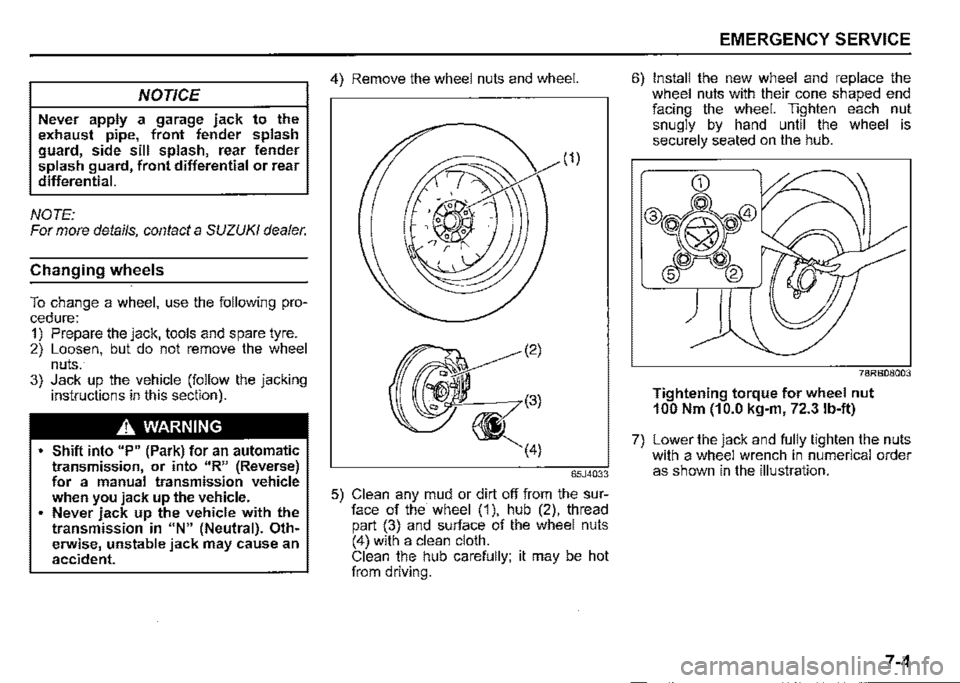
cedure: 1) Prepare the jack, tools and spare tyre. 2) Loosen, but do not remove the wheel nuts. 3) Jack up the vehicle (follow the jacking instructions in this section).
A WARNING
Shift into "P" (Park) for an automatic transmission, or into 11R" (Reverse) for a manual transmission vehicle when you jack up the vehicle. Never jack up the vehicle with the transmission in "N" (Neutral). OthR erwise, unstable jack may cause an accident.
4) Remove the wheel nuts and wheel.
65J4033
5) Clean any mud or dirt off from the surface of the wheel (1 ), hub (2), thread part (3) and surface of the wheel nuts (4) with a clean cloth. Clean the hub carefully; it may be hot from driving.
EMERGENCY SERVICE
6) Install the new wheel and replace the wheel nuts with their cone shaped end facing the wheel. Tighten each nut snugly by hand until the wheel is securely seated on the hub.
78RB08003
Tightening torque for wheel nut 100 Nm (10.0 kg-m, 72.3 lb-ft)
7) Lower the jack and fully tighten the nuts with a wheel wrench in numerical order as shown in the illustration.
7-4
Page 390 of 421
APPEARANCE CARE
Corrosion prevention
It is_ important to take good care of your vehicle to protect it from corrosion. Listed below are instructions for how to maintain your vehicle to prevent corrosion. Please read and follow these instructions carefully.
Important information about corro
sion
Common causes of corrosion 1) Accumulation of road salt, dirt moisture or chemicals in hard-to-reach areas of the vehicle underbody or frame. 2) Chipping, scratches and any damage to treated or painted metal surfaces resulting from minor accidents or abrasion by stones and gravel.
Environmental conditions which accelerate corrosion 1) Road salt, dust control chemicals, sea breeze or industrial pollution will all accelerate the corrosion of metal. 2) High humidity will increase the rate of corrosion particularly when the temperature range is just above the freezing point. 3) Moisture in certain areas of a vehicle for an extended period of lime may promote corrosion even though other body sections may be completely dry.
8-1
4) High temperatures will cause an accelerated rate of corrosion to parts of the vehicle which are not well-ventilated to permit quick drying.
This information illustrates the necessity of keeping your vehicle (particularly the ~nderbody) as clean and dry as possible. It Is equally important to repair any damage to the paint or protective coatings as soon as possible.
How to help prevent corrosion
Wash your vehicle frequently The_ best way to preserve the finish on your vehicle and to help avoid corrosion is to keep it clean with frequent washing. Wash your vehicle at least once during the winter and once immediately after the winter. K<:ep your vehicle, particularly the underside, as clean and dry as possible. If you frequently drive on salted roads your vehicle should be washed at least once a month during the winter. If you live near the ocean, your vehicle should be washed at least once a month throughout the year.
For washing instructions, refer to "Vehicle cleaning" section.
Remove foreign material deposits Foreign materials such as salts chemicals road oil or tar, tree sap, bird droppings and industnal fall-out may damage the finish of your vehicle if it is left on painted surfaces. Remove these types of deposits as quickly as possible. If these deposits are difficult to wash off, an additional cleaner may be required. Check that any cleaner you use is not harmful to painted surfaces and is specifically intended for your purposes. Follow the manufacturer's directions when using these special cleaners.
Repair finish damage Carefully examine your vehicle for damage to the painted surfaces. Should you find any chip~ or scratches in the paint, touch them up 1mmed1ately to prevent corrosion from starting. If the chips or scratches have gone through to the bare metal have a qualified body shop make the rep~ir.
Keep passenger and luggage compartments clean Moisture, dirt or mud can accumulate under the floor mats and may cause corrosion. Occasionally, check under these mats to ensure that this area is clean and dry. More fr~quent checks are necessary if the vehicle Is used for off-road driving or in wet weather. Certain cargos such as chemicals, fertilizers, cleaners, salts, etc. are extremely corrosive by nature. These products should be transported in sealed containers. If they
Page 398 of 421

SPECIFICATION
Vehicle identification
Chassis serial number
78RB10001
9-1
for some vehicles)
00000
78RB10003
The chassis and/or engine serial numbers are used to register the vehicle. They are also used to assist a SUZUKI dealer when ordering or referring to special service information. Whenever you have occasion to consult a SUZUKI dealer, remember to identify your vehicle with this number. Should you find the number difficult to read, you will also find it on the identifica
tion plate.
Engine serial number
78RB10004
The engine serial number is stamped on the cylinder block as shown in the illustration.
Page 405 of 421
SPECIFICATION
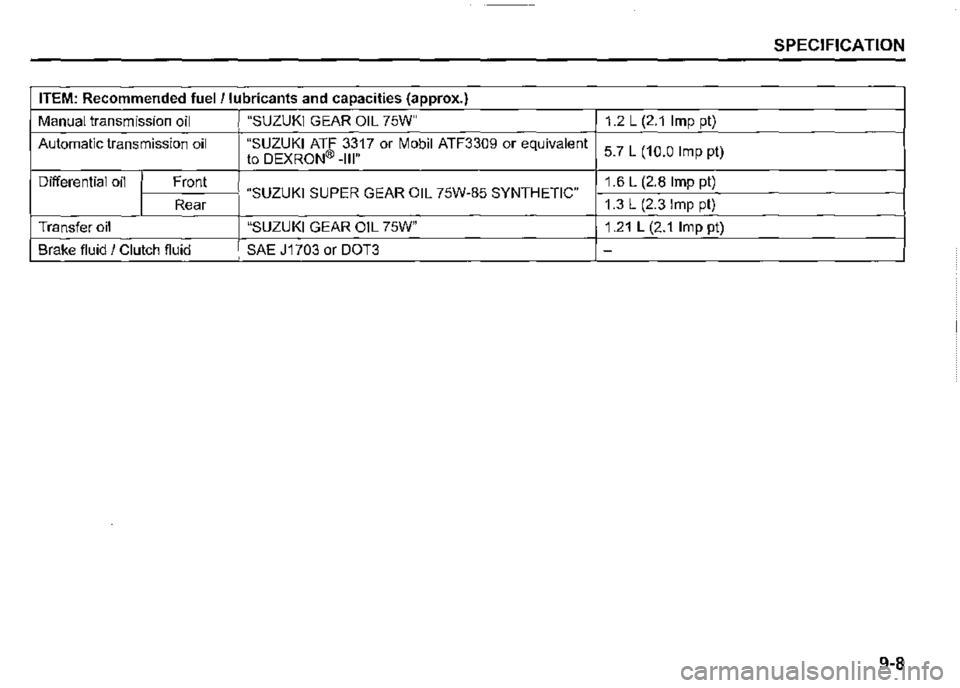
ITEM: Recommended fuel/ lubricants and capacities (approx.)
Manual transmission oil "SUZUKI GEAR OIL 75W" 1.2 L (2.1 Imp pt)
Automatic transmission oil "SUZUKI ATF 3317 or Mobil ATF3309 or equivalent to DEXRON® -111" 5.7 L (10.0 Imp pt)
Differential oil Front 1.6 L (2.8 Imp pt) "SUZUKI SUPER GEAR OIL 75W-85 SYNTHETIC" Rear 1.3 L (2.3 Imp pt)
Transfer oil "SUZUKI GEAR OIL 75W" 1.21 L (2.1 Imp pt)
Brake fluid / Clutch fiuid SAE J1703 or DOT3 -
9-8
Page 414 of 421
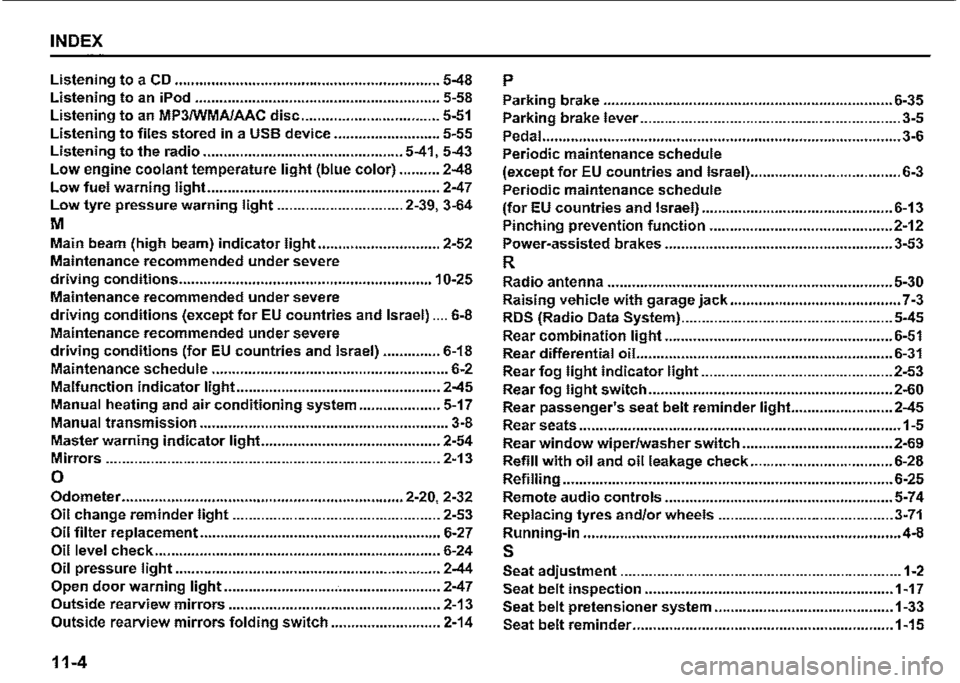
INDEX
Listening to a CD ................................................................. 5-48
Listening to an iPod ............................................................ 5-58
Listening to an MP3/WMA/AAC disc .................................. 5-51
Listening to files stored in a USB device .......................... 5-55
Listening to the radio ................................................. 5-41, 5-43
Low engine coolant temperature light (blue color) .......... 2-48
Low fuel warning light ......................................................... 2-47
Low tyre pressure warning light ............................... 2-39, 3-64
M
Main beam (high beam) indicator light .............................. 2-52
Maintenance recommended under severe
driving conditions .............................................................. 10-25
Maintenance recommended under severe
driving conditions (except for EU countries and Israel) .... 6-8
Maintenance recommended under severe
driving conditions (for EU countries and Israel) .............. 6-18
Maintenance schedule .......................................................... 6-2
Malfunction indicator light .................................................. 2-45
Manual heating and air conditioning system .................... 5-17
Manual transmission ............................................................. 3-8
Master warning indicator light ............................................ 2-54
Mirrors .................................................................................. 2-13
0
Odometer ..................................................................... 2-20, 2-32
Oil change reminder light ................................................... 2-53
Oil filter replacement ........................................................•.. 6-27
Oil level check ...................................................................... 6-24
Oil pressure light ...................................•.................•........... 2-44
Open door warning light ..................................................... 2-47
Outside rearview mirrors ..........................•......................... 2-13
Outside rearview mirrors folding switch ........................... 2-14
11-4
p
Parking brake ....................................................................... 6-35
Parking brake lever ................................................................ 3-5
Pedal ........•............................................................................... 3-6
Periodic maintenance schedule
(except for EU countries and lsrael) ..................................... 6-3
Periodic maintenance schedule
(for EU countries and Israel) ............................................... 6-13
Pinching prevention function ............................................. 2-12
Power-assisted brakes ........................................................ 3-53
R
Radio antenna ...................................................................... 5-30
Raising vehicle with garage jack .......................................... 7-3
RDS (Radio Data System) .................................................... 5-45
Rear combination light ........................................................ 6-51
Rear differential oil.. ............................................................. 6-31
Rear fog light indicator light ............................................... 2-53
Rear fog light switch ............................................................ 2-60
Rear passenger's seat belt reminder light... ...................... 2-45
Rear seats ............................................................................... 1-5
Rear window wiper/washer switch ..................................... 2-69
Refill with oil and oil leakage check ................................... 6-28
Refilling ................................................................................. 6-25
Remote audio controls ........................................................ 5-74
Replacing tyres and/or wheels ........................................... 3-71
Running-in .............................................................................• 4-8
s
Seat adjustment ..................................................................... 1-2
Seat belt inspection ............................................................. 1-17
Seat belt pretensioner system ............................................ 1-33
Seat belt reminder ................................................................ 1-15