mirror SUZUKI JIMNY 2021 Owners Manual
[x] Cancel search | Manufacturer: SUZUKI, Model Year: 2021, Model line: JIMNY, Model: SUZUKI JIMNY 2021Pages: 421, PDF Size: 6.35 MB
Page 12 of 421
ILLUSTRATED TABLE OF CONTENTS
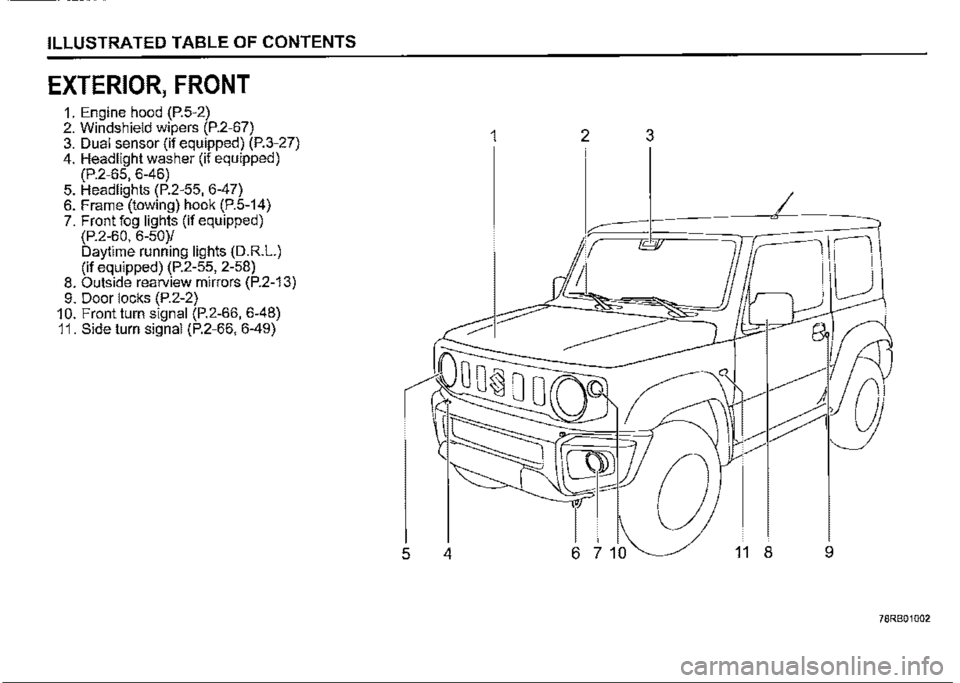
EXTERIOR, FRONT
1. Engine hood (P.5-2) 2. Windshield wipers (P.2-67) 3. Dual sensor (if equipped) (P.3-27) 4. Headlight washer (if equipped) (P.2-65, 6-46) 5. Headlights (P.2-55, 6-47) 6. Frame (towing) hook (P.5-14) 7. Front fog lights (if equipped) (P.2-60, 6-50)/ Daytime running lights (D.R.L.) (if equipped) (P.2-55, 2-58) 8. Outside rearview mirrors (P.2-13) 9. Door locks (P.2-2) 10. Front turn signal (P.2-66, 6-48) 11. Side turn signal (P.2-66, 6-49)
1 2 3
I
5 4 6 7 10 11 8 9
78RB01002
Page 15 of 421
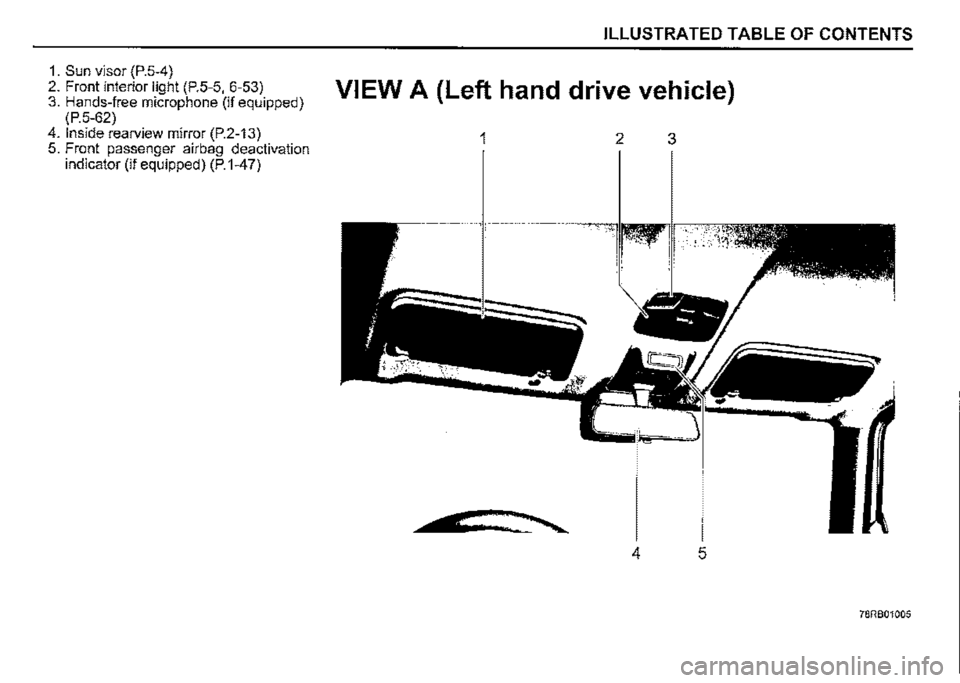
1. Sun visor (P.5-4) 2. Front interior light (P.5-5, 6-53) 3. Hands-free microphone (if equipped) (P.5-62) 4. Inside rearview mirror (P.2-13) 5. Front passenger airbag deactivation indicator (if equipped) (P.1-47)
ILLUSTRATED TABLE OF CONTENTS
VIEW A (Left hand drive vehicle)
1 2 3
4 5
78RB01005
Page 16 of 421
ILLUSTRATED TABLE OF CONTENTS
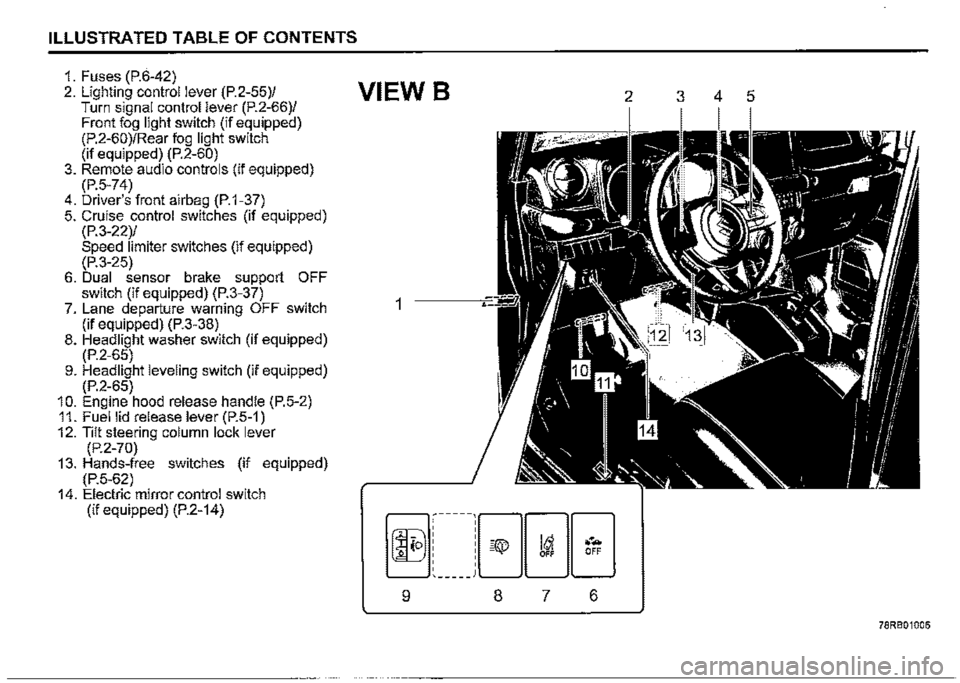
1. Fuses (P.6-42) 2. Lighting control lever (P.2-55)/ Turn signal control lever (P.2-66)/ Front fog light switch (if equipped) (P.2-60)/Rear fog light switch (if equipped) (P.2-60) 3. Remote audio controls (if equipped) (P.5-74) 4. Driver's front airbag (P.1-37) 5. Cruise control switches (if equipped) (P.3-22)/ Speed limiter switches (if equipped) (P.3-25) 6. Dual sensor brake support OFF switch (if equipped) (P.3-37) 7. Lane departure warning OFF switch (if equipped) (P.3-38) 8. Headlight washer switch (if equipped) (P.2-65) 9. Headlight leveling switch (if equipped) (P.2-65) 10. Engine hood release handle (P.5-2) 11. Fuel lid release lever (P.5-1) 12. Tilt steering column lock lever (P.2-70) 13. Hands-free switches (if equipped) (P.5-62) 14. Electric mirror control switch (if equipped) (P.2-14)
VIEW B 2 3 4 5
1
-----18·'"' 0til G ... : -\¥-' OFF OFF
' _____ )
9 8 7 6
78RB01006
Page 17 of 421
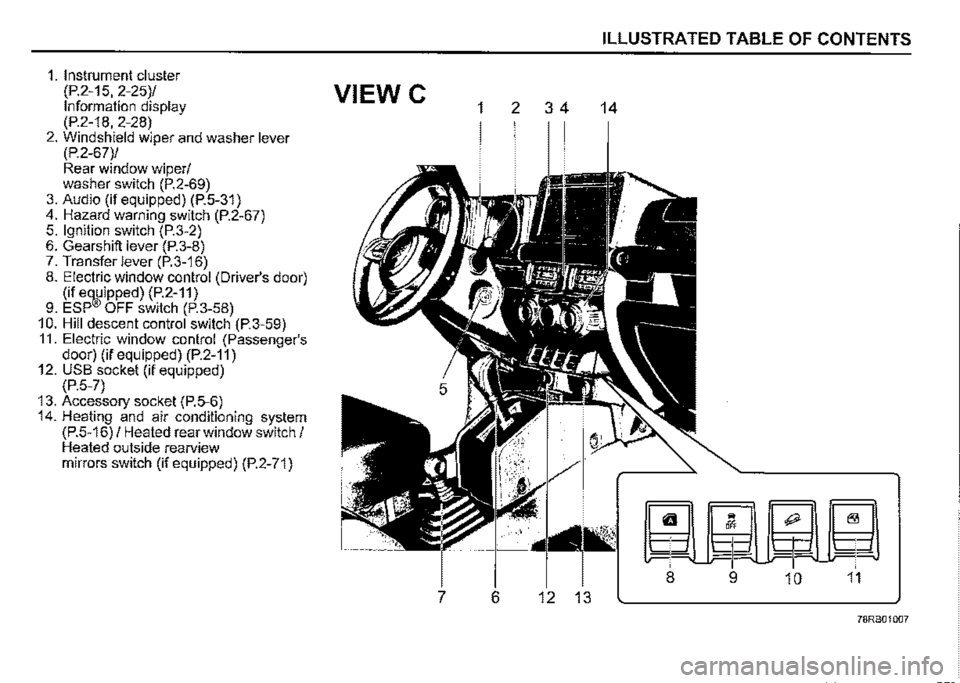
1. Instrument cluster
(P.2-15, 2-25)/ VIEW C Information display (P.2-18, 2-28) 2. Windshield wiper and washer lever (P.2-67)/ Rear window wiper/ washer switch (P.2-69) 3. Audio (if equipped) (P.5-31) 4. Hazard warning switch (P.2-67) 5. Ignition switch (P.3-2) 6. Gearshift lever (P.3-8) 7. Transfer lever (P.3-16) 8. Electric window control (Driver's door) (if e~ipped) (P.2-11) 9. ESP OFF switch (P.3-58) 10. Hill descent control switch (P.3-59) 11. Electric window control (Passenger's door) (if equipped) (P.2-11) 12. USB socket (if equipped) (P.5-7) 13. Accessory socket (P.5-6) 14. Heating and air conditioning system (P.5-16) / Heated rear window switch/ Heated outside rearview mirrors switch (if equipped) (P.2-71)
1 2 3 4
7 6 12 13
ILLUSTRATED TABLE OF CONTENTS
14
~m0~
-P-~ ¥ -1-
8 9 10 11
78RB01007
Page 71 of 421
BEFORE DRIVING
BEFORE DRIVING
Brightness control .............................................................. 2-17
Information display ............................................................. 2-18 -
Instrument cluster (Type B) (if equipped) ......................... 2-25
Speedometer ....................................................................... 2-26
Tachometer .......................................................................... 2-26
Fuel gauge ........................................................................... 2-26
Brightness control .............................................................. 2-26
Information switch
(if equipped) ......................................................................... 2-27
Information display ............................................................. 2-28
Warning and indicator lights .............................................. 2-39
Lighting control lever ......................................................... 2-55
Headlight leveling switch
(if equipped) ......................................................................... 2-65
Headlight washer switch
(if equipped) ........................................................................ 2-65
60G404 Turn signal control lever .................................................... 2-66
Keys ...................................................................................... 2-1 Hazard warning switch ....................................................... 2-67
Door locks ............................................................................ 2-2 Windshield wiper and washer lever .................................. 2-67
Keyless entry system transmitter (if equipped) ................ 2-6 Tilt steering lock lever ........................................................ 2-70
Theft deterrent alarm system (if equipped) ....................... 2-8 Horn ...................................................................................... 2-70
Theft deterrent light Heated rear window switch /
(if equipped) ........................................................................ 2-10 heated outside rearview mirror switch (if equipped) ...... 2-71
Windows ............................................................................... 2-1 o Vehicle loading .................................................................... 2-72
Mirrors .................................................................................. 2-13 Trailer towing ....................................................................... 2-72
Instrument cluster (Type A) (if equipped) ......................... 2-15
Speedometer ........................................................................ 2-16
Tachometer .......................................................................... 2-16
Fuel gauge ............................................................................ 2-16
Page 84 of 421
BEFORE DRIVING
Mirrors
Inside rearview mirror
68LMT0205
(( ?1
J(1)
(2) (3)
68LMT0206
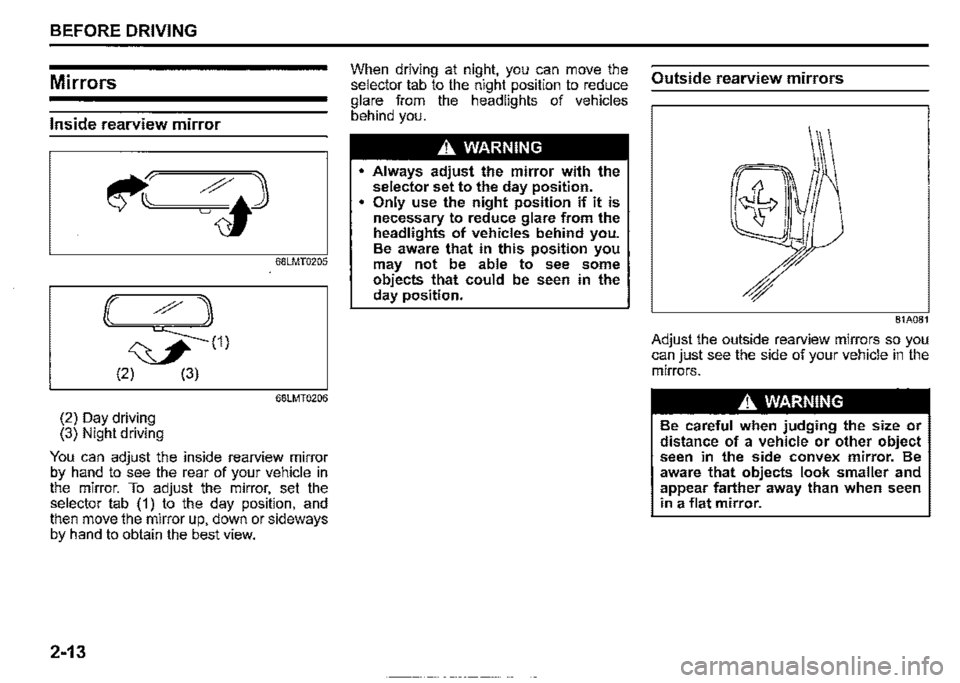
(2) Day driving (3) Night driving
You can adjust the inside rearview mirror by hand to see the rear of your vehicle in the mirror. To adjust the mirror, set the selector tab (1) to the day position, and then move the mirror up, down or sideways by hand to obtain the best view.
2-13
When driving at night, you can move the selector tab to the night position to reduce glare from the headlights of vehicles behind you.
A WARNING
• Always adjust the mirror with the selector set to the day position. • Only use the night position if it is necessary to reduce glare from the headlights of vehicles behind you. Be aware that in this position you may not be able to see some objects that could be seen in the day position.
Outside rearview mirrors
81A081
Adjust the outside rearview mirrors so you can just see the side of your vehicle in the mirrors.
A WARNING
Be careful when judging the size or distance of a vehicle or other object seen in the side convex mirror. Be aware that objects look smaller and appear farther away than when seen in a flat mirror.
Page 85 of 421
Electric mirrors (if equipped)
78RB02082
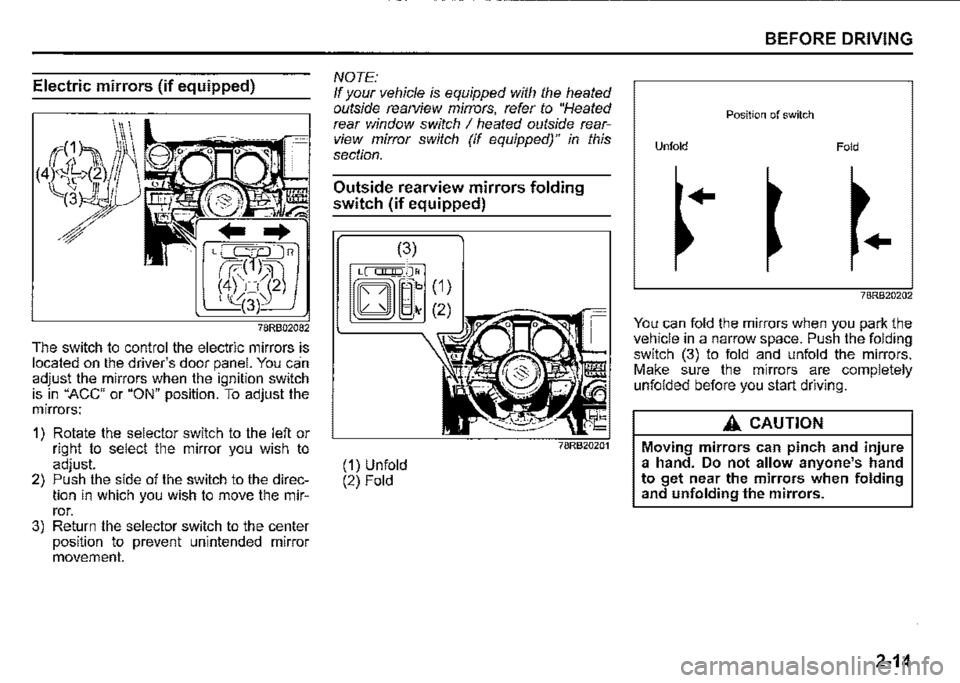
The switch to control the electric mirrors is located on the driver's door panel. You can adjust the mirrors when the ignition switch is in "ACC" or "ON" position. To adjust the mirrors:
1) Rotate the selector switch to the left or right to select the mirror you wish to adjust. 2) Push the side of the switch to the direction in which you wish to move the mirror. 3) Return the selector switch to the center position to prevent unintended mirror movement.
NOTE: If your vehicle is equipped with the heated outside rearview mirrors, refer to "Heated rear window switch I heated outside rearview mirror switch (if equipped)" in this section.
Outside rearview mirrors folding
switch (if equipped)
(1) Unfold (2) Fold
(1)
(2
BEFORE DRIVING
Position of switch
Unfold Fold
..
..
78RB20202
You can fold the mirrors when you park the vehicle in a narrow space. Push the folding switch (3) to fold and unfold the mirrors. Make sure the mirrors are completely unfolded before you start driving.
A_ CAUTION
Moving mirrors can pinch and injure a hand. Do not allow anyone's hand to get near the mirrors when folding and unfolding the mirrors.
2-14
Page 142 of 421

BEFORE DRIVING
Heated rear window switch/
heated outside rearview
mirror switch (if equipped)
Type 1
(1)
78RB02064
2-71
Type2
78RB02065
When the rear window is misted, push this switch (1) to clear the window.
If the outside rearview mirror has the mark (2), it is also equipped with the heated outside rearview mirrors. When you push the switch (1 ), both the heated outside rearview mirrors and the heated rear window will operate simultaneously.
An indicator light will come on when the defogger is on. The defogger will work only when the engine is running. To turn off the defogger, push the switch (1) again.
NOTICE
The heated rear window and the heated outside rearview mirrors (if equipped) use a large amount of electricity. Turn off the switch after the window and mirrors have become clear.
NOTE: The defogger will work only when the engine is running. The defogger will automatically turn off after the defogger remains on for 15 minutes to prevent discharging of the lead-acid battery.
Page 145 of 421
Tow bars
Only use a tow bar that is designed to attach to the chassis of your vehicle, and a hitch that is designed to bolt to this tow bar. We recommend that you use a genuine SUZUKI tow bar kit (available as an option), or equivalent.
A WARNING
Never use a tow bar which attaches to the axle or the bumper of your vehicle.
Safety chains
Always attach safety chains between your vehicle and the trailer. Cross safety chains under the nose of the trailer so that the nose will not drop to the road if the trailer becomes separated from the tow bar. Follow the manufacturer's recommendation for attaching safety chains. Always leave just enough slack to permit full turning. Never allow safety chains to drag on the road.
A WARNING
Never attach safety chains to the bumper of your vehicle. Secure connections so that they cannot come loose.
-----------------------
Trailer lights
Check that your trailer is equipped with lights which meet local requirements. Always check for the proper operation of all trailer lights before you start to tow.
A WARNING
Never connect trailer lights directly into your vehicle's electrical system, or electrical system damage may occur.
Brakes
A WARNING
If the trailer is equipped with the brakes, follow all instructions provided by the manufacturer. Never connect to the brake system of your vehicle and never take an electrical supply directly from the wiring har
ness.
BEFORE DRIVING
Tyres
A WARNING
When towing a trailer, it is very important for your vehicle and trailer to have properly inflated tyres. Your vehicle's tyres should be inflated to the pressures listed on your vehicle's tyre information label. The tyres should be inflated to the laden pressures. Inflate trailer tyres according to the specifications provided by the trailer manufacturer.
Mirrors
Check if your vehicle's mirrors meet local requirements for mirrors used on towing vehicles. If they do not, you must install the required mirrors before you tow.
2-74
Page 152 of 421
OPERATING YOUR VEHICLE
Daily inspection checklist
Before driving
60A187
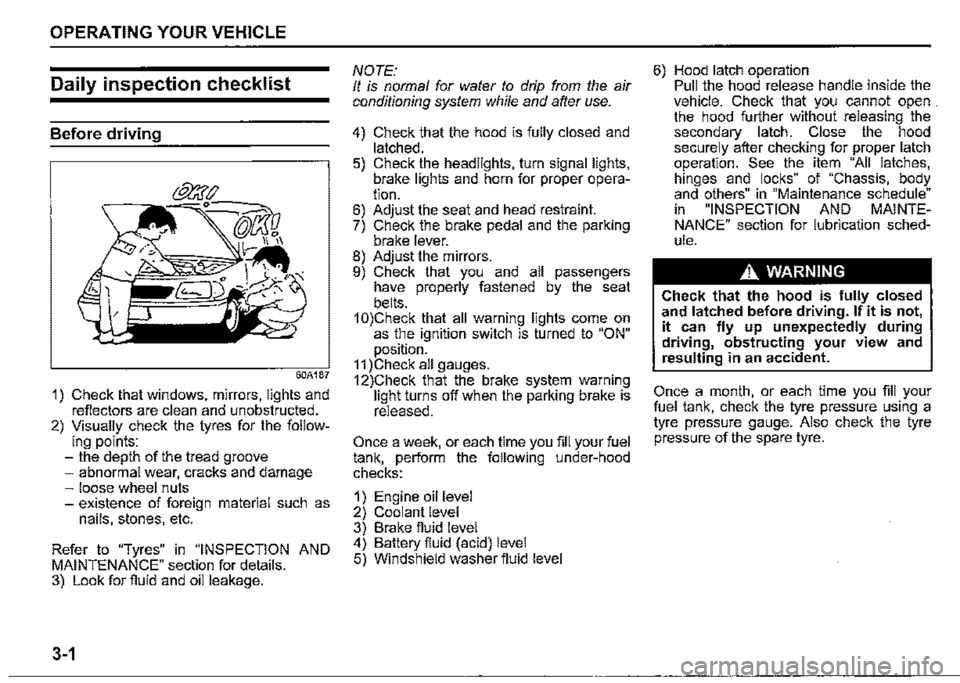
1) Check that windows, mirrors, lights and reflectors are clean and unobstructed. 2) Visually check the tyres for the follow-ing points: -the depth of the tread groove -abnormal wear, cracks and damage -loose wheel nuts -existence of foreign material such as nails, stones, etc.
Refer to "Tyres" in "INSPECTION AND MAINTENANCE" section for details. 3) Look for fluid and oil leakage.
3-1
NOTE: It is normal for water to drip from the air conditioning system while and after use.
4) Check that the hood is fully closed and latched. 5) Check the headlights, turn signal lights, brake lights and horn for proper operation. 6) Adjust the seat and head restraint. 7) Check the brake pedal and the parking brake lever. 8) Adjust the mirrors. 9) Check that you and all passengers have properly fastened by the seat belts. 1 0)Check that all warning lights come on as the ignition switch is turned to "ON" position. 11 )Check all gauges. 12)Check that the brake system warning light turns off when the parking brake is released.
Once a week, or each time you fill your fuel tank, perform the following under-hood checks:
1) Engine oil level 2) Coolant level 3) Brake fluid level 4) Battery fluid (acid) level 5) Windshield washer fluid level
6) Hood latch operation Pull the hood release handle inside the vehicle. Check that you cannot open . the hood further without releasing the secondary latch. Close the hood securely after checking for proper latch operation. See the item "All latches, hinges and locks" of "Chassis, body and others" in "Maintenance schedule" in "INSPECTION AND MAINTENANCE" section for lubrication schedule.
A WARNING
Check that the hood is fully closed and latched before driving. If it is not, it can fly up unexpectedly during driving, obstructing your view and resulting in an accident.
Once a month, or each time you fill your fuel tank, check the tyre pressure using a tyre pressure gauge. Also check the tyre pressure of the spare tyre.