key SUZUKI JIMNY 2022 Owner's Guide
[x] Cancel search | Manufacturer: SUZUKI, Model Year: 2022, Model line: JIMNY, Model: SUZUKI JIMNY 2022Pages: 421, PDF Size: 6.35 MB
Page 298 of 421
OTHER CONTROLS AND EQUIPMENT
Phone registration
To use the hands-free function with this unit, it is required to register the phone in advance.
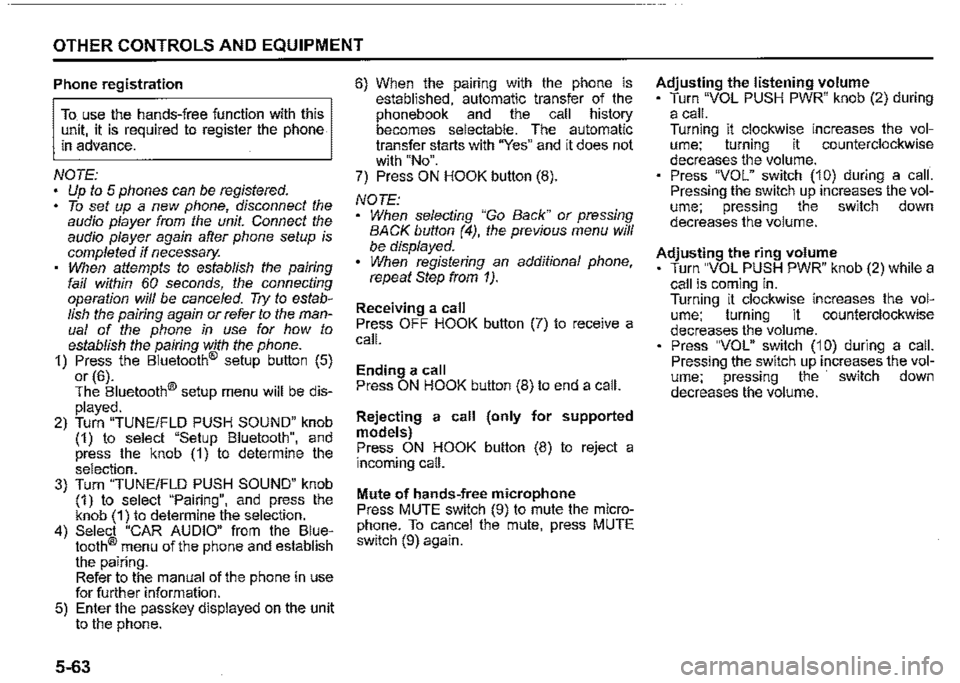
NOTE: Up to 5 phones can be registered. To set up a new phone, disconnect the audio player from the unit. Connect the audio player again after phone setup is completed if necessary. When attempts to establish the pairing fail within 60 seconds, the connecting operation will be cance/ed. Try to establish the pairing again or refer to the manual of the phone in use for how to establish the pairing with the phone. 1) Press the Bluetooth® setup button (5)
or (6). The Bluetooth® setup menu will be dis
played. 2) Turn "TUNE/FLO PUSH SOUND" knob (1) to select "Setup Bluetooth", and press the knob (1) to determine the selection. 3) Turn "TUNE/FLO PUSH SOUND" knob (1) to select "Pairing", and press the knob (1) to determine the selection. 4) Select "CAR AUDIO" from the Bluetooth® menu of the phone and establish the pairing. Refer to the manual of the phone in use for further information. 5) Enter the passkey displayed on the unit to the phone.
5-63
6) When the pamng with the phone is established, automatic transfer of the phonebook and the call history becomes selectable. The automatic transfer starts with "Yes" and it does not with "No". 7) Press ON HOOK button (8).
NOTE: When selecting "Go Back" or pressing BACK button (4), the previous menu will be displayed. When registering an additional phone, repeat Step from 1).
Receiving a call Press OFF HOOK button (7) to receive a call.
Ending a call Press ON HOOK button (8) to end a call.
Rejecting a call (only for supported models) Press ON HOOK button (8) to reject a incoming call.
Mute of hands-free microphone Press MUTE switch (9) to mute the microphone. To cancel the mute, press MUTE switch (9) again.
Adjusting the listening volume Turn "VOL PUSH PWR" knob (2) during a call. Turning it clockwise increases the volume; turning it counterclockwise decreases the volume. Press "VOL" switch (10) during a call. Pressing the switch up increases the volume; pressing the switch down decreases the volume.
Adjusting the ring volume Turn "VOL PUSH PWR" knob (2) while a call is coming in. Turning it clockwise increases the volume; turning it counterclockwise decreases the volume. Press "VOL" switch (10) during a call. Pressing the switch up increases the volume; pressing the switch down decreases the volume.
Page 304 of 421
OTHER CONTROLS AND EQUIPMENT
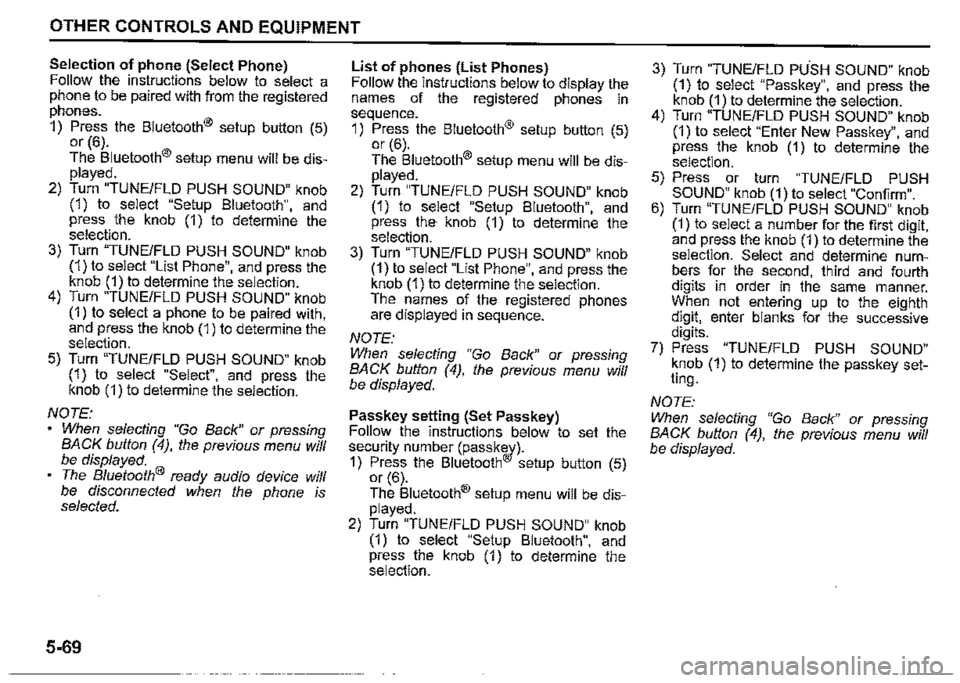
Selection of phone (Select Phone) Follow the instructions below to select a phone to be paired with from the registered phones.
1) Press the Bluetooth® setup button (5) or (6).
The Bluetooth® setup menu will be displayed.
2) Turn "TUNE/FLO PUSH SOUND" knob (1) to select "Setup Bluetooth", and press the knob (1) to determine the selection. 3) Turn "TUNE/FLD PUSH SOUND" knob (1) to select "List Phone", and press the knob (1) to determine the selection. 4) Turn "TUNE/FLD PUSH SOUND" knob (1) to select a phone to be paired with, and press the knob (1) to determine the selection.
5) Turn "TUNE/FLO PUSH SOUND" knob (1) to select "Select", and press the knob (1) to determine the selection.
NOTE: When selecting "Go Back" or pressing BACK button (4), the previous menu will be displayed. The Bluetooth® ready audio device will be disconnected when the phone is selected.
5-69
List of phones (List Phones) Follow the instructions below to display the names of the registered phones in sequence.
1) Press the Bluetooth® setup button (5) or (6). The Bluetooth® setup menu will be displayed. 2) Turn "TUNE/FLD PUSH SOUND" knob (1) to select "Setup Bluetooth", and press the· knob (1) to determine the selection. 3) Turn "TUNE/FLD PUSH SOUND" knob (1) to select "List Phone", and press the knob (1) to determine the selection. The names of the registered phones are displayed in sequence.
NOTE: When selecting "Go Back" or pressing BACK button (4), the previous menu will be displayed.
Passkey setting (Set Passkey) Follow the instructions below to set the security number (passkw)-1) Press the Bluetooth setup button (5) or (6).
The Bluetooth® setup menu will be displayed.
2) Turn "TUNE/FLD PUSH SOUND" knob (1) to select "Setup Bluetooth", and press the knob (1) to determine the selection.
3) Turn "TUNE/FLD PUSH SOUND" knob (1) to select "Passkey", and press the knob (1) to determine the selection. 4) Turn "TUNE/FLD PUSH SOUND" knob (1) to select "Enter New Passkey", and press the knob (1) to determine the selection.
5) Press or turn "TUNE/FLD PUSH SOUND" knob (1) to select "Confirm". 6) Turn "TUNE/FLO PUSH SOUND" knob (1) to select a number for the first digit, and press the knob (1) to determine the selection. Select and determine numbers for the second, third and fourth digits in order in the same manner. When not entering up to the eighth digit, enter blanks for the successive digits. 7) Press "TUNE/FLD PUSH SOUND" knob (1) to determine the passkey setting.
NOTE:
When selecting "Go Back" or pressing BACK button (4), the previous menu will be displayed.
Page 307 of 421
Registration of audio devices
To use Bluetooth® ready audio devices with this unit, it is required to register the devices.
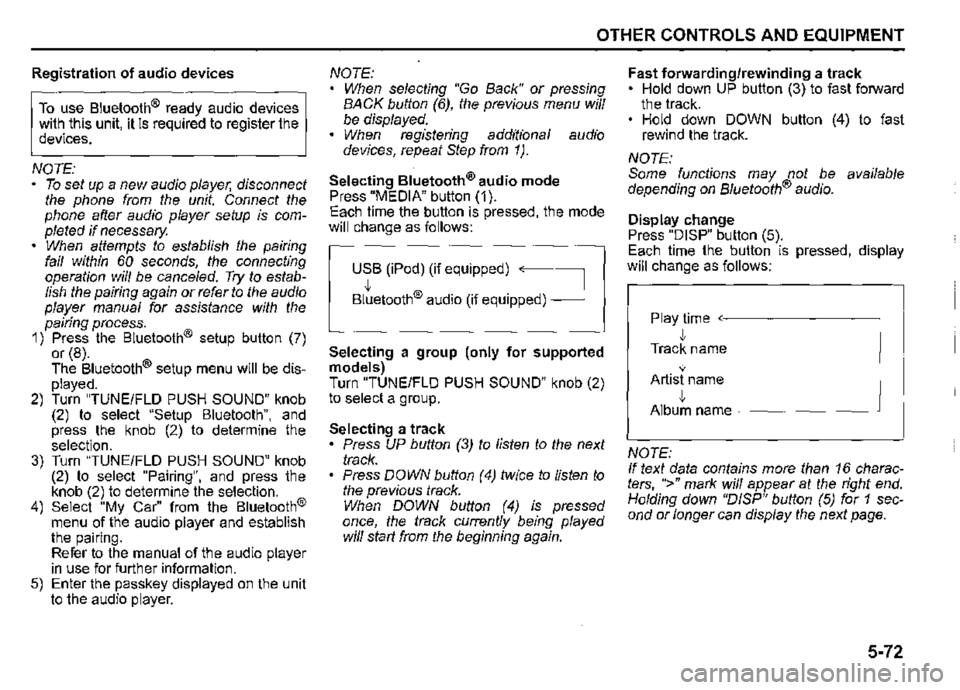
NOTE: • To set up a new audio player, disconnect the phone from the unit. Connect the phone after audio player setup is completed if necessary. When. attempts to establish the pairing fail within 60 seconds, the connecting operation will be cance/ed. Try to establish the pairing again or refer to the audio player manual for assistance with the pairing process. 1) Press the Bluetooth® setup button (7) or (8). The Bluetooth® setup menu will be displayed. 2) Turn "TUNE/FLO PUSH SOUND" knob (2) to select "Setup Bluetooth", and press the knob (2) to determine the selection. 3) Turn "TUNE/FLO PUSH SOUND" knob (2) to select "Pairing", and press the knob (2) to determine the selection. 4) Select "My Car" from the Bluetooth® menu of the audio player and establish the pairing. Refer to the manual of the audio player in use for further information. 5) Enter the passkey displayed on the unit to the audio player.
OTHER CONTROLS AND EQUIPMENT
NOTE: When selecting "Go Back" or pressing BACK button (6), the previous menu will be displayed. When registering additional audio devices, repeat Step from 1 ).
Selecting Bluetooth® audio mode Press "MEDIA" button (1). Each time the button is pressed, the mode will change as follows:
USB (iPod) (if equipped) ~
Bltetooth® audio (if equipped) __J
Selecting a group (only for supported models) Turn "TUNE/FLO PUSH SOUND" knob (2) to select a group.
Selecting a track • Press UP button (3) to listen to the next track. Press DOWN button (4) twice to listen to the previous track. When DOWN button (4) is pressed once, the track currently being played will start from the beginning again.
Fast forwarding/rewinding a track • Hold down UP button (3) to fast forward the track. • Hold down DOWN button (4) to fast rewind the track.
NOTE: Some functions may not be available depending on B/uetooth® audio.
Display change Press "DISP" button (5). Each time the button is pressed, display will change as follows:
Play time ~-------~
• Track name
• Artist name
• Album name _______ __J
NOTE: If text data contains more than 16 characters, ">" mark will appear at the right end. Holding down "D/SP" button (5) for 1 second or longer can display the next page.
5-72
Page 308 of 421
OTHER CONTROLS AND EQUIPMENT
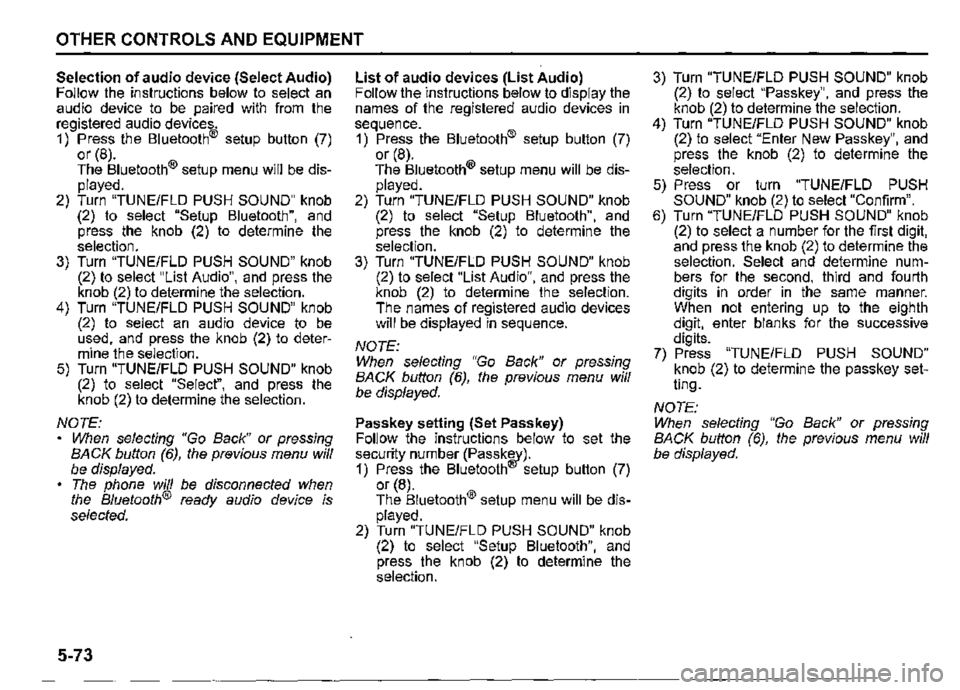
Selection of audio device (Select Audio) Follow the instructions below to select an audio device to be paired with from the registered audio devices. 1) Press the Bluetooth® setup button (7) or (8). The Bluetooth® setup menu will be displayed. 2) Turn "TUNE/FLO PUSH SOUND" knob (2) to select "Setup Bluetooth", and press the knob (2) to determine the selection. 3) Turn "TUNE/FLO PUSH SOUND" knob (2) to select "List Audio", and press the knob (2) to determine the selection. 4) Turn "TUNE/FLO PUSH SOUND" knob (2) to select an audio device to be used, and press the knob (2) to determine the selection. 5) Turn "TUNE/FLO PUSH SOUND" knob (2) to select "Select", and press the knob (2) to determine the selection.
NOTE: When selecting "Go Back" or pressing BACK button (6), the previous menu will be displayed. The phone will be disconnected when the Bluetooth® ready audio device is selected.
5-73
List of audio devices (List Audio) Follow the instructions below to display the names of the registered audio devices in sequence. 1) Press the Bluetooth® setup button (7) or (8). The Bluetooth® setup menu will be displayed. 2) Turn "TUNE/FLO PUSH SOUND" knob (2) to select "Setup Bluetooth", and press the knob (2) to determine the selection. 3) Turn "TUNE/FLO PUSH SOUND" knob (2) to select "List Audio", and press the knob (2) to determine the selection. The names of registered audio devices will be displayed in sequence.
NOTE: When selecting "Go Back" or pressing BACK button (6), the previous menu will be displayed.
Passkey setting (Set Passkey) Follow the instructions below to set the security number (Passkw)-1) Press the Bluetooth setup button (7) or (8). The Bluetooth® setup menu will be displayed. 2) Turn "TUNE/FLO PUSH SOUND" knob (2) to select "Setup Bluetooth", and press the knob (2) to determine the selection.
3) Turn "TUNE/FLO PUSH SOUND" knob (2) to select "Passkey", and press the knob (2) to determine the selection. 4) Turn "TUNE/FLO PUSH SOUND" knob (2) to select "Enter New Passkey", and press the knob (2) to determine the selection. 5) Press or turn "TUNE/FLO PUSH SOUND" knob (2) to select "Confirm". 6) Turn "TUNE/FLO PUSH SOUND" knob (2) to select a number for the first digit, and press the knob (2) to determine the selection. Select and determine numbers for the second, third and fourth digits in order in the same manner. When not entering up to the eighth digit, enter blanks for the successive digits. 7) Press "TUNE/FLO PUSH SOUND" knob (2) to determine the passkey setting.
NOTE: When selecting "Go Back" or pressing BACK button (6), the previous menu will be displayed.
Page 362 of 421
INSPECTION AND MAINTENANCE
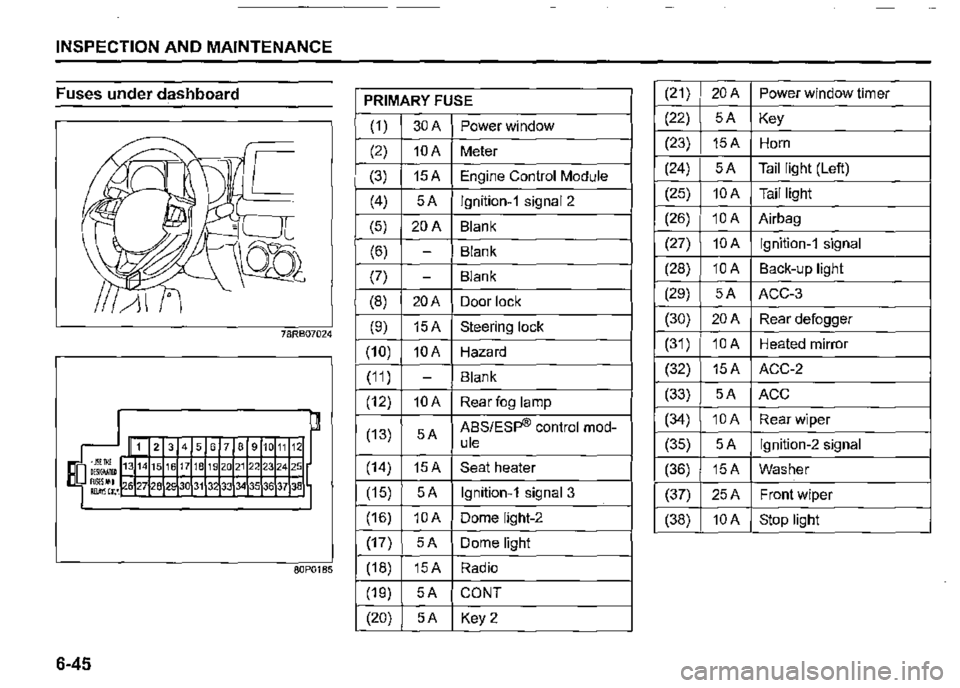
Fuses under dashboard
6-45
78RB07024
1 2 3 4 5 6 7 8 9 10 11 12
71819202122232425
80P0185
PRIMARY FUSE
(1) 30A Power window
(2) 10A Meter
(3) 15A Engine Control Module
(4) 5A lgnition-1 signal 2
(5) 20A Blank
(6) -Blank
(7) -Blank
(8) 20A Door lock
(9) 15A Steering lock
(10) 10A Hazard
(11) -Blank
(12) 10A Rear fog lamp
(13) 5A ABS/Esp® control mod-ule
(14) 15A Seat heater
(15) 5A lgnition-1 signal 3
(16) 10A Dome light-2
(17) 5A Dome light
(18) 15A Radio
(19) 5A CONT
(20) 5A Key2
(21) 20A Power window timer
(22) 5A Key
(23) 15A Horn
(24) 5A Tail light (Left)
(25) 10A Tail light
(26) 10A Airbag
(27) 10A lgnition-1 signal
(28) 10A Back-up light
(29) 5A ACC-3
(30) 20A Rear defogger
(31) 10A Heated mirror
(32) 15A ACC-2
(33) 5A ACC
(34) 10A Rear wiper
(35) 5A lgnition-2 signal
(36) 15A Washer
(37) 25A Front wiper
(38) 10A Stop light
Page 386 of 421

EMERGENCY SERVICE
Rear wheels lifted (all models)
"ON"__.. "ACC"
UNLOCKED
78RB08006
7-9
Rear wheels lifted Your vehicle may be towed by a tow truck with the rear wheels lifted and the front wheels on the ground. Towing speed should not exceed 90 km/h (55 mph).
For this type of towing: 1) Shift the manual transmission to Neutral or the automatic transmission to "P" position and start the. engine. 2) Shift the transfer lever to 2WD position ("2H"). 3) Make sure the 4WD indicator on the instrument cluster is turned off.
NOTICE
If the air-locking hubs cannot be unlocked, tow the vehicle with the rear wheels lifted and a dolly under the front wheels.
4) Turn the ignition key to the "ACC" position to stop the engine and to unlock the steering wheel.
NOTICE
The steering column lock is not strong enough to withstand shocks transmitted from the front wheels during towing.
5) Make sure the front wheels are facing straight forward and secure the steering wheel with a steering wheel clamping device designed for towing service.
Page 413 of 421
INDEX
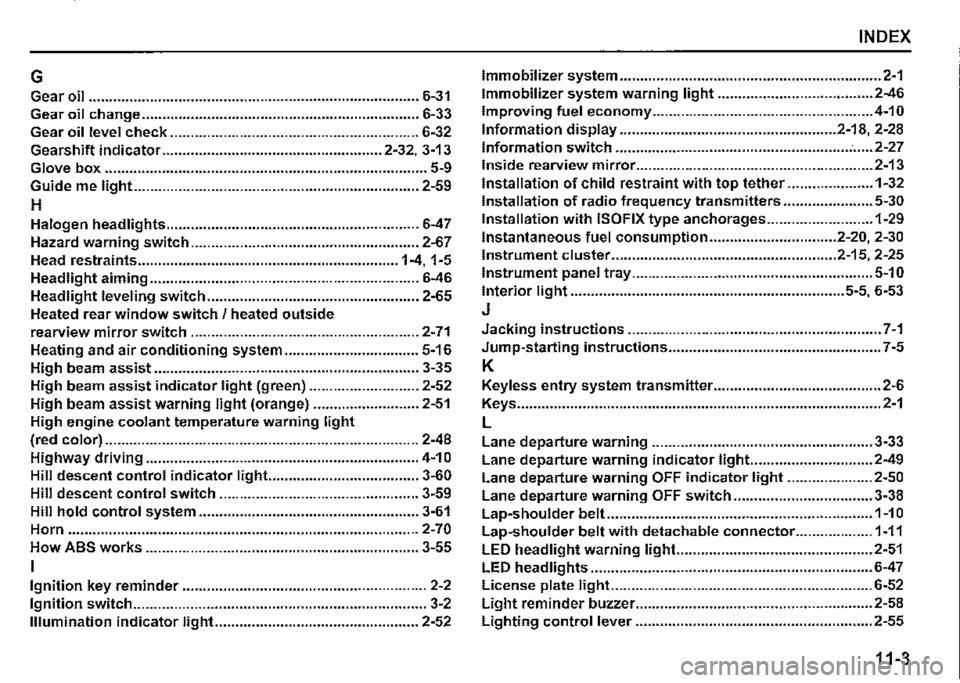
G Immobilizer system ................................................................ 2-1
Gear oil ................................................................................. 6-31 Immobilizer system warning light ...................................... 2-46
Gear oil change .................................................................... 6-33 Improving fuel economy ...................................................... 4-10
Gear oil level check ............................................................. 6-32 Information display ..................................................... 2-18, 2-28
Gearshift indicator ...................................................... 2-32, 3-13 Information switch ......................................................... : ..... 2-27
Glove box ............................................................................... 5-9 Inside rearview mirror .......................................................... 2-13
Guide me light ...................................................................... 2-59 Installation of child restraint with top tether ..................... 1-32
H Installation of radio frequency transmitters ...................... 5-30
Halogen headlights .............................................................. 6-47
Hazard warning switch ........................................................ 2-67
Head restraints ................................................................ 1-4, 1-5
Headlight aiming .................................................................. 6-46
Headlight leveling switch .................................................... 2-65
Heated rear window switch / heated outside
Installation with ISOFIX type anchorages .......................... 1-29
Instantaneous fuel consumption ............................... 2-20, 2-30
Instrument cluster ....................................................... 2-15, 2-25
Instrument panel tray ........................................................... 5-10
Interior light ................................................................... 5-5, 6-53
J
rearview mirror switch ........................................................ 2-71 Jacking instructions .............................................................. 7-1
Heating and air conditioning system ................................. 5-16 Jump-starting instructions .................................................... 7-5
High beam assist ................................................................. 3-35 K
High beam assist indicator light (green) ........................... 2-52 Keyless entry system transmitter ......................................... 2-6
High beam assist warning light (orange) .......................... 2-51 Keys ......................................................................................... 2-1
High engine coolant temperature warning light L
(red color) ............................................................................. 2-48 Lane departure warning ...................................................... 3-33 Highway driving ................................................................... 4-1 O Lane departure warning indicator light.. ............................ 2-49
Hill descent control indicator light... .................................. 3-60 Lane departure warning OFF indicator light ..................... 2-50 Hill descent control switch ................................................. 3-59 Lane departure warning OFF switch .................................. 3-38 Hill hold control system ...................................................... 3-61 Lap-shoulder belt ................................................................. 1-1 O Horn ...................................................................................... 2-70 Lap-shoulder belt with detachable connector ................... 1-11 How ABS works ................................................................... 3-55 LED headlight warning light.. .............................................. 2-51
I LED headlights ..................................................................... 6-47
Ignition key reminder ............................................................ 2-2 License plate light ................................................................ 6-52
Ignition switch ........................................................................ 3-2 Light reminder buzzer .......................................................... 2-58
Illumination indicator light.. ................................................ 2-52 Lighting control lever .......................................................... 2-55
11-3