license plate light SUZUKI KIZASHI 2010 1.G Owners Manual
[x] Cancel search | Manufacturer: SUZUKI, Model Year: 2010, Model line: KIZASHI, Model: SUZUKI KIZASHI 2010 1.GPages: 388, PDF Size: 4.94 MB
Page 10 of 388

ILLUSTRATED TABLE OF CONTENTS
57L20-03E
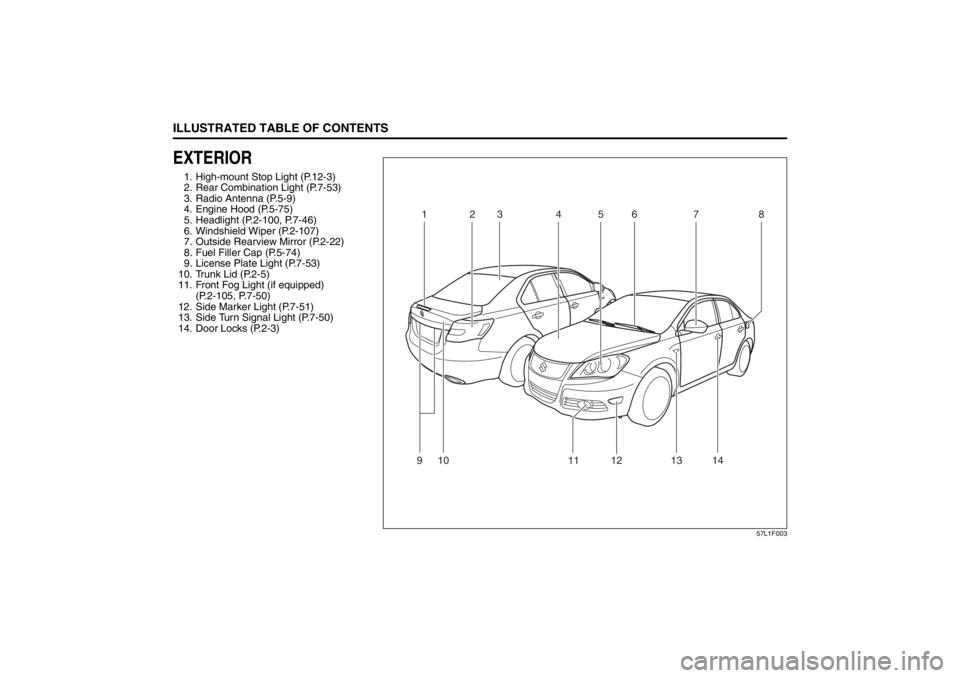
EXTERIOR1. High-mount Stop Light (P.12-3)
2. Rear Combination Light (P.7-53)
3. Radio Antenna (P.5-9)
4. Engine Hood (P.5-75)
5. Headlight (P.2-100, P.7-46)
6. Windshield Wiper (P.2-107)
7. Outside Rearview Mirror (P.2-22)
8. Fuel Filler Cap (P.5-74)
9. License Plate Light (P.7-53)
10. Trunk Lid (P.2-5)
11. Front Fog Light (if equipped)
(P.2-105, P.7-50)
12. Side Marker Light (P.7-51)
13. Side Turn Signal Light (P.7-50)
14. Door Locks (P.2-3)
57L1F003
1
5
7
2
3
4
6
8
10
9 11
14
13
12
Page 119 of 388

2-100
BEFORE DRIVING
57L20-03E
Lighting Control Lever
57L21128
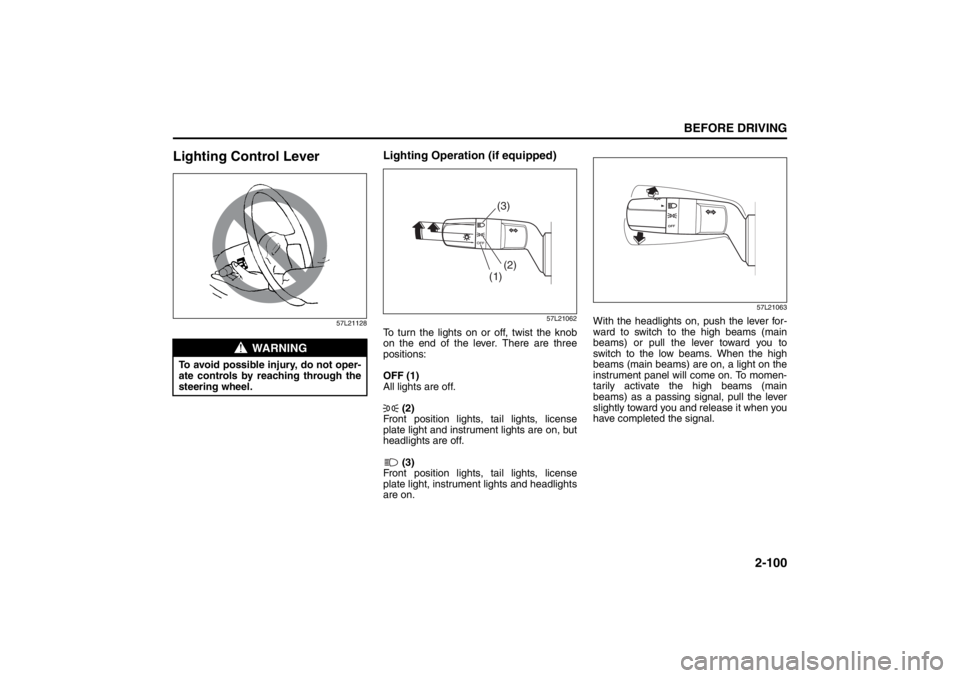
Lighting Operation (if equipped)
57L21062
To turn the lights on or off, twist the knob
on the end of the lever. There are three
positions:
OFF (1)
All lights are off.
(2)
Front position lights, tail lights, license
plate light and instrument lights are on, but
headlights are off.
(3)
Front position lights, tail lights, license
plate light, instrument lights and headlights
are on.
57L21063
With the headlights on, push the lever for-
ward to switch to the high beams (main
beams) or pull the lever toward you to
switch to the low beams. When the high
beams (main beams) are on, a light on the
instrument panel will come on. To momen-
tarily activate the high beams (main
beams) as a passing signal, pull the lever
slightly toward you and release it when you
have completed the signal.
WARNING
To avoid possible injury, do not oper-
ate controls by reaching through the
steering wheel.
(1)(2)(3)
Page 121 of 388

2-102
BEFORE DRIVING
57L20-03E
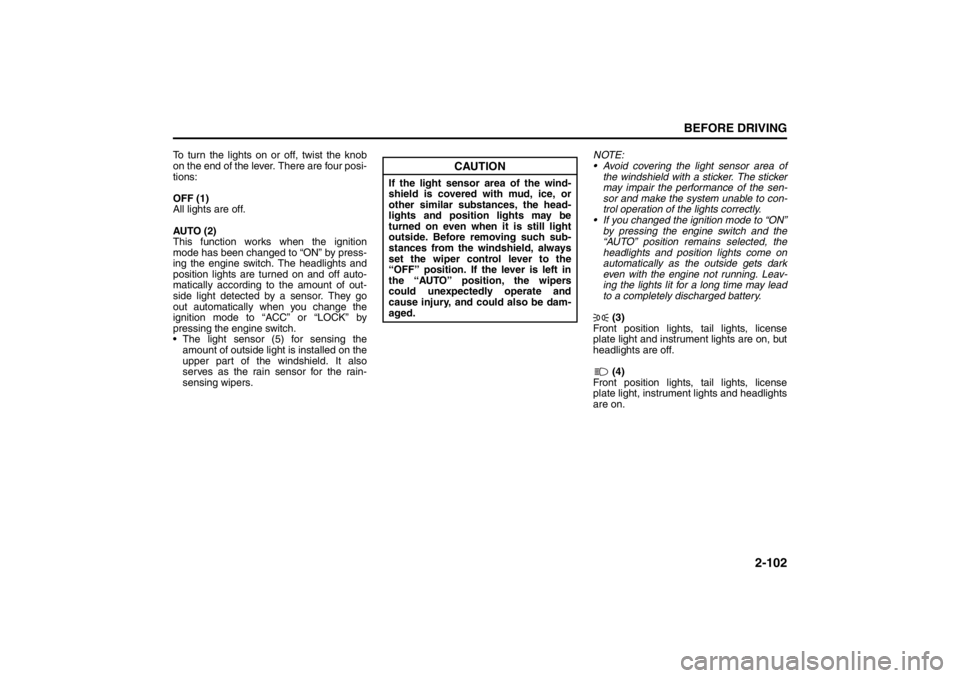
To turn the lights on or off, twist the knob
on the end of the lever. There are four posi-
tions:
OFF (1)
All lights are off.
AUTO (2)
This function works when the ignition
mode has been changed to “ON” by press-
ing the engine switch. The headlights and
position lights are turned on and off auto-
matically according to the amount of out-
side light detected by a sensor. They go
out automatically when you change the
ignition mode to “ACC” or “LOCK” by
pressing the engine switch.
The light sensor (5) for sensing the
amount of outside light is installed on the
upper part of the windshield. It also
serves as the rain sensor for the rain-
sensing wipers.NOTE:
Avoid covering the light sensor area of
the windshield with a sticker. The sticker
may impair the performance of the sen-
sor and make the system unable to con-
trol operation of the lights correctly.
If you changed the ignition mode to “ON”
by pressing the engine switch and the
“AUTO” position remains selected, the
headlights and position lights come on
automatically as the outside gets dark
even with the engine not running. Leav-
ing the lights lit for a long time may lead
to a completely discharged battery.
(3)
Front position lights, tail lights, license
plate light and instrument lights are on, but
headlights are off.
(4)
Front position lights, tail lights, license
plate light, instrument lights and headlights
are on.
CAUTION
If the light sensor area of the wind-
shield is covered with mud, ice, or
other similar substances, the head-
lights and position lights may be
turned on even when it is still light
outside. Before removing such sub-
stances from the windshield, always
set the wiper control lever to the
“OFF” position. If the lever is left in
the “AUTO” position, the wipers
could unexpectedly operate and
cause injury, and could also be dam-
aged.
Page 156 of 388

3-25OPERATING YOUR VEHICLE
57L20-03E
NOTE:
Thin poles or obstacles lower than the
sensors may become undetectable as
the vehicle moves closer to them even if
they have been detected from longer dis-
tances. The system may calculate the distance
to a road sign or similar obstacle to be
shorter than the actual distance.
Certification (Canada only)
This ISM device complies with Canadian
ICES*-001
* Interference-Causing Equipment Stan-
dards
CAUTION
Under the following conditions, the
parking sensor system may not
work normally because the sensors
cannot detect obstacles correctly.
– Sensors are covered with mud,
ice or other materials. (Such
materials must be removed for
normal operation.)
– Sensors are wet from water
splashes or heavy rain.
– Sensors are covered by a hand,
sticker, accessory, etc.
– There is an accessory or other
object attached within the sen-
sor’s sensing area.
– Items such as tow hooks, a back-
lit license plate, commercially
available corner poles, radio
antenna, etc. are installed on the
bumper.
– The height of the bumper is
changed due to alteration to the
suspension or other causes.
– The sensor areas are extremely
hot from direct sunlight or cold
due to freezing weather.
– The vehicle is on a rough sur-
face, slope, gravel road or grass
field.
– The vehicle is at a steep angle.
(Continued)
CAUTION
(Continued)
– Sensors have intercepted ultra-
sonic noise from another vehi-
cle’s horn, engine, air braking
system (large vehicles), or park-
ing sensor.
– Obstacles are too close to the
sensors.
– Sensors are at an angle to a
highly reflective object such as
glass. (Ultrasonic waves are not
reflected back from the obstacle.)
Sensors may not be able to cor-
rectly detect the following types of
obstacles:
– Objects made of a thin material
like wire netting and ropes
– Square-shaped curbstones or
other objects with sharp edges
– Tall objects with a large upper
part like a road sign
– Low-profile objects such as curb-
stones
– Sound-absorbing objects such
as cotton and snow
Page 338 of 388

7-53INSPECTION AND MAINTENANCE
57L20-03E
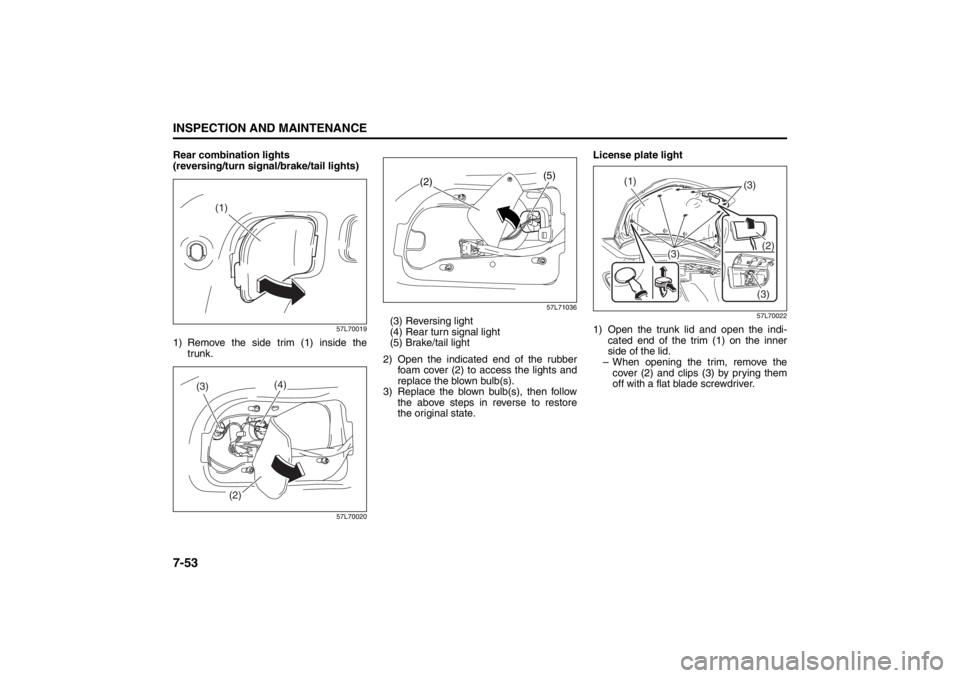
Rear combination lights
(reversing/turn signal/brake/tail lights)
57L70019
1) Remove the side trim (1) inside the
trunk.
57L7002057L71036
(3) Reversing light
(4) Rear turn signal light
(5) Brake/tail light
2) Open the indicated end of the rubber
foam cover (2) to access the lights and
replace the blown bulb(s).
3) Replace the blown bulb(s), then follow
the above steps in reverse to restore
the original state.License plate light
57L70022
1) Open the trunk lid and open the indi-
cated end of the trim (1) on the inner
side of the lid.
– When opening the trim, remove the
cover (2) and clips (3) by prying them
off with a flat blade screwdriver.
(1)
(4)
(3)
(2)
(5)
(2)
(1)
(3)
(3)(2)
(3)
Page 379 of 388

12-3
SPECIFICATIONS
57L20-03E
ITEM: Light WATTAGE BULB No.
Headlight 12V 55W H7
Front fog light 12V 55W H11
Front turn signal light 12V 27W 2357A
Rear turn signal light 12V 21W PY21W
Parking light 12V 5W W5W
Brake/tail light 12V 21/5W P21/5W
License plate light 12V 5W C5W
Reversing light 12V 21W P21W
Front dome light 12V 8W –
Rear dome light 12V 10W –
Glove box light 12V 1.4W –
Footwell lights LED –
Trunk room light 12V 5W W5W
Spot light 12V 8W –
High mount stop light LED –
Front side marker light 12V 5W 168
Curtsey light 12V 5W –
Vanity mirror light 12V 2W –
Specifications: 1, 2, 5, 6, 7, 10, 11