fuel pump SUZUKI MARUTI 2005 1.G Owners Manual
[x] Cancel search | Manufacturer: SUZUKI, Model Year: 2005, Model line: MARUTI, Model: SUZUKI MARUTI 2005 1.GPages: 136, PDF Size: 2.93 MB
Page 10 of 136
Downloaded from www.Manualslib.com manuals search engine 1083K
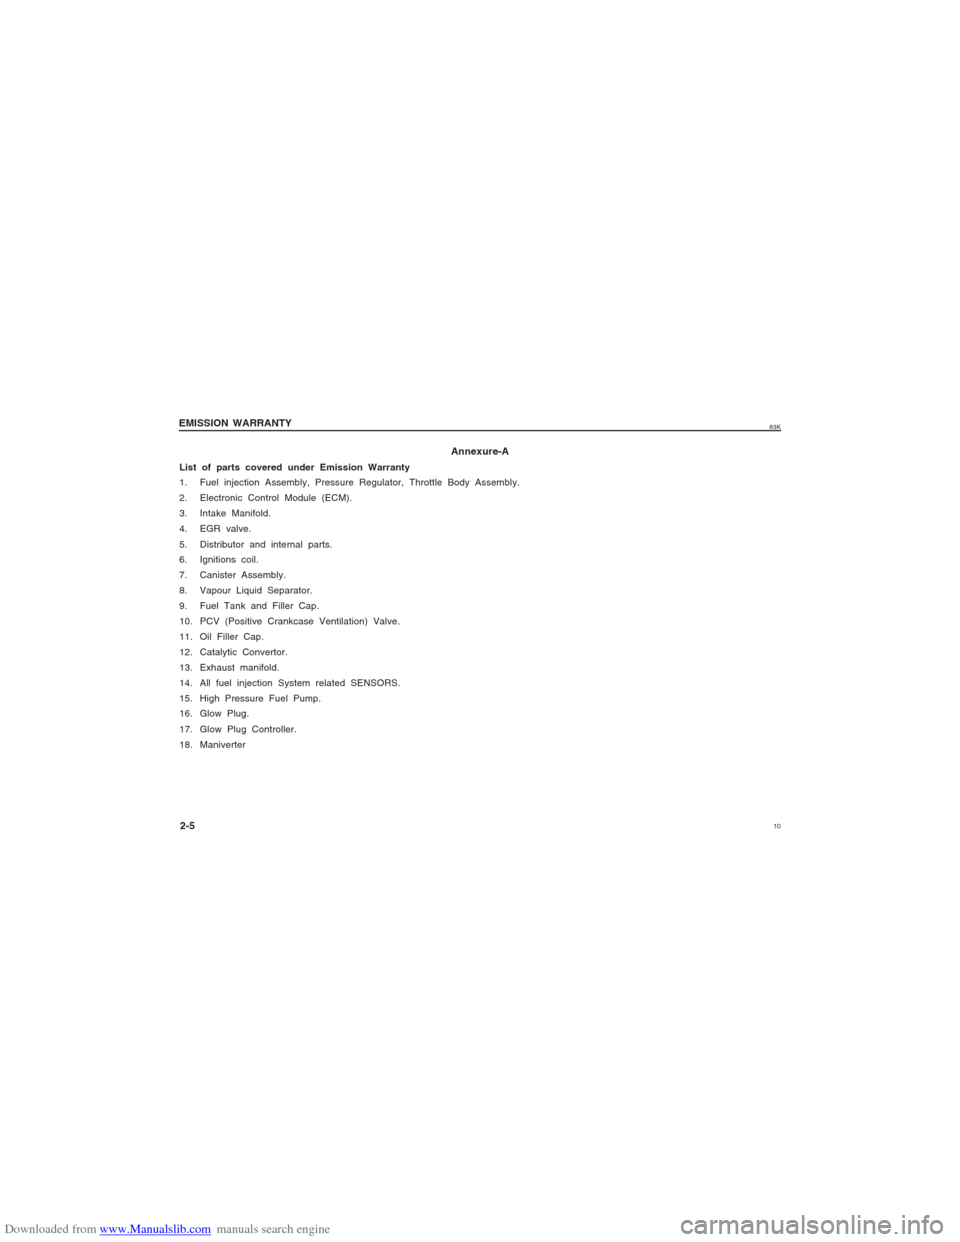
Annexure-A
List of parts covered under Emission Warranty
1. Fuel injection Assembly, Pressure Regulator, Throttle Body Assembly.
2. Electronic Control Module (ECM).
3. Intake Manifold.
4. EGR valve.
5. Distributor and internal parts.
6. Ignitions coil.
7. Canister Assembly.
8. Vapour Liquid Separator.
9. Fuel Tank and Filler Cap.
10. PCV (Positive Crankcase Ventilation) Valve.
11. Oil Filler Cap.
12. Catalytic Convertor.
13. Exhaust manifold.
14. All fuel injection System related SENSORS.
15. High Pressure Fuel Pump.
16. Glow Plug.
17. Glow Plug Controller.
18. ManiverterEMISSION WARRANTY
2-5
Page 92 of 136
Downloaded from www.Manualslib.com manuals search engine 9283K
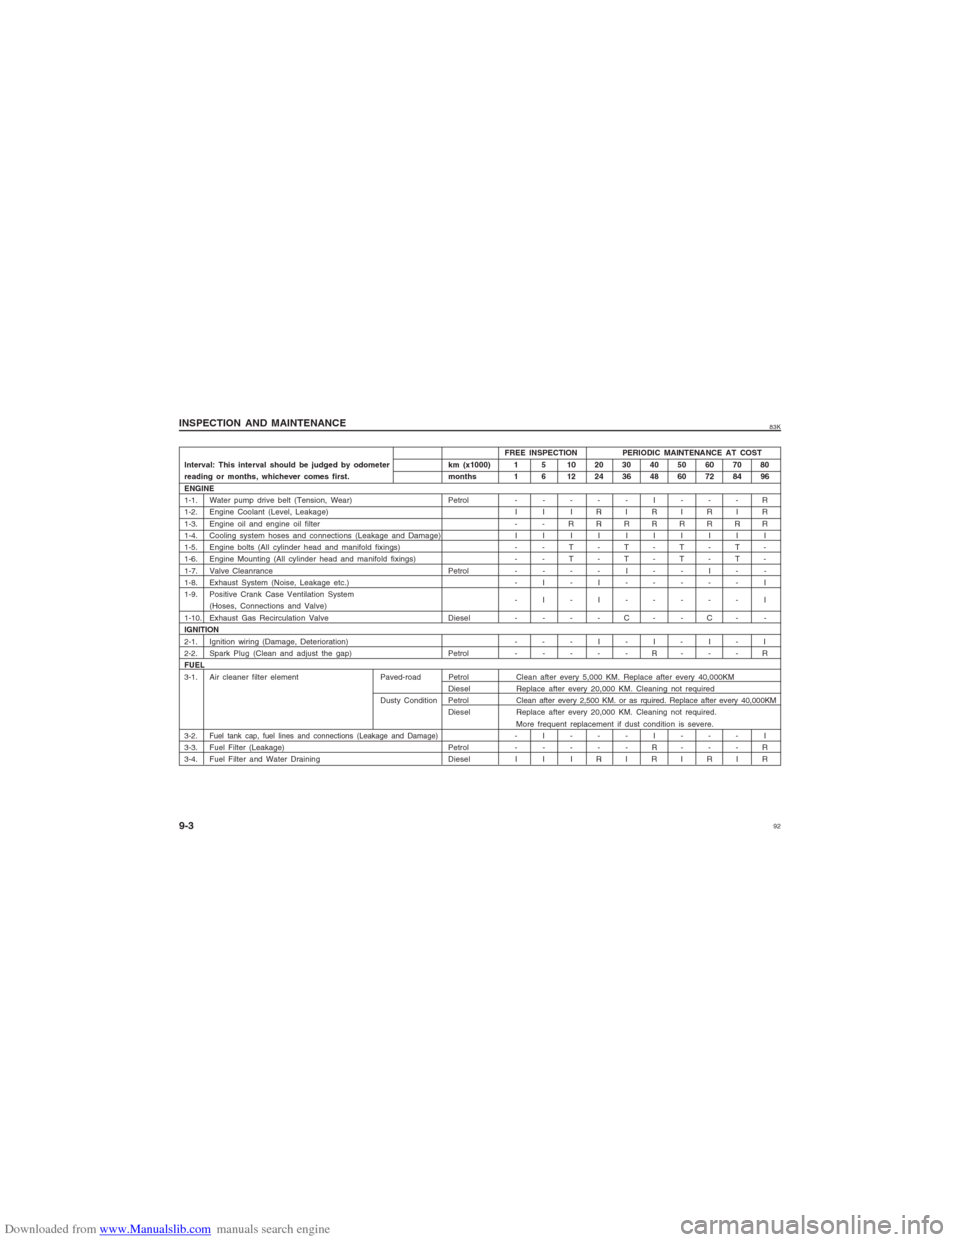
FREE INSPECTION PERIODIC MAINTENANCE AT COST
Interval: This interval should be judged by odometer km (x1000) 1 5 10 20 30 40 50 60 70 80
reading or months, whichever comes first.months 1 6 12 24 36 48 60 72 84 96
ENGINE
1-1. Water pump drive belt (Tension, Wear) Petrol-----I---R
1-2.Engine Coolant (Level, Leakage) I I I R I R I R I R
1-3. Engine oil and engine oil filter - - R RRRRRRR
1-4.Cooling system hoses and connections (Leakage and Damage)IIIIIIIIII
1-5.Engine bolts (All cylinder head and manifold fixings) - - T - T - T - T -
1-6.Engine Mounting (All cylinder head and manifold fixings) - - T - T - T - T -
1-7. Valve Cleanrance Petrol----I--I--
1-8.Exhaust System (Noise, Leakage etc.) - I - I-----I
1-9. Positive Crank Case Ventilation System
(Hoses, Connections and Valve)-I-I-----I
1-10.Exhaust Gas Recirculation Valve Diesel----C--C--
IGNITION
2-1.Ignition wiring (Damage, Deterioration) - - - I - I - I - I
2-2. Spark Plug (Clean and adjust the gap) Petrol-----R---R
FUEL
3-1. Air cleaner filter element Paved-road Petrol Clean after every 5,000 KM. Replace after every 40,000KM
Diesel Replace after every 20,000 KM. Cleaning not required
Dusty Condition Petrol Clean after every 2,500 KM. or as rquired. Replace after every 40,000KM
Diesel Replace after every 20,000 KM. Cleaning not required.
More frequent replacement if dust condition is severe.
3-2.
Fuel tank cap, fuel lines and connections (Leakage and Damage)
-I---I---I
3-3. Fuel Filter (Leakage) Petrol-----R---R
3-4. Fuel Filter and Water Draining Diesel I I I R I R I R I R
INSPECTION AND MAINTENANCE
9-3
Page 111 of 136
Downloaded from www.Manualslib.com manuals search engine 11183K
INSPECTION AND MAINTENANCE
9-22
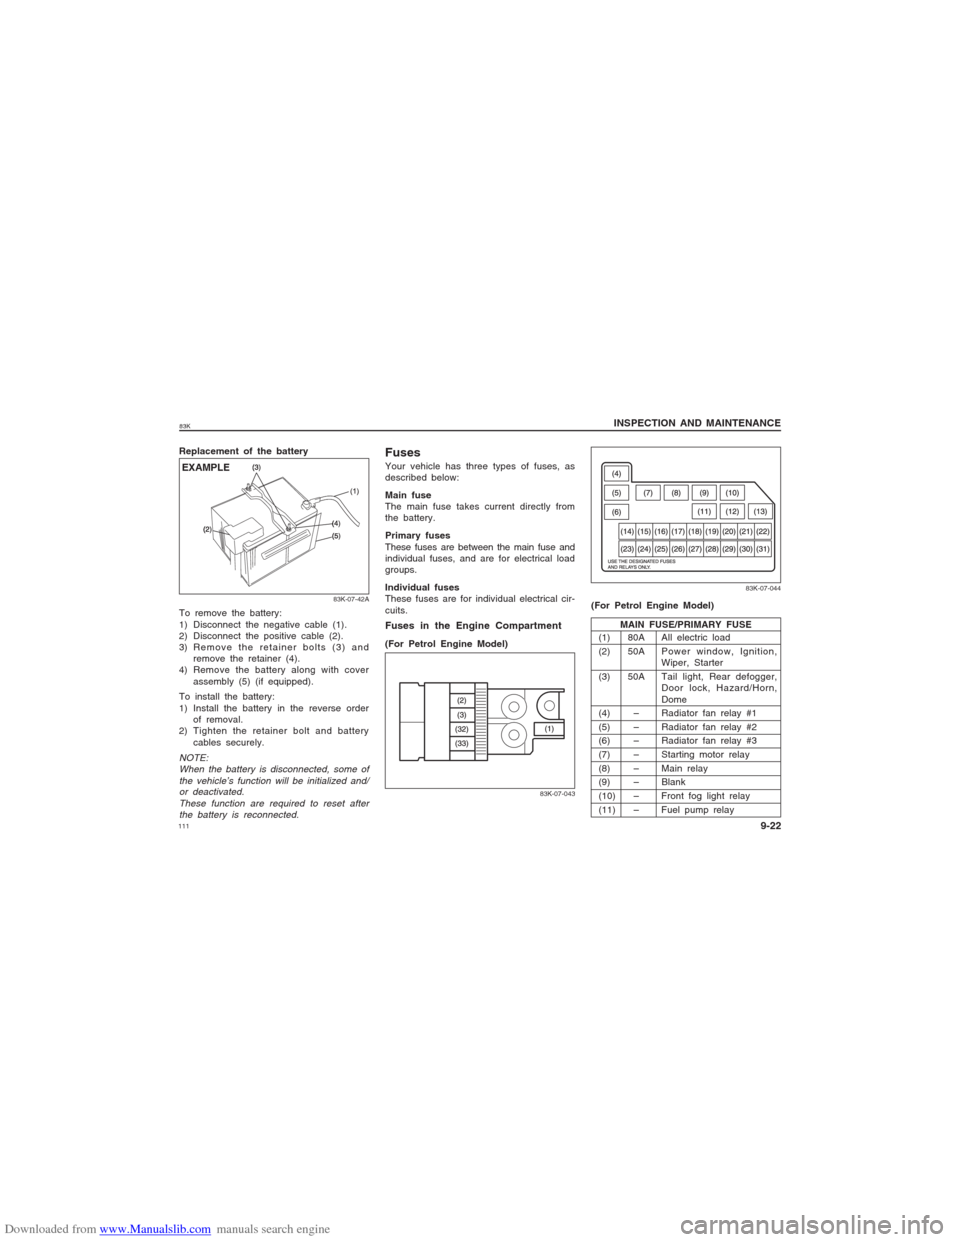
83K-07-043
83K-07-044
Fuses in the Engine Compartment(For Petrol Engine Model)
Replacement of the battery
83K-07-42A
EXAMPLETo remove the battery:
1) Disconnect the negative cable (1).
2) Disconnect the positive cable (2).
3) Remove the retainer bolts (3) and
remove the retainer (4).
4) Remove the battery along with cover
assembly (5) (if equipped).
To install the battery:
1) Install the battery in the reverse order
of removal.
2) Tighten the retainer bolt and battery
cables securely.NOTE:
When the battery is disconnected, some of
the vehicle’s function will be initialized and/
or deactivated.
These function are required to reset after
the battery is reconnected.
FusesYour vehicle has three types of fuses, as
described below:
Main fuse
The main fuse takes current directly from
the battery.
Primary fuses
These fuses are between the main fuse and
individual fuses, and are for electrical load
groups.
Individual fuses
These fuses are for individual electrical cir-
cuits.
(1) 80A All electric load
(2) 50A Power window, Ignition,
Wiper, Starter
(3) 50A Tail light, Rear defogger,
Door lock, Hazard/Horn,
Dome
(4) – Radiator fan relay #1
(5) – Radiator fan relay #2
(6) – Radiator fan relay #3
(7) – Starting motor relay
(8) – Main relay
(9) – Blank
(10) – Front fog light relay
(11) – Fuel pump relayMAIN FUSE/PRIMARY FUSE(For Petrol Engine Model)
Page 112 of 136
Downloaded from www.Manualslib.com manuals search engine 11283K
INSPECTION AND MAINTENANCE
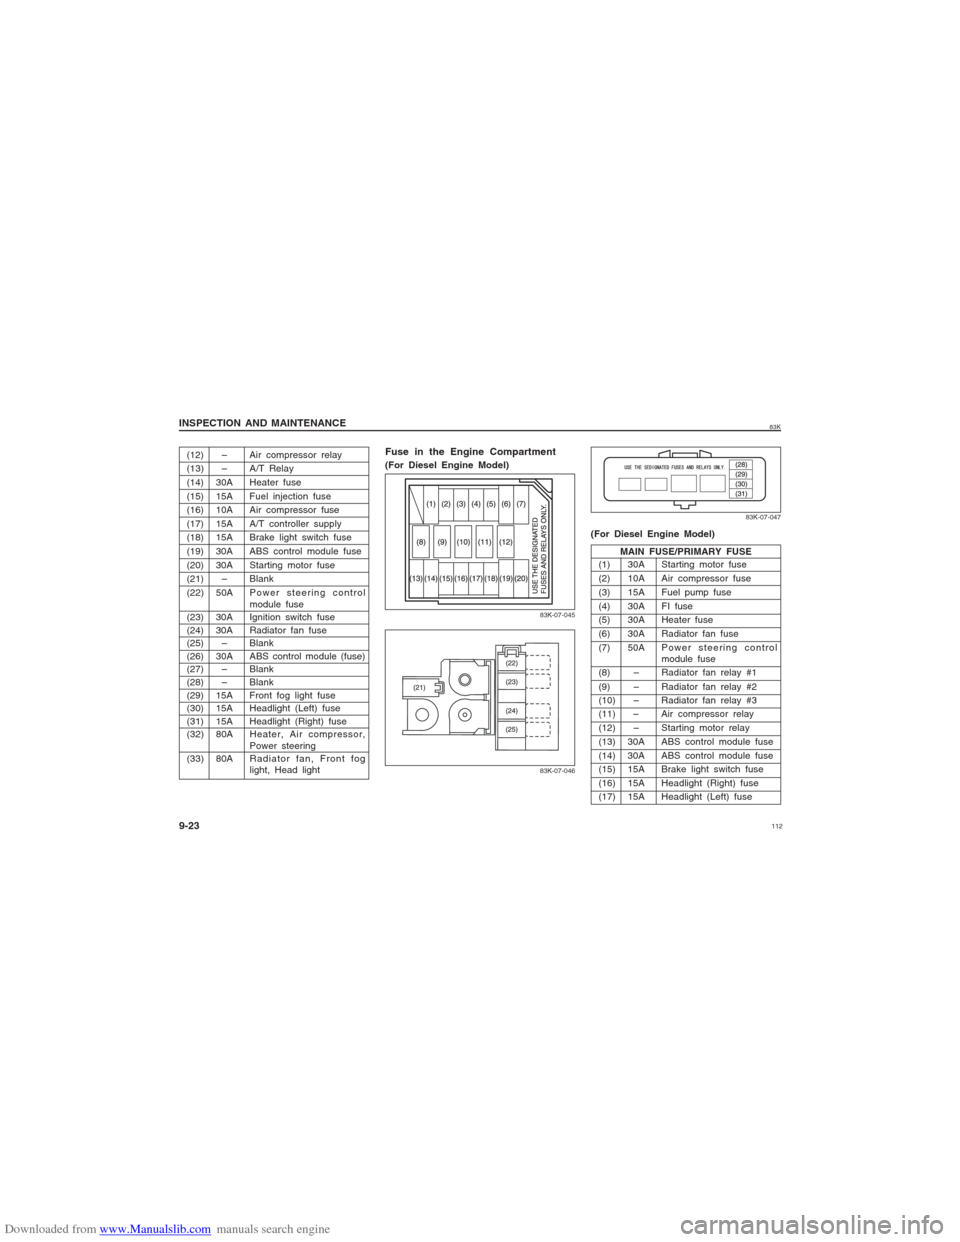
9-23(12) – Air compressor relay
(13) – A/T Relay
(14) 30A Heater fuse
(15) 15A Fuel injection fuse
(16) 10A Air compressor fuse
(17) 15A A/T controller supply
(18) 15A Brake light switch fuse
(19) 30A ABS control module fuse
(20) 30A Starting motor fuse
(21) – Blank
(22) 50A P o w e r steering control
module fuse
(23) 30A Ignition switch fuse
(24) 30A Radiator fan fuse
(25) – Blank
(26) 30AABS control module (fuse)
(27) – Blank
(28) – Blank
(29) 15A Front fog light fuse
(30) 15A Headlight (Left) fuse
(31) 15A Headlight (Right) fuse
(32) 80AHeater, Air compressor,
Power steering
(33) 80ARadiator fan, Front fog
light, Head light
83K-07-046
Fuse in the Engine Compartment(For Diesel Engine Model)
83K-07-045
(For Diesel Engine Model)(1) 30A Starting motor fuse
(2) 10A Air compressor fuse
(3) 15A Fuel pump fuse
(4) 30A FI fuse
(5) 30A Heater fuse
(6) 30A Radiator fan fuse
(7) 50A Power steering control
module fuse
(8) – Radiator fan relay #1
(9) – Radiator fan relay #2
(10) – Radiator fan relay #3
(11) – Air compressor relay
(12) – Starting motor relay
(13) 30A ABS control module fuse
(14) 30A ABS control module fuse
(15) 15A Brake light switch fuse
(16) 15A Headlight (Right) fuse
(17) 15A Headlight (Left) fuseMAIN FUSE/PRIMARY FUSE
83K-07-047
Page 124 of 136
Downloaded from www.Manualslib.com manuals search engine 12483K
EMERGENCY SERVICE
10-3
the wheel and hub with a clean cloth.
Clean the hub carefully; it may be hot
from driving.
7) Install the new wheel and replace the
wheel nuts with their cone shaped end
facing the wheel. Tighten each nut
snugly by hand until the wheel is
securely seated on the hub.
83K-08-009
Tightening torque for wheel nut
85 Nm (8.5 kg-m, 61.5 lb-ft)
8) Lower the jack and fully tighten the nuts
in a crisscross fashion with a wrench as
shown in the illustration.
w ww w
w WARNING
Use Maruti genuine wheel nuts and
tighten them to the specified torque
as soon as possible after changing
V VV V
V
wheels. Incorrect wheel nuts or
improperly tightened wheel nuts may
come loose or fall off, which can
result in an accident. If you do not
have a torque wrench, have the wheel
nut torque checked by a MARUTI
SUZUKI authorized dealer.
w ww w
w WARNING
V VV V
V
Jump Starting Instructions
w ww w
w WARNING
Never attempt to jump start your
vehicle if the battery appears to be
frozen. Batteries in this condition
may explode or rupture if jump
starting is attempted.
When making jump lead connec-
tions, be certain that your hands
and the jump leads remain clear
from pulleys, belts, or fans.
Batteries produce flammable
hydrogen gas. Keep flames and
sparks away from the battery or an
explosion may occur. Never smoke
when working in the vicinity of the
battery.
If the booster battery you use for
jump starting is installed in another
vehicle, make sure the two vehicles
are not touching each other.
V VV V
V
w ww w
w WARNING
V VV V
V
CAUTION
Your vehicle should not be started by
pushing or towing. This starting
method could result in permanent
damage to the catalytic converter and
high pressure fuel pump (diesel). Use
jump leads to start a vehicle with a
weak or flat battery. If your battery discharges repeat-
edly, for no apparent reason, have
your vehicle inspected by a MARUTI
SUZUKI authorized dealer.
To avoid harm to yourself or dam-
age to your vehicle or battery, fol-
low the jump starting instructions
below precisely and in order.
If you are in doubt, contact your
nearest MARUTI SUZUKI authorized
workshop.When Jump Starting Your Vehicle,
Use the Following Procedure:1) Use only a 12 volt battery to jump start
your vehicle. Position the good 12 V
battery close to your vehicle so that the
jump leads will reach both batteries.
When using a battery installed on
another vehicle, DO NOT LET THE