hood release SUZUKI RENO 2008 1.G Owners Manual
[x] Cancel search | Manufacturer: SUZUKI, Model Year: 2008, Model line: RENO, Model: SUZUKI RENO 2008 1.GPages: 226, PDF Size: 4.98 MB
Page 10 of 226
0-3
85Z14-03E
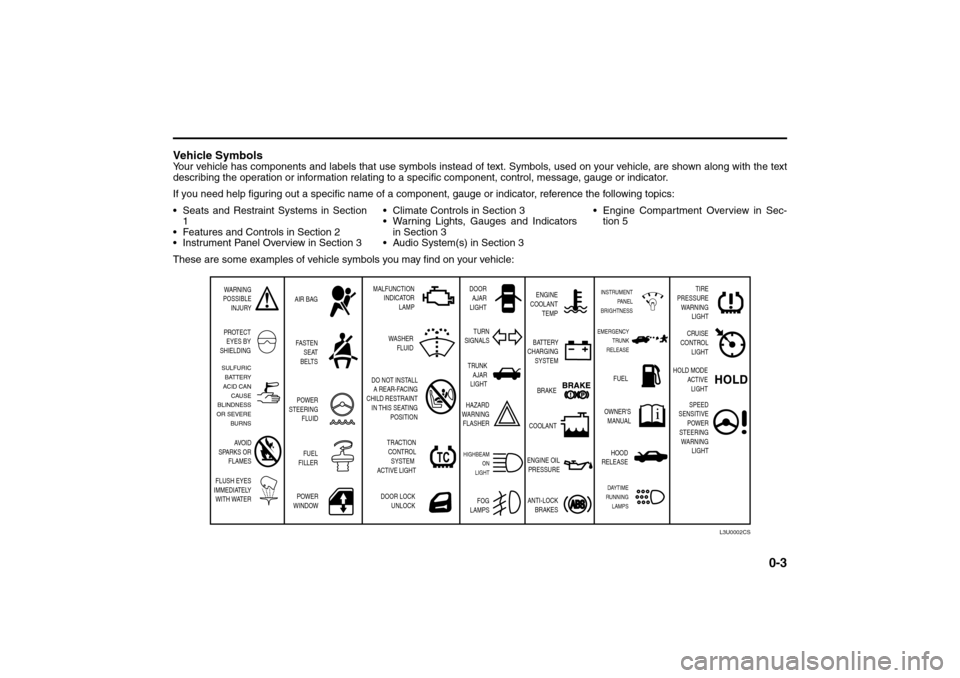
Vehicle SymbolsYour vehicle has components and labels that use symbols instead of text. Symbols, used on your vehicle, are shown along with the text
describing the operation or information relating to a specific component, control, message, gauge or indicator.
If you need help figuring out a specific name of a component, gauge or indicator, reference the following topics:
Seats and Restraint Systems in Section
1
Features and Controls in Section 2
Instrument Panel Overview in Section 3 Climate Controls in Section 3
Warning Lights, Gauges and Indicators
in Section 3
Audio System(s) in Section 3 Engine Compartment Overview in Sec-
tion 5
These are some examples of vehicle symbols you may find on your vehicle:
WARNING
POSSIBLE
INJURY
PROTECT
EYES BY
SHIELDINGFASTEN
SEAT
BELTS
POWER
WINDOWDOOR LOCK
UNLOCK DO NOT INSTALL
A REAR-FACING
CHILD RESTRAINT
IN THIS SEATING
POSITION AIR BAGMALFUNCTION
INDICATOR
LAMPENGINE
COOLANT
TEMP
FUEL
OWNER'S
MANUAL BATTERY
CHARGING
SYSTEM
BRAKE
COOLANT
ENGINE OIL
PRESSURE
ANTI-LOCK
BRAKES TURN
SIGNALS
HAZARD
WARNING
FLASHER
HIGHBEAM
ON
LIGHT
FOG
LAMPS
SULFURIC
BATTERY
ACID CAN
CAUSE
BLINDNESS
OR SEVERE
BURNS
AVOID
SPARKS OR
FLAMES
FLUSH EYES
IMMEDIATELY
WITH WATER
L3U0002CS
DOOR
AJAR
LIGHT
POWER
STEERING
FLUID
FUEL
FILLER
EMERGENCY
TRUNK
RELEASEINSTRUMENT
PANEL
BRIGHTNESS
TRUNK
AJAR
LIGHT
HOOD
RELEASEDAYTIME
RUNNING
LAMPS
TRACTION
CONTROL
SYSTEM
ACTIVE LIGHTWASHER
FLUID
TIRE
PRESSURE
WARNING
LIGHT
CRUISE
CONTROL
LIGHT
HOLD MODE
ACTIVE
LIGHT
SPEED
SENSITIVE
POWER
STEERING
WARNING
LIGHT
Page 56 of 226
2-8
FEATURES AND CONTROLS
85Z14-03E
Express-Down Window
The driver’s window also has an express-
down feature.
This switch is labeled AUTO. Press the
switch then release it and the driver’s win-
dow will go all the way down.
To stop the window while it is lowering,
press the switch again. To raise the win-
dow, pull up and hold the switch.
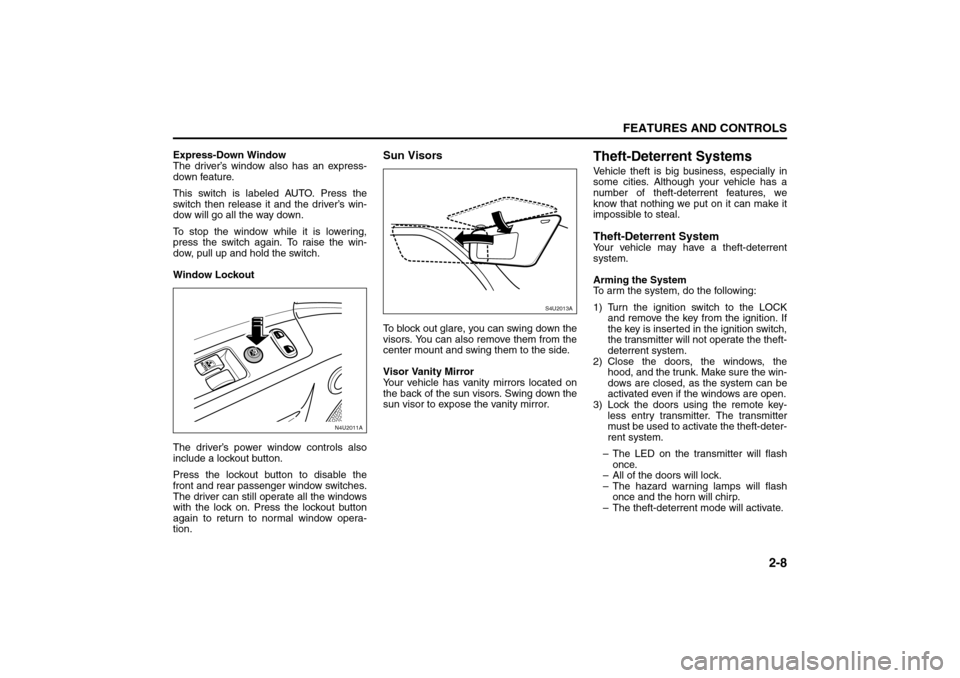
Window Lockout
The driver’s power window controls also
include a lockout button.
Press the lockout button to disable the
front and rear passenger window switches.
The driver can still operate all the windows
with the lock on. Press the lockout button
again to return to normal window opera-
tion.
Sun VisorsTo block out glare, you can swing down the
visors. You can also remove them from the
center mount and swing them to the side.
Visor Vanity Mirror
Your vehicle has vanity mirrors located on
the back of the sun visors. Swing down the
sun visor to expose the vanity mirror.
Theft-Deterrent SystemsVehicle theft is big business, especially in
some cities. Although your vehicle has a
number of theft-deterrent features, we
know that nothing we put on it can make it
impossible to steal.Theft-Deterrent SystemYour vehicle may have a theft-deterrent
system.
Arming the System
To arm the system, do the following:
1) Turn the ignition switch to the LOCK
and remove the key from the ignition. If
the key is inserted in the ignition switch,
the transmitter will not operate the theft-
deterrent system.
2) Close the doors, the windows, the
hood, and the trunk. Make sure the win-
dows are closed, as the system can be
activated even if the windows are open.
3) Lock the doors using the remote key-
less entry transmitter. The transmitter
must be used to activate the theft-deter-
rent system.
– The LED on the transmitter will flash
once.
– All of the doors will lock.
– The hazard warning lamps will flash
once and the horn will chirp.
– The theft-deterrent mode will activate.
N4U2011A
S4U2013A
Windows:
Theft-Deterrent Systems:
Page 58 of 226
2-10
FEATURES AND CONTROLS
85Z14-03E
Daily Inspection ChecklistBefore Driving1) Make sure that windows, mirrors, lights
and reflectors are clean and unob-
structed.
2) Visually check the tires for the following
points:
– the depth of the tread groove
– abnormal wear, cracks and damage
– loose wheel nuts
– existence of foreign material such as
nails, stones, etc.
Refer to “Tires” in the “SERVICE AND
APPEARANCE CARE” section for details.
3) Look for oil or other fluid leaks.
NOTE:
It is normal for water to drip from the air
conditioning system after use.
4) Make sure the hood is fully closed and
latched.
5) Check the headlights, turn signal lights,
brake lights and horn for proper opera-
tion.
6) Lock all doors.
7) Adjust the seat and adjustable head
restraints (if equipped).
8) Check the brake pedal.
9) Adjust the mirrors.
10)Make sure that you and all passengers
have properly fastened your seat belts.
11)Make sure that all warning lights come
on as the key is turned to the “ON” or
“START” position.12)Check all gauges.
13)Make sure that the BRAKE light turns
off when the parking brake is released.
Once a week, or each time you fill your fuel
tank, perform the following under-hood
checks:
1) Engine oil level
2) Coolant level
3) Brake fluid level
4) Power steering (if equipped) fluid level
5) Windshield washer fluid level
6) Hood latch operation
Pull the hood release handle inside the
vehicle. Make sure that you cannot
open the hood all the way without
releasing the secondary latch. Be sure
to close the hood securely after check-
ing for proper latch operation. See the
item “Lubricate Locks, Hinges & Hood
Latch” under “Chassis and Body” in the
“MAINTENANCE SCHEDULE” section
for the lubrication schedule.
Starting and Operating Your
VehicleNew Vehicle Break-In
WARNING
Make sure the hood is fully closed
and latched before driving. If it is not,
it can fly up unexpectedly during
driving, obstructing your view and
resulting in an accident.
CAUTION
Your vehicle doesn’t need an elabo-
rate “break-in.” But it will perform
better in the long run if you follow
these guidelines:
Don’t drive at any one speed – fast
or slow – for the first 500 miles (805
km). Don’t make full-throttle starts.
Avoid making hard stops for the
first 200 miles (322 km) or so. Dur-
ing this time your new brake linings
aren’t yet broken in. Hard stops
with new linings can mean prema-
ture wear and earlier replacement.
Follow this break-in guideline every
time you get new brake linings.
Daily Inspection Checklist:
Starting and Operating Your Vehicle:
Page 75 of 226
3-1INSTRUMENT PANEL
85Z14-03E
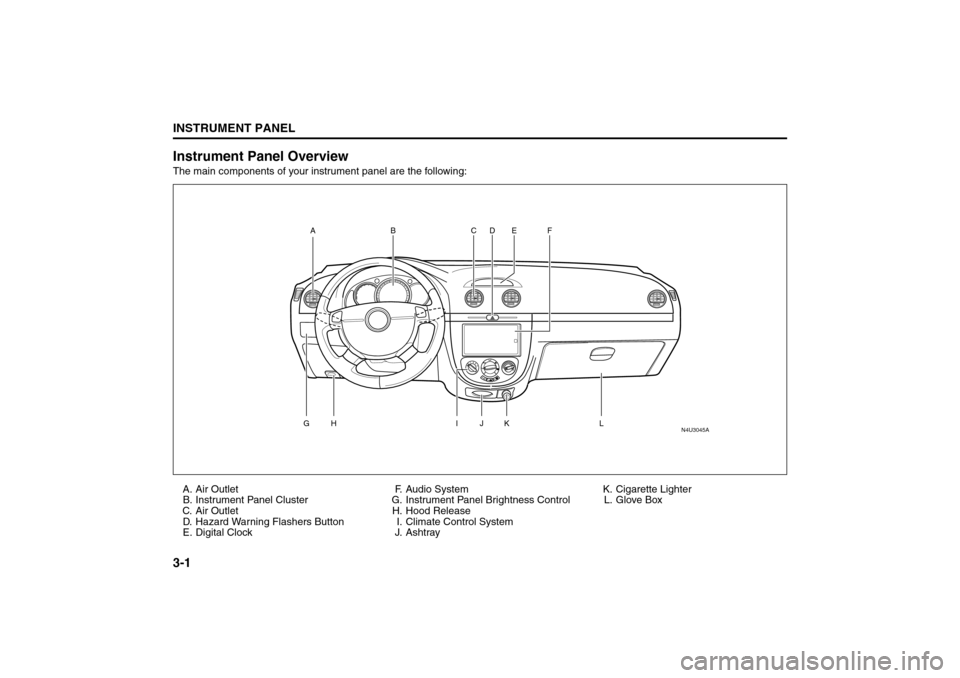
Instrument Panel OverviewThe main components of your instrument panel are the following:
A. Air Outlet
B. Instrument Panel Cluster
C. Air Outlet
D. Hazard Warning Flashers Button
E. Digital ClockF. Audio System
G. Instrument Panel Brightness Control
H. Hood Release
I. Climate Control System
J. AshtrayK. Cigarette Lighter
L. Glove Box
N4U3045A
AG
H
I
L
J
K CD E F
B
Instrument Panel Overview:
Page 148 of 226
5-4
SERVICE AND APPEARANCE CARE
85Z14-03E
Filling a Portable Fuel Container
Checking Things Under the
Hood
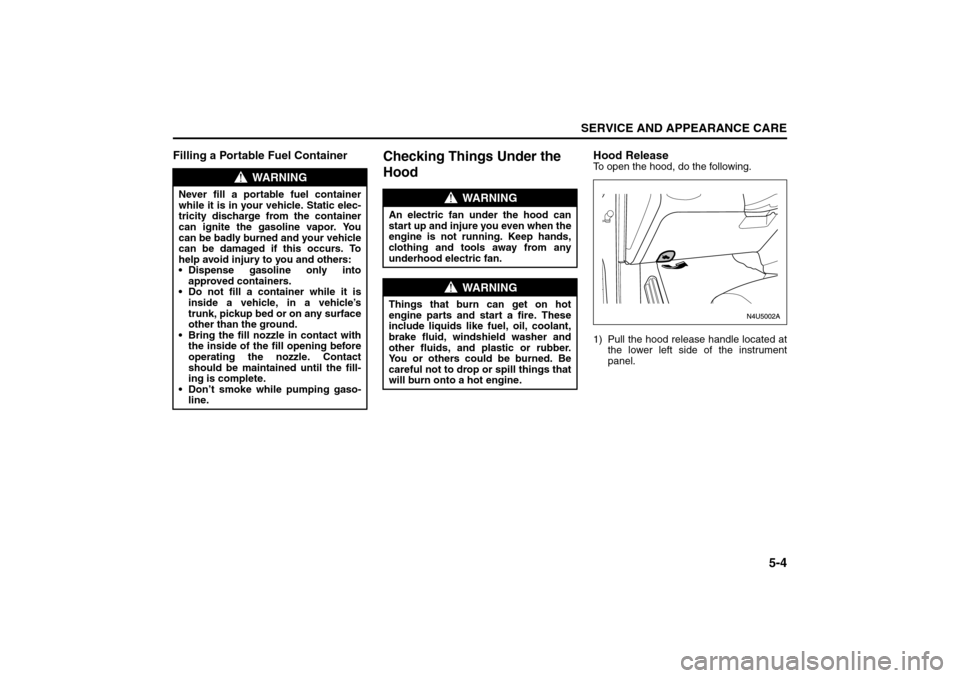
Hood ReleaseTo open the hood, do the following.
1) Pull the hood release handle located at
the lower left side of the instrument
panel.
WARNING
Never fill a portable fuel container
while it is in your vehicle. Static elec-
tricity discharge from the container
can ignite the gasoline vapor. You
can be badly burned and your vehicle
can be damaged if this occurs. To
help avoid injury to you and others:
Dispense gasoline only into
approved containers.
Do not fill a container while it is
inside a vehicle, in a vehicle’s
trunk, pickup bed or on any surface
other than the ground.
Bring the fill nozzle in contact with
the inside of the fill opening before
operating the nozzle. Contact
should be maintained until the fill-
ing is complete.
Don’t smoke while pumping gaso-
line.
WARNING
An electric fan under the hood can
start up and injure you even when the
engine is not running. Keep hands,
clothing and tools away from any
underhood electric fan.
WARNING
Things that burn can get on hot
engine parts and start a fire. These
include liquids like fuel, oil, coolant,
brake fluid, windshield washer and
other fluids, and plastic or rubber.
You or others could be burned. Be
careful not to drop or spill things that
will burn onto a hot engine.
Fuel:
Checking Things Under the Hood:
Page 149 of 226
5-5SERVICE AND APPEARANCE CARE
85Z14-03E
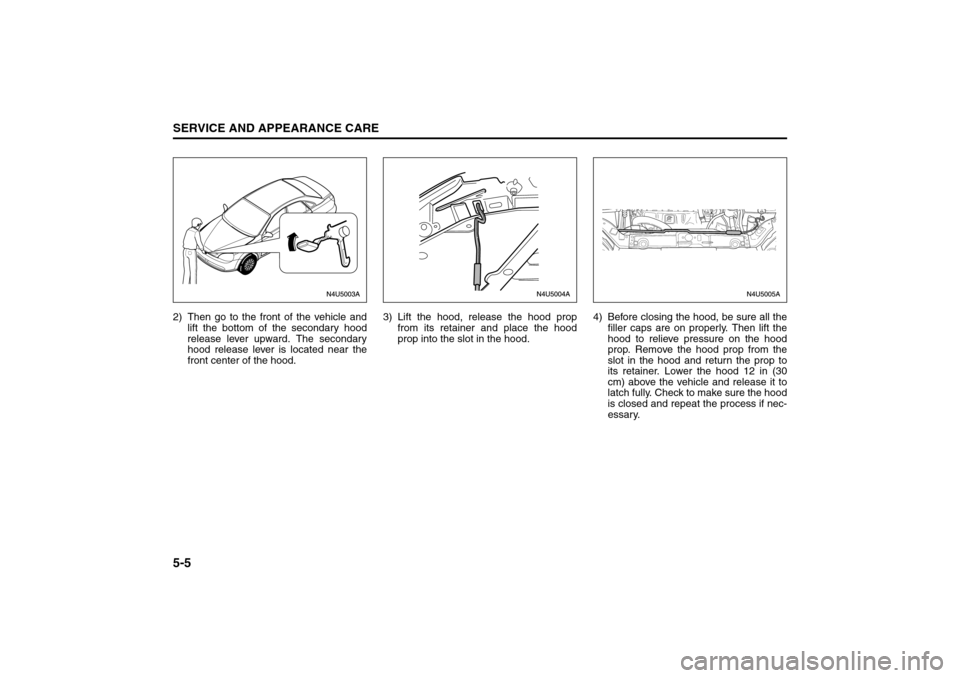
2) Then go to the front of the vehicle and
lift the bottom of the secondary hood
release lever upward. The secondary
hood release lever is located near the
front center of the hood.3) Lift the hood, release the hood prop
from its retainer and place the hood
prop into the slot in the hood.4) Before closing the hood, be sure all the
filler caps are on properly. Then lift the
hood to relieve pressure on the hood
prop. Remove the hood prop from the
slot in the hood and return the prop to
its retainer. Lower the hood 12 in (30
cm) above the vehicle and release it to
latch fully. Check to make sure the hood
is closed and repeat the process if nec-
essary.
Checking Things Under the Hood:
Page 154 of 226
5-10
SERVICE AND APPEARANCE CARE
85Z14-03E
km) or 3 months. If necessary, clean or
replace it.
How to Inspect the Engine Air Cleaner/
Filter
To inspect the air cleaner/filter, remove the
filter from the vehicle and lightly shake the
filter to release loose dust and dirt. If the fil-
ter remains “caked” with dirt, a new filter is
required.
To inspect or replace the filter, do the fol-
lowing:
1) Remove the four screws on the cover.
2) Lift off the cover.
3) Check or replace the engine air
cleaner/filter. See “Normal Mainte-
nance Replacement Parts” in this sec-
tion for replacement part numbers.
4) Reinstall the filter, put the cover back on
tightly, and tighten the screws.
Automatic Transmission FluidTo ensure proper functioning, efficiency,
and durability of the automatic transmis-
sion, be sure to keep the transmission fluid
at the proper level. Too much or too little
fluid can cause problems.
The fluid level must be checked with the
engine running and the selector lever in P
(Park). The vehicle must be up to normal
operating temperature and parked on level
ground.
The normal operating temperature for the
fluid will be reached after driving about 10
minutes.
Checking Automatic Transmission Fluid
Level
If the fluid is contaminated or discolored,
change the automatic transmission fluid.
A decrease in the fluid level indicates a
leak in the automatic transmission. If
noted, contact your SUZUKI dealer for
repair as soon as possible.1) Start the engine.
2) Warm up the engine until the tempera-
ture of the automatic transmission fluid
reaches approximately 40°C (104°F).
3) Move the selector lever from “P” to “1”
and return to “P”. Wait for a few sec-
onds at each select position until the
selected gears are fully engaged.
WARNING
Operating the engine with the air
cleaner/filter off can cause you or
others to be burned. The air cleaner
not only cleans the air, it helps to
stop flame if the engine backfires. If it
isn’t there and the engine backfires,
you could be burned. Don’t drive with
it off, and be careful working on the
engine with the air cleaner/filter off.
CAUTION
If the air cleaner/filter is off, a backfire
can cause a damaging engine fire.
And, dirt can easily get into your
engine, which will damage it. Always
have the air cleaner/filter in place
when you’re driving.
WARNING
This work requires special skill and
equipment. Before attempting to do
the work, be sure you are fully
acquainted with doing this job.
Have your SUZUKI dealer do this
work if you are not confident you can
complete the task safely.
Otherwise, you could be injured or
could damage the vehicle.
Checking Things Under the Hood:
Page 168 of 226
5-24
SERVICE AND APPEARANCE CARE
85Z14-03E
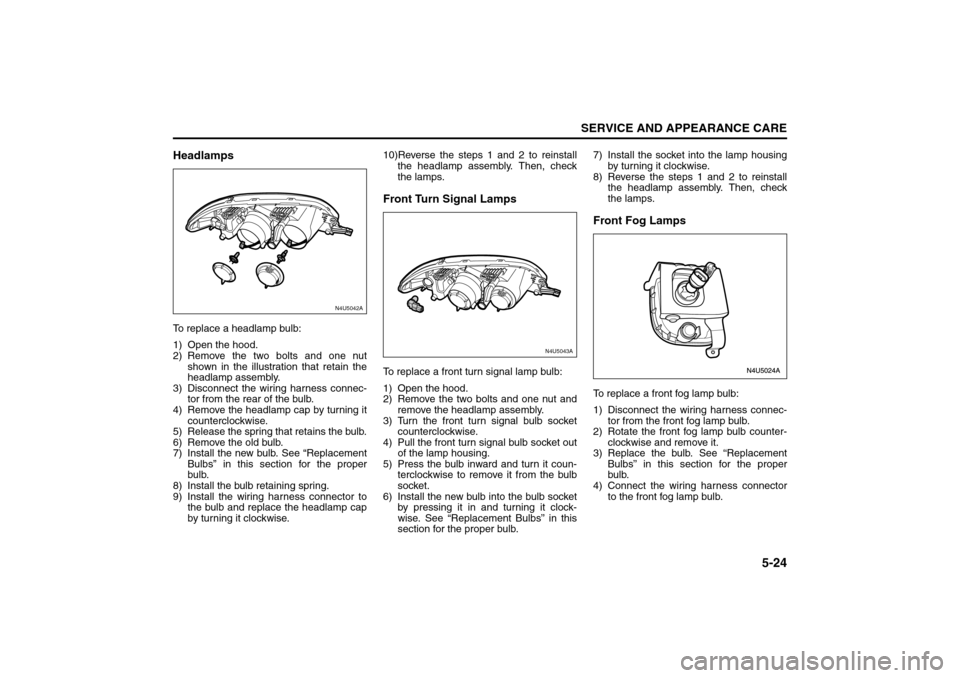
HeadlampsTo replace a headlamp bulb:
1) Open the hood.
2) Remove the two bolts and one nut
shown in the illustration that retain the
headlamp assembly.
3) Disconnect the wiring harness connec-
tor from the rear of the bulb.
4) Remove the headlamp cap by turning it
counterclockwise.
5) Release the spring that retains the bulb.
6) Remove the old bulb.
7) Install the new bulb. See “Replacement
Bulbs” in this section for the proper
bulb.
8) Install the bulb retaining spring.
9) Install the wiring harness connector to
the bulb and replace the headlamp cap
by turning it clockwise.10)Reverse the steps 1 and 2 to reinstall
the headlamp assembly. Then, check
the lamps.
Front Turn Signal LampsTo replace a front turn signal lamp bulb:
1) Open the hood.
2) Remove the two bolts and one nut and
remove the headlamp assembly.
3) Turn the front turn signal bulb socket
counterclockwise.
4) Pull the front turn signal bulb socket out
of the lamp housing.
5) Press the bulb inward and turn it coun-
terclockwise to remove it from the bulb
socket.
6) Install the new bulb into the bulb socket
by pressing it in and turning it clock-
wise. See “Replacement Bulbs” in this
section for the proper bulb.7) Install the socket into the lamp housing
by turning it clockwise.
8) Reverse the steps 1 and 2 to reinstall
the headlamp assembly. Then, check
the lamps.
Front Fog LampsTo replace a front fog lamp bulb:
1) Disconnect the wiring harness connec-
tor from the front fog lamp bulb.
2) Rotate the front fog lamp bulb counter-
clockwise and remove it.
3) Replace the bulb. See “Replacement
Bulbs” in this section for the proper
bulb.
4) Connect the wiring harness connector
to the front fog lamp bulb.
N4U5042A
N4U5043A
Bulb Replacement:
Page 221 of 226
8-2INDEX
85Z14-03E
Doing Your Own Service Work
...........................................5-1
Door Ajar Light
....................................................................3-26
Door Ajar Reminder
.............................................................2-5
Door Locks
...........................................................................2-4
Doors and Locks
.................................................................2-4
Driver Position
.....................................................................1-7
Driver Seat Height Adjuster
................................................1-2
Driving at Night
....................................................................4-8
Driving in Rain and on Wet Roads
.....................................4-9
Drunken Driving
...................................................................4-1
EElectrical System
.................................................................5-48
Emission Compliance Label (for U.S.A.)
...........................7-2
Engine Air Cleaner/Filter
.....................................................5-9
Engine Compartment Overview
.........................................5-6
Engine Coolant
....................................................................5-12
Engine Coolant Temperature Gauge
.................................3-22
Engine Exhaust
....................................................................2-19
Engine Oil
.............................................................................5-7
Engine Overheating
.............................................................5-14
Engine Serial Number .........................................................7-1
Exterior Lamps
....................................................................3-8
FFilling a Portable Fuel Container
.......................................5-4
Filling Your Tank
.................................................................5-2
Finish Damage
.....................................................................5-47
Fog Lamp Light ....................................................................3-25
Folding Rear Seat ................................................................1-4
Freeway Driving
...................................................................4-11
Front Armrest Storage Area
...............................................2-22
Front Fog Lamps
.................................................................5-24Front Seats
.......................................................................... 1-1
Front Storage Area
............................................................. 2-22
Front Turn Signal Lamps
................................................... 5-24
Fuel
....................................................................................... 5-1
Fuel Gauge
.......................................................................... 3-25
Fuels in Foreign Countries
................................................ 5-2
Fuses and Circuit Breakers ............................................... 5-49
GGasoline Octane
.................................................................. 5-1
General Information
............................................................ 6-1
Glossary of Tire Terminology
............................................ 5-30
Glove Box
............................................................................ 2-21
HHalogen Bulbs
..................................................................... 5-23
Hazard Warning Flashers
................................................... 3-2
Head Restraints
................................................................... 1-3
Headlamp Aiming ................................................................ 5-23
Headlamp Wiring ................................................................. 5-48
Headlamps
........................................................................... 5-24
Highbeam On Light
............................................................. 3-25
Highway Hypnosis .............................................................. 4-12
Hill and Mountain Roads
.................................................... 4-12
Hold Mode Light
.................................................................. 3-22
Hood Release
...................................................................... 5-4
Horn
...................................................................................... 3-2
How Does an Air Bag Restrain?
........................................ 1-32
How to Wear Safety Belts Properly ................................... 1-7
Hydraulic Clutch
................................................................. 5-12
IIdentification Numbers
....................................................... 7-1
If a Tire Goes Flat
................................................................ 5-38