wiring SUZUKI SWIFT 2000 1.G RG413 Service Owner's Manual
[x] Cancel search | Manufacturer: SUZUKI, Model Year: 2000, Model line: SWIFT, Model: SUZUKI SWIFT 2000 1.GPages: 698, PDF Size: 16.01 MB
Page 167 of 698
3B1-26 ELECTRICAL POWER STEERING (P/S) SYSTEM
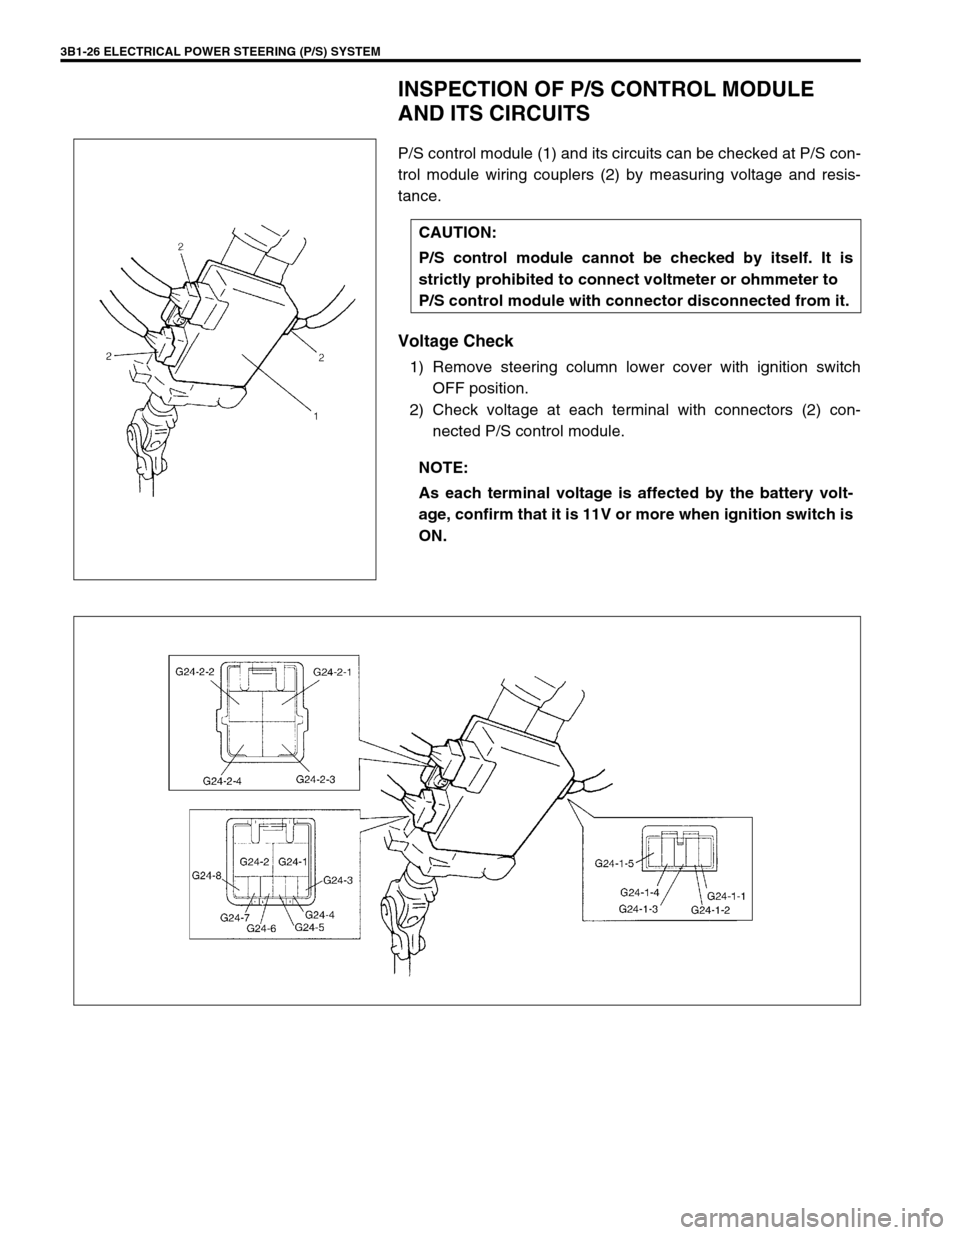
INSPECTION OF P/S CONTROL MODULE
AND ITS CIRCUITS
P/S control module (1) and its circuits can be checked at P/S con-
trol module wiring couplers (2) by measuring voltage and resis-
tance.
Voltage Check
1) Remove steering column lower cover with ignition switch
OFF position.
2) Check voltage at each terminal with connectors (2) con-
nected P/S control module. CAUTION:
P/S control module cannot be checked by itself. It is
strictly prohibited to connect voltmeter or ohmmeter to
P/S control module with connector disconnected from it.
NOTE:
As each terminal voltage is affected by the battery volt-
age, confirm that it is 11V or more when ignition switch is
ON.
Page 174 of 698
STEERING WHEEL AND COLUMN 3C-1
6F1
6F2
6G
6H
6K
7A
7A1
7B1
3C1
7E
7F
8A
8B
8C
8D
8E
9
10
10A
10B
SECTION 3C
STEERING WHEEL AND COLUMN
CONTENTS
GENERAL DESCRIPTION .............................. 3C-2
STEERING COLUMN .................................. 3C-2
STEERING WHEEL AND DRIVER AIR
BAG (INFLATOR) MODULE ........................ 3C-2
DIAGNOSIS ..................................................... 3C-2
INSPECTION AND REPAIR REQUIRED
AFTER ACCIDENT ...................................... 3C-2
ON-VEHICLE SERVICE .................................. 3C-3
SERVICE PRECAUTIONS........................... 3C-3
SERVICE AND DIAGNOSIS .................... 3C-3
DISABLING AIR BAG SYSTEM ............... 3C-3
ENABLING AIR BAG SYSTEM ................ 3C-3
HANDLING AND STORAGE.................... 3C-4
DISPOSAL ............................................... 3C-4DRIVER AIR BAG (INFLATOR) MODULE .. 3C-4
STEERING WHEEL ..................................... 3C-6
CENTERING CONTACT COIL .................... 3C-7
CONTACT COIL AND COMBINATION
SWITCH ASSEMBLY .................................. 3C-8
STEERING COLUMN ASSEMBLY............ 3C-10
STEERING LOCK ASSEMBLY
(IGNITION SWITCH) ................................. 3C-16
STEERING LOWER SHAFT...................... 3C-17
CHECKING STEERING COLUMN
ASSEMBLY AND LOWER SHAFT FOR
ACCIDENT DAMAGE ................................... 3C-18
SPECIAL TOOL ............................................ 3C-19
WARNING:
For vehicles equipped with Supplemental Restraint (Air Bag) System:
Service on and around the air bag system components or wiring must be performed only by an
authorized SUZUKI dealer. Please observe all WARNINGS and “Service Precautions” under “On-
Vehicle Service” in air bag system section before performing service on or around the air bag sys-
tem components or wiring. Failure to follow WARNINGS could result in unintentional activation of
the system or could render the system inoperative. Either of these two conditions may result in
severe injury.
The procedures in this section must be followed in the order listed to temporarily disable the air
bag system and prevent false diagnostic codes from setting. Failure to follow procedures could
result in possible air bag system activation, personal injury or otherwise unneeded air bag system
repairs.
CAUTION:
When fasteners are removed, always reinstall them at the same location from which they were
removed. If a fastener needs to be replaced, use the correct part number fastener for that application.
If the correct part number fastener is not available, a fastener of equal size and strength (or stronger)
may be used. Fasteners that are not reused, and those requiring thread-locking compound, will be
called out. The correct torque value must be used when installing fasteners that require it. If the above
procedures are not followed, parts or system damage could result.
Page 326 of 698
ANTILOCK BRAKE SYSTEM (ABS) 5E-1
6F1
6F2
6G
6H
6K
7A
7A1
7B1
7C1
7D
7E
7F
8A
8B
8C
8D
8E
5E
9
10
10A
10B
SECTION 5E
ANTILOCK BRAKE SYSTEM (ABS)
CONTENTS
GENERAL DESCRIPTION .............................. 5E-2
COMPONENTS/PARTS LOCATION AND
BRAKE HOSE/PIPE ROUTING ................... 5E-2
SYSTEM SCHEMATIC ................................ 5E-4
ABS HYDRAULIC UNIT/CONTROL
MODULE ASSEMBLY ................................. 5E-5
SELF-DIAGNOSIS FUNCTION................ 5E-5
FAIL-SAFE FUNCTION............................ 5E-5
SYSTEM CIRCUIT ....................................... 5E-6
DIAGNOSIS ..................................................... 5E-8
PRECAUTION IN DIAGNOSING
TROUBLES .................................................. 5E-8
ABS DIAGNOSTIC FLOW TABLE ............... 5E-9
ABS WARNING LAMP CHECK ................. 5E-12
EBD WARNING LAMP (BRAKE
WARNING LAMP) CHECK ........................ 5E-12
TABLE – A ABS WARNING LAMP
CIRCUIT CHECK – LAMP DOES NOT
COME “ON” AT IGNITION SWITCH ON.... 5E-13
TABLE – B ABS WARNING LAMP
CIRCUIT CHECK – LAMP COMES
“ON” STEADY ............................................ 5E-14TABLE – C ABS WARNING LAMP
CIRCUIT CHECK – THE LAMP FLASHES
CONTINUOUSLY WHILE IGNITION
SWITCH IS ON .......................................... 5E-15
TABLE – D CODE (DTC) IS NOT
OUTPUTTED EVEN WITH DIAGNOSIS
SWITCH TERMINAL CONNECTED TO
GROUND ................................................... 5E-16
TABLE – E EBD WARNING LAMP
(BRAKE WARNING LAMP) CHECK
– LAMP COMES “ON” STEADY ................ 5E-17
DIAGNOSTIC TROUBLE CODE
(DTC) CHECK (USING ABS WARNING
LAMP) ........................................................ 5E-18
DIAGNOSTIC TROUBLE CODE (DTC)
CHECK (USING SUZUKI SCAN TOOL).... 5E-19
DIAGNOSTIC TROUBLE CODE
(DTC) CLEARANCE .................................. 5E-19
DIAGNOSTIC TROUBLE CODE (DTC)
TABLE........................................................ 5E-20
DTC C1013 (DTC 13) – SYSTEM
SPECIFICATIONS DIFFERENT FROM ABS
CONTROL MODULE SPECIFICATIONS .. 5E-22 WARNING:
For vehicles equipped with Supplemental Restraint (Air Bag) System :
Service on and around the air bag system components or wiring must be performed only by an
authorized SUZUKI dealer. Refer to “Air Bag System Components and Wiring Location View” under
“General Description” in air bag system section in order to confirm whether you are performing ser-
vice on or near the air bag system components or wiring. Please observe all WARNINGS and “Ser-
vice Precautions” under “On-Vehicle Service” in air bag system section before performing service
on or around the air bag system components or wiring. Failure to follow WARNINGS could result in
unintentional activation of the system or could render the system inoperative. Either of these two
conditions may result in severe injury.
Technical service work must be started at least 90 seconds after the ignition switch is turned to the
“LOCK” position and the negative cable is disconnected from the battery. Otherwise, the system
may be activated by reserve energy in the Sensing and Diagnostic Module (SDM).
NOTE:
All brake fasteners are important attaching parts in that they could affect the performance of vital
parts and systems, and/or could result in major repair expense. They must be replaced with one of
same part number or with an equivalent part if replacement becomes necessary. Do not use a replace-
ment part of lesser quality or substitute design. Torque values must be used as specified during reas-
sembly to assure proper retention of all parts. There is to be no welding as it may result in extensive
damage and weakening of the metal.
Page 370 of 698
ENGINE GENERAL INFORMATION AND DIAGNOSIS 6-1
6
6F2
6G
6H
6K
7A
7A1
7B1
7C1
7D
7E
7F
8A
8B
8C
8D
8E
9
10A
10B
SECTION 6
ENGINE GENERAL INFORMATION AND
DIAGNOSIS
ENGINE GENERAL INFORMATION AND ENGINE DIAGNOSIS................................................. Section 6
ENGINE MECHANICAL ................................................................................................................. Section 6A1
ENGINE COOLING......................................................................................................................... Section 6B
ENGINE FUEL ................................................................................................................................ Section 6C
ENGINE AND EMISSION CONTROL SYSTEM ............................................................................ Section 6E1
IGNITION SYSTEM ........................................................................................................................ Section 6F1
CRANKING SYSTEM ..................................................................................................................... Section 6G
CHARGING SYSTEM ..................................................................................................................... Section 6H
EXHAUST SYSTEM ....................................................................................................................... Secton 6K
CONTENTS
GENERAL INFORMATION ................................ 6-4
STATEMENT ON CLEANLINESS AND
CARE .............................................................. 6-4
GENERAL INFORMATION ON ENGINE
SERVICE ........................................................ 6-4PRECAUTION ON FUEL SYSTEM
SERVICE .................................................... 6-5
FUEL PRESSURE RELIEF
PROCEDURE ............................................. 6-6
FUEL LEAKAGE CHECK PROCEDURE.... 6-6 WARNING:
For vehicles equipped with Supplemental Restraint (Air Bag) System :
Service on and around the air bag system components or wiring must be performed only by an
authorized SUZUKI dealer. Refer to “Air Bag System Components and Wiring Location View” under
“General Description” in air bag system section in order to confirm whether you are performing ser-
vice on or near the air bag system components or wiring. Please observe all WARNINGS and “Ser-
vice Precautions” under “On-Vehicle Service” in air bag system section before performing service
on or around the air bag system components or wiring. Failure to follow WARNINGS could result in
unintentional activation of the system or could render the system inoperative. Either of these two
conditions may result in severe injury.
Technical service work must be started at least 90 seconds after the ignition switch is turned to the
“LOCK” position and the negative cable is disconnected from the battery. Otherwise, the system
may be activated by reserve energy in the Sensing and Diagnostic Module (SDM).
NOTE:
Whether the following systems (parts) are used in the particular vehicle or not depends on vehicle
specifications. Be sure to bear this in mind when performing service work.
EGR valve
Heated oxygen sensor(s) or CO adjusting resistor
Three way catalytic converter
Immobilizer indicator lamp (vehicle with immobilizer indicator lamp can be identified also by HO2S-
2)
Knock sensor
Page 405 of 698
6-36 ENGINE GENERAL INFORMATION AND DIAGNOSIS
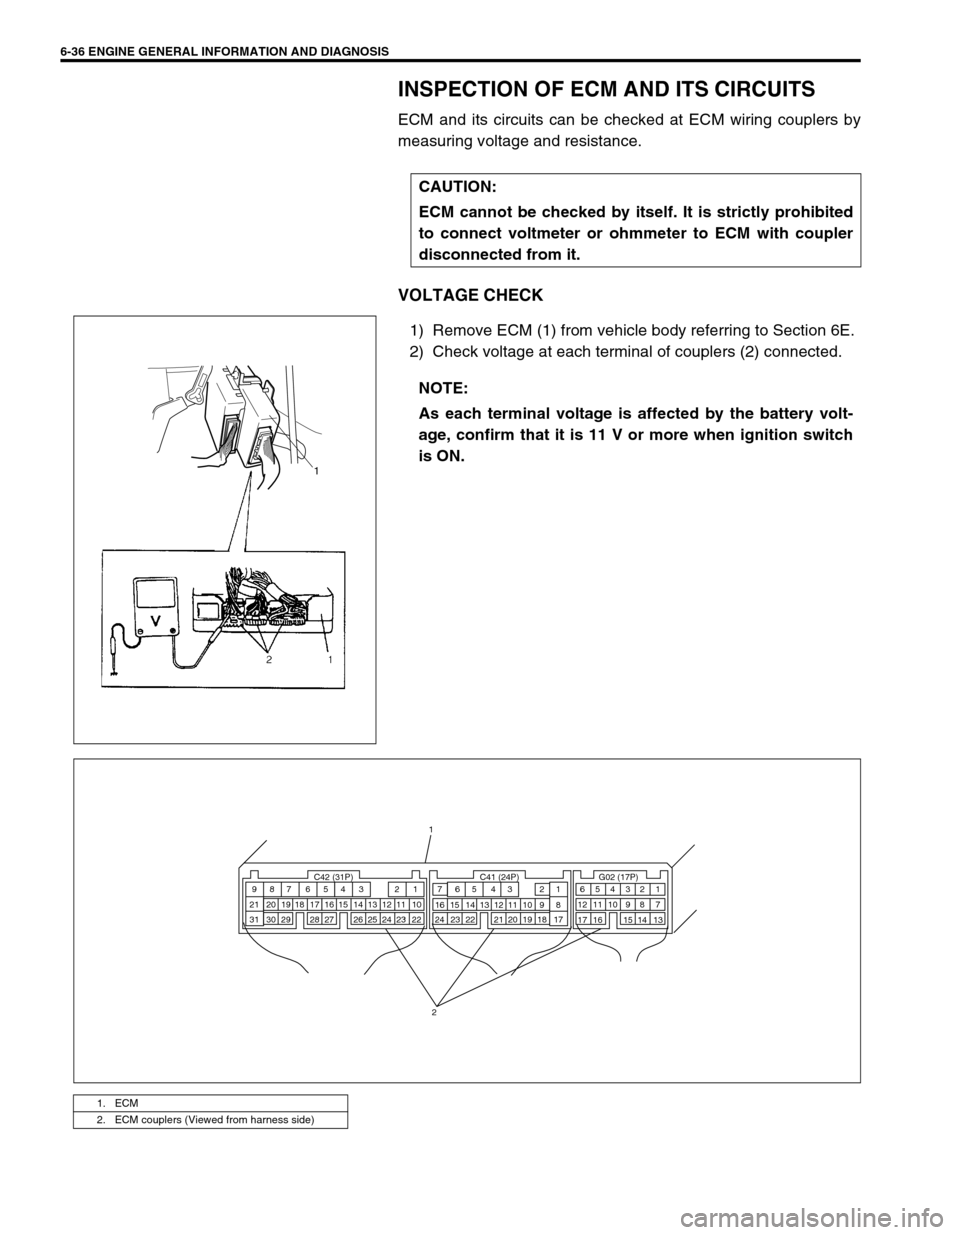
INSPECTION OF ECM AND ITS CIRCUITS
ECM and its circuits can be checked at ECM wiring couplers by
measuring voltage and resistance.
VOLTAGE CHECK
1) Remove ECM (1) from vehicle body referring to Section 6E.
2) Check voltage at each terminal of couplers (2) connected.CAUTION:
ECM cannot be checked by itself. It is strictly prohibited
to connect voltmeter or ohmmeter to ECM with coupler
disconnected from it.
NOTE:
As each terminal voltage is affected by the battery volt-
age, confirm that it is 11 V or more when ignition switch
is ON.
1
1. ECM
2. ECM couplers (Viewed from harness side)
C42 (31P) C41 (24P) G02 (17P)1 2 3 4 5 6 7 8 9
10 11 12 13 14 15 16 17 18 19 20 21
22 23 24 25 26 28 27 29 30 315 6
1 2 3 4 5 6 7
11 12
9 10 11 13 12 14 15 16
16 171 2
7 8
13 14 3 4
9 10
15 17 188
19 20 21 22 23 24
2
1
Page 415 of 698
6-46 ENGINE GENERAL INFORMATION AND DIAGNOSIS
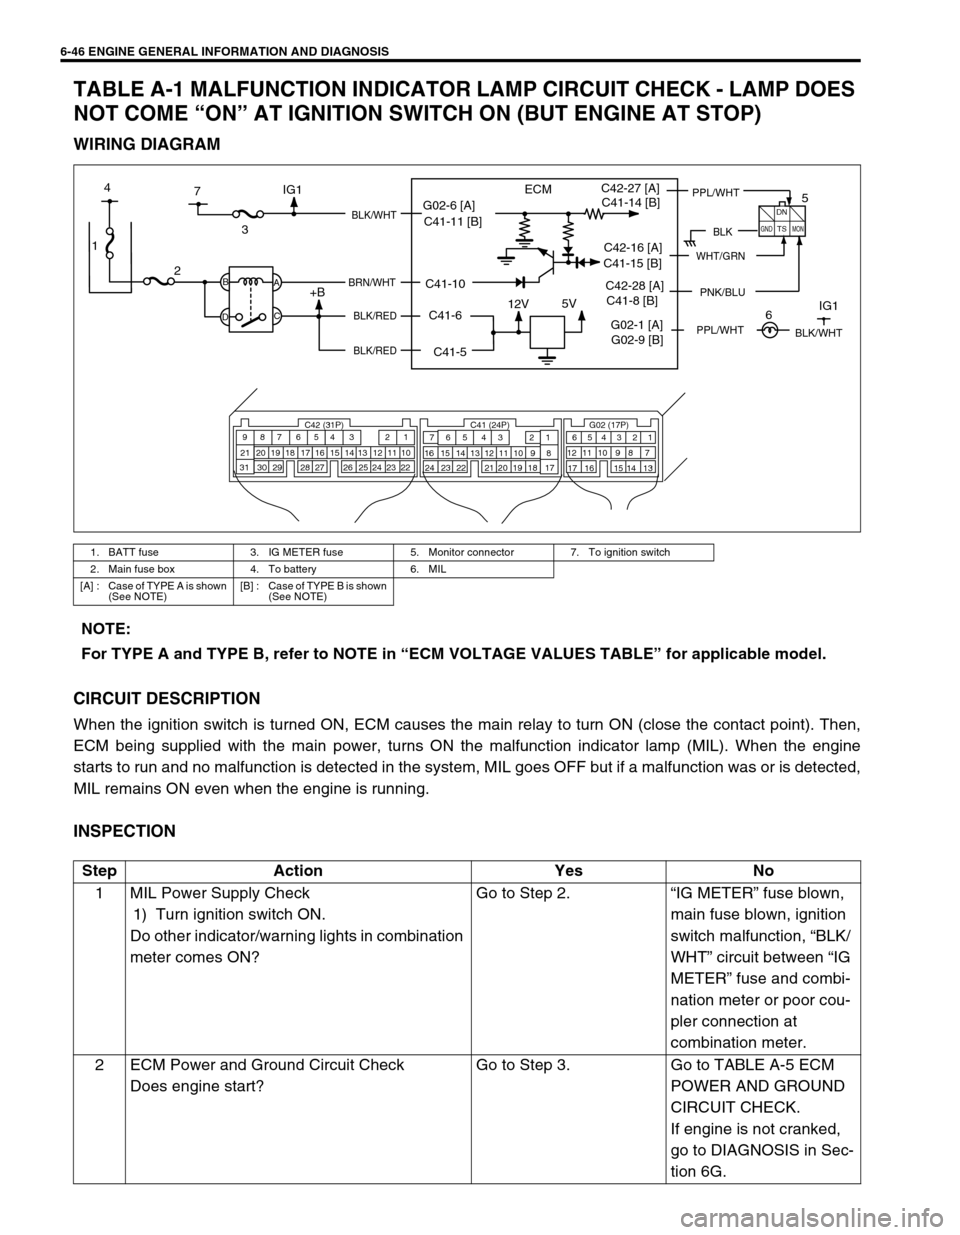
TABLE A-1 MALFUNCTION INDICATOR LAMP CIRCUIT CHECK - LAMP DOES
NOT COME “ON” AT IGNITION SWITCH ON (BUT ENGINE AT STOP)
WIRING DIAGRAM
CIRCUIT DESCRIPTION
When the ignition switch is turned ON, ECM causes the main relay to turn ON (close the contact point). Then,
ECM being supplied with the main power, turns ON the malfunction indicator lamp (MIL). When the engine
starts to run and no malfunction is detected in the system, MIL goes OFF but if a malfunction was or is detected,
MIL remains ON even when the engine is running.
INSPECTION
1. BATT fuse 3. IG METER fuse 5. Monitor connector 7. To ignition switch
2. Main fuse box 4. To battery 6. MIL
[A] : Case of TYPE A is shown
(See NOTE)[B] : Case of TYPE B is shown
(See NOTE)
1
12V5V
ECM
23
+BB
DA
C
BLK/WHT
BRN/WHT
BLK/RED
BLK/RED
C42 (31P) C41 (24P) G02 (17P)1 2 3 4 5 6 7 8 9
10 11 12 13 14 15 16 17 18 19 20 21
22 23 24 25 26 28 27 29 30 315 6
1 2 3 4 5 6 7
11 12
9 10 11 13 12 14 15 16
16 171 2
7 8
13 14 3 4
9 10
15 17 188
19 20 21 22 23 24
BLK
DN
TS
GNDMON
PPL/WHTC42-27 [A]
C42-16 [A]
PNK/BLUC42-28 [A]
7 4
G02-1 [A]IG1
5
6IG1
WHT/GRN
BLK/WHT
G02-6 [A]
C41-5 C41-6 C41-10 C41-11 [B]C41-14 [B]
C41-15 [B]
C41-8 [B]
G02-9 [B]
PPL/WHT
NOTE:
For TYPE A and TYPE B, refer to NOTE in “ECM VOLTAGE VALUES TABLE” for applicable model.
Step Action Yes No
1 MIL Power Supply Check
1) Turn ignition switch ON.
Do other indicator/warning lights in combination
meter comes ON?Go to Step 2.“IG METER” fuse blown,
main fuse blown, ignition
switch malfunction, “BLK/
WHT” circuit between “IG
METER” fuse and combi-
nation meter or poor cou-
pler connection at
combination meter.
2 ECM Power and Ground Circuit Check
Does engine start?Go to Step 3. Go to TABLE A-5 ECM
POWER AND GROUND
CIRCUIT CHECK.
If engine is not cranked,
go to DIAGNOSIS in Sec-
tion 6G.
Page 416 of 698
ENGINE GENERAL INFORMATION AND DIAGNOSIS 6-47
TABLE A-2 MALFUNCTION INDICATOR LAMP CIRCUIT CHECK - LAMP
REMAINS “ON” AFTER ENGINE STARTS
WIRING DIAGRAM / CIRCUIT DESCRIPTION
Refer to table A-1.
INSPECTION
3 MIL Circuit Check
1) Turn ignition switch OFF and disconnect
connectors from ECM.
2) Check for proper connection to ECM at ter-
minal G02-1 (Case of TYPE A. See NOTE)
or G02-9 (Case of TYPE B. See NOTE).
3) If OK, then using service wire, ground termi-
nal G02-1 (Case of TYPE A. See NOTE) or
G02-9 (Case of TYPE B. See NOTE) in con-
nector disconnected.
Does MIL turn on at ignition switch ON?Substitute a known-good
ECM and recheck.Bulb burned out or “PPL/
YEL” (Case of TYPE A.
See NOTE) or “PPL/
WHT” (Case of TYPE B.
See NOTE) wire circuit
open.
Test switch terminal cir-
cuit grounded (vehicle
without immobilizer indi-
cator lamp) Step Action Yes No
NOTE:
For TYPE A and TYPE B, refer to NOTE in “ECM VOLTAGE VALUES TABLE” for applicable model.
Step Action Yes No
1 Diagnostic Trouble Code (DTC) Check
1) Check DTC referring to DTC CHECK
section.
Is there any DTC(s)?Go to Step 2 of ENGINE DIAG.
FLOW TABLE.Go to Step 2.
2DTC Check
1) Start engine and recheck DTC while
engine running.
Is there any DTC(s)?Go to Step 3.
3 MIL Circuit Check
1) Turn OFF ignition switch.
2) Disconnect connectors from ECM.
Does MIL turn ON at ignition switch ON?“PPL/YEL” (Case of TYPE A.
See NOTE) or “PPL/WHT”
(Case of TYPE B. See NOTE)
wire circuit shorted to ground.Substitute a known-good
ECM and recheck.
Page 417 of 698

6-48 ENGINE GENERAL INFORMATION AND DIAGNOSIS
TABLE A-3 MIL CHECK - MIL FLASHES AT IGNITION SWITCH ON (VEHICLE
WITHOUT IMMOBILIZER INDICATOR LAMP)
WIRING DIAGRAM / CIRCUIT DESCRIPTION
Refer to TABLE A-1.
INSPECTION
TABLE A-4 MIL CHECK - MIL DOES NOT FLASH OR JUST REMAINS ON EVEN
WITH GROUNDING DIAGNOSIS SWITCH TERMINAL (VEHICLE WITHOUT
IMMOBILIZER INDICATOR LAMP)
WIRING DIAGRAM / CIRCUIT DESCRIPTION
Refer to TABLE A-1.
INSPECTION
NOTE:
For TYPE A and TYPE B, refer to NOTE in “ECM VOLTAGE VALUES TABLE” for applicable model.
Step Action Yes No
1 MIL Flashing Pattern Check
1) Turn ignition switch ON.
Does lamp flashing pattern indicate diag-
nostic trouble code?Go to Step 2. Substitute a known-good ECM
and recheck.
2 Diag. Switch Circuit Check
Is diag. switch terminal connected to
ground via service wire?System is in good condi-
tion.“PPL/WHT” circuit for monitor
connector shorted to ground. If
circuit is OK substitute a known-
good ECM and recheck.
NOTE:
For TYPE A and TYPE B, refer to NOTE in “ECM VOLTAGE VALUES TABLE” for applicable model.
Step Action Yes No
1 MIL Circuit Check
1) Turn ignition switch OFF and disconnect connec-
tors from ECM.
Does MIL turn ON at ignition switch ON?“PPL/YEL” (Case of TYPE A.
See NOTE) or “PPL/WHT”
(Case of TYPE B. See NOTE)
circuit shorted to ground.Go to Step 2.
2 ECM/PCM Connection Check
1) Turn ignition switch OFF.
Is connector (C42-27 (Case of TYPE A. See NOTE)
or C41-14 (Case of TYPE B. See NOTE) connection)
connected to ECM/PCM properly?Go to Step 3. Poor connector connec-
tion.
3 Diag. Switch Terminal Circuit Check
1) Connect connectors to ECM.
2) Using service wire, ground C42-27 (Case of
TYPE A. See NOTE) or C41-14 (Case of TYPE
B. See NOTE) connection) terminal with connec-
tors connected to ECM.
3) Turn ignition switch ON.
Does MIL flash?“PPL/WHT” or “BLK” circuit in
monitor connector is open.Substitute a known-good
ECM and recheck.
Page 418 of 698
ENGINE GENERAL INFORMATION AND DIAGNOSIS 6-49
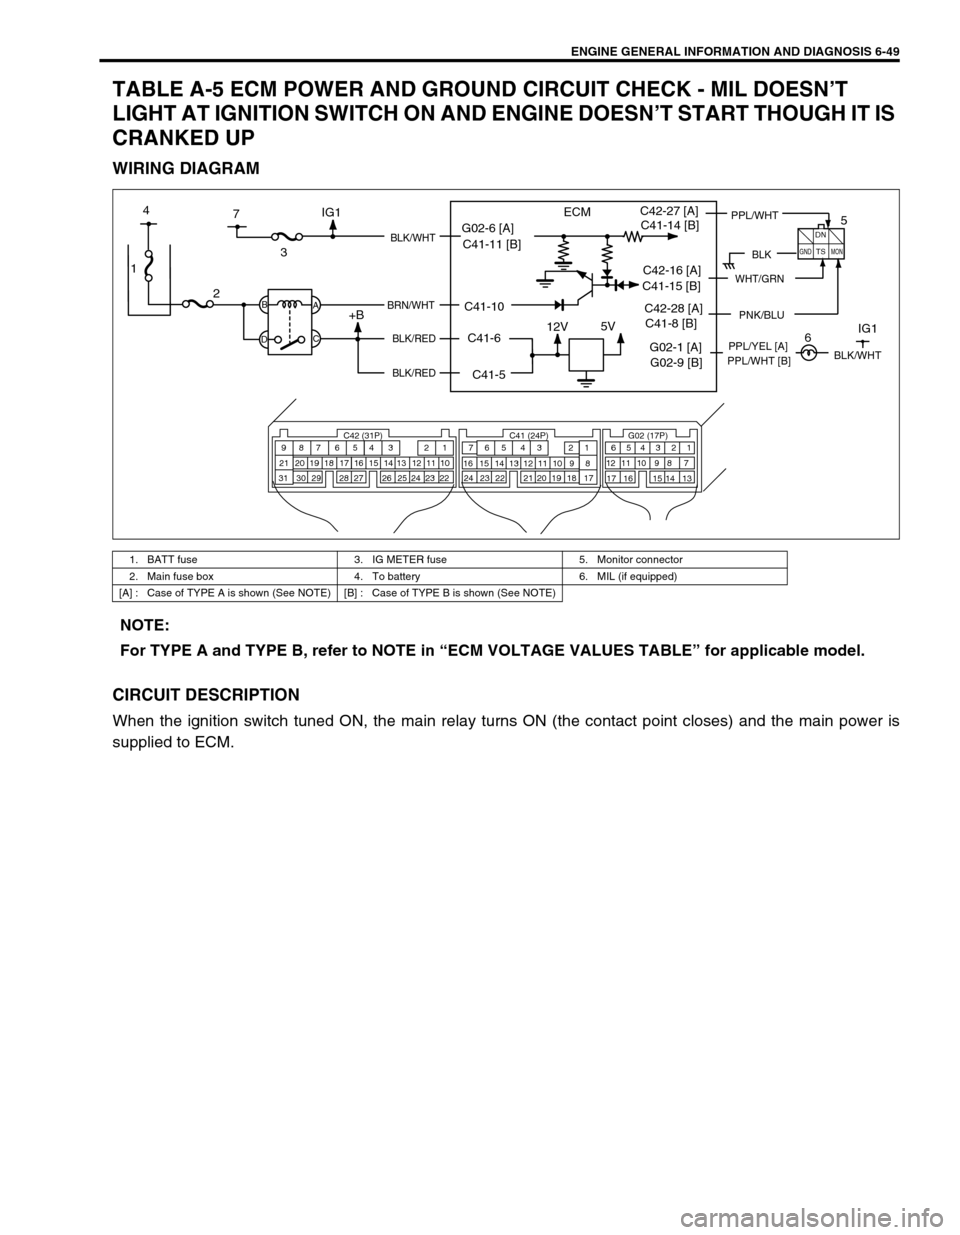
TABLE A-5 ECM POWER AND GROUND CIRCUIT CHECK - MIL DOESN’T
LIGHT AT IGNITION SWITCH ON AND ENGINE DOESN’T START THOUGH IT IS
CRANKED UP
WIRING DIAGRAM
CIRCUIT DESCRIPTION
When the ignition switch tuned ON, the main relay turns ON (the contact point closes) and the main power is
supplied to ECM.
1. BATT fuse 3. IG METER fuse 5. Monitor connector
2. Main fuse box 4. To battery 6. MIL (if equipped)
[A] : Case of TYPE A is shown (See NOTE) [B] : Case of TYPE B is shown (See NOTE)
1
12V5V
ECM
23
+BB
DA
C
BLK/WHT
BRN/WHT
BLK/RED
BLK/RED
C42 (31P) C41 (24P) G02 (17P)1 2 3 4 5 6 7 8 9
10 11 12 13 14 15 16 17 18 19 20 21
22 23 24 25 26 28 27 29 30 315 6
1 2 3 4 5 6 7
11 12
9 10 11 13 12 14 15 16
16 171 2
7 8
13 14 3 4
9 10
15 17 188
19 20 21 22 23 24
BLK
DN
TS
GNDMON
PPL/WHTC42-27 [A]
C42-16 [A]
PNK/BLUC42-28 [A]
7 4
G02-1 [A]IG1PPL/YEL [A]
5
6IG1
WHT/GRN
BLK/WHT
G02-6 [A]
C41-5 C41-6 C41-10 C41-11 [B]C41-14 [B]
C41-15 [B]
C41-8 [B]
G02-9 [B]PPL/WHT [B]
NOTE:
For TYPE A and TYPE B, refer to NOTE in “ECM VOLTAGE VALUES TABLE” for applicable model.
Page 421 of 698
6-52 ENGINE GENERAL INFORMATION AND DIAGNOSIS
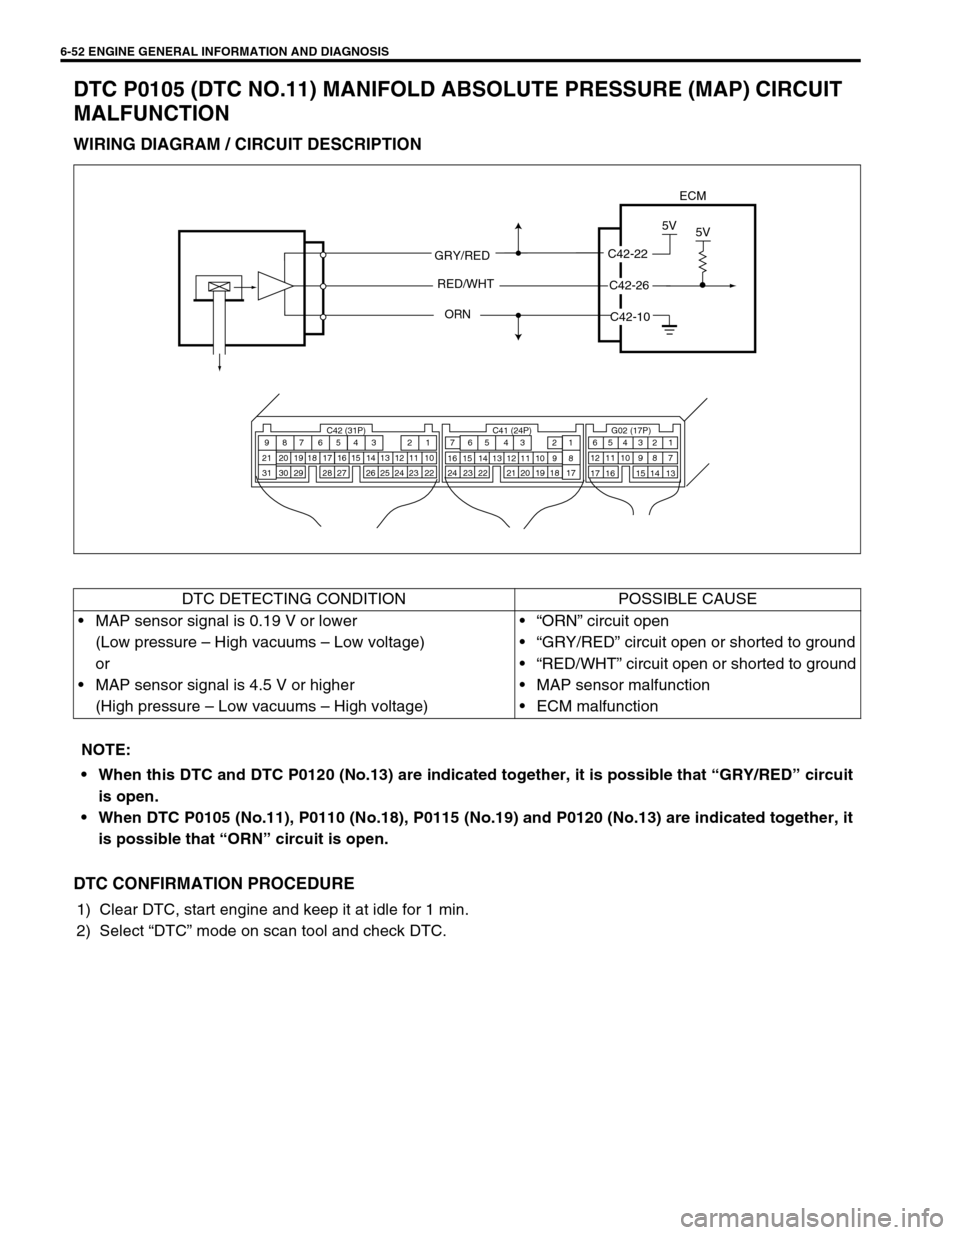
DTC P0105 (DTC NO.11) MANIFOLD ABSOLUTE PRESSURE (MAP) CIRCUIT
MALFUNCTION
WIRING DIAGRAM / CIRCUIT DESCRIPTION
DTC CONFIRMATION PROCEDURE
1) Clear DTC, start engine and keep it at idle for 1 min.
2) Select “DTC” mode on scan tool and check DTC.
ECM
GRY/RED
ORN
C42-22
5V
AMPC42-26
5V
RED/WHT
C42-10
C42 (31P) C41 (24P) G02 (17P)1 2 3 4 5 6 7 8 9
10 11 12 13 14 15 16 17 18 19 20 21
22 23 24 25 26 28 27 29 30 315 6
1 2 3 4 5 6 7
11 12
9 10 11 13 12 14 15 16
16 171 2
7 8
13 14 3 4
9 10
15 17 188
19 20 21 22 23 24
DTC DETECTING CONDITION POSSIBLE CAUSE
MAP sensor signal is 0.19 V or lower
(Low pressure – High vacuums – Low voltage)
or
MAP sensor signal is 4.5 V or higher
(High pressure – Low vacuums – High voltage)“ORN” circuit open
“GRY/RED” circuit open or shorted to ground
“RED/WHT” circuit open or shorted to ground
MAP sensor malfunction
ECM malfunction
NOTE:
When this DTC and DTC P0120 (No.13) are indicated together, it is possible that “GRY/RED” circuit
is open.
When DTC P0105 (No.11), P0110 (No.18), P0115 (No.19) and P0120 (No.13) are indicated together, it
is possible that “ORN” circuit is open.