relay SUZUKI SWIFT 2000 1.G RG413 Service Workshop Manual
[x] Cancel search | Manufacturer: SUZUKI, Model Year: 2000, Model line: SWIFT, Model: SUZUKI SWIFT 2000 1.GPages: 698, PDF Size: 16.01 MB
Page 12 of 698
GENERAL INFORMATION 0A-9
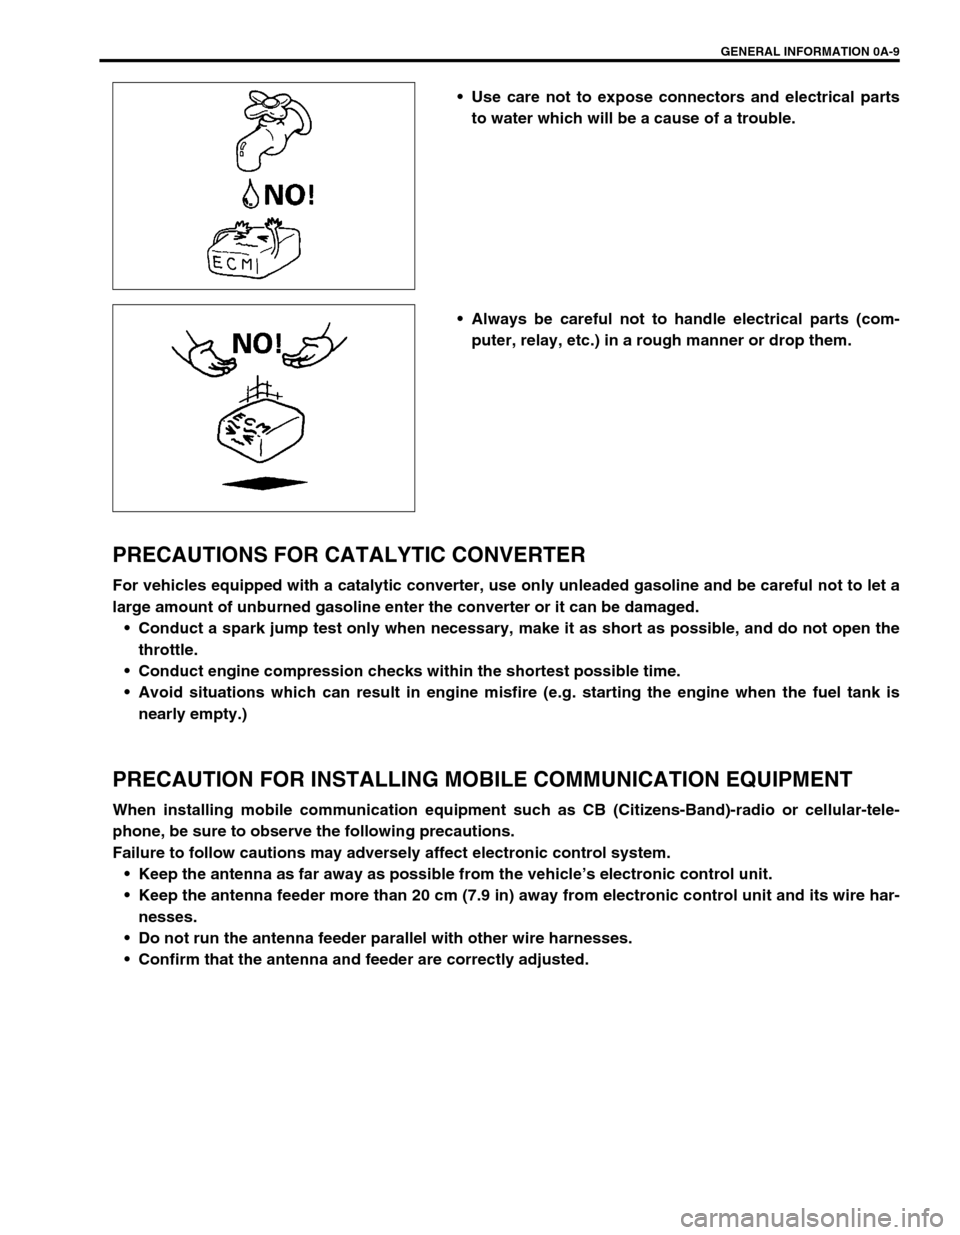
Use care not to expose connectors and electrical parts
to water which will be a cause of a trouble.
Always be careful not to handle electrical parts (com-
puter, relay, etc.) in a rough manner or drop them.
PRECAUTIONS FOR CATALYTIC CONVERTER
For vehicles equipped with a catalytic converter, use only unleaded gasoline and be careful not to let a
large amount of unburned gasoline enter the converter or it can be damaged.
Conduct a spark jump test only when necessary, make it as short as possible, and do not open the
throttle.
Conduct engine compression checks within the shortest possible time.
Avoid situations which can result in engine misfire (e.g. starting the engine when the fuel tank is
nearly empty.)
PRECAUTION FOR INSTALLING MOBILE COMMUNICATION EQUIPMENT
When installing mobile communication equipment such as CB (Citizens-Band)-radio or cellular-tele-
phone, be sure to observe the following precautions.
Failure to follow cautions may adversely affect electronic control system.
Keep the antenna as far away as possible from the vehicle’s electronic control unit.
Keep the antenna feeder more than 20 cm (7.9 in) away from electronic control unit and its wire har-
nesses.
Do not run the antenna feeder parallel with other wire harnesses.
Confirm that the antenna and feeder are correctly adjusted.
Page 19 of 698
0A-16 GENERAL INFORMATION
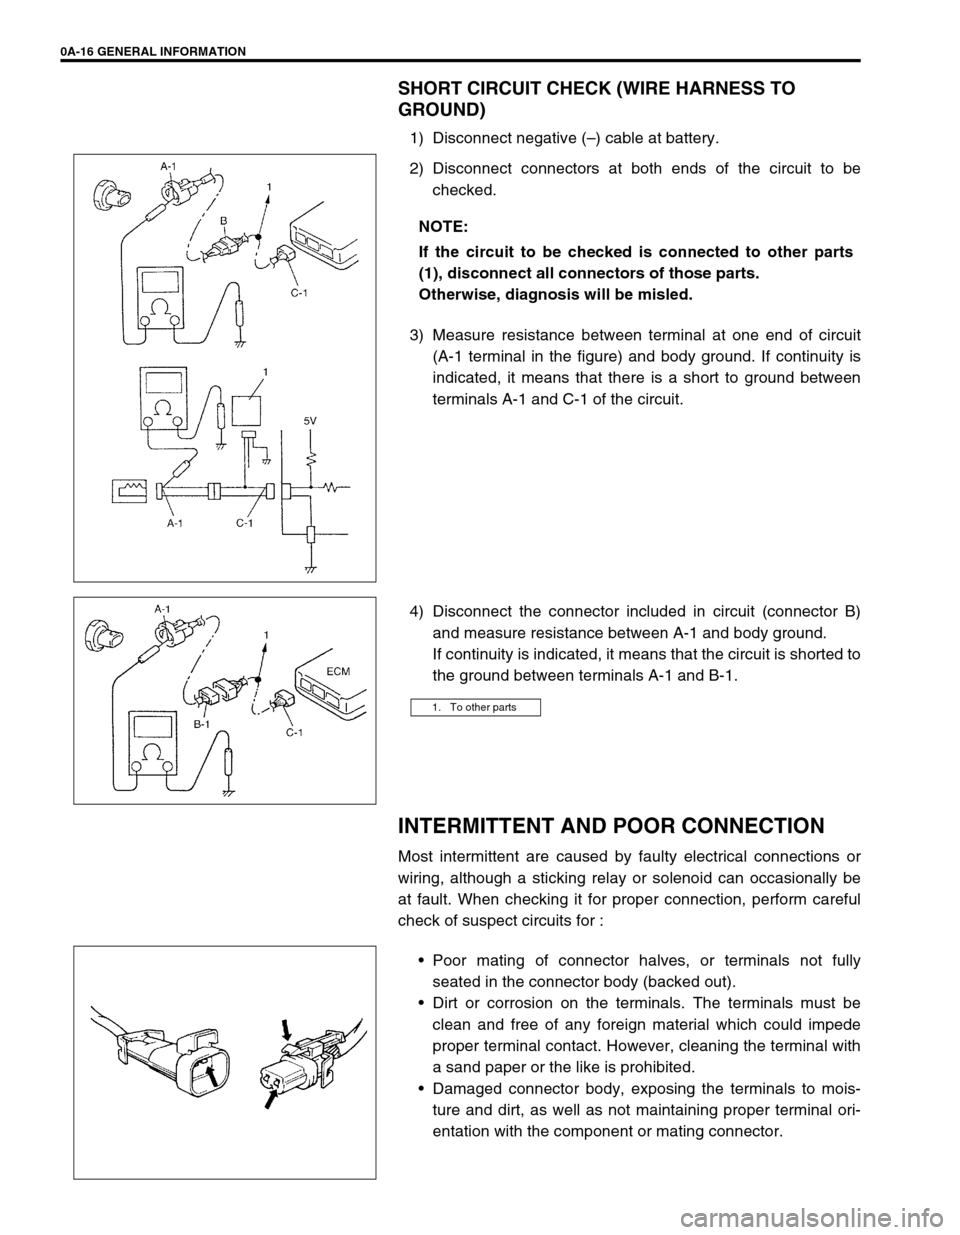
SHORT CIRCUIT CHECK (WIRE HARNESS TO
GROUND)
1) Disconnect negative (–) cable at battery.
2) Disconnect connectors at both ends of the circuit to be
checked.
3) Measure resistance between terminal at one end of circuit
(A-1 terminal in the figure) and body ground. If continuity is
indicated, it means that there is a short to ground between
terminals A-1 and C-1 of the circuit.
4) Disconnect the connector included in circuit (connector B)
and measure resistance between A-1 and body ground.
If continuity is indicated, it means that the circuit is shorted to
the ground between terminals A-1 and B-1.
INTERMITTENT AND POOR CONNECTION
Most intermittent are caused by faulty electrical connections or
wiring, although a sticking relay or solenoid can occasionally be
at fault. When checking it for proper connection, perform careful
check of suspect circuits for :
Poor mating of connector halves, or terminals not fully
seated in the connector body (backed out).
Dirt or corrosion on the terminals. The terminals must be
clean and free of any foreign material which could impede
proper terminal contact. However, cleaning the terminal with
a sand paper or the like is prohibited.
Damaged connector body, exposing the terminals to mois-
ture and dirt, as well as not maintaining proper terminal ori-
entation with the component or mating connector. NOTE:
If the circuit to be checked is connected to other parts
(1), disconnect all connectors of those parts.
Otherwise, diagnosis will be misled.
1. To other parts
Page 54 of 698
HEATER AND VENTILATION 1A-3
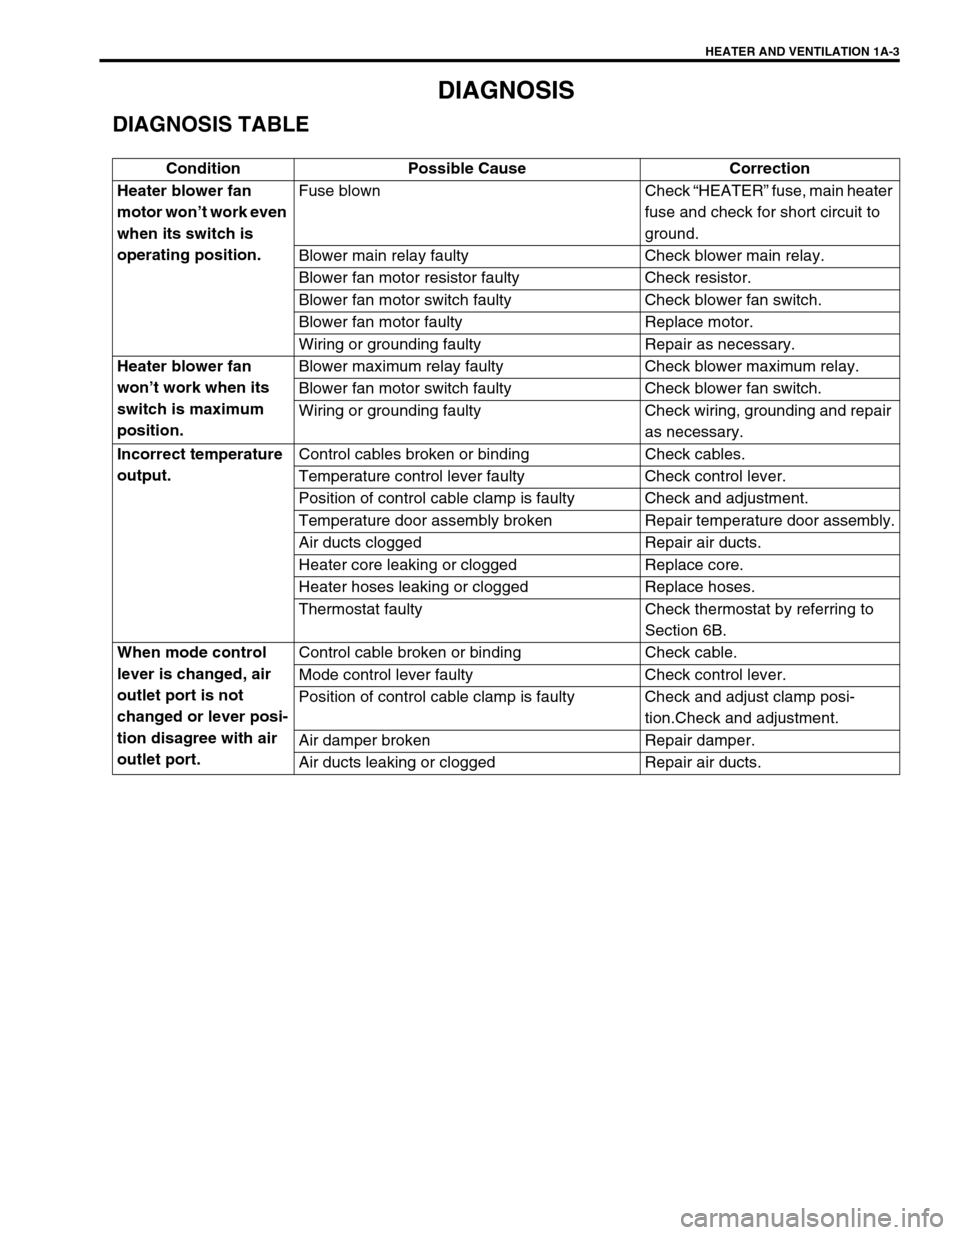
DIAGNOSIS
DIAGNOSIS TABLE
Condition Possible Cause Correction
Heater blower fan
motor won’t work even
when its switch is
operating position.Fuse blown Check “HEATER” fuse, main heater
fuse and check for short circuit to
ground.
Blower main relay faulty Check blower main relay.
Blower fan motor resistor faulty Check resistor.
Blower fan motor switch faulty Check blower fan switch.
Blower fan motor faulty Replace motor.
Wiring or grounding faulty Repair as necessary.
Heater blower fan
won’t work when its
switch is maximum
position.Blower maximum relay faulty Check blower maximum relay.
Blower fan motor switch faulty Check blower fan switch.
Wiring or grounding faulty Check wiring, grounding and repair
as necessary.
Incorrect temperature
output.Control cables broken or binding Check cables.
Temperature control lever faulty Check control lever.
Position of control cable clamp is faulty Check and adjustment.
Temperature door assembly broken Repair temperature door assembly.
Air ducts clogged Repair air ducts.
Heater core leaking or clogged Replace core.
Heater hoses leaking or clogged Replace hoses.
Thermostat faulty Check thermostat by referring to
Section 6B.
When mode control
lever is changed, air
outlet port is not
changed or lever posi-
tion disagree with air
outlet port.Control cable broken or binding Check cable.
Mode control lever faulty Check control lever.
Position of control cable clamp is faulty Check and adjust clamp posi-
tion.Check and adjustment.
Air damper broken Repair damper.
Air ducts leaking or clogged Repair air ducts.
Page 67 of 698
1B-2 AIR CONDITIONING (OPTIONAL)
REMOVING MANIFOLD GAUGE SET ...... 1B-26
LEAK TEST................................................ 1B-26
LIQUID LEAK DETECTORS .................. 1B-26
ON-VEHICLE SERVICE ................................ 1B-27
SERVICE PRECAUTION........................... 1B-27
REFRIGERANT LINE ............................ 1B-27
HANDLING REFRIGERANT HFC-134a
(R-134a) ................................................. 1B-28
REFRIGERANT RECOVERY ................ 1B-28
REFRIGERANT CHARGE ..................... 1B-28
CONDENSER ASSEMBLY........................ 1B-28
RECEIVER/DRYER ................................... 1B-30
RADIATOR/CONDENSER COOLING FAN
MOTOR...................................................... 1B-31COOLING UNIT (EVAPORATOR) ............ 1B-32
A/C EVAPORATOR TEMPERATURE
SENSOR.................................................... 1B-34
EXPANSION VALVE ................................. 1B-34
A/C REFRIGERANT PRESSURE
SWITCH..................................................... 1B-35
A/C SWITCH.............................................. 1B-36
RADIATOR/CONDENSER COOLING FAN
MOTOR RELAY No.1, No.2 and No.3 ....... 1B-36
COMPRESSOR ......................................... 1B-36
MAGNET CLUTCH .................................... 1B-38
LIP TYPE SEAL ......................................... 1B-41
REQUIRED SERVICE MATERIAL ............... 1B-43
SPECIAL TOOL ............................................ 1B-44
Page 70 of 698
AIR CONDITIONING (OPTIONAL) 1B-5
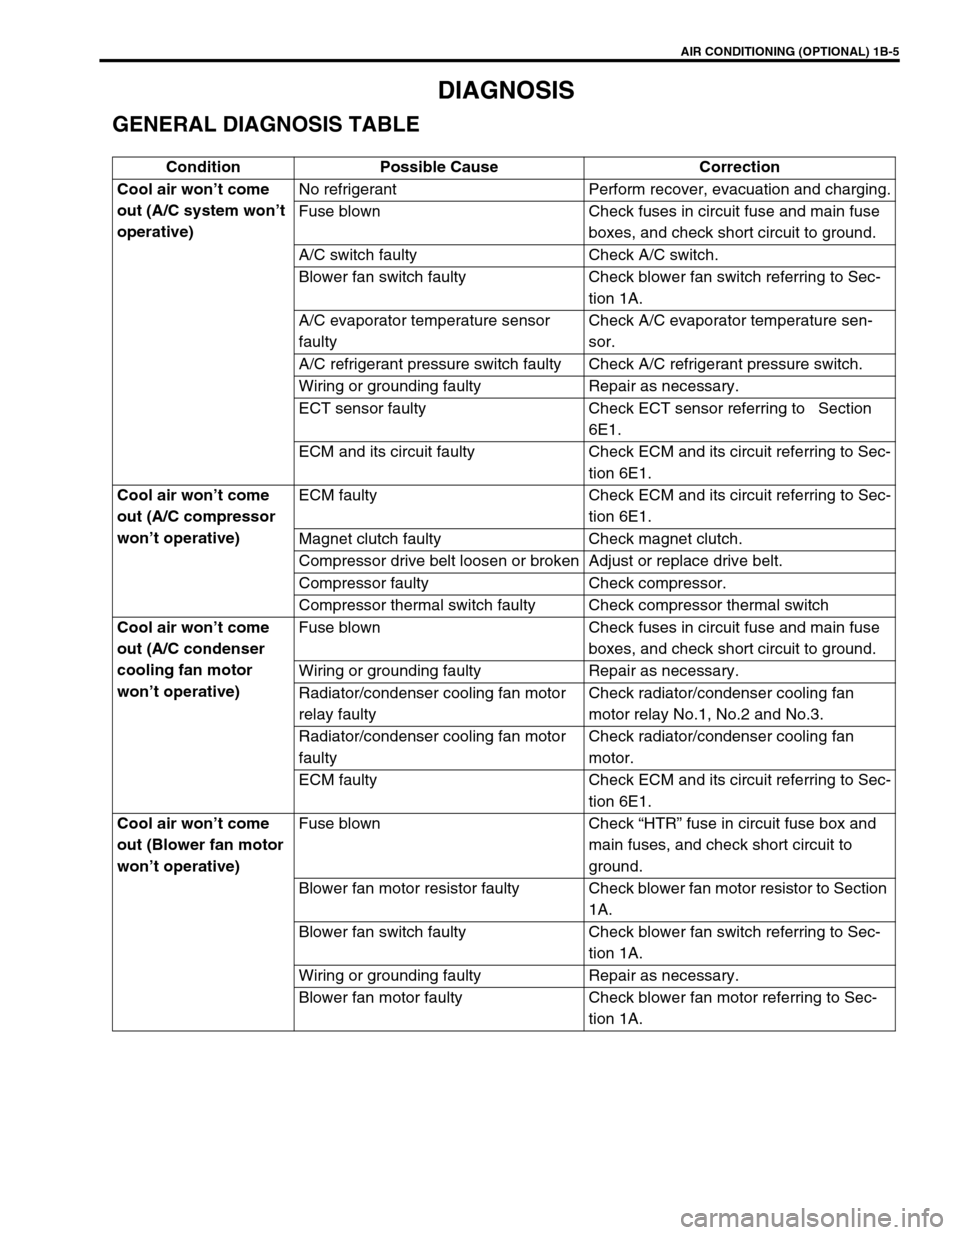
DIAGNOSIS
GENERAL DIAGNOSIS TABLE
Condition Possible Cause Correction
Cool air won’t come
out (A/C system won’t
operative)No refrigerant Perform recover, evacuation and charging.
Fuse blown Check fuses in circuit fuse and main fuse
boxes, and check short circuit to ground.
A/C switch faulty Check A/C switch.
Blower fan switch faulty Check blower fan switch referring to Sec-
tion 1A.
A/C evaporator temperature sensor
faultyCheck A/C evaporator temperature sen-
sor.
A/C refrigerant pressure switch faulty Check A/C refrigerant pressure switch.
Wiring or grounding faulty Repair as necessary.
ECT sensor faulty Check ECT sensor referring to Section
6E1.
ECM and its circuit faulty Check ECM and its circuit referring to Sec-
tion 6E1.
Cool air won’t come
out (A/C compressor
won’t operative)ECM faulty Check ECM and its circuit referring to Sec-
tion 6E1.
Magnet clutch faulty Check magnet clutch.
Compressor drive belt loosen or broken Adjust or replace drive belt.
Compressor faulty Check compressor.
Compressor thermal switch faulty Check compressor thermal switch
Cool air won’t come
out (A/C condenser
cooling fan motor
won’t operative)Fuse blown Check fuses in circuit fuse and main fuse
boxes, and check short circuit to ground.
Wiring or grounding faulty Repair as necessary.
Radiator/condenser cooling fan motor
relay faultyCheck radiator/condenser cooling fan
motor relay No.1, No.2 and No.3.
Radiator/condenser cooling fan motor
faultyCheck radiator/condenser cooling fan
motor.
ECM faulty Check ECM and its circuit referring to Sec-
tion 6E1.
Cool air won’t come
out (Blower fan motor
won’t operative)Fuse blown Check “HTR” fuse in circuit fuse box and
main fuses, and check short circuit to
ground.
Blower fan motor resistor faulty Check blower fan motor resistor to Section
1A.
Blower fan switch faulty Check blower fan switch referring to Sec-
tion 1A.
Wiring or grounding faulty Repair as necessary.
Blower fan motor faulty Check blower fan motor referring to Sec-
tion 1A.
Page 81 of 698
1B-16 AIR CONDITIONING (OPTIONAL)
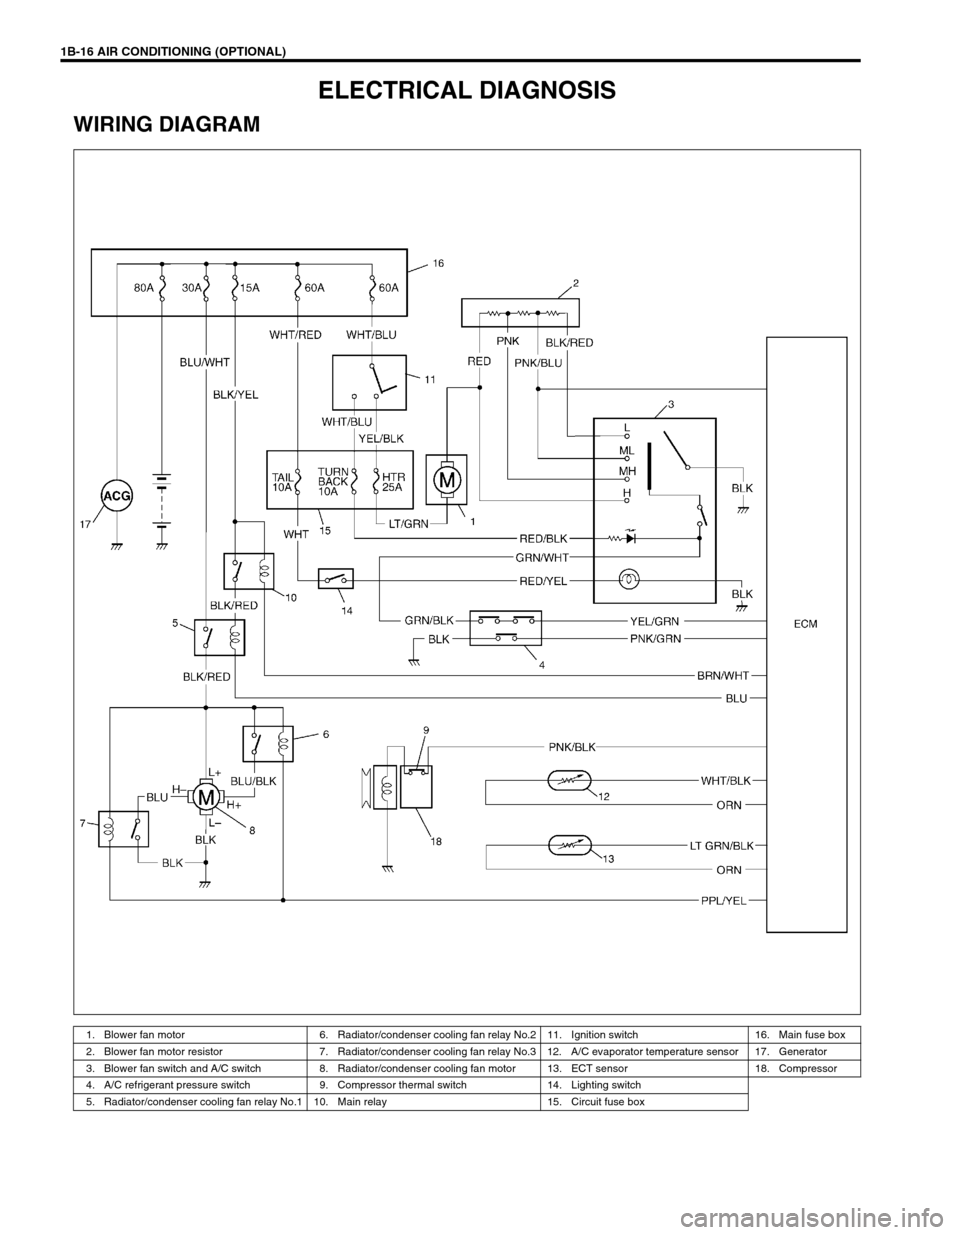
ELECTRICAL DIAGNOSIS
WIRING DIAGRAM
1. Blower fan motor 6. Radiator/condenser cooling fan relay No.2 11. Ignition switch 16. Main fuse box
2. Blower fan motor resistor 7. Radiator/condenser cooling fan relay No.3 12. A/C evaporator temperature sensor 17. Generator
3. Blower fan switch and A/C switch 8. Radiator/condenser cooling fan motor 13. ECT sensor 18. Compressor
4. A/C refrigerant pressure switch 9. Compressor thermal switch 14. Lighting switch
5. Radiator/condenser cooling fan relay No.1 10. Main relay 15. Circuit fuse box
Page 83 of 698
1B-18 AIR CONDITIONING (OPTIONAL)
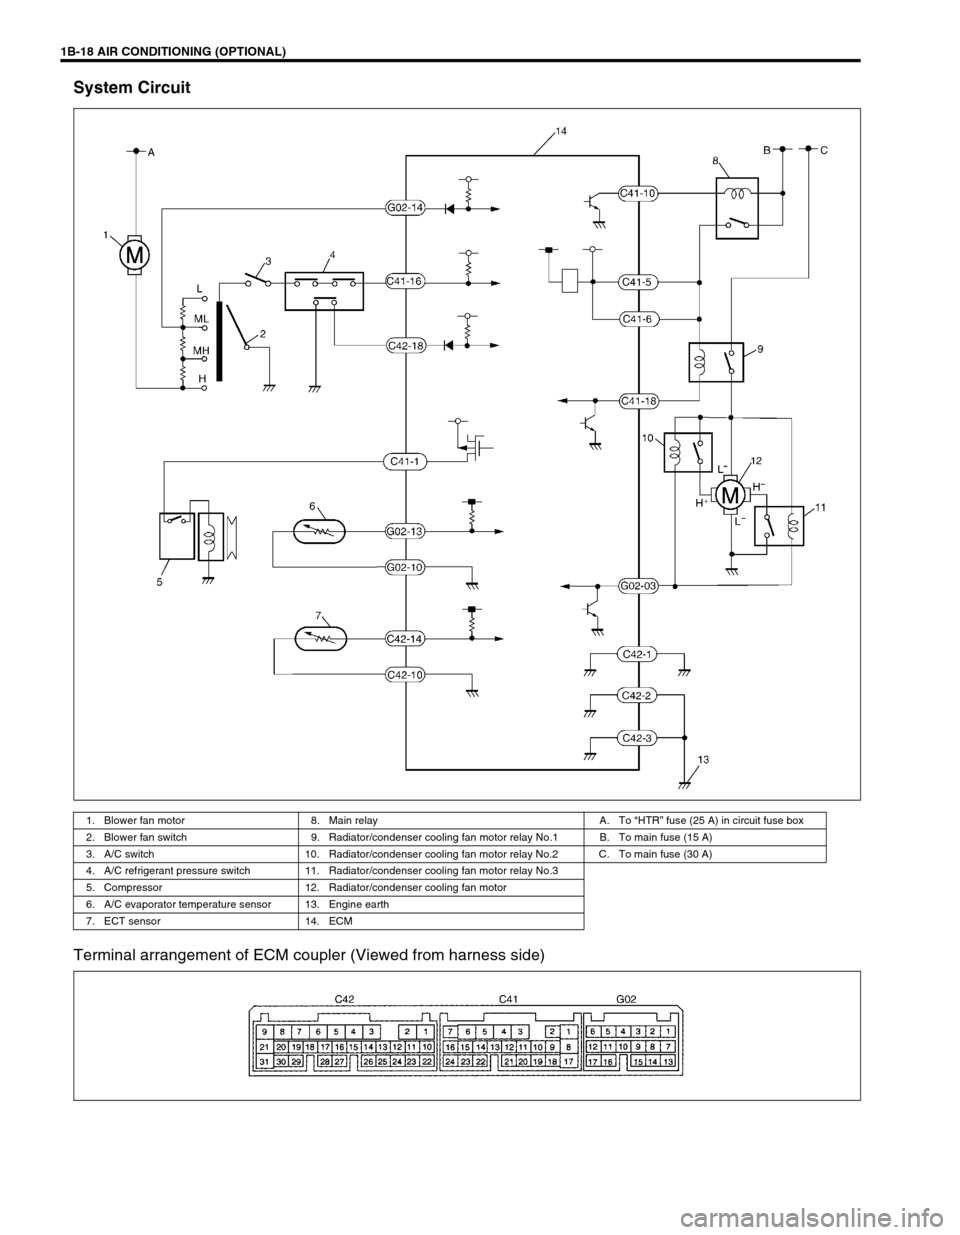
System Circuit
Terminal arrangement of ECM coupler (Viewed from harness side)
1. Blower fan motor 8. Main relay A. To “HTR” fuse (25 A) in circuit fuse box
2. Blower fan switch 9. Radiator/condenser cooling fan motor relay No.1 B. To main fuse (15 A)
3. A/C switch 10. Radiator/condenser cooling fan motor relay No.2 C. To main fuse (30 A)
4. A/C refrigerant pressure switch 11. Radiator/condenser cooling fan motor relay No.3
5. Compressor 12. Radiator/condenser cooling fan motor
6. A/C evaporator temperature sensor 13. Engine earth
7. ECT sensor 14. ECM
Page 84 of 698
AIR CONDITIONING (OPTIONAL) 1B-19
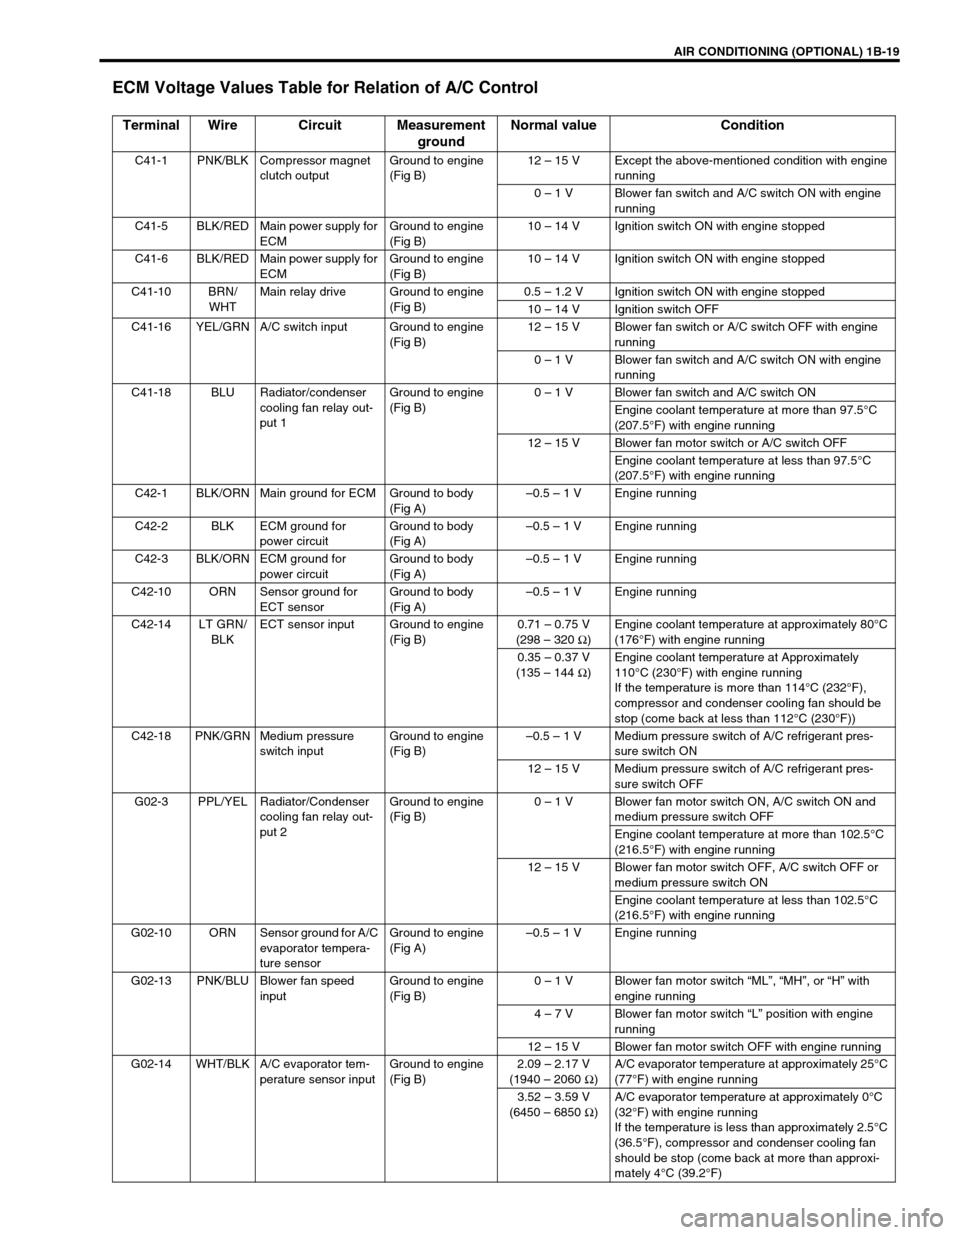
ECM Voltage Values Table for Relation of A/C Control
Terminal Wire Circuit Measurement
groundNormal value Condition
C41-1 PNK/BLK Compressor magnet
clutch outputGround to engine
(Fig B)12 – 15 V Except the above-mentioned condition with engine
running
0 – 1 V Blower fan switch and A/C switch ON with engine
running
C41-5 BLK/RED Main power supply for
ECMGround to engine
(Fig B)10 – 14 V Ignition switch ON with engine stopped
C41-6 BLK/RED Main power supply for
ECMGround to engine
(Fig B)10 – 14 V Ignition switch ON with engine stopped
C41-10 BRN/
WHTMain relay drive Ground to engine
(Fig B)0.5 – 1.2 V Ignition switch ON with engine stopped
10 – 14 V Ignition switch OFF
C41-16 YEL/GRN A/C switch input Ground to engine
(Fig B)12 – 15 V Blower fan switch or A/C switch OFF with engine
running
0 – 1 V Blower fan switch and A/C switch ON with engine
running
C41-18 BLU Radiator/condenser
cooling fan relay out-
put 1Ground to engine
(Fig B)0 – 1 V Blower fan switch and A/C switch ON
Engine coolant temperature at more than 97.5°C
(207.5°F) with engine running
12 – 15 V Blower fan motor switch or A/C switch OFF
Engine coolant temperature at less than 97.5°C
(207.5°F) with engine running
C42-1 BLK/ORN Main ground for ECM Ground to body
(Fig A)–0.5 – 1 V Engine running
C42-2 BLK ECM ground for
power circuitGround to body
(Fig A)–0.5 – 1 V Engine running
C42-3 BLK/ORN ECM ground for
power circuitGround to body
(Fig A)–0.5 – 1 V Engine running
C42-10 ORN Sensor ground for
ECT sensorGround to body
(Fig A)–0.5 – 1 V Engine running
C42-14 LT GRN/
BLKECT sensor input Ground to engine
(Fig B)0.71 – 0.75 V
(298 – 320 Ω
)Engine coolant temperature at approximately 80°C
(176°F) with engine running
0.35 – 0.37 V
(135 – 144 Ω
)Engine coolant temperature at Approximately
110°C (230°F) with engine running
If the temperature is more than 114°C (232°F),
compressor and condenser cooling fan should be
stop (come back at less than 112°C (230°F))
C42-18 PNK/GRN Medium pressure
switch inputGround to engine
(Fig B)–0.5 – 1 V Medium pressure switch of A/C refrigerant pres-
sure switch ON
12 – 15 V Medium pressure switch of A/C refrigerant pres-
sure switch OFF
G02-3 PPL/YEL Radiator/Condenser
cooling fan relay out-
put 2Ground to engine
(Fig B)0 – 1 V Blower fan motor switch ON, A/C switch ON and
medium pressure switch OFF
Engine coolant temperature at more than 102.5°C
(216.5°F) with engine running
12 – 15 V Blower fan motor switch OFF, A/C switch OFF or
medium pressure switch ON
Engine coolant temperature at less than 102.5°C
(216.5°F) with engine running
G02-10 ORN Sensor ground for A/C
evaporator tempera-
ture sensorGround to engine
(Fig A)–0.5 – 1 V Engine running
G02-13 PNK/BLU Blower fan speed
inputGround to engine
(Fig B)0 – 1 V Blower fan motor switch “ML”, “MH”, or “H” with
engine running
4 – 7 V Blower fan motor switch “L” position with engine
running
12 – 15 V Blower fan motor switch OFF with engine running
G02-14 WHT/BLK A/C evaporator tem-
perature sensor inputGround to engine
(Fig B)2.09 – 2.17 V
(1940 – 2060 Ω
)A/C evaporator temperature at approximately 25°C
(77°F) with engine running
3.52 – 3.59 V
(6450 – 6850 Ω
)A/C evaporator temperature at approximately 0°C
(32°F) with engine running
If the temperature is less than approximately 2.5°C
(36.5°F), compressor and condenser cooling fan
should be stop (come back at more than approxi-
mately 4°C (39.2°F)
Page 101 of 698
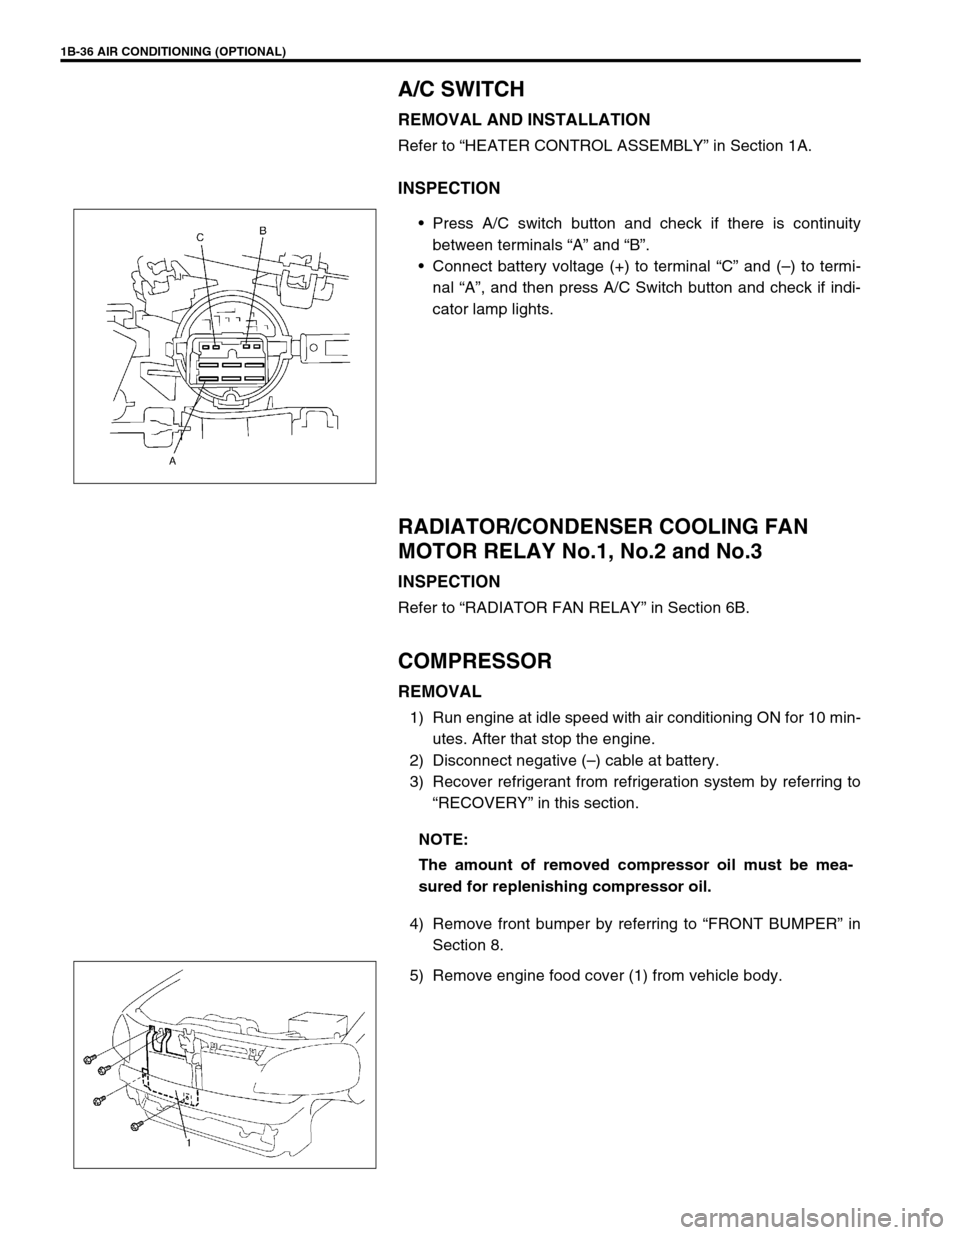
1B-36 AIR CONDITIONING (OPTIONAL)
A/C SWITCH
REMOVAL AND INSTALLATION
Refer to “HEATER CONTROL ASSEMBLY” in Section 1A.
INSPECTION
Press A/C switch button and check if there is continuity
between terminals “A” and “B”.
Connect battery voltage (+) to terminal “C” and (–) to termi-
nal “A”, and then press A/C Switch button and check if indi-
cator lamp lights.
RADIATOR/CONDENSER COOLING FAN
MOTOR RELAY No.1, No.2 and No.3
INSPECTION
Refer to “RADIATOR FAN RELAY” in Section 6B.
COMPRESSOR
REMOVAL
1) Run engine at idle speed with air conditioning ON for 10 min-
utes. After that stop the engine.
2) Disconnect negative (–) cable at battery.
3) Recover refrigerant from refrigeration system by referring to
“RECOVERY” in this section.
4) Remove front bumper by referring to “FRONT BUMPER” in
Section 8.
5) Remove engine food cover (1) from vehicle body.
NOTE:
The amount of removed compressor oil must be mea-
sured for replenishing compressor oil.
Page 327 of 698

5E-2 ANTILOCK BRAKE SYSTEM (ABS)
DTC C1015 (DTC 15) – G SENSOR
CIRCUIT .................................................... 5E-22
DTC C1021 (DTC 21), DTC C1022
(DTC 22) – RIGHT-FRONT WHEEL
SPEED SENSOR CIRCUIT OR SENSOR
RING .......................................................... 5E-24
DTC C1025 (DTC 25), DTC C1026
(DTC 26) – LEFT-FRONT WHEEL
SPEED SENSOR CIRCUIT OR SENSOR
RING .......................................................... 5E-24
DTC C1031 (DTC 31), DTC C1032
(DTC 32) – RIGHT-REAR WHEEL
SPEED SENSOR CIRCUIT OR SENSOR
RING .......................................................... 5E-24
DTC C1035 (DTC 35), DTC C1036
(DTC 36) – LEFT-REAR WHEEL SPEED
SENSOR CIRCUIT OR SENSOR RING.... 5E-24
DTC C1041 (DTC 41) – RIGHT-FRONT
INLET SOLENOID CIRCUIT...................... 5E-26
DTC C1045 (DTC 45) – LEFT-FRONT
INLET SOLENOID CIRCUIT...................... 5E-26
DTC C1051 (DTC 51) – RIGHT-REAR
INLET SOLENOID CIRCUIT...................... 5E-26
DTC C1055 (DTC 55) – LEFT-REAR
INLET SOLENOID CIRCUIT...................... 5E-26
DTC C1042 (DTC 42) – RIGHT-FRONT
OUTLET SOLENOID CIRCUIT.................. 5E-26
DTC C1046 (DTC 46) – LEFT-FRONT
OUTLET SOLENOID CIRCUIT.................. 5E-26
DTC C1052 (DTC 52) – RIGHT-REAR
OUTLET SOLENOID CIRCUIT.................. 5E-26DTC C1056 (DTC 56) – LEFT-REAR
OUTLET SOLENOID CIRCUIT ................. 5E-26
DTC C1057 (DTC 57) – POWER
SOURCE CIRCUIT .................................... 5E-27
DTC C1061 (DTC 61) – ABS PUMP
MOTOR CIRCUIT ...................................... 5E-28
DTC C1063 (DTC 63) – ABS FAIL-SAFE
RELAY CIRCUIT ....................................... 5E-29
DTC C1071 (DTC 71) – ABS CONTROL
MODULE ................................................... 5E-30
ON-VEHICLE SERVICE................................ 5E-31
PRECAUTIONS ......................................... 5E-31
ABS HYDRAULIC UNIT OPERATION
CHECK (USING SUZUKI SCAN TOOL) ... 5E-31
ABS HYDRAULIC UNIT OPERATION
CHECK (NOT USING SUZUKI SCAN
TOOL) ........................................................ 5E-31
ABS HYDRAULIC UNIT/CONTROL
MODULE ASSEMBLY ............................... 5E-33
FRONT WHEEL SPEED SENSOR ........... 5E-35
FRONT WHEEL SPEED SENSOR
RING .......................................................... 5E-37
REAR WHEEL SPEED SENSOR.............. 5E-38
REAR WHEEL SPEED SENSOR
RING (FOR 2WD VEHICLE) ..................... 5E-41
REAR WHEEL SPEED SENSOR
RING(FOR 4WD VEHICLE) ...................... 5E-42
G SENSOR (FOR 4WD VEHICLE
ONLY) ........................................................ 5E-43
SPECIAL TOOL ............................................ 5E-44
GENERAL DESCRIPTION
COMPONENTS/PARTS LOCATION AND BRAKE HOSE/PIPE ROUTING
The ABS (Antilock Brake System) controls the fluid pressure applied to the Wheel cylinder of each brake from
the master cylinder so that each wheel is not locked even when hard braking is applied.
This ABS has also the following function.
While braking is applied, but before ABS control becomes effective, braking force is distributed between the front
and rear so as to prevent the rear wheels from being locked too early for better stability of the vehicle.