Sings SUZUKI SWIFT 2006 2.G Service Workshop Manual
[x] Cancel search | Manufacturer: SUZUKI, Model Year: 2006, Model line: SWIFT, Model: SUZUKI SWIFT 2006 2.GPages: 1496, PDF Size: 34.44 MB
Page 314 of 1496

Downloaded from www.Manualslib.com manuals search engine 1D-29 Engine Mechanical:
Camshaft, Tappet and Shim Removal and
Installation
S7RS0B1406021
CAUTION!
β’ Keep working table, tools and hands clean while overhauling.
β’ Use special care to handle aluminum parts so as not to damage them.
β’ Do not expose removed parts to dust. Keep them always clean.
Removal
1) Remove timing chain cover referring to βTiming Chain Cover Removal and Installationβ.
2) Remove timing chain referring to βTiming Chain and Chain Tensioner Removal and Installationβ.
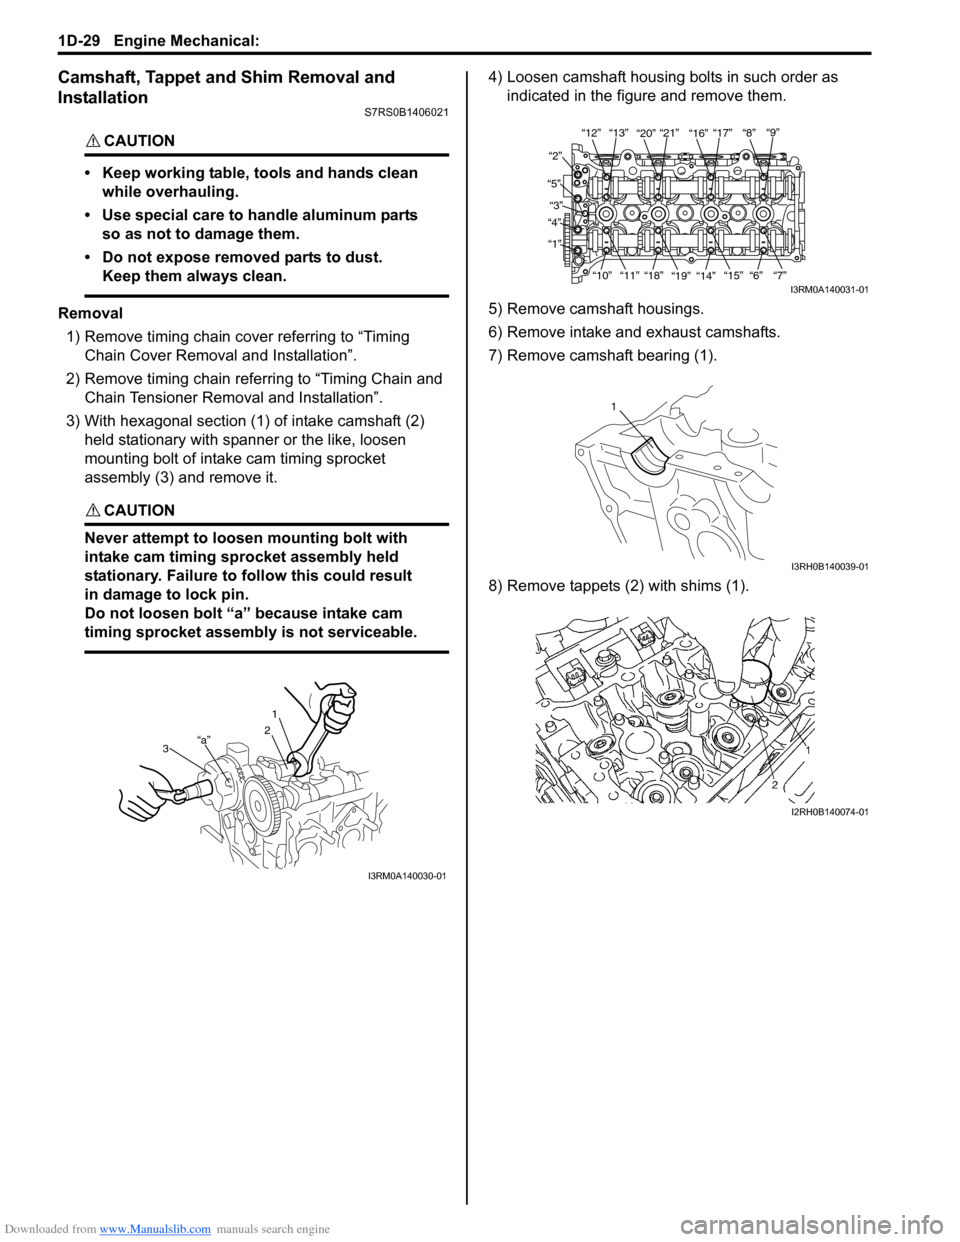
3) With hexagonal section (1) of intake camshaft (2) held stationary with spanner or the like, loosen
mounting bolt of intake cam timing sprocket
assembly (3) and remove it.
CAUTION!
Never attempt to loosen mounting bolt with
intake cam timing sprocket assembly held
stationary. Failure to fo llow this could result
in damage to lock pin.
Do not loosen bolt βaβ because intake cam
timing sprocket assembly is not serviceable.
4) Loosen camshaft housing bolts in such order as indicated in the figure and remove them.
5) Remove camshaft housings.
6) Remove intake and exhaust camshafts.
7) Remove camshaft bearing (1).
8) Remove tappets (2) with shims (1).
3βaβ
1
2
I3RM0A140030-01
β12ββ13β β20ββ21β
β16ββ17β β8β β9β
β2β
β5β β3β
β4β
β1β
β10ββ11ββ18β
β19β β14β β15β β6β β7β
I3RM0A140031-01
1
I3RH0B140039-01
I2RH0B140074-01
Page 315 of 1496

Downloaded from www.Manualslib.com manuals search engine Engine Mechanical: 1D-30
Installation1) Install tappets and shims to cylinder head. Apply engine oil around tappet and then install it to
cylinder head.
NOTE
When installing shim, make sure to direct
shim No. side toward tappet.
2) Install camshaft bearing (1) to cylinder head.
CAUTION!
Do not apply engine oil to camshaft bearing
back.
Only a upper half bearing of intake camshaft
bearing No.1 has some holes. Other
bearings.
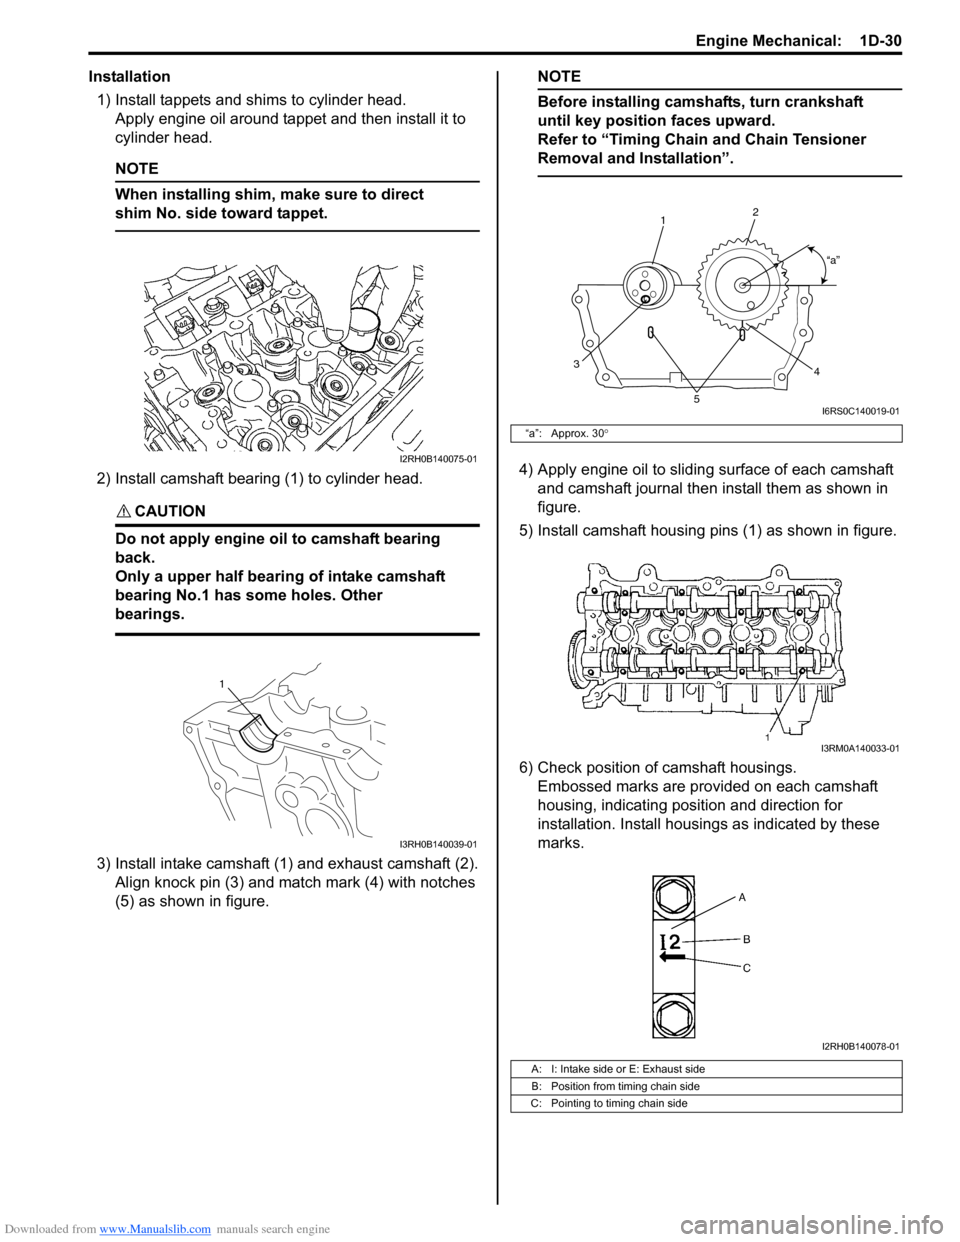
3) Install intake camshaft (1) and exhaust camshaft (2). Align knock pin (3) and match mark (4) with notches
(5) as shown in figure.
NOTE
Before installing camshafts, turn crankshaft
until key position faces upward.
Refer to βTiming Chain and Chain Tensioner
Removal and Installationβ.
4) Apply engine oil to sliding surface of each camshaft and camshaft journal then install them as shown in
figure.
5) Install camshaft housing pins (1) as shown in figure.
6) Check position of camshaft housings. Embossed marks are provided on each camshaft
housing, indicating position and direction for
installation. Install housings as indicated by these
marks.I2RH0B140075-01
1
I3RH0B140039-01
βaβ: Approx. 30 Β°
A: I: Intake side or E: Exhaust side
B: Position from timing chain side
C: Pointing to timing chain side
1 2
3 4
5
βaβ
I6RS0C140019-01
I3RM0A140033-01
I2RH0B140078-01
Page 317 of 1496

Downloaded from www.Manualslib.com manuals search engine Engine Mechanical: 1D-32
Camshaft Runout
Set camshaft between two βVβ blocks, and measure its
runout by using a dial gauge.
If measured runout exceeds limit, replace camshaft.
Camshaft runout limit
0.10 mm (0.0039 in.)
Camshaft Journal Wear
Check camshaft journals and camshaft housings for
pitting, scratches, wear or damage.
If any malcondition is found, replace camshaft or cylinder
head with housing. Never re place cylinder head without
replacing housings.
Check clearance by using ga uging plastic. Checking
procedure is as follows.
1) Clean housings and camshaft journals.
2) Remove all tappets with shims.
3) Install camshafts to cylinder head.
4) Place a piece of gauging plastic to full width of
journal of camshaft (parallel to camshaft).
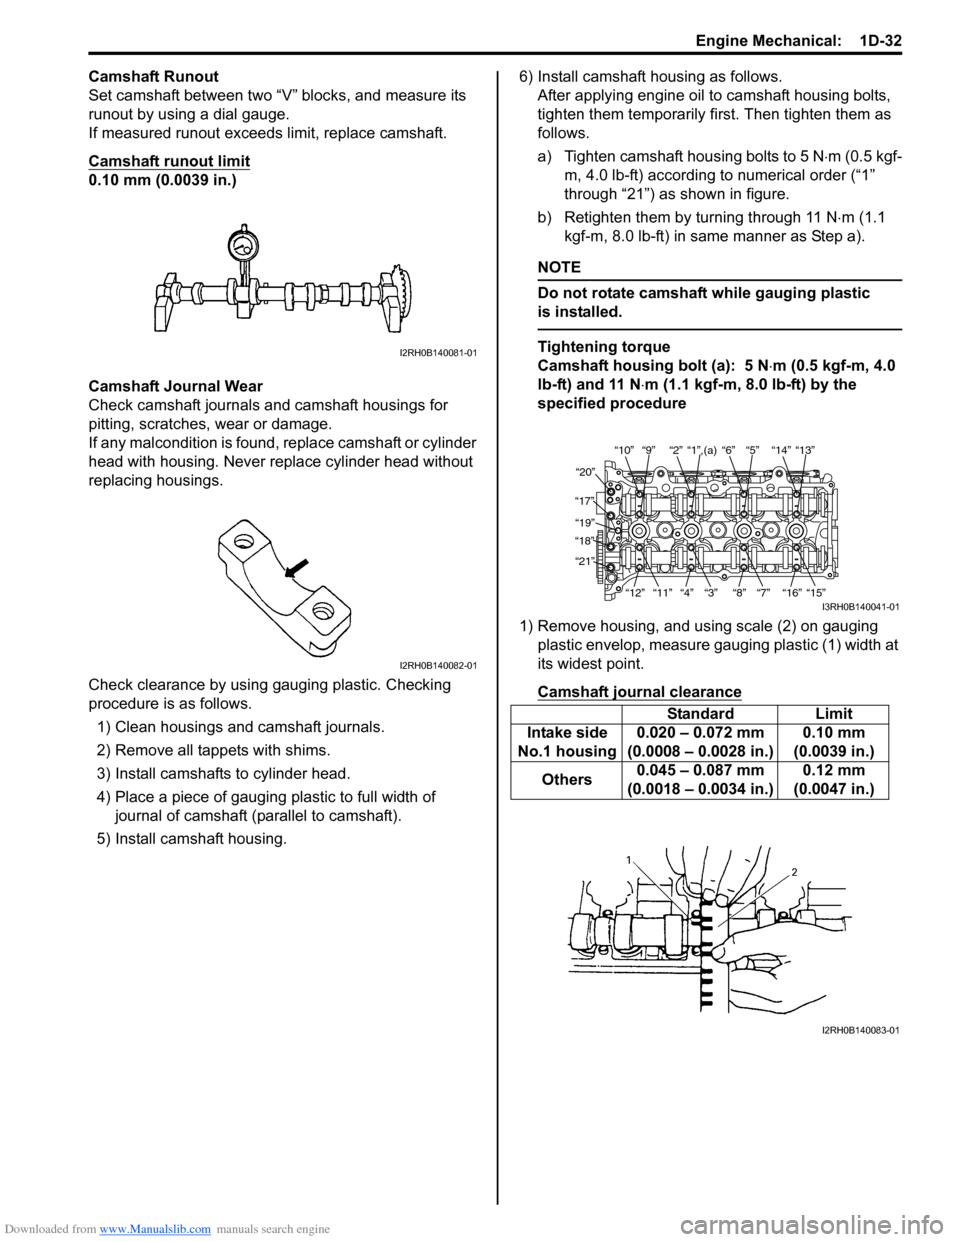
5) Install camshaft housing. 6) Install camshaft housing as follows.
After applying engine oil to camshaft housing bolts,
tighten them temporarily first. Then tighten them as
follows.
a) Tighten camshaft housing bolts to 5 N β
m (0.5 kgf-
m, 4.0 lb-ft) according to numerical order (β1β
through β21β) as shown in figure.
b) Retighten them by turning through 11 N β
m (1.1
kgf-m, 8.0 lb-ft) in same manner as Step a).
NOTE
Do not rotate camshaft while gauging plastic
is installed.
Tightening torque
Camshaft housing bolt (a): 5 N β
m (0.5 kgf-m, 4.0
lb-ft) and 11 N β
m (1.1 kgf-m, 8.0 lb-ft) by the
specified procedure
1) Remove housing, and using scale (2) on gauging plastic envelop, measure gauging plastic (1) width at
its widest point.
Camshaft journal clearanceI2RH0B140081-01
I2RH0B140082-01
Standard Limit
Intake side
No.1 housing 0.020 β 0.072 mm
(0.0008 β 0.0028 in.) 0.10 mm
(0.0039 in.)
Others 0.045 β 0.087 mm
(0.0018 β 0.0034 in.) 0.12 mm
(0.0047 in.)
β10ββ9β β2β β1β,(a) β6β β5β β14β β13β
β20β
β17β β19β
β18β
β21β
β12ββ11β
β4β β3β β8β β7β β16β β15β
I3RH0B140041-01
I2RH0B140083-01