ECU SUZUKI SWIFT 2017 5.G Owner's Manual
[x] Cancel search | Manufacturer: SUZUKI, Model Year: 2017, Model line: SWIFT, Model: SUZUKI SWIFT 2017 5.GPages: 336, PDF Size: 6.24 MB
Page 93 of 336
3-8
OPERATING YOUR VEHICLE
74LH0-74E
to start the engine or select the ignition
mode. The “remote controller outside”
warning may not be given at that time.–The remote controller is outside the
vehicle but very close to a door.
–The remote controller is on the instru-
ment panel.Parking Brake Lever
54G039
(1) To set
(2) To release
(3) To release
The parking brake lever is located between
the seats. To set the parking brake, hold
the brake pedal down and pull the parking
brake lever all the way up. To release the
parking brake, hold the brake pedal down,
pull up slightly on the parking brake lever,
push the button on the end of the lever with
your thumb, and lower the lever to its origi-
nal position.
For automatic transaxle vehicles, always
set the parking brake before moving the
gearshift lever to the “P” (PARK) position. Ifyou park on an incline and shift into “P”
before setting the parking brake, the
weight of the vehicle may make it difficult to
shift out of “P” when you are ready to drive
the vehicle.
When preparing to drive the vehicle, move
the gearshift lever out of the “P” position
before releasing the parking brake.
Parking Brake Reminder BuzzerA buzzer sounds intermittently to remind
you to release the parking brake if you
start the vehicle without releasing the park-
ing brake. Make sure that the parking
brake is fully released and the brake sys-
tem warning light turns off.
(2)(3)
(1)
EXAMPLE
WA R N I N G
Never drive your vehicle with the
parking brake on: rear brake effec-
tiveness can be reduced from over-
heating, brake life may be
shortened, or permanent brake
damage may result.
If the parking brake does not hold
the vehicle securely or does not
fully release, have your vehicle
inspected immediately by an autho-
rized MARUTI SUZUKI dealer.
WA R N I N G
Always set the parking brake firmly
before leaving your vehicle or it may
move, causing injury or damage.
When parking, make sure the gear-
shift lever is in reverse or first gear.
Remember, even though the
transaxle is in gear, you must set the
parking brake firmly.
WA R N I N G
When parking the vehicle in
extremely cold weather, the following
procedure should be used:
1) Set the parking brake firmly.
2) Manual transaxle - turn off the
engine, then shift into reverse or
first gear.
Auto Gear Shift - shift into reverse
or first gear and check the gear
position indicator in the instru-
ment cluster to make sure that the
transaxle is engaged in 1st or
reverse, then turn off the engine
completely.
Automatic transaxle - shift into
“P” (Park) and turn off the engine.
3) Check the parking brake firmly
again. Get out of the vehicle and
put chocks under the wheels.
4) Release the parking brake.
When you return to your vehicle,
you must remember to first set the
parking brake, then remove the
wheel chocks.
Braking: 6
Page 107 of 336
3-22
OPERATING YOUR VEHICLE
74LH0-74E
Starting off:
1) Start the engine as instructed in “Start-
ing the engine” in this section.
2) With your foot on the brake pedal, shift
the gearshift lever to the “M” position.
When the gearshift lever is shifted to
the “M” position, the gear will be shifted
to 1st. Before starting off, always make
sure that the intended gear is engaged
by checking the gear position indicator,
then depress the accelerator pedal.NOTE:
If 1st gear cannot be engaged even
though the gearshift lever has been
shifted from the “N” to the “M” position,
the system will re-try shifting automati-
cally. This will take some time, noise
may be heard from the gears, and shift-
ing gear shock may occur. However,
they do not indicate a malfunction.
The “N” indicator will flash, the depress
brake pedal indicator will come on and a
warning buzzer (long pulse sound) will
sound if any of the following cases
occur;
– If you shift the gearshift lever from the
“N” to the “M” position without
depressing the brake pedal
– If the system is unable to re-try shifting
You should depress the brake pedal and
shift the gearshift lever to “N” position,
then shift to “M” position again a few
seconds later.
3) Release the parking brake and brake
pedal. Depress the accelerator pedal
slowly for smooth starting.Starting off on an uphill/downhill slope:
Uphill
1) Apply the parking brake firmly so that
the vehicle does not roll backwards.
2) Shift the gearshift lever to the “M” posi-
tion while depressing the brake pedal.
Make sure that the gear position indica-
tor in the instrumental cluster displays
1st gear.
3) Release the brake pedal and depress
the accelerator pedal gradually, and
when the vehicle starts to move,
NOTICE
If the gearshift lever cannot shift
into any position, or the gear is
changed to “N” position automati-
cally when the vehicle speed
becomes less than 10 km/h, there
may be a systematic malfunction. In
this case, ask your MARUTI SUZUKI
dealer to inspect the Auto Gear Shift
system as soon as possible.
The manual (M) mode does not
upshift even if the engine speed
reaches the rev-limit.
The system will not allow shifting up
or down to a gear that would cause
engine over-revving or under-rev-
ving.
If frequently driving at low speed
using a high gear position, the life
cycle of the clutch may be reduced.
Frequent downshifting (more than 3
positions consecutively) causes the
reduction of transaxle life.
WA R N I N G
Always keep your foot on the brake
pedal or pull up the parking lever
while stopped with the engine run-
ning. These operations prevent the
vehicle from starting due to unin-
tended activation of the creeping
function.
NOTICE
Do not operate the system as
described below. The life cycle of the
clutch may be reduced.
Using the accelerator pedal to hold
the vehicle on an uphill slope oper-
ation with the gearshift lever in the
“M” or “D” position. If you perform
this operation for a certain period
of time, a warning buzzer will
sound.
Shifting the gearshift lever to the
“M”, “D” or “R” position while rac-
ing the engine.
Driving at low speed using a high
gear.
Stopping on a slope using the
creeping function. If you perform
this operation for a certain period
of time, a warning buzzer will
sound.
Page 122 of 336
4-5DRIVING TIPS
67LH3-74E
If Your Vehicle Gets StuckIf your vehicle gets stuck in snow, mud, or
sand, follow the directions below:
1) Shift the transaxle back and forthbetween a forward range (or first gear
for manual transaxle) and reverse. This
will create a rocking motion which may
give you enough momentum to free the
vehicle. Press gently on the accelerator
to keep wheel spinning to a minimum
wheel rpm. Remove your foot from the
accelerator while shifting.
Do not race the engine. Excessive
wheel spin will cause the tires to dig
deeper, making it more difficult to free
the vehicle.
2) If your vehicle remains stuck after a few
minutes of rocking, we recommend you
to consult your authorised Maruti
Suzuki workshop or a roadside assis-
tance service. If a towing service is not
available in an emergency, your vehicle
may be temporarily towed by a towing
cable or chain secured to the towing
hook either on the front of the vehicle or
on the rear of the vehicle. Refer to
“Frame Hooks” in the “OTHER CON-
TROLS AND EQUIPMENT” section.
Driving on Wet Roads
WA R N I N G
Do not allow anyone to stand near
the vehicle when you are rocking it,
and do not spin the wheels faster
than an indicated 40 km/h on the
speedometer. Perso nal injury and/or
vehicle damage may result from spin-
ning the wheels too fast.
NOTICE
Do not continue rocking the vehicle
for more than a few minutes. Pro-
longed rocking can cause engine
overheating or transaxle damage.
NOTICE
When driving on wet roads, avoid driving through large amount of
standing water on the road. Large
amount of water entering the
engine compartment may cause
damage to the engine and or elec-
trical components.
If stuck in deep water, do not start the engine.
Water is incompressible substance, water inside engine is harmful to
the engine.
WA R N I N G
In addition to following the driving
tips in this section, it is important to
observe the following precautions.
Make sure your tires are in good
condition and always maintain the
specified tire pressure. Refer to
“Tires” in the “INSPECTION AND
MAINTENANCE” section for
details.
Do not use tires other than those
specified by MARUTI SUZUKI.
Never use different sizes or types
of tires on the front and rear
wheels. For information regarding
the specified tires, refer to the Tire
Information Label located on the
driver’s door lock pillar.
Never use oversized tires or spe- cial shock absorbers and springs
to raise (jack up) your vehicle. This
will change the handling character-
istics. Oversized tires may also rub
against the vehicle body over
bumps, causing vehicle damage or
tire failure.
After driving through water, test the brakes while driving at a slow
speed to see if they have main-
tained their normal effectiveness. If
they are less effective than normal,
dry them by repeatedly applying
the brakes while driving slowly
until the brakes have regained their
normal effectiveness.
Page 156 of 336
5-29OTHER CONTROLS AND EQUIPMENT
74LH0-74E
the knob (1) to display the device name
or the BD (
® Device) address.
NOTE:
When selecting “Go Back”, the previous
menu will be displayed.
Reset to the factory defaults
Follow the instructions below to reset all
the settings to the factory defaults.
1) Press the ® setup button (4).
The
® setup menu will be displayed.
2) Turn the TUNE FOLDER PUSH
SOUND knob (1) to select “Setup ”, and
press the knob (1) to determine the
selection.
3) Turn the TUNE FOLDER PUSH
SOUND knob (1) to select “Initialize”,
and press the knob (1) to determine the
selection.
4) Turn the TUNE FOLDER PUSH
SOUND knob (1) to select “All Initial-
ize”, and press the knob (1) to deter-
mine the selection.
5) Turn the TUNE FOLDER PUSH
SOUND knob (1) to select “Confirm”,
and press the knob (1) to start the
reset.
NOTE:
When selecting “Go Back”, the previous
menu will be displayed.Selection of phone (Select Phone)
Follow the instructions below to select a
phone to be paired with from the registered
phones.
1) Press the
® setup button (4).
The
® setup menu will be displayed.
2) Turn the TUNE FOLDER PUSH
SOUND knob (1) to select “Setup ”, and
press the knob (1) to determine the
selection.
3) Turn the TUNE FOLDER PUSH
SOUND knob (1) to select “List Phone”,
and press the knob (1) to determine the
selection.
4) Turn the TUNE FOLDER PUSH
SOUND knob (1) to select a phone to
be paired with, and press the knob (1)
to determine the selection.
5) Turn the TUNE FOLDER PUSH
SOUND knob (1) to select “Select”, and
press the knob (1) to determine the
selection.
NOTE:
When selecting “Go Back”, the previous
menu will be displayed.
The ® ready audio device will be discon-
nected when the phone is selected.List of phones (List Phones)
Follow the instructions below to display the
names of the registered phones in
sequence.
1) Press the
® setup button (4).
The
® setup menu will be displayed.
2) Turn the TUNE FOLDER PUSH
SOUND knob (1) to select “Setup ”, and
press the knob (1) to determine the
selection.
3) Turn the TUNE FOLDER PUSH
SOUND knob (1) to select “List Phone”,
and press the knob (1) to determine the
selection.
The names of the registered phones
are displayed in sequence.
NOTE:
When selecting “Go Back”, the previous
menu will be displayed.
Passkey setting (Set Passkey)
Follow the instructions below to set the
security number (Passkey).
1) Press the
® setup button (4).
The
® setup menu will be displayed.
2) Turn the TUNE FOLDER PUSH
SOUND knob (1) to select “Setup ”, and
press the knob (1) to determine the
selection.
3) Turn the TUNE FOLDER PUSH
SOUND knob (1) to select “Passkey”,
and press the knob (1) to determine the
selection.
4) Turn the TUNE FOLDER PUSH
SOUND knob (1) to select “New Pass-
Page 160 of 336
5-33OTHER CONTROLS AND EQUIPMENT
74LH0-74E
List of audio devices (List Audio)
Follow the instructions below to display the
names of the registered audio devices in
sequence.
1) Press the
® setup button (6).
The
® setup menu will be displayed.
2) Turn the TUNE FOLDER PUSH
SOUND knob (2) to select “Setup ”, and
press the knob (2) to determine the
selection.
3) Turn the TUNE FOLDER PUSH
SOUND knob (2) to select “List Audio”,
and press the knob (2) to determine the
selection. The names of registered
audio devices will be displayed in
sequence.
NOTE:
When selecting “Go Back”, the previous
menu will be displayed.
Passkey setting (Set Passkey)
Follow the instructions below to set the
security number (Passkey).
1) Press the
® setup button (6).
The
® setup menu will be displayed.
2) Turn the TUNE FOLDER PUSH
SOUND knob (2) to select “Setup ”, and
press the knob (2) to determine the
selection.
3) Turn the TUNE FOLDER PUSH
SOUND knob (2) to select “Passkey”,
and press the knob (2) to determine the
selection.
4) Turn the TUNE FOLDER PUSH
SOUND knob (2) to select “New Pass-key”, and press the knob (2) to deter-
mine the selection.
5) Press or turn the TUNE FOLDER
PUSH SOUND knob (2) to select “Con-
firm”.
6) Turn the TUNE FOLDER PUSH
SOUND knob (2) to select a number for
the first digit, and press the knob (2) to
determine the selection. Select and
determine numbers for the second,
third and fourth digits in order in the
same manner. When not entering up to
the eighth digit, enter blanks for the
successive digits.
7) Turn the TUNE FOLDER PUSH
SOUND knob (2) to determine the
passkey setting.
NOTE:
When selecting “Go Back”, the previous
menu will be displayed.
Deletion of audio device information
(Delete Audio)
Follow the instructions below to delete the
registered information of audio device.
1) Press the
® setup button (6).
The
® setup menu will be displayed.
2) Turn the TUNE FOLDER PUSH
SOUND knob (2) to select “Setup ”, and
press the knob (2) to determine the
selection.
3) Turn the TUNE FOLDER PUSH
SOUND knob (2) to select “List Audio”,
and press the knob (2) to determine the
selection.4) Turn the TUNE FOLDER PUSH
SOUND knob (2) to select an audio
device to be deleted, and press the
knob (2) to determine the selection.
5) Turn the TUNE FOLDER PUSH
SOUND knob (2) to select “Delete”, and
press the knob (2) to determine the
selection.
6) Turn the TUNE FOLDER PUSH
SOUND knob (2) to select “Delete?”,
and press the knob (2) to determine the
selection.
7) Turn the TUNE FOLDER PUSH
SOUND knob (2) to select “Confirm”,
and press the knob (2) to complete the
deletion.
NOTE:
When selecting “Go Back”, the previous
menu will be displayed.
Disclaimer for
® function
Depending on the mobile phone models,
some phones may not be compatible
fully or partially (some function may be
restricted).
Connectivity or voice quality may get
affected depending on circumstances.
After the ignition switch is turned to the
“ON” position, the audio system takes
few seconds to detect and connect to the® device (if already paired).
Make sure that you are aware of all
applicable local laws and accordingly
use device.
Page 162 of 336
5-35OTHER CONTROLS AND EQUIPMENT
74LH0-74E
The anti-theft function is intended to dis-
courage thefts, such as that the audio sys-
tem becomes inoperable when it is
installed on other vehicles.
This function works by entering a Personal
Identification Number (PIN).
When the unit is disconnected from its
power source, such as when the audio
system is removed or the battery is discon-
nected, the unit will become inoperable
until the PIN is reentered.
Setting the Anti-Theft Function
1) Press the VOL PUSH POWER knob (1)
to power off.
2) Hold down the buttons numbered [1]
and [6] of the Preset buttons (2) and
press the VOL PUSH POWER knob (1).
“SECURITY” will be displayed.
3) Press the Up button (3) and the button
numbered [1] of the Preset buttons (2)
simultaneously.
4) Enter a 4-digit number to be registered
as PIN using the buttons numbered [1] -
[4] of the Preset buttons (2).
5) Hold down the TUNE FOLDER PUSH
SOUND knob (4) for 1 second or longer
to set the anti-theft function.
NOTE:
Take a note of the registered PIN and keep
it for the future use.Canceling the anti-theft feature
To cancel the anti-theft function, delete the
registered PIN.
1) Press the VOL PUSH POWER knob (1)
to power off.
2) Hold down the buttons numbered [1]
and [6] of the Preset buttons (2) and
press the VOL PUSH POWER knob (1).
“PIN ENTRY” will be displayed.
3) Press the Up button (3) and the button
numbered [1] of the Preset buttons (2)
simultaneously.
4) Enter a 4-digit number to be registered
as PIN using the buttons numbered [1] -
[4] of the Preset buttons (2).
5) Hold down the TUNE FOLDER PUSH
SOUND knob (4) for 1 second or longer
to delete the registered PIN. The indi-
cation “----” will be displayed and the
anti-theft function will be canceled.
NOTE:
To change your PIN, first delete your cur-
rent PIN, then set a new one.Confirming the Personal Identification
Number (PIN)
When the main power source is discon-
nected such as when the battery is
replaced, etc, it is required to enter the PIN
to make the unit operable again.
1) Set the ignition switch to the “ACC”
position.
“SECURITY” will be displayed.
2) Press the Up button (3) and the button
numbered [1] of the Preset buttons (2)
simultaneously.
3) Enter a 4-digit number to be registered
as PIN using the buttons numbered [1] -
[4] of the Preset buttons (2).
4) Hold down TUNE FOLDER PUSH
SOUND knob (4) for 1 second or lon-
ger.
When the PIN same as registered is
entered, the power of the audio system
will be turned off automatically and it
will become operable again.
NOTE:
If an incorrect PIN is entered, “ERROR”
and the total number of incorrect entry
attempts will be displayed.
If an incorrect PIN is entered 10 times,
“HELP” will be displayed and the audio
system will become inoperable.
Page 170 of 336
5-43OTHER CONTROLS AND EQUIPMENT
74LH0-74E
TroubleshootingWhen encountered a problem, check and follow the instructions as described below.
If the described suggestions do not solve the problem, it is recommended to take the unit to your authorized MARUTI SUZUKI dealer.
Problem
Possible cause
Possible solution
Common
Unable to operate The security function is on.When “SECURITY” is displayed, enter
the ID.
When “HELP” is displayed, contact your
authorized MARUTI SUZUKI dealer.
Unable to turn on the power (no sound).
(No sound is produced)Fuse is blown.Contact your authorized MARUTI
SUZUKI dealer.
Radio
Much noiseIt may not be exactly tuned in to the sta-
tion.Tune it in exactly to the station.
Unable to receive by auto tuningThere may be no station emitting signals
powerful enough.Pick up a station by manual tuning.
CD
Sound skips or noise producedThe disc is dirty. Wipe the disc with a soft cloth.
The disc has a major scratch or is
warped.Replace the disc with the one with no
scratch and also not warped.
Page 175 of 336
5-48
OTHER CONTROLS AND EQUIPMENT
74LH0-74E
Engine Bonnet
63J063
To open the engine hood:
1) Pull the hood release handle located on
the outboard side of the driver’s side of
the instrument panel. This will disen-
gage the engine hood lock halfway.
74LHT0514
2) Push the under-hood release lever up
with your finger, as shown in the illustra-tion. While pushing the lever, lift up the
engine hood.
63J065
3) Continue to lift up the hood until it is
high enough to support with the prop
rod.
To close the engine hood:
1) Lift the hood up slightly and remove the
prop rod from the hole. Put the prop rod
back to the holding clip.
2) Lower the hood to about 20 cm above
the hood latch, then let it drop down.
Make sure the hood is securely latched
after closing.
Sun Visor
79J161
The sun visors can be pulled down to block
glare coming through the windshield, or
they can be unhooked and turned to the
side to block glare coming through the side
window.
Card holder (if equipped)
74LHT0516
(1) Card holder
You can put a card in the card holder (1) on
the back of the sun visor.
EXAMPLE
EXAMPLE
WA R N I N G
Make sure the hood is fully closed
and latched before driving. If it is not,
it can fly up unexpectedly during
driving, obstructing your view and
resulting in an accident.
NOTICE
When unhooking and hooking a sun
visor, be sure to handle it by the hard
plastic parts or the sun visor can be
damaged.EXAMPLE
(1)
Page 178 of 336
5-51OTHER CONTROLS AND EQUIPMENT
74LH0-74E
AUX/USB Socket (if equipped)
74LHT0518
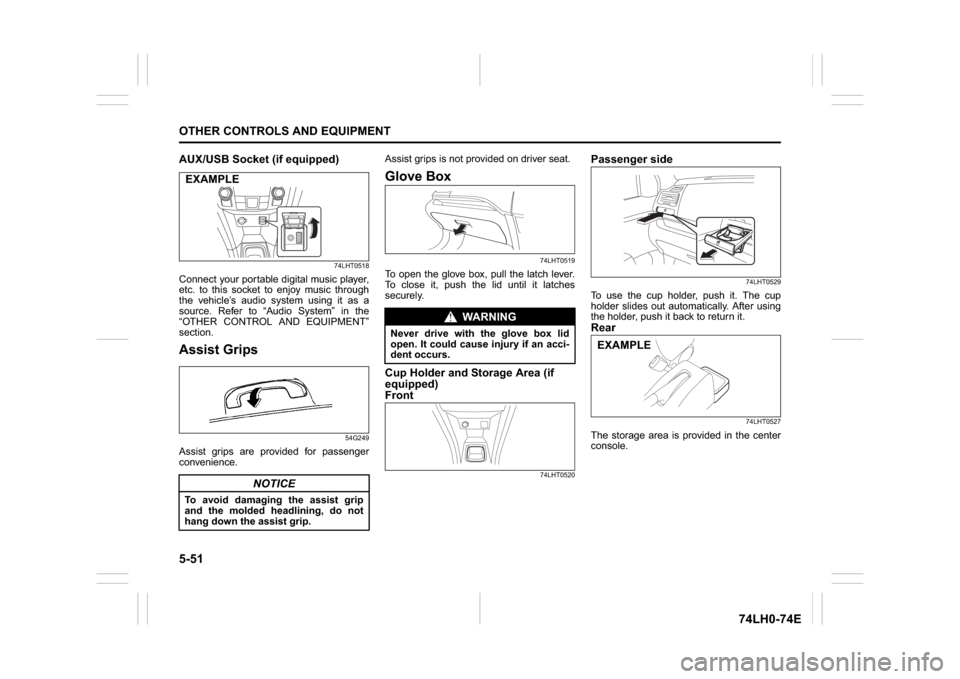
Connect your portable digital music player,
etc. to this socket to enjoy music through
the vehicle’s audio system using it as a
source. Refer to “Audio System” in the
“OTHER CONTROL AND EQUIPMENT”
section.Assist Grips
54G249
Assist grips are provided for passenger
convenience.Assist grips is not provided on driver seat.
Glove Box
74LHT0519
To open the glove box, pull the latch lever.
To close it, push the lid until it latches
securely.Cup Holder and Storage Area (if
equipped)
Front
74LHT0520
Passenger side
74LHT0529
To use the cup holder, push it. The cup
holder slides out automatically. After using
the holder, push it back to return it.Rear
74LHT0527
The storage area is provided in the center
console.
NOTICE
To avoid damaging the assist grip
and the molded headlining, do not
hang down the assist grip.EXAMPLE
WA R N I N G
Never drive with the glove box lid
open. It could cause injury if an acci-
dent occurs.
EXAMPLE
Page 181 of 336
5-54
OTHER CONTROLS AND EQUIPMENT
74LH0-74E
(with spare tyre)
74LHT0528
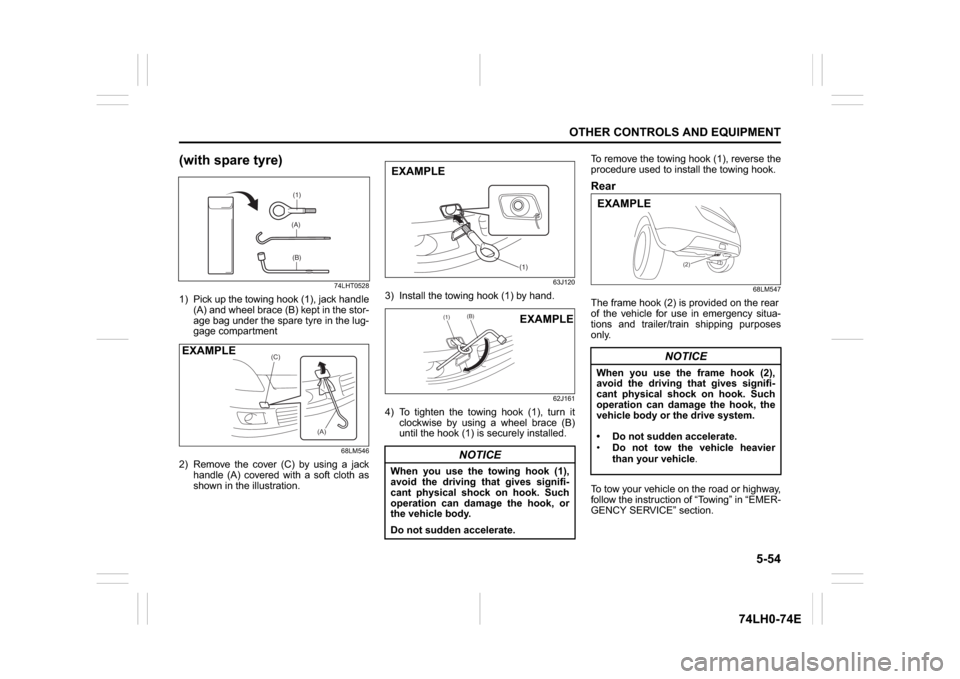
1) Pick up the towing hook (1), jack handle
(A) and wheel brace (B) kept in the stor-
age bag under the spare tyre in the lug-
gage compartment
68LM546
2) Remove the cover (C) by using a jack
handle (A) covered with a soft cloth as
shown in the illustration.
63J120
3) Install the towing hook (1) by hand.
62J161
4) To tighten the towing hook (1), turn it
clockwise by using a wheel brace (B)
until the hook (1) is securely installed.To remove the towing hook (1), reverse the
procedure used to install the towing hook.
Rear
68LM547
The frame hook (2) is provided on the rear
of the vehicle for use in emergency situa-
tions and trailer/train shipping purposes
only.
To tow your vehicle on the road or highway,
follow the instruction of “Towing” in “EMER-
GENCY SERVICE” section.
(1)(A)(B)
(C)
(A)
EXAMPLE
NOTICE
When you use the towing hook (1),
avoid the driving that gives signifi-
cant physical shock on hook. Such
operation can damage the hook, or
the vehicle body.
Do not sudden accelerate.
(1)
EXAMPLE
(1)
(B)
EXAMPLE
NOTICE
When you use the frame hook (2),
avoid the driving that gives signifi-
cant physical shock on hook. Such
operation can damage the hook, the
vehicle body or the drive system.
Do not sudden accelerate.
Do not tow the vehicle heavier
than your vehicle.
(2)
EXAMPLE