wind SUZUKI SWIFT 2017 5.G Owner's Manual
[x] Cancel search | Manufacturer: SUZUKI, Model Year: 2017, Model line: SWIFT, Model: SUZUKI SWIFT 2017 5.GPages: 336, PDF Size: 6.24 MB
Page 134 of 336
5-7OTHER CONTROLS AND EQUIPMENT
74LH0-74E
Temperature-controlled air comes out of
the floor outlets and the side outlets, a
small amount of air comes out of the wind-
shield defroster outlets and also comes
slightly out of the side demister outlets.
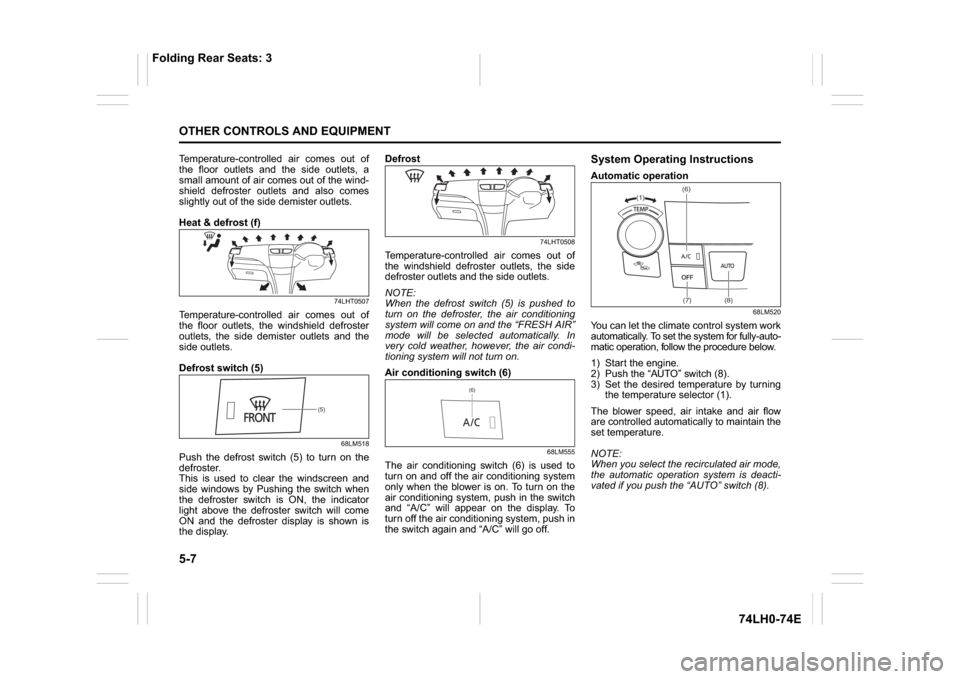
Heat & defrost (f)
74LHT0507
Temperature-controlled air comes out of
the floor outlets, the windshield defroster
outlets, the side demister outlets and the
side outlets.
Defrost switch (5)
68LM518
Push the defrost switch (5) to turn on the
defroster.
This is used to clear the windscreen and
side windows by Pushing the switch when
the defroster switch is ON, the indicator
light above the defroster switch will come
ON and the defroster display is shown is
the display.Defrost
74LHT0508
Temperature-controlled air comes out of
the windshield defroster outlets, the side
defroster outlets and the side outlets.
NOTE:
When the defrost switch (5) is pushed to
turn on the defroster, the air conditioning
system will come on and the “FRESH AIR”
mode will be selected automatically. In
very cold weather, however, the air condi-
tioning system will not turn on.
Air conditioning switch (6)
68LM555
The air conditioning switch (6) is used to
turn on and off the air conditioning system
only when the blower is on. To turn on the
air conditioning system, push in the switch
and “A/C” will appear on the display. To
turn off the air conditioning system, push in
the switch again and “A/C” will go off.
System Operating InstructionsAutomatic operation
68LM520
You can let the climate control system work
automatically. To set the system for fully-auto-
matic operation, follow the procedure below.
1) Start the engine.
2) Push the “AUTO” switch (8).
3) Set the desired temperature by turning
the temperature selector (1).
The blower speed, air intake and air flow
are controlled automatically to maintain the
set temperature.
NOTE:
When you select the recirculated air mode,
the automatic operation system is deacti-
vated if you push the “AUTO” switch (8).
(5)
(6)
(1)(6)
(7) (8)
Folding Rear Seats: 3
Page 135 of 336
5-8
OTHER CONTROLS AND EQUIPMENT
74LH0-74E
You can use the air conditioning switch (6)
to manually turn the air conditioner on or off
according to your preference. When you
turn the air conditioning switch off, the cli-
mate control system cannot lower the inside
temperature below outside temperature.
To turn the climate control system off, push
the “OFF” switch (7).
NOTE:
If the “AUTO” on the display blinks, there is
a problem in the heating system and/or air
conditioning system. You should have the
system inspected by an authorized MAR-
UTI SUZUKI dealer.
NOTE:
To find the temperature at which you are
most comfortable, start with the 25°C
(75°F) setting.
If you turn the temperature selector (1)
until “HI” or “LO” appears on the display,
the climate control system will operate at
maximum heating or cooling and the
blower will run at full speed.
To avoid blowing cold air in cold weather
or hot air in hot weather, the system will
delay turning on the blower until warmed
or chilled air is available.
If your vehicle has been left in the sun
with the windows closed, it will cool
faster if you open the windows briefly. Even under the automatic operation, you
can set individual selectors to the man-
ual mode. The manually selected func-
tions are maintained, and the other
functions remain under automatic opera-
tion.
To return the blower speed selector (2),
air intake selector (3), and air flow selec-
tor (4) to automatic operation, push the
“AUTO” switch (8).
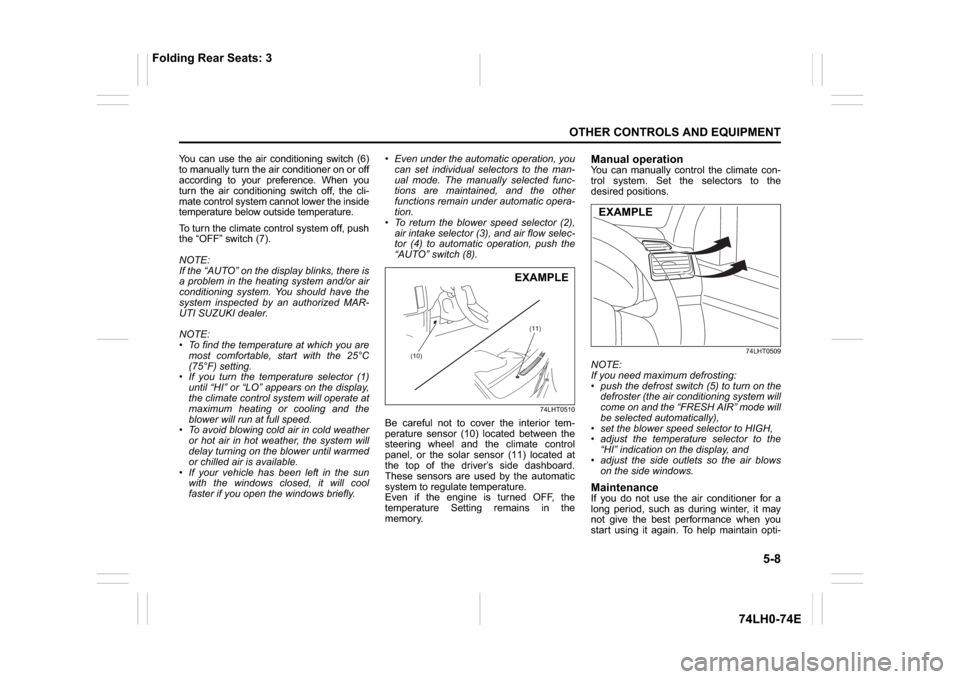
74LHT0510
Be careful not to cover the interior tem-
perature sensor (10) located between the
steering wheel and the climate control
panel, or the solar sensor (11) located at
the top of the driver’s side dashboard.
These sensors are used by the automatic
system to regulate temperature.
Even if the engine is turned OFF, the
temperature Setting remains in the
memory.
Manual operationYou can manually control the climate con-
trol system. Set the selectors to the
desired positions.
74LHT0509
NOTE:
If you need maximum defrosting:
push the defrost switch (5) to turn on the
defroster (the air conditioning system will
come on and the “FRESH AIR” mode will
be selected automatically),
set the blower speed selector to HIGH,
adjust the temperature selector to the
“HI” indication on the display, and
adjust the side outlets so the air blows
on the side windows.MaintenanceIf you do not use the air conditioner for a
long period, such as during winter, it may
not give the best performance when you
start using it again. To help maintain opti-
(10)(11)
EXAMPLE
EXAMPLE
Folding Rear Seats: 3
Page 143 of 336
5-16
OTHER CONTROLS AND EQUIPMENT
74LH0-74E
A CD is to be inserted with its label side
up.
When there is a CD already in the unit, it
is impossible to insert another CD with-
out ejecting the CD in the unit. Do not
use force to insert a CD into the CD
insertion slot.
Loading a CD
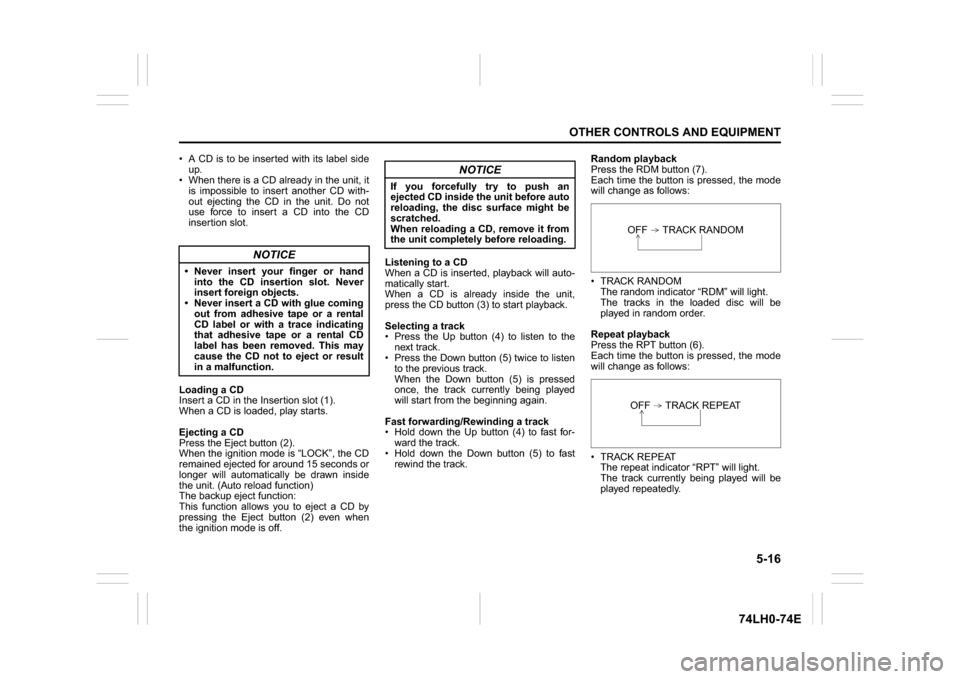
Insert a CD in the Insertion slot (1).
When a CD is loaded, play starts.
Ejecting a CD
Press the Eject button (2).
When the ignition mode is “LOCK”, the CD
remained ejected for around 15 seconds or
longer will automatically be drawn inside
the unit. (Auto reload function)
The backup eject function:
This function allows you to eject a CD by
pressing the Eject button (2) even when
the ignition mode is off.Listening to a CD
When a CD is inserted, playback will auto-
matically start.
When a CD is already inside the unit,
press the CD button (3) to start playback.
Selecting a track
Press the Up button (4) to listen to the
next track.
Press the Down button (5) twice to listen
to the previous track.
When the Down button (5) is pressed
once, the track currently being played
will start from the beginning again.
Fast forwarding/Rewinding a track
Hold down the Up button (4) to fast for-
ward the track.
Hold down the Down button (5) to fast
rewind the track.Random playback
Press the RDM button (7).
Each time the button is pressed, the mode
will change as follows:
TRACK RANDOM
The random indicator “RDM” will light.
The tracks in the loaded disc will be
played in random order.
Repeat playback
Press the RPT button (6).
Each time the button is pressed, the mode
will change as follows:
TRACK REPEAT
The repeat indicator “RPT” will light.
The track currently being played will be
played repeatedly.
NOTICE
Never insert your finger or hand
into the CD insertion slot. Never
insert foreign objects.
Never insert a CD with glue coming
out from adhesive tape or a rental
CD label or with a trace indicating
that adhesive tape or a rental CD
label has been removed. This may
cause the CD not to eject or result
in a malfunction.
NOTICE
If you forcefully try to push an
ejected CD inside the unit before auto
reloading, the disc surface might be
scratched.
When reloading a CD, remove it from
the unit completely before reloading.
OFF TRACK RANDOMOFF TRACK REPEAT
Page 144 of 336
5-17OTHER CONTROLS AND EQUIPMENT
74LH0-74E
Display change
Press the DISP button (8).
Each time the button is pressed, display
will change as follows:
NOTE:
“NO TITLE” will be displayed when there
is no text information in the disc currently
being played.
If text data contains more than 12 char-
acters, the “>” mark will appear at the
right end. Holding down the DISP button
(8) for 1 second or longer can display the
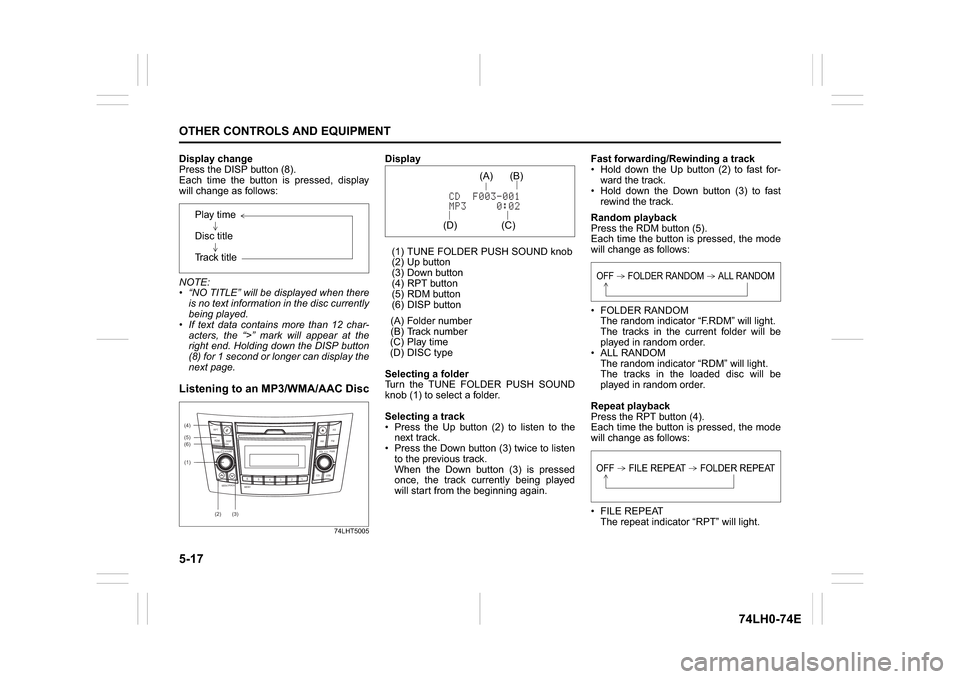
next page.Listening to an MP3/WMA/AAC Disc
74LHT5005
Display
(1) TUNE FOLDER PUSH SOUND knob
(2) Up button
(3) Down button
(4) RPT button
(5) RDM button
(6) DISP button
(A) Folder number
(B) Track number
(C) Play time
(D) DISC type
Selecting a folder
Turn the TUNE FOLDER PUSH SOUND
knob (1) to select a folder.
Selecting a track
Press the Up button (2) to listen to the
next track.
Press the Down button (3) twice to listen
to the previous track.
When the Down button (3) is pressed
once, the track currently being played
will start from the beginning again.Fast forwarding/Rewinding a track
Hold down the Up button (2) to fast for-
ward the track.
Hold down the Down button (3) to fast
rewind the track.
Random playback
Press the RDM button (5).
Each time the button is pressed, the mode
will change as follows:
FOLDER RANDOM
The random indicator “F.RDM” will light.
The tracks in the current folder will be
played in random order.
ALL RANDOM
The random indicator “RDM” will light.
The tracks in the loaded disc will be
played in random order.
Repeat playback
Press the RPT button (4).
Each time the button is pressed, the mode
will change as follows:
FILE REPEAT
The repeat indicator “RPT” will light. Play time
Disc title
Track title
(5)
B S
U
CD
2
3 4 5 6
SEEK/TRACK
AS
AMFM RPT
RDM
DISP
PUSHSOUND
TUNE/FLD
VOLPWRPUSH
11
MENU
(2)
(4)
(3) (6)
(1)
(C)(B) (A)
(D)
OFF FOLDER RANDOM ALL RANDOMOFF FILE REPEAT FOLDER REPEAT
Page 145 of 336
5-18
OTHER CONTROLS AND EQUIPMENT
74LH0-74E
The track currently being played will be
played repeatedly.
FOLDER REPEAT
The repeat indicator “RPT.F” will light.
All tracks in the currently selected folder
will be played repeatedly.
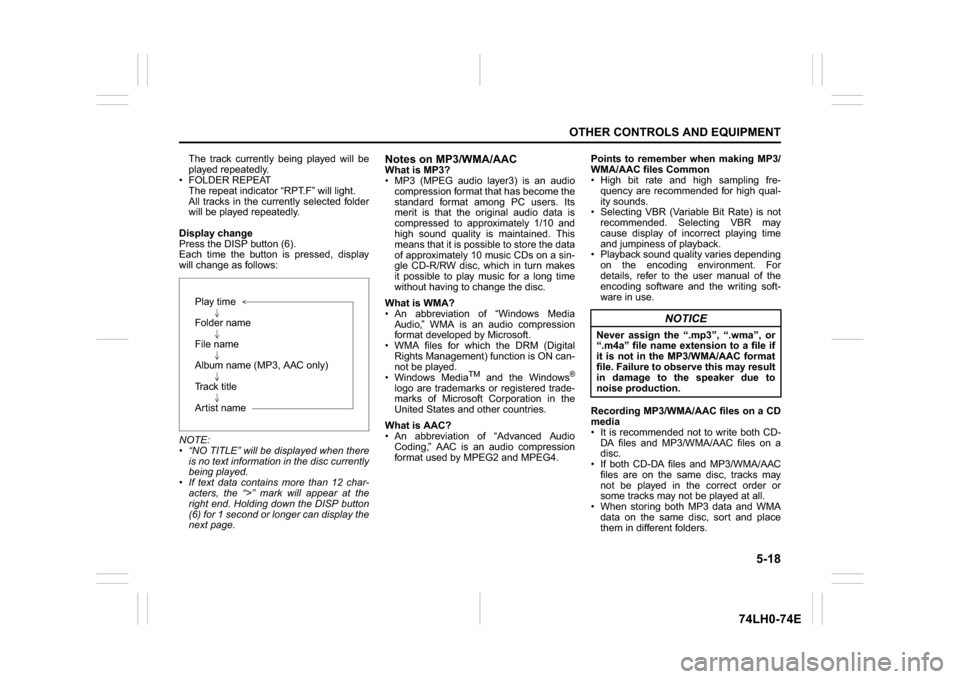
Display change
Press the DISP button (6).
Each time the button is pressed, display
will change as follows:
NOTE:
“NO TITLE” will be displayed when there
is no text information in the disc currently
being played.
If text data contains more than 12 char-
acters, the “>” mark will appear at the
right end. Holding down the DISP button
(6) for 1 second or longer can display the
next page.
Notes on MP3/WMA/AACWhat is MP3?
MP3 (MPEG audio layer3) is an audio
compression format that has become the
standard format among PC users. Its
merit is that the original audio data is
compressed to approximately 1/10 and
high sound quality is maintained. This
means that it is possible to store the data
of approximately 10 music CDs on a sin-
gle CD-R/RW disc, which in turn makes
it possible to play music for a long time
without having to change the disc.
What is WMA?
An abbreviation of “Windows Media
Audio,” WMA is an audio compression
format developed by Microsoft.
WMA files for which the DRM (Digital
Rights Management) function is ON can-
not be played.
Windows Media
TM
and the Windows
®
logo are trademarks or registered trade-
marks of Microsoft Corporation in the
United States and other countries.
What is AAC?
An abbreviation of “Advanced Audio
Coding,” AAC is an audio compression
format used by MPEG2 and MPEG4.Points to remember when making MP3/
WMA/AAC files Common
High bit rate and high sampling fre-
quency are recommended for high qual-
ity sounds.
Selecting VBR (Variable Bit Rate) is not
recommended. Selecting VBR may
cause display of incorrect playing time
and jumpiness of playback.
Playback sound quality varies depending
on the encoding environment. For
details, refer to the user manual of the
encoding software and the writing soft-
ware in use.
Recording MP3/WMA/AAC files on a CD
media
It is recommended not to write both CD-
DA files and MP3/WMA/AAC files on a
disc.
If both CD-DA files and MP3/WMA/AAC
files are on the same disc, tracks may
not be played in the correct order or
some tracks may not be played at all.
When storing both MP3 data and WMA
data on the same disc, sort and place
them in different folders. Play time
Folder name
File name
Album name (MP3, AAC only)
Track title
Artist name
NOTICE
Never assign the “.mp3”, “.wma”, or
“.m4a” file name extension to a file if
it is not in the MP3/WMA/AAC format
file. Failure to observe this may result
in damage to the speaker due to
noise production.
Page 147 of 336
5-20
OTHER CONTROLS AND EQUIPMENT
74LH0-74E
Selecting a USB device mode
Press the USB device mode (1).
Selecting a folder
Turn the TUNE FOLDER PUSH SOUND
knob (2) to select the desired folder.
Selecting a track
Press the Up button (3) to listen to the
next track.
Press the Down button (4) twice to listen
to the previous track.
When the Down button (4) is pressed
once, the track currently being played
will start from the beginning again.
Fast forwarding/Rewinding a track
Hold down the Up button (3) to fast for-
ward the track.
Hold down the Down button (4) to fast
rewind the track.Random playback
Press the RDM button (6).
Each time the button is pressed, the mode
will change as follows:
FOLDER RANDOM
The random indicator “F.RDM” will light.
The tracks in the currently selected
folder will be played in random order.
ALL RANDOM
The random indicator “RDM” will light.
The tracks in the connected USB device
will be played in random order.
Repeat playback
Press the RPT button (5).
Each time the button is pressed, the mode
will change as follows:
FILE REPEAT
The repeat indicator “RPT” will light.
The track currently being played will be
played repeatedly. FOLDER REPEAT
The repeat indicator “RPT.F” will light.
All the tracks in the folder currently
selected will be played repeatedly.
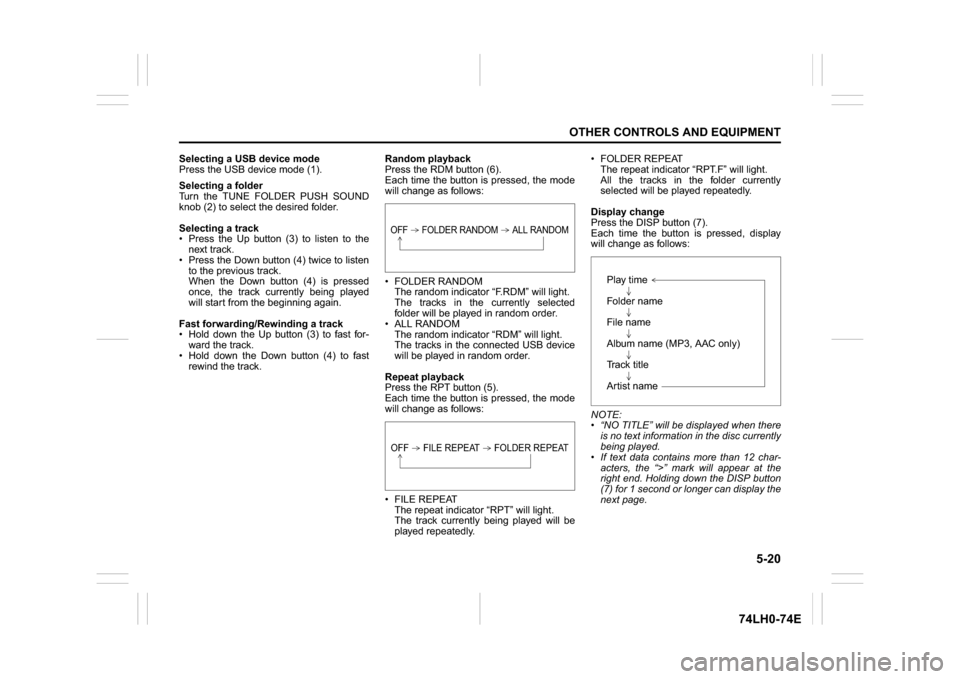
Display change
Press the DISP button (7).
Each time the button is pressed, display
will change as follows:
NOTE:
“NO TITLE” will be displayed when there
is no text information in the disc currently
being played.
If text data contains more than 12 char-
acters, the “>” mark will appear at the
right end. Holding down the DISP button
(7) for 1 second or longer can display the
next page.
OFF FOLDER RANDOM ALL RANDOMOFF FILE REPEAT FOLDER REPEAT
Play time
Folder name
File name
Album name (MP3, AAC only)
Track title
Artist name
Page 149 of 336
5-22
OTHER CONTROLS AND EQUIPMENT
74LH0-74E
Selecting an iPod
® mode
Press the USB button (1).
Selecting a track
Press the Up button (3) to listen to the
next track.
Press the Down button (4) twice to listen
to the previous track.
When the Down button (4) is pressed
once, the track currently being played
will start from the beginning again.
Fast forwarding/Rewinding a track
Hold down the Up button (3) to fast for-
ward the track.
Hold down the Down button (4) to fast
rewind the track.
Random playback
Press the RDM button (6).
Each time the button is pressed, the mode
will change as follows:
SONG RANDOM
The random indicator “RDM” will light.
The tracks in the iPod
® will be played in
random order.
ALBUM RANDOM
The random indicator “D.RDM” will light.
The albums in the iPod® will be played in
random order.Repeat playback
Press the RPT button (5).
Each time the button is pressed, the mode
will change as follows:
SONG REPEAT
The repeat indicator “RPT” will light.
The track currently being played will be
played repeatedly.
Display change
Press the DISP button (7).
Each time the button is pressed, display
will change as follows:
NOTE:
If text data contains more than 12 characters,
the “>” mark will appear at the right end.
Holding down the DISP button (7) for 1 sec-
ond or longer can display the next page.
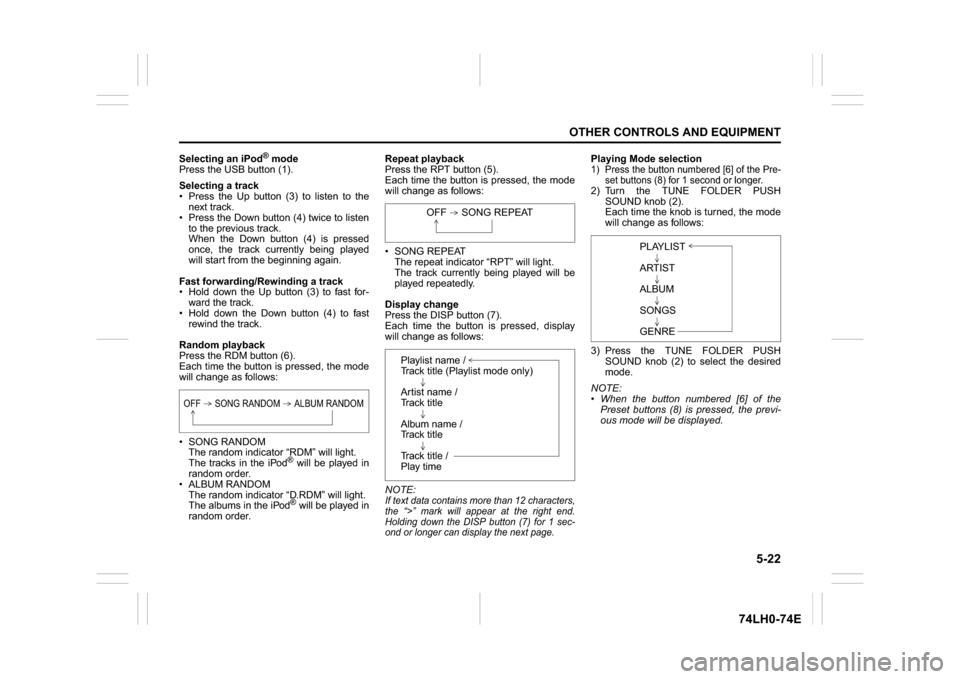
Playing Mode selection1) Press the button numbered [6] of the Pre-
set buttons (8) for 1 second or longer.2) Turn the TUNE FOLDER PUSH
SOUND knob (2).
Each time the knob is turned, the mode
will change as follows:
3) Press the TUNE FOLDER PUSH
SOUND knob (2) to select the desired
mode.
NOTE:
When the button numbered [6] of the
Preset buttons (8) is pressed, the previ-
ous mode will be displayed.
OFF SONG RANDOM ALBUM RANDOM
OFF SONG REPEAT
Playlist name /
Track title (Playlist mode only)
Artist name /
Track title
Album name /
Track title
Track title /
Play time
PLAYLIST
ARTIST
ALBUM
SONGS
GENRE
Page 159 of 336
5-32
OTHER CONTROLS AND EQUIPMENT
74LH0-74E
Selecting the
® audio mode
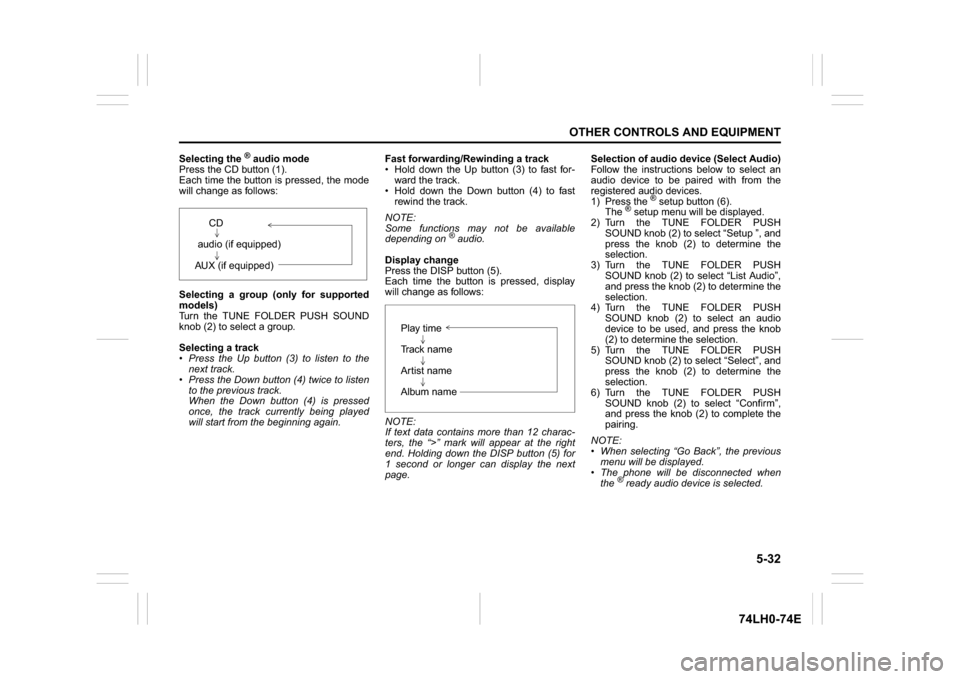
Press the CD button (1).
Each time the button is pressed, the mode
will change as follows:
Selecting a group (only for supported
models)
Turn the TUNE FOLDER PUSH SOUND
knob (2) to select a group.
Selecting a track
Press the Up button (3) to listen to the
next track.
Press the Down button (4) twice to listen
to the previous track.
When the Down button (4) is pressed
once, the track currently being played
will start from the beginning again.Fast forwarding/Rewinding a track
Hold down the Up button (3) to fast for-
ward the track.
Hold down the Down button (4) to fast
rewind the track.
NOTE:
Some functions may not be available
depending on
® audio.
Display change
Press the DISP button (5).
Each time the button is pressed, display
will change as follows:
NOTE:
If text data contains more than 12 charac-
ters, the “>” mark will appear at the right
end. Holding down the DISP button (5) for
1 second or longer can display the next
page.Selection of audio device (Select Audio)
Follow the instructions below to select an
audio device to be paired with from the
registered audio devices.
1) Press the
® setup button (6).
The
® setup menu will be displayed.
2) Turn the TUNE FOLDER PUSH
SOUND knob (2) to select “Setup ”, and
press the knob (2) to determine the
selection.
3) Turn the TUNE FOLDER PUSH
SOUND knob (2) to select “List Audio”,
and press the knob (2) to determine the
selection.
4) Turn the TUNE FOLDER PUSH
SOUND knob (2) to select an audio
device to be used, and press the knob
(2) to determine the selection.
5) Turn the TUNE FOLDER PUSH
SOUND knob (2) to select “Select”, and
press the knob (2) to determine the
selection.
6) Turn the TUNE FOLDER PUSH
SOUND knob (2) to select “Confirm”,
and press the knob (2) to complete the
pairing.
NOTE:
When selecting “Go Back”, the previous
menu will be displayed.
The phone will be disconnected when
the
® ready audio device is selected. CD
audio (if equipped)
AUX (if equipped)
Play time
Track name
Artist name
Album name
Page 161 of 336
5-34
OTHER CONTROLS AND EQUIPMENT
74LH0-74E
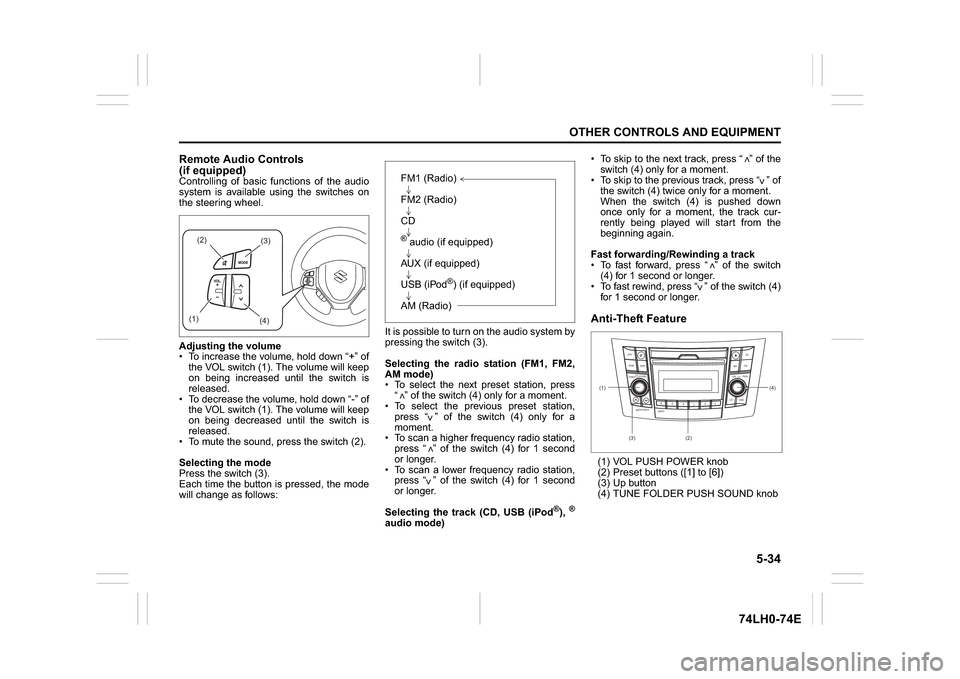
Remote Audio Controls
(if equipped)Controlling of basic functions of the audio
system is available using the switches on
the steering wheel.
Adjusting the volume
To increase the volume, hold down “+” of
the VOL switch (1). The volume will keep
on being increased until the switch is
released.
To decrease the volume, hold down “-” of
the VOL switch (1). The volume will keep
on being decreased until the switch is
released.
To mute the sound, press the switch (2).
Selecting the mode
Press the switch (3).
Each time the button is pressed, the mode
will change as follows:It is possible to turn on the audio system by
pressing the switch (3).
Selecting the radio station (FM1, FM2,
AM mode)
To select the next preset station, press
“ ” of the switch (4) only for a moment.
To select the previous preset station,
press “ ” of the switch (4) only for a
moment.
To scan a higher frequency radio station,
press “ ” of the switch (4) for 1 second
or longer.
To scan a lower frequency radio station,
press “ ” of the switch (4) for 1 second
or longer.
Selecting the track (CD, USB (iPod
®),®
audio mode) To skip to the next track, press “ ” of the
switch (4) only for a moment.
To skip to the previous track, press “ ” of
the switch (4) twice only for a moment.
When the switch (4) is pushed down
once only for a moment, the track cur-
rently being played will start from the
beginning again.
Fast forwarding/Rewinding a track
To fast forward, press “ ” of the switch
(4) for 1 second or longer.
To fast rewind, press “ ” of the switch (4)
for 1 second or longer.
Anti-Theft Feature(1) VOL PUSH POWER knob
(2) Preset buttons ([1] to [6])
(3) Up button
(4) TUNE FOLDER PUSH SOUND knob
(2)
(3)
(1)
(4)
FM1 (Radio)
FM2 (Radio)
CD® audio (if equipped)
AUX (if equipped)
USB (iPod
®) (if equipped)
AM (Radio)
<
<<<
<
<
<<
(1)
B S U
CD
2
3 4 5 6
S
EEK/TRACK
AS
AMFM RPT
RDM
DISP
PUSHSOUND
TUNE/FLD
VOLPWRPUSH
11
MENU
(3)(4)
(2)
Page 166 of 336
5-39OTHER CONTROLS AND EQUIPMENT
74LH0-74E
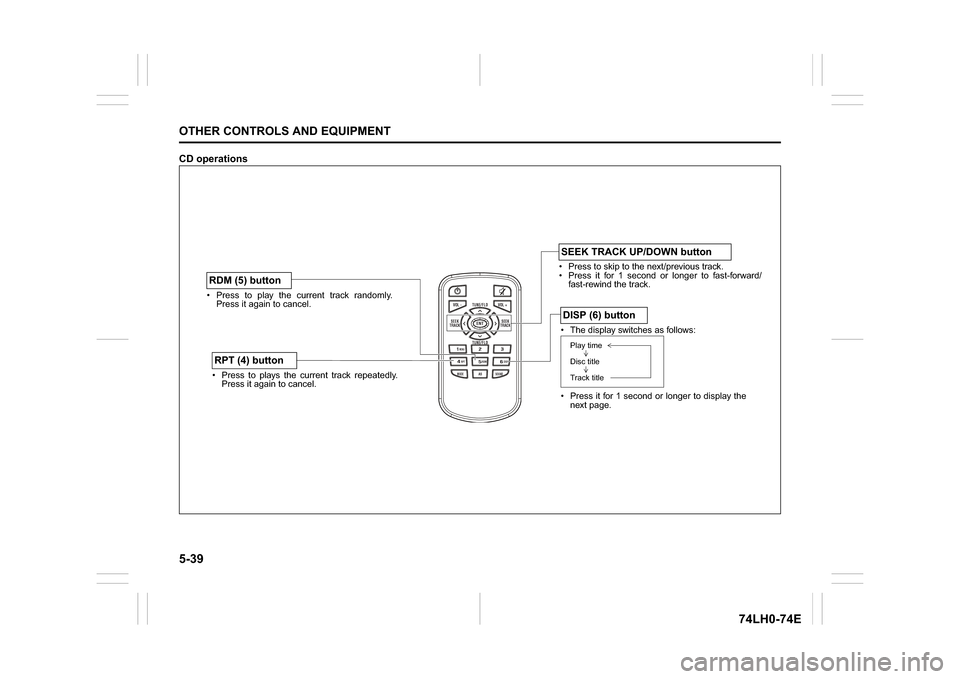
CD operations
/TUNE
VOL -VOL + FLD/TUNE
MODE
AS
SOUND
1
5
4
FLDENT
SEEK
TRACK
SEEK
TRACK
RPT RDM
6
MENU
3 2DISP
Press to play the current track randomly.
Press it again to cancel.RDM (5) button Press to plays the current track repeatedly.
Press it again to cancel.RPT (4) button
Press to skip to the next/previous track.
Press it for 1 second or longer to fast-forward/
fast-rewind the track.SEEK TRACK UP/DOWN button The display switches as follows:
Press it for 1 second or longer to display the
next page.DISP (6) buttonPlay time
Disc title
Track title