set up SUZUKI SWIFT 2017 5.G Workshop Manual
[x] Cancel search | Manufacturer: SUZUKI, Model Year: 2017, Model line: SWIFT, Model: SUZUKI SWIFT 2017 5.GPages: 336, PDF Size: 6.24 MB
Page 164 of 336
5-37OTHER CONTROLS AND EQUIPMENT
74LH0-74E
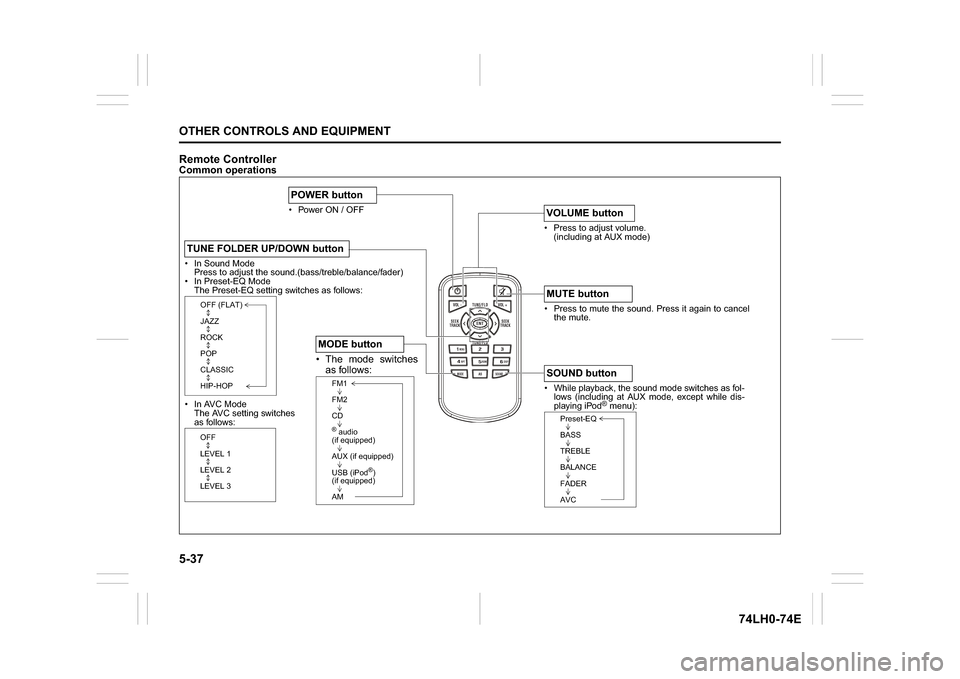
Remote ControllerCommon operations
/TUNE
VOL -VOL + FLD/TUNE
MODE
AS
SOUND
1
5
4
FLDENT
SEEK
TRACK
SEEK
TRACK
RPT RDM
6
MENU
3 2DISP
In Sound Mode
Press to adjust the sound.(bass/treble/balance/fader)
In Preset-EQ Mode
The Preset-EQ setting switches as follows:
In AVC Mode
The AVC setting switches
as follows:TUNE FOLDER UP/DOWN button
OFF (FLAT)
JAZZ
ROCK
POP
CLASSIC
HIP-HOPOFF
LEVEL 1
LEVEL 2
LEVEL 3
Power ON / OFFPOWER button
Press to adjust volume.
(including at AUX mode)VOLUME button Press to mute the sound. Press it again to cancel
the mute.MUTE button While playback, the sound mode switches as fol-
lows (including at AUX mode, except while dis-
playing iPod
® menu):
SOUND button
Preset-EQ
BASS
TREBLE
BALANCE
FADER
AVC
The mode switches
as follows: MODE button
FM1
FM2
CD® audio
(if equipped)
AUX (if equipped)
USB (iPod
®)
(if equipped)
AM
Page 165 of 336
5-38
OTHER CONTROLS AND EQUIPMENT
74LH0-74E
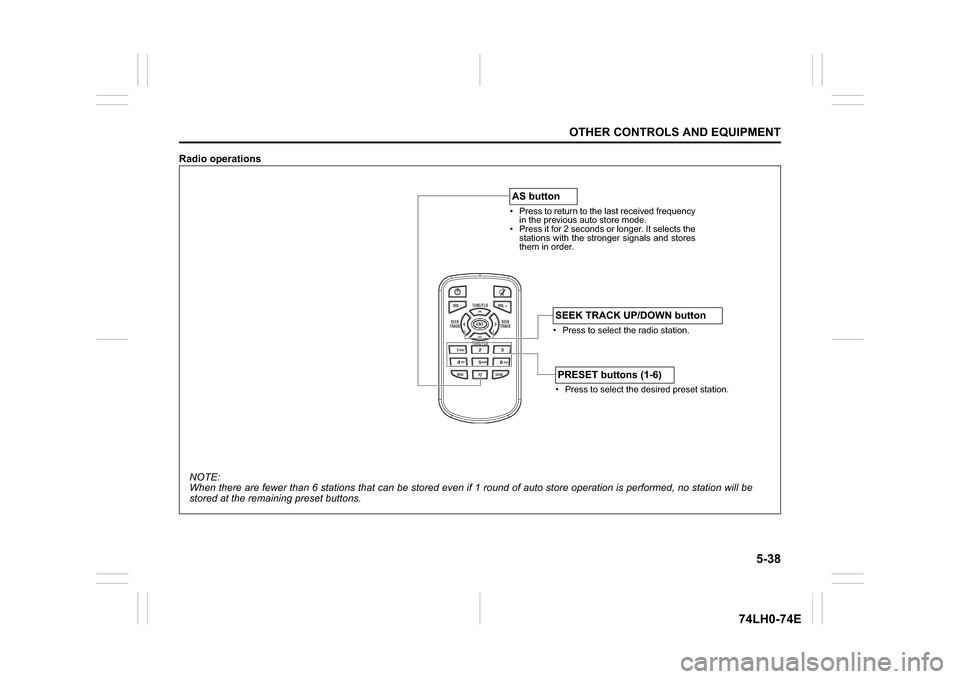
Radio operations
/TUNE
VOL -VOL + FLD/TUNE
MODE
AS
SOUND
1
5
4
FLDENT
SEEK
TRACK
SEEK
TRACK
RPT RDM
6
MENU
3 2DISP
NOTE:
When there are fewer than 6 stations that can be stored even if 1 round of auto store operation is performed, no station will be
stored at the remaining preset buttons.
Press to return to the last received frequency
in the previous auto store mode.
Press it for 2 seconds or longer. It selects the
stations with the stronger signals and stores
them in order.AS button
Press to select the radio station.SEEK TRACK UP/DOWN button Press to select the desired preset station.PRESET buttons (1-6)
Page 192 of 336
7-1INSPECTION AND MAINTENANCE
74LH0-74E
60B128S
WA R N I N G
You should take extreme care when
working on your vehicle to prevent
accidental injury. Here are a few pre-
cautions that you should be espe-
cially careful to observe:
To prevent damage or unintended
activation of the air bag system or
seat belt pretensioner system, be
sure the battery is disconnected and
the ignition switch has been in the
“LOCK” position for at least 90 sec-
onds before performing any electri-
cal service work on your vehicle. Do
not touch air bag system compo-
nents, seat belt pretensioner system
components or wires.
The wires are wrapped with yellow
tape or yellow tubing, and the cou-
plers are yellow for easy identifica-
tion.
Do not leave the engine running in
garages or other confined areas.
(Continued)
WA R N I N G
(Continued)
When the engine is running, keep
hands, clothing, tools, and other
objects away from the fan and drive
belt. Even though the fan may not
be moving, it can automatically
turn on without warning.
When it is necessary to do service
work with the engine running, make
sure that the parking brake is set
fully and the transmission is in
Neutral.
Do not touch ignition wires or other
ignition system parts when starting
the engine or when the engine is
running, or you could receive an
electric shock.
Be careful not to touch a hot
engine, exhaust manifold and
pipes, muffler, radiator and water
hoses.
Do not allow smoking, sparks, or
flames around fuel or the battery.
Flammable fumes are present.
Do not get under your vehicle if it is
supported only with the portable
jack provided in your vehicle.
Be careful not to cause accidental
short circuits between the positive
and negative battery terminals.
(Continued)
WA R N I N G
(Continued)
Keep used oil, coolant, and other
fluids away from children and pets.
Dispose of used fluids properly;
never pour them on the ground,
into sewers, etc.
Page 211 of 336
7-20
INSPECTION AND MAINTENANCE
74LH0-74E
Temporary Spare Tire (if equipped)Your vehicle comes equipped with the tem-
porary spare tire. It is only intended for
temporary emergency use, until the con-
ventional tire can be repaired or replaced.
The inflation pressure of the temporary
spare tire should be checked at least
monthly. At the same time, check that the
tire is stored securely. If it is not, tighten it.
Note that two or more temporary spare
tires should not be used on one vehicle
simultaneously.
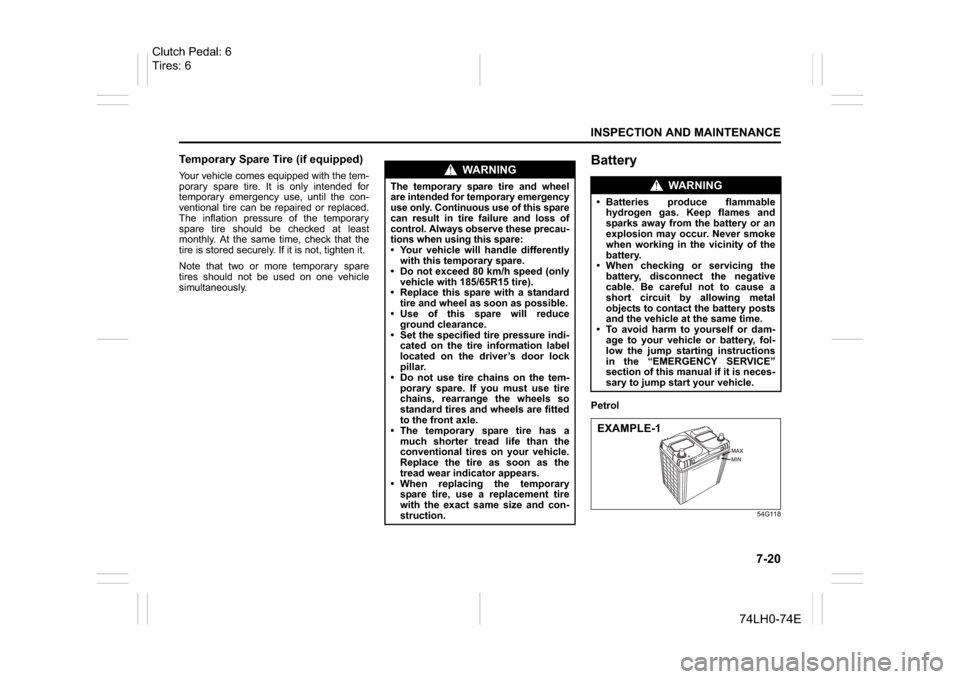
BatteryPetrol
54G118
WA R N I N G
The temporary spare tire and wheel
are intended for temporary emergency
use only. Continuous use of this spare
can result in tire failure and loss of
control. Always observe these precau-
tions when using this spare: Your vehicle will handle differently
with this temporary spare.
Do not exceed 80 km/h speed (only
vehicle with 185/65R15 tire).
Replace this spare with a standard
tire and wheel as soon as possible.
Use of this spare will reduce
ground clearance.
Set the specified tire pressure indi-
cated on the tire information label
located on the driver’s door lock
pillar.
Do not use tire chains on the tem-
porary spare. If you must use tire
chains, rearrange the wheels so
standard tires and wheels are fitted
to the front axle.
The temporary spare tire has a
much shorter tread life than the
conventional tires on your vehicle.
Replace the tire as soon as the
tread wear indicator appears.
When replacing the temporary
spare tire, use a replacement tire
with the exact same size and con-
struction.
WA R N I N G
Batteries produce flammable
hydrogen gas. Keep flames and
sparks away from the battery or an
explosion may occur. Never smoke
when working in the vicinity of the
battery.
When checking or servicing the
battery, disconnect the negative
cable. Be careful not to cause a
short circuit by allowing metal
objects to contact the battery posts
and the vehicle at the same time.
To avoid harm to yourself or dam-
age to your vehicle or battery, fol-
low the jump starting instructions
in the “EMERGENCY SERVICE”
section of this manual if it is neces-
sary to jump start your vehicle.EXAMPLE-1
Clutch Pedal: 6
Tires: 6
Page 212 of 336
7-21INSPECTION AND MAINTENANCE
74LH0-74E
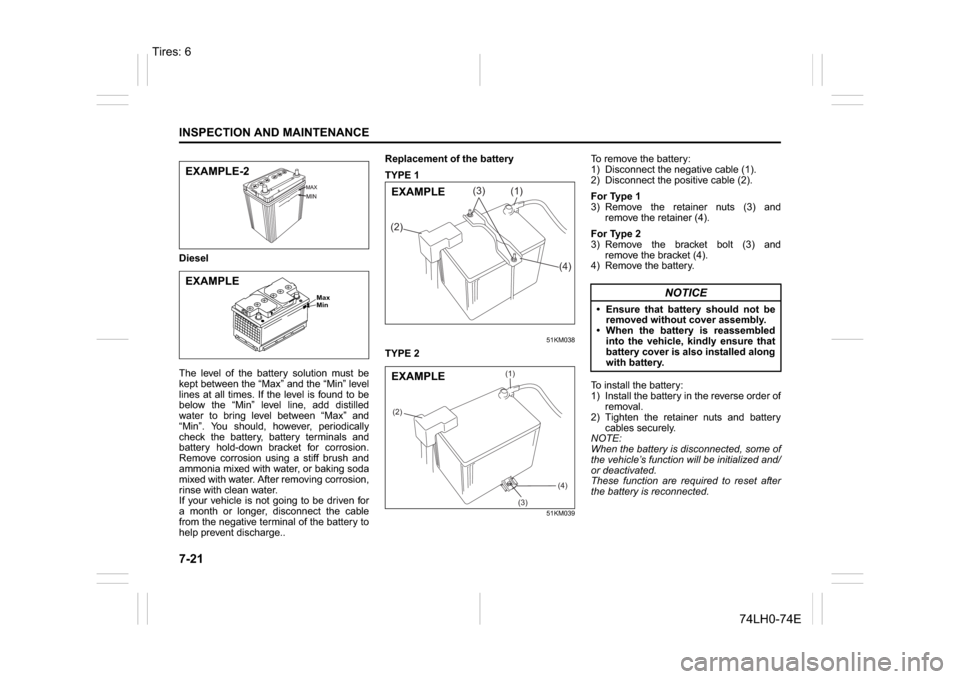
Diesel
The level of the battery solution must be
kept between the “Max” and the “Min” level
lines at all times. If the level is found to be
below the “Min” level line, add distilled
water to bring level between “Max” and
“Min”. You should, however, periodically
check the battery, battery terminals and
battery hold-down bracket for corrosion.
Remove corrosion using a stiff brush and
ammonia mixed with water, or baking soda
mixed with water. After removing corrosion,
rinse with clean water.
If your vehicle is not going to be driven for
a month or longer, disconnect the cable
from the negative terminal of the battery to
help prevent discharge..Replacement of the battery
TYPE 1
51KM038
TYPE 2
51KM039
To remove the battery:
1) Disconnect the negative cable (1).
2) Disconnect the positive cable (2).
For Type 1
3) Remove the retainer nuts (3) and
remove the retainer (4).
For Type 2
3) Remove the bracket bolt (3) and
remove the bracket (4).
4) Remove the battery.
To install the battery:
1) Install the battery in the reverse order of
removal.
2) Tighten the retainer nuts and battery
cables securely.
NOTE:
When the battery is disconnected, some of
the vehicle’s function will be initialized and/
or deactivated.
These function are required to reset after
the battery is reconnected.
EXAMPLE-2
Max
Min
EXAMPLE
(1)
(2)
(3)
(4)
EXAMPLE
(1)
(2)
(3)
(4)
EXAMPLE
NOTICE
Ensure that battery should not be
removed without cover assembly.
When the battery is reassembled
into the vehicle, kindly ensure that
battery cover is also installed along
with battery.
Tires: 6
Page 225 of 336
8-2
EMERGENCY SERVICE
74LH0-74E
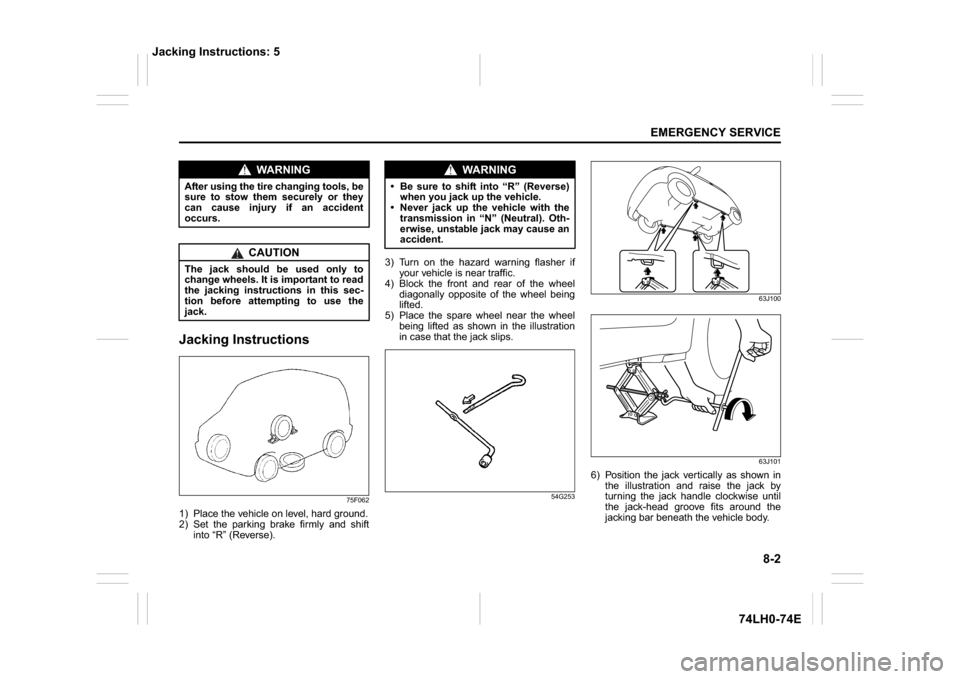
Jacking Instructions
75F062
1) Place the vehicle on level, hard ground.
2) Set the parking brake firmly and shift
into “R” (Reverse).3) Turn on the hazard warning flasher if
your vehicle is near traffic.
4) Block the front and rear of the wheel
diagonally opposite of the wheel being
lifted.
5) Place the spare wheel near the wheel
being lifted as shown in the illustration
in case that the jack slips.
54G25363J100
63J101
6) Position the jack vertically as shown in
the illustration and raise the jack by
turning the jack handle clockwise until
the jack-head groove fits around the
jacking bar beneath the vehicle body.
WA R N I N G
After using the tire changing tools, be
sure to stow them securely or they
can cause injury if an accident
occurs.
CAUTION
The jack should be used only to
change wheels. It is important to read
the jacking instructions in this sec-
tion before attempting to use the
jack.
WA R N I N G
Be sure to shift into “R” (Reverse)
when you jack up the vehicle.
Never jack up the vehicle with the
transmission in “N” (Neutral). Oth-
erwise, unstable jack may cause an
accident.
Jacking Instructions: 5
Page 228 of 336
8-5EMERGENCY SERVICE
74LH0-74E
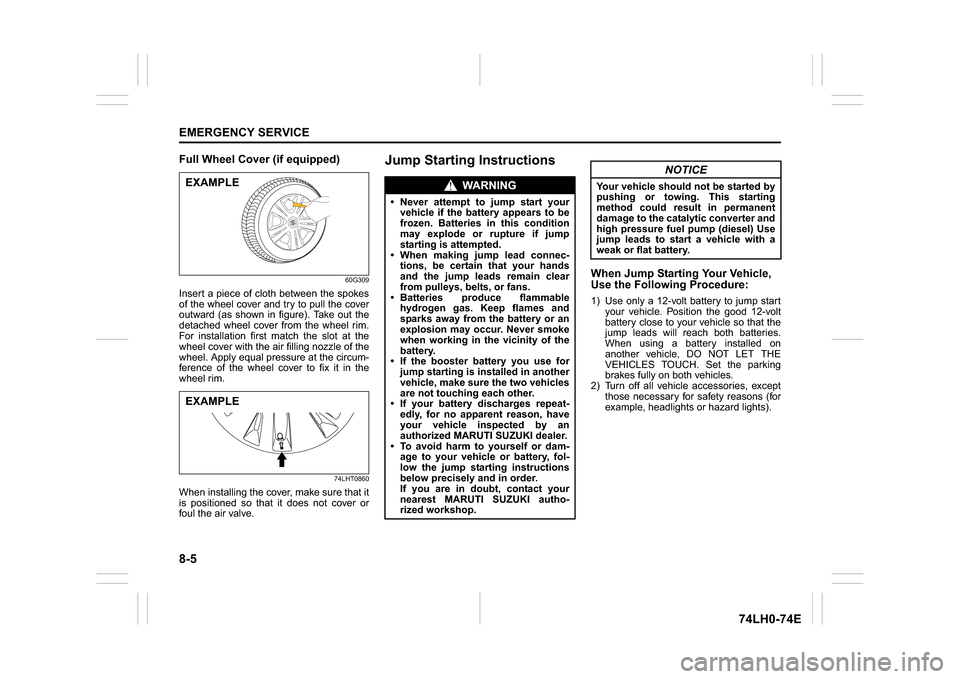
Full Wheel Cover (if equipped)
60G309
Insert a piece of cloth between the spokes
of the wheel cover and try to pull the cover
outward (as shown in figure). Take out the
detached wheel cover from the wheel rim.
For installation first match the slot at the
wheel cover with the air filling nozzle of the
wheel. Apply equal pressure at the circum-
ference of the wheel cover to fix it in the
wheel rim.
74LHT0860
When installing the cover, make sure that it
is positioned so that it does not cover or
foul the air valve.
Jump Starting Instructions
When Jump Starting Your Vehicle,
Use the Following Procedure:1) Use only a 12-volt battery to jump start
your vehicle. Position the good 12-volt
battery close to your vehicle so that the
jump leads will reach both batteries.
When using a battery installed on
another vehicle, DO NOT LET THE
VEHICLES TOUCH. Set the parking
brakes fully on both vehicles.
2) Turn off all vehicle accessories, except
those necessary for safety reasons (for
example, headlights or hazard lights).
EXAMPLEEXAMPLE
WA R N I N G
Never attempt to jump start your
vehicle if the battery appears to be
frozen. Batteries in this condition
may explode or rupture if jump
starting is attempted.
When making jump lead connec-
tions, be certain that your hands
and the jump leads remain clear
from pulleys, belts, or fans.
Batteries produce flammable
hydrogen gas. Keep flames and
sparks away from the battery or an
explosion may occur. Never smoke
when working in the vicinity of the
battery.
If the booster battery you use for
jump starting is installed in another
vehicle, make sure the two vehicles
are not touching each other.
If your battery discharges repeat-
edly, for no apparent reason, have
your vehicle inspected by an
authorized MARUTI SUZUKI dealer.
To avoid harm to yourself or dam-
age to your vehicle or battery, fol-
low the jump starting instructions
below precisely and in order.
If you are in doubt, contact your
nearest MARUTI SUZUKI autho-
rized workshop.
NOTICE
Your vehicle should not be started by
pushing or towing. This starting
method could result in permanent
damage to the catalytic converter and
high pressure fuel pump (diesel) Use
jump leads to start a vehicle with a
weak or flat battery.