light SUZUKI SWIFT 2017 5.G Repair Manual
[x] Cancel search | Manufacturer: SUZUKI, Model Year: 2017, Model line: SWIFT, Model: SUZUKI SWIFT 2017 5.GPages: 336, PDF Size: 6.24 MB
Page 145 of 336
5-18
OTHER CONTROLS AND EQUIPMENT
74LH0-74E
The track currently being played will be
played repeatedly.
FOLDER REPEAT
The repeat indicator “RPT.F” will light.
All tracks in the currently selected folder
will be played repeatedly.
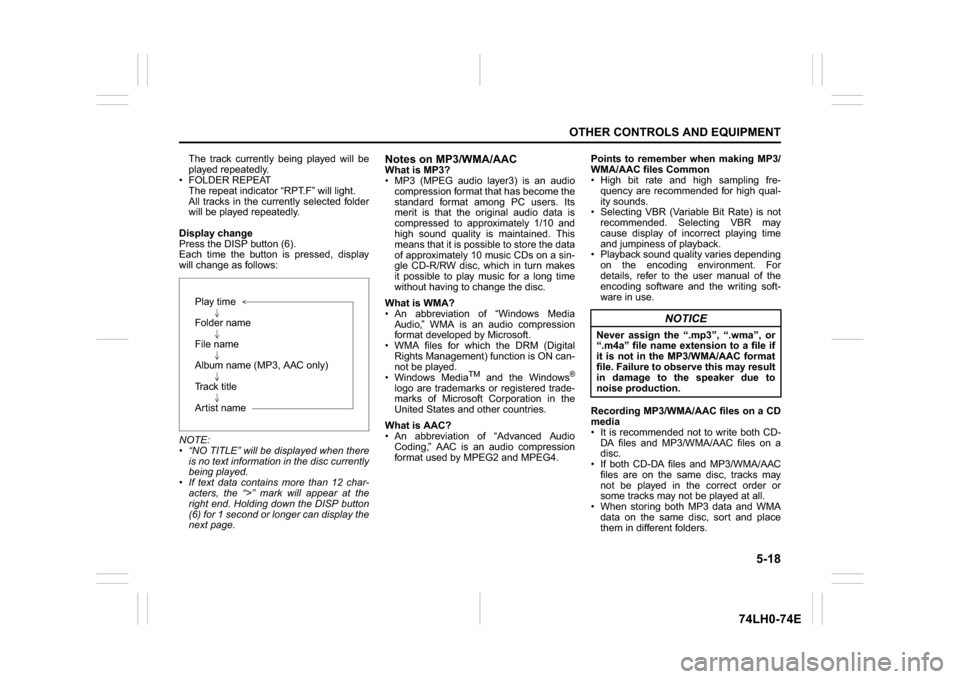
Display change
Press the DISP button (6).
Each time the button is pressed, display
will change as follows:
NOTE:
“NO TITLE” will be displayed when there
is no text information in the disc currently
being played.
If text data contains more than 12 char-
acters, the “>” mark will appear at the
right end. Holding down the DISP button
(6) for 1 second or longer can display the
next page.
Notes on MP3/WMA/AACWhat is MP3?
MP3 (MPEG audio layer3) is an audio
compression format that has become the
standard format among PC users. Its
merit is that the original audio data is
compressed to approximately 1/10 and
high sound quality is maintained. This
means that it is possible to store the data
of approximately 10 music CDs on a sin-
gle CD-R/RW disc, which in turn makes
it possible to play music for a long time
without having to change the disc.
What is WMA?
An abbreviation of “Windows Media
Audio,” WMA is an audio compression
format developed by Microsoft.
WMA files for which the DRM (Digital
Rights Management) function is ON can-
not be played.
Windows Media
TM
and the Windows
®
logo are trademarks or registered trade-
marks of Microsoft Corporation in the
United States and other countries.
What is AAC?
An abbreviation of “Advanced Audio
Coding,” AAC is an audio compression
format used by MPEG2 and MPEG4.Points to remember when making MP3/
WMA/AAC files Common
High bit rate and high sampling fre-
quency are recommended for high qual-
ity sounds.
Selecting VBR (Variable Bit Rate) is not
recommended. Selecting VBR may
cause display of incorrect playing time
and jumpiness of playback.
Playback sound quality varies depending
on the encoding environment. For
details, refer to the user manual of the
encoding software and the writing soft-
ware in use.
Recording MP3/WMA/AAC files on a CD
media
It is recommended not to write both CD-
DA files and MP3/WMA/AAC files on a
disc.
If both CD-DA files and MP3/WMA/AAC
files are on the same disc, tracks may
not be played in the correct order or
some tracks may not be played at all.
When storing both MP3 data and WMA
data on the same disc, sort and place
them in different folders. Play time
Folder name
File name
Album name (MP3, AAC only)
Track title
Artist name
NOTICE
Never assign the “.mp3”, “.wma”, or
“.m4a” file name extension to a file if
it is not in the MP3/WMA/AAC format
file. Failure to observe this may result
in damage to the speaker due to
noise production.
Page 147 of 336
5-20
OTHER CONTROLS AND EQUIPMENT
74LH0-74E
Selecting a USB device mode
Press the USB device mode (1).
Selecting a folder
Turn the TUNE FOLDER PUSH SOUND
knob (2) to select the desired folder.
Selecting a track
Press the Up button (3) to listen to the
next track.
Press the Down button (4) twice to listen
to the previous track.
When the Down button (4) is pressed
once, the track currently being played
will start from the beginning again.
Fast forwarding/Rewinding a track
Hold down the Up button (3) to fast for-
ward the track.
Hold down the Down button (4) to fast
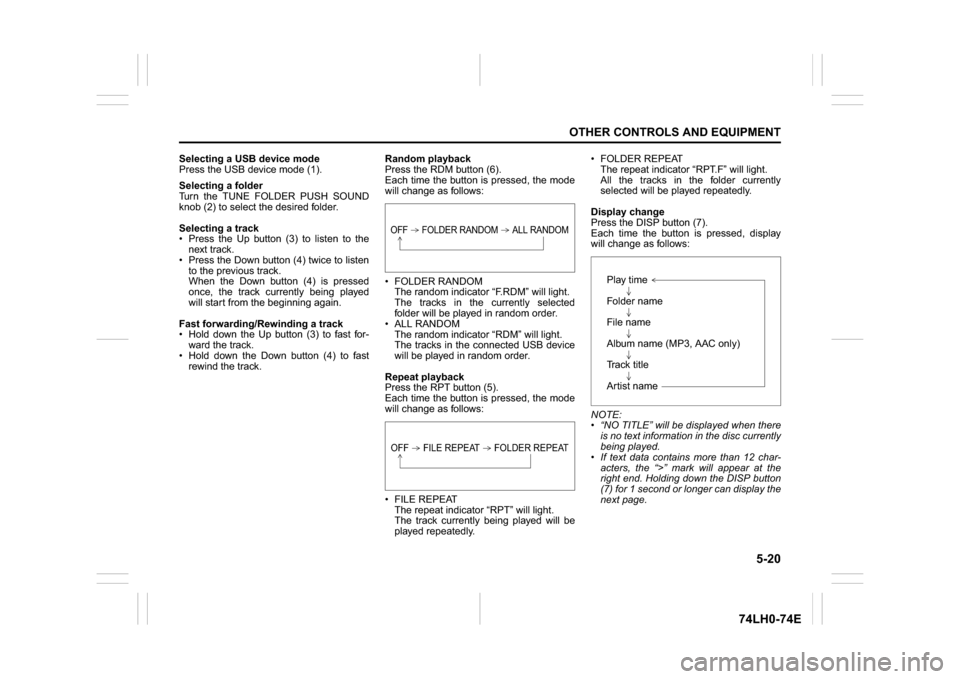
rewind the track.Random playback
Press the RDM button (6).
Each time the button is pressed, the mode
will change as follows:
FOLDER RANDOM
The random indicator “F.RDM” will light.
The tracks in the currently selected
folder will be played in random order.
ALL RANDOM
The random indicator “RDM” will light.
The tracks in the connected USB device
will be played in random order.
Repeat playback
Press the RPT button (5).
Each time the button is pressed, the mode
will change as follows:
FILE REPEAT
The repeat indicator “RPT” will light.
The track currently being played will be
played repeatedly. FOLDER REPEAT
The repeat indicator “RPT.F” will light.
All the tracks in the folder currently
selected will be played repeatedly.
Display change
Press the DISP button (7).
Each time the button is pressed, display
will change as follows:
NOTE:
“NO TITLE” will be displayed when there
is no text information in the disc currently
being played.
If text data contains more than 12 char-
acters, the “>” mark will appear at the
right end. Holding down the DISP button
(7) for 1 second or longer can display the
next page.
OFF FOLDER RANDOM ALL RANDOMOFF FILE REPEAT FOLDER REPEAT
Play time
Folder name
File name
Album name (MP3, AAC only)
Track title
Artist name
Page 149 of 336
5-22
OTHER CONTROLS AND EQUIPMENT
74LH0-74E
Selecting an iPod
® mode
Press the USB button (1).
Selecting a track
Press the Up button (3) to listen to the
next track.
Press the Down button (4) twice to listen
to the previous track.
When the Down button (4) is pressed
once, the track currently being played
will start from the beginning again.
Fast forwarding/Rewinding a track
Hold down the Up button (3) to fast for-
ward the track.
Hold down the Down button (4) to fast
rewind the track.
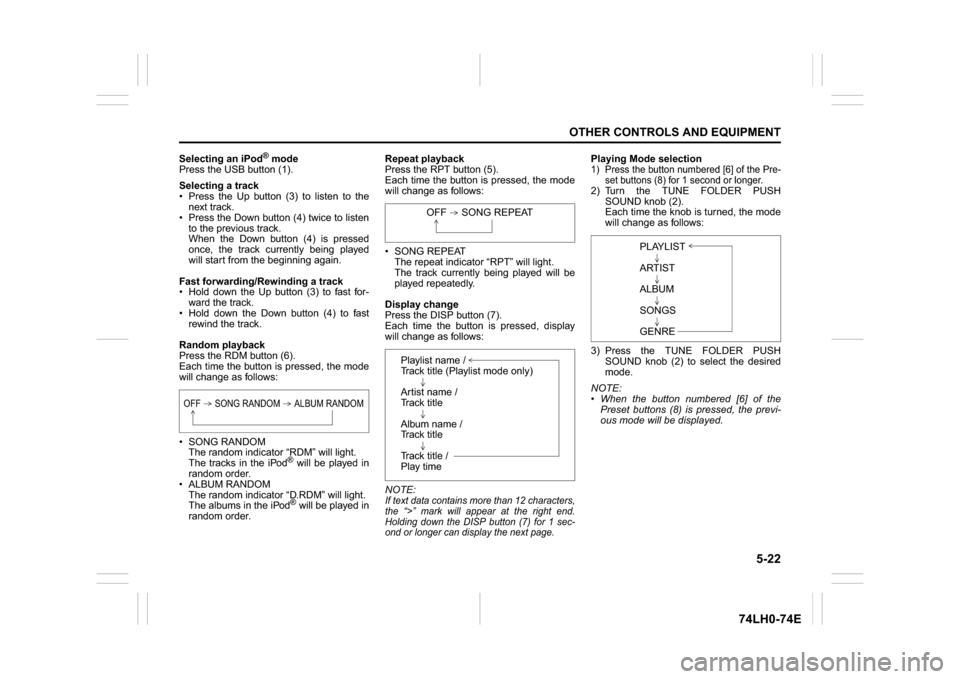
Random playback
Press the RDM button (6).
Each time the button is pressed, the mode
will change as follows:
SONG RANDOM
The random indicator “RDM” will light.
The tracks in the iPod
® will be played in
random order.
ALBUM RANDOM
The random indicator “D.RDM” will light.
The albums in the iPod® will be played in
random order.Repeat playback
Press the RPT button (5).
Each time the button is pressed, the mode
will change as follows:
SONG REPEAT
The repeat indicator “RPT” will light.
The track currently being played will be
played repeatedly.
Display change
Press the DISP button (7).
Each time the button is pressed, display
will change as follows:
NOTE:
If text data contains more than 12 characters,
the “>” mark will appear at the right end.
Holding down the DISP button (7) for 1 sec-
ond or longer can display the next page.
Playing Mode selection1) Press the button numbered [6] of the Pre-
set buttons (8) for 1 second or longer.2) Turn the TUNE FOLDER PUSH
SOUND knob (2).
Each time the knob is turned, the mode
will change as follows:
3) Press the TUNE FOLDER PUSH
SOUND knob (2) to select the desired
mode.
NOTE:
When the button numbered [6] of the
Preset buttons (8) is pressed, the previ-
ous mode will be displayed.
OFF SONG RANDOM ALBUM RANDOM
OFF SONG REPEAT
Playlist name /
Track title (Playlist mode only)
Artist name /
Track title
Album name /
Track title
Track title /
Play time
PLAYLIST
ARTIST
ALBUM
SONGS
GENRE
Page 163 of 336
5-36
OTHER CONTROLS AND EQUIPMENT
74LH0-74E
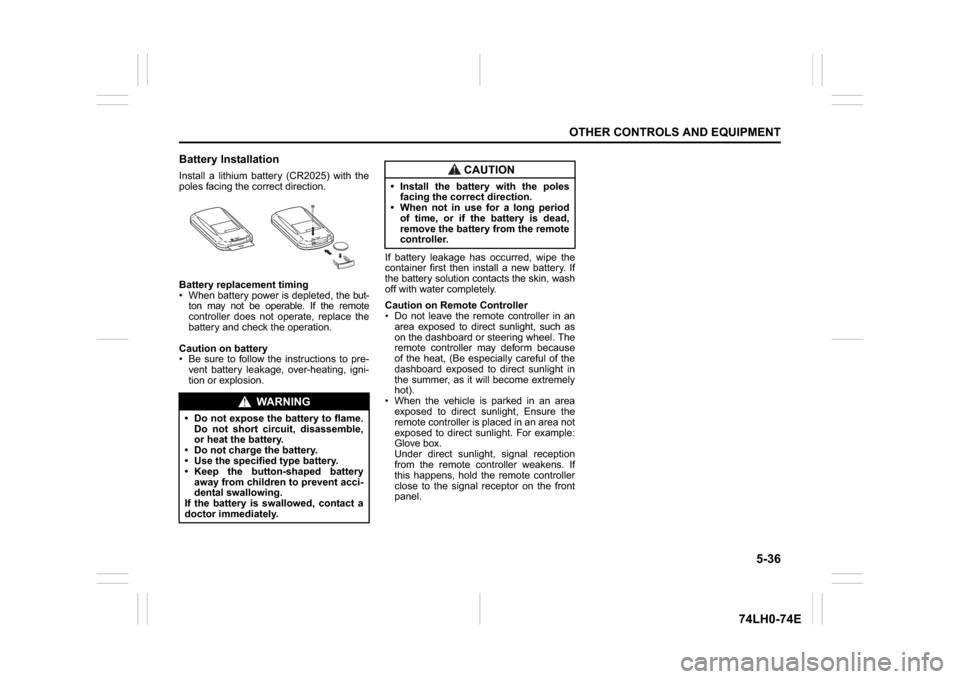
Battery InstallationInstall a lithium battery (CR2025) with the
poles facing the correct direction.
Battery replacement timing
When battery power is depleted, the but-
ton may not be operable. If the remote
controller does not operate, replace the
battery and check the operation.
Caution on battery
Be sure to follow the instructions to pre-
vent battery leakage, over-heating, igni-
tion or explosion.If battery leakage has occurred, wipe the
container first then install a new battery. If
the battery solution contacts the skin, wash
off with water completely.
Caution on Remote Controller
Do not leave the remote controller in an
area exposed to direct sunlight, such as
on the dashboard or steering wheel. The
remote controller may deform because
of the heat, (Be especially careful of the
dashboard exposed to direct sunlight in
the summer, as it will become extremely
hot).
When the vehicle is parked in an area
exposed to direct sunlight, Ensure the
remote controller is placed in an area not
exposed to direct sunlight. For example:
Glove box.
Under direct sunlight, signal reception
from the remote controller weakens. If
this happens, hold the remote controller
close to the signal receptor on the front
panel.
WA R N I N G
Do not expose the battery to flame.
Do not short circuit, disassemble,
or heat the battery.
Do not charge the battery.
Use the specified type battery.
Keep the button-shaped battery
away from children to prevent acci-
dental swallowing.
If the battery is swallowed, contact a
doctor immediately.
CAUTION
Install the battery with the poles
facing the correct direction.
When not in use for a long period
of time, or if the battery is dead,
remove the battery from the remote
controller.
Page 175 of 336
5-48
OTHER CONTROLS AND EQUIPMENT
74LH0-74E
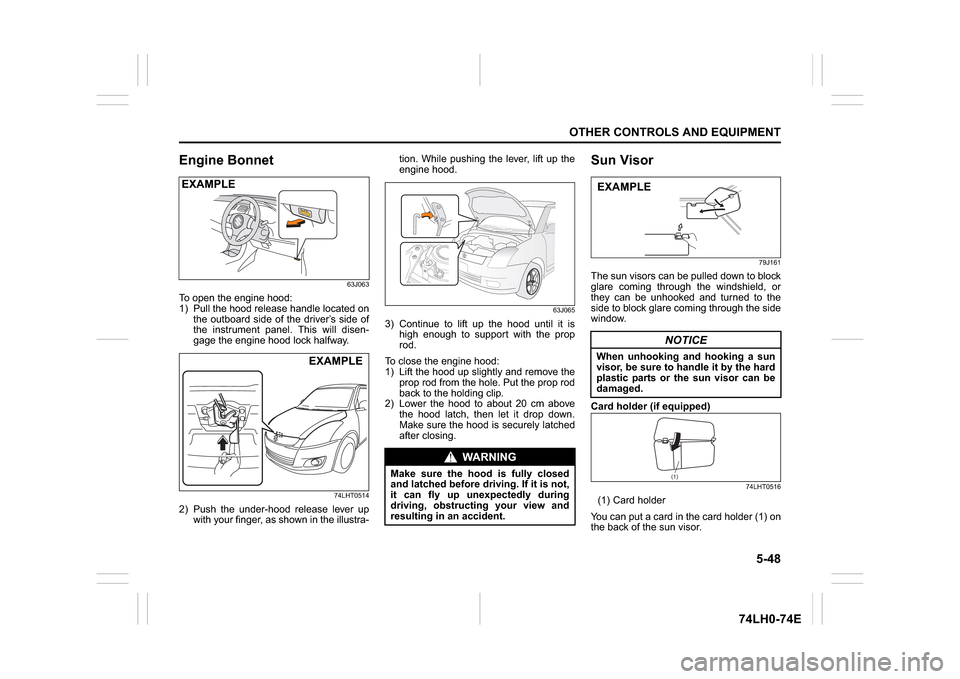
Engine Bonnet
63J063
To open the engine hood:
1) Pull the hood release handle located on
the outboard side of the driver’s side of
the instrument panel. This will disen-
gage the engine hood lock halfway.
74LHT0514
2) Push the under-hood release lever up
with your finger, as shown in the illustra-tion. While pushing the lever, lift up the
engine hood.
63J065
3) Continue to lift up the hood until it is
high enough to support with the prop
rod.
To close the engine hood:
1) Lift the hood up slightly and remove the
prop rod from the hole. Put the prop rod
back to the holding clip.
2) Lower the hood to about 20 cm above
the hood latch, then let it drop down.
Make sure the hood is securely latched
after closing.
Sun Visor
79J161
The sun visors can be pulled down to block
glare coming through the windshield, or
they can be unhooked and turned to the
side to block glare coming through the side
window.
Card holder (if equipped)
74LHT0516
(1) Card holder
You can put a card in the card holder (1) on
the back of the sun visor.
EXAMPLE
EXAMPLE
WA R N I N G
Make sure the hood is fully closed
and latched before driving. If it is not,
it can fly up unexpectedly during
driving, obstructing your view and
resulting in an accident.
NOTICE
When unhooking and hooking a sun
visor, be sure to handle it by the hard
plastic parts or the sun visor can be
damaged.EXAMPLE
(1)
Page 176 of 336
5-49OTHER CONTROLS AND EQUIPMENT
74LH0-74E
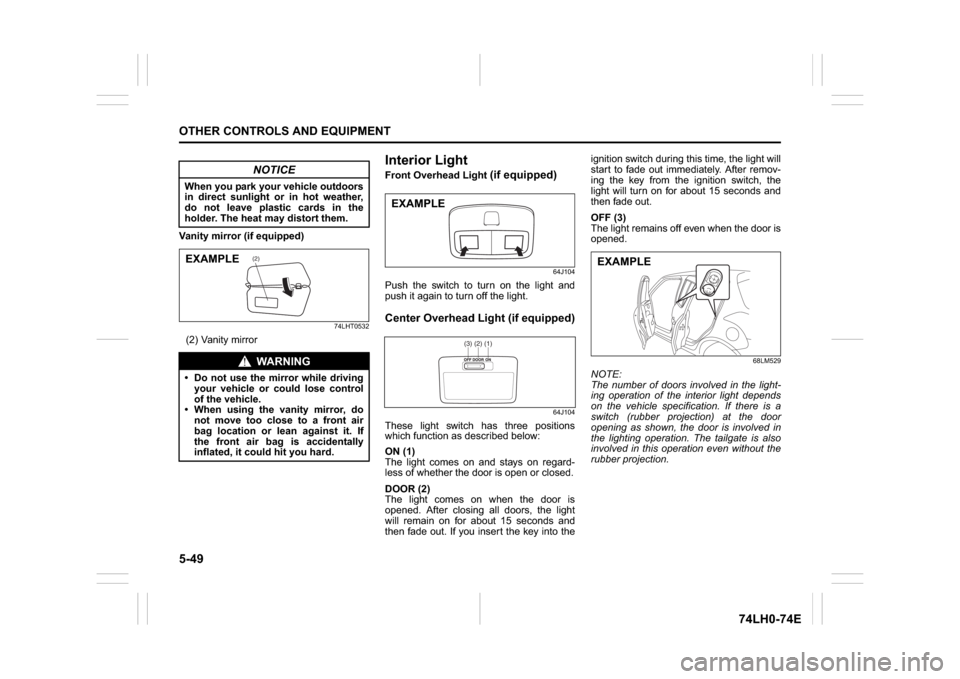
Vanity mirror (if equipped)
74LHT0532
(2) Vanity mirror
Interior Light Front Overhead Light
(if equipped)
64J104
Push the switch to turn on the light and
push it again to turn off the light.Center Overhead Light (if equipped)
64J104
These light switch has three positions
which function as described below:
ON (1)
The light comes on and stays on regard-
less of whether the door is open or closed.
DOOR (2)
The light comes on when the door is
opened. After closing all doors, the light
will remain on for about 15 seconds and
then fade out. If you insert the key into theignition switch during this time, the light will
start to fade out immediately. After remov-
ing the key from the ignition switch, the
light will turn on for about 15 seconds and
then fade out.
OFF (3)
The light remains off even when the door is
opened.
68LM529
NOTE:
The number of doors involved in the light-
ing operation of the interior light depends
on the vehicle specification. If there is a
switch (rubber projection) at the door
opening as shown, the door is involved in
the lighting operation. The tailgate is also
involved in this operation even without the
rubber projection.
NOTICE
When you park your vehicle outdoors
in direct sunlight or in hot weather,
do not leave plastic cards in the
holder. The heat may distort them.
WA R N I N G
Do not use the mirror while driving
your vehicle or could lose control
of the vehicle.
When using the vanity mirror, do
not move too close to a front air
bag location or lean against it. If
the front air bag is accidentally
inflated, it could hit you hard.
(2)
EXAMPLE
EXAMPLE
(1)(2)(3)
EXAMPLE
Page 177 of 336
5-50
OTHER CONTROLS AND EQUIPMENT
74LH0-74E
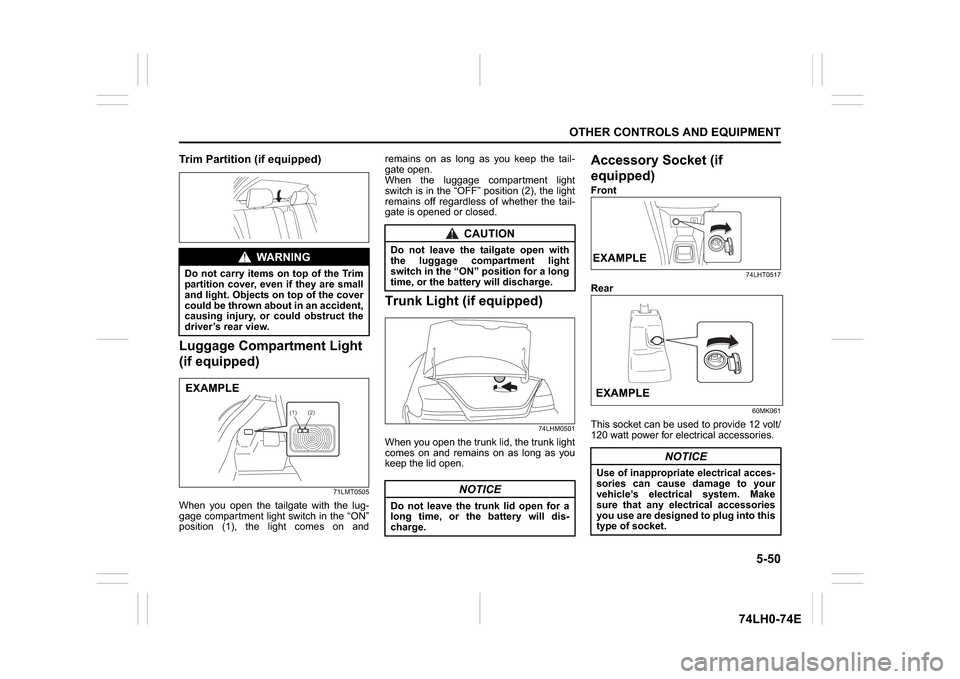
Trim Partition (if equipped)Luggage Compartment Light
(if equipped)
71LMT0505
When you open the tailgate with the lug-
gage compartment light switch in the “ON”
position (1), the light comes on andremains on as long as you keep the tail-
gate open.
When the luggage compartment light
switch is in the “OFF” position (2), the light
remains off regardless of whether the tail-
gate is opened or closed.
Trunk Light (if equipped)
74LHM0501
When you open the trunk lid, the trunk light
comes on and remains on as long as you
keep the lid open.
Accessory Socket (if
equipped)Front
74LHT0517
Rear
60MK061
This socket can be used to provide 12 volt/
120 watt power for electrical accessories.
WA R N I N G
Do not carry items on top of the Trim
partition cover, even if they are small
and light. Objects on top of the cover
could be thrown about in an accident,
causing injury, or could obstruct the
driver’s rear view.EXAMPLE
(1) (2)
CAUTION
Do not leave the tailgate open with
the luggage compartment light
switch in the “ON” position for a long
time, or the battery will discharge.
NOTICE
Do not leave the trunk lid open for a
long time, or the battery will dis-
charge.
NOTICE
Use of inappropriate electrical acces-
sories can cause damage to your
vehicle’s electrical system. Make
sure that any electrical accessories
you use are designed to plug into this
type of socket.EXAMPLEEXAMPLE
Page 179 of 336
5-52
OTHER CONTROLS AND EQUIPMENT
74LH0-74E
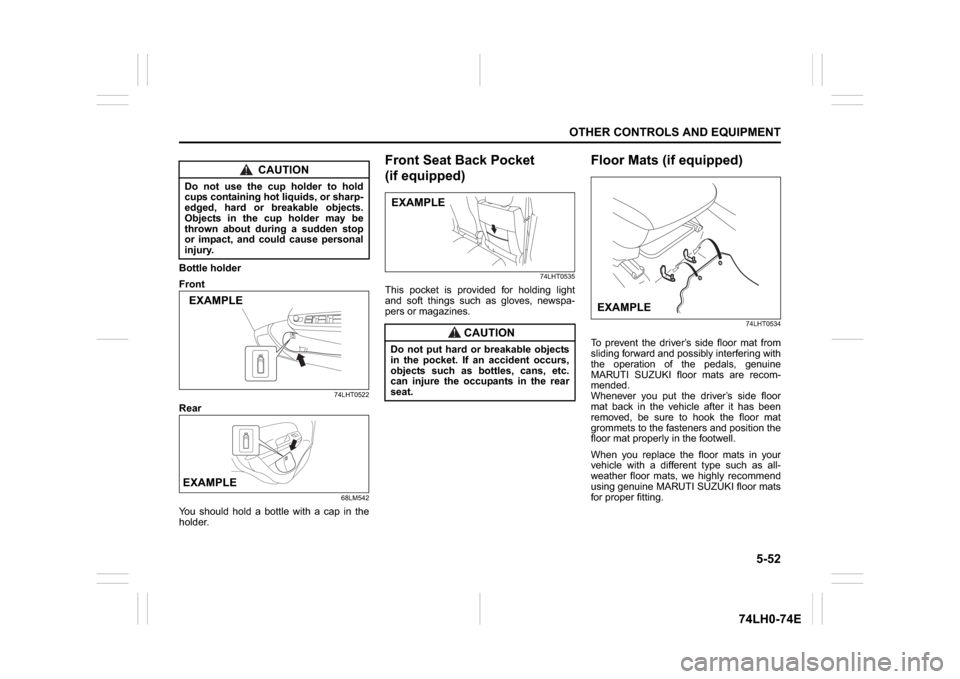
Bottle holder
Front
74LHT0522
Rear
68LM542
You should hold a bottle with a cap in the
holder.
Front Seat Back Pocket
(if equipped)
74LHT0535
This pocket is provided for holding light
and soft things such as gloves, newspa-
pers or magazines.
Floor Mats (if equipped)
74LHT0534
To prevent the driver’s side floor mat from
sliding forward and possibly interfering with
the operation of the pedals, genuine
MARUTI SUZUKI floor mats are recom-
mended.
Whenever you put the driver’s side floor
mat back in the vehicle after it has been
removed, be sure to hook the floor mat
grommets to the fasteners and position the
floor mat properly in the footwell.
When you replace the floor mats in your
vehicle with a different type such as all-
weather floor mats, we highly recommend
using genuine MARUTI SUZUKI floor mats
for proper fitting.
CAUTION
Do not use the cup holder to hold
cups containing hot liquids, or sharp-
edged, hard or breakable objects.
Objects in the cup holder may be
thrown about during a sudden stop
or impact, and could cause personal
injury.EXAMPLEEXAMPLE
CAUTION
Do not put hard or breakable objects
in the pocket. If an accident occurs,
objects such as bottles, cans, etc.
can injure the occupants in the rear
seat.EXAMPLE
EXAMPLE
Page 180 of 336
5-53OTHER CONTROLS AND EQUIPMENT
74LH0-74E
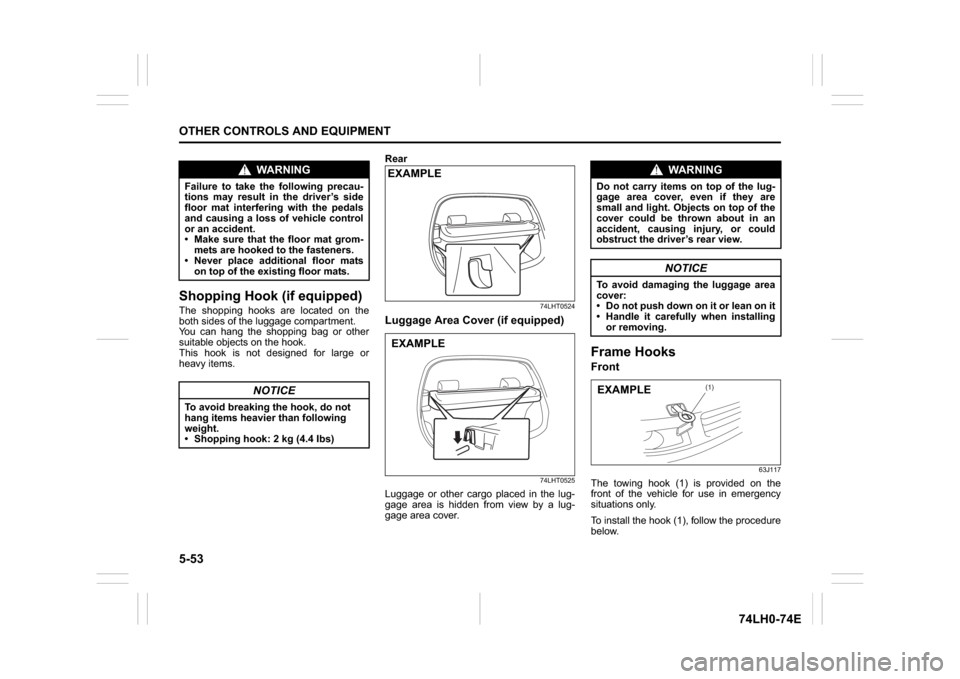
Shopping Hook (if equipped)The shopping hooks are located on the
both sides of the luggage compartment.
You can hang the shopping bag or other
suitable objects on the hook.
This hook is not designed for large or
heavy items.Rear
74LHT0524
Luggage Area Cover (if equipped)
74LHT0525
Luggage or other cargo placed in the lug-
gage area is hidden from view by a lug-
gage area cover.
Frame Hooks Front
63J117
The towing hook (1) is provided on the
front of the vehicle for use in emergency
situations only.
To install the hook (1), follow the procedure
below.
WA R N I N G
Failure to take the following precau-
tions may result in the driver’s side
floor mat interfering with the pedals
and causing a loss of vehicle control
or an accident.
Make sure that the floor mat grom-
mets are hooked to the fasteners.
Never place additional floor mats
on top of the existing floor mats.
NOTICE
To avoid breaking the hook, do not
hang items heavier than following
weight.
Shopping hook: 2 kg (4.4 Ibs)
EXAMPLEEXAMPLE
WA R N I N G
Do not carry items on top of the lug-
gage area cover, even if they are
small and light. Objects on top of the
cover could be thrown about in an
accident, causing injury, or could
obstruct the driver’s rear view.
NOTICE
To avoid damaging the luggage area
cover:
Do not push down on it or lean on it
Handle it carefully when installing
or removing.
(1)
EXAMPLE
Page 184 of 336
6-1VEHICLE LOADING AND TOWING
74LH0-74E
Vehicle LoadingYour vehicle was designed for specific
weight capacities. The weight capacities of
your vehicle are indicated by the Gross
Vehicle Weight Rating (GVWR) and the
Gross Axle Weight Rating (GAWR, front
and rear). The GVWR and GAWR (front
and rear) are listed in the “SPECIFICA-
TIONS” section.
GVWR – Maximum permissible overall
weight of the fully loaded vehicle (including
all the occupants, accessories and cargo
plus the trailer nose weight if towing a
trailer).
GAWR – (Front and Rear) Maximum per-
missible weight on an individual axle.
Actual weight of the loaded vehicle and
actual loads at the front and rear axles can
only be determined by weighing the vehi-
cle. Compare these weights to the GVWR
and GAWR (front and rear). If the gross
vehicle weight or the load on either axle
exceeds these ratings, you must remove
enough weight to bring the load down to
the rated capacity.
Trailer TowingYour MARUTI SUZUKI was originally
designed to carry people and a normal
amount of cargo, not to tow a trailer.
MARUTI SUZUKI does not recommend
you use your vehicle to tow a trailer. Tow-
ing a trailer can adversely affect handling,
durability,
Some countries have regulations which
specifically allow trailer towing up to a
specified maximum trailer weight (regis-
tered or statutory towing capacity, which-
ever is smaller); vehicles sold in these
countries can be used to tow a light trailer,
provided the trailer does not exceed the
maximum trailer weight specified in the
country’s regulations.
If you use your MARUTI SUZUKI to tow a
trailer, you should always observe the
requirements and recommendations in this
section. If you intend to tow a trailer, it is
essential to select a trailer and trailer tow-
ing equipment which are compatible. A
reputable towing specialist can help you.
and fuel economy.
WA R N I N G
Never overload your vehicle. The
gross vehicle weight (sum of the
weights of the vehicle, all the occu-
pants, accessories, cargo plus trailer
nose weight if towing a trailer) must
never exceed the Gross Vehicle
Weight Rating (GVWR). In addition,
never distribute a load so that the
weight on either the front or rear axle
exceeds the Gross Axle Weight Rat-
ing (GAWR).
WA R N I N G
Always distribute cargo evenly. To
avoid personal injury or damage to
your vehicle, always secure cargo to
prevent it from shifting if the vehicle
moves suddenly. Place heavier
objects on the floor and as far for-
ward in the cargo area as possible.
Never pile cargo higher than the top
of the seat backs.
NOTICE
Trailer towing puts additional stress
on the engine, drive train, and brakes
of your vehicle. Never tow a trailer
during the first 960 km (600 miles) of
vehicle operation.
Vehicle Loading: 11
Trailer Towing: 5, 11