engine SUZUKI SWIFT 2017 5.G Manual PDF
[x] Cancel search | Manufacturer: SUZUKI, Model Year: 2017, Model line: SWIFT, Model: SUZUKI SWIFT 2017 5.GPages: 336, PDF Size: 6.24 MB
Page 175 of 336
5-48
OTHER CONTROLS AND EQUIPMENT
74LH0-74E
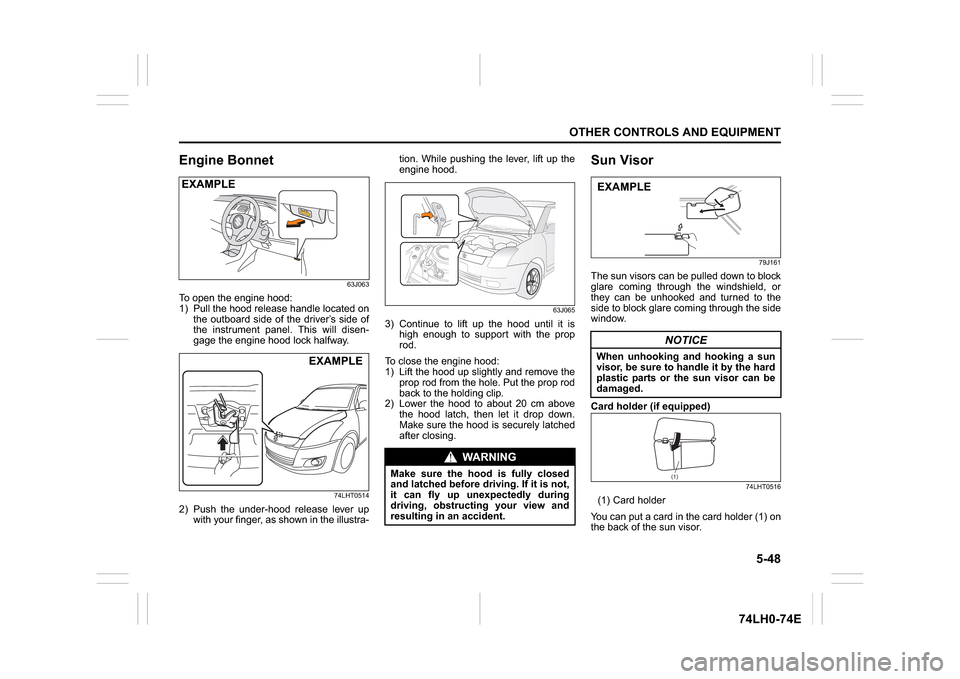
Engine Bonnet
63J063
To open the engine hood:
1) Pull the hood release handle located on
the outboard side of the driver’s side of
the instrument panel. This will disen-
gage the engine hood lock halfway.
74LHT0514
2) Push the under-hood release lever up
with your finger, as shown in the illustra-tion. While pushing the lever, lift up the
engine hood.
63J065
3) Continue to lift up the hood until it is
high enough to support with the prop
rod.
To close the engine hood:
1) Lift the hood up slightly and remove the
prop rod from the hole. Put the prop rod
back to the holding clip.
2) Lower the hood to about 20 cm above
the hood latch, then let it drop down.
Make sure the hood is securely latched
after closing.
Sun Visor
79J161
The sun visors can be pulled down to block
glare coming through the windshield, or
they can be unhooked and turned to the
side to block glare coming through the side
window.
Card holder (if equipped)
74LHT0516
(1) Card holder
You can put a card in the card holder (1) on
the back of the sun visor.
EXAMPLE
EXAMPLE
WA R N I N G
Make sure the hood is fully closed
and latched before driving. If it is not,
it can fly up unexpectedly during
driving, obstructing your view and
resulting in an accident.
NOTICE
When unhooking and hooking a sun
visor, be sure to handle it by the hard
plastic parts or the sun visor can be
damaged.EXAMPLE
(1)
Page 184 of 336
6-1VEHICLE LOADING AND TOWING
74LH0-74E
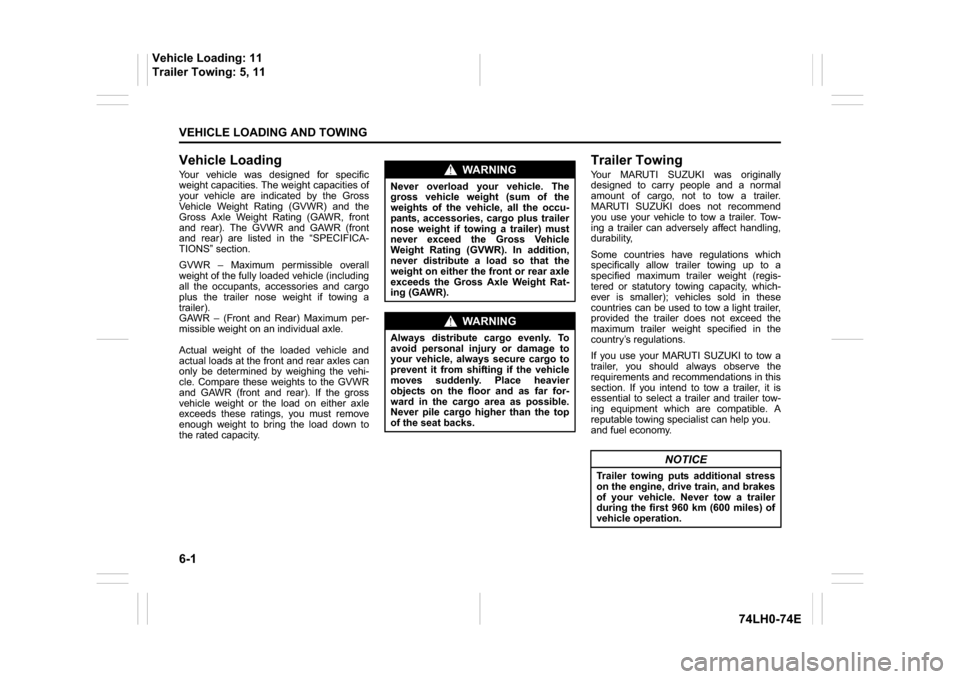
Vehicle LoadingYour vehicle was designed for specific
weight capacities. The weight capacities of
your vehicle are indicated by the Gross
Vehicle Weight Rating (GVWR) and the
Gross Axle Weight Rating (GAWR, front
and rear). The GVWR and GAWR (front
and rear) are listed in the “SPECIFICA-
TIONS” section.
GVWR – Maximum permissible overall
weight of the fully loaded vehicle (including
all the occupants, accessories and cargo
plus the trailer nose weight if towing a
trailer).
GAWR – (Front and Rear) Maximum per-
missible weight on an individual axle.
Actual weight of the loaded vehicle and
actual loads at the front and rear axles can
only be determined by weighing the vehi-
cle. Compare these weights to the GVWR
and GAWR (front and rear). If the gross
vehicle weight or the load on either axle
exceeds these ratings, you must remove
enough weight to bring the load down to
the rated capacity.
Trailer TowingYour MARUTI SUZUKI was originally
designed to carry people and a normal
amount of cargo, not to tow a trailer.
MARUTI SUZUKI does not recommend
you use your vehicle to tow a trailer. Tow-
ing a trailer can adversely affect handling,
durability,
Some countries have regulations which
specifically allow trailer towing up to a
specified maximum trailer weight (regis-
tered or statutory towing capacity, which-
ever is smaller); vehicles sold in these
countries can be used to tow a light trailer,
provided the trailer does not exceed the
maximum trailer weight specified in the
country’s regulations.
If you use your MARUTI SUZUKI to tow a
trailer, you should always observe the
requirements and recommendations in this
section. If you intend to tow a trailer, it is
essential to select a trailer and trailer tow-
ing equipment which are compatible. A
reputable towing specialist can help you.
and fuel economy.
WA R N I N G
Never overload your vehicle. The
gross vehicle weight (sum of the
weights of the vehicle, all the occu-
pants, accessories, cargo plus trailer
nose weight if towing a trailer) must
never exceed the Gross Vehicle
Weight Rating (GVWR). In addition,
never distribute a load so that the
weight on either the front or rear axle
exceeds the Gross Axle Weight Rat-
ing (GAWR).
WA R N I N G
Always distribute cargo evenly. To
avoid personal injury or damage to
your vehicle, always secure cargo to
prevent it from shifting if the vehicle
moves suddenly. Place heavier
objects on the floor and as far for-
ward in the cargo area as possible.
Never pile cargo higher than the top
of the seat backs.
NOTICE
Trailer towing puts additional stress
on the engine, drive train, and brakes
of your vehicle. Never tow a trailer
during the first 960 km (600 miles) of
vehicle operation.
Vehicle Loading: 11
Trailer Towing: 5, 11
Page 187 of 336
6-4
VEHICLE LOADING AND TOWING
74LH0-74E
60A186
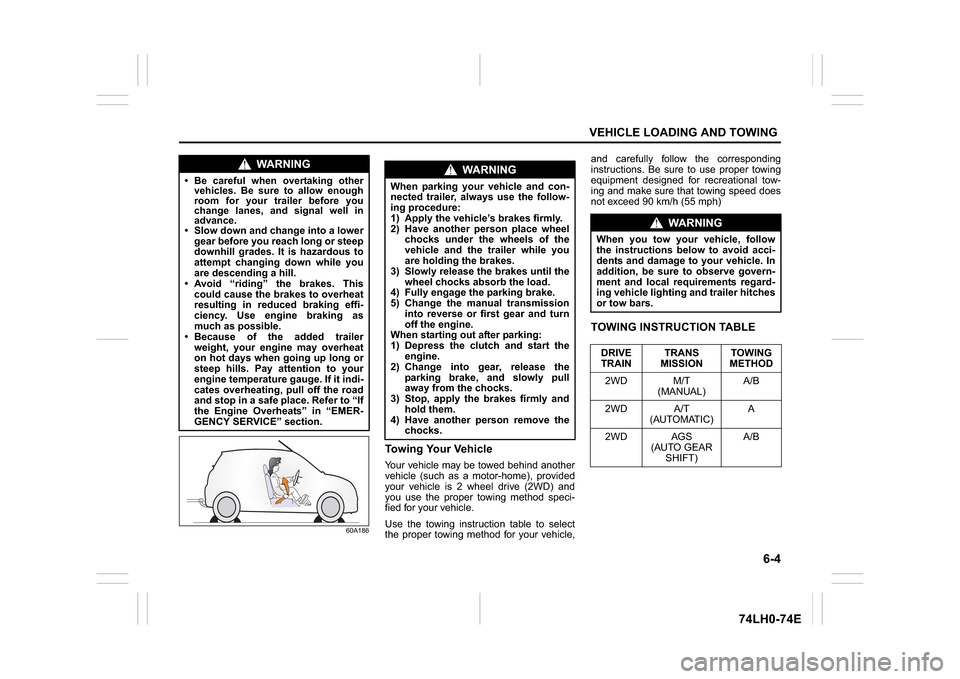
Towing Your VehicleYour vehicle may be towed behind another
vehicle (such as a motor-home), provided
your vehicle is 2 wheel drive (2WD) and
you use the proper towing method speci-
fied for your vehicle.
Use the towing instruction table to select
the proper towing method for your vehicle,and carefully follow the corresponding
instructions. Be sure to use proper towing
equipment designed for recreational tow-
ing and make sure that towing speed does
not exceed 90 km/h (55 mph)
TOWING INSTRUCTION TABLE
WA R N I N G
Be careful when overtaking other
vehicles. Be sure to allow enough
room for your trailer before you
change lanes, and signal well in
advance. Slow down and change into a lower
gear before you reach long or steep
downhill grades. It is hazardous to
attempt changing down while you
are descending a hill.
Avoid “riding” the brakes. This
could cause the brakes to overheat
resulting in reduced braking effi-
ciency. Use engine braking as
much as possible.
Because of the added trailer
weight, your engine may overheat
on hot days when going up long or
steep hills. Pay attention to your
engine temperature gauge. If it indi-
cates overheating, pull off the road
and stop in a safe place. Refer to “If
the Engine Overheats” in “EMER-
GENCY SERVICE” section.
WA R N I N G
When parking your vehicle and con-
nected trailer, always use the follow-
ing procedure:
1) Apply the vehicle’s brakes firmly.
2) Have another person place wheel
chocks under the wheels of the
vehicle and the trailer while you
are holding the brakes.
3) Slowly release the brakes until the
wheel chocks absorb the load.
4) Fully engage the parking brake.
5) Change the manual transmission
into reverse or first gear and turn
off the engine.
When starting out after parking:
1) Depress the clutch and start the
engine.
2) Change into gear, release the
parking brake, and slowly pull
away from the chocks.
3) Stop, apply the brakes firmly and
hold them.
4) Have another person remove the
chocks.
WA R N I N G
When you tow your vehicle, follow
the instructions below to avoid acci-
dents and damage to your vehicle. In
addition, be sure to observe govern-
ment and local requirements regard-
ing vehicle lighting and trailer hitches
or tow bars.
DRIVE
TRAINTRANS
MISSIONTOWING
METHOD
2WD M/T
(MANUAL)A/B
2WD A/T
(AUTOMATIC)A
2WD AGS
(AUTO GEAR
SHIFT)A/B
Page 191 of 336
INSPECTION AND MAINTENANCE
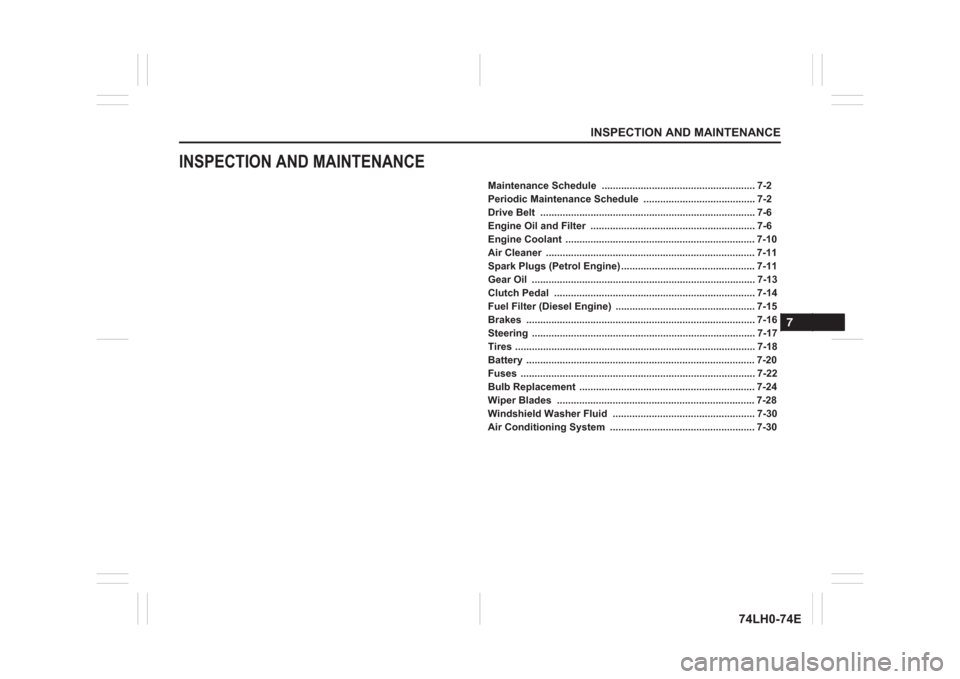
INSPECTION AND MAINTENANCE
Maintenance Schedule ....................................................... 7-2
Periodic Maintenance Schedule ........................................ 7-2
Drive Belt ............................................................................. 7-6
Engine Oil and Filter ........................................................... 7-6
Engine Coolant .................................................................... 7-10
Air Cleaner ........................................................................... 7-11
Spark Plugs (Petrol Engine)................................................ 7-11
Gear Oil ................................................................................ 7-13
Clutch Pedal ........................................................................ 7-14
Fuel Filter (Diesel Engine) .................................................. 7-15
Brakes .................................................................................. 7-16
7
Steering ................................................................................ 7-17
Tires ...................................................................................... 7-18
Battery .................................................................................. 7-20
Fuses .................................................................................... 7-22
Bulb Replacement ............................................................... 7-24
Wiper Blades ....................................................................... 7-28
Windshield Washer Fluid ................................................... 7-30
Air Conditioning System .................................................... 7-30
74LH0-74E
Page 192 of 336
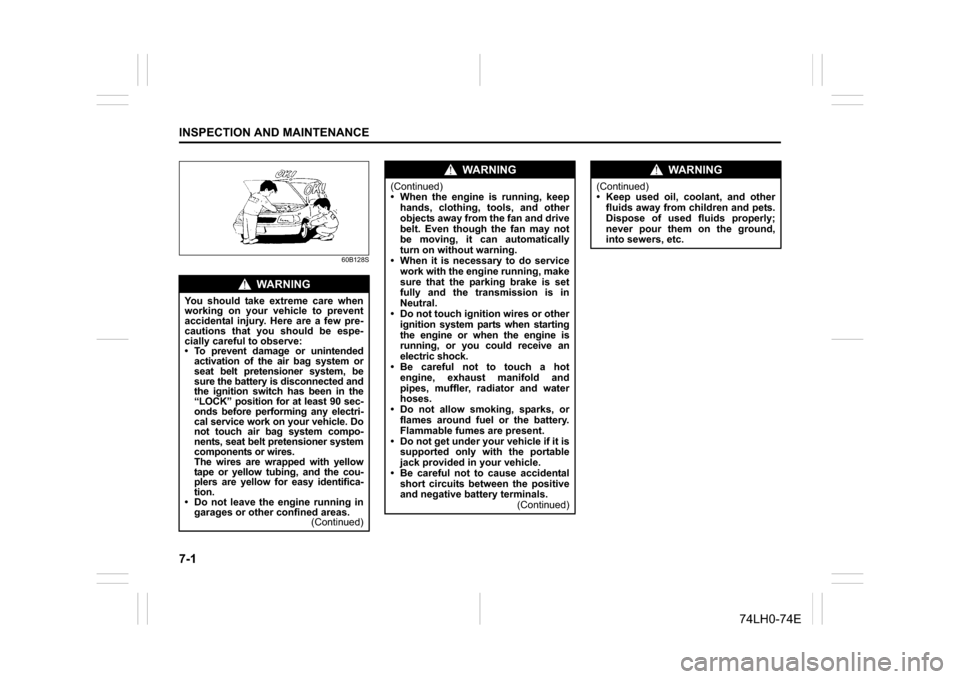
7-1INSPECTION AND MAINTENANCE
74LH0-74E
60B128S
WA R N I N G
You should take extreme care when
working on your vehicle to prevent
accidental injury. Here are a few pre-
cautions that you should be espe-
cially careful to observe:
To prevent damage or unintended
activation of the air bag system or
seat belt pretensioner system, be
sure the battery is disconnected and
the ignition switch has been in the
“LOCK” position for at least 90 sec-
onds before performing any electri-
cal service work on your vehicle. Do
not touch air bag system compo-
nents, seat belt pretensioner system
components or wires.
The wires are wrapped with yellow
tape or yellow tubing, and the cou-
plers are yellow for easy identifica-
tion.
Do not leave the engine running in
garages or other confined areas.
(Continued)
WA R N I N G
(Continued)
When the engine is running, keep
hands, clothing, tools, and other
objects away from the fan and drive
belt. Even though the fan may not
be moving, it can automatically
turn on without warning.
When it is necessary to do service
work with the engine running, make
sure that the parking brake is set
fully and the transmission is in
Neutral.
Do not touch ignition wires or other
ignition system parts when starting
the engine or when the engine is
running, or you could receive an
electric shock.
Be careful not to touch a hot
engine, exhaust manifold and
pipes, muffler, radiator and water
hoses.
Do not allow smoking, sparks, or
flames around fuel or the battery.
Flammable fumes are present.
Do not get under your vehicle if it is
supported only with the portable
jack provided in your vehicle.
Be careful not to cause accidental
short circuits between the positive
and negative battery terminals.
(Continued)
WA R N I N G
(Continued)
Keep used oil, coolant, and other
fluids away from children and pets.
Dispose of used fluids properly;
never pour them on the ground,
into sewers, etc.
Page 194 of 336
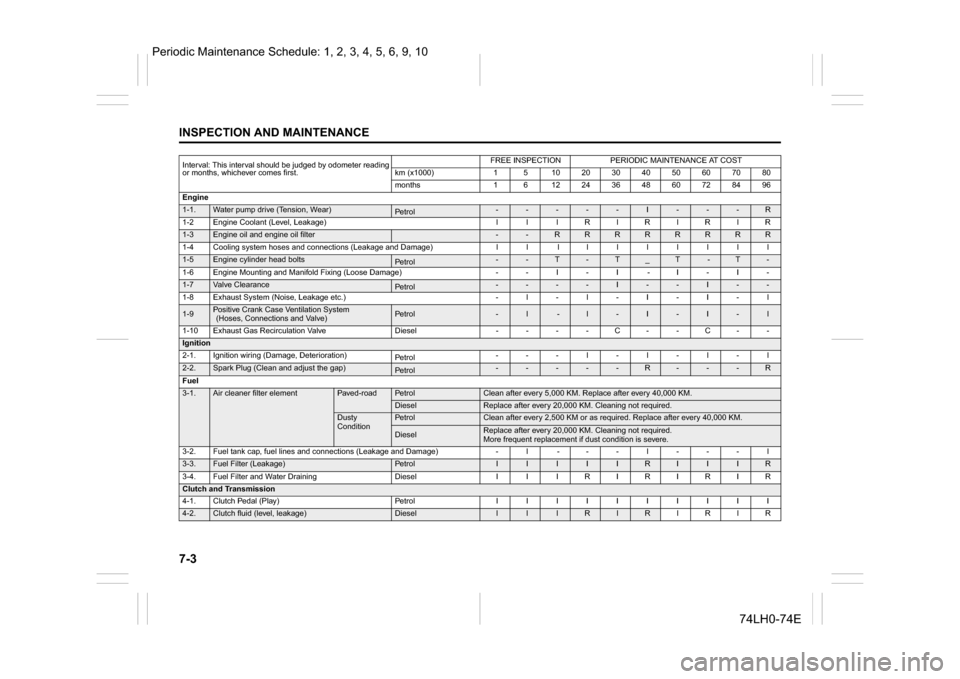
7-3INSPECTION AND MAINTENANCE
74LH0-74E
Interval: This interval should be judged by odometer reading
or months, whichever comes first.
FREE INSPECTION
PERIODIC MAINTENANCE AT COST
km (x1000)
1
5
10
20
30
40
50
60
70
80
months
1
6
12
24
36
48
60
72
84
96
Engine
1-1.
Water pump drive (Tension, Wear)
Pe tro l
-
-
-
-
-
I
-
-
-
R
1-2Engine Coolant (Level, Leakage) l l lRlRlRlR
1-3
Engine oil and engine oil filter
-
-
R
R
R
R
R
R
R
R
1-4 Cooling system hoses and connections (Leakage and Damage) l l l l l lllll
1-5
Engine cylinder head bolts
Pe tro l
-
-
T
-
T
_
T
-
T
-
1-6 Engine Mounting and Manifold Fixing (Loose Damage) - - I - I - I - I -
1-7
Valve Clearance
Pe tro l
-
-
-
-
I
-
-
I
-
-
1-8
Exhaust System (Noise, Leakage etc.)
-
l
-
l
-
I
-
I
-
l
1-9
Positive Crank Case Ventilation System (Hoses, Connections and Valve)
Pe tro l
-
l
-
l
-
I
-
I
-
l
1-10 Exhaust Gas Recirculation Valve Diesel - - - - C - - C - -
Ignition2-1.
Ignition wiring (Damage, Deterioration)
Pe tro l
-
-
-
l
-
l
-
l
-
l
2-2.
Spark Plug (Clean and adjust the gap)
Pe tro l
-
-
-
-
-
R
-
-
-
R
Fuel
3-1.
Air cleaner filter element
Paved-road
Pe tro l
Clean after every 5,000 KM. Replace after every 40,000 KM.
Diesel
Replace after every 20,000 KM. Cleaning not required.
Dusty
Condition
Pe tro l
Clean after every 2,500 KM or as required. Replace after every 40,000 KM.
Diesel
Replace after every 20,000 KM. Cleaning not required.
More frequent replacement if dust condition is severe.
3-2.
Fuel tank cap, fuel lines and connections (Leakage and Damage)
-
l
-
-
-
l
-
-
-
l
3-3.
Fuel Filter (Leakage)
Pe tro l
I
I
I
I
I
R
I
I
I
R
3-4.
Fuel Filter and Water Draining
Diesel
I
I
I
R
I
R
I
R
I
R
Clutch and Transmission4-1.
Clutch Pedal (Play)
Pe tro l
I
I
I
I
I
I
I
I
I
I
4-2.
Clutch fluid (level, leakage)
Diesel
l
l
l
R
l
R
l
R
l
R
Periodic Maintenance Schedule: 1, 2, 3, 4, 5, 6, 9, 10
Page 195 of 336
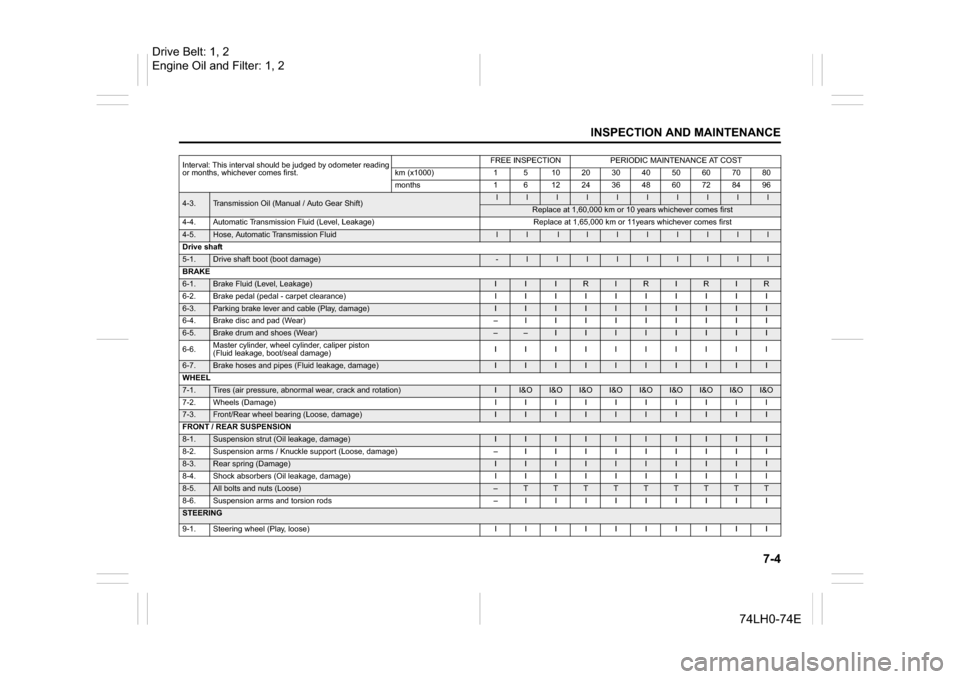
7-4
INSPECTION AND MAINTENANCE
74LH0-74E
4-3.
Transmission Oil (Manual / Auto Gear Shift)
l
l
l
l
l
l
l
l
l
l
Replace at 1,60,000 km or 10 years whichever comes first
4-4. Automatic Transmission Fluid (Level, Leakage) Replace at 1,65,000 km or 11years whichever comes first
4-5.
Hose, Automatic Transmission Fluid
l
l
l
l
l
l
l
l
l
l
Drive shaft
5-1.
Drive shaft boot (boot damage)
-
l
l
l
l
l
l
l
l
l
BRAKE
6-1.
Brake Fluid (Level, Leakage)
I
I
I
R
I
R
I
R
I
R
6-2. Brake pedal (pedal - carpet clearance) I I I I I I I I I I
6-3.
Parking brake lever and cable (Play, damage)
I
I
I
I
I
I
I
I
I
I
6-4. Brake disc and pad (Wear) – I I I I I I I I I
6-5.
Brake drum and shoes (Wear)
–
–
I
I
I
I
I
I
I
I
6-6.Master cylinder, wheel cylinder, caliper piston
(Fluid leakage, boot/seal damage)IIIIIIIIII
6-7.
Brake hoses and pipes (Fluid leakage, damage)
I
I
I
I
I
I
I
I
I
I
WHEEL
7-1.
Tires (air pressure, abnormal wear, crack and rotation)
I
I&O
I&O
I&O
I&O
I&O
I&O
I&O
I&O
I&O
7-2. Wheels (Damage) I I I I I I I I I I
7-3.
Front/Rear wheel bearing (Loose, damage)
I
I
I
I
I
I
I
I
I
I
FRONT / REAR SUSPENSION
8-1.
Suspension strut (Oil leakage, damage)
I
I
I
I
I
I
I
I
I
I
8-2. Suspension arms / Knuckle support (Loose, damage) – I I I I I I I I I
8-3.
Rear spring (Damage)
I
I
I
I
I
I
I
I
I
I
8-4. Shock absorbers (Oil leakage, damage) I I I I I I I I I I
8-5.
All bolts and nuts (Loose)
–
T
T
T
T
T
T
T
T
T
8-6. Suspension arms and torsion rods – I I I I I I I I I
STEERING
9-1. Steering wheel (Play, loose) I I I I I I I I I IInterval: This interval should be judged by odometer reading
or months, whichever comes first.
FREE INSPECTION
PERIODIC MAINTENANCE AT COST
km (x1000)
1
5
10
20
30
40
50
60
70
80
months
1
6
12
24
36
48
60
72
84
96
Drive Belt: 1, 2
Engine Oil and Filter: 1, 2
Page 196 of 336
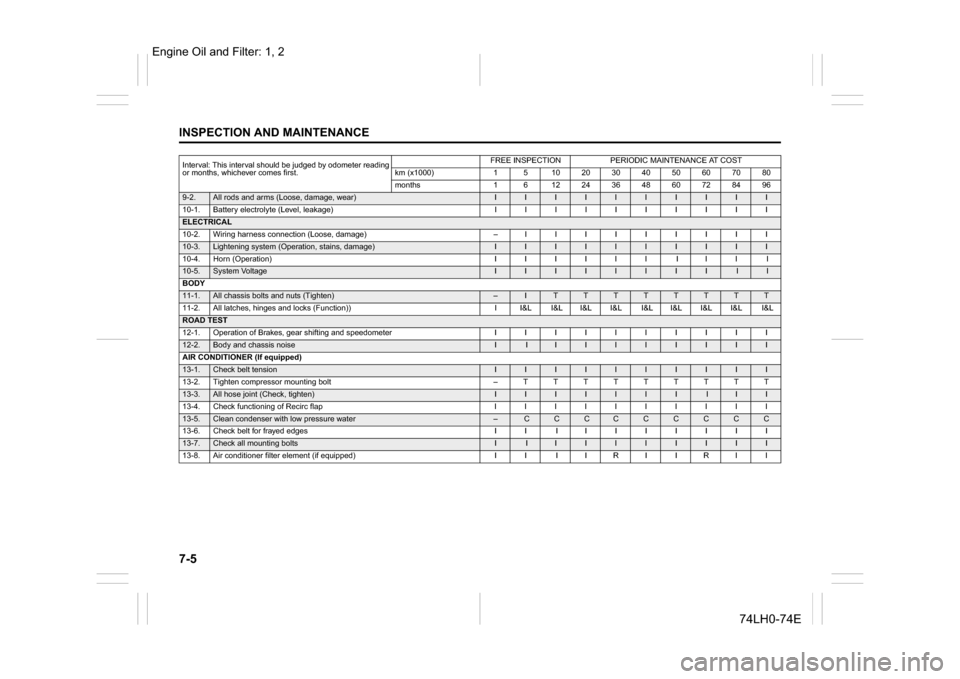
7-5INSPECTION AND MAINTENANCE
74LH0-74E
9-2.
All rods and arms (Loose, damage, wear)
I
I
I
I
I
I
I
I
I
I
10-1. Battery electrolyte (Level, leakage) I I I I I I I I I I
ELECTRICAL
10-2. Wiring harness connection (Loose, damage)
–
I I I I I I I I I10-3.
Lightening system (Operation, stains, damage)
I
I
I
I
I
I
I
I
I
I
10-4. Horn (Operation) I I I I I I I I I I
10-5.
System Voltage
I
I
I
I
I
I
I
I
I
I
BODY
11-1.
All chassis bolts and nuts (Tighten)
–
I
T
T
T
T
T
T
T
T
11-2. All latches, hinges and locks (Function)) I I&L I&L I&L I&L I&L I&L I&L I&L I&L
ROAD TEST12-1.
Operation of Brakes, gear shifting and speedometer
I
I
I
I
I
I
I
I
I
I
12-2.
Body and chassis noise
I
I
I
I
I
I
I
I
I
I
AIR CONDITIONER (If equipped)
13-1.
Check belt tension
I
I
I
I
I
I
I
I
I
I
13-2. Tighten compressor mounting bolt
–
T T T T T T T T T
13-3.
All hose joint (Check, tighten)
I
I
I
I
I
I
I
I
I
I
13-4. Check functioning of Recirc flap I I I I I I I I I I
13-5.
Clean condenser with low pressure water
–
C
C
C
C
C
C
C
C
C
13-6. Check belt for frayed edges I I I I I I I I I I
13-7.
Check all mounting bolts
I
I
I
I
I
I
I
I
I
I
13-8. Air conditioner filter element (if equipped) I I I I R I I R I I
Interval: This interval should be judged by odometer reading
or months, whichever comes first.
FREE INSPECTION
PERIODIC MAINTENANCE AT COST
km (x1000)
1
5
10
20
30
40
50
60
70
80
months
1
6
12
24
36
48
60
72
84
96
Engine Oil and Filter: 1, 2
Page 197 of 336
7-6
INSPECTION AND MAINTENANCE
74LH0-74E
Drive Belt(For Petrol Engine Model)
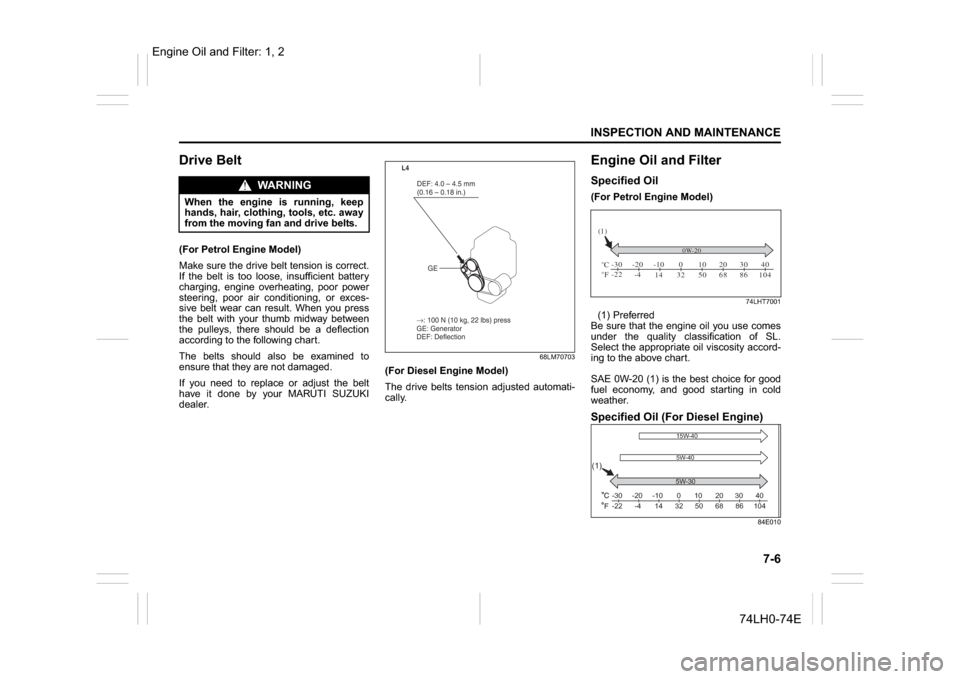
Make sure the drive belt tension is correct.
If the belt is too loose, insufficient battery
charging, engine overheating, poor power
steering, poor air conditioning, or exces-
sive belt wear can result. When you press
the belt with your thumb midway between
the pulleys, there should be a deflection
according to the following chart.
The belts should also be examined to
ensure that they are not damaged.
If you need to replace or adjust the belt
have it done by your MARUTI SUZUKI
dealer.
68LM70703
(For Diesel Engine Model)
The drive belts tension adjusted automati-
cally.
Engine Oil and FilterSpecified Oil (For Petrol Engine Model)
74LHT7001
(1) Preferred
Be sure that the engine oil you use comes
under the quality classification of SL.
Select the appropriate oil viscosity accord-
ing to the above chart.
SAE 0W-20 (1) is the best choice for good
fuel economy, and good starting in cold
weather. Specified Oil (For Diesel Engine)
84E010
When the engine is running, keep
hands, hair, clothing, tools, etc. away
from the moving fan and drive belts.
→ : 100 N (10 kg, 22 lbs) press
GE: Generator
DEF: Deflection DEF: 4.0 – 4.5 mm
(0.16 – 0.18 in.)
GE
L4
CFo o-30
-22 -20
-4 -10
14 32 50 68 86 104 010203040
(1)
0W-205W-30
(1)
-30
-22 -4 14
32506886 104
-20 -10 10 20
3040
0
15W-40
5W-40
Engine Oil and Filter: 1, 2
WA R N I N G
Page 198 of 336
7-7INSPECTION AND MAINTENANCE
74LH0-74E
(1) Preferred
Be sure that the engine oil you use comes
under the quality classification of ACEA
A5/B5. The recommended Engine oil is
5W30 A5/B5. Oil Level Check(For Petrol Engine Model)
80G064
52D084
(For Diesel Engine Model)
84E012
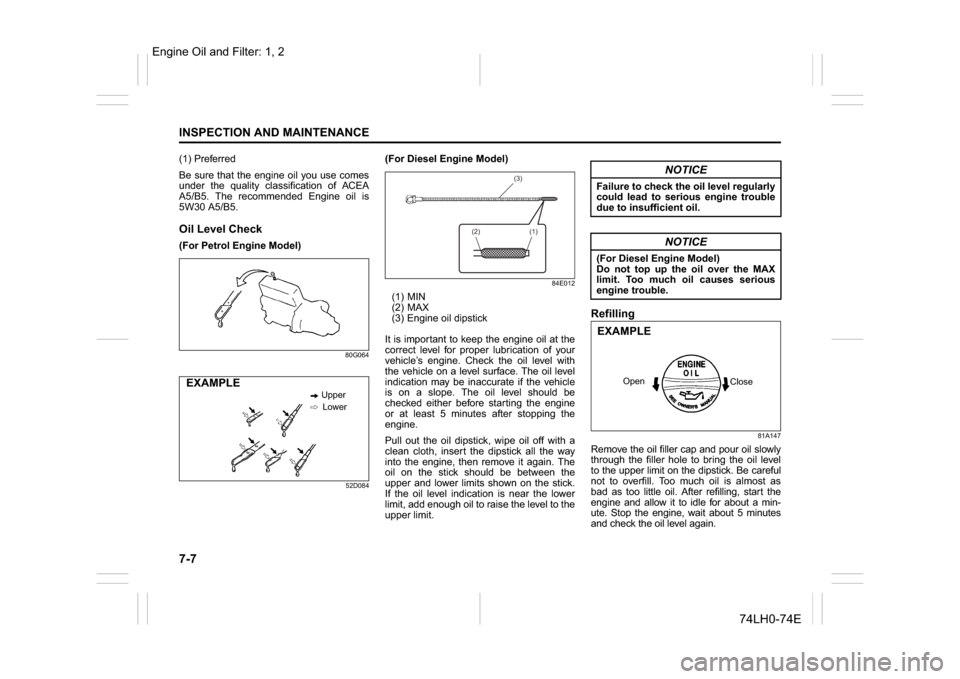
(1) MIN
(2) MAX
(3) Engine oil dipstick
It is important to keep the engine oil at the
correct level for proper lubrication of your
vehicle’s engine. Check the oil level with
the vehicle on a level surface. The oil level
indication may be inaccurate if the vehicle
is on a slope. The oil level should be
checked either before starting the engine
or at least 5 minutes after stopping the
engine.
Pull out the oil dipstick, wipe oil off with a
clean cloth, insert the dipstick all the way
into the engine, then remove it again. The
oil on the stick should be between the
upper and lower limits shown on the stick.
If the oil level indication is near the lower
limit, add enough oil to raise the level to the
upper limit.
Refilling
81A147
Remove the oil filler cap and pour oil slowly
through the filler hole to bring the oil level
to the upper limit on the dipstick. Be careful
not to overfill. Too much oil is almost as
bad as too little oil. After refilling, start the
engine and allow it to idle for about a min-
ute. Stop the engine, wait about 5 minutes
and check the oil level again.
Upper
Lower
EXAMPLE
(3)
(2) (1)
NOTICE
Failure to check the oil level regularly
could lead to serious engine trouble
due to insufficient oil.
NOTICE
(For Diesel Engine Model)
Do not top up the oil over the MAX
limit. Too much oil causes serious
engine trouble.
Close Open
EXAMPLE
Engine Oil and Filter: 1, 2